Airmega AP1220B - Air purifier Coway - Free user manual and instructions
Find the device manual for free Airmega AP1220B Coway in PDF.

| Product Type | Air Purifier |
| Brand | Coway |
| Model | Airmega AP1220B |
| Dimensions (W x D x H) | 376 x 196 x 717 mm |
| Weight | 8.7 kg |
| Power Supply | 220-240 V ~ 50/60 Hz |
| Power Consumption | 50 W |
| Recommended Room Size | 40 m² |
| Max Airflow (Turbo, Normal mode) | 6.0 m³/min |
| Operating Modes | Auto, Silent, Turbo, Manual (3 speeds), Standby |
| Airflow Modes | Normal (top) and Focus (front) |
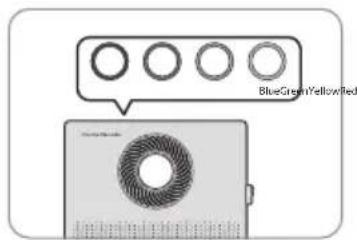
| Pollution Sensor | Yes, 4-color LED display (blue/green/yellow/red) |
| Filters | Ultra-fine pre-filter, Custom filter (optional), Deodorizing carbon filter, HEPA filter |
| Pre-filter Cleaning | Every 2 to 4 weeks (vacuum or water) |
| Sensor Cleaning | Every 2 months |
| HEPA/Deodorizing filter replacement | About 1 year (depending on usage) |
| Custom filter replacement | Every 4 months |
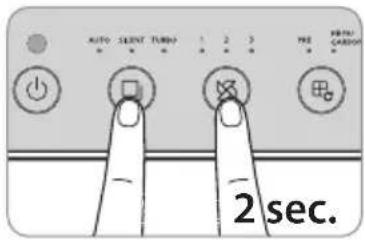
| Button Lock | Yes (press and hold Ambiance 2 sec) |
| Safety | Power cut if front cover open |
| Warranty | 2-year limited |
| Included Accessories | User Manual |
Frequently Asked Questions - Airmega AP1220B Coway
User questions about Airmega AP1220B Coway
0 question about this device. Answer the ones you know or ask your own.
Ask a new question about this device
Download the instructions for your Air purifier in PDF format for free! Find your manual Airmega AP1220B - Coway and take your electronic device back in hand. On this page are published all the documents necessary for the use of your device. Airmega AP1220B by Coway.
USER MANUAL Airmega AP1220B Coway
Coway Air PurifierAP-1220B
• This product is for domestic market only. Product voltage does not work overseas.
- For your safety and proper use of the product, please read this user manual before use.
- Warranty card is included in this user manual.
• English/German/French/Spanish/Italian/Swedish/Polish
natural_image
Line drawing of a portable electronic device with a circular vent and perforated grille (no text or symbols)FEATURES
Superior Air Cleaning
In order to remove fine dust in the indoor air, the product uses a powerful ultra-fine dust collecting filter and optimized filter system to remove contaminants quickly.
natural_image
Illustration of a portable electronic device emitting sound waves (no text or symbols visible)Power Circulation of Clean Air
2 The normal circulation and focus circulation functions circulate clean air rapidly in a variety of directions. With the flow path switching structure applied, the UI control is designed to be intuitive.
Customizable High-performance Filter System
3 The customized filter system provides right filters for various situations, seasons, spaces.
flowchart
graph TD
    A["Input Signal"] --> B["Noise Source"]
    C["Display Component"] --> B
    D["Output Signal"] --> B
    B --> E["Feedback to Display"]
    style A fill:#f9f,stroke:#333
    style C fill:#f9f,stroke:#333
    style D fill:#f9f,stroke:#333
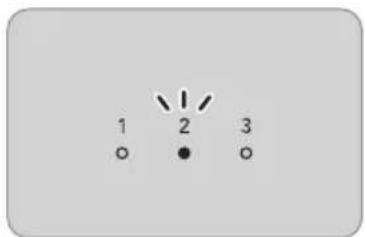
Real-time Air Cleanliness Display
4 The pollution sensor allows you to check the indoor air condition easily from a distance through the four-level color display.
5 The vent grille at the top of the product and the built-in front grille can be separated to make cleaning easier than other products.
natural_image
Illustration of hands operating a device with an arrow indicating rotation (no text or symbols present)DEAR CUSTOMERS
Thank you for using the Coway air purifier.
Please be sure to read this user manual to use and maintain your air purifier correctly. If you experience any problems during use, you can refer to this user manual to resolve them. This user manual contains the product warranty, so please store it safely.
CONTENTS
FOR INFORMATION
| 03 | SAFETY INFORMATION
Danger
Warning
Caution
| 07 | PARTS NAME
| 09 | AIR PURIFICATION PROCESS
HOW TO USE
| 10 | BEFORE USE
How to Install Filter
11 | INDICATORS AND BUTTONS
| 13 | HOW TO USE
15 FORCED FILTER RESET MODE
16 ADJUST PARTICLE SENSOR
MAINTENANCE
| 17 | HOW TO CLEAN
Product
Filter
| 19 | HOW TO REPLACE FILTER
OTHERS
| 21 | TROUBLE SHOOTING
| 22 | SPECIFICATION
| 23 | Warranty card
SAFETY INFORMATION
The following information is for user safety that should be observed.
It is to ensure user safety and prevent property damage. Please read the precautions carefully and use the product correctly.
220 V - 240 V\~ 50 Hz, 60 Hz only
▲ DANGER : Failing to follow the precautions below may result in serious injury or even death.
- Do not use damaged power plugs or loose sockets.
- The power plug must be plugged into 220 V – 240 V\~ 50 Hz, 60 Hz.
- Do not pull on the power cord to move the device.
• Do not touch the power plug with wet hands. - To avoid damaging or warping the power cord, do not use excessive force to bend the power cord or put heavy objects on top of it.
- Do not repeatedly connect and disconnect the power plug.
- If water enters the power supply, unplug the power and completely dry before using again.
- Be sure to unplug the power during product repair, maintenance or part replacement.
- If the power plug's pins or contact area become covered in dust or water, wipe them thoroughly.
- Do not plug several electric appliances into one socket, and use only a dedicated socket.
• Unplug the power when not used for a long time. - Do not carelessly connect or tamper with the power cord.
- If the power cord is damaged, do not replace it yourself. Contact a service center to have it replaced.
• Do not install near electric heaters. -
Do not put on top of electric products like heaters or televisions.
-
Do not install in places with a lot of humidity or dust or places where water (rainwater) splashes.
- Do not use or store combustible gases or flammable materials near this product.
- If there is a strange sound, burning smell, or smoke from the device, immediately unplug the power plug and contact a service center.
• Never immerse the product in water. - Do not spray flammable materials such as insecticides or air fresheners on the intake.
- Do not open, repair, or modify the device yourself.
- Do not put bowls of water, chemicals, food, small metal objects, or flammable materials on top of this product.
• Unplug the power before cleaning. - If the purifier falls over and gets wet during use, A/S maintenance is required before further use.
- Do not spray water directly on the device or use benzene, thinners, etc. to wipe it during cleaning.
- Do not insert sharp objects such as picks into the air quality sensor.
- Do not put fingers or foreign matter (pins, sticks, coins, etc.) into the vent.
• Do not let children hang from or climb on the purifier. - Be careful that children do not put their hands in the vent.
- Replace the filter with a new one when the time comes.
• Do not spray water directly on the purifier.
SAFETY INFORMATION
WARNING: Failing to follow the precautions below may result in considerable physical injury or property damage.
- Do not unplug by pulling on the power cord.
- Plug into a power socket connected to an earth leakage circuit breaker (current sensitivity 30 mA or less).
- If extending the power cord, only use with sockets and cords of 250V/15A and use by itself.
- Do not use in baths, showers, swimming pools, or other areas where the purifier may be in direct contact with water.
CAUTION: Failing to follow the precautions below may result in slight physical injury or property damage.
- Do not unplug the power or move the purifier while it is operating.
- If unusual sound, odor, or smoke comes from the purifier, immediately unplug the power and call our service center.
- Do not install on a slope.
- Do not excessively impact or use excessive force on this product.
- Use at least 20 cm away from walls or other objects on each side.
• Install the purifier in a place where it is not blocked on any side so air can circulate well.
• Install at least 2 m away from TVs and other electronic items. - Do not use in BBQ or other restaurants where odor, smoke, or oil may occur.
- Do not use in direct sunlight.
- Do not install in a high place.
-
Do not use extreme force on the purifier.
-
Do not push or lean on the purifier. The purifier may fall over.
- Do not use for a long time in places that are sealed or where children, the elderly, or sick people are.
- Do not block the vent with laundry or curtains.
- Remove dust from the pre-filter with a vacuum cleaner or water.
- Periodically wash the pre-filter and dry it well in a shady place with good ventilation.
• People with physical, sensory, or mental impairment as well as children must be supervised or guided while using the device.
• Children shall not play with the appliance. - This appliance can be used by children aged from 8 years and above and persons with reduced physical, sensory or mental capabilities or lack of experience and knowledge if they have been given supervision or instruction concerning use of the appliance in a safe way and understand the hazards involved.
- Cleaning and user maintenance shall not be made by children without supervision.
• Children should be supervised to ensure that they do not play with the appliance.
READ AND SAVE THESE INSTRUCTIONS
PARTS NAME
Front/Rear
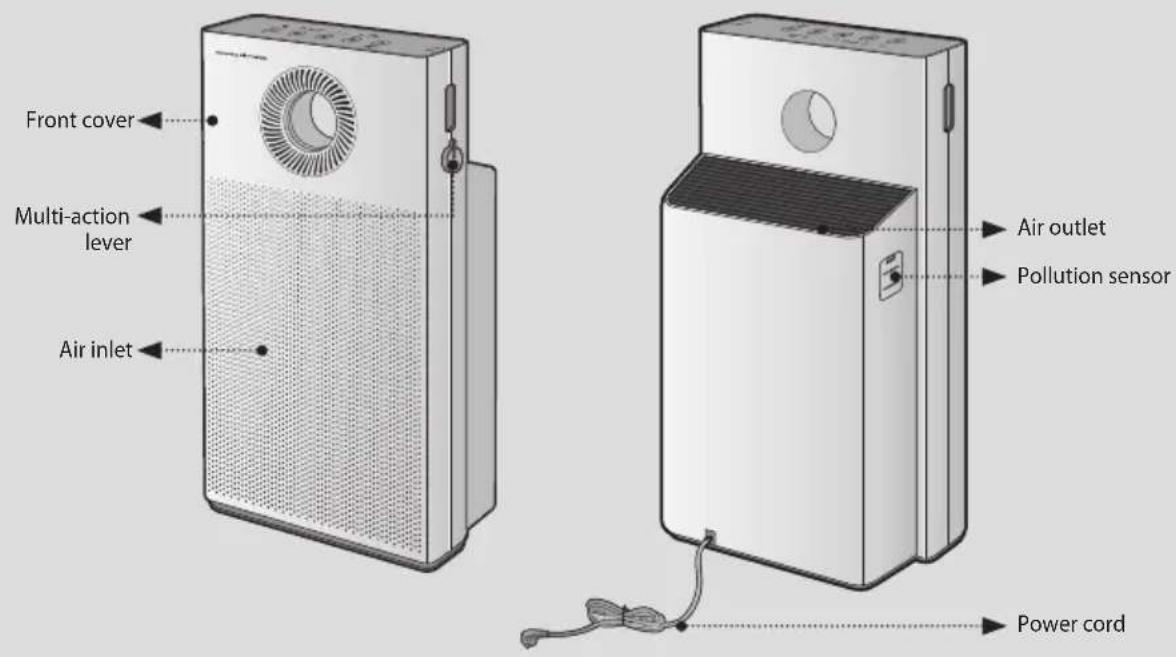
Top

Accessories
User Manual
AIR PURIFICATION PROCESS
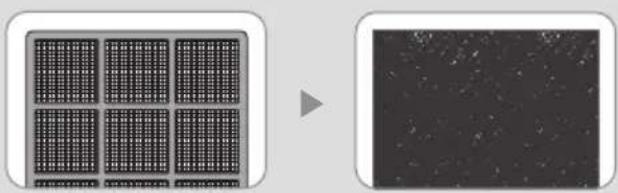
■ Pre-filter
Removes large dust particles, mold, hair, and pet hair.
■ Customized filter\*
The customized filter system provides right filters for various situations, seasons, spaces.
■ Deodorization filter
The granular activated carbon deodorizing filter effectively removes odors including food smells and unpleasant household odors and harmful gases.
■ HEPA filter
The high-performance synthetic HEPA filter is excellent at removing cigarette smoke and fine dust.
natural_image
Two-panel image showing a grid-patterned surface and a grayscale noise pattern (no text or symbols)- Ultrafine Pre-filter 2. Customized filter
- Deodorization filter 4. HEPA filter
BEFORE USE
Please check before use!

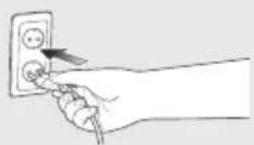
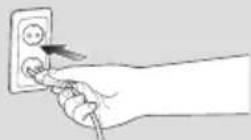
This product is for 220 V-240 V\~50 Hz, 60 Hz only.
Make sure to connect the power plug to a
220 V- 240 V\~ 50 Hz, 60 Hz outlet.
How to Install Filter

Tips
- Be sure to remove the packaging vinyl before installing the filter.
- Use the filter indoors only.
- Unplug the power cord from the outlet when not using the product.
- Check the front of the filter when installing it.
▶ Filter assembly order : HEPA filter → Deodorization filter → Customized Filter → Ultrafine Pre-filter
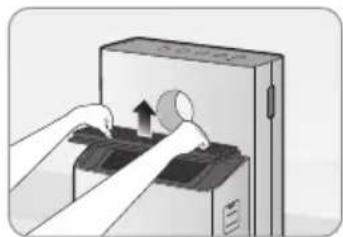
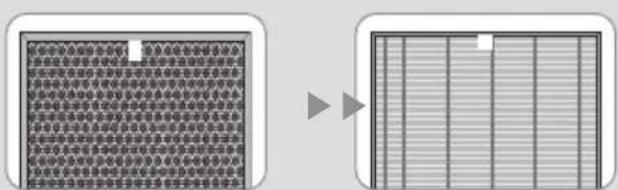
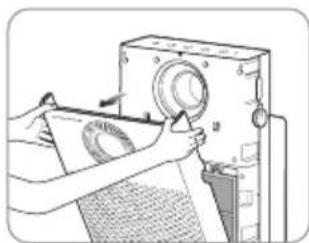
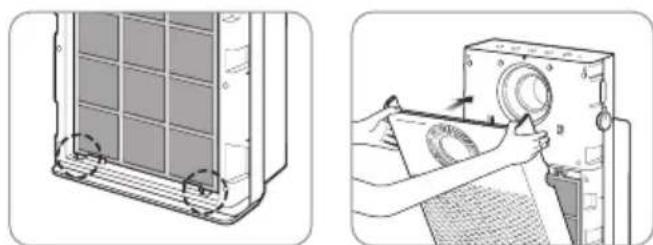
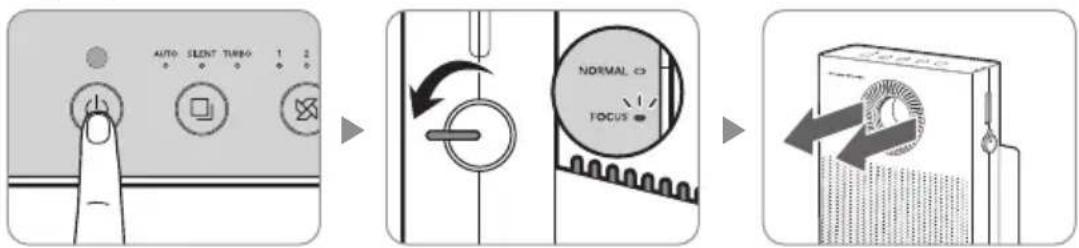
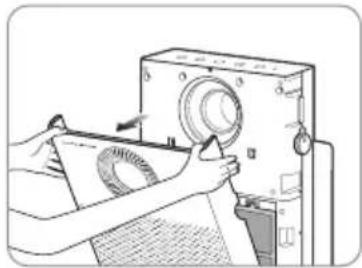
1. Open the front cover.
Pull both sides of the front cover to open it.
natural_image
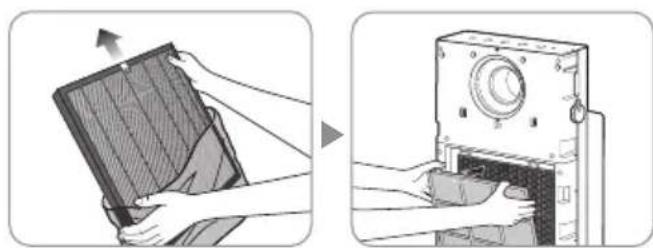
Illustration of hands operating a vintage machine with a paper sheet and circular components (no text or symbols visible)2. Take out the filter and remove the packaging vinyl.
Remove the packaging vinyl of the filters except the ultrafine Pre-filter and install them onto the product according to the filter installation order.
Insert the customized filter into the back of the ultrafine Pre-filter.
natural_image
Illustration showing two steps of installing a panel on a device, one being open and the other closed (no text or symbols present)* Filter installation order : HEPA filter→ Deodorization filter → Customized Filter→ Ultrafine Pre-filter
* The customized filter is sold separately and is not included with the product purchase.
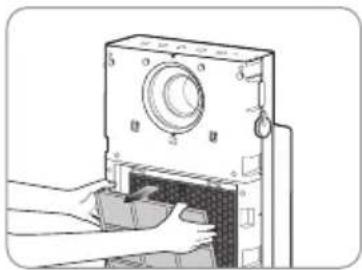
3. Attach the front cover.
Align the two projections on the bottom of the front cover with the grooves and push in the cover to fix it.
* The product will not operate if the front cover is not attached correctly.
natural_image
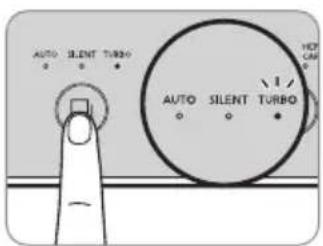
Two-step diagram showing a door panel installation and a printer's printing process (no text or symbols)INDICATORS AND BUTTONS
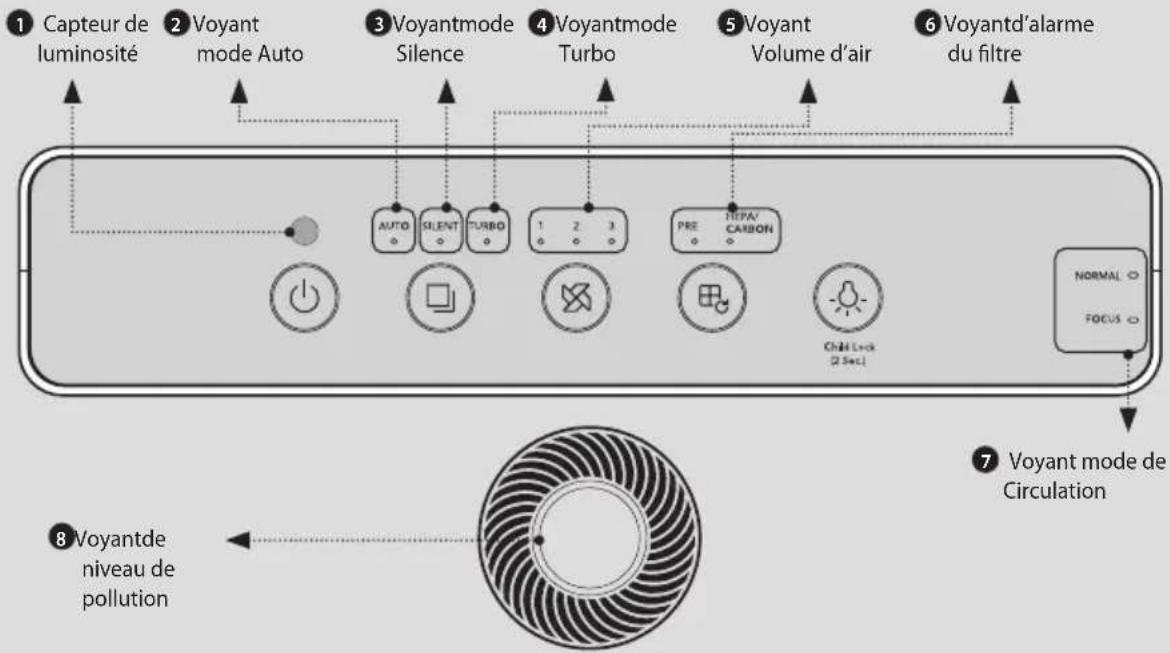
Indicators
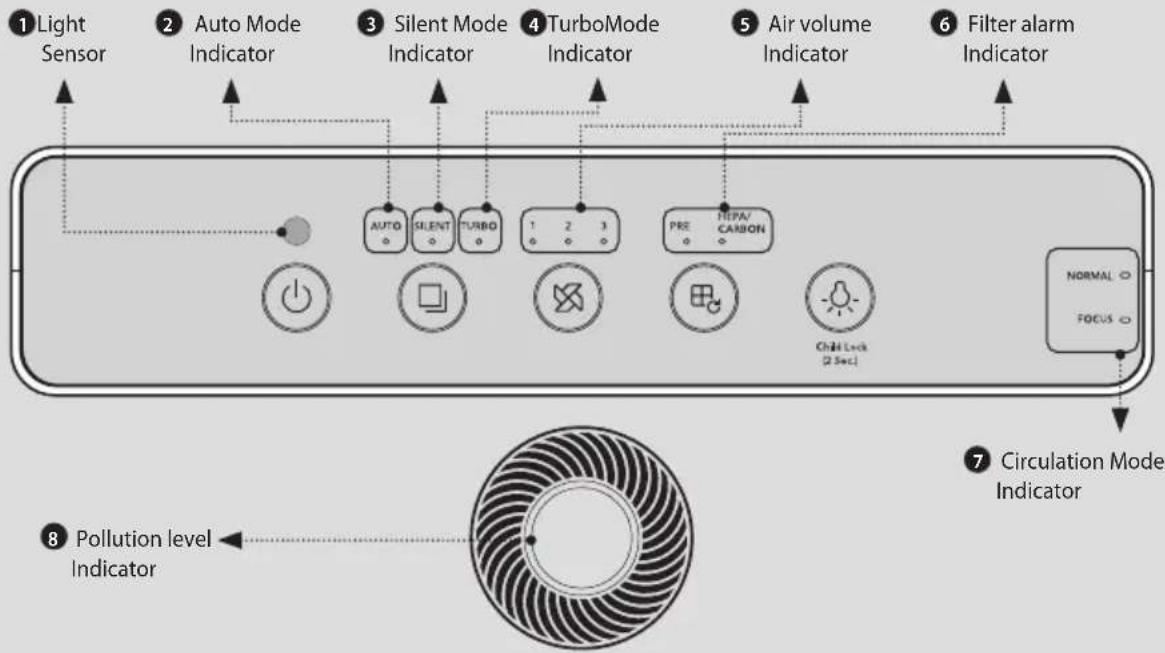

1 Light Sensor
This sensor detects light around the product.

3 Silent Mode Indicator
The indicator lights up when Silent Mode is selected.

5 Air volume Indicator
The indicator lights up when an air volume is selected.

7 Circulation Mode Indicator
The indicator lights up when Circulation Mode is selected. (NORMAL /FOCUS)

2 Auto Mode Indicator
The indicator lights up when Auto Mode is selected.

4 Turbo Mode Indicator
The indicator lights up when Turbo Mode is selected.
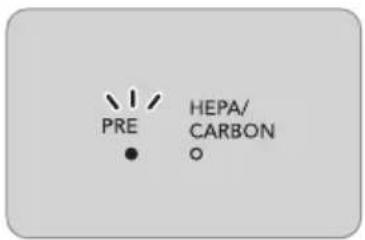
6 Filter alarm Indicator
The indicator lights up during the filter cleaning/replacement period. When there is 5% or less remaining in the filter cleaning cycle or life, this indicator lights up to alert the user.
8 Pollution level Indicator
This indicator displays the indoor pollution level in LED colors. Clean (blue) → Low pollution (green) → Medium pollution (yellow) → High pollution (red)
| Pollution Level | Clean | Low pollution | Medium pollution | High pollution |
| LED Color | Blue Green | Yellow Red |
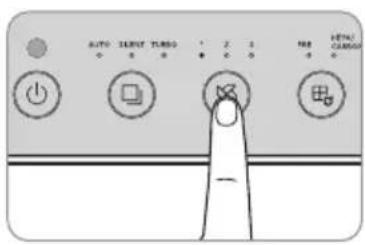
Buttons
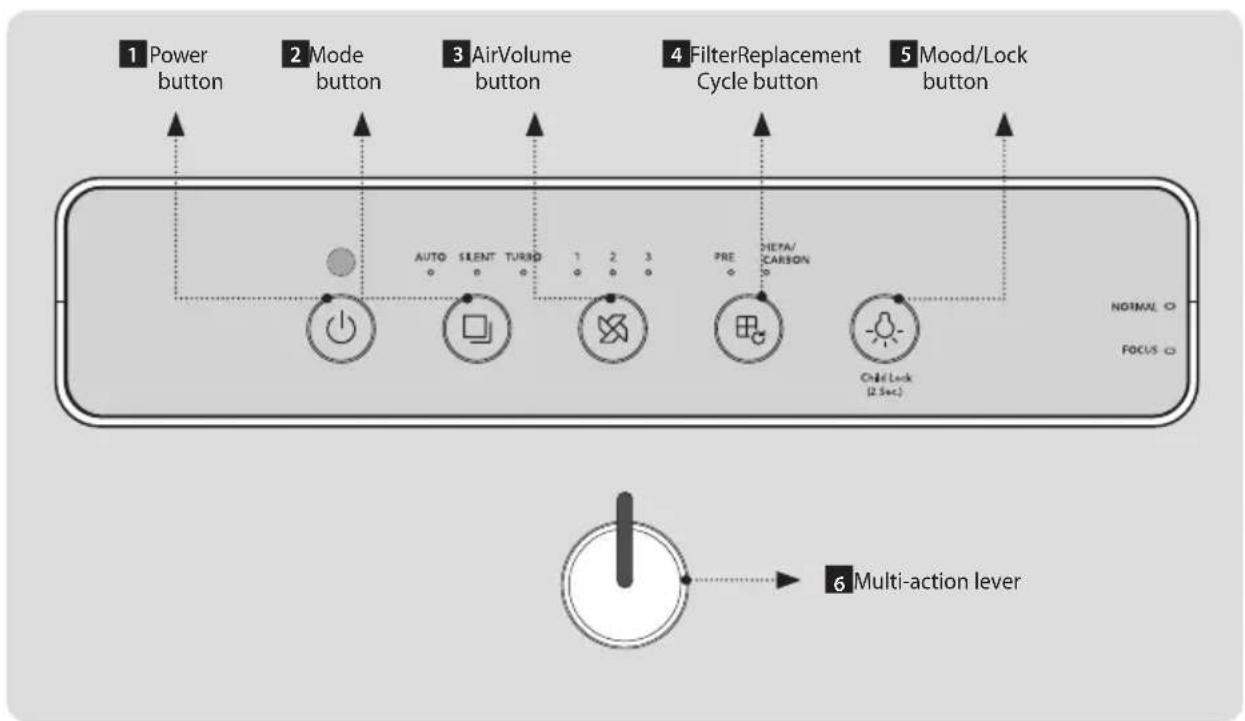

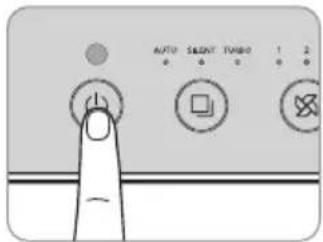
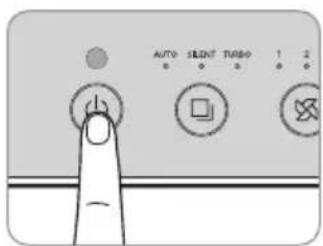
1 Power Button
Use the button to turn the product on and off.
*When you operate the product for the first time, it is operated in Auto Mode. If you turn off the product during operation and turn it on again, it is operated in the mode active before the product was turned off.

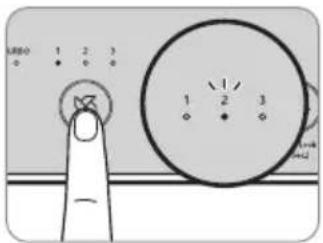
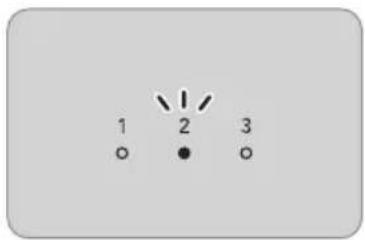
3 Air Volume Button
Press the Air Volume button to select the air volume, which is switched in the order of 1 2 3 .

5 Mood/Lock Button
Use the button to turn the pollution level indicator and other indicators on and off. While the pollution level indicator and other indicators are turned on, pressing the Mood/Lock button repeatedly executes the following: pollution level indicator OFF → all other indicators OFF → all indicators ON.
*You can lock all the buttons by pressing and holding this button for more than 2 seconds. Press the button again for more than 2 seconds to unlock the buttons.
*If you press this button while the buttons are locked, a sound informs you of the locked status.

2 Mode Button
Press the Mode button to switch between Auto → Silent → Turbo Modes.

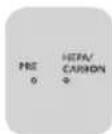
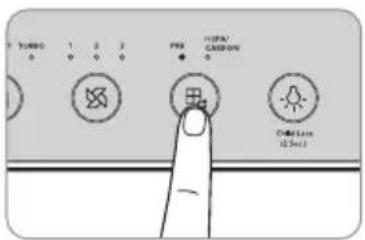
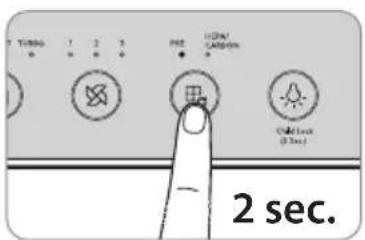
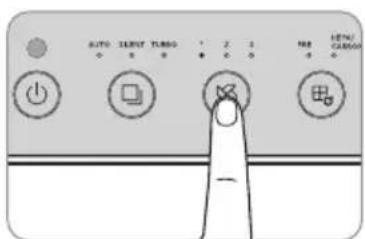
4 Filter Replacement Cycle Button
If the filter alarm indicator is on, clean or replace the filter and press the button for two seconds or longer to reset the replacement cycle.
* If the PRE and HEPA/CARBON lights are turned on at the same time, they reset together.
* If the filter alarm indicator is not turned on, this button does not operate.
* If you have replaced or repaired the filter before the filter alarm indicator was turned on, refer to page 15.

6 Multi-action lever
Turn the lever to select the circulation mode. Rotate the lever's indicator 90 degrees forward or upward.
- Turn indicator upward: NORMAL Mode, upward discharge
- Turn indicator forward: FOCUS Mode, forward discharge
HOW TO USE

Tips
- Plug the power cord into an outlet before operating the product.
- When the product is turned on for the first time, it operates in Auto Mode, and afterward, it operates in the previously used mode.
■ How to Operate Product Manually
Press the Power button to turn on the product and press the Air Volume button to select the desired air volume.
$$ (1 \rightarrow 2 \rightarrow 3) $$

▶
■ How to Use Auto Mode
Press the Power button to turn on the product and press the Mode button to select Auto Mode. (Refer to P. 14)

▶
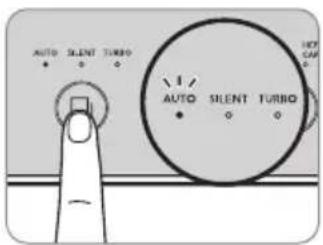
■ How to Use Silent Mode
Press the Power button to turn on the product and press the Mode button to select Silent Mode. This mode minimizes the air volume during operation for a quiet and pleasant environment.
▶
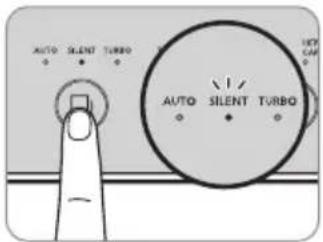
■ How to Use Turbo Mode
Rapidly purifies the indoor air by increasing air volume to the maximum. In Turbo Mode, the device runs more powerfully than when set to the "3" air volume.
▶
▶ Auto Mode
The device automatically adjusts the air volume (Low → Medium → Strong) according to the indoor pollution level detected by the sensor to operate efficiently.
This mode is convenient for general users.
| Pollution Level 1 | Pollution Levels 2, 3 | Pollution Level 4 | |
| Air Volume | Auto Level 1 | Auto Level 2 | Auto Level 3 |
▶ Sleep Mode (only works in Auto Mode)
If the room remains dark during Auto Mode operation, the device enters Sleep Mode and runs low air/low noise/power saving operation.
* The pollution level indicator is turned off during Sleep Mode.
* When the room becomes bright again, the device re-enters Auto Mode.
Multi-action function
■ NORMAL Mode
In NORMAL Mode, air is discharged from the ventilator at the top of the product. Press the Power button to turn on the product and turn the multi-action lever to select NORMAL Mode. At this time, the NORMAL mode indicator will light up.
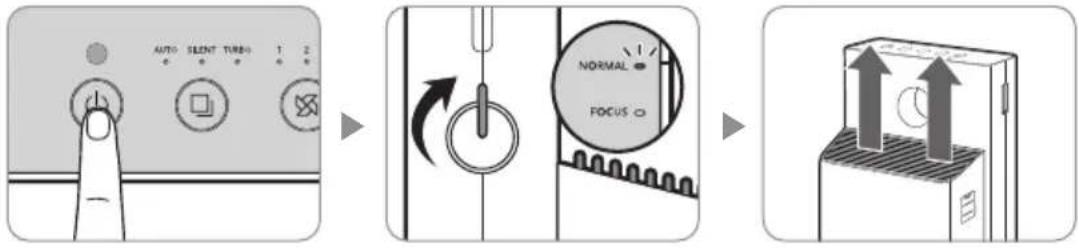
■ FOCUS Mode
In FOCUS Mode, air is discharged through the front grille of the product. Press the Power button to turn on the product and turn the multi-action lever to select FOCUS Mode. At this time, the FOCUS mode indicator will light up.
flowchart
graph LR
    A["AUTO SILENT TURBO 1 2"] --> B["NORMAL FOCUS"]
    B --> C["Digital Mode"]

- The circulation mode indicator does not light up when the multi-action lever is in the middle.
- When turning the multi-action lever, turn it all the way until the circulation mode indicator lights up.
- The multi-action lever turns only up to 90 degrees.
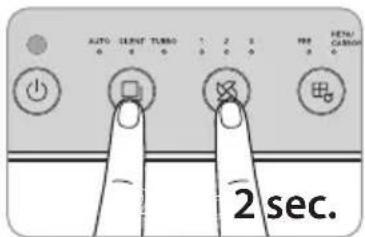
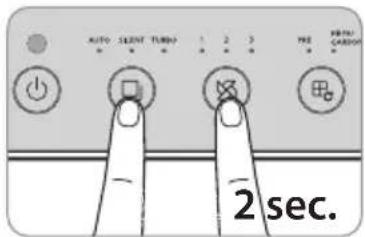
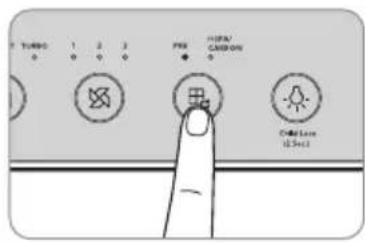
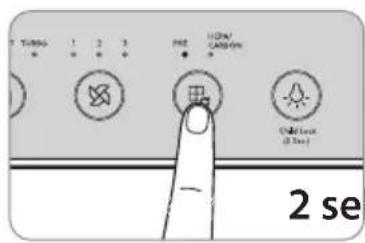
FORCED FILTER RESET MODE
How to Force-reset Filter
Use this function if you have replaced or repaired the filter before the filter alarm indicator was turned on.
- Press the Filter Replacement Cycle button and the Mood button simultaneously for more than 2 seconds while the product is operating.
- The Pre-filter LED flashes at an approximately 0.5 second interval.
- Press the Filter Replacement Cycle button to select the desired filter. filters are selected in the following order.
PRE → HEPA / CARBON → PRE & HEPA / CARBON → PRE
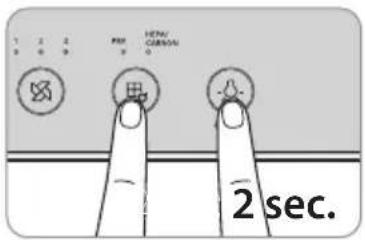
- After selecting the filter to reset, press the Filter Replacement Cycle button for 2 seconds or longer to reset the filter setting.
* If the Filter Replacement Cycle button is not pressed within 10 seconds or if the Filter Replacement Cycle button and the Mood button are pressed simultaneously for longer than 2 seconds, the mode is canceled.
ADJUST PARTICLE SENSOR
How to adjust the sensitivity of the particle sensor
When you operate the product for the first time, the pollution sensor is set at the standard sensitivity. If the pollution level indicator remains at High after the air purifier operates for more than two hours where the pollution level is high, or if the pollution level indicator remains at Clean for more than one hour where the pollution level is high, you can adjust the sensor's sensitivity as follows.
-
Press the Mode button and the Air Volume button simultaneously for longer than 2 seconds while the product is operating.
-
The air volume mode indicator flashes at an approximately 0.5 second interval.
-
Press the Air Volume button to adjust sensitivity of the sensor. When the sensor's sensitivity is selected, the air volume mode indicator flashes as shown below.
| Level 1 Level | 2 Level 3 | |
| High Standard Low | ||
- If you press the Air Volume button and the Mode button at the same time for longer than 2 seconds, the selected sensor sensitivity is entered and the product operates normally.
* The selected sensitivity of the sensor is automatically entered if the Air Volume button and the Mode button are not pressed for 10 seconds.
HOW TO CLEAN

- Always unplug the power cord before cleaning.
- Do not use organic solvents (thinner, etc.), bleach, or detergents containing chlorine or abrasives to clean the product.
- Do not immerse the product in water or spray water on it.
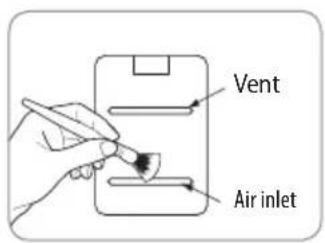
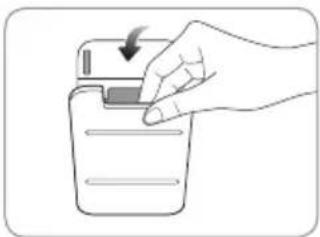
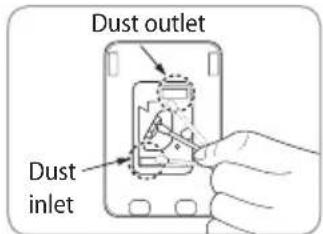
■ How to Clean Pollution Sensor (every two months)
- Open the pollution sensor cover on the left side of the product. Clean the air inlet, outlet, and the pollution sensor area with a soft brush or a vacuum cleaner first.
▶
natural_image
Hand inserting a device into a container with an arrow indicating the process (no text or symbols present)- Wipe the lens and the dust inlet and outlet with a moistened cotton swab, and wipe them again with a dry swab to remove moisture.
* Failure to clean regularly may result in reduced performance of the pollution sensor.
* Clean the sensor more frequently in a dusty environment because the cleaning cycle varies depending on the operating environment.
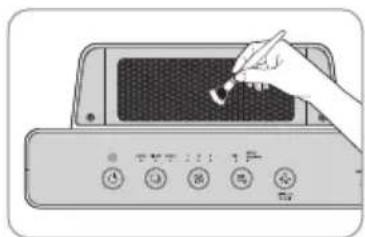
■ How to Clean Air Inlet and Outlet (every two months)
Clean the air inlet and outlet with a soft brush.
* Take care not to allow dust to fall inside the product when cleaning.
natural_image
Illustration of a hand holding a pen inserted into a device panel (no text or symbols visible)■ How to Clean Front Cover
Remove the front cover from the product and remove dust from the surface of the cover with a soft, dry cloth or a soft brush.
* If the degree of pollution severe, use a slightly wet cloth to wipe it. (Do not use an abrasive.)
natural_image
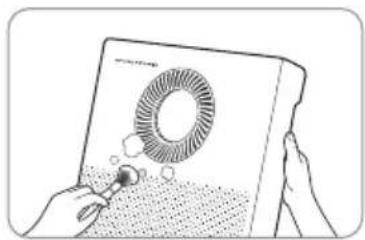
Illustration of hands holding a device with a circular fan and abstract pattern (no text or symbols)■ How to Clean Main Body of Product (every two to four weeks)
Use a dry and soft cloth to wipe it.
* If the degree of pollution is severe, use a slightly wet cloth to wipe it. (Do not use an abrasive.)

natural_image
Line drawing of a hand cleaning a front-loading air conditioner unit (no text or symbols)
- Always unplug the power cord before cleaning the filter.
- The Pre-filter can be restored by removing dust or washing with water.
- Failure to clean the Pre-filter for a long time may result in poor product performance.
- The customized filter, Deodorization filter and HEPA filter cannot be restored by cleaning. Never wash these filters with water.
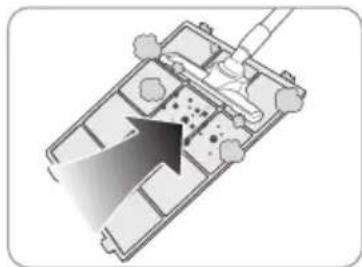
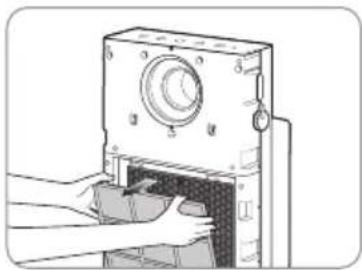
■ Pre-filter (every two to four weeks)
- Pull the top part of the front cover to open it.
natural_image
Illustration of hands operating a vintage camera with a paper roll, no text or symbols present- Press the Pre-filter knob and take the filter out.
natural_image
Illustration of hands operating a mechanical device with a knob and handle (no text or symbols visible)- Remove dust with a vacuum cleaner or water depending on the degree of pollution.
natural_image
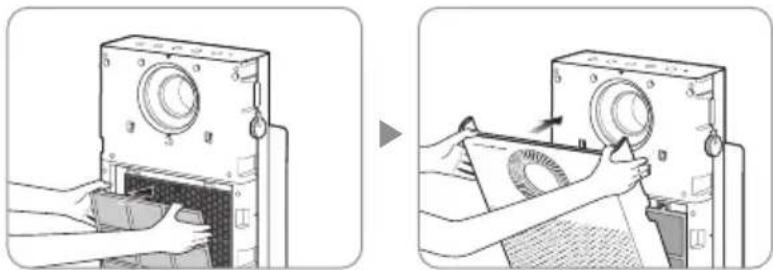
Top-down architectural floor plan showing room layouts and structural elements (no text or labels)4. Dry the Pre-filter completely and install it on the product.
Re-attach the front cover on the product.
* When attaching the Pre-filter on the product, insert it correctly into the hook.
* Wash the Pre-filter in running water or wash it in water with a neutral detergent (approx. 30°C) and dry it thoroughly in well-ventilated shade. If you dry it in direct sunlight or near a dryer, heater, or other heat-generating appliance, the Pre-filter may be deformed and the product may not function properly.
natural_image
Two-step illustration showing hands operating a camera device to press or adjust the screen (no text or symbols present)HOW TO REPLACE FILTER
■ How to Replace
- Refer to the filter installation method on page 10 to replace the filter.
- Be sure to check the front side when installing the filter.
- Use genuine Coway filter to maintain optimal performance of the product.
- Always unplug the power cord before replacing the filter.
■ Filter Cleaning and Replacement Cycle
| Filter Cleaning/Replacement Time Cleaning/Replacement | ||
| Ultrafine Pre-filter When the “PRE” indicator is lit* Clean and wash | ||
| Customized filter Once / 4 months Replace | ||
| Deodorization / HEPA filter | When “HEPA / CARBON” indicator is lit** | Replace |
* If you operate the device for 8 hours everyday at the maximum air volume, it will light up after about 2 weeks of use.
** If you operate the device for 8 hours everyday at the maximum air volume, it will light up after about one year of use.
The timing of when the filter cleaning/replacement alarm indicator lights up varies depending on the use and environment.
- After cleaning or replacing the filter, be sure to press the Filter Replacement Cycle button to reset the cycle (P.15).
- The filter replacement cycle is the recommended cycle and may vary depending on usage environment.
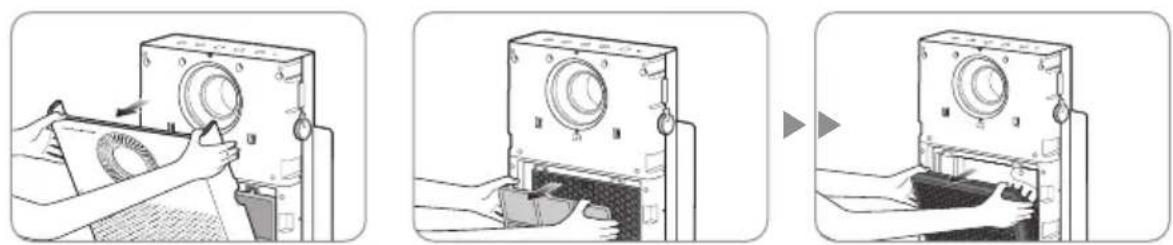
■ How to Replace Customized Filter
- Open the front cover, remove the ultrafine Pre-filter from the product, and remove the customized filter from the ultrafine Pre-filter.

natural_image
Two-step diagram showing a hand operating a washing machine and then adjusting a dark tray with an arrow (no text or symbols present)- Remove the packaging vinyl from the new customized filter and insert it into the back of the ultrafine Pre-filter. Reassemble the ultrafine Pre-filter, insert it into the device in the reverse order, and then close the front cover.

natural_image
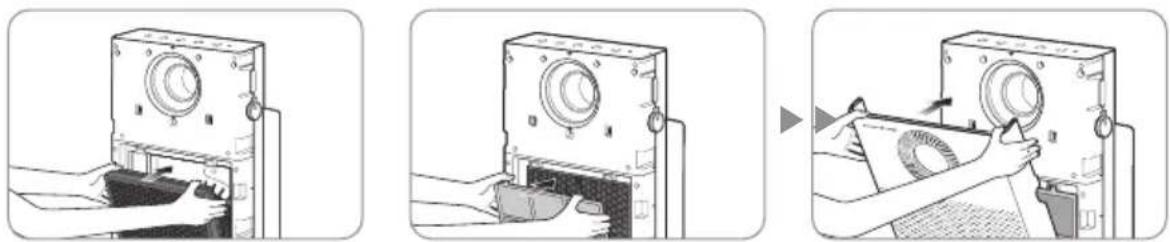
Two-step diagram showing a hand pressing down on a flat panel and then adjusting a device with a circular component (no text or symbols present)■ How to Replace Deodorization / HEPA filter (when filter alarm indicator is on)
- Open the front cover, remove the Pre-filter from the product, and remove the Deodorization / HEPA filter
natural_image
Three-step illustration showing a hand operating a vintage camera with a close-up of the camera's opening (no text or symbols present)- Remove the packaging vinyl from the new Deodorization / HEPA filter, and replace the old one with it. Reassemble the Pre-filter, insert it into the device in the reverse order, and close the side cover.
* Check the front display of the filter. * When assembling the Pre-filter, press the hooks on both sides completely.
natural_image
Three-step diagram showing a device being opened, then closed, and finally being placed on a device (no text or symbols present)TROUBLE SHOOTING
Even when the product is not broken, the air purifier may malfunction due to misuse by the user or other minor causes. Check the following in such a circumstance to resolve the issue easily without assistance from the service center. If the problem persists after checking the items below, please contact the service center.
| Symptom Check | Measures to take | |
| No air is coming out. | • Is the power cord plugged in? | Plug the power cord into a 220 V- 240 V~ 50 Hz, 60 Hz outlet. |
| • Are all the indicators off? | Press the Power button and select the desired function. | |
| • Is there a power outage? | Use the product after the electricity is restored. | |
| The air volume does not change. | • Is the Auto Mode indicator on? | Air volume selection is available only in Manual Mode (normal). |
| • Is the SILENT / TURBO Mode indicator on? | Air volume is not selected in Silent / Turbo modes, but rather runs at a set level. | |
| The air volume has weakened considerably. | • Has the filter cleaning or replacement time passed? | Check the filter cleaning and replacement cycle and clean or replace the filter. |
| The pollution level does not change. | • Is there dirt on the pollution sensor lens? | Clean the pollution sensor lens. (Refer to P. 17.) |
| • Does the pollution level remain at High? | Adjust the pollution sensor's sensitivity to Low or Standard. (Refer to P. 16.) | |
| • Does the pollution level remain at Low? | Adjust the pollution sensor's sensitivity to High or Standard. (Refer to P. 16.) | |
| There is a bad smell coming our of the ventilator. | • Has the filter cleaning or replacement time passed? | Check the filter cleaning and replacement cycle and clean or replace the filter. |
| The pollution level indicator is flashing. | • Contact the service center. | |
| Other functional defects | • Check the problem, unplug the power cord, and contact the service center. | |
SPECIFICATION
| Product Name Air Purifier | |
| Model Name AP-1220B | |
| Rated Voltage 220 V - 240 V~ 50 Hz, 60 Hz | |
| Phase Single phase | |
| Power Consumption 50 W | |
| Product Insulation Class Class 2 equipment | 回 |
| Dust Collection Method Mechanical dust collection (HEPA filter) | |
| Safety Device Power cut off upon opening/closing of the door | |
| Installation Location For indoor use | |
| Recommended Use Area 40 m^2 | |
| Maximum air volume 6.0 m^3 / min | |
| Product Size 376 mm (width) × 196 mm (length) × 717 mm (height) | |
| Product Weight 8.7 kg | |
There may be slight changes to the specifications for improving the product's performance.
The recommended use area and the maximum air volume are results of measurement in Turbo Mode in the Normal circulation mode.
WARRANTY CARD OR WARRANTY LETTER TWO YEAR LIMITED WARRANTY AIR PURIFIER AP-1220B("PRODUCT")
Model:
Serial Number:
Customer Name: ("OWNER")
Date of Purchase:
What This Warranty Covers:
Commencing with the date of purchase of the Product and continuing for a period of Two years, if manufacturing defects in the Product cause the Product to not operate properly for its intended use, then subject to the exclusions, conditions, and limitations contained herein, COWAY at its sole option will repair or replace the Product. Decisions as to the extent of repair or replacement required will be made solely by COWAY. The remedy under this Warranty is available only for that portion of the Product exhibiting defects at the time of the warranty claim. The replacement Product as well as any remaining original Product will be warranted only for the original two years warranty period. This limited warranty applies only to Product used for an application specified by COWAY for the Product and applied in strict accordance with COWAY published specifications in effect at the time of application. IF PRODUCT IS USED FOR OTHER THAN ITS INTENDED PURPOSE, IT IS SOLD AS IS AND WITHOUT ANY EXPRESS OR IMPLIED WARRANTIES, INCLUDING OF MERCHANTABILITY OR FITNESS FOR A PARTICULAR PURPOSE.
What This Warranty Does Not Cover:
This Warranty warrants that the Product will be free from manufacturing defects which affect the ability of the Product to operate for its intended use; it is not a warranty that the Product will never require repairs or to undertake responsibilities, liabilities or obligations other than those specifically identified in the preceding section. COWAY is not responsible or liable for personal injury or property damage of any kind, even if arising from a breach of this Warranty.
Limitations and Exclusions:
TO THE EXTENT PERMITTED BY APPLICABLE LAW, COWAY DISCLAIMS ANY OTHER WARRANTY EXPRESS OR IMPLIED, THAN THAT PROVIDED FOR HEREIN. THIS WARRANTY IS IN LIEU OF AND EXCLUDES ALL OTHER WARRANTIES, GUARANTEES, CONDITIONS AND REPRESENTATIONS, EXPRESS OR IMPLIED, ORAL OR WRITTEN, STATUTORY OR OTHERWISE, INCLUDING BUT NOT LIMITED TO ANY IMPLIED CONDITIONS OR WARRANTIES AS TO THE MERCHANTABILITY OR FITNESS FOR A PARTICULAR PURPOSE OF THE COWAY PRODUCT. SOME STATES DO NOT ALLOW LIMITATIONS ON HOW LONG AN IMPLIED WARRANTY LASTS, SO THE ABOVE LIMITATION MAY NOT APPLY TO YOU. COWAY DOES NOT AUTHORIZE ANY PERSON INCLUDING ITS REPRESENTATIVES, TO MAKE ANY REPRESENTATION OR TO OFFER ANY WARRANTY, CONDITION OR GUARANTY IN RESPECT OF THE PRODUCT OTHER THAN THIS WARRANTY. THIS LIMITED WARRANTY SHALL BE THE OWNER'S SOLE AND EXCLUSIVE REMEDY AGAINST COWAY AND COWAY SHALL NOT BE LIABLE FOR ANY CONSEQUENTIAL, EXEMPLARY, SPECIAL, INCIDENTAL OR OTHER DAMAGES INCLUDING, BUT NOT LIMITED TO, LOSS OF PROFITS, AND LOSS OF USE. INCIDENTAL, CONSEQUENTIAL AND EXEMPLARY DAMAGES SHALL NOT BE RECOVERABLE EVEN IF THE REMEDIES OR THE ACTIONS PROVIDED FOR IN THIS WARRANTY FAIL OF THEIR ESSENTIAL PURPOSE. SOME STATES DO NOT ALLOW THE EXCLUSION OR LIMITATION OF INCIDENTAL OR CONSEQUENTIAL DAMAGES, SO THE ABOVE LIMITATION OR EXCLUSION MAY NOT APPLY TO YOU. COWAY SHALL NOT BE LIABLE FOR ANY DAMAGES WHICH ARE BASED UPON NEGLIGENCE, BREACH OF WARRANTY, STRICT LIABILITY OR ANY OTHER LEGAL THEORY OF LIABILITY OTHER THAN THE EXCLUSIVE LIABILITY SET FORTH IN THIS WARRANTY.
Limitations on Implied Warranties:
Any implied warranty of merchantability or fitness for a particular purpose or use, shall be limited to the duration of the foregoing express written warranty.
Conditions of Warranty:
COWAY's continuing liability under this Warranty is conditioned upon the following:
a) The defect or damage is not caused by or is the result of: abnormal use or conditions; improper storage, unauthorized modifications or repair; misuse, neglect, accident, alteration, improper installation or other acts that are not the fault of Coway or the manufacturer of the product or that are not covered by the manufacturer's warranty;
b) The Product has not been altered, modified or repaired without prior written approval of COWAY;
c) The OWNER has notified COWAY in writing of any failure of the Product covered by this Warranty within thirty (30) days following such failure;
d) There has been no misuse, abuse or negligence with respect to the Product on the part of the OWNER.
COWAY
Add : Coway Co., Ltd. 136-23, Yugumagoksa-ro, Yugu-eup, Gongju-si, Chungcheongnam-do, Korea
Tel. : +82-1588-5100
ITALY
COWAY's failure at any time to enforce or rely upon any of the terms or conditions stated herein shall not be construed to be a waiver of its rights hereunder.
Obtaining Warranty Service and OWNER'S Duties:
If the Product fails to operate for its intended purpose, then notify COWAY or its Representative Agency, within 48 hours or within the next business day after discovery of any defect in the Product. The OWNER must give written notice to COWAY no later than thirty (30) days after a defect is discovered or should by reasonable diligence have been discovered. Claims under this Warranty will require proof of purchase by the OWNER.
GERMANY & AUSTRIA
Web: https://kunzigroup.com
POLAND
Add : OPUS SP.z o.o. Toruńska 8, 44-122 Gliwice
Tel.:+32 4201255
Web: https://www.hakman.com.tr
FUNKTIONEN
1
natural_image
Illustration of a portable electronic device emitting sound waves (no text or symbols)2
3
natural_image
Illustration of hands operating a device with a scroll wheel (no text or symbols visible)LIEBE KUNDEN
natural_image
Two-panel image showing a grid of microstructures on the left and a grayscale speckled texture on the right (no text or symbols)- Geruchsfilter 4. HEPA filter
natural_image
Illustration of hands operating a vintage machine with a paper sheet (no text or symbols visible)natural_image
Illustration showing two steps of installing a panel on a device, one being open and the other closed (no text or symbols present)natural_image
Two-step diagram showing a door panel installation and a printer's printing process (no text or symbols)ANZEIGEN UND TASTEN
Anzeigen
natural_image
Circular pattern with concentric rings and radial lines, no text or symbols present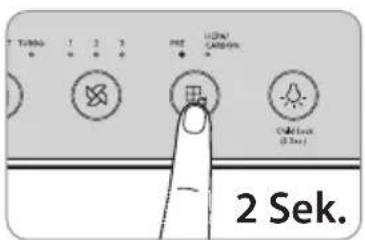
natural_image
Hand inserting a card into a plastic container with a downward arrow (no text or symbols)natural_image
Illustration of a hand pointing at a screen with buttons (no text or symbols visible)natural_image
Illustration of a hand holding a device with a circular fan and a droplet, no text or symbols presentnatural_image
Line drawing of a hand cleaning a washing machine with a circular vent (no text or symbols)
natural_image
Illustration of hands operating a vintage camera with a scroll wheel (no text or symbols visible)natural_image
Illustration of hands operating a device with a lid and control panel (no text or symbols visible)natural_image
Diagram of a vehicle or tank interior with an arrow pointing to a specific area, no text or symbols present.natural_image
Two-step illustration showing a device being opened into a case, then being placed on a paper with a circular component (no text or symbols)FILTERTAUSCH
natural_image
Two-step diagram showing a hand operating a washing machine and then adjusting a dark tray with an arrow (no text or symbols present)natural_image
Two-step diagram showing a hand pressing down on a flat panel and then operating a device with a rotary knob (no text or symbols present)natural_image
Illustration of hands operating a washing machine with a circular dial (no text or symbols visible)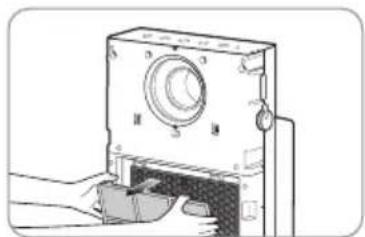
natural_image
Illustration of a hand inserting a component into a device housing (no text or symbols visible)
natural_image
Illustration of hands operating a mechanical device with a circular component and handle (no text or symbols visible)natural_image
Illustration of hands operating a mechanical device with a circular dial and handle (no text or symbols visible)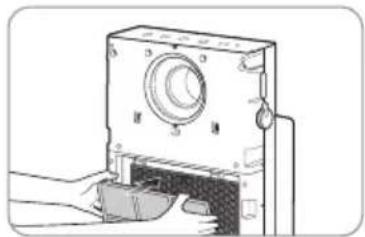
natural_image
Illustration of a mechanical device with a handle and control knob (no text or symbols)
natural_image
Person operating a sewing machine with a cloth cover (no visible text or symbols)FEHLERBEHEBUNG
Web: https://www.hakman.com.tr/
FONCTIONNALITÉS
1
natural_image
Illustration of a portable electronic device emitting sound waves (no text or symbols)2
3
natural_image
Illustration of hands operating a device with a scroll wheel (no text or symbols visible)CHERS CLIENTS
natural_image
Illustration of hands operating a vintage camera with a paper roll (no text or symbols visible)natural_image
Illustration showing two steps of installing a panel cover and a device with a camera (no text or symbols present)natural_image
Two-step diagram showing a door panel installation and a printer's printing process (no text or symbols)VOYANTS ET BOUTONS
Voyants

natural_image
Simple diagram of a circular object with a vertical bar and an arrow pointing outward (no text or symbols)6 Manette polyvalente

natural_image
Hand inserting a card into a plastic container with a downward arrow (no text or symbols)natural_image
Illustration of a hand inserting a small object into a device control panel (no text or symbols visible)natural_image
Illustration of hands interacting with a device displaying a circular fan or button (no text or symbols visible)natural_image
Line drawing of a hand cleaning a front-loading air conditioner unit (no text or symbols)
natural_image
Illustration of hands operating a vintage camera with a paper roll, no text or symbols presentnatural_image
Illustration of hands operating a mechanical device with a knob and handle (no text or symbols visible)natural_image
Top-down architectural floor plan showing room layouts and structural elements (no text or labels)natural_image
Illustration of two-step mechanical device operation: adding a component to a base, then adjusting a paper with a circular inset (no text or symbols)REEMPLACER LE FILTRE
natural_image
Two-step diagram showing a hand operating a washing machine and then adjusting a flatboard with an arrow (no text or symbols present)natural_image
Two-step diagram showing a hand pressing down on a flat panel and then adjusting a device with a circular component (no text or symbols)natural_image
Illustration of hands operating a mechanical device with a circular component, no visible text or symbols
natural_image
Diagram of a mechanical device with labeled parts (no text or symbols present)
natural_image
Illustration of hands operating a device with a circular dial and control knob (no text or symbols visible)natural_image
Illustration of hands operating a device with a circular dial and handle (no text or symbols visible)
natural_image
Diagram of a mechanical device with a handle and control panel (no text or symbols)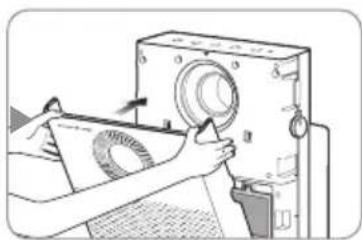
natural_image
Illustration of hands operating a machine with a circular component, no visible text or symbolsRÉSOLUTION DE PROBLÈMES
natural_image
Illustration of a portable electronic device emitting sound waves (no text or symbols)natural_image
Illustration of hands operating a device with a scroll wheel (no text or symbols visible)ESTIMADO CLIENTE
natural_image
Two-panel image showing a grid of 3x4 grids and a grayscale noise pattern on the right (no text or symbols)- Prefiltro ultrafino 2. Filtro
personalizado
natural_image
Illustration of hands operating a vintage camera with lens and paper nearby (no text or symbols)natural_image
Illustration showing two steps of installing a panel on a device, one being open and the other closed (no text or symbols present)natural_image
Two-step diagram showing a door panel installation and a hand operating a fan device (no text or symbols present)natural_image
Simple diagram with a vertical bar and arrow, no text or symbols presentflowchart
graph LR
    A["AUTO SILENT TURBO 1 2"] --> B["NORMAL FOCUS"]
    B --> C["Backwash with directional arrows indicating rotation or change"]

natural_image
Line drawing of a hand pressing down on a device (no text or symbols)natural_image
Illustration of a hand holding a pen next to a digital device with buttons (no text or symbols visible)natural_image
Illustration of a hand holding a device with a circular component and a droplet, no text or symbols presentnatural_image
Line drawing of a hand cleaning a device with a circular fan (no text or symbols)
natural_image
Illustration of hands operating a vintage camera with a paper roll, no text or symbols presentnatural_image
Illustration of hands operating a mechanical device with a knob and handle (no text or symbols visible)natural_image
Top-down architectural floor plan showing room layouts and structural elements (no text or labels)natural_image
Two-step illustration showing hands operating a camera device to press or adjust the screen (no text or symbols present)natural_image
Two-step diagram showing a person using a washing machine to clean a flatboard with an arrow indicating the process (no text or symbols present)natural_image
Two-step diagram showing a hand pressing down on a flat panel and then adjusting a device with a circular component (no text or symbols present)natural_image
Illustration of hands operating a mechanical device with a circular component and a scroll wheel (no text or symbols visible)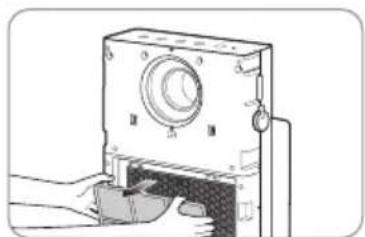
natural_image
Illustration of a mechanical device with a handle and circular component (no text or symbols)
natural_image
Illustration of hands operating a mechanical device with a circular dial and handle (no text or symbols visible)natural_image
Illustration of a hand inserting a device into a machine (no text or symbols visible)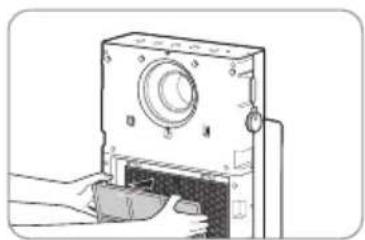
natural_image
Diagram of a mechanical device with a handle and control panel (no text or symbols)
natural_image
Illustration of a person operating a machine with a circular component, no visible text or symbolsWeb: https://kunzigroup.com
Renuncia:
natural_image
Illustration of a portable electronic device emitting sound waves (no text or symbols)2
3
natural_image
Illustration of hands operating a device with an arrow indicating rotation (no text or symbols present)CARI CLIENTI
natural_image
Two-panel image showing a grid of small squares on the left and a dark textured surface on the right, both without any text or symbols.- Filtro deodorante 4. Filtro HEPA
natural_image
Illustration of hands operating a vintage typewriter with a paper roll (no text or symbols visible)natural_image
Illustration showing two steps of installing a panel on a device, one being open and the other closed (no text or symbols present)natural_image
Two-step diagram showing a door panel installation and a printer's printing process (no text or symbols)SPIE E PULSANTI
Spie
PULIZIA

natural_image
Hand placing a button into a plastic container with a downward arrow (no text or symbols)natural_image
Illustration of hands holding a tablet device with a circular fan and abstract patterns (no text or symbols)natural_image
Illustration of a hand cleaning a front-mounted device with a circular fan (no text or symbols visible)
Tips
natural_image
Illustration of hands operating a camera with a paper clip, no text or symbols present- Premere la manopola del pre-filtro ed estrarlo.
natural_image
Illustration of hands operating a mechanical device with a circular dial and handle (no text or symbols visible)natural_image
Top-down architectural sketch of a tank with visible seating and structural elements (no text or symbols)natural_image
Two-step illustration showing hands operating a device into a case, before and after close-up (no text or symbols)SOSTITUZIONE DEL FILTRO
■ Sostituzione
natural_image
Two-step diagram showing a hand operating a washing machine and then adjusting a dark tray with an arrow (no text or symbols present)natural_image
Two-step diagram showing a hand pressing down on a flat panel and then operating a device with a rotary knob (no text or symbols present)natural_image
Three-step illustration showing a hand operating a vintage camera with a scroll wheel, then to open the case (no text or symbols present)natural_image
Three-step diagram showing a device being opened, then closed, and finally being inserted into a machine (no text or symbols present)Web: https://kunzigroup.com
POLONIA
Web: https://www.hakman.com.tr/
EGENSKAPER
natural_image
Illustration of a portable electronic device emitting sound waves (no text or symbols)natural_image
Illustration of hands operating a device with a scroll wheel (no text or symbols visible)KÄRA KUNDER
INNEHÅLLSFÖRTECKNING
FÖR INFORMATION
| 03 | SÄKERHETSINFORMATION
Fara
Varning
Var försiktig
| 07 | DELARNAS NAMN
| 09 | LUFTRENINGSPROCESS
HUR DU ANVÄNDER
| 10 | INNAN ANVÄNDNING
natural_image
Two-panel image showing a grid of 3x4 grids and a grayscale noise pattern on the right (no text or symbols)- Deodoriseringsfilter 4. HEPA-filter
natural_image
Illustration of hands operating a vintage typewriter with a paper sheet (no text or symbols visible)natural_image
Illustration showing two steps of installing a panel on the left and opening a camera into the right (no text or symbols)natural_image
Two-step diagram showing a door panel installation and a printer's operation with paper handling (no text or symbols)INDIKATORER OCH KNAPPAR
Indikatorer
natural_image
Simple diagram showing a vertical bar on a circular base with an arrow pointing outward (no text or symbols)6 Multi-action spak

1 Strömbrytare
FÖR → HEPA/KOL → PRE & HEPA/KOL → FÖR
natural_image
Line drawing of a hand inserting a button into a container with an arrow indicating the action (no text or symbols present)natural_image
Illustration of a hand holding a pen next to a digital device with buttons (no text or symbols visible)natural_image
Illustration of hands holding a device with a circular component and bubbles, no text or symbols presentnatural_image
Line drawing of a hand cleaning a front-loading air conditioner unit (no text or symbols)
natural_image
Illustration of hands operating a vintage camera with a paper roll, no text or symbols presentnatural_image
Illustration of hands operating a mechanical device with a lid and handle (no text or symbols visible)natural_image
Top-down architectural floor plan of a vehicle or tank with visible structural elements and a black arrow pointing to a specific area (no text or labels)natural_image
Two-step illustration showing hands operating a device into a container and then to press or adjust a paper sheet (no text or symbols present)HUR DU BYTER FILTER
■ Hur du byter
natural_image
Two-step diagram showing a hand operating a washing machine and then adjusting a dark tray with an arrow (no text or symbols present)natural_image
Two-step diagram showing a hand pressing down on a flat panel and then operating a device with a circular component (no text or symbols present)natural_image
Illustration of hands operating a mechanical device with a circular component, no visible text or symbols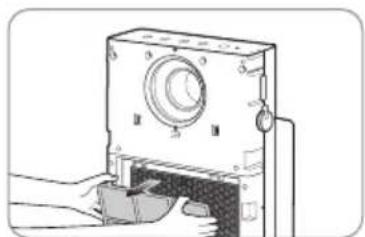
natural_image
Illustration of a hand inserting a device into a housing (no text or symbols visible)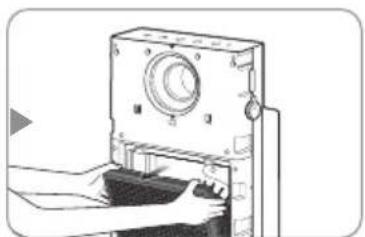
natural_image
Illustration of hands operating a device with a circular dial and handle (no text or symbols visible)natural_image
Illustration of a hand operating a mechanical device with a handle and control panel (no text or symbols visible)
natural_image
Illustration of a mechanical device with labeled parts (no text or symbols visible)
natural_image
Illustration of hands operating a machine with a circular component, no visible text or symbolsFELSÖKNING
E-post: info@hakman.com.tr
Webb : https://www.hakman.com.tr/
CECHY
1
natural_image
Illustration of a portable electronic device emitting sound waves (no text or symbols)2
3
natural_image
Illustration of hands operating a device with an arrow indicating rotation (no text or symbols present)DRODZY KLIENCI
natural_image
Illustration of hands operating a vintage machine with a paper sheet (no text or symbols visible)natural_image
Illustration showing two steps of installing a panel on a device, one being open and the other closed (no text or symbols present)natural_image
Two-step diagram showing a door panel installation and a printer's printing process (no text or symbols)WSKAŹNIKI I PRZYCISKI
Wskaźniki
natural_image
Simple diagram with a vertical bar and arrow, no text or symbols present2 sekundy.

2 sekundy.
DOSTOSOWANIE CZUJNIKA CZĄSTEK STAŁYCH
natural_image
Hand inserting a card into a plastic container with a downward arrow (no text or symbols)natural_image
Illustration of a hand using a stylus to press a device on a screen (no text or symbols visible)natural_image
Illustration of a hand holding a tablet with a circular fan design (no text or symbols)natural_image
Illustration of a hand cleaning a front-mounted device with a fan (no text or symbols)
Porady
natural_image
Illustration of hands operating a vintage camera with a paper roll, no text or symbols presentnatural_image
Illustration of hands installing or removing a CD-ROM into a device (no text or symbols visible)natural_image
Top-down architectural floor plan showing room layouts and structural elements (no text or labels)natural_image
Two-step illustration showing hands operating a device into a case, before and after close-up (no text or symbols)JAK WYWYMIENIĆ FILTR
Jak wymienić
natural_image
Illustration showing a person using a washing machine to clean a flatboard with an arrow indicating the fold (no text or symbols present)natural_image
Two-step diagram showing a hand pressing down on a flat panel and then adjusting a circular device with a handle (no text or symbols present)natural_image
Three-step diagram showing a machine being opened, with no visible text or symbolsnatural_image
Three-step diagram showing a device being opened, then placed on a paper with a magnifying glass (no text or symbols)ROZWIĄZYWANIE PROBLEMÓW
WWW:https://www.hakman.com.tr/
NOTATKA
NOTATKA
coway
www.coway.com