MO2NL - Cooktop Adventys - Free user manual and instructions
Find the device manual for free MO2NL Adventys in PDF.
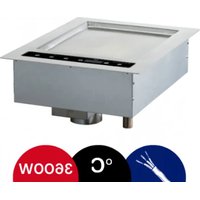
| Product type | Professional induction cooktop |
| Model | Adventys MO2NL |
| Number of cooking zones | 8 independent cooking zones |
| Materials | Stainless steel and vitroceramic |
| Vitroceramic dimensions | 320 x 640 x 6 mm (thickness) |
| Generator dimensions | 296 x 500 mm (approx.) |
| Total power | 8000 W or 16000 W depending on version |
| Max power per cooking zone | 2000 W |
| Power supply | Three-phase 400 V (320-450 V / 40-70 Hz) |
| Rated current | 12 A per phase (8000 W) or 24 A per phase (16000 W) |
| Control | Incremental encoder + 4-digit display |
| Main functions | Independent power adjustment (levels 1-30) or temperature (30-250°C) per zone, global selection of all 4 zones, individual or global stop |
| Memory | 3 memorizable programs for all zones |
| Temperature range | 30°C to 250°C in 1°C steps |
| Power range | 25 W to 2000 W per zone |
| Safety | Automatic shutdown in case of overheating, error codes (F1-F8, H1-H6), protection against electric shock |
| Maintenance and cleaning | Clean with household alcohol, avoid steam cleaner and large amounts of water |
| Safety instructions | Do not use aluminum containers without special bottom, do not leave metal objects on the zones |
| Error codes | F1: vitro temperature sensor, F2: electronic temperature sensor, F3: mains voltage, F4: low voltage, F5: ambient sensor, F6: control error, F8: fans, H1/H3: vitro overheating, H2: electronic overheating, H5: under vitro sensor, H6: ambient temperature |
| Warranty | Manufacturer warranty subject to compliant installation and use |
| Manufacturing | Made in France |
Frequently Asked Questions - MO2NL Adventys
User questions about MO2NL Adventys
0 question about this device. Answer the ones you know or ask your own.
Ask a new question about this device
Download the instructions for your Cooktop in PDF format for free! Find your manual MO2NL - Adventys and take your electronic device back in hand. On this page are published all the documents necessary for the use of your device. MO2NL by Adventys.
USER MANUAL MO2NL Adventys
natural_image
Exterior view of a stainless steel kitchen appliance with open lid and control panel (no visible text or symbols)Chère cliente, cher client,
natural_image
Simple line drawing of a trash bin with crossed lines indicating no waste or discharge (no text or symbols)Plaque de raccordement
text_image
1 2 3 M ADVENTYS P T P/T 0.text_image
1 2 3 M 0. 0. ADVENTYS P T P/T 0.text_image
1 2 3 M 0.0. ADVENTYS P T P/T 0.0.text_image
1 2 3 M ADVENTYS® 600.text_image
1 2 3 1500 134 ADVENTYS P T 77c 2000 P/Ttext_image
1 2 3 M ADVENTYS PT P/TEteindre une zone :
text_image
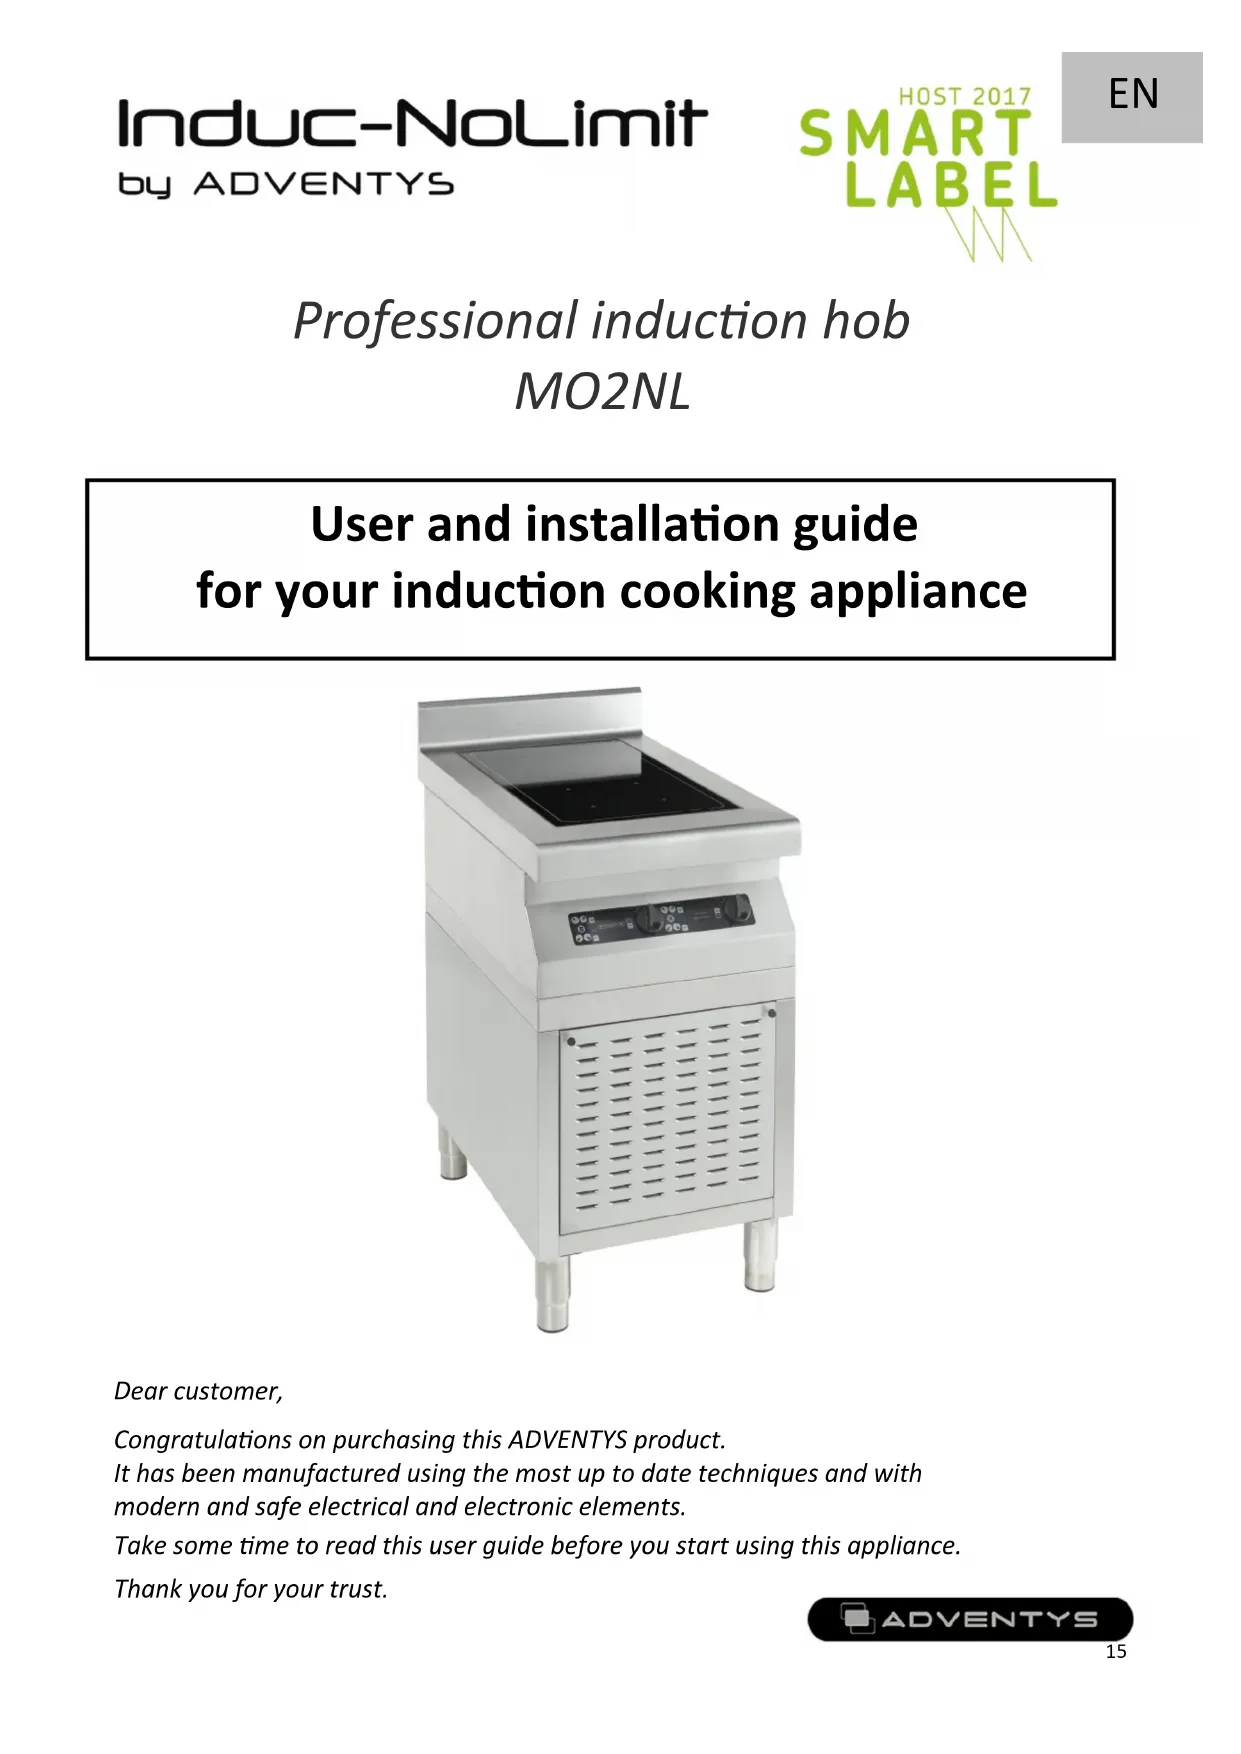
1 2 3 M 0.0 ADVENTYS P T P/T 0.0Professional induction hob MO2NL
User and installation guide for your induction cooking appliance
natural_image
Exterior view of a stainless steel kitchen appliance with open lid and control panel (no visible text or symbols)Dear customer,
Congratulations on purchasing this ADVENTYS product.
It has been manufactured using the most up to date techniques and with modern and safe electrical and electronic elements.
Take some time to read this user guide before you start using this appliance.
Thank you for your trust.
Technical information
| Model: | MO2NL |
| Name: | Multi zone induction modular 400 |
| Materials: | Stainless steel and vitroceramic |
| Power: | 8000 or 16000 W |
| Electrical network; | 400V three-phase (Operates between 320 and 450V / 40 and 70Hz)Provide 2 electrical arrivals.1 power cord H07RNF5G-1.5 with 1.5 mm ^2 for MO2NL 80001 power cord H07RNF5G-2.5 with 2.5 mm ^2 for MO2NL 16000 |
| Current: | 12 A per phase for MO2NL 800024 A per phase for MO2NL 16000 |
| Command: | Incremental encoder and 4-digit display |
| Vitroceramic dimensions: | 320 x 640 x thickness 6 mm |
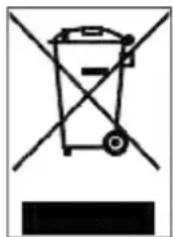
Conformity and waste declaration
This product conforms to current EC directives. We certify this point in the EC declaration of conformity. If necessary, we can send you the declaration of conformity in question.
This appliance's packaging materials may be recycled. Recycle them and help protect the environment by placing them in the municipal containers provided for this purpose.
natural_image
Simple line drawing of a trash bin with crossed lines indicating no waste or discharge (no text or symbols)When the appliance reaches the end of its useful life, it must be destroyed in accordance with current national waste elimination and recycling regulations. We recommend contacting a specialist waste elimination company.
WARNING:
To eliminate any risks related to the destruction of the appliance, disconnect it from the mains and remove the mains cable from the appliance.
NOTE!
For the destruction of the appliance, respect the local decrees and the regulations which apply in your country or geographical zone.
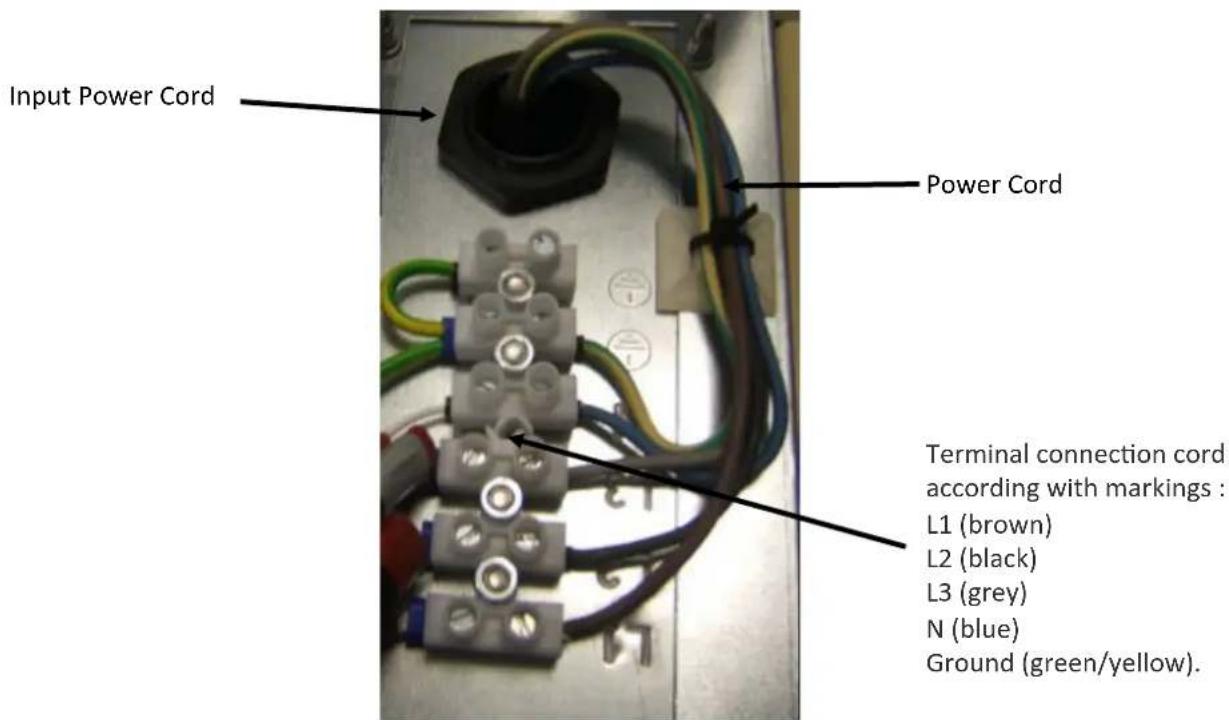
Electrical connection
- Unscrew the 4 screws of the bottom plate, located under the unit to access the connection terminal block area.
- Prepare a sector cable equipped with 5 conductor caps wiring.
- Place the cord into the cable clamp and tighten the cable clamp to secure the power cords.
- Connect the 5 wires of the power cord to the terminal block in accordance with the following diagram.
text_image
Input Power Cord Power Cord Terminal connection cord according with markings : L1 (brown) L2 (black) L3 (grey) N (blue) Ground (green/yellow).Connecting Plate
- Replace the bottom plate by screwing the 4 screws.
- You can connect the power cord to a standard three phase plug 400 V +/- 10% of your electrical installation.
Reminder : 1 power cord H07RNF5G-1.5 with 1.5 mm² for MO2NL 8000 1 power cord H07RNF5G-2.5 with 2.5 mm² for MO2NL 16000
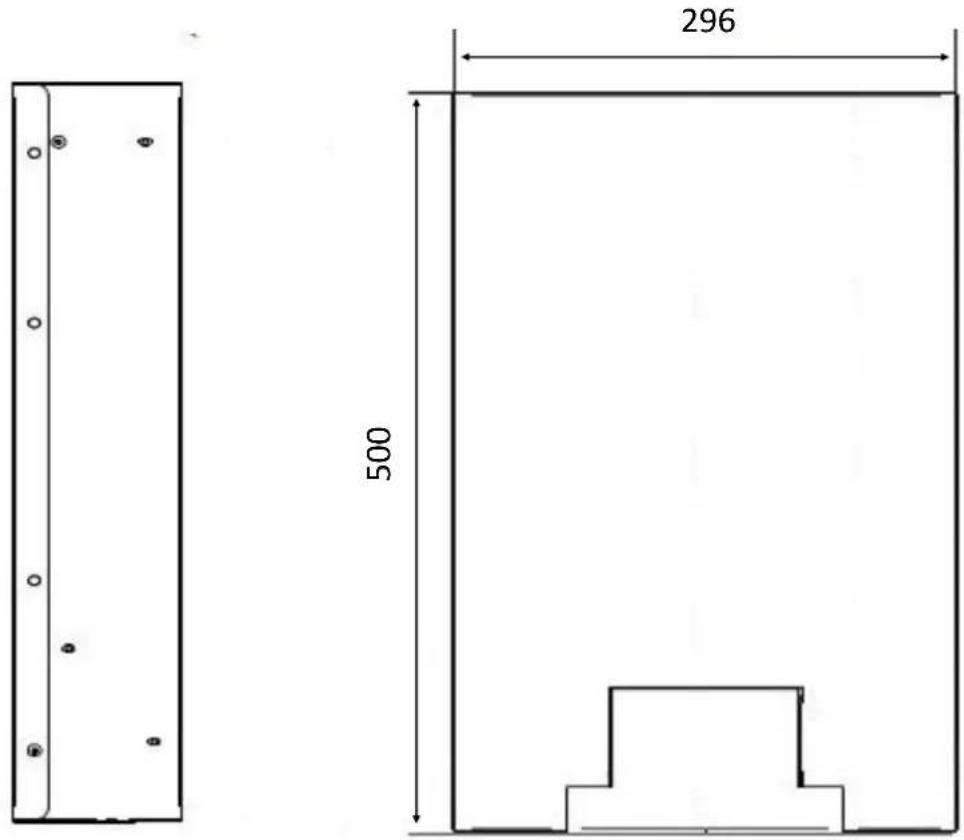
Product installation
Generator dimensions
text_image
296 500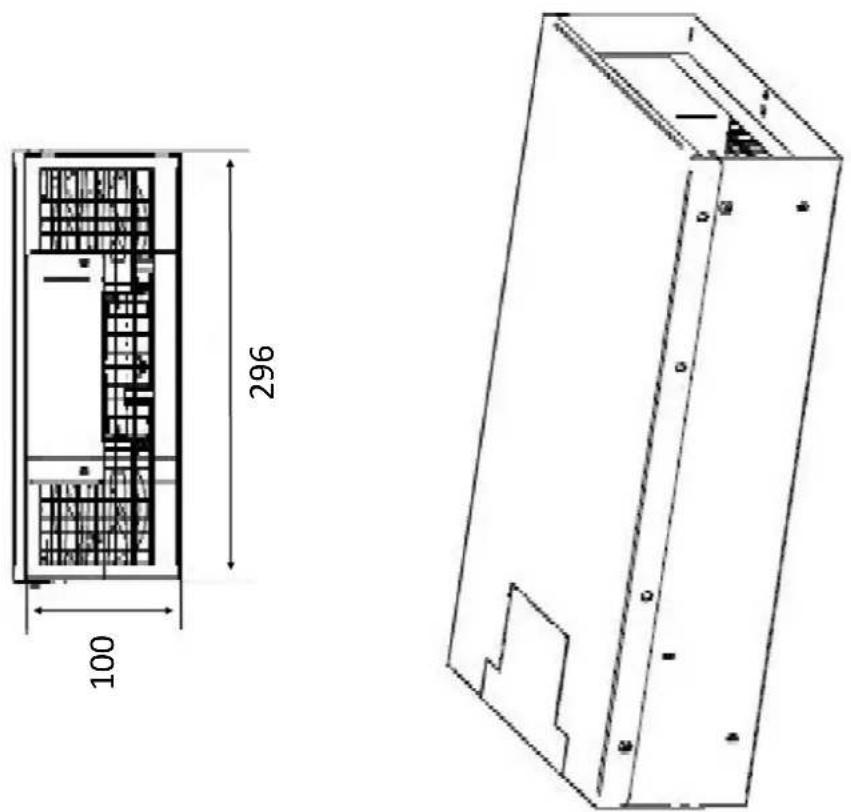
text_image
100 296
text_image
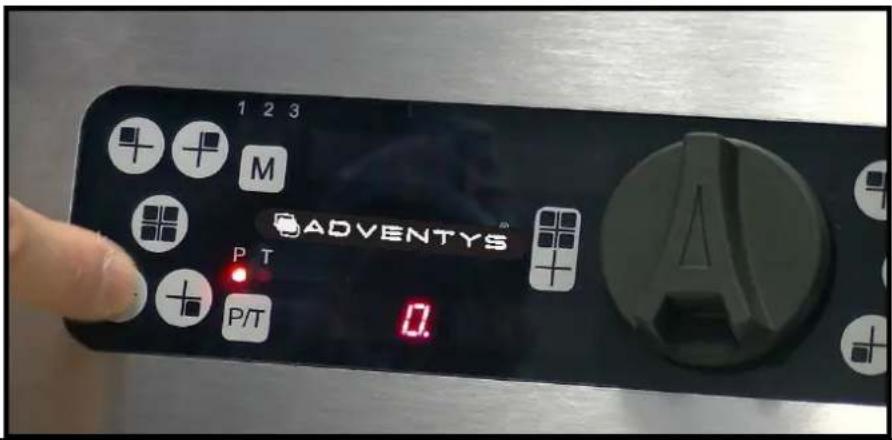
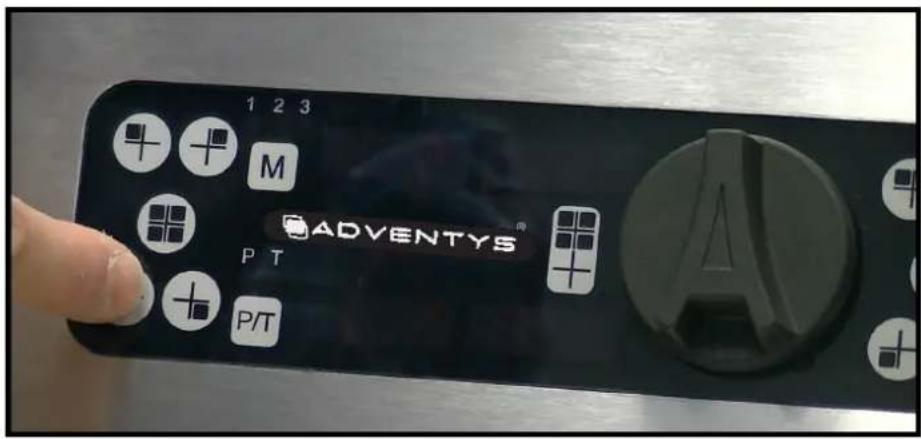
1 MEMORY key: memorization or call of 1 program out of 3, for all 4 zones. 3 LEDS to indicate the number-selected program. 4 SELECTION keys (1 for each zone). Short press for selection and start-up and long press for shutdown. 4 DISPLAYS with 4 digits to indicate the power or temperature value selected for each zone. 1 INCREMENTAL ENCODER to adjust the selected zone (P or T). 1 SELECTION key, GLOBAL of 4 zones. Short press for selection and start-up and long press to stop 4 zones at the same time. 2 LEDS to indicate the selection POWER or TEMPERATURE 1 SELECTION key, POWER or TEMPERATURE for selected zone or all zones.To select a zone:
Short press on the SELECTION key on selected zone(s). A light point at the bottom right of the corresponding display(s) on the zone(s) lights for 5s. This corresponds to the time during which it is possible to turn the incremental encoder to adjust the zone(s) in power or temperature (depending on the selection P / T). After 5s, the zone(s) will automatically deselect itself, the light points will go out to indicate it and the action on the incremental encoder will no longer be taken into account.
To memorize a configuration:
Set the 4 zones in the desired configuration then press the M button for 3 seconds. The 3 leds will flash, use the incremental encoder to select one of the 3 memories (1, 2 or 3). After 3 seconds without any action the led lights up in a fixed way and your configuration is saved.
To call a stored configuration:
Just press the M key and then select the configuration (1,2 or 3) you want.
To turn off a zone:
Just press the button corresponding to the zone for 3 seconds. This also works with the GLOBAL selection key of the 4 zones.
How your device works
1-
text_image
1 2 3 M ADVENTYS PT P/T 0.Getting started and setting an area:
Press the SELECTION key of the desired zone then use the incremental encoder to set the desired power or temperature.
You have a delay of 5 seconds after selecting the zone to start turning the encoder.
2-
text_image
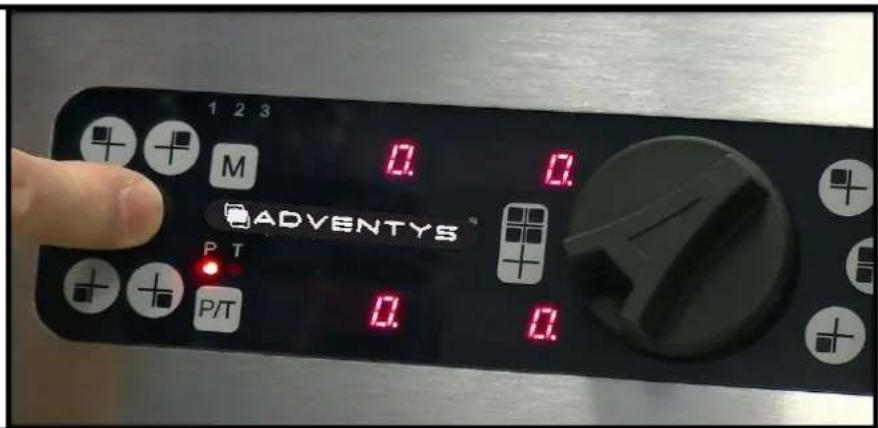
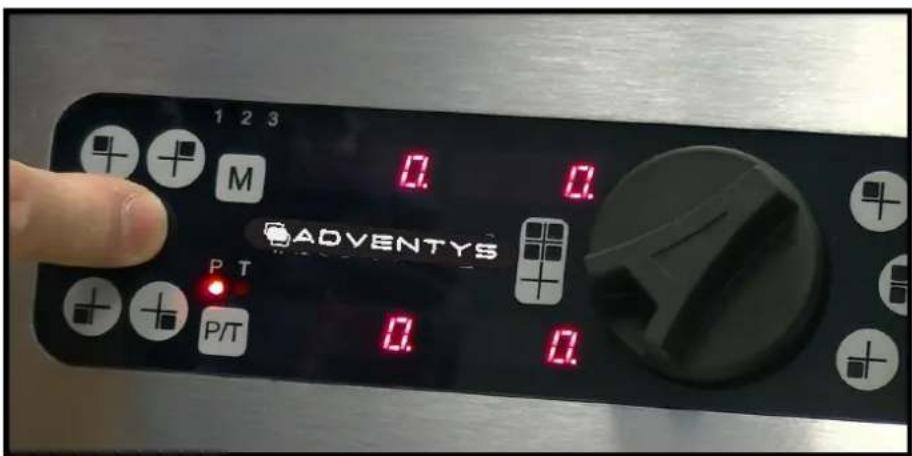
1 2 3 M 0. 0. ADVENTYS® P T P/T 0.Start-up and adjustment of several zones simultaneously:
Press the SELECTION keys of the desired zones and then use the incremental encoder to adjust the desired power or temperature.
You have a delay of 3 seconds after selecting zones to begin turning the encoder.
3-
text_image
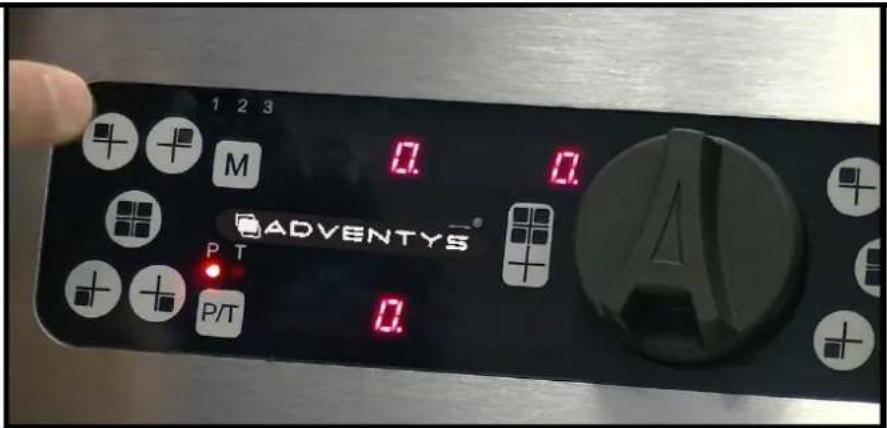
1 2 3 M 0.0 ADVENTYS P T P/T 0.0 0.0Select and adjust the 4 zones simultaneously:
Press the GLOBAL selection key of the 4 zones and then use the incremental encoder to set the desired power or temperature which will be identical for the 4 zones.
How your device works
4-

text_image
1 2 3 M ADVENTYS® 600Switch to temperature setting:
Press the SELECTION key for the zone you want to adjust, then press the [P / T] key and then use the encoder to select the desired temperature. By default the setting of a zone is made in power.
The P or T° led indicates the current setting mode: P for power and T for temperature.
5-
text_image
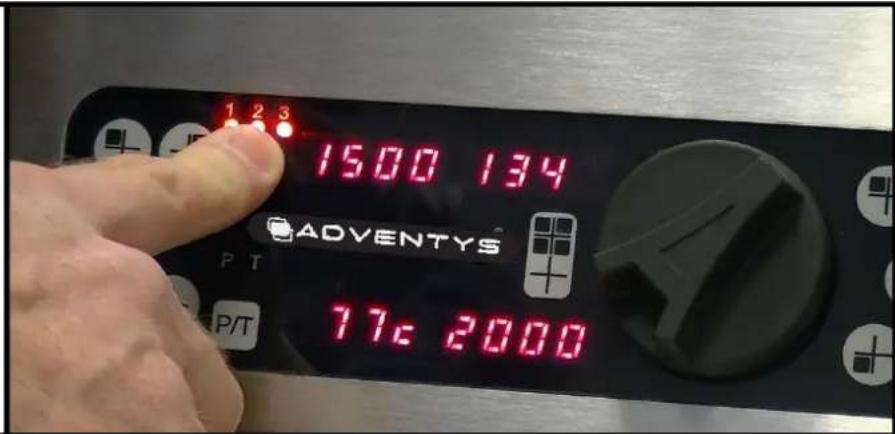
1 2 3 1500 134 ADVENTYS P T 77c 2000Save a configuration in memory:
Set each zone in a configuration you wish to memorize. Press the [M] key for 3 seconds until the 3 LEDs flash. Then select with the encoder the desired memory program (1 or 2 or 3). Then, without any action on your part for 3 seconds the new configuration will be memorized.
6-
text_image
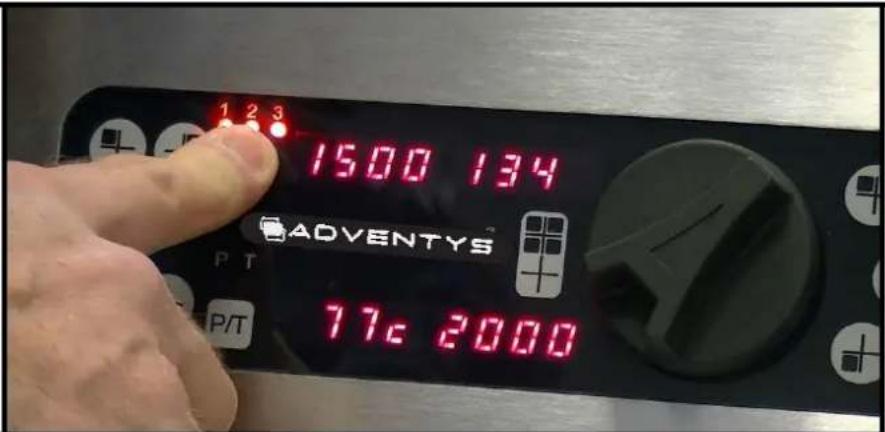
1 2 3 1500 134 ADVENTYS 77c 2000Call a stored configuration:
Press the memory button [M] briefly and select with the incremental encoder one of the 3stored programs (1or2or3). Then, without any action on your part for 3 seconds, the settings of the stored program will be sent.
How your device works
7-
text_image
1 2 3 M ADVENTYS PT P/TSwitch off an cooking zone:
Press the SELECTION key for 3 seconds for the zone you want to turn off.
8-
text_image
1 2 3 M 0.0 ADVENTYS P T P/T 0.0Switch off the 4 zones simultaneously:
Press for 3 seconds the GLOBAL selection key of the 4 zones.
To use your appliance at maximum power on 4 zones simultaneously, the diameter of the bottom of your pan should be at least 35 cm.
How does your appliance work?
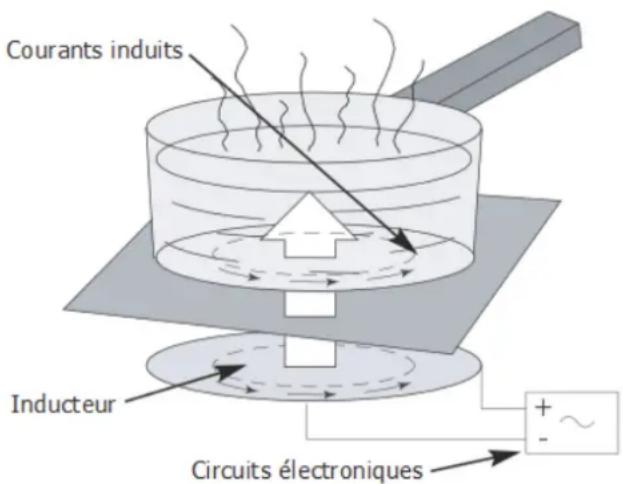
Induction principle
When the appliance is switched on, as soon as a power level is selected, the electronic circuits produce induced currents in the bottom of the container, which instantly directs the heat produced to the food.
The food is cooked with practically no energy loss and with a very high energy output.
For the attention of anyone who wears a cardiac pacemaker and active implants
The appliance's operation conforms to current electromagnetic interference standards. Your induction cooking appliance therefore fully meets legal requirements (89/336/EEC directives). It has been designed to not disrupt the operation of other electric appliances as long as they respect these same regulations.
Your induction cooking appliance generates magnetic fields in its immediate environment. To ensure there is no interference between your cooking appliance and a cardiac pacemaker, this pacemaker must be designed according to its own regulations. In this respect, we can only guarantee you the conformity of our own product. You may contact the manufacturer of your cardiac pacemaker or your doctor for information on its conformity or any incompatibilities.
Disconnect the appliance immediately if a crack appears in the surface of the glass to prevent any risk of electric shock.
To do so, remove the fuses or activate the circuit breaker.
Do not use your appliance again until you have replaced the vitroceramic glass.
The appliance must not be used to store anything.
Make sure that the power cable of an electric appliance which is connected to a plug near the appliance is not in contact with the cooking zones.
When cooking, never use tin foil and never place any products wrapped in tin foil or any frozen products in aluminium trays directly on the appliance.
The aluminium will melt and damage your appliance beyond repair.
Do not clean your appliance with a large volume of water. Use a little domestic alcohol.
Do not use a steam cleaner.
If the power cable is damaged, it must be replaced by the manufacturer, their after sales department or someone with similar qualifications to prevent any danger.
This appliance is not intended to be used by anyone (including children) whose physical, sensory or mental capacities are impaired, or by anyone who does not have any experience or knowledge of it, unless they are monitored by someone responsible for their safety or have received instructions in how to use the appliance from them. Children must be supervised to make sure they do not play with the appliance.
When using the appliance, pay attention to any objects worn by the user such as rings, watches or similar objects which may heat up if they are placed very close to the cooking surface.
Only use containers of the type and size recommended.
Any repairs must be carried out only by people who have been trained or recommended by the manufacturer.
Make sure that the coating and surrounding areas do not contain any metal surfaces.
Your induction cooking hob is not intended to be used with an external timer or separate remote control system.
How your device works
The NoLimit has 8 independently adjustable zones in power or temperature. Each zone is capable of providing up to 2000 watts of power and it can be set to a temperature up to 250 °C.
It is possible to use 8 small saucepans at the same time (1 small saucepan on each zone) with different power and / or temperature settings.
Power setting for each zones :
| MO2NL 16000 MO2NL 8000 | ||
| Level Power Power per zone(Watts) | (Watts) | |
| 1 25 25 | ||
| 2 50 50 | ||
| 3 100 100 | ||
| 4 150 150 | ||
| 5 200 200 | ||
| 6 250 250 | ||
| 7 300 300 | ||
| 8 350 350 | ||
| 9 400 400 | ||
| 10 | 450 | 450 |
| 11 | 500 | 500 |
| 12 | 550 | 550 |
| 13 | 600 | 600 |
| 14 | 650 | 650 |
| 15 | 700 | 700 |
| 16 | 750 | 750 |
| 17 | 800 | 800 |
| 18 | 850 | 850 |
| 19 | 900 | 900 |
| 20 | 1000 | 1000 |
| 21 1100 | ||
| 22 1200 | ||
| 23 1300 | ||
| 24 1400 | ||
| 25 1500 | ||
| 26 1600 | ||
| 27 1700 | ||
| 28 1800 | ||
| 29 1900 | ||
| 30 2000 | ||
Setting the temperature to the nearest degree for each 8 zones
Each zone is adjustable in temperature between 30^ and 250^ in steps of 1^ . (!) For the optimum use of the temperature control mode, it is essential that the pot/pan covers a cross marked on the glass-ceramic, corresponding to the zone used.
How your device works
Specific message display
The device is perfectly secure. It constantly monitors temperature values and several other electrical parameters to guarantee the user the highest level of performance and safety at all times.
If during use an incorrect operating status is detected, there may be forced shutdown of the device with the indication on the power level display, a flashing error code "Fx" or "hx".
The different codes managed by the device are listed in the table below.
| ERROR DESIGNATION | CODE ON DISPLAY |
| T° vitro sensor missing or short-circuited | F1 |
| Electronic T° sensor missing or short-circuited | F2 |
| Three-phase mains voltage out of tolerance | F3 |
| Low voltage supply voltage out of tolerance | F4 |
| Room temperature sensor (internal to the product) missing or short-circuited | F5 |
| Error on control electronics of power transistors | F6 |
| Problem connecting fans (lack of fan or reverse polarity) | F8 |
| Overheating vitro H1 or H3 | |
| Overheating of electronic power circuits H2 | |
| Problem on temperature sensor under the vitro | H5 |
| Overheating of the ambient temperature H6 |
The flashing error code is displayed as long as the user has not stopped the unit himself and has not restarted a new start, by using the SELECTION / ON key of the relevant fireplace.
If an error code remains permanently displayed despite several successive acknowledgment attempts, contact the service department.
If error code F8 is displayed when the generator block is turned on, it indicates a problem with the fans.
Either there is no connection (absence) of 1 or more fans, or there is reverse polarity, or there is overconsumption. You should contact the after-sales service and report error F8.
Pending the verdict of the manufacturer, the user has the opportunity to inhibit the error F8 and use the product in a degraded mode, until the complete correction of the problem.
Pot types
Your induction cooking appliance is able to recognise most containers.
Container test: place your container on the burner and place a power level: if the indicator remains steady, your container is compatible; if it flashes, your container is not recognised and cannot be used.
You may also use a magnet: if it "catches" onto the bottom of the container, it is compatible with induction technology.
The following containers are induction-compatible:
- Enamel steel containers with or without non-stick coating.
-
Cast iron containers with or without enamel base. An enamel base presents your appliance's glass top from being scratched.
-
Stainless steel containers suitable for induction. Most stainless steel containers are suitable if they pass the container test.
- Special base aluminium containers.
NOTE
Containers made of glass, ceramic or earthenware, aluminium (without special base) and copper and certain non-magnetic stainless steel containers are incompatible with induction cooking.
The selected power level indicator will flash to indicate it to you.
Plastic containers must not be placed on hot surfaces.
How can you preserve and maintain your ap-
Prevent containers from rubbing the top of the appliance.
Do not leave empty containers on the burner.
Do not heat up closed tins of food as they may explode.
Do not pre-heat food on a maximum power level when using a container with a non-stick internal coating (such as Teflon) with no or very little oil or fat.
All of these faults which do not stop the appliance from operating or prevent it from being used are not covered by the warranty.

Metal objects such as cutlery, cooking utensils and so on must not be placed on the cooking zones as they may heat up.
Warranty
To benefit from your hob's warranty, do not forget to keep a receipt of your date of purchase. Modifications or interventions such as drilling, welding, crimping, clinching and so on are not authorised and will void the manufacturer's warranty.
Any interventions due to installation or use which does not comply with the requirements in this manual will be rejected under the manufacturer's warranty, which will then be voided.
The manufacturer's warranty is depending on the product and its mechanical and electrical characteristics not being modified.
Appearance faults caused by the use of abrasive products or containers rubbing on the vitroceramic top which do not stop the appliance from operating or prevent it from being used are not covered by the warranty.
All repairs must be carried out by a qualified technician.
Only distributors of our brand:
- KNOW YOUR APPLIANCE AND ITS OPERATION PERFECTLY.
- APPLY OUR ADJUSTMENT, SERVICING AND REPAIR METHODS IN FULL.
- USE ORIGINAL PARTS EXCLUSIVELY.
If you have a complaint or want to order spare parts from your distributor, provide them with the full reference of your appliance (type of appliance and serial number). These details appear on the information plate attached under the appliance's metal unit.
The descriptions and characteristics provided in this "booklet" are given for information purposes only and are non-binding. In fact, as we set great store on the quality of our products, we reserve the right to make any modifications or improvements necessary without notice.
Original parts: during a servicing operation, ask your vendor for only certified original parts to be used.

text_image
ADVENTYSMade In France