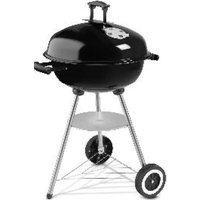
GGW 84 B1 - Barbecue Grillmeister - Free user manual and instructions
Find the device manual for free GGW 84 B1 Grillmeister in PDF.

| Product type | Charcoal barbecue on cart |
| Brand | Grillmeister |
| Model | GGW 84 B1 |
| Dimensions (W × H × D) | 84 × 86 × 45 cm |
| Cooking grid dimensions (W × D) | 48.5 × 28.5 cm |
| Weight | Approx. 6.8 kg |
| Fuel | Charcoal (not briquettes) |
| Charcoal container capacity | Max. 1 kg |
| Main material | Painted steel |
| Included accessories | Rotisserie with clamps, wind shield (3 parts), cooking grid, handle, 2 wheels |
| Number of wheels | 2 |
| Use | Outdoor only, domestic use |
| Safety instructions | Do not use indoors, flat and heat-resistant surface, keep away from children |
| Maintenance and cleaning | Wait for complete cooling, clean with water and mild detergent, no abrasive products |
| Warranty | 3 years (TARGA GmbH) |
| After-sales service | 0800 919270 (France), targa@lidl.fr |
| Article number (IAN) | 385762_2107 |
| Standards | Firelighters conforming to EN 1860-3, charcoal EN 1860-2 |
Frequently Asked Questions - GGW 84 B1 Grillmeister
User questions about GGW 84 B1 Grillmeister
0 question about this device. Answer the ones you know or ask your own.
Ask a new question about this device
Download the instructions for your Barbecue in PDF format for free! Find your manual GGW 84 B1 - Grillmeister and take your electronic device back in hand. On this page are published all the documents necessary for the use of your device. GGW 84 B1 by Grillmeister.
USER MANUAL GGW 84 B1 Grillmeister
natural_image
Black outdoor grill with wheels and a mounted stove (no visible text or symbols)Operating instructions and safety instructions
FR
BARBECUE À CHARBON DE BOIS
| 19 | 20 | 21 | 22 | 23 | 24 |
| M5×10 | M4×10 | M5 | M8 | ∅5.4 | M4×10 |
| 47x | 2x | 47x | 2x | 47x | 2x |
English....2
Français....17
Nederlands 35
Deutsch 50
Contents
- Intended use .... 3
- Copyright 3
- Package contents .... 4
- Assembly material .... 4
- Technical data .... 5
- Safety instructions .... 5
- Assembly 6
7.1 Required tools....6
7.2 Assembly preparation....6 - Initial use ...... 12
- Maintenance/cleaning 13
- Storing the device when not in use.... 13
- Environmental and waste disposal information ...... 13
- Notes on warranty and service 15
Congratulations!
By purchasing the GRILL MEISTER GGW 84 B1 trolley barbecue, hereinafter referred to as barbecue, you have opted for a high-quality product.
Familiarise yourself with the product and the components supplied before assembling the barbecue and read these operating instructions carefully. Observe the safety instructions and only use the barbecue in the manner described in these operating instructions and for the indicated fields of application.
Keep these operating instructions in a safe place. Hand over all documents in the event that you pass on the barbecue to a third party.
1. Intended use
This barbecue is only designed to barbecue food such as meat, fish and vegetables. This barbecue is for outdoor use only. Never use the barbecue indoors. It is not intended for business or commercial use. Use the barbecue solely for private purposes; any other use is deemed improper.
The manufacturer shall not be liable for any damage or faults arising as a result of changes or modifications made to the barbecue without the approval of the manufacturer.
Please observe the national regulations and/or laws in the respective country of use.
2. Copyright
All contents of this operating manual are subject to copyright law and are provided to the user solely as a source of information. Any form of copying or reproduction of data and information without the express written permission of the author is prohibited. This also concerns commercial use of the content and data. The text and illustrations correspond to the technical standards at the time of printing. Subject to alterations.
3. Package contents
Unpack the barbecue and all of the accessories. Remove all packaging materials and check all of the components for completeness and signs of damage. If any parts are missing or damaged, please contact the manufacturer.
- Barbecue (not assembled)
- Assembly material
• This operating manual
This operating manual also has a cover that can be unfolded. The inside of the cover provides a schematic of the barbecue and a number legend. The numbers identify the following parts/functions:
1 Barbecue rotisserie (including brackets)
2 Wind guard (middle)
3 Wind guard (right)
4 Cooking grate
5 Charcoal basket
6 Handle
7 Handle bracket (2)
8 Leg (2)
9 Cross-support (2)
10 Shelf slat (long, 5)
11 Wheel (2)
12 Axle
13 Wheel leg (2)
14 Reinforcing bar (2)
15 Slat holder (front, back)
16 Shelf slat (short, 3)
17 Handle (for the cooking grate, 2)
18 Wind guard (left)
4. Assembly material
| 19 | 20 | 21 | 22 | 23 | 24 |
 |  |  |  |  |  |
| M 5X10 | M4 X10 | M 5 | M 8 | ∅5.4 | M 4x10 |
| 47x | 2x | 47x | 2x | 47x | 2x |
5. Technical data
| Model GGW 84 B1 | |
| Dimensions when assembled (W x H x D) Approx. 84 x 86 x 45 cm | |
| Dimensions of cooking grate (W x D) Approx. 48.5 x 28.5 cm | |
| Fuel Charcoal (not charcoal briquettes) | |
| Charcoal basket capacity max. 1 kg | |
| Weight | Approx. 6.8 |
The specifications and design are subject to change without notice.
6. Safety instructions
Before using the barbecue for the first time, read the following instructions carefully and observe all warnings. Keep this operating manual in a safe place for future reference. If you give the device away or sell it, please ensure that you also pass on this operating manual. It is part of the product.
Key to symbols

DANGER! This symbol, together with the word 'Danger', indicates an impending dangerous situation that, if not prevented, can lead to serious injuries or even death.

WARNING! This symbol indicates important information for the safe operation of the barbecue and user safety.

DANGER! This symbol indicates health hazards due to scalding/burning.

Heat resistant gloves

Do not operate the barbecue in enclosed and/or habitable rooms, for example, in buildings, tents, motor homes, mobile homes or boats. There is a risk of death due to carbon monoxide poisoning.

DANGER! Never use the barbecue indoors. Only allow charcoal to burn out in open spaces; do not allow it to do this indoors! Otherwise you could be in danger of carbon monoxide poisoning, which can lead to death in a very short time.

DANGER! Always place the barbecue on an even, heat-resistant, solid surface and not in the vicinity of flammable materials, liquids or gases. Ensure a sufficient distance from walls and other objects and never leave the barbecue unattended when in use and after use for as long as it is still warm. There is a risk of fire!

DANGER! Only light the barbecue with firelighters that conform to the requirements of the European EN 1860-3 standard. Never use petrol or methylated spirits. There is danger of deflagration or uncontrollable heat generation that can lead to serious burn injuries or fire. There is a risk of injury and fire!

DANGER! Do not use a hairdryer or similar device. There is a risk of flying sparks, and the barbecue could become damaged.

DANGER! Never use water to extinguish a grease fire on the barbecue! This can cause an explosive deflagration. Instead, use a fire blanket to suffocate the fire.

DANGER! Only use the barbecue with charcoal. Do not use any other kind of fuel. There is a risk of fire!

DANGER! When barbecuing, wear protective gloves in accordance with the PPE Ordinance (Category II regarding thermal risks, DIN-EN 407). Use a suitable utensil when barbecuing, such as barbecue tongs, to turn the food in order to prevent burns. There is a risk of burn injuries.

DANGER! Allow the barbecue to cool completely before cleaning. There is a risk of burn injuries!

WARNING! Keep children and pets away from the barbecue.

WARNING! The barbecue gets very hot and must not be moved when in use!

WARNING! When you have finished barbecuing, allow the remaining charcoal to burn out. Do not extinguish with water.

WARNING! Only charcoal that meets the requirements of the EN 1860-2 standard may be used in the barbecue.
7. Assembly
7.1 Required tools
- Phillips screwdriver
- Open-ended spanner: Size 8 mm and two size 13 mm
7.2 Assembly preparation
• Proceed with care when assembling the barbecue.
- Plan a sufficient amount of time.
- Ensure you have a sufficiently large workspace.
- Remove all of the individual components from the packaging and place them somewhere easily accessible.
- Remove all of the assembly materials from the packaging and place them somewhere easily accessible.
- Ensure you have the required tools at hand.

WARNING! When assembling the barbecue, make sure that the heads of the screws always point outwards. This allows you to prevent injuries caused by protruding screws.
Below are instructions on how to assemble the barbecue in eight steps, including diagrams. Set aside the required individual components and assembly materials.
Please note that some sheet metal parts will only contract and take on their final positions during assembly because of their shape. For that reason, we recommend initially hand-tightening the screws before tightening them using a tool later on.
Step 1
➢ Hand-screw the two slat holders (15) to the wheel legs (13). Use the bottom hole of the slat holder (15) and the middle hole of the wheel leg (13) to do this, see diagram. You will need a screw (19), a washer (23) and a nut (21) in each case.
➢ Fasten the reinforcing bars (14) to the wheel legs (13). You will need a screw (19), a washer (23) and a nut (21) for each one.
Now fasten the reinforcing bars (14) to the slat holders (15). You will need a screw (19), a washer (23) and a nut (21) for each one.
Screw the wheel legs (13) and mounted slat holders (15) to the left side of the charcoal basket (5). To do this, use the top hole of the wheel legs (13).
Please note: The three holes for assembling the wind guard in the charcoal basket (5) must be facing the back. For each wheel leg (13) you will need two screws (19), two washers (23) and two nuts (21).
Now tighten all the screws.
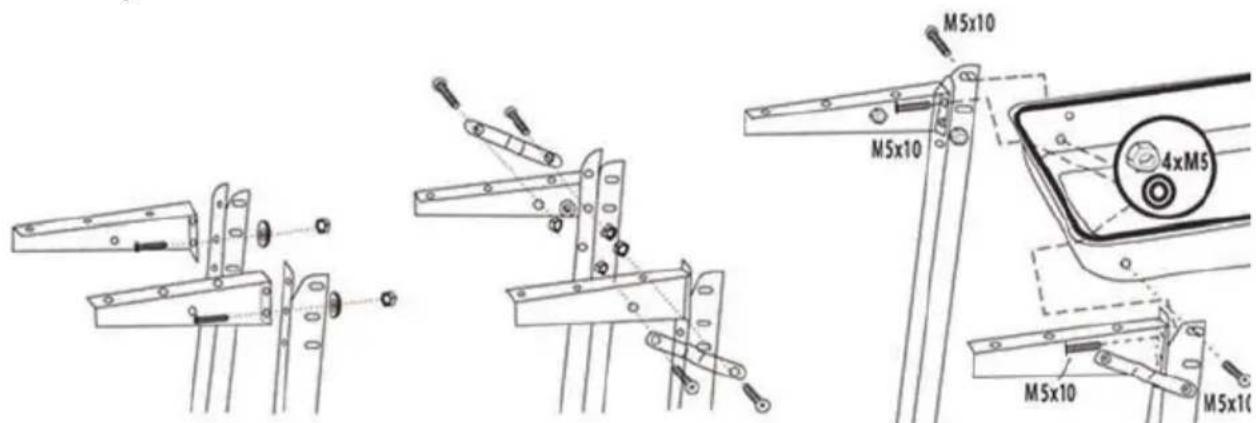
Step 2
➢ Hand-screw the handle brackets (7) to the legs (8). Use the bottom hole of the handle bracket (7) for this. You will need a screw (19), a washer (23) and a nut (21) in each case.
➢ Fasten the legs (8) and mounted handle brackets (7) to the right side of the charcoal basket (5). To do this, use the top hole of the legs (8). You will need two screws (19), two washers (23) and two nuts (21) for each leg (8).
Screw the handle (6) between the handle brackets (7). You will need two screws (20).
Now tighten all the screws.
Step 3
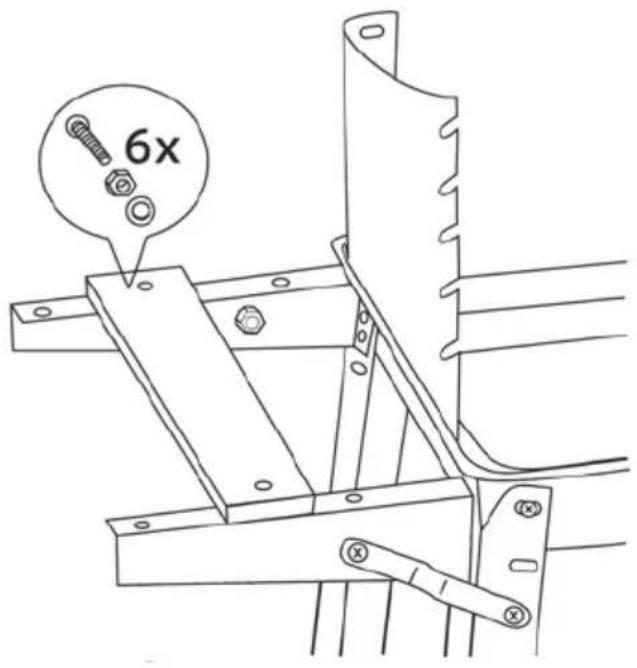
Screw the two cross-supports (9) between the legs (8) and the wheel legs (13). The five holes on the cross-supports (9) should be facing upwards. You will need four screws (19), four washers (23) and four nuts (21) for each cross-support (9).
➢ Hand-screw the five shelf slats (10) to the cross-supports (9). You will need ten screws (19), ten washers (23) and ten nuts (21).
Now tighten all the screws.

Step 4
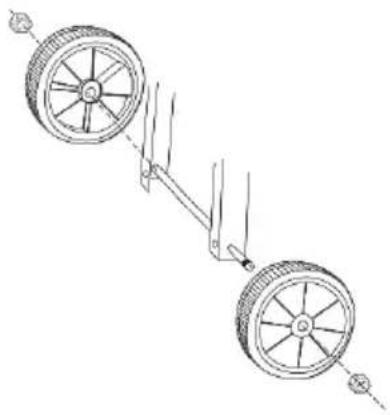
Slide the axle (12) through the bottom hole of the wheel legs (13). Now place the wheels (11) onto the ends of the axle (12). Hand-screw the cap nuts (22) onto the ends of the axle (12). Then, using two size 13 open-ended spanners, simultaneously screw both cap nuts (22) tightly into place.
natural_image
Diagram of a two-dot-wheeled vehicle with wheels and suspension components (no text or symbols)Step 5
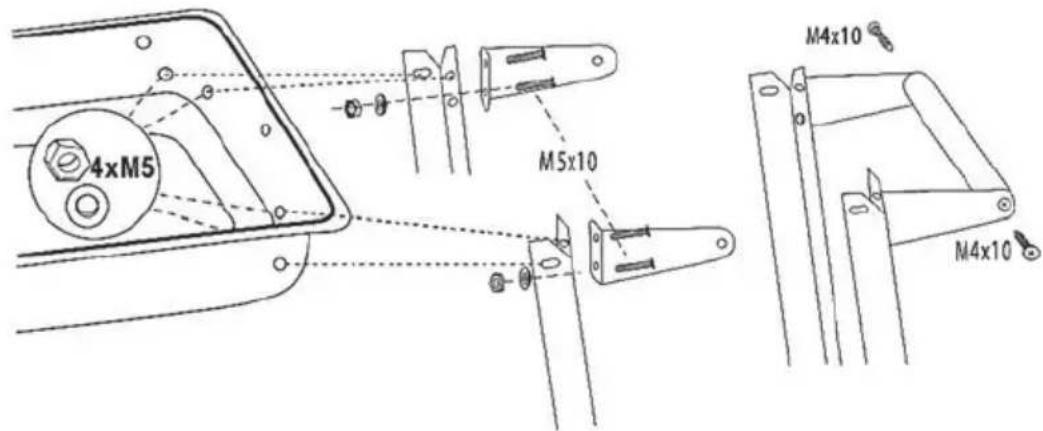
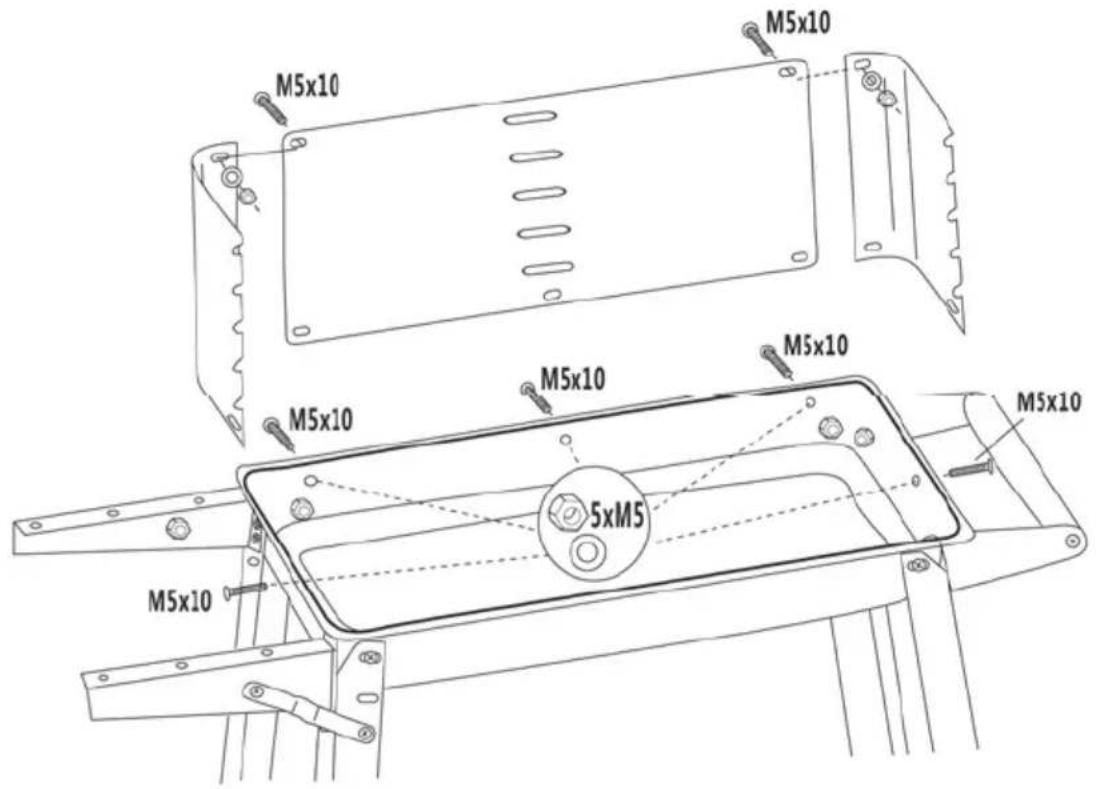
Hand-screw the three parts of the wind guard (18, 2, 3) together using the top holes. When screwing the parts together, ensure that the holes in the wind guard (18, 2, 3) are facing downwards (as shown in the illustration). You will need two screws (19), two washers (23) and two nuts (21).
Screw the wind guard (18, 2, 3) to the charcoal basket (5) from the inside. Always ensure that the heads of the screws face outwards. You will need five screws (19), five washers (23) and five nuts (21).
Now tighten all the screws.
Step 6
➢ Hand-screw the three shelf slats (16) to the slat holders (15). You will need six screws (19), six washers (23) and six nuts (21).
Now tighten all the screws.
Step 7
➢ Fasten the brackets (with the forks facing each other) to the barbecue rotisserie (1) using the eye bolts (24). Insert the handles (17) into the cooking grate (4).
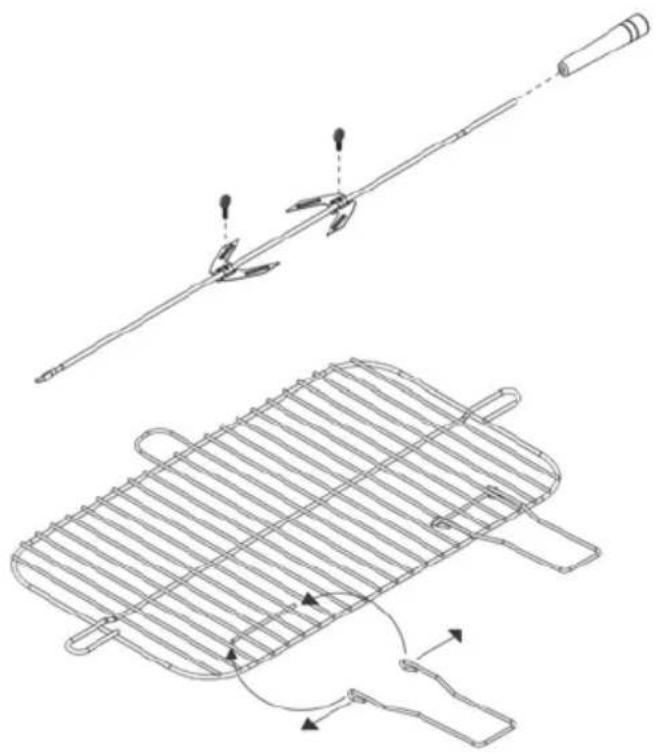
natural_image
Technical line drawing of a mechanical device with two views: top shows a rod and lever mechanism, bottom shows a grid-like structure with arrows indicating motion (no text or symbols)Step 8
➢ Check all screw connections and retighten as necessary!
Now insert the cooking grate (4) into the recesses on the wind guard (18, 2, 3).
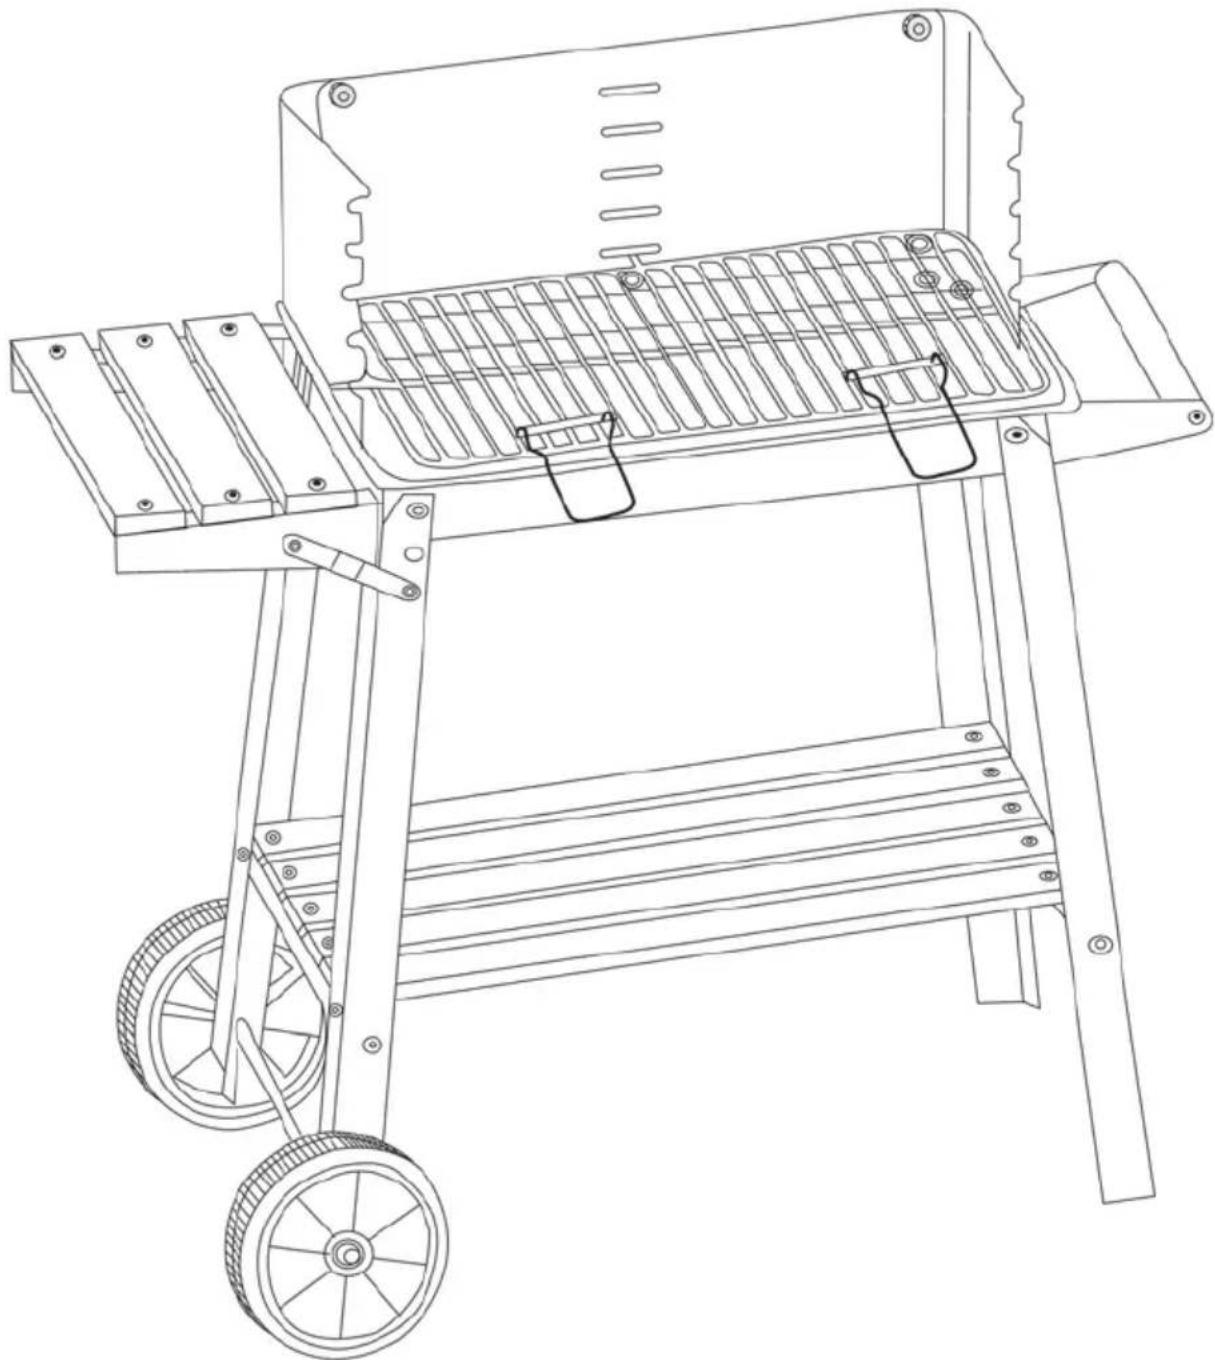
natural_image
Line drawing of a portable outdoor grill with wheels and side-mounted grilles (no text or symbols)The barbecue is now ready for use.
8. Initial use
Before using the barbecue for the first time, heat it for at least 30 minutes in order to burn any possible production residues. Odours may develop during this time, but this is completely normal.

DANGER! Only light the barbecue with firelighters that conform to the requirements of the European EN 1860-3 standard. Never use petrol or methylated spirits. There is danger of deflagration or uncontrollable heat generation that can lead to serious burn injuries or fire. There is a risk of injury and fire!

DANGER! Do not use a hairdryer or similar device. There is a risk of flying sparks, and the barbecue could become damaged.

DANGER! Always place the barbecue on an even, heat-resistant, solid surface and not in the vicinity of flammable materials, liquids or gases. Ensure a sufficient distance from walls and other objects and never leave the barbecue unattended when in use and after use for as long as it is still warm. There is a risk of fire!
➢ Fill the charcoal basket (5) with enough charcoal to cover the base.
Note: You can also ignite the charcoal away from the barbecue on a fire-proof surface in a chimney starter, if one is available to you.
➢ Place two or three solid firelighters on the charcoal and light them with a lighter or match.
Once the firelighters are burning properly, carefully fill the charcoal basket (5) with charcoal. Make sure not to suffocate the firelighters.
The embers are in an ideal state when the charcoal forms a white layer of ash and the firelighters are completely burned.
➢ Distribute the charcoal evenly in the charcoal basket (5) using a suitable metal instrument.
Now insert the cooking grate (4) and barbecue rotisserie (1) into the recesses on the wind guard (18, 2, 3).
➢ Wait a short time until the cooking grate (4) is heated up and then begin barbecuing.
Remove the barbecued food once the desired cooking point/browning is achieved.
Enjoy!
9. Maintenance/cleaning

Wait until the barbecue has cooled down completely before cleaning. Otherwise, there is a risk of burn injuries.
The barbecue does not contain any components that require regular maintenance. Use a dishcloth, water and any commercially available washing up-liquid for routine cleaning. Do not use any aggressive or scouring cleaning agents in order to prevent damage.
Use a household sponge and washing up-liquid to clean the cooking grate (4). If the cooking grate (4) is heavily encrusted, it is helpful to soak it in water to soften the encrustations before cleaning. After cleaning, rinse the cooking grate (4) with clean water to remove any detergent residue.
10. Storing the device when not in use
If you do not intend to use the barbecue, clean it as described in section 9 'Maintenance/cleaning' and keep it in a clean, dry place.
11. Environmental and waste disposal information
Dispose of the fuel in suitable containers made of incombustible materials once the fuel has completely cooled down or burned out.
By properly disposing of the old device, you can avoid environmental damage and health hazards. Further information regarding proper disposal of the old device can be obtained from your local authority or the shop where you purchased the device.
 | Make sure that the packaging is disposed of in an environmentally friendly manner. Cardboard packaging can be put out for waste-paper collection or taken to public collection points for recycling. The plastic packaging used for your device will be collected by your local waste management company and disposed of in an environmentally friendly manner. |
 | |
| ES/PT | |
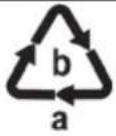
  | Relevant for France only:The product can be recycled, is subject to an extended producer responsibility and is collected separately.Please pay attention to the labels on packaging materials when you separate waste; these are marked with abbreviations (a) and numbers (b) that mean the following:1-7: Plastics/20-22: Paper and cardboard/80-98: Composite materials. |
 |
| Symbol | Material This product contains the following packaging components | |
 | Polyethylene terephthalate — | |
 | High-density polyethylene — | |
 | Polyvinyl chloride — | |
 | Low-density polyethylene Bag for accessories | |
 | Polypropylene — | |
 | Polystyrene — | |
 | Other plastics — | |
 | Corrugated cardboard Sales/inner packaging | |
 | Other cardboard — | |
 | Paper Tissue paper to protect the surfaces | |
 | Paper/cardboard/plastic — | |
 | Paper/cardboard/plastic/aluminium — | |
12. Notes on warranty and service
Warranty of TARGA GmbH
Dear Customer,
This device is sold with three years warranty from the date of purchase. In the event of product defects, you have legal rights towards the seller. These statutory rights are not restricted by our warranty as described below.
Warranty conditions
The warranty period commences upon the date of purchase. Please keep the original receipt in a safe place as it is required as proof of purchase. If any material or manufacturing faults occur within three years of purchase of this product, we will repair or replace the product free of charge as we deem appropriate.
Warranty period and legal warranty rights
The warranty period is not extended in the event of a warranty claim. This also applies to replaced and repaired parts. Any damage or defects discovered upon purchase must be reported immediately when the product has been unpacked. Any repairs required after the warranty period will be subject to charge.
Scope of warranty
The device was carefully manufactured in compliance with stringent quality guidelines and subjected to thorough testing before it left the works. The warranty applies to material and manufacturing faults. This warranty does not cover product components which are subject to normal wear and which can therefore be regarded as wearing parts, or damage to fragile components such as switches, rechargeable batteries or components made of glass. This warranty is void if the product is damaged, incorrectly used or serviced. To ensure correct use of the product, always comply fully with all instructions contained in the user manual. The warnings and recommendations in the user manual regarding correct and incorrect use and handling of the product must always be observed and complied with. The product is solely designed for private use and is not suitable for commercial applications. The warranty is rendered void in the event of incorrect handling and misuse, if it is subjected to force, and also if any person other than our authorised service technicians interfere with the device. No new warranty period commences if the product is repaired or replaced.
Submitting warranty claims
To ensure speedy handling of your complaint, please note the following:
Before using your product for the first time, please read the enclosed documentation carefully. Should any problems arise which cannot be solved in this way, please call our hotline.
- Always have your receipt, the product article number as well as the serial number (if available) to hand as proof of purchase.
- If it is not possible to solve the problem on the phone, our hotline support staff will initiate further servicing procedures depending on the fault.

Service

Phone: 0800 404 7657
E-Mail: targa@lidl.co.uk

Phone: 1890 930 034
E-Mail: targa@lidl.ie

Phone: 800 62230
E-Mail: targa@lidl.com.mt

Phone: 8009 4409
E-Mail: targa@lidl.com.cy
IAN: 385762_2107

Manufacturer
Please note that the following address is not a service address. First contact the service point stated above.
TARGA
GmbH
Coesterweg 45
59494 Soest
GERMANY
Table des matières
natural_image
Diagram of a two-dot-wheeled vehicle with wheels and suspension components (no text or symbols)Étape 5
natural_image
Technical line drawing of a mechanical device with two views: top shows a rod and lever mechanism, bottom shows a grid-like structure with arrows indicating motion (no text or symbols)Étape 8
natural_image
Line drawing of a portable outdoor grill with wheels and side-mounted grilles (no text or symbols)Cher client, chère cliente,
Cher client, chère cliente,