
Essential YY5347 - Coffee machine KRUPS - Free user manual and instructions
Find the device manual for free Essential YY5347 KRUPS in PDF.
| Product type | Automatic espresso machine with grinder (Espresso, lungo, ristretto) |
| Brand | Krups |
| Model | Essential YY5347 (EA80/EA81 series) |
| Power supply | 220-240 V, 50/60 Hz, 1450 W |
| Pump | 15 bar |
| Heating system | Compact Thermoblock System |
| Water tank capacity | Approx. 1.5 L (not exactly specified, reasonable estimate) |
| Bean hopper capacity | Approx. 200 g (reasonable estimate) |
| Maximum cups without emptying | 9 coffees (grounds container) |
| Functions | Espresso, lungo, ristretto, cappuccino, café latte, steam, 2 cups simultaneously |
| Grind adjustment | Metal burr grinder, continuous adjustment via wheel (left = fine, right = coarse) |
| Temperature adjustment | 3 levels (preset level 2) |
| Water hardness adjustment | 5 levels (0 = very soft to 4 = very hard, preset 4) |
| Auto shut-off | Programmable from 1 to 4 hours (preset 1 h) |
| Water filter | Claris Aqua Filter System cartridge (optional, replace every 2 months or 50 L) |
| Cleaning and descaling | Automatic programs with KRUPS tablets/descaler; long rinse; removable steam nozzle |
| Included accessories | Steam nozzle, cleaning needle, cleaning tablet (1), descaler (1), filter? (not exactly specified) |
| Optional accessories | Auto-cappuccino set XS6000, Claris cartridge |
| After-sales service | KRUPS hotlines and authorized service centers |
Frequently Asked Questions - Essential YY5347 KRUPS
User questions about Essential YY5347 KRUPS
0 question about this device. Answer the ones you know or ask your own.
Ask a new question about this device
Download the instructions for your Coffee machine in PDF format for free! Find your manual Essential YY5347 - KRUPS and take your electronic device back in hand. On this page are published all the documents necessary for the use of your device. Essential YY5347 by KRUPS.
USER MANUAL Essential YY5347 KRUPS
J Grille repose-tasses
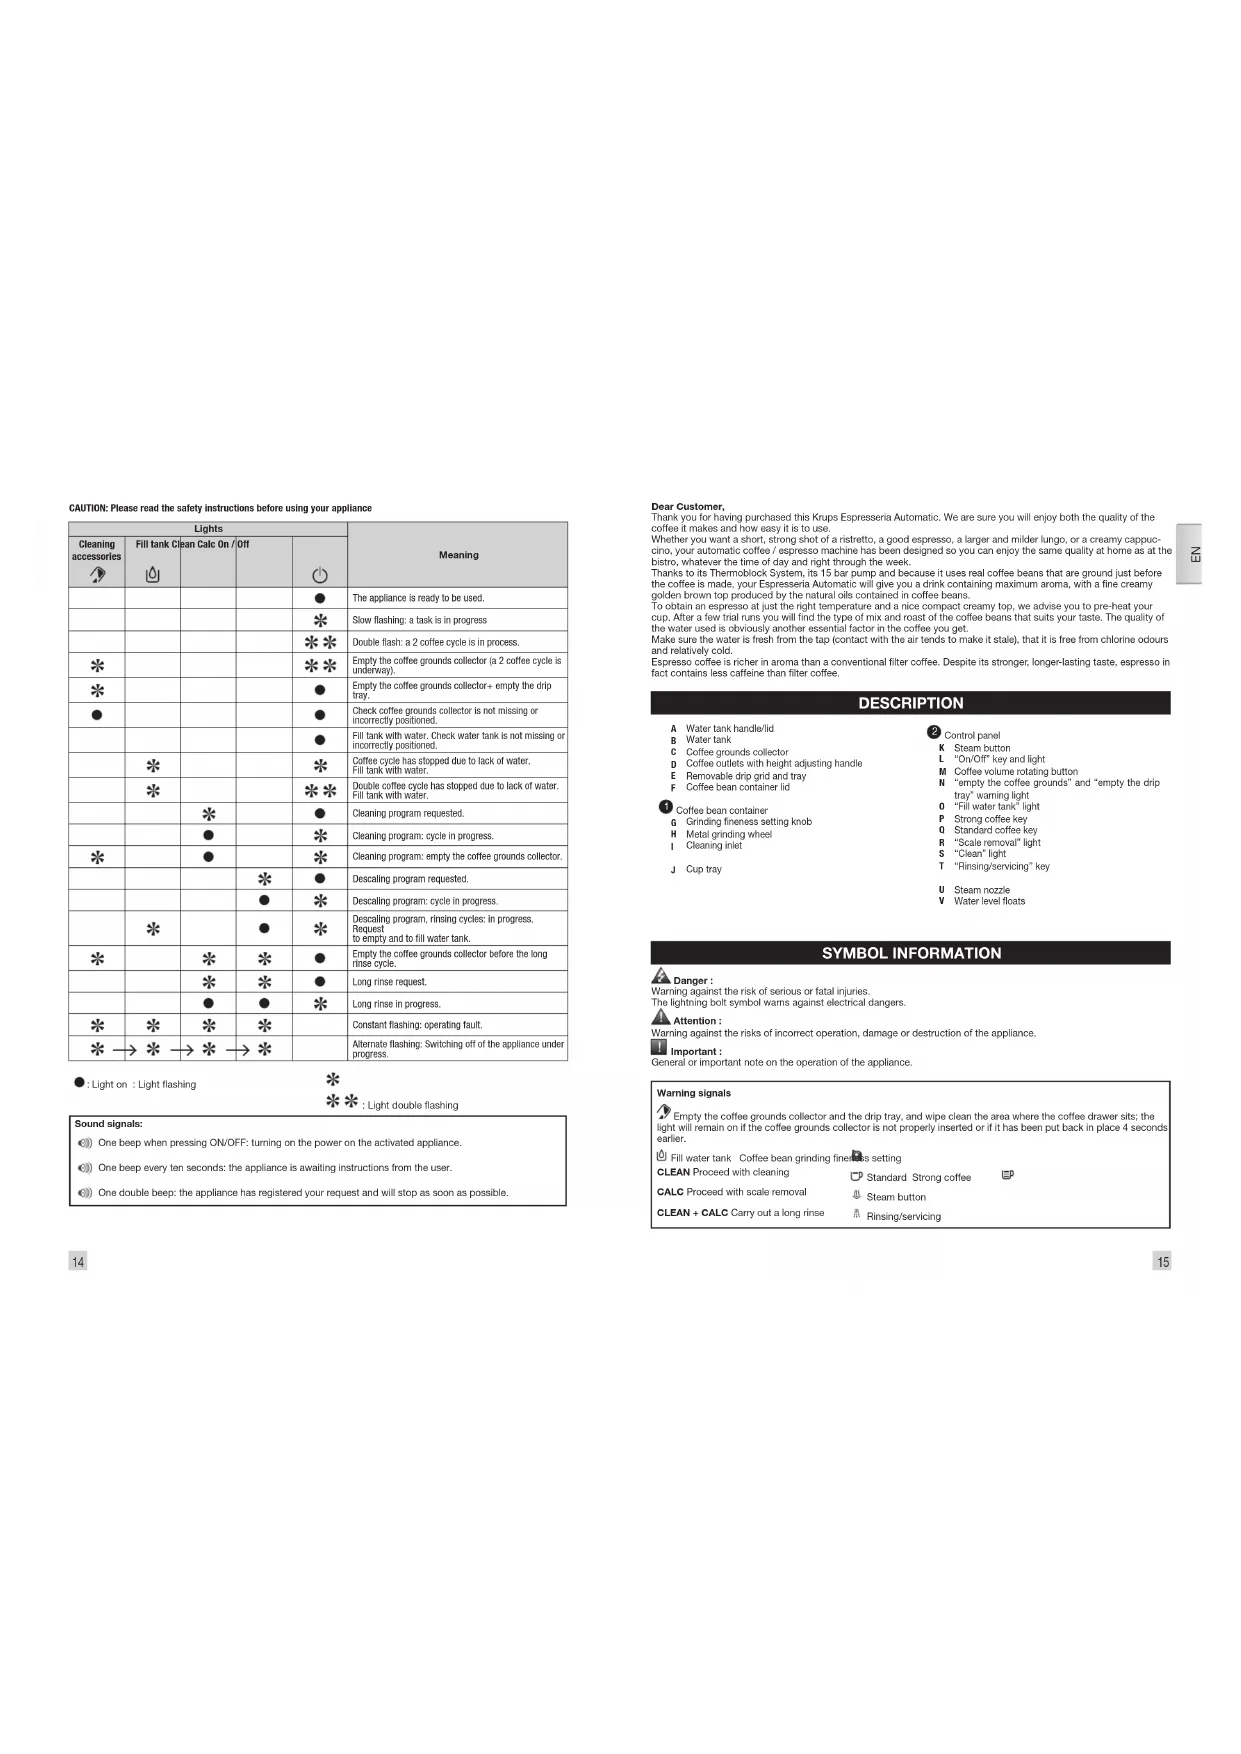
CAUTION: Please read the safety instructions before using your appliance
| Lights | Meaning | ||||
| Cleaning accessories | Fill tank Cl | Clean Calc On / Off | |||
| ● | The appliance is ready to be used. | ||||
| * | Slow flashing: a task is in progress | ||||
| ** | Double flash: a 2 coffee cycle is in process. | ||||
| * | ** | Empty the coffee grounds collector (a 2 coffee cycle is underway). | |||
| * | ● | Empty the coffee grounds collector+ empty the drip tray. | |||
| ● | ● | Check coffee grounds collector is not missing or incorrectly positioned. | |||
| ● | Fill tank with water. Check water tank is not missing or incorrectly positioned. | ||||
| * | * | Coffee cycle has stopped due to lack of water. Fill tank with water. | |||
| * | ** | Double coffee cycle has stopped due to lack of water. Fill tank with water. | |||
| * | ● | Cleaning program requested. | |||
| ● | * | Cleaning program: cycle In progress. | |||
| * | ● | * | Cleaning program: empty the coffee grounds collector. | ||
| * | ● | Descaling program requested. | |||
| ● | * | Descaling program: cycle In progress. | |||
| * | ● | * | Descaling program, rinsing cycles: in progress. Request to empty and to fill water tank. | ||
| * | * | * | ● | Empty the coffee grounds collector before the long rinse cycle. | |
| * | * | ● | Long rinse request. | ||
| ● | ● | * | Long rinse in progress. | ||
| * | * | * | * | Constant flashing: operating fault. | |
| * → * → * → * | Alternate flashing: Switching off of the appliance under progress. | ||||
● : Light on : Light flashing
*
*** : Light double flashing
Sound signals:
(6) One beep when pressing ON/OFF: turning on the power on the activated appliance.
(8) One beep every ten seconds: the appliance is awaiting instructions from the user.
(1) One double beep: the appliance has registered your request and will stop as soon as possible.
Dear Customer,
Thank you for having purchased this Krups Espresseria Automatic. We are sure you will enjoy both the quality of the coffee it makes and how easy it is to use.
Whether you want a short, strong shot of a ristretto, a good espresso, a larger and milder lungo, or a creamy cappuccino, your automatic coffee / espresso machine has been designed so you can enjoy the same quality at home as at the bistro, whatever the time of day and right through the week.
Thanks to its Thermoblock System, its 15 bar pump and because it uses real coffee beans that are ground just before the coffee is made, your Espresseria Automatic will give you a drink containing maximum aroma, with a fine creamy golden brown top produced by the natural oils contained in coffee beans.
To obtain an espresso at just the right temperature and a nice compact creamy top, we advise you to pre-heat your cup. After a few trial runs you will find the type of mix and roast of the coffee beans that suits your taste. The quality of the water used is obviously another essential factor in the coffee you get.
Make sure the water is fresh from the tap (contact with the air tends to make it stale), that it is free from chlorine odours and relatively cold.
Espresso coffee is richer in aroma than a conventional filter coffee. Despite its stronger, longer-lasting taste, espresso in fact contains less caffeine than filter coffee.
DESCRIPTION
A Water tank handle/lid
B Water tank
C Coffee grounds collector
D Coffee outlets with height adjusting handle
E Removable drip grid and tray
F Coffee bean container lid
1 Coffee bean container
G Grinding fineness setting knob
H Metal grinding wheel
Cleaning inlet
J Cup tray
② Control panel
K Steam button
L "On/Off" key and light
M Coffee volume rotating button
N "empty the coffee grounds" and "empty the drip
tray" warning light
0 "Fill water tank" light
P Strong coffee key
0 Standard coffee key
R "Scale removal" light
\$ "Clean" light
1 "Rinsing/servicing" key
U Steam nozzle
V Water level floats
SYMBOL INFORMATION

Danger :
Warning against the risk of serious or fatal injuries.
The lightning bolt symbol warns against electrical dangers.

Attention:
Warning against the risks of incorrect operation, damage or destruction of the appliance.

important :
General or important note on the operation of the appliance.
Warning signals
Empty the coffee grounds collector and the drip tray, and wipe clean the area where the coffee drawer sits; the light will remain on if the coffee grounds collector is not properly inserted or if it has been put back in place 4 seconds earlier.
Fill water tank Coffee bean grinding fineness setting
CLEAN Proceed with cleaning
CALC Proceed with scale removal
CLEAN + CALC Carry out a long rinse
Standard Strong coffee
Steam button
Rinsing/servicing

BEVERAGE PREPARATION
| TYPES OF COFFEE | Number of cups possible | Possible volume settings (ml) | Possible strength settings |
| RISTRETTO | 1 20 to 30 ml | or | |
| 2 x 1 | 2 x 20 to 30 ml in two cycles | ||
| ESPRESSO | 1 30 to 70 ml | or | |
| 2 x 1 | 2 x 30 to 70 ml in two cycles | ||
| COFFEE or LUNGO | 1 80 to 220 ml | or | |
| 2 x 1 | 2 x 80 to 220 ml in two cycles |
BEFORE FIRST USE
Preparing the appliance
Pull out and fill the water tank - Fig. 1 and 2.
Put it back in place by pressing firmly and close the lid again - Fig. 3.
Open the coffee bean container lid. Add the coffee beans - Fig. 4.
Close the coffee bean container lid again.
Do not fill the water tank with hot water, milk or any other liquid. If you turn on the appliance when the water tank is not in place or not correctly filled (under the "min." level), the light will come on and making an espresso or a cup of coffee will be made impossible.

A NEVER PUT GROUND COFFEE IN THE COFFEE CONTAINER.
It is recommended that you do not use oily, caramelised or flavoured coffee beans for this appliance. These kinds of beans may damage the appliance.
Check that the coffee beans do not contain any foreign particles such as grit, as any damage caused by the presence of foreign particles will invalidate the guarantee.
Do not put water into the coffee bean container.
Remember to fit the drip tray to avoid waste water flowing onto the work surface and staining it or scalding you. Check that your water tank is clean.
Initialisation cycle - total duration: around 3 minutes
Turn on the appliance by pressing the button ⏻ Fig. 5. The light is constant.
Put a container with a minimum capacity of 0.6 litres underneath the two coffee outlets and steam nozzle.
Press the ⚠ - Fig. 6 button: the appliance starts the initialisation cycle for rinsing of the steam and coffee circuits. The light ⏻ flashes.
The cycle is finished when the light ⏻ becomes constant. The appliance is now ready to use.
It is preferable to rinse the 2 circuits out at least once after the appliance has not been used for several days. Each time you plug your appliance in, it will carry out an initialisation cycle.
Preparing the grinder
You can choose the strength of your coffee by setting the coffee bean grinding fineness. The finer the grinding setting, the stronger and creamier the coffee should be. Set the desired fineness for grinding by turning the 'Grinding fineness setting' knob. Turn to the left for finer grind. Turn to the right for coarser grind.

CHANGE THE SETTING DURING GRINDING.
Never force the grinding fineness setting button.
PREPARING ESPRESSO AND LONG COFFEES

YOUR APPLIANCE IS DESIGNED TO MAKE COFFEE FROM COFFEE BEANS ONLY.
When you first make coffee with the appliance or after a long period of absence or a cleaning or scale removal procedure, a little steam and hot water will come out of the steam nozzle (priming). Splashing or scalding may occur if the coffee outlets are set too high in relation to the size of the cups.
Note:
The amount of water needed to make an espresso is between 30 and 70 ml. The amount of water needed to make a coffee is between 80 and 220 ml.
Production of an espresso or coffee
Plug in your appliance.
Press the button Ⓗ. The light will flash during the pre-heating and initialisation cycle. The light Ⓗ becomes constant.
Put a cup under the coffee outlets. You can lower or raise the coffee outlets to suit the size of your cups - Fig. 7. Select the 📋 key to get a strong espresso or the 📋 key to get a standard espresso - Fig. 8. You can change the volume of water at any time - Fig. 9.
To stop coffee flowing into the cup, you can either again press one of the ☐ or ☐ keys or turn the knob to the min. position.

The ground coffee is moistened with a little hot water after the grinding stage. A few moments later, percolation as such starts. Beyond a certain amount of coffee in the cup, we recommend - in order to obtain a stronger coffee - to provide your preparation into two separate cycles. Example 2 x 70 ml cycles for a cup of 140 ml.
2 cup function
You can prepare 2 cups of coffee or espresso with your appliance.
Press the button ⏻ the light flashes during the pre-heating of the appliance
The light ⏻ becomes constant.
Place 2 cups under the coffee outlets. You can lower or raise the coffee outlets to suit the size of your cup - Fig. 10. Select the button ☐ or ☐ according to your choice, by quickly pressing the button twice. The light comes on with a double flash to inform you that you have requested two cups of coffee.

The appliance will automatically sequence 2 complete coffee-making cycles.
Make sure that you don't remove the cups after the first cycle.
If you press the ☑ button once and the ☐ button a second time (or the other way round), the second one isn't taken into account.
PREPARING STEAM
Steam froths up the milk to make a cappuccino or a caffe latte, for example, and also heats up liquids. As you need a higher temperature to produce steam than to make an espresso, the appliance runs an additional pre-heating phase for steam.
Plug in your appliance.
Press the Ⓞ button: the light flashes during the pre-heating of the appliance.
The light ⏻ becomes constant
Press the button - Fig. 11
The light ⏻ flashes during the pre-heating.
Once the pre-heating is finished, the light Ⓧ stays constant and you can start the steam production by pressing the ♦ button again.
Press the 🔊 button again to stop the cycle.

The appliance goes back to its initial position if the steam control is not used after 2 mins.

BE CAREFUL, BECAUSE THE CYCLE DOES NOT STOP IMMEDIATELY.
Frothing milk
We recommend that you use pasteurised or UHT milk that has been recently opened. Untreated milk does not give the best results.
Pour the milk into your milk jug. Immerse the nozzle in the milk - Fig. 12.
Initiate the steam function as explained in the paragraph above.
Once your milk is frothy enough - Fig. 13 - again press the ↓ button to stop the cycle.
To remove any milk traces from the steam nozzle, place a container under the nozzle and restart a preparation with
steam (around 10 seconds).
The steam nozzle can be removed for more intense cleaning. Wash it out with water and a little washing up liquid and a small non-abrasive brush. Rinse and dry it - Fig. 14. Before putting it back, ensure that the air inlet holes are not blocked by any milk residues. If necessary, unblock them using the needle supplied - Fig. 15.
Do not wash the steam nozzle in a dishwasher.
To interrupt the steam function, simply press any button.
If the nozzle is obstructed, unblock it with the needle provided.
Steam can be produced for a maximum of 2 minutes per cycle.
After the steam function has been used, the nozzle can be hot, and we recommend that you wait for a few moments before handling it.
Auto-cappuccino XS 6000 Set (sold separately)
This auto-cappuccino accessory enables you to make cappuccinos or lattes - Fig. 16. Connect the different parts to each other. Ensure that you do not pierce the pipe by keeping the button in the correct place.
After removing the lid, fill the jug with milk - Fig. 17 and place a cup or glass under the auto-cappuccino nozzle - Fig.
- Select the cappuccino or latte position on the special nozzle - Fig. 19.
Start the steam, as indicated in the chapter 'Making drinks with steam'. Once you have made the milk froth, place your cup under the coffee outlets and start a coffee cycle - Fig. 20.
To prevent the milk from drying on the auto-cappuccino accessory, ensure that you clean it thoroughly. You are advised to wash it immediately by running a steam cycle with the accessory jug filled with water in order to clean the inside of the nozzle. You can use the KRUPS liquid cleaner for this, available separately.
MAINTAINING YOUR APPLIANCE
Emptying the coffee grounds collector and the drip tray.
If the light flashes.
Remove, empty and clean the coffee ground collector - Fig. 21.
Replace the coffee grounds collector - Fig. 22
Remove, empty and clean the drip tray - Fig. 23
The drip tray is equipped with floats to indicate when it needs to be emptied.
Put all parts back in place.
As soon as you remove the coffee grounds collector, you will have to empty it completely to avoid any overflow.
The light will remain on if the coffee drawer ____ area is not cleaned thoroughly and if the used grounds collector is not pushed firmly into place or is incorrectly installed.
You cannot make espresso or coffee while the light is on or is flashing. The coffee grounds collector has a capacity of 9 coffees.
Rinsing of circuits
These 2 functions are available anytime, except if the appliance requests a 'CLEAN' and/or 'CALC' cycle.
Rinsing out the coffee circuit:
Place a container under the coffee nozzles. Press the 🎩 button - Fig. 6 quickly to start a coffee circuit rinsing cycle, which will automatically stop after around 40 ml.
Rinsing out the steam circuit:
Place a container under the steam nozzle and press the M button for 3 seconds to start a steam circuit rinsing cycle, which will automatically stop after around 300 ml.
Appliance cleaning program, 3 times a year (total duration: about 13 minutes)
For hygienic reasons and to preserve all best coffee flavor we recommend you to clean the coffee system when the machine asks you to, about 3 times a year.
To perform this cleaning you will need:
- 1 KRUPS cleaning tablet
- 1 container of minimum 600ml
several flows will follow one another
When to carry out this program?
When it is necessary to run a cleaning program, the appliance alerts you by flashing the CLEAN indicator light. This program can only be accessed when the appliance requests it (approximately every 300 brews of coffee or espresso). To comply with the warranty conditions, it is essential to perform the cleaning cycle when the appliance alerts you. Follow the order of operations carefully.
Use only KRUPS cleaning tablets (available on our KRUPS.com store)
How to start the automatic cleaning program?
-
Start the cleaning program by pressing the button ⚠. The CLEAN indicator becomes solid and the ⏰ indicators flash.
-
Remove, empty, clean and replace the coffee grounds collector Fig 21-22 The indicator light go off.
-
Remove, empty, clean and replace the drip tray Fig 23.
-
Fill and replace the water tank
-
Place the 600 ml container under the coffee nozzles Fig 24.
-
Open the maintenance hatch Fig 25.
-
Insert the KRUPS XS3000 cleaning tablet into the cleaning chute Fig 26.
-
Press the button to start the cleaning cycle
-
The cleaning phase (about 13 min) starts. Several water flows follow one another in several phases without any
necessary intervention. They allow the device to be rinsed and the cleaning residue to be removed.
- The cleaning cycle is finished when the light stays on and the CLEAN light goes out, empty the drip tray.
Your device is ready to be used.
Important
You do not have to run the cleaning program as soon as the appliance requests it, but you must do it reasonably soon after. If cleaning is postponed, the alert message will remain displayed as long as the operation has not been performed.
if you unplug your machine or if you turn it off during cleaning or in the event of electrical failure, the cleaning program will resume the current step at the time of the incident.
It will not be possible to postpone this operation: rinsing the water circuit is mandatory.
If there is not enough water in the water tank when you start the program, the light will come on to warn you. Add the appropriate amount of water to the container and cleaning will continue automatically.
If you unplug the appliance during cleaning, press the button, or there is an electrical power cut, the cleaning program will start again from the beginning. In this case, another cleaning tablet may be necessary. Make sure to carry out the full cleaning cycle to ensure good maintenance of your appliance. The cleaning cycle is intermittent: do not put your hands under the water outlets 'E' and 'W' while the cycle is in progress.
Only use KRUPS (XS3000) cleaning tablets. We cannot be held responsible for any damage that may result from the use of tablets from other brands.
You can obtain cleaning tablets from KRUPS Service Centres.
Scale removal program - total duration: about 20 minutes
The quantity of scale deposited depends on the hardness of the water used. The appliance will automatically warn you by the 'CALC' light coming on when you need to proceed with scale removal.
This program is only accessible when the appliance requests it.
To benefit from the guarantee conditions, it is essential to perform the appliance's scale removal cycle when informed to do so. Be sure to follow the procedure closely step by step. You can continue to use the appliance when the light is on, but you are advised to perform the program as soon as possible.
If your appliances fitted with our Claris - Aqua Filter System F068 cartridge, please remove the cartridge during the descaling operation.
Only use KRUPS scale removal products. You can obtain scale removal products from KRUPS Service Centres. We cannot be held responsible for any damage that may result from the use of tablets from other brands.

Make certain to protect your work surface during cleaning and scale removal cycles, especially if it is
Start the descaling program by pressing the 📄 button. The 'CALC' light becomes constant and the indicator lights [0] and Ⓐ flash.
Remove and clean the drip tray.
Place a container with a minimum capacity of 0.6 l under the coffee outlets as well as under the steam nozzle - Fig. 24. Empty the tank and refill it with warm water up to the line 'CALC' - Fig. 33.
Dissolve a sachet of Krups (40 g) F054 descaler in the tank - Fig. 33.
Replace the water tank. The indicator light ⏻ switches off.
Press the 📄 button after carrying out all of these operations.
The first phase (approximately 8 min) begins.
The descaling cycle will start automatically.
At the end of this phase, the sound signal beeps every 10 seconds and the indicator light (U) flashes.
Empty the used water container and put it back in place
Empty and rinse the water tank - Fig. 34.
Refill the tank with water and put it back into place. The warning light 📋 goes out.
Press the button again to start the second phase. The sound signal stops.
The second phase (about 6 min) begins.
The program continues. It rinses the appliance and removes any traces of the descaler.
At the end of this phase, the sound signal beeps every 10 seconds
Remove and empty your used water container and put it back in place.
Press the 📄 button again to start the final phase. The sound signal stops.
The final phase (approximately 6 min) begins.
The program continues. It removes the last particles of descaler.
When the descaling cycle is finished, the indicator light 'CALC' goes out.
Refill your water tank.
Your appliance is ready for the next use.

f there is not enough water in the water tank, you will be warned by the light.
Add the appropriate amount of water to the tank and scale removal will continue automatically.

If you unplug the appliance during cleaning, press the ⏻ button, or there is an electrical power cut, the cleaning program will start again from the beginning. In this case, another cleaning tablet may be necessary. Make sure to carry out the full cleaning cycle to ensure good maintenance of your appliance.
The cleaning cycle is intermittent: do not put your hands under the water outlets 'E' and 'W' while the cycle is in progress.
Long rinsing program – total duration: about 2 minutes
When it is necessary to make a long rinsing program, the appliance warns you of this by flashing the 'CLEAN' and 'CALC' lights.
Remove, fill and replace the water tank.
Place a container with a minimum capacity of 0.6 l under the coffee outlets and the steam nozzle.
Start the long rinsing program by pressing the 🔒 button. The lights 'CLEAN' and 'CALC' become constant and the indicator light ⏻ starts flashing.
When the long rinse is finished, the lights 'CLEAN' and 'CALC' go out and the indicator light ⏻ becomes constant.
Your appliance is ready for the next use
The appliance can ask you to empty the coffee ground collector.
OTHER FUNCTIONS
To switch the appliance off
You can switch off your appliance at any time. As the appliance is switching off, a double beep is emitted and all of the red lights flash, one after the other. The appliance has registered your request and will stop as soon as possible.
Installation of the filter cartridge - total duration: around 2 min
To get the best taste from your coffee and extend your appliance's service life, we advise you to use only the Claris - Aqua Filter System cartridge sold as an accessory.
Fig. 30 : Mechanism to indicate the month the cartridge was fitted and when to replace it (after 2 months at most). Installing the cartridge in the appliance. On first use, screw the filter cartridge into the bottom of the water tank - Fig. 31. Place a 0.6 l container under the steam nozzle.
Press the 🔊 button for more than 3 seconds (unless the appliance requires a 'CLEAN' and/or 'CALC' maintenance). The indicator light ⏻ flashes.
When the installation of the filter cartridge is finished, the indicator light Ⓞ becomes constant. Your appliance is ready for the next use.

The Claris cartridge needs to be replaced after about every 50 litres of water or every two months at least. If you are using the Claris – Aqua Filter System cartridge, set the water hardness to level 0.
Coffee temperature display

Appliances are pre-set in the factory to level 2.
Connect the appliance to the mains supply but do not switch it on.
Press the 🔊 and Buttons together, - Fig. 27.
The ⏻ LED flashes during the setting phase.
Twist the knob to 20 ml to set the coffee temperature - Fig. 28.
Press the 📋 button to increase or touch the 📋 button to decrease the setting - Fig. 32.
Select the coffee temperature level: 1 LED lit = temperature 1, 2 LEDs lit = temperature 2, 3 LEDs lit = temperature 3, the hottest setting.
To exit settings mode, press ⏻.
Water Hardness Setting

Appliances are pre-set in the factory to hardness level 4.
Before using the appliance for the first time or after a change to the water hardness, it is advisable to set the appliance to the correct water hardness. Contact your water supplier to find out the water hardness for your area.
| Degree of hardness | 0 Very soft | 1 soft | 2 moderately hard | 3 hard | 4 extremely hard |
| ^ f<5.4°> | 7.2°>12.6°>25.2°>37.8° | ||||
| ^ dH<3°> | 4°>7°>14° | >21° | |||
| ^ e | <3.75° | >5° | >8.75° | >17.5° | >26.25° |
Connect the appliance to the mains supply but do not switch it on.
Press the and buttons together. - Fig. 27.
The ⏻ LED flashes during the setting phase
Twist the knob to 120 ml to set the water hardness - Fig. 28
Press the 📋 button to increase or touch the 📋 button to decrease the setting - Fig. 32.
Select the level of water hardness to be used: 0 LEDs lit = very soft, 1 LED lit = soft, 2 LEDs lit = average hardness, 3 LEDs lit = hard, 4 LEDs lit = very hard - Fig. 29.
To exit settings mode, press ⏻.
Setting the electrical supply cut-off mechanism

Appliances are pre-set in the factory to 1 hour.
You can program your machine's automatic shut-off following a pre-programmed number of hours.
Connect the appliance to the mains supply but do not switch it on.
Press the 📁 and 🖱 buttons together, - Fig. 27.
The Ⓗ LED flashes during the setting p
Twist the knob to 220 ml to set the automatic cut-off duration - Fig. 28.
Press the 📋 button to increase or touch the 📋 button to decrease the setting - Fig. 32.
Select the desired hardness: 1 LED lit = 1 hour, 2 LEDs lit = 2 hours, 3 LEDs lit = 3 hours, 4 LEDs lit = 4 hours - Fig. 29. To exit settings mode, press Ⓞ.
Information on cycle number
Connect the appliance to the mains supply but do not switch it on.
Press the in and buttons together, - Fig. 27
The Ⓐ LED flashes during the setting phase.
To go to "cycle number" mode, press and hold the A button for 3 seconds; all of the red LEDs flash three times before displaying the information - Fig. 29.
Cycle number:
- Less than 3000: 1 LED lit.
- Greater than 3000: 2 LEDs lit.
- Greater than 6000: 3 LEDs lit.
To exit settings mode, press ⏻
At each of these steps you can exit settings made by pressing the ⏻ button if you have finished your settings. All of the lights are off. These settings will be saved even if there is an electrical failure. You can modify these settings at any time by repeating these steps.
TROUBLESHOOTING, CORRECTIVE ACTIONS
| PROBLEM MALFUNCTION CORRECTIVE ACTION | |
| Your appliance detects a fault. | Switch off and disconnect the appliance, remove the filter cartridge, wait for a minute and restart the appliance. |
| The appliance does not turn on when the ⏻ button is pressed. | Check your fuses and plug sockets.Check that the two power plugs are correctly pushed in the socket. |
| The coffee grinder makes a strange noise. | There is a foreign body in the grinder. Disconnect the appliance before investigating. See if you can extract the foreign body using your vacuum cleaner. |
| The steam nozzle makes a noise. | Check that the steam nozzle is correctly attached to its corresponding end piece. |
| The steam nozzle on your appliance seems partially or completely clogged. | Ensure that the opening in the end piece is not obstructed by milk residue or limescale. Unclog the holes with the needle supplied with your appliance. |
| The steam nozzle makes little or no milk froth. | For milk-based drinks, use very fresh, very cold pasteurised or UHT milk. It is also advisable to use a cold container. If the results do not improve, try changing the brand of milk. |
| No steam comes out of the nozzle. | Empty the tank and temporarily remove the filter cartridge. Fill the water tank with mineral water which is high in calcium (> 100 mg/l) and run successive steam cycles. |
| The auto-cappuccino set makes little or no froth.The auto-cappuccino set does not take in milk. | Check that the accessory is correctly attached to the appliance, remove it then replace it.Check that the flexible tube is not obstructed or pierced and that it is correctly attached to the accessory so as to make it airtight. Rinse and clean the accessory (refer to the "Auto-cappuccino accessory" chapter). |
| PROBLEM MALFUNCTION CORRECTIVE ACTION | |
| There is water underneath the appliance. | Before removing the water tank, wait for 15 seconds after the coffee has finished flowing so that the appliance finishes its cycle properly.Check that the drip tray is correctly positioned on the appliance; it should always be in place, even when the appliance is not in use.Check that the drip tray is not full.The drip tray should not be removed during a cycle.Clean the tank and its connection regularly to avoid the build up of scale, which can cause leaks. |
| After emptying the coffee grounds collector, the warning message is still displayed on the screen. | Remove the coffee grounds collector and ensure it is empty and clean. Wait at least 6 seconds before replacing, and ensure it is correctly installed. |
| The coffee dispenses too slowly. | Turn the coffee fineness dial to the right to make the grounds courser (this could also depend on the type of coffee used).Run one or several rinsing cycles.Change the Claris Aqua Filter System cartridge (see "Installing the filter"). |
| The water/steam is not dispensed normally from the steam nozzle. | At the beginning or end of making a drink, the steam nozzle may drip slightly. |
| The coffee fineness dial is difficult to turn. Only change the grinder setting when it is running. | |
| The espresso or coffee is not hot enough. | Change the coffee temperature setting. Warm the cup by rinsing it with hot water before making the drink. |
| The coffee is too lightly coloured or too weak. | Avoid using oily, caramelised or flavoured coffee. Check that the coffee bean container has coffee in it and that it is dispensing correctly.Decrease the drink volume, increase the drink strength.Turn the coffee fineness dial to the left to make the grounds finer.Make the drink in two cycles by using the 2 cups function. |
| The appliance is not producing coffee. | A problem has been detected during preparation of the drink.The appliance has restarted automatically and is ready for a new cycle. |
| Why can I not start the descaling or cleaning program?Why does my appliance not request to be descaled or cleaned? | The appliance only requests to be cleaned once it has made several types of coffee. The appliance only requests a descaling cycle once it has made a certain number of drinks using steam. |
| A power failure occurs during a cycle. | The appliance is automatically restarted when power is switched back on. |
| Coffee flows behind the coffee nozzles. | Pour cold or room-temperature water into the tank. Reduce the temperature level. |
| The appliance is working but no liquid comes out. | Check that the water tank is in the correct position and that the cord is not jammed between the appliance and the water tank. |
| Ground coffee is in the drip tray. | Yes. to stay clean the appliance clears ground coffee which has fallen out of the percolation tank. |

Danger: Only a qualified technician is authorised to carry out repairs on the power cord and the electrical system. Failure to respect this exposes you to fatal injuries due to the presence of electricity. Do not use an appliance that is visibly damaged.
Here are some recipes you can make using your Espresseria Automatic:
Cappuccino
For a cappuccino in the rules of the art, the ideal proportions are as follows: 1/3 hot milk, 1/3 coffee, 1/3 milk froth.
Caffe Latte
To make coffee with milk, also often called Latte Macchiato, the proportions are as follows: 3/5 hot milk, 1/5 coffee, 1/5 milk froth.
- For these milk-based preparations, it is best to use cold skimmed milk straight from the refrigerator (ideally between 6 and 8^ ).
- To finish off, you can sprinkle with cocoa.
Café Crème
- Prepare a conventional espresso in a large cup.
- Add a little cream to get a café crème.
Café corretto\*
Prepare a cup of espresso as usual.
Then add 1/4 or 1/2 of a liqueur glass of Cognac to taste.
- You can also use anisette, brandy, Sambuca, Kirsch or Cointreau.
- There are many other ways to give some punch to your espresso.
- Just use your imagination.
Coffee liqueur\*
Mix 3 cups of espresso, 250 g of brown sugar candy and 1/2 litre of Cognac or Kirsch in an empty 0.75 litre bottle.
Leave the mixture to macerate for at least 2 weeks.
- You will obtain a delicious liqueur. A real treat for coffee lovers
Italian style iced coffee
4 scoops of vanilla ice-cream, 2 cups of espresso with sugar to taste, 1/8 l milk, fresh cream, grated chocolate.
- Mix the cold espresso with the milk
- Serve the scoops of ice-cream into the glasses, pour the coffee onto them and decorate with fresh cream and grated
chocolate.
Add a small glass of rum to a cup of sweetened espresso.
Decorate with a good layer of fresh cream and serve.
Flambéed espresso\*
2 cups of espresso, 2 small glasses of Cognac, 2 teaspoons of brown sugar, fresh cream.
- Pour the Cognac into heat-resistant glasses, heat and light.
- Add the sugar, mix, pour in the coffee and decorate with fresh cream.
Espresso Parfait\*
2 cups of espresso, 6 egg yolks, 200g sugar, 1/8 litre of sweetened fresh cream, 1 small glass of orange liqueur.
- Beat the egg yolks with the sugar until it forms a thick, frothy mass.
- Add the cold espresso and the orange liqueur.
- Then mix in the whipped fresh cream.
- Pour the mix into saucer champagne glasses or ordinary.
- Put the champagne glasses in the freezer.
(*: Remember, over-indulgence in alcohol is bad for the health.)
ESPRESSO EN KOFFIE MAKEN

DE MACHINE IS UITSLUITEND GESCHIKT OM KOFFIE TE MAKEN MET KOFFIEBONEN.
Coloque as tacas no congelador.
PRZYRZADZANIE ESPRESSO I KAWY

URZADZENIE ZOSTAŁO PRZEZNACZONE WYŁACZNIE DO STOSOWANIA KAWY ZIARNISTEJ.