USER MANUAL VL12 Prime Denon DJ
User Guide (English)
Introduction
Box Contents
VL12 Prime 45 RPM Adapter Power Cable
Headshell
Counterweight
&
Scale Ring User Guide
Felt Slipmat
Additional Counterweight Safety & Warranty Manual
Target Light RCA Stereo Cable
Support
For the latest information about this product (documentation, technical specifications, system requirements, compatibility information, etc.) and product registration, visit denondj.com.
For additional product support, visit denondj.com/support.
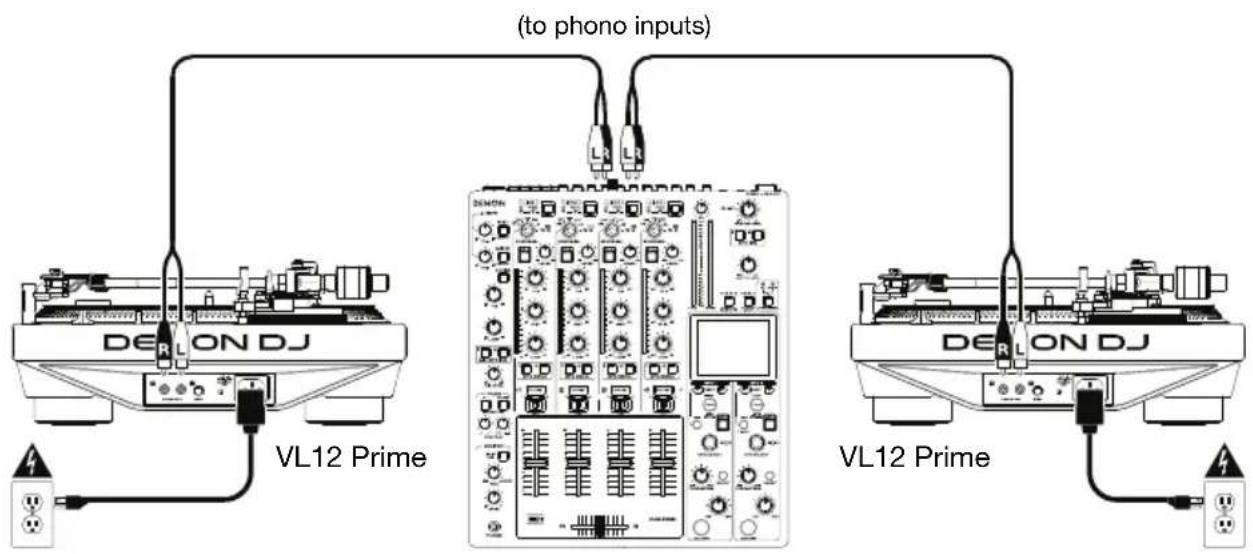
Connection Diagram
Items not listed under the Introduction > Box Contents are sold separately.
text_image
(to phono inputs)
DELON DJ
VL12 Prime
DELON DJ
VL12 Prime
Power outlet Power outlet
DJ mixer
Features
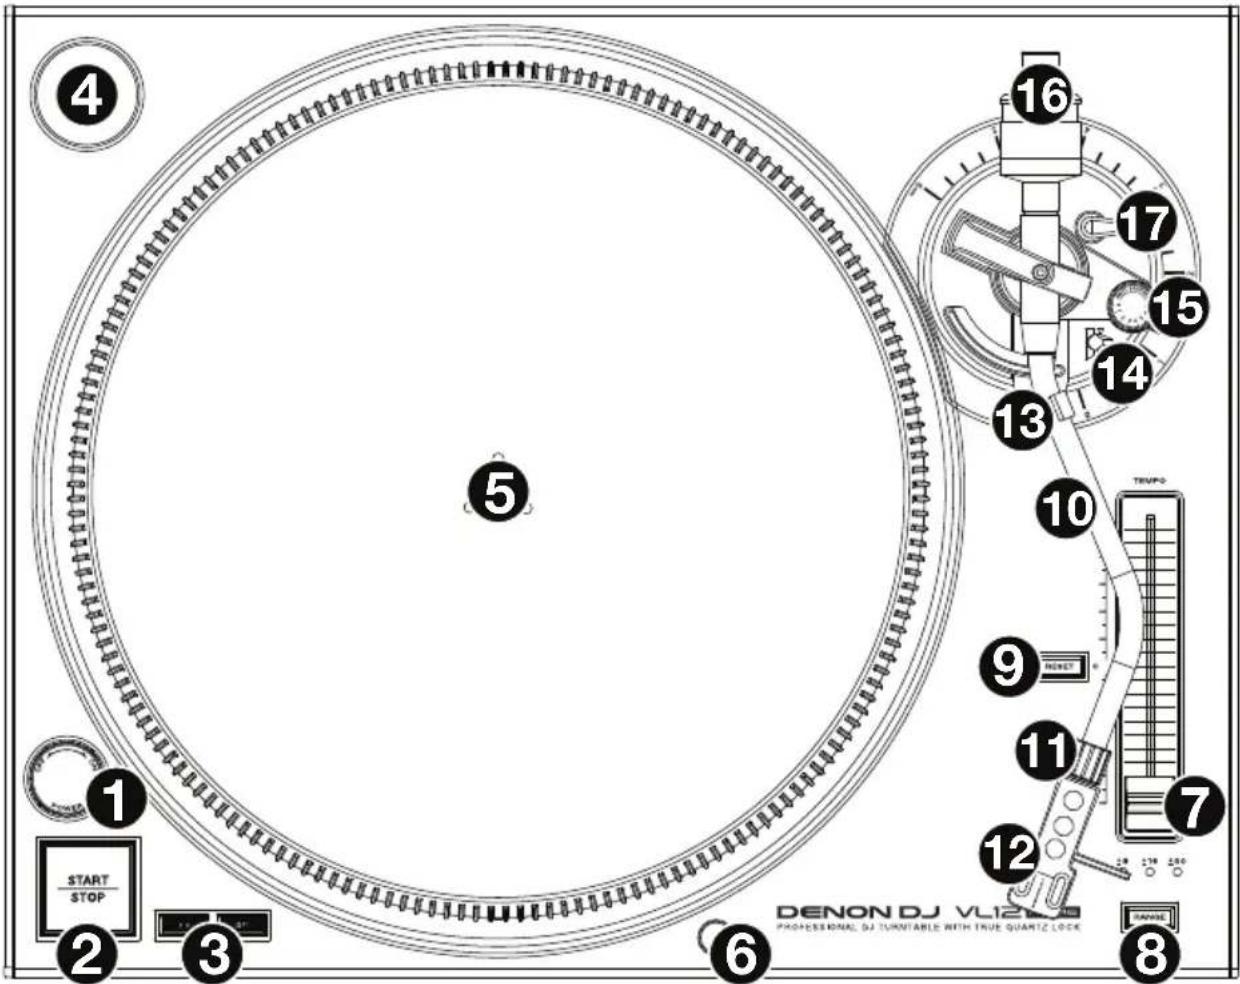
Top Panel
text_image
4
5
16
17
15
14
13
10
9
11
7
12
8
DENON DJ V121
PROFESSIONAL DJ TURNITABLE WITH TRUE QUANTZ LOCK
START
STOP
STOP
STOP
STOP
- Power Switch & Strobe Light: Turn this dial at the top of the strobe light to power VL12 Prime on or off.
The strobe light illuminates the edge of the platter, which indicates whether or not the phase of the platter's rotation is constant. As the platter rotates, look at the vertical lines on its edge under the light's strobing. If the phase is constant, the lines will appear to be still. If the rotation is out of phase, the lines will appear to move or "drift".
-
Start/Stop: Press this button to start and stop the platter's motor. If the platter appears not to be functioning, make sure it is properly secured (see Setup > Platter).
-
33 & 45 RPM Buttons: Press one of these buttons to set the rotation speed (RPM) of the platter. The lit button indicates the current selection.
-
45 RPM Adapter Holder: Use this spindle to hold the 45 RPM adapter when not using it.
-
Platter: Place the platter onto the motor before using it. See Setup > Platter for detailed information on securing the platter.
-
Target Light: The target light (included) illuminates the grooves on your record so you can visually track the stylus in dark environments. To turn it on, secure it to this connector. To turn it off, remove it from the connector.
Note: To prevent damage, we recommend removing the target light before packing or transporting VL12 Prime.
- Pitch Fader: Move this fader to increase or decrease speed of the platter (and therefore the pitch of the track). In the center position, the pitch is at 0%. Use the Pitch Range button to set the full range of the pitch fader.
- Pitch Range: Press this button to cycle through the available ranges of the pitch fader: +8%, +16%, and +50%. The lights above the button indicate the current selection.
- Pitch Reset: Press this button to return the speed of the platter to 0% pitch adjustment immediately, regardless of the position of the pitch fader.
- Tonearm: With the tonearm lever in the “raised” position, gently move the tonearm so it rests over your record on the platter. To play your record, move the tonearm lever to the “lowered” position, which will lower the tonearm onto your record.
- Tonearm Lock Nut: This nut secures the headshell and cartridge assembly to the tonearm. Turn the cartridge clockwise to loosen it or counterclockwise to tighten it. Do not over-tighten it.
- Headshell: Mount your cartridge (not included) on this headshell, and then attach the headshell to the tonearm lock nut. (Remember to remove the plastic cover from your cartridge before using it.) The headshell is user-replaceable and compatible with many standard cartridges.
Note: To prevent damage, we recommend removing the headshell and cartridge assembly before packing or transporting VL12 Prime.
- Tonearm Clip: While not using the tonearm, place it in this tonearm clip. The “outer” notch of the tonearm clip is for temporarily resting the tonearm (you can still move, raise, or lower it), while the “inner” notch is for securing it.
Note: To prevent damage, we recommend securing the tonearm in the “inner” notch of the tonearm clip before packing or transporting VL12 Prime.
- Tonearm Lever: Move this lever between its two positions to raise or lower the tonearm. Raise the tonearm before moving it toward or away from the record, and lower it once it is in place.
- Anti-Skate Dial: Turn this dial to compensate for inward tracking forces that occur with certain cartridges as the stylus nears the center of the record. In most cases, set this to 0. If you experience excessive skipping during back-cueing or scratching while nearing the center of the record, increase this dial's setting in small increments and test its performance.
- Counterweight & Scale Ring: The counterweight balances the headshell and cartridge assembly so the tonearm can apply the proper amount of stylus pressure to the record. See Setup > Tonearm to learn how to properly balance the tonearm.
Note: If your headshell is heavier than expected, there is an additional counterweight included, which you use with this counterweight to balance your tonearm properly.
- Height Adjustment & Lock Lever: Turn this large dial to set the height of the tonearm. Move the small Lock lever (above the Anti-Skate Dial) counterclockwise or clockwise to unlock or lock the height adjustment, respectively. See Setup > Tonearm to learn how to set the appropriate height.
Side Panels
Left Side
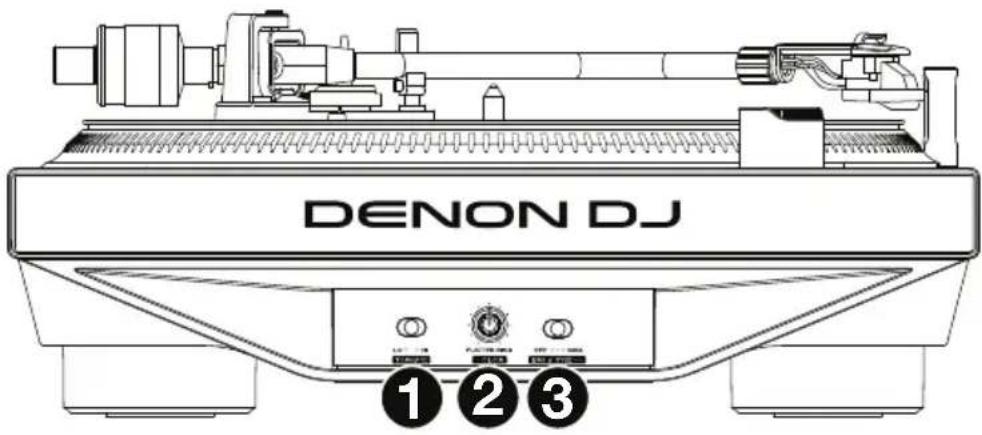
text_image
DENON DJ
1 2 3
- Torque: Use this switch to set the torque of the platter. At the Hi setting, the platter will have a heavier, stronger feel. At the Lo setting, the platter will feel lighter and more graceful.
- Platter Color: Turn this knob to set the color of the light around the platter.
- Platter Brightness: Use this switch to set the brightness of the light around the platter.
Right Side
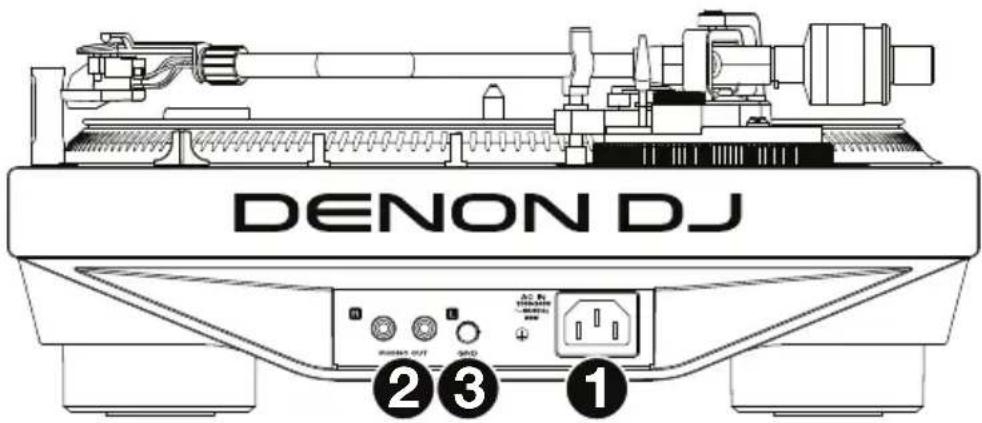
text_image
DENON DJ
2 3 1
- Power Input: Use the included power adapter to connect this input to a power outlet, and then power on the unit.
- Phono Outs (RCA): Connect these outputs to the phono inputs of your mixer.
- Grounding Terminal: If you hear a low "hum" or "buzz" in your record's audio signal, this could mean that VL12 Prime is not grounded. In that case, use a grounding wire to connect this terminal to the grounding terminal of your mixer.
Setup
Platter
Place the platter onto the motor by aligning the pins in the bottom of the platter with the holes in the motor. Press it down firmly. Check to make sure that it rotates uniformly and does not wobble excessively, and then place the slipmat onto the platter.
Important:
- Incorrect platter setup can lead to poor turntable performance, platter instability or permanent motor damage.
- Make sure that the felt slipmat is always placed on top of the platter while using the turntable. Failure to use the slipmat may cause damage to your media as well as damage to the turntable.

natural_image
Technical line drawing of a mechanical component with concentric ovals and a central base (no text or symbols)
Tonearm
text_image
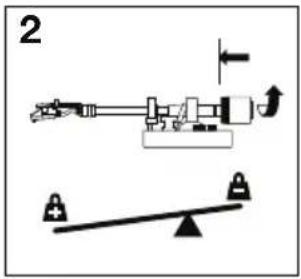
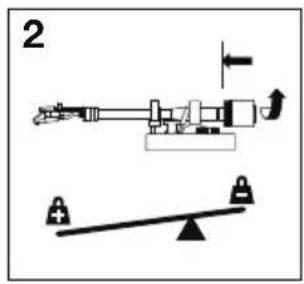
2
text_image
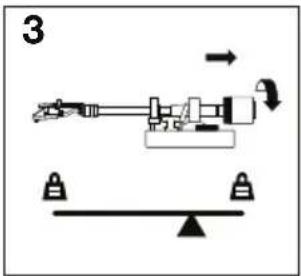
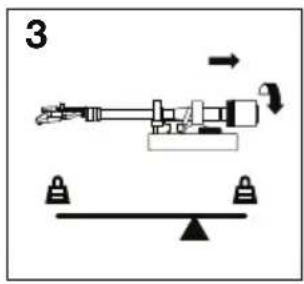
3
text_image
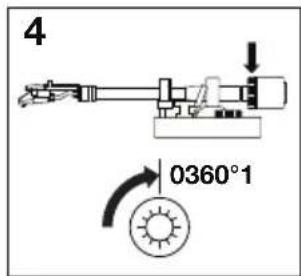
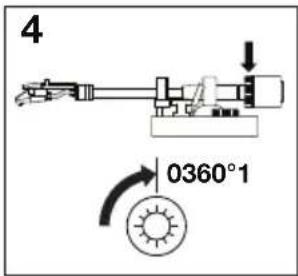
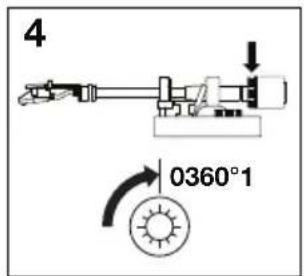
4
0360°1
text_image
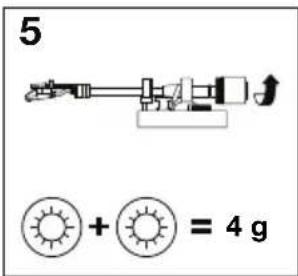
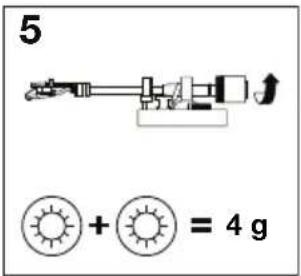
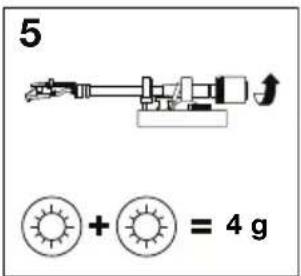
5
+ = 4 g
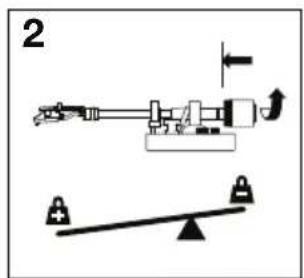
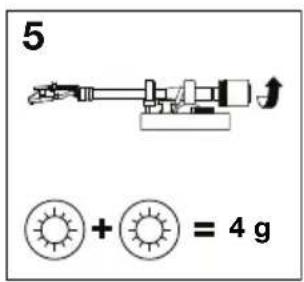
Important: Refer to the documentation for your cartridge to determine the proper stylus pressure/weight (in grams) and tonearm height (in millimeters).
- Make sure the cartridge is on the tonearm. Turn it clockwise to loosen it or counterclockwise to tighten it. Do not over-tighten it! Remove the plastic cartridge cover (needle cover) before operating the turntable.
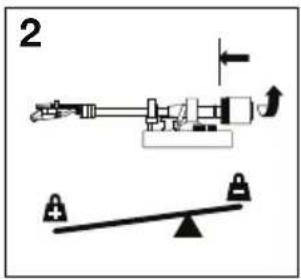
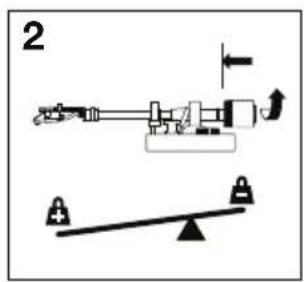
- Attach the counterweight and scale ring to the tonearm, and then rotate the counterweight counterclockwise (while you are facing the scale ring) until it is in the complete forward position.
Note: This is also the maximum amount of pressure that can be applied to the cartridge.
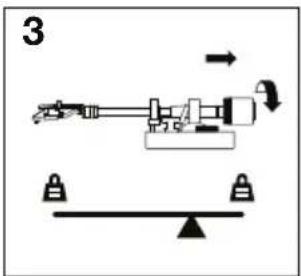
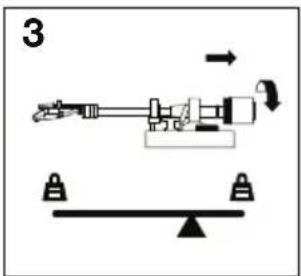
- Now there should be a feeling of weight and resistance when the headshell is raised and lowered. Begin rotating the counterweight clockwise (while you are facing the scale ring) until the weight and resistance feeling is gone. If done properly, the tonearm will pivot with very little resistance back and forth indicating that there is exactly 0 grams of stylus pressure.
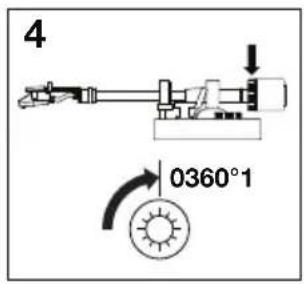
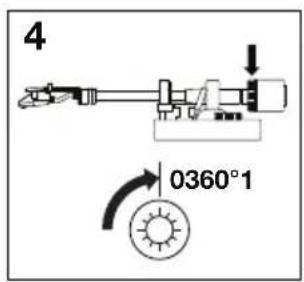
- With the counterweight in its new position further away from tonearm pivot point, grasp the scale ring only and rotate it until 0 is in the vertical position.
- Finally, rotate the counterweight and scale ring counterclockwise until you reach the desired weight. A complete revolution of the scale ring corresponds to 3 g, so if the scale rotates 360^ beyond the 0 point, add 3 to the new scale ring reading.
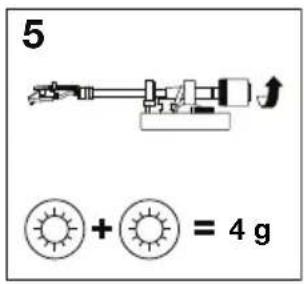
If you cannot achieve the desired weight during this step, remove the counterweight and scale ring from the tonearm entirely, attach the additional counterweight (included) to the end of the tonearm, and then start again from Step 2 above. This is not a common occurrence, though there may be some DJ headshells and cartridges that are heavier than normal.
- Push the small Lock lever (above the Anti-Skate Dial) counterclockwise to unlock the height adjustment dial. Place the stylus on your record, and then move the tonearm lever to raise or lower the tonearm so it is parallel with the record. Push the Lock lever clockwise to lock the height adjustment dial.
natural_image
Technical line drawing of a mechanical component with two circular parts and a base, showing alignment lines (no text or symbols)
Brazo de lectura
text_image
2
text_image
3
text_image
4
0360°1
text_image
5
+ = 4 g
natural_image
Technical line drawing of a mechanical component with two concentric ovals and a base, showing alignment lines (no text or symbols)
Bras de lecture
text_image
2
text_image
3
text_image
4
0360°1
text_image
5
+ = 4 g
natural_image
Technical line drawing of a mechanical component with two circular parts and dashed alignment lines (no text or symbols)
Braccio
text_image
2
text_image
3
text_image
4
0360°1
text_image
5
+ = 4 g
natural_image
Technical line drawing of a mechanical component with two concentric ovals and a small protrusion at the base (no text or symbols)
Tonarm
text_image
2

text_image
3
text_image
4
0360°1
text_image
5
+ = 4 g
Technical Specifications
| Motor Drive | | Quartz direct-drive |
| Torque | High: 5.0 kgf/cm (starting/instant); 3.4 kgf/cm (stable)Low: 3.2 kgf/cm (starting/instant); 1.4 kgf/cm (stable) |
| Starting | < 0.4 second Time |
| Braking | Electronic System |
| Platter | Material | Aluminum die-cast |
| Diameter | 13.1" / 332 mm |
| Weight | 4.9 lbs. / 2.2 g |
| Tonearm | Effective | 9.4 Length mm |
| Overhang | 1.0" / 25 mm |
| Offset | 20.5° Angle |
| Speeds | 331⁄3, 45 RPM< 0.05% wow & flutter (JIS-weighted) |
| Output | Phono-level via stereo RCA cable |
| Pitch Range | ±8%, ±16%, ±50% |
| Connections | (2) RCA outputs (1 stereo pair)(1) IEC power input |
| Power | Connection | IEC |
| Input | 100-240 V/Hz |
| Consumption | 65 W |
| Dimensions(width x depth x height) | 17.8" x 14.0" x 5.9"45.1 x 35.5 x 15.0 cm |
| Weight | 27.4 lbs.12.4 kg |
Specifications are subject to change without notice.
Trademarks & Licenses
Denon is a trademark of D&M Holdings Inc., registered in the U.S. and other countries. Denon DJ products are produced by inMusic Brands, Inc., Cumberland, RI 02864, USA. All other product or company names are trademarks or registered trademarks of their respective owners.
DENONDJ.COM