SPECTRATUBESFC - Lamp AFX - Free user manual and instructions
Find the device manual for free SPECTRATUBESFC AFX in PDF.

| Product type | RGBW LED tube lamp |
| Brand | AFX |
| Model | SPECTRATUBESFC |
| Power supply | 100-240V~50-60Hz, 40W |
| Battery | Lithium-ion 12V 8000mAh |
| Charger | Output 12.6V 4A, integrated charger for 10 tubes |
| Light sources | 128 RGBW 0.25W LEDs, 16 pixel zones |
| DMX channels | 9/21/69 channels |
| Control modes | DMX512, wireless DMX, master/slave, music, auto, IR remote control |
| Protection rating | IP65 |
| DMX connectors | XLR 3-pin (input/output) |
| Remote control | Infrared, CR2025 batteries, range 6m |
| Minimum lighting distance | 0.5 m |
| Maximum ambient temperature | 40°C |
| Electrical class | I (requires grounded outlet) |
| Mounting | Tripod and M8 eyelets included |
| Light source replacement | Non-replaceable, device to be replaced at end of life |
| Battery warranty | Not covered by warranty |
| Approximate weight (per tube) | 1.5 kg |
Frequently Asked Questions - SPECTRATUBESFC AFX
User questions about SPECTRATUBESFC AFX
0 question about this device. Answer the ones you know or ask your own.
Ask a new question about this device
Download the instructions for your Lamp in PDF format for free! Find your manual SPECTRATUBESFC - AFX and take your electronic device back in hand. On this page are published all the documents necessary for the use of your device. SPECTRATUBESFC by AFX.
USER MANUAL SPECTRATUBESFC AFX
natural_image
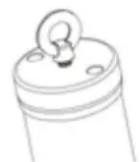
Six vertical metal stand holders and one cylindrical device with a display (no text or symbols visible)GB - User Manual - p. 4
| CH | Function | Value |
| 1 | Total dimmer | Dimmer 0%-100% |
| 2 | Strobe | 000-008: no strobe |
| 009-255: strobe from slow to fast | ||
| 3 | R1 | Red 1 dimming 0 to 100% |
| 4 | G1 | Green 1 dimming 0 to 100% |
| 5 | B1 | Blue 1 dimming 0 to 100% |
| 6 | W1 | White 1 dimming 0 to 100% |
| 7 | ... | ... |
| 63 | R16 | Red 16 dimming 0 to 100% |
| 64 | G16 | Green 16 dimming 0 to 100% |
| 65 | B16 | Blue 16 dimming 0 to 100% |
| 66 | W16 | White 16 dimming 0 to 100% |
| 67 | CTO | 1100K-6500K |
| 68 | Color Chase | Effect 1-20 |
| 69 | Chase speed | Chose effect from slow to fast |
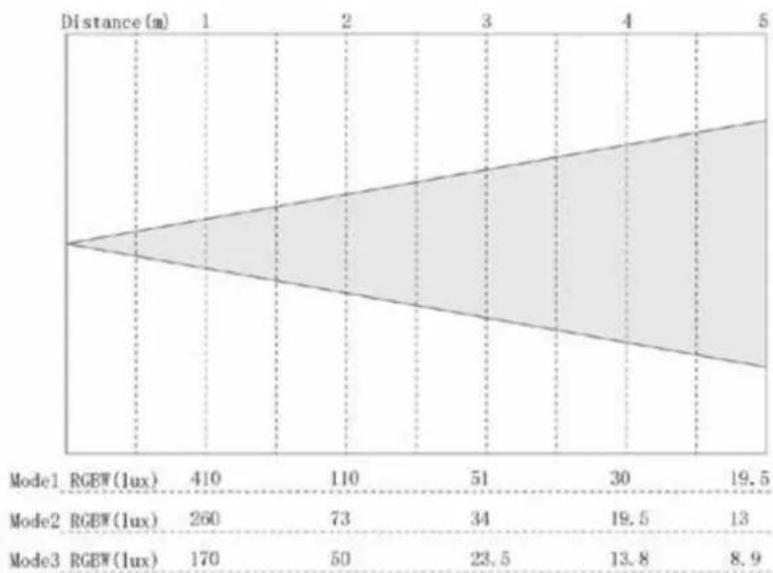
ILLUMINATION DIAGRAM
area
| Model | RGBW(1ux) | Distance(m) | | :--- | :--- | :--- | | Mode1 | 410 | 1 | | Mode2 | 260 | 4 | | Mode3 | 170 | 1 | | Mode2 | 73 | 1 | | Mode3 | 50 | 1 | | Mode2 | 34 | 2 | | Mode3 | 23.5 | 3 | | Mode2 | 19.5 | 4 | | Mode3 | 13 | 5 | | Mode2 | 19.5 | 5 | | Mode3 | 8.9 | 5 |WHITE PARAMETERS
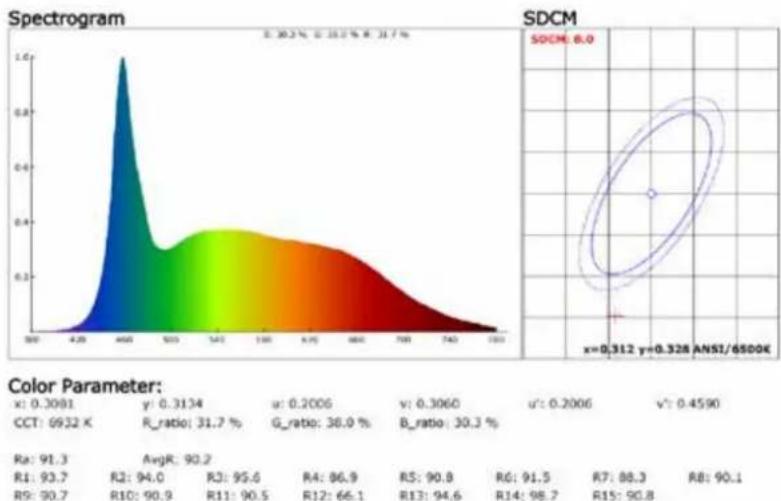
| x: 0.3091 | y: 0.3134 | u: 0.2006 | v: 0.3060 | u': 0.2006 | v': 0.4590 |
| CCT: 6932 X | R_ratio: 31.7 % | G_ratio: 38.0 % | B_ratio: 30.3 % | ||
| Ra: 91.3 | AvgR: 90.2 | ||||
| R1: 93.7 | R2: 94.0 | R3: 95.6 | R4: 96.9 | R5: 90.8 | R6: 91.5 |
| R5: 90.7 | R10: 90.9 | R11: 90.5 | R12: 66.1 | R13: 94.6 | R14: 98.7 |
RGBW PARAMETERS
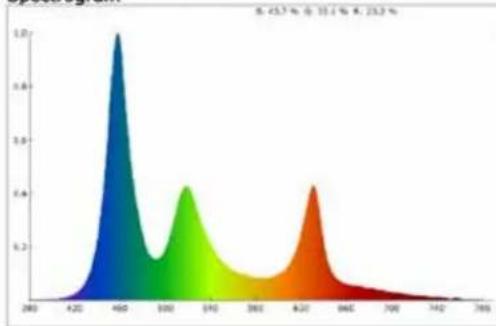
Spectrogram
area
| X Value | Y Value | | ------- | ------- | | 450 | 1.0 | | 500 | 0.6 | | 540 | 0.4 | | 620 | 0.6 |SDCM
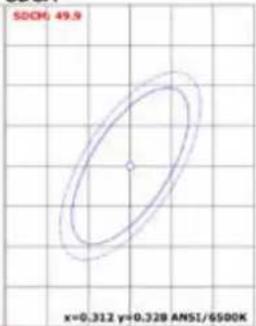
Color Parameter:
| x: 0.2463 | y: 0.2439 | u: 0.1813 | v: 0.2693 | u'': 0.1813 | v': 0.4040 |
| CCT: 44049 X | R_ratio: 23.2 % | G_ratio: 33.1 % | B_ratio: 43.7 % | ||
| Ra: 72.4 | AvgR: 58.1 | ||||
| R1: 61.0 | R2: 80.5 | R3: 87.7 | R4: 71.7 | R5: 74.4 | R6: 81.6 |
| R9: -89.7 | R10: 57.3 | R11: 60.4 | R12: 64.0 | R13: 63.7 | R14: 89.0 |
USER MANUAL
EXPLANATION OF SYMBOLS ON THE SILKSCREEN

The triangle containing a lightning symbol is used to indicate whenever your health is at risk (due to electrocution, for example).

An exclamation mark in a triangle indicates particular risks in handling or operating the appliance.

Class I protection: Connect only to an earthed mains outlet (flight case)

The unit complies with UK standards

Minimum distance between the appliance and other objects

Do not stare into the light beam

CAUTION DO NOT OPEN THE HOUSING SHOCK HAZARD
Please read this manual carefully before operating this product.
SAFETY RECOMMENDATIONS
- Please read this manual carefully as it contains important information on the installation, use and maintenance of this product.
- Please keep this manual for future reference. If you sell the unit to another user, ensure that they also receive this manual.
- Always ensure that you are connecting to the correct voltage and that the voltage to which you are connecting is not higher than that indicated on the bottom of the unit.
- This product is a Class I product and must only be connected to an earthed wall socket.
- To reduce the risk of fire or electric shock, do not expose the fixture to rain or moisture. Ensure that there are no flammable materials near the unit during operation.
- The unit must be installed in a location with adequate ventilation and at least 20 inches (50 cm) from adjacent surfaces. Ensure that ventilation slots are not blocked.
- The minimum distance from the part of the luminaire or lamp to the illuminated object is 0.5m.
- The maximum ambient temperature (Ta) is 40^ C. Don't operate the fixture at higher temperatures.
- The surface temperature of the fixture can reach 60^ C. DO NOT TOUCH the enclosure with bare hands during operation. Turn off the power and allow the fixture to cool for approximately 15 minutes before replacing or servicing.
- Do not operate the fixture continuously for more than 10 hours.
- In the event of a serious operating problem, stop using the unit immediately. Never attempt to repair the unit yourself. Repairs performed by unqualified personnel may result in damage or malfunction. Contact your nearest authorised service centre. Always use the same type of replacement parts.
- Ensure that the power cord is never pinched or damaged.
- Never disconnect the power cord by pulling or tugging on the cord.
- Do not look directly at the light source when it is on, as this may cause epileptic shock in susceptible persons (especially epileptics).
- The light source of this fixture is not replaceable. When the light source reaches the end of its life, the entire fixture must be replaced. This product is not intended for domestic use.
- If the external flexible cable or cord of this fixture is damaged, it must only be replaced by the manufacturer or its service agent or a similarly qualified person in order to avoid hazards.
- The lenses, housing or UV filter must be replaced if they are visibly damaged.
DISCONNECT DEVICE
Where the MAINS plug or an appliance coupler is used as the disconnect device, the disconnect device shall remain readily operable.
IMPORTANT NOTE ON LITHIUM-ION BATTERIES
- PRIOR to using the unit for the first time, please charge fully the battery without any interruption.
- Charge the battery regularly after each use. Don't wait until it is discharged!
- DON'T allow the battery to discharge completely, otherwise it will lose 20% of its capacity or even be totally damaged! If the voltage becomes too low, the internal circuits are not powered anymore, and it will become impossible to recharge the battery!
- If you don't use the unit for a longer period, it is recommended to charge it at 40% of its capacity and check/charge it once per month.
The lifetime of the battery depends on the observance of these recommendations.
** BATTERIES ARE NOT COVERED BY THE WARRANTY **
We cannot be held responsible for damaged batteries further to the non-observance of these basic rules.
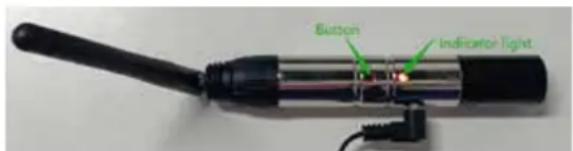
CHARGING THE BATTERIES
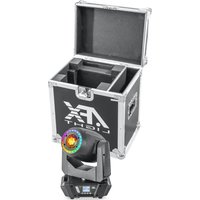
The built-in charger can charge 10 tubes at the same time.
You can also charge every tube individually by plugging the supplied mains adaptor into the charger socket on the tube and the other end into an appropriate wall outlet.
natural_image
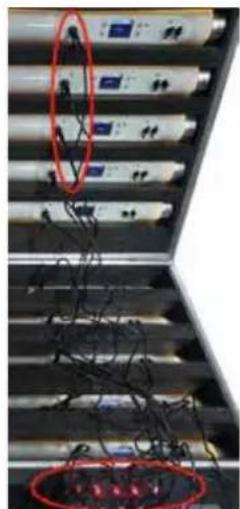
Close-up of server racks with red oval highlights highlighting specific components (no readable text or symbols)OPERATION
Control panel


natural_image
Completely black image with no visible content or text.

| Button When at top Navigation | When inside Main Menu Other Functions | ||
| M | Enter Main Menu Back | to previous Menu Power on by holding button for 3 seconds | |
| E Confirm Confirm | |||
| ▲ | Choose Choose Power | off by holding UP and | Down buttons same time about 3 seconds |
| ▼ Choose Choose | |||
| Password lock: press ▲▼ ▲ M open the lock | |||
Password lock: press ▲▼▲ M open the lock
MENU MAP
| Addr A001-A512 DMX Address selection | |
| Mode DMX 9ch/21ch/69ch | |
| Auto Pro00~Pro20/ Sp00~Sp99 | |
| Sound Pro00~Pro20 / Se00~Se99 | |
| Static Dimmer :000-255 | |
| Blue:000~255 | ||
| White:000~255 | ||
| Fade: 000~255 | ||
| Jump: 000~255 | ||
| Slave | ||
| Setting W-Dmx Link RDX1--Sweden Wireless DMX | ||
| Link RDX2--Guangzhou Wireless DMX | ||
| Unlink RDX--DMX OFF | ||
| Group 1ch / 2ch / 3ch | / 4ch / 5ch / 6ch / 7ch | |
| Display on / off | ||
| Display Rev on / off | ||
| Limiter M1/M2/M3 | ||
| Key Lock on / off | ||
| Frequency 3K Hz / 22K Hz | ||
| DMX Fail Blackout / Sound / Auto / Hold | ||
| System Info | Firmware V1.3 | |
| Time Info (XX)H | ||
CONTROL MODES
The light can be controlled in several ways:
- Use infrared remote control, point it at individual lights and press the desired effect. Note that the IR sensor is next to the display.
- The light can be controlled by DMX512.
- The light can also be controlled by wireless DMX, the built-in receiver Compatible with the world's major wireless communication protocols. Whether you use Sweden or Guangzhou wireless transceiver, we can be fully compatible with it. (Note: the transceiver is NOT included)
REMOTE CONTROL
- SPEED adjustment: Press or to set the speed in programme mode
- ON/OFF of the remote control mode.
- COLOUR BUTTONS
- EFFECT BUTTONS
The light can be controlled by the infrared remote control:
Firstly choose Auto, Sound or Static mode of the tube, and exit the interface.
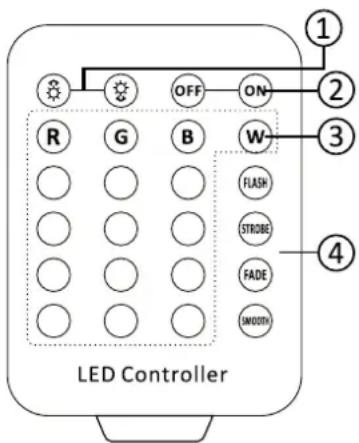
- Press ON button on the remote control, the fixture automatically exits the current mode and enters infrared remote control mode.
- Press any Static color button to select the corresponding color on
the remote panel. After the color selection, press the STROBE button and then press the Speed button to adjust the strobe speed.
- 3-Press FLASH button to switch into Auto mode. Press the FLASH button repeatedly to browse through the different Auto modes. In addition, press the Speed buttons to select different automatic speeds.
- 4-Pressing STROBE alone will not work and needs to be used with Static color.
- 5-Press FADE will appear color fade. if press speed of effect key can adjust the speed of close fade.
- 6-Press SMOOTH to select Sound control mode. Press SMOOTH repeatedly to switch among the different sound modes. Press the SPEED button to change the speed of the effect.
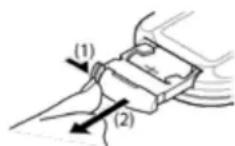
INSTALLING THE BATTERIES IN THE REMOTE CONTROL
- Place the remote face down on a flat surface.
- Push the compartment cover into the direction of the arrow.
- Slide the battery compartment open.
- Remove the old battery and install the new one (CR2025) with the plus (+) symbol facing up.
- Gently slide the battery compartment closed. It locks automatically.
RECOMMENDATIONS FOR BATTERIES

This symbol indicates that used batteries should not be disposed of with household waste but deposed correctly in accordance with your local regulations..
Batteries shall not be exposed to excessive heat such as sunshine, fire or the like.
When the internal batteries are not to be used, remove them to avoid damage caused by battery leakage or corrosion.
ATTENTION: Danger of explosion if battery is incorrectly placed. Only replace by the same or equivalent type.
WARNING : Do not swallow the battery. Danger of chemical burns. Keep new and old batteries out of the reach of children.
If the battery compartment doesn't close properly, stop using the product and keep it out of the reach of children.
If you are in doubt whether the batteries have been swallowed or introduced into any other part of the body, contact immediately a doctor.
CONTROLLED BY WIRED DMX
The fixture itself has 2-3.5MM audio and video sockets, through specialized DMX Cable can be connect with DMX console. It must be set to DMX mode and Menu (W-DMX--Unlink RDX)
CONTROLLED BY WIRELESS DMX (transceiver not included. Available as an option: order WIDMX-T (code: 15-1849))
Two modes: Guangzhou and Sweden
Guangzhou Wireless DMX
The operation method of fixture using Guangzhou wireless DMX as follows:
- Firstly, set the fixture to DMX Mode
-
Secondly, set Menu (W-DMX) to Link RDX2
-
Thirdly, on the Menu (GROUP) set to any of groups 1 to 7. The colors are red, green, yellow, blue, purple, cyan, and white.
The indicator light on the transmitter will show the same colour as selected above.
Sweden Wireless DMX
The operation method of fixture using Sweden wireless dmx as follows:
- Firstly, set the fixture to DMX Mode.
- Secondly, set Menu (W-DMX) to Link RDX1.
- Thirdly, press wireless transmitter key to pair it with the fixtures.
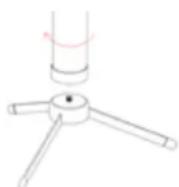
MOUNTING ACCESSORIES
Small tripod
For a quick vertical setup, the tripod can be screwed onto the tube via one of its M8 threads. It can be folded for convenient transportation.
Rings
The ring can be screwed into the M8 thread on the battery tube.
SPECIFICATIONS
Power input : 100-240V\~50-60Hz
Power : 40W
LED: 128 x 0.25W RGBW 4in1,16 pixel zone control
3 Channel mode : 9/21/69CH
Control mode: Master-slave, sound, auto, DMX 512, wireless, infrared remote
Power connector: ...... DC 12.6-12.8V charging port
Battery ....Lithium Ion Battery capacity: 12V 8000mAh
Charger.... output voltage: 12.6V 4A
DMX in/out: 3-pin XLR
IP rating: IP65
Dimensions: 1038 x ∅55mm
Net weight of a tube: 2.2kg

IMPORTANT NOTE: Electric products must not be put into household waste. Please bring them to a recycling centre. Ask your local authorities or your dealer about the way to proceed.
MANUEL D'UTILISATION
EXPLICATION DES SYMBOLES SUR L'APPAREIL

DISPOSITIF DE COUPURE
natural_image
Completely black image with no visible content, text, or symbols.


natural_image
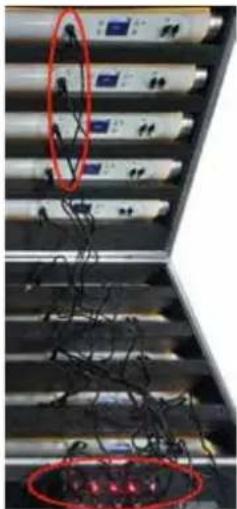
Close-up of electronic equipment racks with red circular annotations highlighting specific components (no readable text or symbols)DMX sans fil Sweden
Dimensions: 1038 x ∅55mm
Poids net du tube: 2.2kg

natural_image
Completely black image with no visible content, text, or symbols.

natural_image
Close-up of electronic equipment racks with wires and connectors, no visible text or symbolsnatural_image
Completely black image with no visible content, text, or symbols.

natural_image
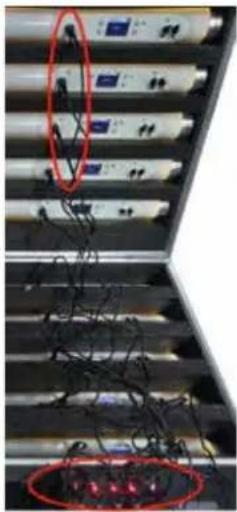
Close-up of electronic equipment racks with red circular annotations highlighting specific components (no readable text or symbols)natural_image
Close-up of electronic equipment racks with red-labeled connectors and wires, no visible text or symbols
View the product on our website and download the manual in other languages
Assembled in PRC
Designed by LOTRONIC S.A.
Rue F. Englert 17 • Bt 2
B - 1480 Tubize
CE
UK CA
[Non-Text]