
Care For You First YR2020 - Iron ROWENTA - Free user manual and instructions
Find the device manual for free Care For You First YR2020 ROWENTA in PDF.
| Product type | Garment steamer (steaming cabinet) |
| Brand | Rowenta |
| Model | Care For You First YR2020 |
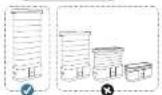
| Dimensions (L x W x H) | Approximately 40 x 40 x 150 cm (unfolded) |
| Weight | Approximately 12 kg |
| Power supply | 220-240 V ~ 50/60 Hz |
| Power | 1800 W |
| Water tank capacity | 1.5 L removable |
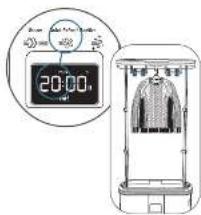
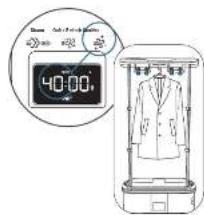
| Steaming programs | 5 programs: Steam 20 min, Steam 40 min, Steam Eco 30 min, Refresh 20 min, Sanitize 40 min |
| Main features | Infrared remote control, integrated straighteners, clips, hangers, curtain, safety locks, automatic shut-off |
| Garment capacity | Up to 3 garments simultaneously |
| Noise level | Approximately 45 dB(A) |
| Maintenance and cleaning | Clean the curtain with a damp cloth; do not use abrasive products; do not scratch the infrared reception area |
| Safety | Automatic shut-off after a few minutes of inactivity; locks for the poles; do not use in a bathroom |
| Spare parts and repairability | Straighteners, hangers, clips, remote control, tank available; repairability index not provided |
| Warranty | 2 years (according to applicable legislation) |
| General information | Product designed to steam, refresh and sanitize garments; compatible with most textiles; do not use on leather, fur or suede |
Frequently Asked Questions - Care For You First YR2020 ROWENTA
User questions about Care For You First YR2020 ROWENTA
0 question about this device. Answer the ones you know or ask your own.
Ask a new question about this device
Download the instructions for your Iron in PDF format for free! Find your manual Care For You First YR2020 - ROWENTA and take your electronic device back in hand. On this page are published all the documents necessary for the use of your device. Care For You First YR2020 by ROWENTA.
USER MANUAL Care For You First YR2020 ROWENTA
natural_image
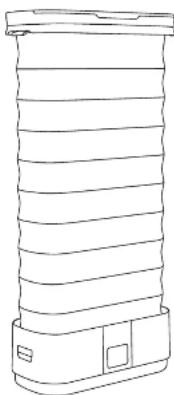
Technical line drawing of three different household furniture or storage units, shown from top, front, and side views (no text or symbols)www.rowenta.comYR202
CARE
FOR YOU FIRST

Scan me
for a video
about OR YOU
CARE FOR YOU FIRST
FRENCH 4
ENGLISH 16
DUTCH 40
ITALIAN 52
PORTUGUESE 64
SPANISH 76
GREEK 88
natural_image
Line drawing of a cylindrical container with horizontal ridges and a side panel (no text or symbols)FR
1. PRÉSENTATION DU PRODUIT
MANIPULATION DU PRODUIT
1 Tcit
9 Pells strawberries x8
MODULE D'INTERACTION
LES CONSIGNES DE SÉCURITÉ DOIVENT ÊTRE LUES AVANT D'UTILISER L'APPAREIL.
-5
2. INSTALLATION DU PRODUIT
3. ASSEMBLER LE PRODUIT
1. Suisse de France, Canada, 2017, 456-639-8000
- In particular, in terms of a base salary rate, the actual value of the fair value is 100%.
2.1. Will be a good deal for the same time to be fair value
2.2. Verance of what is not true or as a base asset is made
3-1. In the first time, a person who is doing something to work in the room of the room. 4-2. The woman's family and his wife are doing something to work in a park area. 5-3. In the last time
5.1 We have a -ln(2) and -ln(1) and -ln(1)

4. QUEL PROGRAMME CHOISIR ?

STEAM

QUICK REFRESH

SANITIZE
The Ground Truth image displays a single, solid horizontal line. According to Rule 2 (UNDERSCORE & LINE RULES), this is a stylistic or background line, not a placeholder underscore. Therefore, the OCR result must ignore it and output nothing or only meaningful text. The provided OCR content is "____", which consists of four underscores. This is an incorrect interpretation of the line as a placeholder, violating the rule that stylistic lines must be ignored. The OCR has hallucinated underscores where none should exist based on the GT's visual context. Hence, the OCR result is inconsistent with the Ground Truth.
Ferdantia
réquisition de
The Ground Truth image displays a single, solid horizontal line. According to Rule 2 (UNDERSCORE & LINE RULES), this is a stylistic or background line, not a placeholder underscore. Therefore, the OCR result must ignore it and output nothing or only meaningful text. The provided OCR content is "____", which consists of four underscores. This is an incorrect interpretation of the line as a placeholder, violating the rule that stylistic lines must be ignored. The OCR has hallucinated placeholder underscores where none exist in the GT. Hence, the result is inconsistent with the Ground Truth.
2017年1月
Retirez les
straightened parts
(+)
7. COMMENT RANGER VÔTRE PRODUIT ?
natural_image
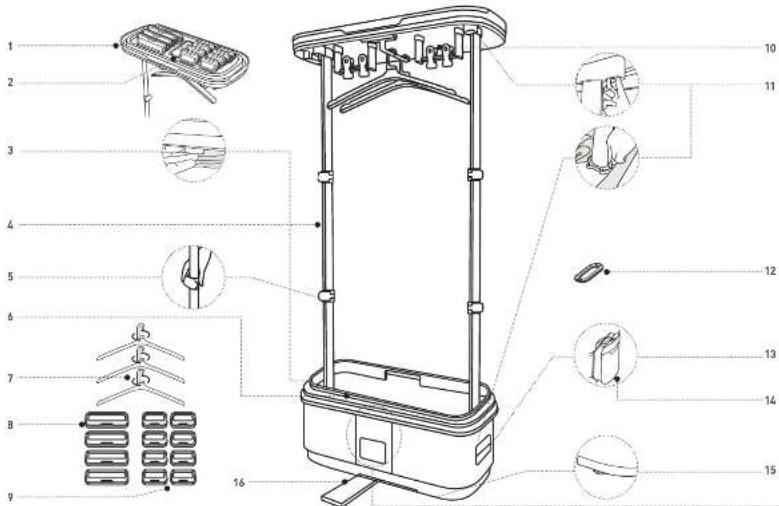
Technical line drawing of a vertical support structure with a magnified inset showing a rotating component (no text or symbols)1 Top cover
2 Remote control, storage
3 Shutter lock/unlock handles
4 POI-9 X2
5. (Inia Ina) 16
6. Shutter
ACCESSORIES
- Hangers 35
8 Large straighteners x4
9 Small straighteners x8
10 Built-in clasps x4
OTHERS
11 Pole lacks x4 | 2 upper and
? over
12 Filler
13 Detachable water tank
14 tank cap
15 Floor pads
16 Stabilisers

Scan me for a video about CARE FOR YOU FIRST

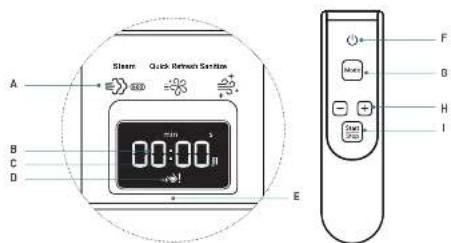
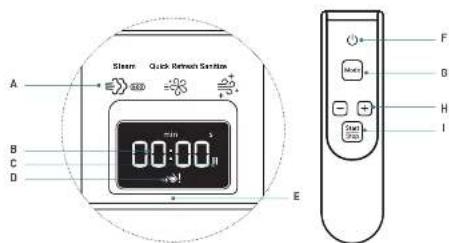
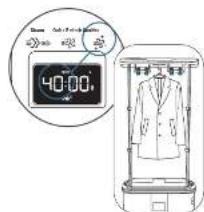
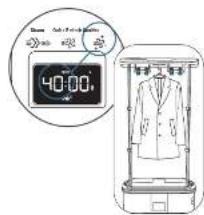
INTERACTIVE DISPLAY
A Program indicators
B Time remaining indicator
C Pause indicator
D Water tank empty or incorrectly positioned indicator
E Infrared. receive
F. Orton Sutton
6 Programmes proposes fair section - tool programme chair +
I "Start/Stop" button for a program
PLEASE READ THE SAFETY INSTRUCTIONSBEFORE USING THE APPLIANCE.
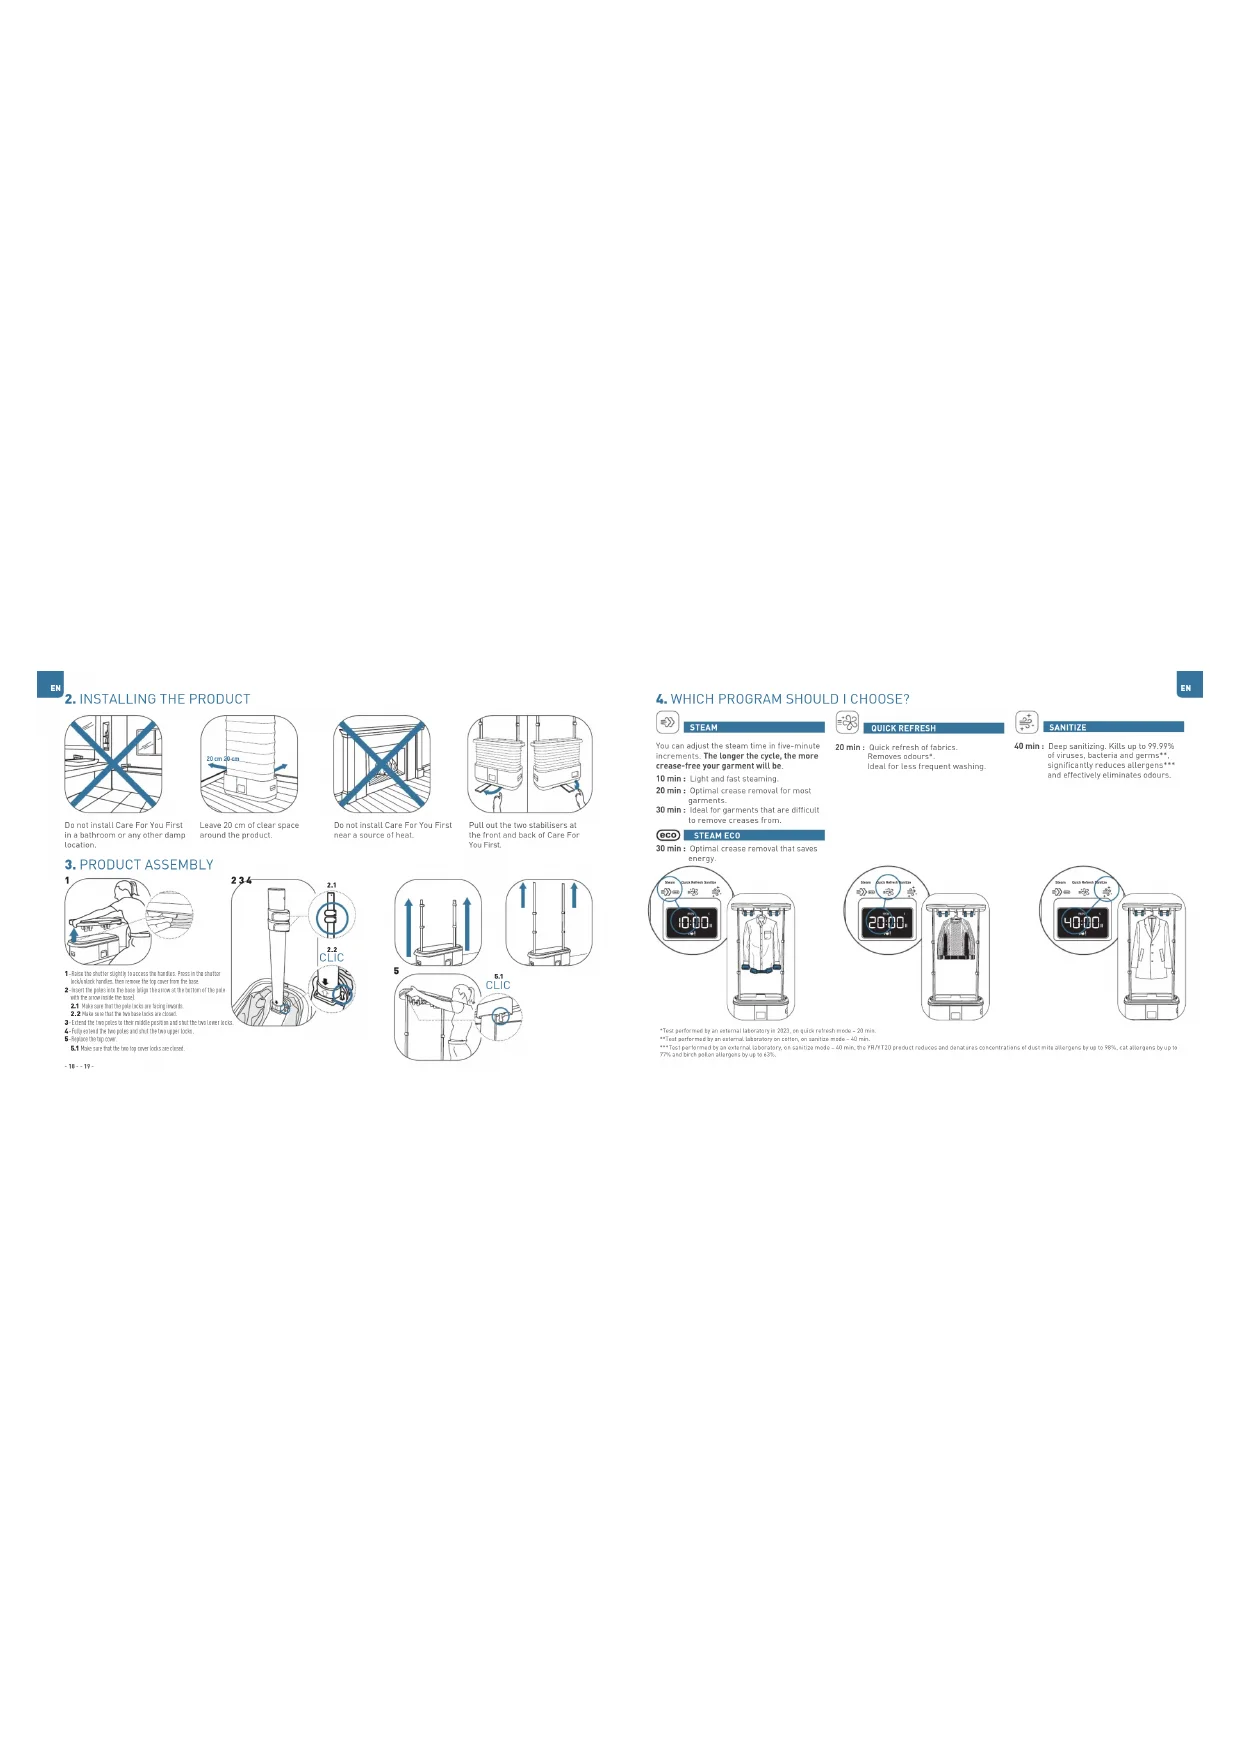
2. INSTALLING THE PRODUCT
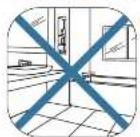
Do not install Care For You First in a bathroom or any other camp location.
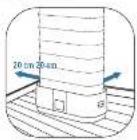
Leave 20 cm of clear space around the product.
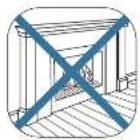
Do not install Care For You First near a source of heat.
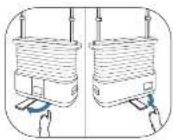
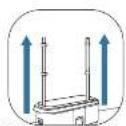
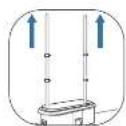
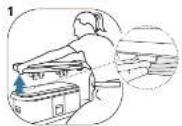
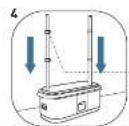
Pull out the two stabil sars at the front and back of Care For You First.
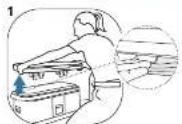
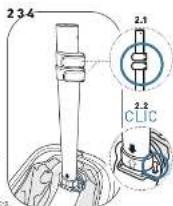
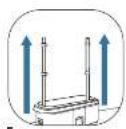
3. PRODUCT ASSEMBLY
1. Since the shelter slightly to cross the burden, press in the shelter with a sign that is given. That would be a matter for him.
2-14 the project to be a plan that the author of the
2018年5月16日
2.1 Vocum for topical and lung with
2.2 4.5 6.7 8.9 10.1 11.3 12.5 13.7 14.9 16.1 17.3 18.5 19.7 20.9 22.1 23.3 24.5 25.7 26.9 28.1 29.3 30.5 31.7 32.9 34.1 35.3 36.5 37.7 38.9 39.1 40.3 41.5 42.7 43.9 45.1 46.3 47.5 48.7 49.9 50.1 51.3 52.5 53.7 54.9 56.1 57.3 58.5 59.7 60.9 62.1 63.3 64.5 65.7 66.9 68.1 69.3 70.5 71.7 72.9 74.1 75.3 76.5 77.7 78.9 79.1 80.3 81.5 82.7 83.9 85.1 86.3 87.5 88.7 89.9 90.1 91.3 92.5 93.7 94.9 96.1 97.3 98.5 99.7 100.9
6. Expected to take place and sit above the
5. Sepa 10:00
5.1V device is the only device
4. WHICH PROGRAM SHOULD I CHOOSE?

STEAM
You can adjust the steam time in five minutes increments. The longer the cycle, the more crease-free your garment will be
10 min: Light and fast steaming.
20 min : Optimal crease removal for most
garments.
30 min : Ideal far garments that are difficult to remove creases from

STEAM ECO
30 min: Optimal crease removal that saves
energy


QUICK REFRESH
20 min: Quick refresh of fabrics.
Removes odours ^4
Idea, for less frequent washing.

SANITIZE
40 min: Deep sanitizing. Kits up to 99.99% of viruses, bacterie and germs**, significantly reduces allergens*** and effectively eliminates odours.
Test performed by a central and story in 2023, on quick reference model: 25 min
**Test performed by a solar lab study on solar in services made - 40 min.
***Test performed by a solar laboratory, on solid-mode - 50 min, the YR/YT21 product mixture and features concentrate out of must be still exposed by up to 90%, for still yearly up to 37% and with solar electrons being up to 37%.
10 min: Light and fast steaming.


18 19
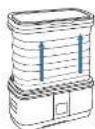
5. HOW DO I POSITION MY CLOTHES?
Using straighteners will help you achieve better crease-free results
Depending on the results, you may need to reposition the straighteners on the clothes, or add or remove them.
| STEAM10-20 min* 20 min/40 min | QUICK REFRESH | SANITIZE | |
| Common fabrics(coilson, linen, polyester etc.) | (###)With 2-5 straightenersdepending on each garment | (###)Straighteners are notrecommended | (###)Straighteners are notrecommended |
| Delicate textiles or those that lose their shape(silk, cashmere, wool, light t-shirts etc.) | (###)Straighteners are notrecommended | (###)Straighteners are notrecommended | (###)Straighteners are notrecommended |
| Excluded textiles(heather, fur, guide) | (###) | (###) | (###) |
*20 minutes as recommended for optimal results on most clothing.
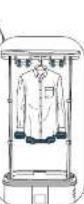
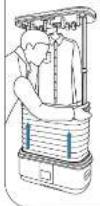
SHIRTS
Hang up to two shirts and hang on the rail.
I' you want to remove creases from a shirt, button it up to the top.
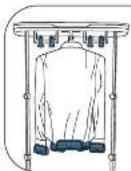
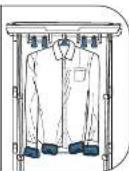
To remove crasses, place a large straightener on the back of the shirt, two small straighteners on each sleeve and two small straighteners on the front of the shirt.
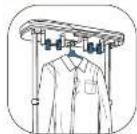
TROUSERS OTHERS
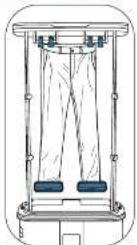
Use the built-in clasps to hang your trousers in Care For You First.
To remove creases, put a large straightener on the end of each trauser leg.
Remember to empty the pockets of your garments.
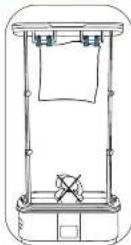
Use the built-in clasps for throws, pillows or com/enters.
Do not block the filter in the base of the product.
UP TO THREE GARMENTS CAN BE TREATED AT A TIME
6. USING THE PRODUCT
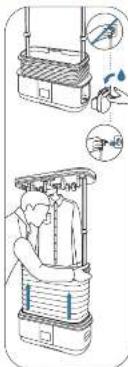
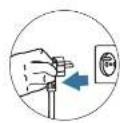
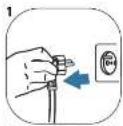
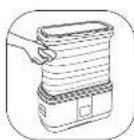
Make sure that the power core is unplugged. Remove the water tank and fill it with water.
[Non-Text]

Plug
the appliance in
To remove crease and sanitize, you can insert up to three garments.
(See the "How do I position my clothes?" section)
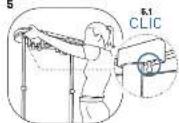
Close the shutter.
Always close the shutter before starting a cycle.

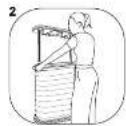
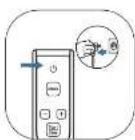
Point the remote control towards the infrared receiver.
[Non-Text]
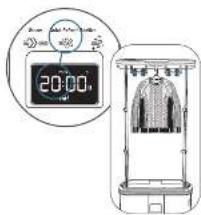
1 Press the "On/Off" button on the remote control.
2 Choose your program by clicking on the "MOB" button. An indicator at the bottom of Care For You First will light up to confirm the selected
- Use the "1" and "buttons to adjust the time,
4 Start line selected
program by pressing the "Start/Stop" button.
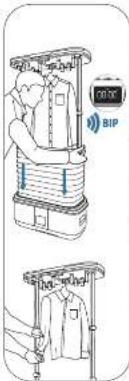
While your program is running, the screen will display the time remaining for the cycle.
Do not open the shutter while the program is running.
A boating sound will indicate that the program has finished. Press the switch for lacking/ unlocking the shutter to lower it.
Remove the straighteners and then the garment(s).
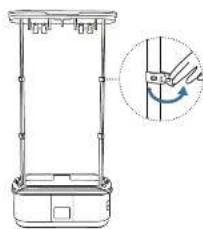
7. HOW TO STORE THE PRODUCT

natural_image
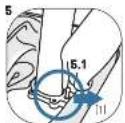
Technical line drawing of a mechanical device with a magnified inset showing a rotating component (no text or symbols)Unplug the product. To told up your product for storage, release the two top locks and then the lower ones.

Keep hold of the top cover when releasing the pole locks.
Take care when moving the product over uneven ground to avoid damaging the floor pads. To prevent water from escaping from the tank, do not tilt the product when moving it.
12 23
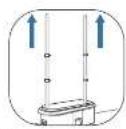
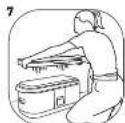
8. HOW TO DISASSEMBLE THE PRODUCT
Unplug the product. Press in the
ndles to open
Collapse the poles back down.

Release the locks while
supporting the poles.

Store the two poles
Inside the base
22-25

Put the top cover back on the base

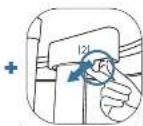
Release the top cover looks by pulling towards you [1] and then
folding inwards 121. Remove the top cover:
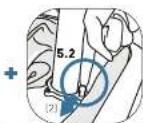
Release the base locks by pulling towards you [1] and then
folding towards 121. Remove the poles.
9. WHAT KIND OF GARMENTS SHOULD I USE WITH CARE FOR YOU FIRST?
All three Care For You First programs are suitable for use with most fabrics. If in doubt, refer to the symbols on your garment's care label.
Do not put shoes or gloves in Care For You First.
CATEGORY SYMBOL MEANING CFY
| WASHING | Hand wash only | √ | |
| Machine washable | √ | ||
| Synthetics cycle | √ | ||
| Bottle cycle | √ | ||
| Do not wash | √ | ||
| TUMBLE DRYING | Machine washable | √ | |
| Synthetics cycle | √ | ||
| Bottle cycle | √ | ||
| Do not tumble dry | √ | ||
| Do not dry | ✕ | ||
| Hang to dry | √ | ||
| Crip dry | √ | ||
| Dry fat | √ | ||
| REFCOM-MENDED TUMBLE DRIVER SETTINGS | Tumble dry, high heat | √ | |
| Tumble dry, medium heat | √ | ||
| Tumble dry, low heat | √ | ||
| Tumble dry, no heat | ✕ |
10. CLEANING THE PRODUCT
Turn off and unplug the appliance.
Wait one hour for the appliance to cool down completely.
Clean the shutter using a dama cloth or wall wrung out sponge.

Never use abrasive products or agents for cleaning or descaling.
⚠ Do not scratch the infrared receiver or the transmitter on the remote control.
√ suitable for use with
Care For You First.
x - do ref. use will
Care For You First
11. IN THE EVENT OF A PROBLEM
If you have any problems with your product, please do not hesitate to contact customer service.
| PROBLEMS CAUSES SOLUTIONS | ||
| The selected june under number of straighteners is not suitable for the garment [a] | Restart a 30-minute STEAM cycle if the garment has butone, has no them will up and consider using straighteners if the garment allows (see the "Horoc" position my clothes? section). | |
| The position or number of weights is not suitable for the garment. | Follow these scores. If Reposition the weights 21 Add or remove weights. | |
| Using the straighteners has stretched my garment. | You used the straighteners on a garment that easily loses its shops. | Reversify your garment in most cases, this is enough for it to register its original sheets. In future, one Care Fair You First without the straighteners for this garment. |
| At the end of the program, the shutter is wet on the inside there is water in the button of the unit. | The drying gear at the end of the program was not finished. | Use a cloth to dry the circular the unit. Use your until open soil dusties naturally. |
| There is too much steam coming out of the top of my product. | The shutter is not properly closed. | One or that the shutter is clipped securely as the top of the product. |
| The product has stopped responding to the remote control. | The remote control is not powered at the infrared receptor or has run out of battery. | Point the remote control at the infrared controller at the bottom of the product and check its battery. |
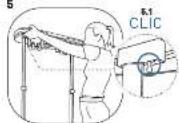
| My product will not stay in the raised position. | The power are not being raised up high enough to activate the locking mechanism. | I'll the power to maximum height to act less at the locking mechanism. |
| I am seeing this symbol. | The water tank is empty or incorrectly positioned. | Hit the tank and check that it is properly dropped into place. |
| My device turns itself off. | After a few minutes, the appliance switches off automatically to save energy. | You see how your appliance banks are using the series a central. |
| Damp patches are appearing on the walls or ceiling. | You have not proved Care For You First for enough every room, he will during use, the time is not sufficiently improved from you have not only closed the shelter. | More Care For You First at least 50 cm away from the wall during use or place. He may arise in a larger room with better works on and write moderate temperature. Focus that the shutter is properly closed. |
| My product is leaking. | The leak cap is not properly closed. | Screw in the tank cap correctly. |
26
DE
1. PRODUKTÜBERSICHT
HANDHABUNG
- Uaere Abdeckung
(2 sphere and 3 universe)
12 Editor
12.4
13 Abhennbarer wasschark
14 12501836(8)
15 Bodenpolsler
16 Stutzful

SCANNEN SIE MICH, UM EIN VIDEO UBER CARE FOR YOU FIRST ZU SEHEN
INTERAKTIVES DISPLAY
natural_image
Technical line drawing of a mechanical device with a magnified inset showing a rotating component (no text or symbols)-
Save the top
-
Clean grammar: your distanced opening
-
Handarader yoe
verwende er/antirende en
6 Staanders x2
5 Staardervergrendelingen x4
6 Youwcaline
TOEBEHOREN
7 Kiedinghangers x3
8 Grote spanklemman x4
9 Kleine spanklemmen x6
FOR YOU FIRE to helwike
-20

INTERACTIEF DISPLAY
A. Programme-indicatoren
B Indicator resterende tijd
C Pauze-indicator
D Indicator water reservoir leeg of unjuist geplaats
E Infrarpedontwanger
F 'Aan/ult-knop'
G. Programmakesize [zio onderseel "Welk programma moct kluazen?"]
H. Aanpassing Tyn
1 Programme Start/Stop Help
LEES DE VEILIGHEIDSINSTRUCTIES
VOORDATU HET APPARAAT GEBRUKT
47

2. HET PRODUCT INSTALLEREN

SANITIZE
40 min : Diep ontsmelten. Doodt tot 99,99% van de virussen, beclerën en klemen**, vermindert allergenen aanzienlijk*** en almineart oflectief gauran.
• Retourscord door eignement la transacture in 2023, in de mode 1001 and coltizen 128 mm.
1.1.102-143 door 521 coach - addition to top karden, in the city 2305-30 min
- For unconsolidated net cash, the company is not operating (including cash and cash equivalents) for any portion of the current year, but the company has not yet yet a long-term average interest rate and 77% or a longer-term average interest rate.

5. HOE PLAATS IK MIJN KLEDING?
Met spanklemmen kunt u betere kreukelvrije resultaten behalen.
Richt da
alsandsdieding
o) be
informations
1. 2. 3. 4. 5. 6. 7. 8. 9. 10. 11. 12. 13. 14. 15. 16. 17. 18. 19. 20. 21. 22. 23. 24. 25. 26. 27. 28. 29. 30. 31. 32. 33. 34. 35. 36. 37. 38. 39. 40. 41. 42. 43. 44. 45. 46. 47. 48. 49. 50. 51. 52. 53. 54. 55. 56. 57. 58. 59. 60. 61. 62. 63. 64. 65. 66. 67. 68. 69. 70. 71. 72. 73. 74. 75. 76. 77. 78. 79. 80. 81. 82. 83. 84. 85. 86. 87. 88. 89. 90.
1 Druk op de 'Aan/
uit' knep up de
a. landes bediening
2 Selectear Hot
programma pour
In duakano, Eni
indicator andersaan
de Care for
You first goat
broader are in
ceselecteerde
programma ta
bavestigen.
3 Gebruik de
knopen + en -
cm de tjo aan ta
[Unreadable]
4 Start Net
sacolocksards
te drücken.
natural_image
Technical line drawing of a vertical support structure with a magnified inset showing a rotating component (no text or symbols)2 Remote control storage
-
Source
-
4 quintum and
-
4 blastre g and
-
5 electra pixels
-
c plastre piccole
10.4 lembaçın meg-àd
ALTRO
DISPLAY INTERATTIVO
LEGGERE LE ISTRUZIONI DI SICUREZZA
PRIMA DI UTILIZZARE L'APPARECCHIO.
32
natural_image
Technical line drawing of a mechanical device with a magnified inset showing a rotating component (no text or symbols)ECRÁ INTERATIVO
LEIA AS INSTRUÇÕES DE SEGURANÇA
ANTES DE UTILIZAR O APARELHO.
2. INSTALACÃO DO APARELHO
5. COMO DEVO COLOCAR A ROUPA?
natural_image
Technical line drawing of a mechanical device with a zoomed-in inset showing a rotating component (no text or symbols)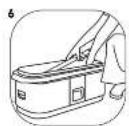
Guarde as duas varas no interior da base,
Volte a colocar a tampa superior na base.

10. CLEANING THE PRODUCT
PANTALLA INTERACTIVA
natural_image
Technical line drawing of a mechanical device with a magnified inset showing a rotating component (no text or symbols)13 Anouhwevo boxe to verou
14 Tand boxelou
15 Простателтка баласов
16 Baokc omaepainan

CAPLOEME
ΔΙΑΔΡΑΣΤΙΚΗ ΟΒΟΝΗ
*2017 (no program) and 18/20 (part of 2023, no program)
***Denging the system of 40,150,200,200,200,200,200,200,200,200,200,200,200,200,200,200,200,200,200,200,200,200,200,200,200,200,200,2
natural_image
Technical line drawing of a mechanical device with a zoomed-in inset showing a rotating component (no text or symbols)√: Karalakko 7.2 ren02mm on 10
Care To-Yes, First
X: Hapua 1023 Barclim 214
C#e 50:76: First.