
Statesman QUAD EL84 - Audio Amplifier HUGHES & KETTNER - Free user manual and instructions
Find the device manual for free Statesman QUAD EL84 HUGHES & KETTNER in PDF.
User questions about Statesman QUAD EL84 HUGHES & KETTNER
0 question about this device. Answer the ones you know or ask your own.
Ask a new question about this device
Download the instructions for your Audio Amplifier in PDF format for free! Find your manual Statesman QUAD EL84 - HUGHES & KETTNER and take your electronic device back in hand. On this page are published all the documents necessary for the use of your device. Statesman QUAD EL84 by HUGHES & KETTNER.
USER MANUAL Statesman QUAD EL84 HUGHES & KETTNER
Manual 1.2Statesman Series
Foreword The Hughes & Kettner Statesman Series brings together for the first time what classic rock as well as blues & country guitarists have been dreaming about for a long time: From early ‘60s open-back clean to early ‘80s stack-drive cream – and tons of top-drawer crunch tones in between – these tone monsters deliver the dynamics and state- of-art features that make life on stage so sweet and simple. With the marvelous new Statesman series, Hughes & Kettner has debunked the myth that all classic tube amp designs lack versatility. The Statesman models’ kinship with ‘60s-era forebears is obvious at first glance – they share that familiar look & feel. Sporting 12AX7 preamp tubes and EL 84 power amp tubes, they would also appear to share the same DNA. Take a closer look, though, and you will see its talents transcend mere mimicry, with two sweet-sounding discrete channels! Clean delivers the soulful shimmering tone of an open tube combo. Its Twang switch lives up to its name by adding a healthy helping of punchy high-mids that put the spank in funk and do the country twang thang so well; even contemporary ballads benefit from the upper mids boost. Dial in a dab more gain, and dive into a world of dynamic crunch tones and hair-trigger response to every subtlety of your touch. The Drive channel offers more than merely more gain. It delivers the secret ingredient that is so critical to a classic rock sound - the powerful punch of a half-stack. The Gain knob takes you on a magical mystery tour from a throaty mid-‘60s bark to a typical ‘70s rock bite. The Boost button is a time machine, taking you and the amp’s overdrive tone a few years down the road! All Statesmen sport a genuine Accutronics® spring reverb; the Reverb Balance knob controls each channel’s amount. A modern effects loop lets you add external effect devices to the sonic equation. And the included footswitch lets you tap your toes to conveniently activate the two channels, Boost, the FX loop, and Reverb. An Eminence® speaker developed especially for these amps brings together the grooviest tried-and-true design features of US and UK speakers. They are the key to these rigs’ jaw-dropping tonal versatility. We wish you lots of fun with your Statesman! Your Hughes & Kettner Team Before the start-up
- Please read the safety notes on Page 32-35 before the start-up!
- A word of warning before you start-up your Statesman: It is loud! High loudness levels can cause hearing damage.
- Ensure a sufficient air supply to the amplifier’s cooling surfaces. Absolutely pay attention to a fixed storage space, which precludes mechanical and thermal external influences, and thus ensures the operational safety of the equipment and the safety of individuals.
- The manufacturer cannot assume any liability for damages to the appliance or to other devices which ensue through improper operation. Start-up
- Before connecting the Statesman to the power supply network, make sure that the power switch is turned off and the indicated voltage value on the back side (see illustration: next to the “Voltage Setting” arrow) tallies with the local mains voltage.
- The illustration shows the 100/120 volt version as an example. The indication of 100 volts is next to the arrow. And so the amp may only be operated on 100 V mains voltage. If the indication on your Statesman next to the arrow does not tally with the voltage that you intend to operate with, it must not be connected!
- In order to avoid unwanted surprises, you should always turn the CLEAN VOLUME and the DRIVE MASTER controllers to the left stop before turning the amp on.
- INPUT: Connect your guitar with this input. Please use only suitable, shielded guitar cable.
- POWER: This switch opens the main current supply; the blue PILOT LAMP lights up.
english C O N T E N T S
5. Technical Data 13Statesman Series
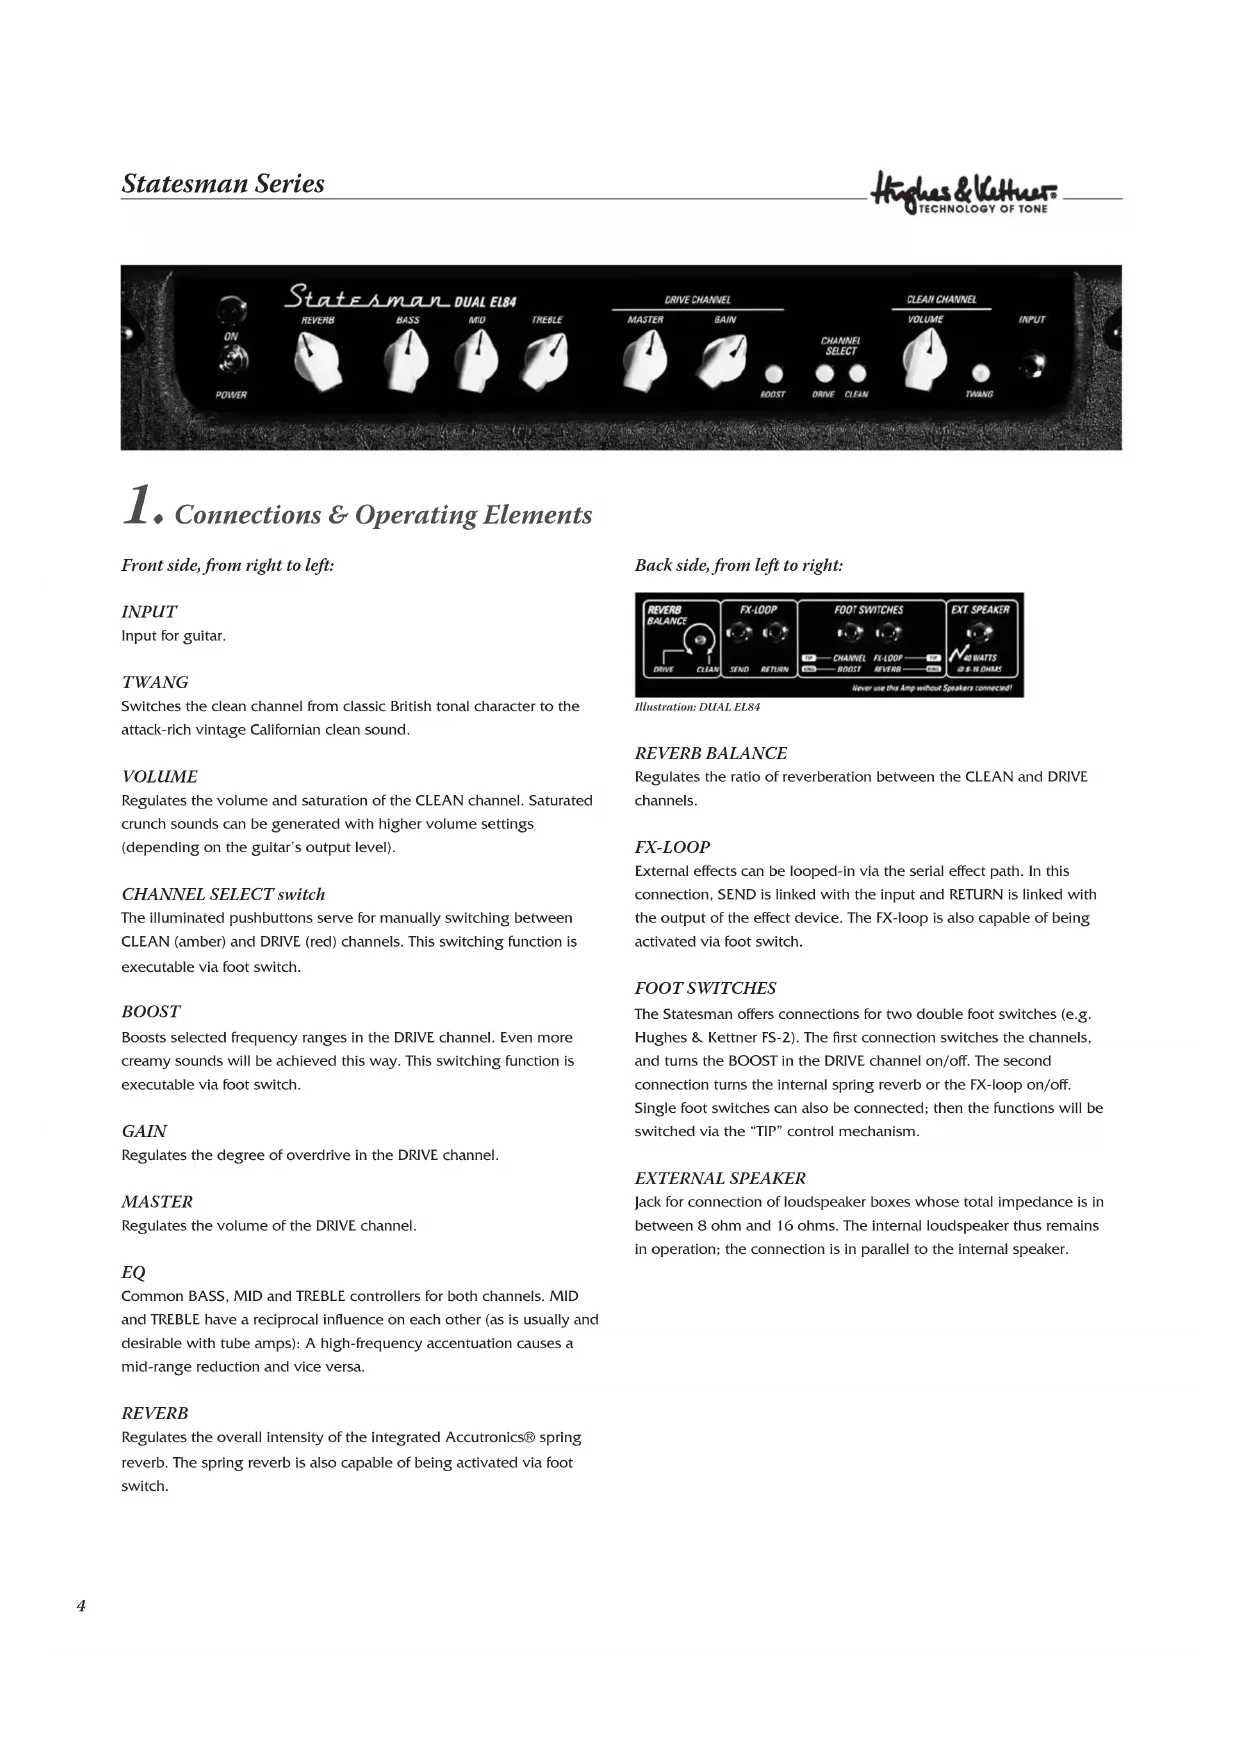
Front side, from right to left: INPUT Input for guitar. TWANG Switches the clean channel from classic British tonal character to the attack-rich vintage Californian clean sound. VOLUME Regulates the volume and saturation of the CLEAN channel. Saturated crunch sounds can be generated with higher volume settings (depending on the guitar’s output level). CHANNEL SELECT switch The illuminated pushbuttons serve for manually switching between CLEAN (amber) and DRIVE (red) channels. This switching function is executable via foot switch. BOOST Boosts selected frequency ranges in the DRIVE channel. Even more creamy sounds will be achieved this way. This switching function is executable via foot switch. GAIN Regulates the degree of overdrive in the DRIVE channel. MASTER Regulates the volume of the DRIVE channel. Common BASS, MID and TREBLE controllers for both channels. MID and TREBLE have a reciprocal influence on each other (as is usually and desirable with tube amps): A high-frequency accentuation causes a mid-range reduction and vice versa. REVERB Regulates the overall intensity of the integrated Accutronics® spring reverb. The spring reverb is also capable of being activated via foot switch. Back side, from left to right: Illustration: DUAL EL84 REVERB BALANCE Regulates the ratio of reverberation between the CLEAN and DRIVE channels. FX-LOOP External effects can be looped-in via the serial effect path. In this connection, SEND is linked with the input and RETURN is linked with the output of the effect device. The FX-loop is also capable of being activated via foot switch. FOOT SWITCHES The Statesman offers connections for two double foot switches (e.g. Hughes & Kettner FS-2). The first connection switches the channels, and turns the BOOST in the DRIVE channel on/off. The second connection turns the internal spring reverb or the FX-loop on/off. Single foot switches can also be connected; then the functions will be switched via the “TIP” control mechanism. EXTERNAL SPEAKER Jack for connection of loudspeaker boxes whose total impedance is in between 8 ohm and 16 ohms. The internal loudspeaker thus remains in operation; the connection is in parallel to the internal speaker.Statesman Series
3. Tubes, Servicing & Maintenance
STATESMAN is factory-loaded with EL84 and 12AX7 tubes. Oncethey’ve been burned in – that is, operated continuously under a load –they are subjected to a rigorous selection process. Their electrical specs and mechanical status (microphonics) are checked, and then they are installed in an amp and their sonic performance is auditioned. One of the most important steps in this process is tube matching, whereby tubes with the same characteristics are teamed up in matched sets of power tubes. When to Replace Tubes The tubes in STATESMAN are exemplary in terms of quality, workman-ship and long service life. Nonetheless, tubes show definite signs of wear when their service life is nearing its end. Telltale signs are increased microphonics, noise and hiss, muddier tone through loss of high-end frequencies, degraded performance, etc. Take these indications seriously and replace old tubes. Not only do these side effects take their toll on sound quality, they also indicate the aging tube will soon fail! Note: Replacing tubes for experimentation purposes is not recommended. Installing the wrong tubes will damage the amp and cost you a lot more than you bargained for in repair costs. Before you start swapping tubes, ask yourself these questions:• Was the fault or failure of the tube caused by the tube itself or by a flawed peripheral device or component, perhaps a defective speaker cable? If you don’t get to the bottom of the problem and remedy it, it may crop up again even after you replace the tubes.• Did the Mains voltage fluctuate or spike while the amp was on? In all-tube amps, over-voltage surges in the Mains net can certainly cause drop-outs. Over-voltages are often caused by generators and faulty high-current power circuits.• Perhaps a fuse blew even though none of the tubes is actually defective? An old fuse, tube de-ionization or Mains voltage power surges may have triggered the fuse. Things to Bear in Mind When Replacing Tubes Replacing tubes is a job best left to qualified professionals! Accordingly, the following guidelines are addressed and apply to qualified service technicians only:• Pull Statesman’s Mains plug and allow for a discharge time of at least two minutes before removing the chassis from the rear of the amp.• The upright mounted preamp and power amp tubes of all Statesman combos are seated in a self-contained chamber that is easily accessible from outside. And so they are optimally protected against vibrations through the loudspeaker’s vibrations. Illustration: QUAD EL 84, 2x 12AX7, 4x EL84• After removal of the protective grid, the measuring points and controller for setting the correct bias current and the heating symmetry (“hum balance”) are also directly accessible. Illustration: QUAD EL 84.
- The illustration shows (from left to right) the aperture for the bias trimmer, the jumpers to the measuring points, and the aperture for the trimmer to the hum balance. The two trimmers may not be mixed up, since otherwise there is a danger of output stage damage through excessively high current in the tube!Statesman Series
Absolutely pay attention to preparations and chronological order! 1. Turn off the device 2. Exchange tubes 3. Remove all jumpers 4. In tubes with the same characteristic curve, do not change the position of the bias trimmer. In tubes with unknown characteristic curve, turn the bias trimmer to the right-side stop (lowest current). 5. Turn on the device 6. Measure and adjust the bias current (equivalent voltage): The jumpers bypass a shunt resistor. When removing the jumpers, the cathode current can be determined via the exposed pins through a voltage measurement. The following applies in this connection: 1 mV is equivalent to 1 mA. The order of the jumpers from left to right corresponds to the order of the appurtenant tubes from left to right. The bias current is correctly adjusted if a voltage between 16 and 21 mV is applied to the pins (between the upper and lower pin of the respective jumper) with all tubes. If this voltage range cannot be adjusted to all tubes, the divergent tubes must be exchanged and a suitable tube must be found. For this reason Hughes & Kettner offers selected tube sets with similar characteristic curves.7. Turn off the device 8. Put on all jumpers. Attention: Do not forget to put the jumpers on again after successful alignment! Never operate the amp without jumpers! 9. Turn on the device 10. Carry out hum balance. Basic setting: Switch the amp to CLEAN, turn VOLUME, TREBLE and MID to the left-side stop, and turn BASS to the right-side stop. With the help of the trimmer, look for a setting in which the lowest humming emerges. 11. Mount the protective grid again
Sources / Troubleshooting Mains connection: STATESMAN won’t power up when you switch it on.
- It‘s not getting AC power. Check the Mains cord to see if it is connected and firmly seated.• The Mains fuse is defective. Ensure it is replaced with another fuse bearing the same rating.• The local Mains voltage does not match Statesman’s operating voltage Available Voltages and How to Adapt Them Statesman ships in two versions rated for 110/120V and 220-240V. You will find the rating indicated on the housing above the Mains socket. Both models offer two operating voltages that are selected using the voltage selector integrated in the Mains socket. Ensure that the Mains voltage matches the voltage rating appearing in the voltage selector window. This value is legible when the amp is in the standard operating position, that is, placed right side up. The upright number indicates the currently selected voltage, and the inverted number indicates the alternative voltage. Check also the fuse ratings to ensure they match the ratings indicated on the rear panel. Voltage selection and fuse replacement may be performed by experienced service technicians only. Accordingly, the following notes are addressed exclusively to service technicians:• Use a small flat screwdriver to remove the voltage selector from the Mains socket.• If the fuse is defective, replace it with a fuse bearing the specified rating.• Turn the voltage selector and insert it back into the port so that the desired Mains voltage rating is legible and appears at the top left (next to the “Voltage Setting” arrow). Statesman is connected properly, but no sound is audible.
- The guitar’s VOLUME knob is turned all the way down.• The amp’s VOLUME knob is turned all the way down.• The effects loop is active and set to SERIAL, but no effect device is connected.• The anode fuse has blown. Ensure that it is replaced with a fuse of the same rating.• The fuse for the tube heating tripped (the tubes don’t glow). Ensure that it is replaced with a fuse bearing the same rating. The amp makes ringing noises when played and tends to Feedback.
- One or several tubes are microphonic. Replace the defective tube with another of the same type. Signs of tube wear such as increased microphonics and noise, Treble loss, weak power output or muddy sound begin reappearing just a few hours after replacing tubes.
- The wrong tubes were installed when old tubes were replaced or the amp was not biased properly. Take the amp to a professional to correct the problem.Statesman Series
All level indications relate to 0 dBV (1V RMS) Inputs INSTRUMENT inputJack: spring jackInput design: balanced Input impedance: 1M ohmSensitivity: -22 dBV / 1 kHz (with Clean, all controllers in middle position)Maximum input level: 1.3 dBV / 1 kHzFX ReturnJack: spring jackInput design: balanced Input impedance: 48k ohmMaximum sensitivity: -10 dBV Outputs FX SendJack: spring jackOutput design: balanced Output impedance: 2k ohmOutput level: -10 dBV / 1 kHz (with Clean, all controllers in middle position)Maximum output level: -3 dBV / 1 kHzSpeaker connectionSpring jack: 1 x 8-16 ohm, parallel to internal speakerSpeaker1x 12" Eminence Rockdriver Cream, 60 watts, 8 ohm General electrical data
- Read all of these instructions!
- Save these instructions for later use!
- Follow all warnings and instructions marked on the product!
- Do not use this product near water, i.e. bathtub, sink, swimming pool, wet basement, etc.
- Do not place this product on an unstable cart, stand or table. The product may fall, causing serious damage to the product or to persons!
- Slots and openings in the cabinet and the back or bottom are provided for ventilation; to ensure reliable operation of the product and to protect it from overheating, these openings must not be blocked or covered. This product should not be placed in a built-in installation unless proper ventilation is provided.
- This product should not be placed near a source of heat such as a stove, radiator, or another heat producing amplifier.
- Use only the supplied power supply or power cord. If you are not sure of the type of power available, consult your dealer or local power company.
- Do not allow anything to rest on the power cord. Do not locate this product where persons will walk on the cord.
- Never break off the ground pin on the power supply cord.
- Power supply cords should always be handled carefully. Periodically check cords for cuts or sign of stress, especially at the plug and the point where the cord exits the unit.
- The power supply cord should be unplugged when the unit is to be unused for long periods of time.
- If this product is to be mounted in an equipment rack, rear support should be provided.
- This product should be used only with a cart or stand that is recommended by Hughes & Kettner.
- Never push objects of any kind into this product through cabinet slots as they may touch dangerous voltage points or short out parts that could result in risk of fire or electric shock. Never spill liquid of any kind on the product.
- Do not attempt to service this product yourself, as opening or removing covers may expose you to dangerous voltage points or other risks. Refer all servicing to qualified service personnel.
- Clean only with dry cloth.
- Do not defeat the safety purpose of the polarized or grounding-type plug. A polarized plug has two blades with one wider than the other. A grounding type plug has two blades and a third grounding prong. The wide blade or the third prong are provided for the safety. If the provided plug does not fit into your outlet, consult an electrician for replacement of the obsolete outlet.
- Place the product always in a way that the mains switch is easily accessible.
- Unplug this product from the wall outlet and refer servicing to qualified service personnel under the following conditions:
- When the power cord or plug is damaged or frayed.
- If liquid has been spilled into the product.
- If the product has been exposed to rain or water.
- If the product does not operate normally when the operating instructions are followed.
- If the product has been dropped or the cabinet has been damaged.
- If the product exhibits a distinct change in performance, indicating a need of service!
- Adjust only these controls that are covered by the operating instructions since improper adjustment of other controls may result in damage and will often require extensive work by a qualified technician to restore the product to normal operation.
- Exposure to extremely high noise levels may cause a permanent hearing loss.
- Individuals vary considerably in susceptibility to noise induced hearing loss, but nearly everyone will lose some hearing if exposed to sufficiently intense noise for a sufficient time. The U.S. Government´s Occupational Safety and Health Administration (OSHA) has specified the following permissible noise level exposures: Duration Per Day In Hours Sound Level dBA, Slow Response
- According to OSHA, any exposure in excess of the above permissible limits could result in some hearing loss.
- Ear plug protectors in the ear canals or over the ears must be worn when operating this amplification system in order to prevent a permanent hearing loss if exposure is in excess of the limits as set forth above. To ensure against potentially dangerous exposure to high sound pressure levels, it is recommended that all persons exposed to equipment capable of producing high sound pressure levels such as this amplification system be protected by hearing protectors while this unit is in operation.
- Fuses: Replace with IEC 127 (5 x 20 mms) type and rated fuse for best performance only TO PREVENT THE RISK OF FIRE AND SHOCK HAZARD, DO NOT EXPOSE THIS APPLIANCE TO MOISTURE OR RAIN. DO NOT OPEN CASE; NO USER SERVICEABLE PARTS INSIDE. REFER SERVICING TO QUALIFIED SERVICE PERSONNEL. Version 1.1 11/2006
- The unit has been built by Hughes & Kettner in accordance with IEC 60065 and left the factory in safe working order. To maintain this condition and ensure non-risk operation, the user must follow the advice and warning comments found in the operating instructions. The unit conforms to Protection Class 1 (protectively earthed). HUGHES & KETTNER ONLY GUARANTEES THE SAFETY, RELIABILITY AND EFFICIENCY OF THE UNIT IF:
- Assembly, extension, re-adjustment, modifications or repairs are carried out by Hughes & Kettner or by persons authorized to do so.
- The electrical installation of the relevant area complies with the requirements of IEC (ANSI) specifications.
- The unit is used in accordance with the operating instructions.
- The unit is regularly checked and tested for electrical safety by a competent technician.
- If covers are opened or sections of casing are removed, except where this can be done manually, live parts can become exposed.
- If it is necessary to open the unit this must be isolated from all power sources. Please take this into account before carrying out adjustments, maintenance, repairs and before replacing parts.
- The appliance can only be insulated from all power sources if the mains connection is unplugged.
- Adjustment, maintenance and repairs carried out when the unit has been opened and is still live may only be performed by specialist personnel who are authorized by the manufacturer (in accordance with VBG 4) and who are aware of the associated hazards.
- Loudspeaker outputs which have the IEC 417/5036 symbol (Diagram 1, below) can carry voltages which are hazardous if they are made contact with. Before the unit is switched on, the loudspeaker should therefore only be connected using the lead recommended by the manufacturer.
- Where possible, all plugs on connection cables must be screwed or locked onto the casing.
- Replace fuses only with IEC 127 type and specified rating.
- It is not permitted to use repaired fuses or to short-circuit the fuse holder.
- Never interrupt the protective conductor connection.
- Surfaces which are equipped with the „HOT“ mark (Diagram 2, below), rear panels or covers with cooling slits, cooling bodies and their covers, as well as tubes and their covers are purposely designed to dissipate high temperatures and should therefore not be touched.
- High loudspeaker levels can cause permanent hearing damage. You should therefore avoid the direct vicinity of loudspeakers operating at high levels. Wear hearing protection if continuously exposed to high levels. MAINS CONNECTION:
- The unit is designed for continuous operation.
- The set operating voltage must match the local mains supply voltage.
- Caution: The unit mains switch must be in position OFF before the mains cable is connected.
- The unit is connected to the mains via the supplied power unit or power cable.
- Power unit: Never use a damaged connection lead. Any damage must be rectified by a competent technician.
- Avoid connection to the mains supply in distributor boxes together with several other power consumers.
- The plug socket for the power supply must be positioned near the unit and must be easily accessible. PLACE OF INSTALLATION:
- The unit should stand only on a clean, horizontal working surface.
- The unit must not be exposed to vibrations during operation.
- Place the product always in a way that the mains switch is easily accessible.
- Keep away from moisture and dust where possible.
- Do not place the unit near water, baths, wash basins, kitchen sinks, wet areas, swimming pools or damp rooms. Do not place objects containing liquid on the unit - vases, glasses, bottles etc.
- Ensure that the unit is well ventilated.
- Any ventilation openings must never be blocked or covered. The unit must be positioned at least 20 cm away from walls. The unit may only be fitted in a rack if adequate ventilation is ensured and if the manufacturer’s installation instructions are followed.
- Keep away from direct sunlight and the immediate vicinity of heating elements and radiant heaters or similar devices.
- If the unit is suddenly moved from a cold to a warm location, condensation can form inside it. This must be taken into account particularly in the case of tube units. Before switching on, wait until the unit has reached room temperature.
- Accessories: Do not place the unit on an unsteady trolley, stand, tripod, base or table. If the unit falls down, it can cause personal injury and itself become damaged. Use the unit only with the trolley, rack stand, tripod or base recommended by the manufacturer or purchased together with the unit. When setting the unit up, all the manufacturer’s instructions must be followed and the setup accessories recommended by the manufacturer must be used. Any combination of unit and stand must be moved carefully. A sudden stop, excessive use of force and uneven floors can cause the combination of unit and stand to tip over.
- Additional equipment: Never use additional equipment which has not been recommended by the manufacturer as this can cause accidents.
- To protect the unit during bad weather or when left unattended for prolonged periods, the mains plug should be disconnected. This prevents the unit being damaged by lightning and power surges in the AC mains supply. Diagram 1 Diagram 2