
MNA89MS1BAC - TV SAMSUNG - Free user manual and instructions
Find the device manual for free MNA89MS1BAC SAMSUNG in PDF.
User questions about MNA89MS1BAC SAMSUNG
0 question about this device. Answer the ones you know or ask your own.
Ask a new question about this device
Download the instructions for your TV in PDF format for free! Find your manual MNA89MS1BAC - SAMSUNG and take your electronic device back in hand. On this page are published all the documents necessary for the use of your device. MNA89MS1BAC by SAMSUNG.
USER MANUAL MNA89MS1BAC SAMSUNG
Thank you for purchasing this Samsung product.
To receive more complete service, please register your product at www.samsung.com
Model ____ Serial No. ____
Before Reading This User Manual
This MICRO LED comes with this User Manual and an embedded e-Manual (☐) > ≡ Menu > ⚙️ Settings > Support > Open e-Manual).
Warning! Important Safety Instructions
Please read the Safety Instructions before using your MICRO LED. Refer to the table below for an explanation of symbols which may be on your Samsung product.
| CAUTION | |
| RISK OF ELECTRIC SHOCK. DO NOT OPEN. | |
| CAUTION: TO REDUCE THE RISK OF ELECTRIC SHOCK, DO NOT REMOVE COVER (OR BACK). THERE ARE NO USER SERVICEABLE PARTS INSIDE. REFER ALL SERVICING TO QUALIFIED PERSONNEL. | |
 | This symbol indicates that high voltage is present inside. It is dangerous to make any kind of contact with any internal part of this product. |
 | This symbol indicates that this product has included important literature concerning operation and maintenance. |
 | Class II product: This symbol indicates that a safety connection to electrical earth (ground) is not required. If this symbol is not present on a product with a mains lead, the product MUST have a reliable connection to protective earth (ground). |
 | AC voltage: Rated voltage marked with this symbol is AC voltage. |
 | DC voltage: Rated voltage marked with this symbol is DC voltage. |
 | Caution. Consult instructions for use: This symbol instructs the user to consult the user manual for further safety related information. |
Power
- Do not overload wall outlets, extension cords, or adapters beyond their voltage and capacity. It may cause fire or electric shock.
Refer to the power specifications section of the manual or the power supply label on the product for voltage and amperage information. - Power-supply cords should be placed so that they are not likely to be walked on or pinched by items placed upon or against them. Pay particular attention to cords at the plug end, at wall outlets, and at the point where they exit from the appliance.
- Never insert anything metallic into the open parts of this apparatus. This may cause electric shock.
- To avoid electric shock, never touch the inside of this apparatus. Only a qualified technician should open this apparatus.
- Be sure to plug in the power cord until it is firmly seated. When unplugging the power cord from a wall outlet, always pull on the power cord's plug. Never unplug it by pulling on the power cord. Do not touch the power cord with wet hands.
- If this apparatus does not operate normally - in particular, if there are any unusual sounds or smells coming from it - unplug it immediately and contact an authorised dealer or Samsung service centre.
- To protect this apparatus from a lightning storm, or to leave it unattended and unused for a long time, be sure to unplug it from the wall outlet and disconnect the antenna or cable system.
– Accumulated dust can cause an electric shock, an electric leakage, or a fire by causing the power cord to generate sparks and heat or by causing the insulation to deteriorate.
• Use only a properly grounded plug and wall outlet.
- An improper ground may cause electric shock or equipment damage. (Class I Equipment only.)
- To turn off this apparatus completely, disconnect it from the wall outlet. To ensure you can unplug this apparatus quickly if necessary, make sure that the wall outlet and power plug are readily accessible.
Installation
- Do not place this apparatus near or over a radiator or heat register, or where it is exposed to direct sunlight.
- Do not place vessels (vases etc.) containing water on this apparatus, as this can result in a fire or electric shock.
- Do not expose this apparatus to rain or moisture.
- Be sure to contact an authorised Samsung service centre for information if you intend to install your MICRO LED in a location with heavy dust, high or low temperatures, high humidity, chemical substances, or where it will operate 24 hours a day such as in an airport, a train station, etc. Failure to do so may lead to serious damage to your MICRO LED.
- Do not expose this apparatus to dripping or splashing.
- This MICRO LED is a consumer product designed for installation in a Home Environment only. Any installation other than a Home environment, e.g: Private Vessel (Including Yacht) or Private Plane or outdoors may invalidate the warranty.
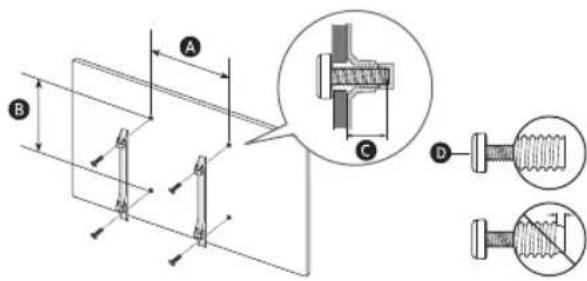
Installing as Wall Mount
- Please refer to the Installation Guide of the Wall Mount for details on attaching the Wall Mount.
- You can install a VESA wall mount. However, it is recommended to use the wall mount that is provided by default.
- When installing a VESA wall mount, it is recommended to first fasten all four VESA screws.
Mounting the MICRO LED on a wall
If you mount this MICRO LED on a wall, follow the instructions exactly as set out by the manufacturer. If it is not correctly mounted, the MICRO LED may slide or fall and cause serious injury to a child or adult and serious damage to the MICRO LED.
- Samsung is not responsible for any damage to the product or injury to yourself or others if you choose to install the wall mount on your own.
-
Samsung is not liable for product damage or personal injury when a non-VESA or non-specified wall mount is used or when the consumer fails to follow the product installation instructions.
-
You can install your wall mount on a solid wall perpendicular to the floor. Before attaching the wall mount to surfaces other than plaster board, contact your nearest dealer for additional information. If you install the MICRO LED on a ceiling or slanted wall, it may fall and result in severe personal injury.
- When installing a wall mount kit, we recommend you fasten all four VESA screws.
- Do not install the MICRO LED set with being tilted.

Do not install your wall mount kit while your MICRO LED is turned on. This may result in personal injury from electric shock.
- Do not use screws that are longer than the standard dimension or do not comply with the VESA standard screw specifications. Screws that are too long may cause damage to the inside of the MICRO LED set.
- For wall mounts that do not comply with the VESA standard screw specifications, the length of the screws may differ depending on the wall mount specifications.
- Do not fasten the screws too firmly. This may damage the product or cause the product to fall, leading to personal injury. Samsung is not liable for these kinds of accidents.
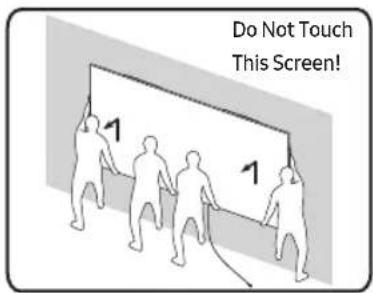
• Always have four people mount the MICRO LED onto a wall.
Wall Mount Specifications (VESA)
text_image
Technical diagram showing mechanical assembly with labeled components A, B, C, D and detail views of a bolted joint| MICRO LED size in inches 76 89 | ||
| VESA screw hole specs(A x B(mm)) | 600 x 400 | |
| C (mm) | 6 | |
| D x 4 | M8 | |
| MICRO LED size in inches 101 114 | ||
| VESA screw hole specs(A x B(mm)) | 800 x 600 1000 x 800 | |
| C (mm) | 6 | |
| D x 4 | M8 | |
Providing proper ventilation for your MICRO LED
When you install your MICRO LED and One Connect Box, maintain a distance of at least 10 cm between the MICRO LED, One Connect Box, and other objects (walls, cabinet sides, etc.) to ensure proper ventilation. Failing to maintain proper ventilation may result in a fire or a problem with the product caused by an increase in its internal temperature.
- When you install your MICRO LED with a wall mount, we strongly recommend you use parts provided by Samsung only. Using parts provided by another manufacturer may cause difficulties with the product or result in injury caused by the product falling.
Operation
- This apparatus uses batteries. In your community, there might be environmental regulations that require you to dispose of these batteries properly. Please contact your local authorities for disposal or recycling information.
- Store the accessories (remote control, or etc.) in a location safely out of the reach of children.
- Do not drop or strike the product. If the product is damaged, disconnect the power cord and contact a Samsung service centre.
- Do not dispose of remote control or batteries in a fire.
- Do not short-circuit, disassemble, or overheat the batteries.
- CAUTION: There is danger of an explosion if you replace the batteries used in the remote with the wrong type of battery. Replace only with the same or equivalent type.
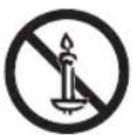
- WARNING - TO PREVENT THE SPREAD OF FIRE, KEEP CANDLES AND OTHER ITEMS WITH OPEN FLAMES AWAY FROM THIS PRODUCT AT ALL TIMES.
Caring for the MICRO LED
- To clean this apparatus, unplug the power cord from the wall outlet and wipe the product with a soft, dry cloth. Do not use any chemicals such as wax, benzene, alcohol, thinners, insecticide, aerial fresheners, lubricants, or detergents. These chemicals can damage the appearance of the MICRO LED or erase the printing on the product.
- The exterior and screen of the MICRO LED can get scratched during cleaning. Be sure to wipe the exterior and screen carefully using a soft cloth to prevent scratches.
- Do not spray water or any liquid directly onto the MICRO LED. Any liquid that goes into the product may cause a failure, fire, or electric shock.
01 What's in the Box?
Make sure the following items are included with your MICRO LED. If any items are missing, contact your dealer.
• Samsung Smart Remote
- User Manual
- Warranty Card / Regulatory Guide (Not available in some locations)
- MICRO LED Power Cord
- IR Cable x 4
- One Connect Box
• One Connect Power Cord
• One Connect Cable
• One Connect Cable Gender
- The provided cables may differ depending on the country. Be sure to use the power cord that is suitable for your region.
- The items' colours and shapes may vary depending on the models.
• Cables not included can be purchased separately.
- Check for any accessories hidden behind or in the packing materials when opening the box.
Warning: Screens can be damaged from direct pressure when handled incorrectly. As shown in the figure, make sure to grip the edges of the screen when you lift the MICRO LED.
text_image
Do Not Touch This Screen!Using the IR Cable
When using the Multi View function, HDMI to 4 ports can be operated via IR cable connected to each IR check the e-Manual (in) > Menu > Settings > Support > Open e-Manual for instructions on how to use the Multi View function.

natural_image
Line drawing of a rectangular electronic device with multiple ports and connecting cables (no text or symbols)02 Connecting the MICRO LED to the One Connect Box

text_image
MICRO LED ① ② ③ ④One Connect Box
text_image
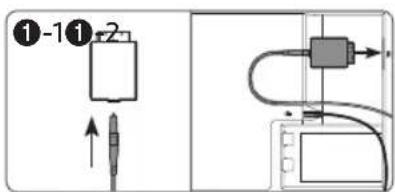
①-1①+2
text_image
Diagram showing three steps of cable connection: wire insertion, cable attachment, and cable outlet installation.Refer to the picture and connect the MICRO LED and One Connect Box with the One Connect cable provided as a component.
- Do not use the One Connect Box in the upside-down or upright position.
- Make sure that the cable is not twisted during connection. Otherwise, the product performance may be degraded or the cable may be damaged.
- When arranging the remaining cable, refer to the picture above to arrange it.

Bending Twisting Pulling


Pressing on

03 Initial Setup
When you turn on your MICRO LED for the first time, it immediately starts the Initial Setup. Follow the instructions displayed on the screen and configure the MICRO LED's basic settings to suit your viewing environment.
- You will need a Samsung Account to access our network-based smart services. If you choose not to log in, you will only get a connection to terrestrial TV (applicable to devices with tuners only) and external devices, e.g. via HDMI.
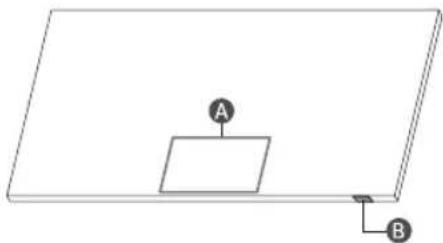
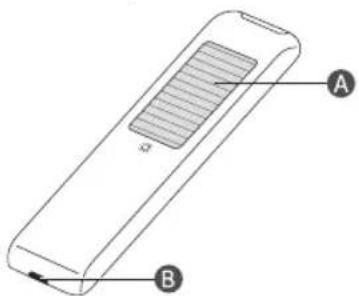
Using the MICRO LED Controller
You can turn on the MICRO LED with the MICRO LED Controller button at the bottom of the MICRO LED, and then use the Control menu. The Control menu appears when the MICRO LED Controller button is pressed while the MICRO LED is On.
natural_image
Simple line drawing of a rectangular block with two labeled points A and B, no text or symbols present.A Control menu
B MICRO LED Controller button / Remote control sensor / Microphone switch
How to turn on and off the Microphone
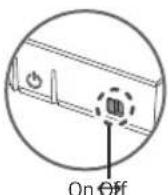
You can turn on or off the microphone by using the switch at the bottom of the MICRO LED. If microphone is turned off, All voice and sound features using microphone are not available.
- The position and shape of the microphone switch may differ depending on the model.
- During analysis using data from the microphone, the data is not saved.
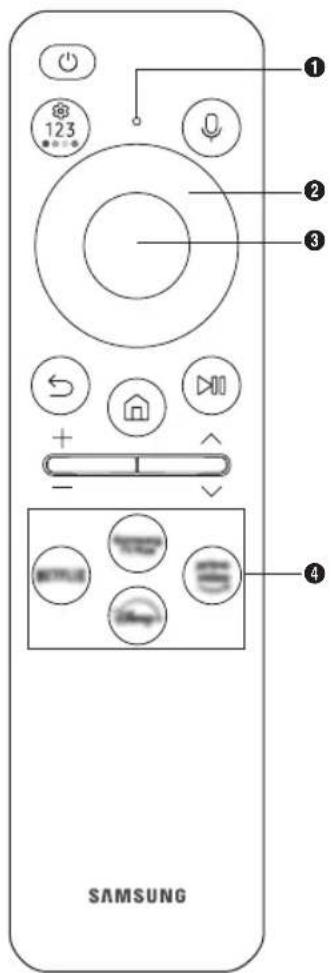
04 About the Buttons on the Samsung SolarCell Remote (Samsung Smart Remote)
text_image
123 SAMSUNG(Power)
Press to turn the MICRO LED on or off.
① MIC / LED
Used as MIC when using voice recognition with the remote control.
- Do not impact the MIC hole or use a sharp object to poke into the hole.
(Voice Assistant)
Runs Voice Assistant. Press and hold the button, say a command, and then release the button to run Voice Assistant.
- The supported Voice Assistant's languages and features may differ by geographical area.
(Settings / Number / Colour button)
Each time you press this button, Settings menu / virtual numeric pad / Option pad with Colour buttons are displayed alternately.
- Use this button to access additional options that are specific to the feature in use.
- Press to bring up the virtual numeric pad on the screen. Use the numeric keypad to enter numeric values. Select numbers and then select Done or Enter Number to enter a numeric value. Use to change the channel, enter a PIN, enter a ZIP code, etc.
② Directional button (up, down, left, right)
Moves the focus and changes the values seen on the MICRO LED's menu.
③ Select
Selects or runs a focused item. When pressed while you are watching content, detailed programme information appears.
(Return)
Press to return to the previous menu. When pressed for 1 second or more, the running function is terminated. When pressed while you are watching a programme, the previous channel appears.
(Smart Hub)
Press to return to the Home Screen.
(Play/pause)
When pressed, the playback controls appear. Using these controls, you can control the media content that is playing.
To use Game Bar, press and hold the button in Game Mode.
- Game Bar may not be supported depending on the model or geographical area.
text_image
UL VALIDATED • THE PLASTIC PART OF 23Y SMART CONTROL CONTAINS A MINIMUM OF 24% RECYCLED CONTENT UL.COM/ECV+/−(Volume)
Move the button up or down to adjust the volume. To mute the sound, press the button. When pressed for 2 seconds or more, the Accessibility Shortcuts menu appears.
^/∨ (Channel)
Move the button up or down to change the channel. To see the Guide screen, press the button. When pressed for 1 second or more, the Channel List screen appears.
④ Launch app button
Press each button to run its function.
• Available apps may differ depending on the geographical area or contents provider.
S + D(Pairing)
If the Samsung Smart Remote does not pair to the MICRO LED automatically, point it at the front of the MICRO LED, and then press and hold the ⬤ and pauttons simultaneously for 3 seconds or more.
- Use the Samsung Smart Remote less than 6 m from the MICRO LED. The usable distance may vary with the wireless environmental conditions.
- The images, buttons, and functions of the Samsung Smart Remote may differ with the model or geographical area.
- The Universal Remote function operates normally only when you use the Samsung Smart Remote that comes with the MICRO LED.
Charging the battery
natural_image
Diagram of a rectangular device with labeled parts A and B, showing internal structure and directional arrows (no text or symbols beyond labels)A Solar Cell
Expose to light when the remote is not in use. This will extend the remote's operating time.
B USB port (C-type) for charging
Used for quick charging. The LED on the front will light when charging. When the battery is fully charged, the LED will turn off.
• The USB Cable is not provided.
- It is recommended to use an original Samsung charger. Otherwise, it may cause performance degradation or failure of the product. In this case, the warranty service is not applicable.
- When the remote control does not work due to low battery, charge it by using the USB-C type port.
Fire or explosion may occur, resulting in damage to the remote control or personal injury.
- Do not apply shock to the remote control.
- Be careful not to let foreign substances such as metal, liquid, or dust come in contact with the charging terminal of the remote control.
- When the remote control is damaged or you smell smoke or burning fumes, immediately stop operation and then repair it at the Samsung service centre.
- Do not arbitrarily disassemble the remote control.
- Be careful not to let infants or pets suck or bite the remote control. Fire or explosion may occur, resulting in damage to the remote control or personal injury.
05 Troubleshooting and Maintenance
Troubleshooting
For more information, refer to "Troubleshooting" in the e-Manual.
Menu > Settings > Support > Open e-Manual >
Troubleshooting
If none of the troubleshooting tips apply, please visit "www.samsung.com" and click Support or contact the Samsung service centre.
- Due to technical limitations in the manufacturing process, some pixels of the panel may appear darker or brighter, or may flicker. However, this does not affect the product's performance.
- Due to multiple modules of the product, a grid pattern may appear from a close distance. This is not a product defect.
- To keep your MICRO LED in optimum condition, upgrade to the latest software. Use the Update Now or Auto update functions on the MICRO LED's menu (Menu > Settings > Support > Software Update > Update Now or Auto update).
The MICRO LED won't turn on.
• Make sure that the power cord is securely plugged into the MICRO LED, One Connect Box and the wall outlet.
- Make sure that the wall outlet is working and the remote control sensor at the bottom of the MICRO LED is lit and glowing a solid red.
- Try pressing the MICRO LED Controller button at the bottom of the MICRO LED to make sure that the problem is not with the remote control. If the MICRO LED turns on, refer to "The remote control does not work".
The remote control does not work.
- Check if the remote control sensor at the bottom of the MICRO LED blinks when you press the ⏻ button on the remote control.
- When the remote's battery is discharged, charge the battery using the USB charging port (C-type), or turn over the remote to expose the solar cell to light.
- Try pointing the remote directly at the MICRO LED from 1.5-1.8 m away.
- If your MICRO LED came with a Samsung Smart Remote (Bluetooth Remote), make sure to pair the remote to the MICRO LED. To pair a Samsung Smart Remote, press the
5 and buttons together for 3 seconds.
Eco Sensor and screen brightness
Eco Sensor adjusts the brightness of the MICRO LED automatically. This feature measures the light in your room and optimises the brightness of the MICRO LED automatically to reduce power consumption. If you want to turn this off, go to
Menu > Settings > All Settings > General & Privacy >
Power and Energy Saving > Brightness Optimisation.
- The eco sensor is located at the bottom of the MICRO LED. Do not block the sensor with any object. This can decrease picture brightness.
06 Specifications and Other Information
Specifications
| Model Name MNA76MS1BAC M | NA89MS1BAC | |
| Display Resolution 3312 x 1872 3 | 864 x 2184 | |
| Screen Size | ||
| Diagonal | 76 inches | 89 inches |
| Measured Diagonally | 193.3 cm | 225.4 cm |
| Sound (Output) 120 W | ||
| Dimensions (W x H x D) | ||
| Body | 1685.1 x 953.6 x 24.9 mm | 1965.5 x 1117.3 x 24.9 mm |
| Weight | ||
| Body 37.0 kg 53.0 kg | ||
| Model Name MNA101MS1BC M | NA114MS1BC | |
| Display Resolution 4416 x 2496 | 4968 x 2808 | |
| Screen Size | ||
| Diagonal | 101 inches | 114 inches |
| Measured Diagonally | 257.6 cm | 289.0 cm |
| Sound (Output) 120 W | ||
| Dimensions (W x H x D) | ||
| Body | 2245.9 x 1275.6 x 24.9 mm | 2526.3 x 1429.1 x 24.9 mm |
| Weight | ||
| Body | 64.0 kg | 79.0 kg |
| Operating Temperature | 15 °C to 35 °C (59 °F to 95 °F) | |
| Operating Humidity | 10 % to 80 %, non-condensing | |
| Storage Temperature | -20 °C to 45 °C (-4 °F to 113 °F) | |
| Storage Humidity | 5 % to 95 %, non-condensing | |
Notes
• This device is a Class B digital apparatus.
- For information about the power supply, and more information about power consumption, refer to the information on the label attached to the product.
- On most models, the label is attached to the back of the MICRO LED.
- On One Connect Box models, the label is attached to the bottom of the One Connect Box.
• Typical power consumption is measured according to IEC 62087.
• To connect a LAN cable, use a CAT7 (*STP type) cable for the connection. (100/10 Mbps)
* Shielded Twisted Pair
* Figures and illustrations in this User Manual are provided for reference only and may differ from the actual product appearance. Product design and specifications may change without notice.
An administration fee may be charged in the following situations:
(a) An engineer is called out at your request, but it is found that the product has no defect (i.e., where the user manual has not been read).
(b) You bring the unit to the Samsung service centre, but it is found that the product has no defect (i.e., where the user manual has not been read).
You will be informed of the administration fee amount before a technician visits.
Following the repair by a non-authorised service provider, self-repair or non-professional repair of the product, Samsung is not liable for any damage to the product, any injury or any other product safety issue caused by any attempt to repair the product which does not carefully follow these repair and maintenance instructions. Any damage to the product caused by an attempt to repair the product by any person other than a Samsung certified service provider will not be covered by the warranty.
Please visit samsung.com/support to find further information about external power adapter and remote control associated with EU Ecodesign directive - ErP regulation
Decreasing power consumption
When you shut the MICRO LED off, it enters Standby mode. In Standby mode, it continues to draw a small amount of power. To decrease power consumption, unplug the power cord when you don't intend to use the MICRO LED for a long time.
Licences
Dolby Atmos
POWERED BY
QUICKSET®
HEVCAvance™ Covered by Patents at patentlist.hevcadvance.com
rovi guide
HDMI ^TM HIGH-DEFINED MULTIMEDIA INTERFACE
The terms HDMI, HDMI High-Definition Multimedia Interface, HDMI trade dress and the HDMI Logos are trademarks or registered trademarks of HDMI Licensing Administrator, Inc.
Hereby, Samsung declares that this radio equipment is in compliance with Directive 2014/53/EU and the relevant UK statutory requirements.
The full text of the declaration of conformity is available at the following internet address:
http://www.samsung.com go to Support and enter the model name.
This equipment may be operated in all EU countries and in the UK.
The 5 GHz WLAN(Wi-Fi) function of this equipment may only be operated indoors.
RF max transmitter power :
100 mW at 2.4 GHz - 2.4835 GHz,
200 mW at 5.15 GHz - 5.25 GHz & 5.47 GHz - 5.725 GHz,
100 mW at 5.25 GHz - 5.35 GHz.
Correct Disposal of This Product (Waste Electrical & Electronic Equipment) (Applicable in countries with separate collection systems)

This marking on the product, accessories or literature indicates that the product and its electronic accessories (e.g. charger, headset, USB cable) should not be disposed of with other household waste at the end of their working life. To prevent possible harm to the environment or human health from uncontrolled waste disposal, please separate these items from other types of waste and recycle them responsibly to promote the sustainable reuse of material resources.
Household users should contact either the retailer where they purchased this product, or their local government office, for details of where and how they can take these items for environmentally safe recycling.
Business users should contact their supplier and check the terms and conditions of the purchase contract. This product and its electronic accessories should not be mixed with other commercial wastes for disposal.

Correct disposal of batteries in this product (Applicable in countries with separate collection systems)
The marking on the battery, manual or packaging indicates that the battery in this product should not be disposed of with other household waste. Where marked, the chemical symbols Hg, Cd or Pb indicate that the battery contains mercury, cadmium or lead above the reference levels in EC Directive 2006/66.
The battery incorporated in this product is not user replaceable. For information on its replacement, please contact your service provider. Do not attempt to remove the battery or dispose it in a fire. Do not disassemble, crush, or puncture the battery. If you intend to discard the product, the waste collection site will take the appropriate measures for the recycling and treatment of the product, including the battery.
Removing the battery
- To remove the battery, contact an authorised service centre. To obtain battery removal instructions, please visit www.samsung.com/global/ecodesign_energy.
- For yours safety, you must not attempt to remove the battery. If the battery is not properly removed, it may lead to damage to the battery and device, cause personal injury, and/or result in the device being unsafe.
EU Declaration of Conformity
Product Details
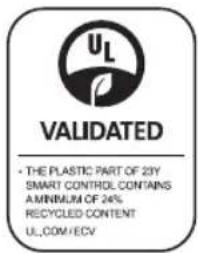
Product: Smart Control
Model(s): VG-TM2360E
Variant Model(s) : VG-TM2360F, VG-TM2360G
Declaration and applicable standards
We hereby declare under our sole responsibility that the product above is in compliance with the essential requirements of the Radio Equipment Directive(2014/53/EU) by application of:
EMC
EN 301 489-1 V2.2.3
EN 301 489-17 V3.2.4
Safety
EN IEC 62368-1:2020+A11:2020
EN IEC 62368-3:2020
EN 62311:2008
Radio
EN 300 328 V2.2.2
and the Directive (2011/65/EU) on the restriction of the use of certain hazardous substances in electrical and electronic equipment by application of EN IEC 63000:2018.
Signed for and on behalf of : Samsung
Samsung Euro QA Lab, Saxony Way, Yateley, GU46 6GG, UK* 2022-11-04 (Place and date of signature)
Stephen Colclough – Director Regulatory Affairs (Name and signature of authorized person)
※ This is not the address of Samsung Service Centre. Please see the address or the phone number of Samsung Service Centre in the warranty card or contact the retailer where you purchased your product.
text_image
Technical diagram showing mechanical assembly with labeled components A, B, C and detail views D and Cnatural_image
Line drawing of a rectangular electronic device with three ports and connecting cables (no text or symbols)text_image
Diagram showing a device with labeled components and an electrical connection diagram
text_image
Diagram showing cable connection steps with labeled components and a 10 cm cable specificationnatural_image
Simple line drawing of a rectangular plate with a small square and two labeled points A and B (no text or symbols beyond labels)text_image
Technical diagram of a rectangular device with labeled parts A and B, showing internal structure and directional arrow.A Solarzelle
HEVCAvance™ Covered by Patents at patentlist.hevcadvance.com
rovi guide
HDMI ^TM HIGH-DEFINED MULTIMEDIA INTERFACE
The terms HDMI, HDMI High-Definition Multimedia Interface, HDMI trade dress and the HDMI Logos are trademarks or registered trademarks of HDMI Licensing Administrator, Inc.
EN IEC 62368-1:2020+A11:2020
EN IEC 62368-3:2020
EN 62311:2008
Funk
EN 300 328 V2.2.2
text_image
Technical diagram showing mechanical assembly with labeled components A, B, C, D and magnified detail viewnatural_image
Line drawing of a rectangular electronic device with three ports and connecting cables (no text or symbols)text_image
Diagram showing a device with labeled components and an electrical connection diagram, including numbered callouts.
text_image
Diagram showing three steps of cable connection: adding cable to a plug, inserting into a device, and adding a CD to a cable outlet.natural_image
Simple line drawing of a rectangular plate with a small square and two labeled points A and B (no text or symbols beyond labels)A Menu de contrôle
text_image
Technical diagram of a rectangular device with labeled parts A and B, showing internal structure and directional arrow.A Cellule solaire
HEVCAvance™ Covered by Patents at patentlist.hevcadvance.com
rovi guide
HDMI ^TM HIGH-DEFINED MULTIMEDIA INTERFACE
The terms HDMI, HDMI High-Definition Multimedia Interface, HDMI trade dress and the HDMI Logos are trademarks or registered trademarks of HDMI Licensing Administrator, Inc.
EN IEC 62368-1:2020+A11:2020
EN 301 489-17 V3.2.4
EN IEC 62368-3:2020
EN 62311:2008
Radio
EN 300 328 V2.2.2
text_image
Technical diagram showing mechanical assembly with labeled components A, B, C and detail views D, including a magnified inset of a bolted joint detail.| Dimensioni in pollici del MICRO LED | 76 89 | |
| Specifiche foro vite VESA (A × B(mm)) | 600 x 400 | |
| C (mm) | 6 | |
| D × 4 | M8 | |
| Dimensioni in pollici delMICRO LED | 101 114 | |
| Specifiche foro vite VESA (A × B(mm)) | 800 x 600 1000 x 800 | |
| C (mm) | 6 | |
| D × 4 | M8 | |
Italiano - 3
natural_image
Line drawing of a rectangular electronic device with multiple ports and connecting cables (no text or symbols)text_image
Diagram showing a device with labeled components and connection to an electronic device, including a cable and plug.
text_image
Diagram showing three steps of cable connection: adding cable, inserting cable via connector, and adding a device with 10 cm distance.natural_image
Simple line drawing of a rectangular plate with a small square and two labeled points A and B (no text or symbols beyond labels)A Menu di controllo
text_image
Diagram of a remote control device with labeled parts A and B, showing internal structure and directional arrow.A Cella solare
HEVCAvance™ Covered by Patents at patentlist.hevcadvance.com
rovi guide
HDMI ^TM HIGH-DEFINED MULTIMEDIA INTERFACE
The terms HDMI, HDMI High-Definition Multimedia Interface, HDMI trade dress and the HDMI Logos are trademarks or registered trademarks of HDMI Licensing Administrator, Inc.
EN IEC 62368-1:2020+A11:2020
EN IEC 62368-3:2020
EN 62311:2008
Radio
EN 300 328 V2.2.2
text_image
Technical diagram showing mechanical assembly with labeled components A, B, C, D and magnified views of a bolted joint detail.natural_image
Line drawing of a rectangular electronic device with three ports and connecting cables (no text or symbols)text_image
Diagram showing three steps of cable connection: adding cable to a plug, inserting into a device, and adding a power outlet.natural_image
Simple line drawing of a rectangular block with two labeled points A and B, no text or symbols present.A Menu Beheer
text_image
Technical diagram of a rectangular device with labeled parts A and B, showing internal structure and directional arrow.A Zonnecel
* Shielded Twisted Pair
HEVCAvance™ Covered by Patents at patentlist.hevcadvance.com
rovi guide
HDMI ^TM HIGH-DEFINED MULTIMEDIA INTERFACE
The terms HDMI, HDMI High-Definition Multimedia Interface, HDMI trade dress and the HDMI Logos are trademarks or registered trademarks of HDMI Licensing Administrator, Inc.
EN IEC 62368-1:2020+A11:2020
EN IEC 62368-3:2020
EN 62311:2008
Radio
EN 300 328 V2.2.2
text_image
Technical diagram showing mechanical assembly with labeled components A, B, C, D and magnified views of a bolted joint detail.natural_image
Line drawing of a rectangular electronic device with three ports and connecting cables (no text or symbols)text_image
Diagram showing a device with labeled components and an electrical connection diagram
text_image
Diagram showing three steps of cable connection: adding cable to a plug, inserting into a device, and adding a card to a cable outlet.natural_image
Simple line drawing of a rectangular block with two labeled points A and B, no text or symbols present.A Menú Control
text_image
Diagram of a remote control device with labeled parts A and B, showing internal structure and directional arrow.A Célula solar
HEVCAvance™ Covered by Patents at patentlist.hevcadvance.com
rovi guide
HDMI ^TM HIGH-DEFINED MULTIMEDIA INTERFACE
The terms HDMI, HDMI High-Definition Multimedia Interface, HDMI trade dress and the HDMI Logos are trademarks or registered trademarks of HDMI Licensing Administrator, Inc.
Modelo(s): VG-TM2360E
Modelo (s) variante (s) : VG-TM2360F, VG-TM2360G
EN IEC 62368-1:2020+A11:2020
EN 301 489-17 V3.2.4
EN IEC 62368-3:2020
EN 62311:2008
Radio
EN 300 328 V2.2.2
text_image
Technical diagram showing mechanical assembly with labeled components A, B, C, D and magnified detail viewnatural_image
Line drawing of a rectangular electronic device with three ports and connecting cables (no text or symbols)text_image
Diagram showing a device with labeled components and connection to a device via cable, including numbered callouts.
text_image
Diagram showing three steps of cable connection: adding cable to a plug, inserting into a device, and adding a device with 10 cm distance.natural_image
Simple line drawing of a rectangular block with two labeled points A and B, no text or symbols present.A Menu de Controlo
text_image
Technical diagram of a remote control device with labeled parts A and BA Célula solar
* Shielded Twisted Pair
HEVCAvance™ Covered by Patents at patentlist.hevcadvance.com
rovi guide
HDMI ^TM HIGH-DEFINED MULTIMEDIA INTERFACE
The terms HDMI, HDMI High-Definition Multimedia Interface, HDMI trade dress and the HDMI Logos are trademarks or registered trademarks of HDMI Licensing Administrator, Inc.
Modelo(s): VG-TM2360E
Variantes do modelo : VG-TM2360F, VG-TM2360G
EN IEC 62368-1:2020+A11:2020
EN IEC 62368-3:2020
EN 62311:2008
Radio
EN 300 328 V2.2.2
text_image
Technical diagram showing mechanical assembly with labeled components A, B, C, D and detail views of a bolted jointnatural_image
Line drawing of a rectangular electronic device with three ports and connecting cables (no text or symbols)text_image
Diagram showing three steps of cable installation: wire connection, device placement, and cable attachment with 10 cm dimension label.natural_image
Simple line drawing of a rectangular plate with a small square and two labeled points A and B (no text or symbols beyond labels)A Kontrollmeny
B MICRO LED-kontroll-knapp / Mottagare för fjärrkontrollen / Mikrofonreglage
text_image
Diagram of a remote control device with labeled parts A and B, showing internal structure and directional arrow.A Solcell
* Shielded Twisted Pair
HEVCAvance™ Covered by Patents at patentlist.hevcadvance.com
rovi guide
HDMI ^TM HIGH-DEFINED MULTIMEDIA INTERFACE
The terms HDMI, HDMI High-Definition Multimedia Interface, HDMI trade dress and the HDMI Logos are trademarks or registered trademarks of HDMI Licensing Administrator, Inc.
EN IEC 62368-1:2020+A11:2020
EN IEC 62368-3:2020
EN 62311:2008
Radio
EN 300 328 V2.2.2
text_image
Technical diagram showing mechanical assembly with labeled components A, B, C and detail views D and E| MICRO LED-størrelse i tommer | 76 | 89 |
| Specifikationer for VESA-skruehuller (A) (B)nm) | 600 x 400 | |
| C (mm) | 6 | |
| D x 4 | M8 | |
| MICRO LED-størrelse i tommer 101 | 14 | |
| Specifikationer for VESA-skruehuller (A) (B)nm) | 800 x 600 | 1000 x 800 |
| C (mm) | 6 | |
| D x 4 | M8 | |
natural_image
Line drawing of a rectangular electronic device with three ports and connecting cables (no text or symbols)text_image
Diagram showing four steps of a device connection with labeled components and a 10 cm measurement indicator.natural_image
Simple line drawing of a rectangular block with two labeled points A and B, no text or symbols present.A Fjernbetjeningsmenu
B MICRO LED-kontrolenhed-knappen / Fjernbetjeningssensor / Mikrofonkontakt
text_image
Technical diagram of a remote control device with labeled parts A and BA solceller
HEVCAvance™ Covered by Patents at patentlist.hevcadvance.com
rovi guide
HDMI ^TM HIGH-DEFINED MULTIMEDIA INTERFACE
The terms HDMI, HDMI High-Definition Multimedia Interface, HDMI trade dress and the HDMI Logos are trademarks or registered trademarks of HDMI Licensing Administrator, Inc.
EN IEC 62368-1:2020+A11:2020
EN 301 489-17 V3.2.4
EN IEC 62368-3:2020
EN 62311:2008
Radio
EN 300 328 V2.2.2
text_image
Technical diagram showing mechanical assembly with labeled components A, B, C and detail views D, including a magnified inset of a bolted component.| MICRO LED -størrelse i tommer 76 89 | |
| VESA, skruehullspesifikasjoner (A x B(mm)) | 600 x 400 |
| C (mm) | 6 |
| D x 4 | M8 |
| MICRO LED -størrelse i tommer 101 114 | |
| VESA, skruehullspesifikasjoner (A x B(mm)) | 800 x 600 1000 x 800 |
| C (mm) | 6 |
| D x 4 | M8 |
natural_image
Line drawing of a rectangular electronic device with three ports and connecting cables (no text or symbols)| IR(→) | 1(→) | 2(→) | 3(→) | 4(→) |

| HDMI(€) | 1(田) | 2(田) | 3(田) | 4(田) |
02 Koble MICRO LED til One Connect-boksen

text_image
MICRO LED ① ② ③ ④One Connect-boks

text_image
Diagram showing a device with labeled components and an electrical connection diagram
text_image
Diagram showing three steps of cable connection: adding a plug, inserting a cable into a device, and adding a power adapter to a device.natural_image
Simple line drawing of a rectangular block with two labeled points A and B, no text or symbols present.A Kontrollmeny
B MICRO LED-kontroller-knappen / Fjernkontrollsensoren / Mikrofonbryteren
text_image
Technical diagram of a remote control device with labeled parts A and BA Solcelle
Eksponer fjernkontrollen for lys når den ikke er i bruk. Dette vil forlenge fjernkontrollens brukstid.
B USB-port (C-type) for lading
* Shielded Twisted Pair
HEVCAvance™ Covered by Patents at patentlist.hevcadvance.com
rovi guide
HDMI ^TM HIGH-DEFINED MULTIMEDIA INTERFACE
The terms HDMI, HDMI High-Definition Multimedia Interface, HDMI trade dress and the HDMI Logos are trademarks or registered trademarks of HDMI Licensing Administrator, Inc.
EN IEC 62368-1:2020+A11:2020
EN IEC 62368-3:2020
EN 62311:2008
Radio
EN 300 328 V2.2.2
text_image
Technical diagram showing mechanical assembly with labeled components A, B, C, D and detail views of a bolted joint| MICRO LED in koko tuumina 76 | 89 | |
| VESA-ruuvinreikien tiedot(A x B(mm)) | 600 x 400 | |
| C (mm) | 6 | |
| D x 4 | M8 | |
| MICRO LED in koko tuumina 101 | 114 | |
| VESA-ruuvinreikien tiedot(A x B(mm)) | 800 x 600 1000 x 800 | |
| C (mm) | 6 | |
| D x 4 | M8 | |
natural_image
Line drawing of a rectangular electronic device with three ports and connecting cables (no text or symbols) |
 |
 |
text_image
Diagram showing a device with labeled components and an electrical connection diagram
text_image
Diagram showing three steps of cable connection: adding a plug, connecting to a device, and adding a device with 10 cm distance.natural_image
Simple line drawing of a rectangular plate with a small square and two labeled points A and B (no text or symbols beyond labels)A Ohjausvalikko
text_image
Technical diagram of a remote control device with labeled components A and BA Aurinkokenno
HEVCAvance™ Covered by Patents at patentlist.hevcadvance.com
rovi guide
HDMI ^TM HIGH-DEFINED MULTIMEDIA INTERFACE
The terms HDMI, HDMI High-Definition Multimedia Interface, HDMI trade dress and the HDMI Logos are trademarks or registered trademarks of HDMI Licensing Administrator, Inc.
EN IEC 62368-1:2020+A11:2020
EN IEC 62368-3:2020
EN 62311:2008
Radio
EN 300 328 V2.2.2
text_image
Technical diagram showing mechanical assembly with labeled components A, B, C, D and detail views of a bolted jointnatural_image
Line drawing of a rectangular electronic device with three ports and connecting cables (no text or symbols)text_image
Diagram showing a battery connected to a device via tubing, with labeled parts and directional arrows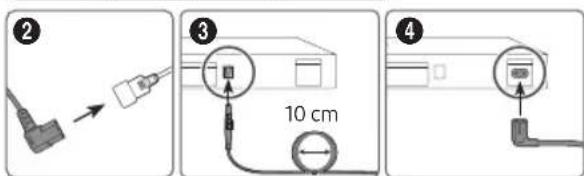
text_image
Diagram showing three steps of a cable connection: adding cable, inserting cable into a device, and adding a CD to a cable outlet.natural_image
Simple line drawing of a rectangular block with two labeled points A and B, no text or symbols present.A Vezérlés menü
(Q) (Voice assistant)
text_image
Technical diagram of a rectangular device with labeled parts A and B, showing internal structure and directional arrow.A Napelem
HEVCAvance™ Covered by Patents at patentlist.hevcadvance.com
rovi guide
HDMI ^TM HIGH-DEFINED MULTIMEDIA INTERFACE
The terms HDMI, HDMI High-Definition Multimedia Interface, HDMI trade dress and the HDMI Logos are trademarks or registered trademarks of HDMI Licensing Administrator, Inc.
EN IEC 62368-1:2020+A11:2020
EN IEC 62368-3:2020
EN 62311:2008
Rádió
EN 300 328 V2.2.2
text_image
Technical diagram showing mechanical assembly with labeled components A, B, C and detail views D, including a magnified inset of a bolted joint.natural_image
Line drawing of a rectangular electronic device with three ports and connecting cables (no text or symbols)text_image
Diagram showing a device with labeled components and an electrical connection diagram, likely illustrating a test setup or measurement setup.
text_image
Diagram showing cable connection steps with labeled components and a 10 cm cable specificationnatural_image
Simple line drawing of a rectangular block with a small square labeled A and a small arrow labeled B pointing to the right side (no text or symbols beyond labels)A Menu sterowania
text_image
Technical diagram of a rectangular device with labeled parts A and B, showing internal structure and directional arrow.A Ogniwo słoneczne
HEVCAvance™ Covered by Patents at patentlist.hevcadvance.com
rovi guide
HDMI ^TM HIGH-DEFINED MULTIMEDIA INTERFACE
The terms HDMI, HDMI High-Definition Multimedia Interface, HDMI trade dress and the HDMI Logos are trademarks or registered trademarks of HDMI Licensing Administrator, Inc.
EN IEC 62368-1:2020+A11:2020
EN IEC 62368-3:2020
EN 62311:2008
Radio
EN 300 328 V2.2.2
text_image
Technical diagram showing mechanical assembly with labeled components A, B, C, D and detail views of bolted connection detailsnatural_image
Line drawing of a rectangular electronic device with three ports and connecting cables (no text or symbols)text_image
Diagram showing a device with labeled components and an electrical connection diagram
text_image
Diagram showing cable connection steps with labeled components and a 10 cm cable specificationnatural_image
Simple line drawing of a rectangular plate with a small square labeled A and a small arrow labeled B pointing to the bottom right (no text or symbols beyond labels)A Μενού ελέγχου
text_image
Technical diagram of a rectangular device with labeled parts A and B, showing internal structure and section line.A Ηλιακό πάνελ
* Shielded Twisted Pair
HEVCAvance™ Covered by Patents at patentlist.hevcadvance.com
rovi guide
HDMI ^TM HIGH-DEFINED MULTIMEDIA INTERFACE
The terms HDMI, HDMI High-Definition Multimedia Interface, HDMI trade dress and the HDMI Logos are trademarks or registered trademarks of HDMI Licensing Administrator, Inc.
EN IEC 62368-1:2020+A11:2020
EN 301 489-1 V2.2.3
EN IEC 62368-3:2020
EN 301 489-17 V3.2.4
EN 62311:2008
Ραδιοσυχνότητα
EN 300 328 V2.2.2
text_image
Technical diagram showing mechanical assembly with labeled components A, B, C and detail views D and E| Размер на MICRO LED в инчове | 76 | 89 |
| Спецификации на отворите за винтове на VESA (A x B (MM) | 600 x 400 | |
| C (MM) | 6 | |
| D x 4 | M8 | |
| Размер на MICRO LED в инчове | 101 114 | |
| Спецификации на отворите за винтове на VESA (A x B (MM) | 800 x 600 10 | 00 x 800 |
| C (MM) | 6 | |
| D x 4 | M8 | |
Български - 3
natural_image
Line drawing of a rectangular electronic device with three ports and connecting cables (no text or symbols)text_image
Diagram showing four steps of connected electrical components with numbered labels and a 10 cm measurement indicator.natural_image
Simple line drawing of a rectangular plate with a small square and two labeled points A and B (no text or symbols beyond labels)text_image
Technical diagram of a rectangular device with labeled parts A and B, showing internal structure and directional arrow.A Слънчев панел
* Shielded Twisted Pair
HEVCAvance™ Covered by Patents at patentlist.hevcadvance.com
rovi guide
HDMI ^TM HIGH-DEFINED MULTIMEDIA INTERFACE
The terms HDMI, HDMI High-Definition Multimedia Interface, HDMI trade dress and the HDMI Logos are trademarks or registered trademarks of HDMI Licensing Administrator, Inc.
EN IEC 62368-1:2020+A11:2020
EN 301 489-1 V2.2.3
EN IEC 62368-3:2020
EN 301 489-17 V3.2.4
EN 62311:2008
Радио
EN 300 328 V2.2.2
text_image
Technical diagram showing mechanical assembly with labeled components A, B, C, D and magnified views of a bolted joint detail.| Veličina zaslona MICRO LED uređaja u inčima | 76 89 | |
| VESA specifikacije za otvor vijka (A x B(mm)) | 600 x 400 | |
| C (mm) | 6 | |
| D x 4 | M8 | |
| Veličina zaslona MICRO LED uređaja u inčima | 101 114 | |
| VESA specifikacije za otvor vijka (A x B(mm)) | 800 x 600 1000 x 800 | |
| C (mm) | 6 | |
| D x 4 | M8 | |
Osiguravanje odgovarajućeg prozračivanja MICRO LED uređaja
Pri postavljanju MICRO LED uređaja i uređaja One Connect ostavite razmak od najmanje 10 cm između MICRO LED uređaja, uređaja One Connect i ostalih predmeta (zidovi, stranice ormarića, itd.) kako bi se zajamčila potrebna ventilacija.
Nepostojanje odgovarajuće ventilacije može uzrokovati požar ili probleme s proizvodom uslijed povećanja njegove interne temperature.
natural_image
Line drawing of a rectangular electronic device with multiple ports and connecting cables (no text or symbols)text_image
Diagram showing a device with labeled components and connection to an electronic device, including a pen and cable.
text_image
Diagram showing three steps of a cable connection: adding cable, inserting cable into a device, and adding a device with 10 cm distance.natural_image
Simple line drawing of a rectangular block with two labeled points A and B, no text or symbols present.A Izbornik za upravljanje
B Gumb Upravljač za MICRO LED uređaj / Senzor daljinskog upravljača / Prekidač mikrofona
text_image
Technical diagram of a remote control device with labeled parts A and BA Solarna ćelija
* Shielded Twisted Pair
* Slike i crteži navedeni u ovom korisničkom priručniku informativne su prirode i mogu se razlikovati od stvarnog izgleda uređaja. Dizajn i specifikacije proizvoda mogu se promijeniti bez prethodne najave.
Moguća je naplata naknade za administraciju u slučaju:
(a) pozivanja inženjera na vaš zahtjev, ako se ustanovi da je proizvod ispravan (tj. niste pročitali korisnički priručnik)
(b) dostave uređaja u Samsung servisni centar, ako se ustanovi da je proizvod ispravan (tj. niste pročitali korisnički priručnik).
O iznosu administrativne naknade bit ćete obaviješteni prije tehničarovog posjeta.
Samsung nije odgovoran za oštećenja uređaja, ozljede ili bilo koji drugi problem u vezi sigurnosti uređaja koji su uzrokovani popravkom uređaja od strane neovlaštenog servisa, od strane samog korisnika uređaja ili od strane nestručne osobe, ili pokušajem popravka uređaja prilikom kojega nisu pažljivo poštivane ove upute za popravak i održavanje. Bilo kakvo oštećenje uređaja nastalo kao posljedica pokušaja popravka uređaja od strane druge osobe osim ovlaštenog Samsung pružatelja servisnih usluga neće biti pokriveno jamstvom za ispravnost uređaja.
Posjetite Samsung.com/support kako biste pronašli detaljnije informacije o vanjskom adapteru za napajanje te daljinskom upravljaču koji su povezani s EU direktivom o ekološkom dizajnu - ErP regulativa
Smanjenje potrošnje energije
HEVCAvance™ Covered by Patents at patentlist.hevcadvance.com
rovi guide
HDMI ^TM HIGH-DEFINED MULTIMEDIA INTERFACE
The terms HDMI, HDMI High-Definition Multimedia Interface, HDMI trade dress and the HDMI Logos are trademarks or registered trademarks of HDMI Licensing Administrator, Inc.
Samsung ovime izjavljuje da je ova radijska oprema u skladu s Direktivom 2014/53/EU i relevantnim zakonskim odredbama Ujedinjene Kraljevine.
EN IEC 62368-1:2020+A11:2020
EN 301 489-17 V3.2.4
EN IEC 62368-3:2020
EN 62311:2008
Radio
EN 300 328 V2.2.2
Direktiva (2011/65/EU) o ograničavanju uporabe određenih opasnih tvari u električnim i elektroničkim uređajima primjenom EN 50581:2012.
Potpisano za i u ime: Samsung
Samsung Euro QA Lab, Saxony Way, Yateley, GU46 6GG, UK* 2022-11-04 (Mjesto i datum potpisa)

Stephen Colclough – Ravnatelj regulatornih poslova (lme i potpis ovlaštene osobe)
※ Ovo nije adresa Samsung servisnog centra. Adresu ili telefonski broj Samsung servisnog centra potražite na jamstvenom listu ili se obratite maloprodajnoj tvrtki od koje ste kupili Vaš proizvod.


text_image
Technical diagram showing mechanical assembly with labeled components A, B, C, D and magnified views of a bolted joint detail.natural_image
Line drawing of a rectangular electronic device with three ports and four connectors, connected by wires (no text or symbols)text_image
Diagram showing a device with labeled components and connection to an electronic device, including a schematic diagram.
text_image
Diagram showing cable connection steps with labeled components and a 10 cm distance measurement indicatornatural_image
Simple 3D diagram of a rectangular block with two labeled points A and B, no text or symbols present.A Systémové menu
text_image
Technical diagram of a remote control device with labeled parts A and BA Solární článek
* Shielded Twisted Pair
HEVCAvance™ Covered by Patents at patentlist.hevcadvance.com
rovi guide
HDMI ^TM HIGH-DEFINED MULTIMEDIA INTERFACE
The terms HDMI, HDMI High-Definition Multimedia Interface, HDMI trade dress and the HDMI Logos are trademarks or registered trademarks of HDMI Licensing Administrator, Inc.
EN IEC 62368-1:2020+A11:2020
EN 301 489-1 V2.2.3
EN IEC 62368-3:2020
EN 301 489-17 V3.2.4
EN 62311:2008
Rádio
EN 300 328 V2.2.2
text_image
Technical diagram showing mechanical assembly with labeled components A, B, C and detail views D, including a magnified inset of a bolted joint.| Velkost televizora MICRO LED v palcoch | 76 89 | |
| Rozmery otvorov na skrutky VESA (A x B(mm)) | 600 x 400 | |
| C (mm) | 6 | |
| D x 4 | M8 | |
| Velkost televizora MICRO LED v palcoch | 101 114 | |
| Rozmery otvorov na skrutky VESA (A x B(mm)) | 800 x 600 | 1000 x 800 |
| C (mm) | 6 | |
| D x 4 | M8 | |
natural_image
Line drawing of a rectangular electronic device with multiple ports and connecting cables (no text or symbols)text_image
Diagram showing a device with labeled components and connection to an oscilloscope, including numbered callouts.
text_image
Diagram showing cable connection steps with labeled components and a 10 cm distance indicatornatural_image
Simple line drawing of a rectangular block with two labeled points A and B, no text or symbols present.A Ponuka ovládania
* Shielded Twisted Pair
HEVCAvance™ Covered by Patents at patentlist.hevcadvance.com
rovi guide
HDMI ^TM HIGH-DEFINED MULTIMEDIA INTERFACE
The terms HDMI, HDMI High-Definition Multimedia Interface, HDMI trade dress and the HDMI Logos are trademarks or registered trademarks of HDMI Licensing Administrator, Inc.
EN IEC 62368-1:2020+A11:2020
EN IEC 62368-3:2020
EN 62311:2008
Rádio
EN 300 328 V2.2.2
text_image
Technical diagram showing mechanical assembly with labeled components A, B, C and detail views D, including a magnified inset of a component.natural_image
Line drawing of a rectangular electronic device with three ports and connecting cables (no text or symbols)text_image
Diagram showing a device with labeled components and connection to an oscilloscope, including numbered callouts.
text_image
Diagram showing three steps of a cable connection: adding cable, inserting cable into a device, and adding a device with 10 cm distance.natural_image
Simple line drawing of a rectangular block with two labeled points A and B, no text or symbols present.A Meniu Control
B Controller MICRO LED Buton / Senzor telecomandă / Comutator microfon
natural_image
Technical line drawing of a rectangular electronic device with labeled parts A and B (no text or symbols beyond labels)A Celulă solară
* Shielded Twisted Pair
HEVCAvance™ Covered by Patents at patentlist.hevcadvance.com
rovi guide
HDMI ^TM HIGH-DEFINED MULTIMEDIA INTERFACE
The terms HDMI, HDMI High-Definition Multimedia Interface, HDMI trade dress and the HDMI Logos are trademarks or registered trademarks of HDMI Licensing Administrator, Inc.
EN IEC 62368-1:2020+A11:2020
EN IEC 62368-3:2020
EN 62311:2008
Radio
EN 300 328 V2.2.2
text_image
Technical diagram showing mechanical assembly with labeled components A, B, C, D and magnified views of a bolted joint detail.| Dijagonala MICRO LED uređaja u inčima | 76 89 | |
| VESA specifikacije za otvore za zavrtnje (A xB(mm)) | 600 x 400 | |
| C (mm) | 6 | |
| D x 4 | M8 | |
| Dijagonala MICRO LED uređaja u inčima | 101 114 | |
| VESA specifikacije za otvore za zavrtnje (A xB(mm)) | 800 x 600 1000 x 800 | |
| C (mm) | 6 | |
| D x 4 | M8 | |
natural_image
Line drawing of a rectangular electronic device with three ports and connecting cables (no text or symbols)text_image
Diagram showing a device with labeled components and connection to an oscilloscope, including numbered callouts.
text_image
Diagram showing cable connection steps with labeled components and a 10 cm cable connection indicatorPogledajte sliku i povežite MICRO LED uređaj i uređaj One Connect pomoću One Connect kabla koji je isporučen kao komponenta.
- Nemojte da koristite One Connect u obrnutom ili uspravnom položaju.
- Prilikom priključivanja se uverite da kabl nije uvrnut. U suprotnom, radne karakteristike proizvoda mogu da budu umanjene ili kabl može da se ošteti.
- Prilikom sprovođenja preostalog kabla pogledajte sliku iznad za pravilno sprovođenje.

natural_image
Simple line drawing of a rectangular block with two labeled points A and B, no text or symbols present.A Kontrolni meni
B Kontroler MICRO LED uređaja dugme / senzor za daljinski upravljač / prekidač za mikrofon
natural_image
Line drawing of a rectangular electronic device with labeled points A and B, showing internal structure (no text or symbols beyond labels)A Solarna celija
* Shielded Twisted Pair
* Slike i ilustracije u ovom korisničkom priručniku služe samo kao referenca i mogu da se razlikuju od stvarnog izgleda uređaja. Dizajn uređaja i specifikacije mogu da se promene bez najave.
HEVCAvance™ Covered by Patents at patentlist.hevcadvance.com
rovi guide
HDMI ^TM HIGH-DEFINED MULTIMEDIA INTERFACE
The terms HDMI, HDMI High-Definition Multimedia Interface, HDMI trade dress and the HDMI Logos are trademarks or registered trademarks of HDMI Licensing Administrator, Inc.
Ovim putem Samsung izjavljuje da je ova radio oprema usklađena sa Direktivom 2014/53/EU i relevantnim ustavnim zahtevima u Ujedinjenom Kraljevstvu.
EN IEC 62368-1:2020+A11:2020
EN IEC 62368-3:2020
EN 62311:2008
Radio
EN 300 328 V2.2.2
i Direktive (2011/65/EU) o ograničenju upotrebe određenih opasnih supstanci u električnoj i elektronskoj opremi kroz primenu standarda EN IEC 63000:2018.
Potpisano za i u ime: Samsung
Samsung Euro QA Lab, Saxony Way, Yateley, GU46 6GG, UK* 2022-11-04 (mesto i datum potpisa)

Stephen Colclough – Direktor službe za pitanja u vezi sa propisima (ime i potpis ovlašćenog lica)
text_image
Technical diagram showing mechanical assembly with labeled components A, B, C and detail views D and Enatural_image
Line drawing of a rectangular electronic device with three ports and connecting cables (no text or symbols)text_image
Diagram showing four steps of connected electrical components with numbered labels and a 10 cm measurement indicator.natural_image
Simple line drawing of a rectangular block with two labeled points A and B, no text or symbols present.A Menyja e komandimit
B Butoni Pulti i MICRO LED / Sensori i telekomandës / Çelësi i mikrofonit
text_image
Technical diagram of a remote control device with labeled parts A and B
Pila diellore
* Shielded Twisted Pair
HEVCAvance™ Covered by Patents at patentlist.hevcadvance.com
rovi guide
HDMI ^TM HIGH-DEFINED MULTIMEDIA INTERFACE
The terms HDMI, HDMI High-Definition Multimedia Interface, HDMI trade dress and the HDMI Logos are trademarks or registered trademarks of HDMI Licensing Administrator, Inc.
EN IEC 62368-1:2020+A11:2020
EN 301 489-17 V3.2.4
EN IEC 62368-3:2020
EN 62311:2008
Radio
EN 300 328 V2.2.2
text_image
Technical diagram showing mechanical assembly with labeled components A, B, C, D and detail views of a bolted joint detail.natural_image
Line drawing of a rectangular electronic device with three ports and connecting cables (no text or symbols)text_image
Diagram showing a device with labeled components and an electrical connection diagram
text_image
Diagram showing three steps of cable connection: adding cable, inserting cable via connector, and adding a device with 10 cm distance.natural_image
Simple line drawing of a rectangular plate with a small square and two labeled points A and B (no text or symbols beyond labels)natural_image
Diagram of a rectangular device with labeled parts A and B, showing internal structure and directional arrows (no text or symbols beyond labels)A Соларна келија
* Shielded Twisted Pair
HEVCAvance™ Covered by Patents at patentlist.hevcadvance.com
rovi guide
HDMI ^TM HIGH-DEFINED MULTIMEDIA INTERFACE
The terms HDMI, HDMI High-Definition Multimedia Interface, HDMI trade dress and the HDMI Logos are trademarks or registered trademarks of HDMI Licensing Administrator, Inc.
EN IEC 62368-1:2020+A11:2020
EN IEC 62368-3:2020
EN 62311:2008
Радио
EN 300 328 V2.2.2
text_image
Technical diagram showing mechanical assembly with labeled components A, B, C, D and magnified views of a bolted joint detail.| Velikost naprave MICRO LED v palcih | 76 | 89 |
| Specifikacije za luknje za vijake VESA (A x B(mm)) | 600 x 400 | |
| C (mm) | 6 | |
| D x 4 | M8 | |
| Velikost naprave MICRO LED v palcih | 101 114 | |
| Specifikacije za luknje za vijake VESA (A x B(mm)) | 800 x 600 | 1000 x 800 |
| C (mm) | 6 | |
| D x 4 | M8 | |
Zagotavljanje ustreznega prezračevanja naprave MICRO LED
Napravo MICRO LED in pretvornik One Connect namestite tako, da je vsaj 10 cm med napravo MICRO LED, pretvornikom One Connect in ostalimi predmeti (stenami, stranicami omar itd.), da zagotovite ustrezno prezračevanje. Pri neustreznem prezračevanju lahko pride do požara ali težav z izdelkom zaradi povišane notranje temperature.
natural_image
Line drawing of a rectangular electronic device with three ports and connecting cables (no text or symbols)text_image
Diagram showing four steps of a device connection with labeled components and a 10 cm measurement indicator.natural_image
Simple line drawing of a rectangular block with two labeled points A and B, no text or symbols present.A Nadzorní meni
text_image
Diagram of a remote control device with labeled parts A and B, showing internal structure and directional arrow.A Solarna celica
* Shielded Twisted Pair
HEVCAvance™ Covered by Patents at patentlist.hevcadvance.com
rovi guide
HDMI ^TM HIGH-DEFINED MULTIMEDIA INTERFACE
The terms HDMI, HDMI High-Definition Multimedia Interface, HDMI trade dress and the HDMI Logos are trademarks or registered trademarks of HDMI Licensing Administrator, Inc.
EN IEC 62368-1:2020+A11:2020
EN IEC 62368-3:2020
EN 62311:2008
Radio
EN 300 328 V2.2.2
text_image
Technical diagram showing mechanical assembly with labeled components A, B, C and inset views of a bolted joint detailnatural_image
Line drawing of a rectangular electronic device with three ports and connecting cables (no text or symbols)text_image
Diagram showing a device with labeled components and an electrical connection diagram
text_image
Diagram showing cable connection steps with labeled components and a 10 cm cable specificationnatural_image
Simple line drawing of a rectangular block with two labeled points A and B, no text or symbols present.text_image
Technical diagram of a remote control device with labeled parts A and BA saules baterija
HEVCAvance™ Covered by Patents at patentlist.hevcadvance.com
rovi guide
HDMI ^TM HIGH-DEFINED MULTIMEDIA INTERFACE
The terms HDMI, HDMI High-Definition Multimedia Interface, HDMI trade dress and the HDMI Logos are trademarks or registered trademarks of HDMI Licensing Administrator, Inc.
EN IEC 62368-1:2020+A11:2020
EN IEC 62368-3:2020
EN 62311:2008
Radio
EN 300 328 V2.2.2
text_image
Technical diagram showing mechanical assembly with labeled components A, B, C, D and detail views of a bolted joint detail.| MICRO LED dydis coliais 76 89 | ||
| VESA varžtu skyliu specifikacijos (A x B(mm)) | 600 x 400 | |
| C (mm) | 6 | |
| D x 4 | M8 | |
| MICRO LED dydis coliais 101 114 | ||
| VESA varžtu skyliu specifikacijos (A x B(mm)) | 800 x 600 1000 x 800 | |
| C (mm) | 6 | |
| D x 4 | M8 | |
natural_image
Line drawing of a rectangular electronic device with three ports and connecting cables (no text or symbols)text_image
Diagram showing a device with labeled parts and connected to an electronic device, including a numbered callout.
text_image
Diagram showing three steps of cable connection: adding cable to a plug, inserting into a device, and adding a power outlet.natural_image
Simple 3D diagram of a rectangular block with two labeled points A and B, no text or symbols present.A Valdymo meniu
B MICRO LED valdiklis mygtukas / Nuotolinio valdymo pulto jutiklis / Mikrofono jungiklis
text_image
Technical diagram of a remote control device with labeled parts A and BA Saulès elementas
* Shielded Twisted Pair
HEVCAvance™ Covered by Patents at patentlist.hevcadvance.com
rovi guide
HDMI ^TM HIGH-DEFINED MULTIMEDIA INTERFACE
The terms HDMI, HDMI High-Definition Multimedia Interface, HDMI trade dress and the HDMI Logos are trademarks or registered trademarks of HDMI Licensing Administrator, Inc.
EN IEC 62368-1:2020+A11:2020
EN IEC 62368-3:2020
EN 62311:2008
Radijo
EN 300 328 V2.2.2
text_image
Technical diagram showing mechanical assembly with labeled components A, B, C, D and detail views of a bolted joint detail.| MICRO LED-i suurus tollides 76 | 89 | |
| VESA kruviaugu andmed (A x B(mm)) | 600 x 400 | |
| C (mm) | 6 | |
| D x 4 | M8 | |
| MICRO LED-i suurus tollides 101 | 114 | |
| VESA kruviaugu andmed (A x B(mm)) | 800 x 600 1000 x 800 | |
| C (mm) | 6 | |
| D x 4 | M8 | |
natural_image
Line drawing of a rectangular electronic device with three ports and connecting cables (no text or symbols)text_image
Diagram showing a device with labeled components and an electrical connection diagram
text_image
Diagram showing three steps of cable connection: adding cable to a plug, inserting into a device, and adding a power outlet.natural_image
Simple line drawing of a rectangular plate with a small square labeled A and a small circle labeled B, no text or symbols present.A Juhtimismenüü
text_image
Diagram of a remote control device with labeled parts A and B, showing internal structure and directional arrow.A paikeseelement
HEVCAvance™ Covered by Patents at patentlist.hevcadvance.com
rovi guide
HDMI ^TM HIGH-DEFINED MULTIMEDIA INTERFACE
The terms HDMI, HDMI High-Definition Multimedia Interface, HDMI trade dress and the HDMI Logos are trademarks or registered trademarks of HDMI Licensing Administrator, Inc.
EN IEC 62368-1:2020+A11:2020
EN IEC 62368-3:2020
EN 62311:2008
Raadiovörk
EN 300 328 V2.2.2
If you have any questions or comments relating to Samsung products, please contact the Samsung service centre.
| Country Samsung Service Centre Website | ||
| AUSTRIA 0800 72 67 864 (0800-SAMSUNG) www.samsung.com/at/support | ||
| BELGIUM 02-201-24-18 | www.samsung.com/be/support (Dutch)www.samsung.com/be_fr/support (French) | |
| BOSNIA 055 233 999 | www.samsung.com/ba/support | |
| ALBANIA 045 620 202 | www.samsung.com/al/support | |
| BULGARIA | 0800 111 31 - Безплатен за всички оператори*3000 - Цена на един градски разговор или според тарифата на мобилният оператор09:00 до 18:00 - Понеделник до Петък | www.samsung.com/bg/support |
| CROATIA 072 726 786 | www.samsung.com/hr/support | |
| CZECH | 800 - SAMSUNG (800-726786) www.samsung.com/cz/support | |
| Samsung Electronics Czech and Slovak, s.r.o. V Parku 2323/14, 148 00 - Praha 4 | ||
| DENMARK 707 019 70 | www.samsung.com/dk/support | |
| FINLAND 030-6227 515 | www.samsung.com/fi/support | |
| FRANCE | 01 48 63 00 00 | www.samsung.com/fr/support |
| GERMANY | 06196 77 555 77 | www.samsung.com/de/support |
| CYPRUS 8009 4000 only from landline, toll free | www.samsung.com/gr/support | |
| GREECE | 80111-SAMSUNG (80111 726 7864) only from land line(+30) 210 6897691 from mobile and land line | |
Contact SAMSUNG WORLD WIDE
If you have any questions or comments relating to Samsung products, please contact the Samsung service centre.
| Country Samsung Service Centre Website | ||
| HUNGARY 0680SAMSUNG (0680-726-7864) www.samsung.com/hu/support | ||
| ITALIA 800-SAMSUNG (800.7267864) www.samsung.com/it/support | ||
| LUXEMBURG 261 03 710 www.samsung.com/be_fr/support | ||
| NORTH MACEDONIA 023 207 777 www.samsung.com/mk/support | ||
| MONTENEGRO 020 405 888 www.samsung.com/support | ||
| SLOVENIA 080 697 267 (brezplačna številka) www.samsung.com/si/support | ||
| NETHERLANDS 088 90 90 100 | www.samsung.com/nl/support | |
| NORWAY | 21629099 | www.samsung.com/no/support |
| POLAND | 801-172-678**(optata wedlug taryfy operatora) | www.samsung.com/pl/support |
| PORTUGAL | 210 608 098 | www.samsung.com/pt/support |
| ROMANIA | 0800872678 - Apel gratuit*8000 - Apel tarifat în rețeaProgram Call CenterLuni - Vineri: 9 AM - 6 PM | www.samsung.com/ro/support |
| SERBIA | 011 321 6899 www.samsung.com/rs/support | |
| KOSOVO | 038 40 30 90 | www.samsung.com/support |
| SLOVAKIA | 0800 - SAMSUNG (0800-726 786) | www.samsung.com/sk/support |
| SPAIN | 91 175 00 15 | www.samsung.com/es/support |
| SWEDEN | 0771-400 300 | www.samsung.com/se/support |
| SWITZERLAND | 0800 726 786 | www.samsung.com/ch/support (German)www.samsung.com/ch_fr/support (French) |
| UK | 0333 000 0333 | www.samsung.com/uk/support |
| IRELAND (EIRE) | 0818 717100 | www.samsung.com/ie/support |
| LITHUANIA | 8-800-77777 | www.samsung.com/lt/support |
| LATVIA | 8000-7267 | www.samsung.com/lv/support |
| ESTONIA | 800-7267 | www.samsung.com/ee/support |
| TÜRKİYE | 444 7711 | www.samsung.com/tr/support |