Nina - Pasta machine Springlane - Free user manual and instructions
Find the device manual for free Nina Springlane in PDF.

User questions about Nina Springlane
0 question about this device. Answer the ones you know or ask your own.
Ask a new question about this device
Download the instructions for your Pasta machine in PDF format for free! Find your manual Nina - Springlane and take your electronic device back in hand. On this page are published all the documents necessary for the use of your device. Nina by Springlane.
USER MANUAL Nina Springlane
natural_image
Line drawing of a kitchen appliance with a yellow interior and heart-shaped buttons (no text or symbols)Nina
Cleaning and care 26
Trouble shooting 27
Customer service 30
Disposal/
Environmental protection 30
text_image
Exploded view diagram of a kitchen appliance with numbered parts for identificationtext_image
Knead Extrude Kneeding Resting Exonding 125 8 ml Plain pasta Egg pasta Scale / TARE Start / Resettext_image
Diagram showing a mechanical assembly with numbered steps from tool to component, including a brush and pin arrangement.text_image
Technical diagram of a blender with labeled parts and directional arrows indicating assembly stepsnatural_image
Close-up of a pile of white powder on a dark surface (no text or symbols visible)natural_image
Close-up of a pile of white powder on a dark surface (no text or symbols visible)natural_image
Close-up of a pile of white, irregularly shaped granular material on a dark surface (no text or symbols visible)Important safety information
Please read this manual carefully before using the appliance for the first time and keep it for future reference.
- Warning – Keep ventilation openings, in the appliance enclosure or in the built-in structure, clear of obstruction. For optimal ventilation, allow space of approx. 8 cm to other objects, furniture, or walls.
- Warning – When positioning the appliance, ensure the supply cord is not trapped or damaged.
- Warning – Do not place any power strips or power generators in the immediate vicinity of the appliance.
- Warning – Do not insert objects or your hand into the appliance while it is in operation.
Intended use
This appliance is solely intended for making pasta and other pasta products.
Symbols

This symbol warns of hazards that can damage
the appliance or cause injury.
This symbol warns of an electric shock that may be caused by a defective appliance or by improper handling. This product may only be opened for necessary service work by an authorised technician.
Safety information
Do not immerse the appliance in water or any other liquid. Protect the power cable and mains plug from moisture.

Never insert body parts or metallic objects into ventilation slots, there is a risk of injury.
• After unpacking the appliance, check that it is in perfect condition and has not sustained any damage that could impair its functional safety. Should you notice any defects or if the
appliance has fallen on the floor, do not attempt to use it, but call our customer service.
- Improper repairs can lead to hazards for the user and the warranty may be deemed void. If individual parts are damaged, they must be replaced by the manufacturer, an authorized specialist company, or a similarly qualified person.
- This appliance is solely intended for making pasta and other pasta products. Do not place any other food items inside.
- Store the appliance out of the reach of children.
• Children under the age of 8 should be kept away from the appliance or be under constant supervision. - This appliance can be used by children aged 8 and above and by persons with reduced physical, sensory, or mental capabilities or lack of experience and knowledge if they are supervised or have been instructed in the safe use of the appliance and have understood the hazards involved. The appliance is not a toy. Children over the age of 8 should not connect, clean, or
service the unit. Children should be supervised to make sure that they don't play with the device.
- Position the appliance on a free and level surface.
-
The appliance is only intended for use in the household or other similar uses such as
-
in kitchenettes in shops, offices, or other workplaces,
• on farms,
• for use by guests in accommodation establishments (hotels, motels) private guest houses, or holiday homes. -
Do not fill above the indicated maximum level.
- Use the appliance only after proper assembly.
- The appliance may only be used with original accessories.
- Use a minimum of 200 g flour to a maximum of 600 g in the appliance.
- Do not use hot water as an ingredient.
- Connect the appliance only to alternating current as indicated on the type plate. Connect the mains plug only to an earthed socket.
-
Uncoil the power cable completely before use.
-
Disconnect the mains plug as soon as you have finished using the appliance. Do not pull the power cable itself, as it could cause damage.
- The appliance must not be operated with an external timer or a separate remote control system.
• Always disconnect the mains plug after use, before cleaning, or in the event of possible malfunctions during operation. - The appliance is not suitable for dishwashers. Removable parts can be cleaned in a dishwasher at a maximum of 60 °C.
-
Never place or use the appliance and power cable on or near a hot surface.
-
The cable must not hang over the edge of the work surface.
- Do not use the appliance outdoors.
Before using the appliance for the first time
- Remove all parts related to packaging and transport safety. Make sure that these parts are also kept away from children – they pose a risk of suffocation!
- Nina should be cleaned before initial operation and after prolonged periods of non-use. When doing so, please make sure to consult our instructions on cleaning and maintenance.
- Place the appliance on a level and dry surface.
Technical data
Power: 180 W, 220-240 V, 50-60Hz
Dimensions (W/D/H): 37 x 18 x 27.5 cm
Weight: 4,5 kg
Revolutions: 40-60 rmp
Fill quantity: 200-600 g flour
Recommended ambient temperature:
20-40 °C, ambient humidity <90%
Features: automatic pasta preparation with 2 preset programmes, manual mode
with separate kneading and output function, integrated scale for dry ingredients, vertical pasta output
Accessories: 7 pasta inserts, measuring cup, cleaning brush, rubber spatula, recipe booklet
Specifications, technology, colours, and design are subject to change without notice.
How to use Nina
Product description
Appliance
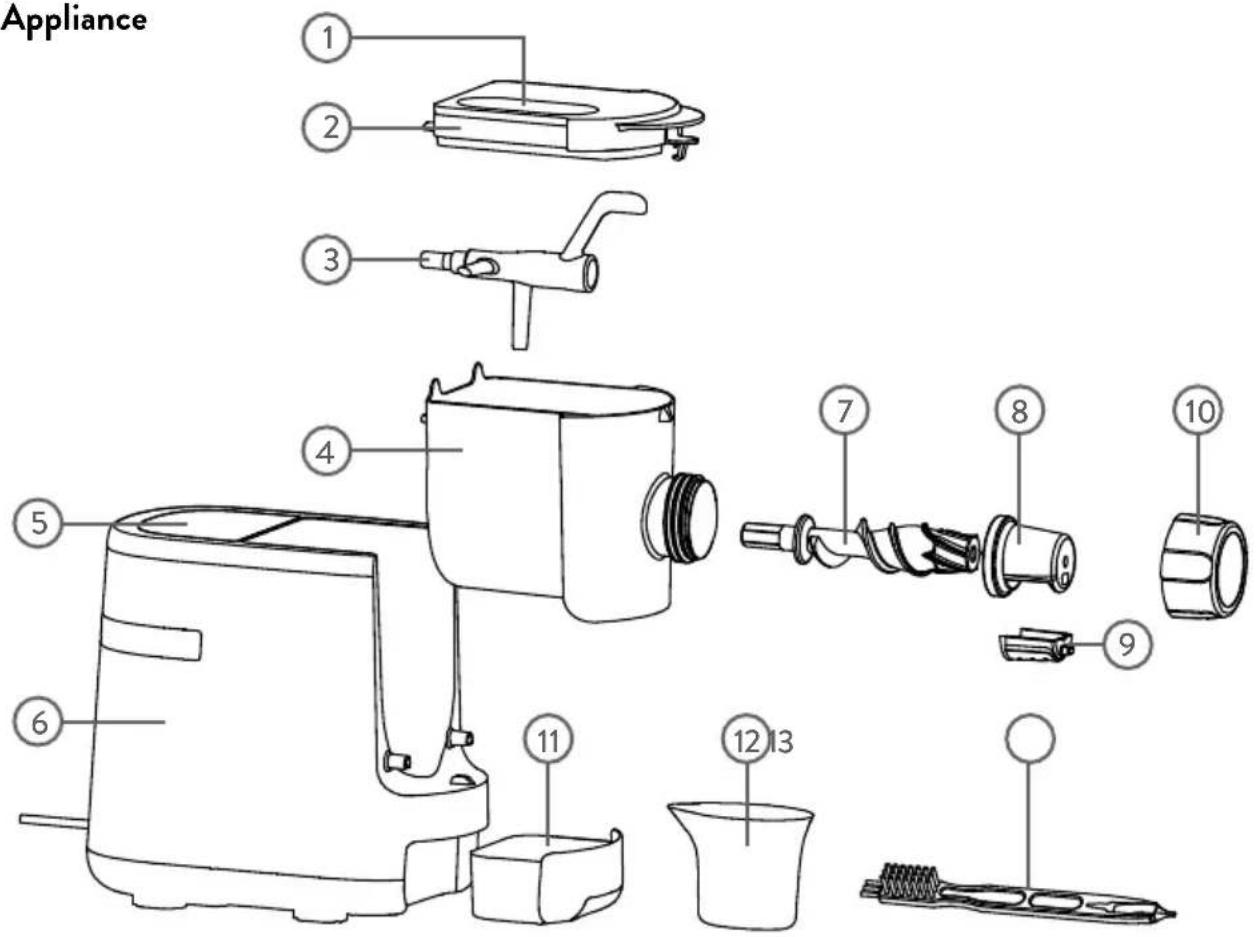
text_image
Appliance ① ② ③ ④ ⑤ ⑥ ⑦ ⑧ ⑩ ⑨ ⑪ ⑫ ⑬ ⑬- Water pouring holes
- Lid
- Mixing arm
- Mixing container
- Display
- Machine base
-
Extruder screw
-
Bracket for pasta inserts
- Insert
- Fixingring
- Drawer for inserts
- Measuring cup
- Cleaning brush
Inserts
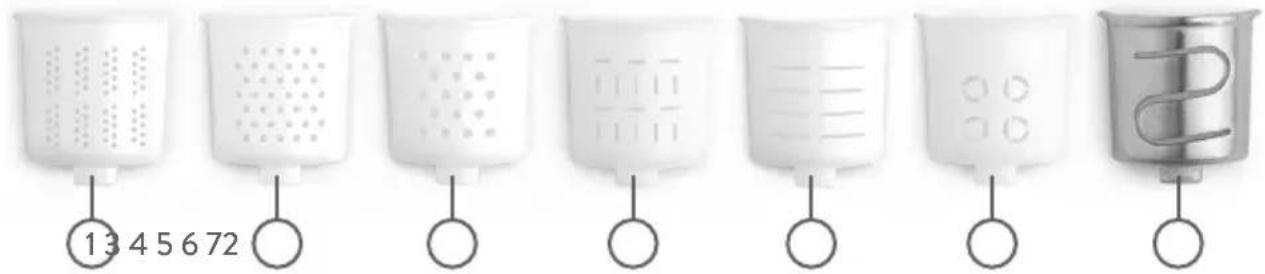
text_image
13 4 5 6 72- Fine spaghetti
- Normal spaghetti
- Thick spaghetti / udon noodles
-
Thin ribbon pasta
-
Broad ribbon pasta
- Penne
- Lasagne
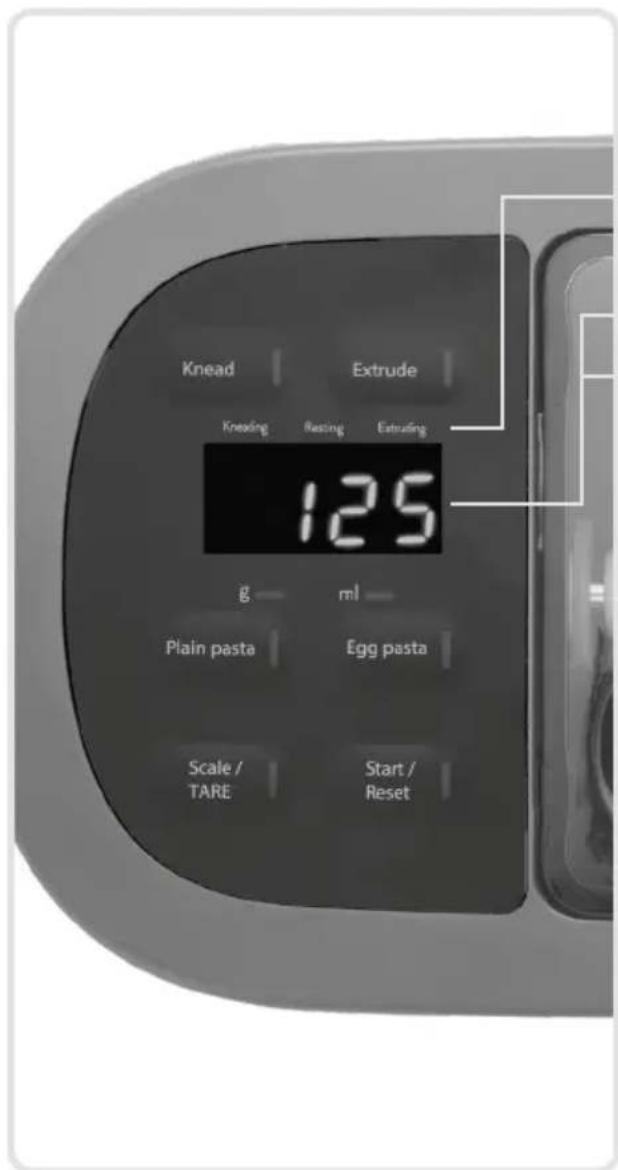
Display
text_image
Knead Extrude Kneading Resting Extruding 125 g ml Plain pasta Egg pasta Scale / TARE Start / ResetKnead: manual mode for kneading
Extrude: manual mode for pressing out the dough
Progress indicator: kneading, mixing, pressing out
Measured grams
Recommended millilitres of liquid
Plain Pasta: quick programme for pasta without egg, including kneading and pressing out. The process takes about 10 minutes.
Egg Pasta: programme for pasta with egg, including kneading, dough resting, and pressing out. The process takes about 16 minutes.
Scale/Tare: function to set the scale back to 0.
Start/Reset: start a process, reset the programme, or cancel an ongoing programme by pressing and holding the button for 3 seconds.
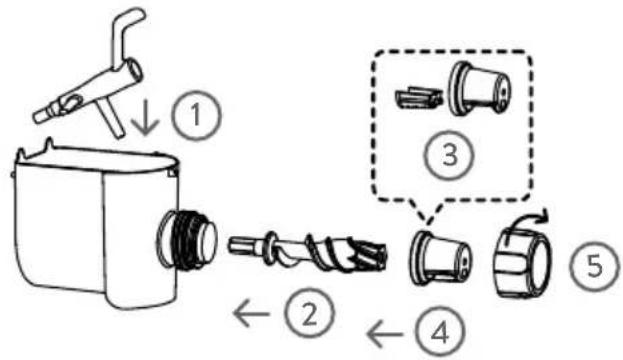
Assembling Nina
text_image
Diagram showing exploded view of a mechanical device with numbered parts and directional arrows indicating assembly steps.-
First, place the mixing arm in the mixing container and then push the container into the appliance. If necessary, turn the mixing arm slightly until it fits into the appliance opening.
-
Then, place the screw at the front of the mixing container so that it engages in the mixing arm.
-
Choose your pasta insert. You can place the remaining inserts in the practical front drawer.
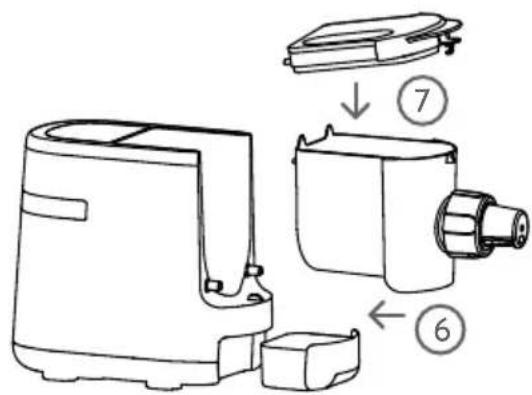
text_image
Technical diagram of a blender with labeled parts and numbered annotations-
Place the pasta insert in the grey bracket so that the pin fills the recess at the front.
-
Place the bracket with the pasta insert at the front of the machine so that the insert faces down and the pasta is pressed out vertically. The bracket should now sit firmly on its own.
-
Screw the bracket onto the machine using the wide fastening ring.
To begin: tips for perfect pasta
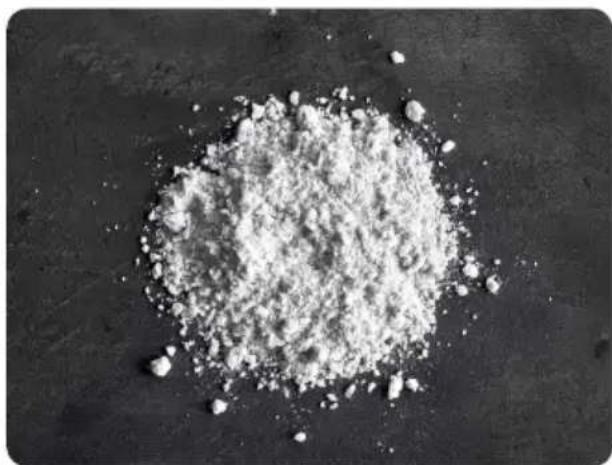
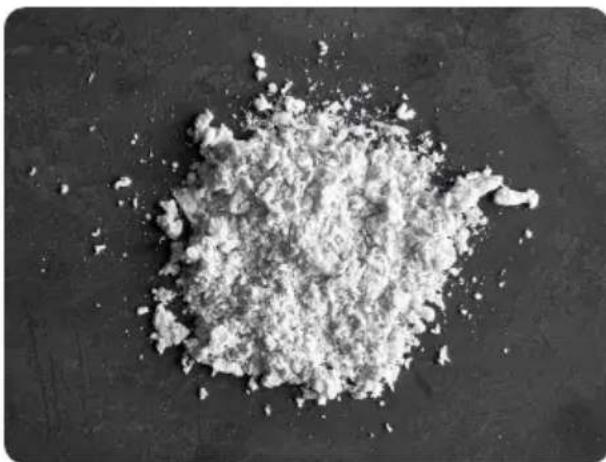
Please note: the dough must be drier than classic pasta dough for a manual pasta maker and should resemble crumbs as on a crumble. The ratio between dry and liquid ingredients is thus very important. Measure dry ingredients and liquids accurately.
natural_image
Pile of white powder on a dark surface, no text or symbols visibleThe dough is too dry, add 5–10 ml of liquid.
natural_image
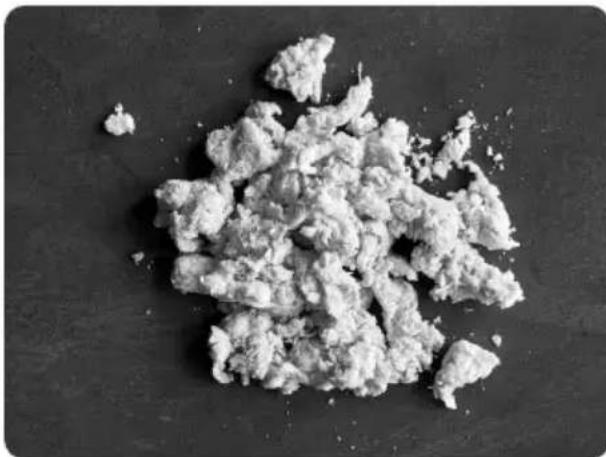
Close-up of a pile of white granular substance on a dark surface (no text or symbols visible)Correct dough consistency

natural_image
Close-up of a pile of irregular, textured organic material on a dark surface (no text or symbols visible)The dough is too wet, add a little flour and allow the dough to continue kneading for a short while.
- For simple operation, Nina comes with two preset programmes: Plain Pasta mode and Egg Pasta mode. These programmes show the exact amount of liquid required for any quantity of flour between 200 and 600g . You can find out how to use these programmes in the Programmes section.
• If you are using egg yolk and water, make sure you whisk them together thoroughly before adding them into
the mixing container.
- The dry to liquid ratio may vary slightly depending on the type of flour used, the liquid, and the temperature of the ingredients. Gradually add 5-10 ml or flour to carefully find the perfect consistency.
- If you dissolve 3-5 g of salt in water and add it to the pasta, it will become slightly firmer to the bite.
- Adding 3-5 ml of oil to the dough will make the pasta a little softer.
• The fresher the pasta you use, the better it will taste.
- Pasta without egg or other refrigerated ingredients can be fully dried out and stored for a long period. Other types of pasta should be frozen.
Using programmes
-
Insert the plug into a power socket. If Nina is in standby mode, reactivate it by pressing any button.
-
Assemble the appliance.
-
Press the Scale/Tare button to set the scale back to 0.
4. a) Plain Pasta
- For durum wheat pasta, you will need Italian "00" pasta flour or a 1:1 mix of plain flour and semolina plus water. First add only the dry ingredients.
- Clasp the lid and close it.
- Select the Plain Pasta programme. Nina will now calculate the required amount of liquid.
• Measure the liquid precisely using a scale, the dough is very sensitive to deviations. 1 ml equals about 1 g. - Proceed.
b) Egg Pasta
- For pasta with egg, you will need regular flour (soft or plain), egg yolk, and water. Add the flour to the mixing container.
- Clasp the lid and close it.
- Select the Egg Pasta programme. Nina will now calculate the required amount of liquid.
- Measure the liquid precisely using a scale, the dough is very sensitive to deviations. 1 ml equals about 1 g. The egg yolk must be included in the liquid measurement, so add water to it until you reach the required quantity. Whisk together the egg and water using a fork
-
Proceed.
-
Press the Start/Reset button and wait until the mixing arm begins to move.
- Allow the liquid to slowly flow into the mixing container via the holes in the lid.
-
Nina will then knead the dough. When using the Egg Pasta mode, a 6-minute resting period will ensure the dough is soft and smooth.
-
A signal will sound before the dough is pressed out. The motor noise will change since Nina is now operating at high pressure, this is normal. You can either remove the pasta directly by hand or use the plastic spatula as an aid. For penne, we recommend allowing the dough to be pressed out in longer segments and then cutting them with a sharp knife, this will result in more uniform pasta. The machine stops automatically.
- The mixer will automatically turn again in the opposite direction to remove large dough remains from the extruder screw. The appliance beeps and the process is complete.
- You can either cook the pasta right away or allow it to fully dry out. We recommend allowing the pasta to dry for around 5 minutes to prevent it from sticking when cooking. Lightly place the pasta on a cooling rack to dry out.
- The pasta will need 2-4 minutes to cook, taste it from time to time to discover your preferred cooking time.
As a rough guide, we recommend the following serving sizes:
• 200 g for 1-2 servings
- 400 g for 3-4 servings
- 600 g for 5-6 servings
Operating manual moden
- Insert the plug into a power socket. If Nina is in standby mode, reactivate it by pressing any button.
- Assemble the appliance.
- Press the Scale/Tare button to set the scale back to 0.
- Place the ingredients in the mixing container and then close the lid.
- Press Knead.
- Allow the liquid to slowly flow into the mixing container via the holes in the lid.
-
The programme ends automatically after 6 minutes.
-
Press Start/Reset.
- Press Extrude. Nina will now begin pressing out the pasta. It stops automatically.
Pausing or cancelling the programme
To pause a programme, simply open the lid. The programme will continue once you close the lid again.
To cancel a programme, press and hold the Start/Reset button for about 3 seconds.
Cleaning and care
Nina should be cleaned and dried after each use as follows. Lack of or improper care of the appliance can impair the functionality of the appliance.
- The appliance is easiest to clean when you first allow the dough remains to dry out. You can then remove them easily using the rubber spatula.
-
Clean all plastic parts on the top shelf of a dishwasher and use a programme with at most 60 °C to keep them from losing their shape. Make sure that the plastic part is not jammed.
-
It is possible for flour to end up between the extruder screw and the mixing arm, or between the mixing arm and the appliance, causing the appliance to make screeching sounds. Make sure these parts are cleaned thoroughly.
- Clean the appliance using a damp cloth. It must not be submerged in water or cleaned under running water.
Trouble shooting
If the device does not work properly, please check the following steps:
- Check if the manual was followed precisely and correctly.
- Check the following table for possible reasons.
- Check if all fuses are working
Error codes
| Error code | Problem Solution | |
| E 02 | The lid is not properly closed. | Close the lid. |
| E 05 | The temperature sensor is defective. | Contact customer services. |
| E 06 | There is a short circuit at the temperature sensor. | Contact customer services. |
| E 09 | There is insufficient water in the mixing container. | Adjust the liquid ratio. |
| E 14 | There is too much flour in the mixing container | Only use 200-600 g flour. |
| E 15 | There is too much dough residue in the mixing container. | Remove the dough residue. |
| E 17 The scale is defective. Contact customer services. | ||
Issues with the appliance
| Problem Solution | |
| There are more dough remains than expected. | It may happen that not all the dough is pushed out by the extruder screw. You can manually start the Extrude programme to have the appliance press out dough again. |
| The appliance does not start. | Make sure that the appliance is plugged in correctly, and that the power cable and plug are intact. |
| The motor was operated for too long in one period of time and the motor protection function was triggered. Wait a few minutes. | |
| Close the lid properly. | |
| The appliance does not react when a button is pressed. | You have not disconnected the appliance from the mains for sufficient time following an error message. The appliance should be disconnected for at least 3 minutes to erase the device memory. |
| The appliance is currently working or the rest period has begun. You can stop a programme by pressing and holding the Start/Reset button for about 3 seconds. | |
| The appliance has a defect. Contact customer services. | |
| The appliance becomes very slow and stops while pressing out the dough. | The dough is too dry. Nina will attempt to knead it and press it out again. Add a little water (5-10 ml) to the mixing chamber and observe if the dough can now be pressed out. |
| When the appliance begins to press out dough, flour will first fall out of the pasta insert. | This process is completely normal. |
| When the appliance presses out dough, the bracket for the pasta insert becomes warm, a little steam escapes and condensation water builds. | This process is completely normal. Nina presses out pasta at high pressure. Heat is produced during this process and a little humidity from the dough evaporates. |
Problems with the dough
| Problem Solution | |
| The dough is pressed out more quickly from the front than the back. | This process is completely normal as the pressure is higher from the front than the back. |
| There are leftover dough remains. | A little remaining dough is completely normal. You can freeze it and add it to the mixing container next time after defrosting. |
| If you have a large amount of leftover dough, you can use the manual Extrude mode to press dough out again. | |
| The pasta breaks up very easily. | Use pasta flour ("Type 00") with sufficient gluten.Always use a thickening agent for gluten-free pasta. |
| Add approx. 5-10 ml of liquid. 510 ml of cooking oil will make the dough softer. | |
| The dough is pressed out more quickly from the front than the back. | This process is completely normal as the pressure is higher from the front than the back. |
Should your Nina have any other defects, please contact a professional repair service provider. Do not attempt to repair the appliance yourself.
Customer service
In principle, our products have a legal warranty duty of 2 years. Further claims can only be processed in conjunction with a proof of purchase. Wearing parts exclude any warranty claims, when usual abrasion has occurred. The durability is determined by the respective handling and use of the products and is thus variable.
For questions concerning handling and functionality of our products, please contact our customer-service:
Free hotline for Germany/Austria only: 0800 270 70 27
From other EU countries: +49 211 749 55 10 (Different costs may apply.)
Disposal/Environmental protection
Our products are manufactured to high quality standards and are designed for a long service life.
Regular maintenance and care will help to extend service life. If the appliance is defective and can no longer be repaired, it must not be disposed of in the normal household waste.
Springlane GmbH herewith declares that the product complies with the essential CE requirements on the issuing date.
The complete declaration of conformity can be accessed at www.springlane.de/bedienungsanleitungen.
Take the appliance to a designated disposal point for recycling electrical or electronic equipment. Through professional disposal and recycling you make an important contribution to protecting our environment.
text_image
Exploded view diagram of a kitchen appliance with numbered parts for identificationtext_image
Knead Extrude Kneeding Resting Extruding 125 g — ml — Plain pasta Egg pasta Scale / TARE Start / Resettext_image
Diagram showing exploded view of a mechanical component with numbered parts and directional arrows indicating assembly steps.text_image
Technical diagram of a blender with labeled parts and directional arrows indicating assembly stepsnatural_image
Pile of white powder on a dark surface, no text or symbols visiblenatural_image
Close-up of a pile of white granular powder on a dark surface (no text or symbols visible)Juiste deegtextuur
natural_image
Close-up of a pile of irregular, textured organic material on a dark surface (no text or symbols visible)text_image
Exploded view diagram of a kitchen appliance with numbered parts for identificationtext_image
Knead Extrude kneading Resting Extruding 125 β — ml — Plain pasta Egg pasta Scale / TARE Start / Resettext_image
Diagram showing exploded view of a mechanical device with numbered parts and directional arrows indicating assembly steps.text_image
Technical diagram of a blender with labeled parts and directional arrows indicating assembly stepsnel vano frontale.