TF04 - Intercom Pentatech - Free user manual and instructions
Find the device manual for free TF04 Pentatech in PDF.

| Product type | Wireless DECT/GAP intercom for residential use |
| Brand | Pentatech |
| Model | TF04 |
| Street panel dimensions | 60 x 175 x 34 mm |
| Handset dimensions | 48 x 159 x 29 mm |
| Base dimensions | 115 x 115 x 68 mm |
| Street panel weight | Approx. 156 g |
| Handset weight | Approx. 132 g |
| Street panel power supply | 12 V DC (stabilized, min. 300 mA) or 2 LR14 (C) 1.5 V batteries |
| Handset power supply | 2 Ni-MH AAA 1.2 V / 600 mAh batteries (rechargeable) |
| Base power supply | 7.5 V DC via supplied mains adapter (230 V ~ 50 Hz) |
| Main functions | Intercom, electric door opener, telephone function via analog line, multiple handsets (up to 4), internal call, conference, 50 contacts directory |
| Wireless range | Up to 30 m indoors, up to 200 m outdoors (line of sight) |
| Frequency | 1880-1900 MHz, DECT |
| Street panel protection rating | IP44 (weather-resistant) |
| Safety | Use only original accessories; do not expose to moisture (except street panel); keep out of reach of children; disconnect power during thunderstorms |
| Maintenance and cleaning | Clean with a slightly damp soft cloth; unplug before cleaning; clean microphone opening with a paperclip or compressed air |
| Spare parts and repairability | Optional accessories: additional handset TF04M, relay module RE05, weather protection TFWS1 |
| General information | Full manual available as PDF; technical support via manufacturer INDEXA GmbH |
Frequently Asked Questions - TF04 Pentatech
User questions about TF04 Pentatech
0 question about this device. Answer the ones you know or ask your own.
Ask a new question about this device
Download the instructions for your Intercom in PDF format for free! Find your manual TF04 - Pentatech and take your electronic device back in hand. On this page are published all the documents necessary for the use of your device. TF04 by Pentatech.
USER MANUAL TF04 Pentatech
natural_image
Pure diagram of a vertical cylindrical device with labeled parts (1, 14, 13), no readable text or symbols beyond labels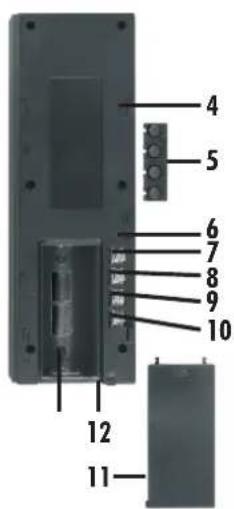
text_image
4 5 6 7 8 9 10 12 11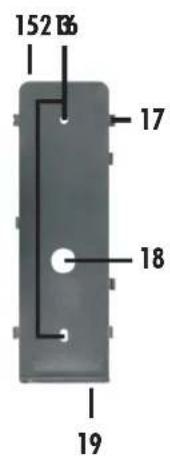
text_image
152 B6 17 18 19
text_image
21 22 24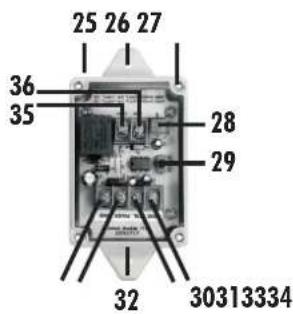
text_image
25 26 27 36 35 28 29 32 30313334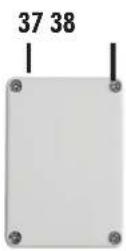
B
text_image
39 40 41 51 42 50 43 44 49 1 2 3 4 5 6 7 8 9 * 0 # 48 45 47 46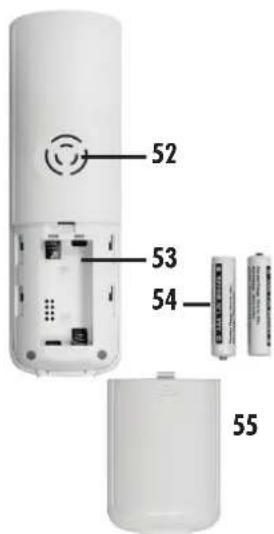
text_image
52 53 54 55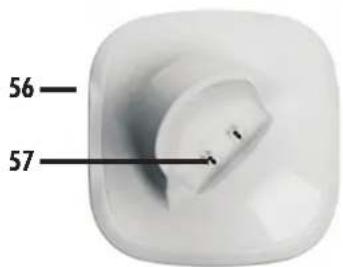
text_image
56 57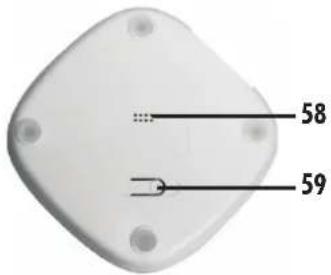
text_image
58 59

natural_image
Close-up of a white electronic device with two labeled ports (61 and 60), no additional text or symbols visible.
text_image
TF04T 12 VDC + 12 VDC - CTRL SGND 12 VDC (min. 300 mA) + -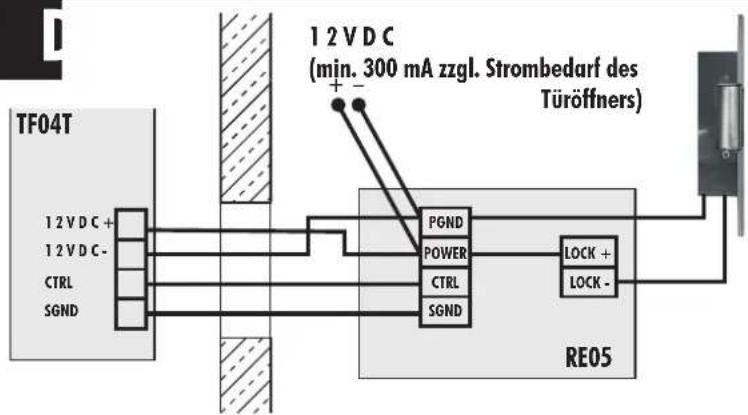
text_image
TF04T 12VDC (min. 300 mA zzgl. Strombedarf des Türöffners) PGND POWER CTRL SGND RE05 LOCK + LOCK - 12VDC+ 12VDC- CTRL SGNDToucheFin/On/Off[44]
Affectationdestouches:
continusymbol = goedeverbinding
14. Werkingdeurintercom
Read through this user manual completely and carefully. The user manual is an integral part of the product and contains important information about operation and handling. Always observe all the safety instructions. If you have any questions or are unsure about using the equipment, ask a specialist or obtain information on line at www.indexa.de. Keep this manual in a safe place and pass it to third parties if necessary.
2. Properuse
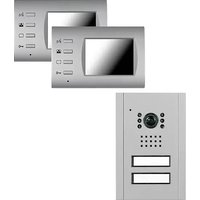
The door intercom TF04 Set consists of door unit TF04T, a handset TF04M withabaseTF04Bandmainsadapter, andarelaymoduleRE05.
When the bell button on the door unit is pressed the handset will ring. After picking up the handset from the base or pressing a key on the handset two-way conversation is enabled. Both components contain a hands-free speaking system. If the base is connected with the cable provided to an analogue telephone or to the analogue connection of a VoIP router, the handset can be used as a cordless DECT telephone.
The door intercom can be expanded with up to three further handsets TF04M.
Internalcommunicationbetweenhandsetsispossible.
The system uses DECT/GAP standard. Compatibility with components from other manufacturers cannot be guaranteed. The door opening function is not available in combination with such components.
- Menunavigation ...... page 63
- CIDbook...... page 64
- PHONEBOOK...... page 64
- Basesettings(BSSETTINGS) ...... page 65
- Handsetsettings(HSSETTINGS) ...... page 66
- Registeringthehandsettothebase(REGISTER) ..... page 68
- Callingwithmorethanonehandset ..... page 69
- CallerlDoncallwaiting..... page 69
- Changingbatteries . . . . . . . . . . . . . . . . . . . . . . . . . . . . . . . . . . . . . . page 69
- Maintenance and cleaning. . . . . . . . . . . . . . . . . . . . . . page 70
- Optionalaccessories ...... page 70
- Disposal page 70
- Declarationofconformity..... page 70
- Troubleshooting..... page 71
The door unit is for surface mounting. It can be used outdoor in a sheltered location (protective class IP 44). The relay module, handset, base and mains adaptermustbekeptdry.
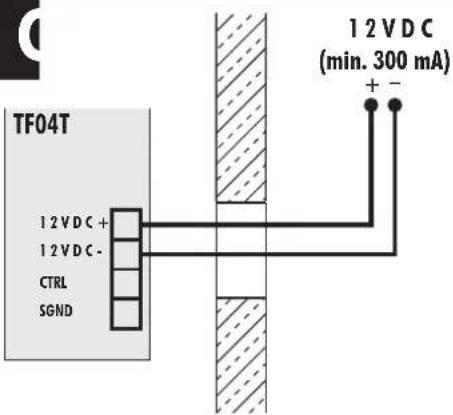
The door unit can be powered using two LR14 (C), 1.5V batteries (not supplied) or via a suitable 12 V DC power supply (stabilised, min. 300mA, not supplied). If the latter is used then an electric door release (12 V DC - not supplied) can be connected through the relay module to the door unit. This can be activated by pressing a key on the handset. The base is powered through the 7.5 V DC mains adapter which is connected to 230 VAC, 50 Hz. The handset is powered by two Ni-MH rechargeable batteries which are automatically recharged when the handset is placed in the base.
Anyotheruseormodificationoftheequipmentisnotauthorisedandpresents significant risks of accident. No liability will be accepted for consequential damagesorfordamagescausedbyimproperuseorincorrectoperation.
This equipment is not suitable for use by persons (including children) with limited physical, sensory, or mental abilities or with lacking experience or lacking knowledge unless they are supervised by a person responsible for their safety or obtaining instructions on how to set the equipment. Children must be supervised to make sure they don't play with the equipment.
3. Packagecontents(seefig.AandB)
- Doorunit
- Bracket
• Fixingmaterialfordoorunit - Sparenamecard
- Torxscrewdriver
- Handset
• 2xAAANi-MHbatteries - Base
- Mainsadapter7.5Vforbase
- Relaymodule
- Telephonecable
• TAEadapter - Usermanual
4. Description
DoorunitTF04T(seefig.A)
1 doorunit
2 speaker
3 bellbuttonwithnamecard
4 slotforbracket
5 rubbercover
6 cover
7 terminal12VDC+
8 terminal12VDC-
9 terminalCTRL(relaycontrol +)
10 terminalSGND(relaycontrol-)
11 batterycompartmentcover
12 holefortorxscrew
13 batterycompartment
14 microphone
15 bracket
16 mountinghole
17 mountinglug
18 cablehole
19 holefortorxscrew
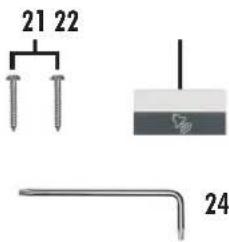
20 wallplug
21 screw
22 sparenamecard
23 torxscrew
24 torxwrench
RelaymoduleRE05(seefig.A)
25 relaymodule
26 mountinghole
27 holeforcoverscrew
28 timeregulator
29 NC/NOswitch
30 terminalSGND
31 terminalCTRL
32 cablehole
33 terminalPOWER +
34 terminalPGND-
35 terminalLock +
36 terminalLock-
37 cover
38 coverscrew
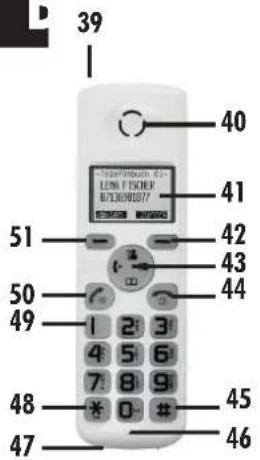
HandsetTF04M(seefig.B)
39 handset
40 earpiece
41 display
42 Redial/Backkey
43 right/left/up/down/recall/INT/phonebook/LSD
44 endkey
45 hashkey(toactivatethedoorrelease)
46 microphone
47 chargingcontact
48 starkey(keypadlock;conferencecall)
49 alphanumerickeys
50 dial/speakerkey
51 Menu/Selectkey
52 speaker
53 batterycompartment
54 battery
55 batterycompartmentcover
BaseTF04B(seefig.B)
56 base
57 chargingcontact
58 speaker
59 pagerbutton
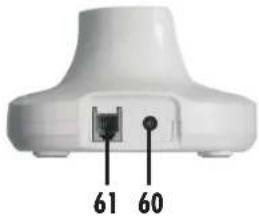
60 mainsadapterconnector
61 telephonecableconnection
62 telephonecable
63 TAEadapter(countryspecific)
64 mainsadapter
5. Technicaldata
Doorunit TF04T
Operating voltage: 12 V DC = (min. 300 mA plus power
requirementofthedoorrelease) or 2xLR14(C),1.5Valkalinebatteries
Powerconsumption: max.0.8mA/12 VDC(standby), max.200mA/12 VDC(use)
Frequencyband : 1880-1900MHz
Maximumradiatedtransmissionpower : <250mW
RFmodulation: GFSK
RFrangetobase: upto30mindoors, upto200minfreespace
Operatingtemperature: -20 °C to +50 °C (note: below 0°C the transmissionrangecanbereduced)
Protectionclass: IP44
Dimensions: 60x175x34mm
Weight: approx.156g
HandsetTF04M
Powersupply: 2xNi-MHbatteriesAAA,1.2V;600mAh
Charging voltage: frombase
Initialchargingduration: 15hours
Standbytime: upto180hours
Talktime: upto8hours
RFmodulation: GFSK
RFrangetobase: upto30mindoors, upto200minfreespace
Operatingtemperature: 0^ C to +40°C
Dimensions: approx.48x159x29mm
Weight: approx.132g
BaseTF04B
Operating voltage: 7.5 VDC(mainsadapter)
Currentconsumption: max.300A,
Operatingtemperature: 0^ C to +40°C
Dimensions: 115x115x68mm
Analogueconnection: 1TR110-1.1,RJ11
Mainsadapter
ModelID: P6-075030EU
Input voltage: 230 V
Input AC frequency: 50 Hz
Output voltage: 7,5 V DC
Output current: 0.3 A
Output power: 2,25 W
Average operating efficiency: 77,7%
Power consumption at no load: 0.06 W
Application: indooruseonly
RelaymoduleRE 05
Operating voltage: 12 VDC, max:60mA
Switchingpower: 30 = VDC, max.10A,
Switchingtime: 1-9sec.
Dimensions: 83x58x33mm
Application: indooruseonly
6. Safetyinstructions
The following instructions are provided for your safety and satisfaction during operation of the machine. Note that non-observance of these safety instructions results in significant risk so accident.
Danger! Danger! If these points are not heeded, property, life and healthcare endangered.
① Tip!Optimumresultswillbeachievedbyobservingtheseinstructions.
- Do not leave small children unsupervised with the product, packaging
material or small parts. Otherwise there is a risk of fatal injury due to choking!
- Do not damage any gas, electricity, water or telecommunication lines during drilling and fixing work. Otherwise there are dangers of personal and fatal injury!
- Treat the supply lines carefully. Lay these so that they cannot be damaged and do not present any tripping hazard. Fix the cables sufficiently. Do not pull the cables over sharp edges and do not crush or crimpthemelsewhere.Otherwisetherearedangersofpersonalandfatal injury!
- Do not allow the product to have contact with moisture (except the door unit: protection class IP44). Never immerse the product in water. Otherwisethereisdangeroffatalinjury!
- Do not use the handset in moist or explosion-risk environments. Otherwisethereisdangeroffatalinjury!
- Use only the supplied power mains adapter with the base. Before connectinghistothemains, ensure that themainssupplycomplies with 230VAC, 50Hz and fitted with a fuse according to regulations.
- Use only rechargeable batteries of the same type in the handset. Do not use primary batteries. Pay attention to the correct polarity. Otherwise there are dangers of personal and fatal injury!
- Ensure that the batteries are not short circuited or exposed to fire. The batteries must not be opened or recharged. Otherwise there is a risk of fatalinjuryduetoexplosion!
- Leaking or damaged batteries can cause burns by contact with skin. Handletheseusingsuitableprotectivegloves.
- The function of medical apparatus can be disturbed by the product. Pay attention to technical constraints in the area of use, for example in medical practices. Otherwise is a risk of fatal injury!
- Note that the handset can cause an unpleasant humming sound in hearing aids.
- Donotexposetheproducttofireorhightemperature!
- Protect the product against strong magnetic or electrical fields and against strong mechanical loads and vibrations!
- Use the product only with the original components or original accessories!
- Before installing and operating the product check the package for damagesandcompleteness.
- If the unit is to be unused for a longer period, disconnect the mains adapterfromthemainssupplyandremovethebatteries.
- Do not connect any damaged device (e.g. transport damage) and disconnect the powersupply immediately in the case of damage. Unplug the mains adapter from the mains socket. Arrange for the damagetobe repaired immediately by a specialist!
! TIP!
- This product produces and uses radio frequency. If the product is not installed and used according to the manual it may disturb or be disturbed by other devices. In case of disturbances relocate the product.
7. Location of the product
Beforeinstalling theproductplanthelocation.Checkthewirelessconnection andthefunctionofthemicrophoneinthedoorunit.
Observethefollowingpoints:
Doorunit:
- Mount the door unit at such a height that conversation is possible. Pay attention to the position of the microphone and speaker, these should be at the average head level of visitors. The bell button must also be accessible.
- Ifthedoor unitismounted outdoorsthelocation mustbeprotectedfrom directrainfall.
- If an external supply or a door release is to be connected ensure a suitable cable routing, as the mains adapter and relay module must be located indoors. Useacablewithcorediameter0.2-0.7mm.
Base:
Themaximumradio frequencyrangeis upto200 m withfreespace between thedoorunitandthebase, andbetweenthebaseandthehandset. Therange indoors is considerably reduced (max. range typically 30 m) through walls and floors (especially of steel reinforced concrete). Metal surfaces, e.g. refrigerators, shelving, and coatedmirrors, also impederadiotransmission. The radio transmission can be affected by strong electrical-magnetic fields and other wireless appliances. Ensure adequate distance from microwave ovens, mobile phones, other wireless appliances, electric motors and mains powercables.
Place the base on a suitable level and solid surface, ideally 1m above the floor(forbetterreception).
Placethebaseata central place inside theresidence, e.g. in the hall. Ensure that the chime can be heard everywhere insidetheresidence.
Ensure that there is a mains power socket within the range of the mains adaptercable.
TIP!
- Place the base where there is wireless contact to the door unit. If you wishtoplacethehandsetfurtherfromthedoorunititcanbestoredinthe chargerTF04L(optionalaccessory:Art.Nr.34238).
8. Installation and connection
8.1 Doorunit
Labellingthenamecard
- Removethebellbutton[3]carefullyfromthedoorunit[1].
- With the use of a small knife, remove the name card carefully from the bellbutton.
- Labelthenamecard.
• Reinsertthenamecardintothebellbutton.
• Reinsertthebellbuttonintothedoorunit.
Installingabattery-operateddoorunit
- Hold the bracket [15] to the desired location and mark the two drilling holesthroughthemountingholes[16].
- Drillthetwoholes.
- Fix the bracket with the supplied screws [21] and wall plugs [20], if required.
- Openthebattery compartment[13]ofthe doorunitby slidingdownthe batterycompartmentcover[11].
- Insert two LR14 (C), 1,5 V alkaline batteries into the battery compartment. Pay attention to the correct polarity. The door unit will sound.
- Closethebatterycompartmentwiththebatterycompartmentcover.
• Slidethedoorunitontothebracket. - Screwthetorxscrew[23]firmlythroughthehole[19]intothehole[12], usingthesuppliedtorxwrench[24].
Installinga12Vdoorunit
- Hold the bracket [15] to the desired location and mark the two drilling holes through the mounting holes [16]. Make sure that there is a lead-throughfortheconnectioncableexactlybehindthecablehole[18].
- Drillthetwoholes.
- Fix the bracket with the supplied screws [21] and wall plugs [20], if required.
-
Removetherubbercover[5]fromthedoorunit.
-
Route the wire ends of the connecting cable through the lead-through and the cable hole [18], as described in fig. C (12 V supply) and fig. D (12Vsupplyanddoorrelease).
- Connect the wire ends to the terminals of the door unit as described in fig.CandD.
- Place the rubber cover back onto the door unit, and route the wires through the slots in the rubber cover.
- Slidethedoorunitontothebracket.
- Screwthetorxscrew[23]firmlythroughthehole[19]intothehole[12], usingthesuppliedtorxwrench[24].
8.2 Optional connection of the relay module and a doorrelease(seefig.D)
- Removethefourcoverscrewsfromtherelaymodule.
• Takethecover[37]offtherelaymodule.
• Routeallconnectedwiresthroughthehole[32]intherelaymodule. - Connect the wire ends to the respective terminals PGND [34], POWER [33], CTRL[31] and SGND[30].
- Connect the two wire ends of a suitable 12 V DC power supply to the terminalsPGND[34]andPOWER[33]intherelaymodule.
- UseacablestrandtoconnecttheterminalPOWER[33]andtheterminalLOCK + [35]intherelaymodule.
- Route a cable through the hole [32] of the relay module and use it to connecttheterminalPGND[34]intherelaymodulewithoneterminalofthedoorrelease.
- Route a cable through the hole [32] of the relay module and use it to connect the terminal LOCK-[36] in the relay module with the other terminalofthedoorrelease.
- SettheNO/NCswitch[29]toNO.
- Turn the time regulator [28] with a small screwdriver to select a time between 1 second and approx. 9 seconds. Press the hashkey [45] for at least 5-6 seconds. Thedoor releasewill unlock forth theselected time, and your visitor can open the door within this time. Replace the cover onto therelaymodule.
8.3 Base/Handset
- For the telephone function, use the telephone cable [62] to connect the telephone cable connection [61] at the base with the telephone connection in your residence. If necessary, use the TAE adapter [63].
- Connect the low-voltage plug of the supplied mains adapter [64] to the mainsadapterconnector[60]ofthebase.
- Placethebaseinthedesiredlocation.
- Removethebatterycompartmentcover[55]fromthehandset[39].
- Insert the two supplied AAA Ni-MH batteries into the battery compartment[53]ofthehandset.Payattentiontothecorrectpolarity.
• Slidethebatterycompartmentcoverbackontothehandset.
- Place the handset on the base so that the charging contacts [47] of the handsettouchthechargingcontacts[57]ofthebase.
9. Operation
- Connectthemainsadapterofthebase to the power supply. The handset willbeeptwise.
The batteries in the handset are charged automatically after the handset has been placed in the connected base. The batteries should be fully charged for about 15 hours before initial operation. Watch the battery charge indicator on the display display [41] (three black bars = batteries are fully charged, one black bar = very low battery power). If the batteries do not reach their full capacity after charging, they should be replaced. When you place the handset in the base, it automatically turnson. - Ifdesired, connect the 12 V power supply of the door unit. After the door unithassounded twice, the handset will ring.
• Pickupthehandsetandthenplaceitbackinthebase.
Nowthewirelessdoorintercomisreadyforoperation.
10. Turning the handseton/off
When the handset is in power off mode and you place it in the base, it automatically turnson.
The keys and display illuminate when the handset is removed from the base and also when a key is pressed. The illumination stops automatically after a period of 10 seconds without a key being pressed.
Toturnthehandsetonoroffinstandbymode, followthesesteps:
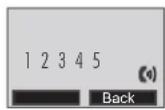
- Toturn the handset on, press and hold the key, until the display is switched on. While the handset searches for a base, the signal icon will flash and the following message will be displayed:

Whenthehandset has found the base, it will enterthestandbymode, the displaywill show the nameofthe handset, signalicon,battery icon ,date and current time. If the handset is unsuccessful in finding a base, the handsetwillbehaveaccordingtotheOutofRangecondition.
Note: If the battery power is very low when you place the handset in the base, the display will show the charging of the battery.
YOUSHOULDFULLYCHARGETHEHANDSETBEFOREUSING.
- Toturnoff the handset, keep the 📷 keypressed, until the display is switched off.
11. Basicsettings
- Selectingalanguageseechapter22.5
- Factorydefault:German
- Settingdateandtimeseechapter22.8
- Settingtheringtone(melodyandvolume)seechapter22.3
Setting the audio volume of your conversational partner see chapter 22.2
12. Registrationoffurtherhandsets
ThesuppliedhandsetisalreadyregisteredwiththenumberMT1.
Youcanregisterupto 4handsetsto thesamebase(seechapter27"Optional accessories").
- Press and hold the pager button [59] on the bottom of the base for at least5seconds. Thanpressthe"Menu"key.
- Pressthe or key repeatedly to choose "Registration".
- Pressthe"Select"key.
• Use or keytoscore through the basenames list. - Pressthe"Select"key to chooseabase.
- As soon as the base is found, and the handset is successfully registered, you will be prompted to enter the PIN code (the default tone is 0000).
- Pressthe "Select" key. On validation of the PIN code, theregistration tone will sound and the base assigns a number to the handset. If the PIN code entered is invalid, a warning tone will sound, and the handset will return to the previous registration state. If the base is not found, the handset will behave according to the OutofRange condition.
13. Radio range
The range of the radio transmission depends on various parameters. Under ideal conditions up to 200 m can be achieved in free space (between door unit and base as well as between base and handset), indoors the range is only upto30m.
A guarantee for this range cannot be given, as the local conditions at the installationsitemayinterferewithit.
Theradiorangecanbeaffectedbythefollowing:
- walls and ceilings, especially those made from reinforced concrete or metal
coatedwindows(e.g.energysavingwindows),radiators,mirrors,metal surfaces(e.g.refrigerators,metalshelves)
o electricalwiresandelectricdevices(e.g.electricmotor,microwaveoven) - deviceswiththesameoranadjacentfrequency.
o weatherconditions(rain,fogetc.)
Thestrengthofthereceivedradiosignalsisdisplayedwiththeicon :
blinkingicon = weakorlostsignal
permanentlyflashingicon =goodradiocommunication
14. Doorintercomfunction
- When the visitor presses the bell button [3], the door unit and all registered handsets will ring for up to 1 minute. The display display showse.g. "HS2Calling". Totalkwiththevisitor, pick up the handset or pressthedral/speakerkey[50].
- To end the conversation, press the end key[44] or place the handset in thebase.
- If a door release is connected to the doorunit, the doorcan be unlocked by pressing the hashkey[45] for approx. 5-6 seconds.
- If a visitor presses the bell button while you are having a telephone conversation, you will hear a callwaitingsignal, but you cannot answer your visitor'scall. If another handset is registered, it will ring and you can talk to your visitor with this handset.
15. Descriptionofthekeys/display
15.1 Keyfunctions(seefig.B)

Dial/speaker[50]
tomake/answera call; activates the speakerifpressedduring acall

End/power[44]
toendacall;pressingandholdingturnsthehandseton/off

Menu/Select[51]
toopenmenu functions in standby mode; to confirm selection and action; to perform "flash" function

Redial/Back[42]
Redial, to return to the previous menu; to mute the microphoneduringacall;todeleteanincorrectinput

Navigationkeys/furtherfunctions[43]

up/CIDbook[65]
to scroll up through lists and menu options; to increase the earpiece/speaker volume during a call; to open the CIDbook

down/phonebook[66]
to scroll down through lists and menu options; to reduce the earpiece/speaker volume during a call; to openthephonebook

INT[67]
to set up an internal call to another handset; to transferanincomingcalltoanotherhandset;tos et up aconferencecallwithanexternallineandaninternal handset

Redial[68]
to enter the redial book; to insert a pause when pre-dialinganumber
![Pentatech TF04 - Redial[68] - 1](/content/2026/03/563203/images/043c67dcc2eee8cde5ed8388feb3e14b0abe24242dbc184a859b48c7e026e00c.jpg)
Star[48]
to turn on/off the keypad lock function; to set up a conference call
![Pentatech TF04 - Star[48] - 1](/content/2026/03/563203/images/ec43422f7b9682f0ef838f7d62a36dd172a5ba7ec48d742a68faa0c72ab2f429.jpg)
Hashkey[45]
toactivatethedoorrelease
0-9
numbers0-9/lettersfromA-Z /symbols
keyassignment:
| Key | Characters in the displayed order | ||||
| 0 | (spc) | & | / | . | |
| 1 | - | 1 | @ | _ | |
| 2 | A | B | C | 2 | |
| 3 | D | E | F | 3 | |
| 4 | G | H | I | 4 | |
| 5 | J | K | L | 5 | |
| 6 | M | N | O | 6 | |
| 7 | P | Q | R | S | 7 |
| 8 | T | U | V | 8 | |
| 9 | W | X | Y | Z | |
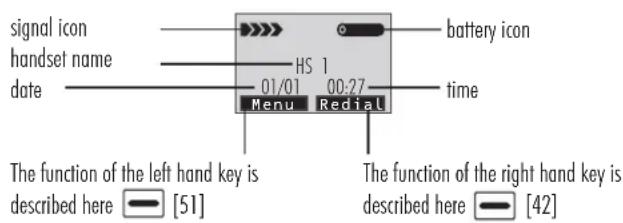
15.2 Iconsonthedisplaydisplay(seefig.B)
text_image
signal icon handset name date HS 1 01/01 00:27 Menu Redial Battery icon time The function of the left hand key is described here — [51] The function of the right hand key is described here — [42](1) indicate that the line is engaged
indicate that you have missed one or more recalls; when the symbol flashes the caller list is full
indicate that the hands-free function is enabled
-0 appearswhenthekeypadislocked
16. Basicfunctions
All descriptions in this manual assume that the handset is in standby mode.
Setthetelephonetostandbymodebypassingthe okey.
16.1 Makingacall
- Pick up the handset and press the key. The icon (0) and the period the handset has been activated in hours (minutes : seconds) appear on the display, the handset is not in standby mode any more.
- Dialatelephonenumber.
- To end the call, either press the 🔒 key or replace the handset in the base.
You can also enter the desired phone number in standby modewhich allows youtomake correctionsbeforedalling.Followthesesteps:
- Pickupthehandset.
- Enter a telephone number. If required, press the ☐ key to insert a pause."P" appearsonthedisplay.
- Check the telephone number. If you made a mistake while entering the number, you can us the "Erase" key to hear the last digit.
- Whenthenumberappearscorrectly, press the key andt hehandset willdialthenumber.
- To end the call, either press the 🔒 key or replace the handset in the base.
16.2 Receivingacall
When a new call is received, the call information will appear on the display and the telephonerings.
Ifthecallercanbeidentified, thecaller'sphonenumberisdisplayed.
- To answer the call, press the ⏻ key. If you have activated the Auto Answer function, when the handset is in the base, simply pick it up to answer.
- To end the call, either press the 🔒 key or replace the handset in the base. After hanging up, the display shows the call duration.
16.3 Mutingthemicrophone
During a conversation, you can temporarily switch your handset's microphoneoff, so that the other party can not be any you.
Example: You want to say something to another person in the room but do not want the other party to be any you.
- To mute your microphone, press the "Mute" — key during the conversation. "CallMuted" appears on the display.
- Tounmutethemicrophone, press the "Mute" — key again.
16.4 Adjustingthevolume
During a conversation, you can use the keys or to adjust the volume of the handset (or the speaker in hands-free mode) from volume 1 to 5. The selected volume is displayed on the display. You can also set the volume in themenu "AudioSetup".
16.5 Lastnumberredial
- Press the "Redial" — or the ⚫ key in standby mode. The displayshowsthelastnumberyoudialed.
- Pressthe keydialoutthenumber.
Your phone allows you to retrieve the last 10 numbers you have dialed and recall them quickly.
Notes:
- Ifnonumbersarefound,"Empty"isdisplayed.
- Whentheredialbookisfull,eachtimeyoudialanewnumber,theoldest numberstoredintheredialbookisautomaticallyerased.
Searchforanddial anumber intheredialbook
- If you want to scroll through the memory, press repeated until you find then number you want to doial.
Usingredialbookoptions
Using the redial book options, you can add a number to the phone book or delete anumberintheredialbook.
- Scrolltothedesirednumberbyusingthe or ?key.
- Whenthenumberappearsonthedisplay, press the "More" key.
-
Use the or keytochooseoneofthefollowingoptions:
-
AddtoPB: allowsyoutoaddthenumbertothephonebook. Complete storingtheentrybystartingfromstep4describedinchapter19.2(the numberisalreadyenteredintheappropriatefield).
- Delete: allowsyoutodeletetheselectednumber.
- DeleteAll:allowsyoutodeletethewholeredialbook.
- Toexit, pressthe "Select" key.
Note: "When you select the options Delete" or "Delete All", a message "Confirm?" will ask you to confirm the deletion. To confirm press the "Del"/"DelAll" key, to escape pressthe "Cancel" key.
16.6 Keylock
If you turn on this feature, all keys will be locked. You can answer calls by using the ☐ key. But when you hang up, the phone returns to the locked mode. This feature is useful to avoid pressing keys by mistake.
- Tolockthekeys, inthestandbymodejustkeep the thedisplayshows" HSLocked and the icon.
- Tounlockthekeys, keep the *keypressedagain till the keylockicon →0 disappears from the display.
Note: If you press any key in locked mode, the phone will generate a warningtoneandthe"HSLocked"messagewillberedisplayed.
16.7 Hands-freetalking
During a call, you can turn on the built-in speaker in the handset. In this mode you can simply put your handset on a surface (e.g. a desk) and enjoy
thecomfortofhands-freeconversation.
- To turn the feature on, press the 🔊 key during a call. The 🔊 icon appears on the display.
- To turn the feature off, and keep on talking in normal mode, press the keyagain. The iconwilldisappear.
Notes:
- Make sure you have turned the speaker off before putting the handset nearyouears.
• Toadjustthespeakervolume,seechapter22.2.
16.8 Flashsignal
When the line is engaged, pressing the "Flash" — key sends the Flash signal. This key is used in conjunction with special services (e.g. call waiting) which can be available in your phone network. For further details please contact your network telephone company.
Tousethesaidspecialservices, justpressthe"Flash" -keywhiletheline isengaged:thedisplaywillshow"R".
16.9 Paging
Youcanpageallhandsetsfromthebaseunitmakingthemringwithaspecial tone.Thisisusefultolocatealosthandset.
- Press the key [59] on the bottom of the base (less than 5 seconds). All handsets registered to the basewilling for about 60 seconds.
- To stop paging, press the key [59] on the base again or any key on the handset.
Note: If you press the key [59] for 5 seconds or longer, the basewill switch to subscription mode.
17. Menunavigation
Toaccessamenu option:
- Todisplaymenuitems, press the "Menu" key.
- Toscrollthroughmenuoptions, press the or key repeatedly.
- To select a menu, press the "Select" — key when the desired menu appearsonthedisplay.
- Repeatifnecessary.
Toreturntostandby mode:
If you press the "Back" — key in any menu (not in the number or text inputmode), the phonereturnstothepreviousscreen.
Toreturntostandbymode, press the 🔒 key.
The phone will automatically return to standby mode from any menu if no key is pressed within 40 seconds.
17.1 Menuoverview
CIDBook
AddtoPB
Delete
DeleteAll
Phonebook
New
Edit
Delete
DeleteAll
PBStatus
BSSettings
TerminateHS
DialMode
FlashTime
ModifyPIN
BSReset
HSSettings
Alarm
AudioSetup
RingSetup
ToneSetup
Language
HSName
AutoAnswer
LCDContrast
Date&Time
SelectBase
HSReset
REGISTER
Base1/ Base2/Base3/Base4
18. CIDBook
When you receive a call, if the caller's information is transmitted from the network on which the call was made (and the caller doesn't hide it), the caller's phone number is displayed. If you missed one or more calls, the icon will appear on the display. If the CID memory is full, the icon will flashon the display.
OUT OF AREA - This message will display when someone calls from an area where the telephone company is not offering the caller identifications services or is not yet providing number delivery to your area.
PRIVATE - If the caller has exercised the option to prevent his name and numberfrombeingsent, thismessagewillshowonthedisplay.
18.1 ViewanddialanyoftheCIDnumbers
- Pressthe"Menu" key.
- Pressthe Keyledriose CIDB . Thenumberofthelast calleris displayed.(Youcanalso accesstheCIDbookdirectlybypassing the 2 keyinstandbymode.)
- Use ? or 📄 keytoselectthedesirednumber.
- Todialanumber, presst he 📞 key.
Note: Numbers that have already been viewed are marked with the symbol in the upper right hand corner, numbers that have been viewed for the first time are marked with the symbol
18.2 Adding a CID number to the phone book (Add to PB)
- Pressthe"Menu" - key.
- Press the "Select" - key to choose "GIDB . The number of the lastcalleris displayed.
- Press 📷 or 📄 keytochoosethedesirednumber.
- When the desired number appears on the display, press the "More" key. "AddtoPB" appears.
- Pressthe"Select" — keyandenterthename.
- Pressthe"Next" key. Thenumberappears.
- Pressthe "Next" key. Use the or ? Key to select the ring toneyouwanttoassigntothenumber.
- Press the "Save" key to confirm and to exit. You will hear a confirmationbeep.
18.3 Delete one or all numbers from the CID book (Delete / Delete All)
- Pressthe"Menu" - key.
- Press the Keylochóse CIDB . Thenumberofthe last calleris displayed.
- Press 📋 or 📄 keytochoosethedesirednumber.
- When the desired number appears on the display, press the "More" key. "AddtoPB" appears.
- Use 📷 or 📄 keytoselect"Delete" or "DeleteAll".
- Pressthe - key. Thedisplayshows"Confirm?".
- Press the "Del" / "Del All" — key to confirm. You will hear a beep and the display show sthenext number.
19. Phonebook
The phone book built in your cordless phone allows you to store frequently used numbers so that you can easily make a call without having to remember or enter the phonenumber. Upto 50 entries can be stored.
Viewinganddialingphonebookentries
- Inthestandbymode, press the key
- Press or key repeatedly until the desired name is displayed.
- Pressthe "Dial" or the key to dialoutthenumber.
19.1 Addingentriestothephonebook(New)
- Pressthe"Menu" - key.
- Use and keytoselect"Phonebook".
- Pressthe Keyelect" — "New"appears.
- Pressthe KeyEteDisplayshows"N ?". ame
- Enterthedesiredname.
- Press"Next" for confirmation. Thedisplayshows"Number?".
• Enterthedesiredtelephonenumber(upto20digits). - Pressthe"Next" key.
- Use 📄 or 📋 key to select the ring tone you want to assign to the number.
- Pressthe"Save" keyforconfirmation.
Notes:
- If you make a mistake while entering the number, you can use the "Erase" Keycorrectit. Each time you press the key the last digit is deleted.
- Using a pause: A pause is useful when you access an interactive voice response system, such as an automated banking system. A pause provides a delay of 3 seconds. If you want to insert a pause when you dial a number in standby mode orstore a number in memory, press the keytilltheletterPappears.
19.2 Changingphonebookentries(Edit)
- Pressthe"Menu" — key.
- Use and keytoselect"Phonebook".
- Pressthe Keyelect" — "New" appears.
- Use and keytoselect"Edit".
- Pressthe Keyelect"
• Use and keytoselectthedesiredentry. - Pressthe"Select" keyoconfirm.
- If necessary, press the "Erase" — key to clear digits, then enter the newname and pressthe "Next" keyto confirm.
- Ifnecessary, changethephonenumber.
- Pressthe"Next" key.
- If necessary, use and keytochangetheringtone.
- Press the "Save" — key to save. The handset generates a confirmationbeep.
19.3 Deleting one or all entries from the phonebook (Delete / Delete All)
- Pressthe"Menu" — key.
- Use and keytoselect"Phonebook".
- Press the Keylect" — "New" appears.
- Use and keytoselect"Delete" or "DeleteAll".
- Pressthe kSelect"
• Use and keytoselectthedesiredentry. - Pressthe"Select" key Thedisplayshows"Confirm?".
- Pressthe "Del" /"DelAll" —keytoconfirm.Thehandsetgeneratesa confirmationbeep.
19.4 Phonebookstatus(PBStatus)
ThePBstatusshowsthenumberofphonebookentriesalreadystored.
- Pressthe"Menu" — key.
- Use and keytoselect"Phonebook".
- Pressthe Select" — "New" appears.
- Use and keytoselect"PBStatusl".
- Pressthe"Select" —key.E.g."11/50"isdisplayed,thatmeansthere are11outof50possibleentriesinthephonebook.
20. Basesettings (BSSettings)
20.1 Deletingahandsetfromthebase(TerminateHS)
With this function an additional handset (TF04M) can be unenrolled. This procedure must be made on the original handset from the set. The handset from the set cannot be unenrolled.
- Pressthe"Menu" - key.
- Use and keytoselect"BSSettings".
- Press the Keylect" — "TerminateHS" appears.
- Pressthe Keyelect" — Thedisplayshows"PIN ?".
- EnterthecurrentPINcode(thedefaultPINcodeis"0000").
- Pressthe"OK" key.
- Use of keytoselectahandset.
- Pressthe "Select" — key to confirm. If you select the current handset or a nonexistent handset, a warning tone will be heard. After a few seconds, theselectedhandsetwillnotberegisteredanymore.
20.2 Diallingmode(DialMode)
This setting is only necessary if required by your telephone system. See user manual of the telephonesystem.
Youcanselecttochangethiediallingmodebythefollowingsteps:
- Pressthe"Menu" - key.
-
Use and keytoselect"BSSettings".
-
Pressthe Keylect" TerminateHS" appears.
• Use and keytoselect "DialMode". - Pressthe Keylect" — Thedisplayshowstheactualsetting.
- Use one key to select the desired dialling mode (Tone or Pulse).
- Pressthe Keyave" A confirm beep will be heard.
Note:
If you are not sure which dialling mode to select, please contact your local serviceprovider.
Factorydefault:Tone
20.3 FlashTime
This setting is only necessary if required by your telephone system. See the usermanualofthetelephonesystem.
YoucanchangetheFlashtimewiththefollowingsteps:
- Pressthe"Menu" key.
• Use and keytoselect"BSSettings". - Pressthe Keylect" "TerminateHS" appears.
- Use and keytoselect"FlashTime".
- Press the Keylect" The displayshowsthecurrentsetting.
- Use or keytoselect"Flash-1"(short)or"Flash-2"(long).
- Pressthe"Save" key.
Factorydefault:Flash-1
20.4 ModifyingthePIN(ModifyPIN)
This function allows you to change the PIN number of the currently active base. The default PIN is 0000.
- Pressthe"Menu" key.
- Use and keytoselect"BSSettings".
- Pressthe Keylect" TerminateHS" appears.
- Use and keytoselect"ModifyPIN".
- Pressthe Keylect" — Thedisplayshows"PIN ?".
- EnterthecurrentPIN.
- Pressthe"Next" key. Thedisplayshows"NewPIN".
- Entera4-digitnewPIN.
- Pressthe"Next" key. The displayshows "Repeat".
- EnterthenewPINagain.
- Pressthe"Save" keytoconfirm.NowyournewPINisactivated.
Note:
ItisimportantthatyoumemorizeyournewPIN. Ifyoulooseyour
PIN, you cannot make an asymmetric modification so the device which requires a PIN.
20.5 Resettingthebase(BSReset)
Thisfunctionallowsyoutoresetthebasesettingtothefactorydefault.
- Pressthe"Menu" key:
• Use and keytoselect"BSSettings". - Pressthe "Select" "TerminateHS" appears.
- Use and keytoselect"FlashTime".
- Pressthe Keylect" — Thedisplayshows"PIN?".
- EnterthecurrentPINcode.
- pressthe"Reset" key.
21. Handsetsettings(HSSettings)
21.1 Alarm
Youareabletosetthealarmonthehandset.
- Pressthe"Menu" key.
- Use and keytoselect"HSSettings".
- Pressthe Keylect" Alarm" appears.
- Pressthe kSelect" [the]displayshowsthecurrentsetting.
- Use or keytoselect"On" or "Off".
- Pressthe"Select" key.
• IfyouselectON, the displayshowsthecurrentalarmtime. - Enterthenewtimewithnumerickeys0to9in24hformatHH:MM.
- Pressthe"Next" key.Abeepsounds.
- Press 📷 or keytoenableordisablethesnoozefunction
- Pressthe"Save" key.
Notes:
If you choose "Snooze Off", the alarm will ring for about 40 seconds at the selected time. By pressing any key you can switch off the alarm at any time. To deactivate the alarm, choose "Off" in the "Alarm" menu, otherwise the alarm will bring again then next day.
If you choose "Snooze On", the alarm will ring in regular intervals approx. every 10 minutestillthe batteriesofthe handsetareempty. Bypassingany key (not the ☐ key) you can switch off the alarm at any time, after 10 minutesthealarmwillringagain.Toswitchoffthealarm,pressthe
Thealarmwillringagainthenext day. Todeactivatethealarm,choose"Off" inthe"Alarm"menu,asdescribedabove.
Factorydefault:Off
21.2 Adjustingthevolume(AudioSetup)
You can adjust the volume of the handset or the speaker when using the hands-freefunctionasfollows:
- Pressthe"Menu" key.
- Use and keytoselect"HSSettings".
- Pressthe 'Select" "Atom" appears.
• Use and keytoselect"AudioSetup". -
Pressthe Keylect"
• Use or keytoselect "SpeakerV." or "EarpieceV.". -
Pressthe Keylect" — Thedisplayshowsthecurrentsetting.
- Use □ or □ key to select the volume level from "Volume 1" to "Volume5".
- Pressthe"Save" key
Factorydefault:Volume3forboth
21.3 Ringtone(melodyandvolume)(RingSetup)
You can choose the ring tone for incoming calls from the telephone network (RING EXT) as well as the ring tone from the door unit or other handsets registeredatthesamebase(RINGINT)andadjustitsvolume.
- Pressthe"Menu" key.
• Use and keytoselect"HSSettings". - Pressthe Keylect" Alarm" appears.
• Use and keytoselect"RingSetup". - Pressthe Keylect"
• Use or keytoselect "INTRing" or "EXTRing". - Pressthe"Select" key.
- Use or keytoselect "Melody" or "Volume".
- Pressthe"Select" key.
- Use of keytoselectaringtonefrommelody1 to 10 or adjust the volume from 1 to 5 or switch it off completely ("Volume Off"). When setting the ringtone or the volume, the telephone will sound these selected melody or ring with the chosen volume.
- Pressthe"Save" keytoconfirm.
Factorydefault: EXTRing:Melody1 INTRing:Melody8/Volume3forboth
21.4 Settingkeytones(ToneSetup)
KeyTone
Each depression of a key can be confirmed by the handset with a tone. This tone can be tuned off.
Receptionrange
Thehandset issues awarning sound whenitis outside thereception range of thebase. This sound can be tuned off.
- Pressthe"Menu" key:
• Use and keytoselect"HSSettings". - Pressthe Keylect" Alarm" appears.
• Use and keytoselect "ToneSetup". - Pressthe Keylect"
- Use and keytoselect"KeyTone" or "RangeAlarm".
- Pressthe keyagain.Thedisplayshowsthecurrentsetting.
- Use ☐ or ☐ key to select "On" or "Off", to enable or disable the function.
- Pressthe"Save" key.
Notes:
- For normal use, we recommend you leave the key tones enabled. This makes the phone easier to use.
- Incertainconditions, a warningonewill sound whenanincorrect key is pressed. This warningtone cannot be disabled in "RangeAlarm".
Factorydefault: forboth:On
21.5 Selectingalanguageonthedisplay (Language)
The handset supports several predefined languages: English, French, Spanish, German, Italian, Dutch, Russian, Polish. You can change the language of the display texts as follows:
- Pressthe"Menu" key.
- Use and keytoselect"HSSettings".
- Pressthe "Select" Alarm"appears.
- Use and keytoselect"Language".
- Pressthe Keylect" — Thedisplayshowsthecurrentsetting.
- Use p# keytoselectalanguage.Eachlanguageisdisplayed initstranslation.
- Press the "Save" key. You will hear a confirmation beep.
Factorydefault: German
21.6 Handsetname(HSName)
The default name of the supplied components is HS 1 (handset) and HS 2 (door unit). The default name of a handset or a door unit after registration is "HS N". The number N=1 to 5 indicates the order in which the device has been registered to the base. Then a name is displayed in standby mode.
Eachhandsetcanbenamedforeasieridentification:
- Pressthe"Menu" key.
- Use and keytoselect"HSSettings".
- Pressthe Keylect" "Alarm" appears.
- Use and keytoselect"HSName".
- Pressthe Keylect"
- Enter the name of the handset (max. 12 digits) with the alphanumeric keys (you can use the "Erase" — key to erase the last digit, if necessary).
- Pressthe"Save" key.
Notes:
When you make an internal call to another handset, "HS N Calling" will appear on this handset instead of the name given by you.
21.7 Automaticanswering(AutoAnswer)
This function allows you to answer a call by simply picking up the handset, without pressing any key.
- Pressthe"Menu" key.
-
Use and keytoselect"HSSettings".
-
Pressthe Keylect" [A]rm"appears.
- Use and keytoselect"AutoAnswer".
- Pressthe Keyelect" — Thedisplayshowsthecurrentsetting.
- Use or keytoselectONorOFFtoenableordisablethefunction.
- Pressthe"Save" key.Youwillhearacconfirmationbeep.
Factorydefault:On
21.8 Settingdateandtime(Date&Time)
- Pressthe"Menu" key.
- Use and keytoselect"HSSettings".
- Pressthe Keylect" Alarm" appears.
- Use and keytoselect"Date&Time".
- Pressthe Keylect"
- Use or key to choose between "Date Format", "Time Format", "SetDate" or "SetTime".
Pressthe"Select" key. Thedisplayshowsthecurrentsetting.
DateFormat
- Use or keytoselect "DD-MM" (DayDay-MonthMonth) or "MM-DD" (DayDay-MonthMonth).
- Pressthe"Save" key.
TimeFormat
- Use or keytoselect "12-Hour" or "24-Hour".
- Pressthe"Save" key.
SetDate
- Enterthedatewiththenumerickeys0to9.
- Pressthe"Save" key.
SetTime
• Enterthetimewiththenumerickeys0to9.
- Pressthe"Save" key.
Factorydefault:DateFormat:DD-MM,TimeFormat:24-Hour
21.9 Selectingabase(SelectBase)
This function allows you to select a base from those already registered to the handset(upto4basescanberegisteredtoonehandset).
- Pressthe"Menu" key.
- Use and keytoselect"HSSettings".
- Pressthe Keylect" "Alarm" appears.
- Use and keytoselect"SelectBase".
- Pressthe Keylect" — The display the show the current base.
- Use or?keytoselectthedesiredbase.
- Press the "Select" — key. If you select a non-existent base, the handset will sound a warning tone. After a short time, a confirmation melody will sound, and the name of the handset will change respectively.
Note:
Thehandsetwillonlyworkwiththebaseithaslastbeenregisteredto,orwith theselectedbase.
21.10 Resettingthehandset(HSReset)
- Pressthe"Menu" key.
- Use and keytoselect"HSSettings".
- Pressthe "Select" Alarm"appears.
- Use and keytoselect"HSReset".
- Pressthe Keylect" — Thedisplayshows"PIN ?".
- EnterthecurrentPINcode.
- Press the "Reset" — key. If the PIN code is validated, all Base settings will be returned to the factory default. Otherwise a warning sound will be heard and the settings will remain. After resetting, the handsetwillreturntostandbymode.
22. Registering a handset to a base (Registration)
The supplied handset is already registered with the number 1. You can register up to 5 handsets/door units to the same base (see chapter 27 "Optionalaccessories").Ahandsetcanberegisteredtoupto4bases.
- Press and hold the key [59] on the bottom of the base for at least 5 seconds.
- Pressthe"Menu" key.
- Use and keytoselect"Registration".
- Pressthe"Select"key.
- Use ? or 📂 keytoscrollthroughthebasenameslist("Base1" to "Base4".
- Pressthe"Select"key —tochooseabase.
- As soon as the base is found, and the handset is successfully registered, you will be prompted to enter the PINcode (the defaultone is 0000).
- Press the ☐ key. On validation of the PIN code, the registration tone will sound and the base assigns anumber to the handset. If the PIN code entered invalid, awarning onewill sound, and the handset will return to the previous registration state. If the base is not found, the handset will behave according to the OutofRange condition.
Notes:
- If the registration of a handset was deleted, it can be registered to the baseagainasdescribedabove.
- To register a registered handset to another base, simply follow the steps described above with another base.
- Thehandsetwillonlyworkwiththebaseithaslastbeenregisteredto,or withtheselectedbase(seechapter22.9).
23. Callingwithmorethanonehandset
If you have more than one handset registered to the same base, you can makeinternalcalls,transferexternalcallsbetweentheregistered handsets,andsetupaconferencecall.
23.1 Internalcall
- Pressthe key: Thedisplayshowsthefollowingmessage:
- Enter the number of the handset you want to call (e.g. "3" for handset 3). If the handset entered is valid, the called handset will ring and display "HSXCalling".
- Thehandsetusercanpressthe keyanswertheinternalcall.
• Toendyourconversation, press the 🔓 key.
Notes:
If an external call comes in during an internal call or a conversation with the door unit, the display will show the caller's number and two short beeps will be heard.
- Press the key to end the internal call. Shortly after that your telephones will bring with their incoming call.
- Nowanswertheexternalcallwiththe key.
Itisnotpossibletocalladoorunitfromahandset.
23.2 Calltransferbetweenhandsets
You can transfer an external call between handsets that are registered to the samebase.
- Duringanexternalcall, press the key
- Enterthenumberofthehandsetyouwanttotransferthecallto.
- If the called party wants to answer your call, he/she can press the key to talk with you. At this time you can inform him/her of the incomingcall.
- When the called party wants to answer the external call, press the keyorreplacethehandsettothebasetocompletethetransfer.
23.3 Settingupaconferencecall
When you have both an external call and an internal call in progress, you can setup a 3-way conference call like this:
- During anexternalcall, press the key and thenenter thenumber of thehandsetyouwanttojointhe3-waycall.
- Thecalledpartypressesthe keytoanswer.
- The calling party presse the key to start the 3-way call.
- Eitherofthetwohandsetscanpressthe callatanytime.
Note:
Ifone of the handsetsleaves theconference call,theremaininghandsetswill continuetheconference.
24. CallerIDoncallwaiting
When you subscribe to Call Waiting service from your local telephone company, the handset will display them name and number of these second caller while you are having a conversation.
- Pressthe"flash" keyanswerthesecondcaller.
- If you press the "flash" — key, you can continue with your conversation with the first caller.
Note:
If you have transferred an external call to another handset, you cannot use thecall-waitingfunctionviathesecondhandset.
25. Changingbatteries
25.1 Doorunit
If the ring toneat the door unit is weak or no communicationis possible, the batteriesinthedoorunitshouldbereplaced:
- Use the supplied torx wrench [24] to removethetorxscrew [23] from the hole [12].
• Pullthedoorunit[1]upwardsandoutofthebracket[15]. - Open the battery compartment [13] of the door unit by sliding the battery compartment cover[11] down.
- Removeanddisposeoftheoldbatteries.
- Insert two new alkaline LR14 (C), 1.5 V batteries into the battery compartment, watching for the correct polarity. The door unit will ring once.
• Replacethebatterycompartmentcover.
• Slidethedoorunitbackontothebracket. - Screwthetorxscrewbackintothedoorunit.
25.2 Handset
If the batteries in the hand set discharge too quickly, they should be replaced:
- Open the battery compartment [53] of the handset [39] by sliding the battery compartment cover[55]down.
- Removeanddisposeoftheoldbatteries.
- Insert two new Ni-MH batteries AAA, 1.2 V; 600 mAh batteries into the battery compartment, watching for the correct polarity.
• Replacethebatterycompartmentcover.
26. Maintenance + cleaning
- Theunitsaremaintenance-free.Donotopenthem.
- Regularlycheckthetechnicalsafetyandfunction
Before you clean the device, pull the mains adapter out of the mains socket. - Clean the microphone openings at the door unit (fig. A [14] with a papercliporcompressedair.
- Use a soft, dry or slightly moist cloth or a dry brush for cleaning the surfaces.
27. Optional accessories
- HandsetTF04Mincl.charger, itemno.34235
- RelaymoduleRE05, itemno.34232
- WeathershieldTFWS1fordoorunit, itemno.34237
28.Disposal

Packaging material, used batteries or electrical products must not be disposed of as household waste. Use your recycling system. Details are available from your local authority.
29. Simplified EU declaration of conformity

Hereby, INDEXAGmbHdeclaresthat the radio equipment type TF04 Setis in compliancewithDirective2014/53/EU. The full text of the EU declarationof conformity is available at the following internet address: http://www.indexa.de/w2/f_CE.htm.
The product is designed for analogue telephone connection in German, Austrian, Swiss, Luxembourg Italian or Dutch telephonenetwork.
Indexa GmbH
| Symptom Cause Remedy | ||
| Avisitorisbadlyheardornotatall Themicrophoneopening(Fig.A[14])atthedoor Cleantheopeningwith,forexample,anofficediporaintercomisblocked compressedairspray | ||
| Handsetdoesn'treact/ Thehandsetisnt'switchedon. Switchthehandseton.nomessageonthe Batteriesofthehandsetarenotinsertedcorrectly. Insertthebatteriescorrectly,watchingforcorrect polarity. | ||
| Handsetreactstopressingakey Thekey padlockisactivated. Deactivatethekeypadlock.onlywithabeep. | ||
| Handset display shows SEARCHING. | The base is not powered. | Connect the mains adapter of the base correctly. |
| The distance between base and handset is too large orthebuildingfabricisshieldingtheradio transmission. | Change the position of the base and/or the handset. | |
| Radiointerference | Switchotherradiotransmittersandinterferingdevicesoff. | |
| Changethepositionofthedevices. | ||
| Thehandsetwasn'tregisteredtothebase. | Registerthehandsettothebase. | |
| No ring can be heard at the door unit when the bell button is pressed. | The door unit is not powered. | Insert faultless batteries with the correct polarity or connect the door unit correctly to a 12 V DC power supply. |
| Handset doesn't react to ringing although it is connected to the base and the ring can be heard at the door unit. | The distance between door unit and base is too large or the building fabric is shielding the radio transmission. | Change the position of the door unit and/or the base. |
| The door unit wasn't registered to the base. | Register the handset to the base. | |
| After pressing the bell button theringatthedoorunitsounds onlyafewtimesand/orno communicationispossible. | The batteries in the door unit are used up. | Insert new batteries with the correct polarity. |
| The electric door release cannot be activated. | The hash key [45] wasn't pressed long enough. | Press and hold the hash key [45] for at least 5-6 seconds. |
| The door release isn't properly connected or the power supplyistooweak. | Connect the door release correctly (see chapter 8.2). | |
| The battery life of the batteries inthehandsetistooshort. | A permanently short battery life can indicate that the batteriesneedtobereplaced. | Insert new suitable batteries with the correct polarity. |
| Nosuitablebatterieswereinserted. | Insertnewsuitablebatterieswiththecorrectpolarity. | |
| No dial tone | The base isn't connected correctly to the telephone network. | Connect the telephone cable and the TAE adapter correctly. |
| Thebaseisnt'powered. | Connectthebasetothemainspower. | |
| Thehandsetdoesn'tring.Thecaller'snumberisnotdisplayed. | Theringtoneisdeactivated. Activatetheringtone.Youhavenot subscribedtoacallerIDserviceviayour networkprovider. | SubscribetoacallerIDserviceviayour networkprovider. |
| Thecallermayhavewithheldhisdetails. | - | |
| Thecaller'snumberisreceivedlater. | Letthehandsetringseveraltimes. | |