Leonie - Bed Lionelo - Free user manual and instructions
Find the device manual for free Leonie Lionelo in PDF.
User questions about Leonie Lionelo
0 question about this device. Answer the ones you know or ask your own.
Ask a new question about this device
Download the instructions for your Bed in PDF format for free! Find your manual Leonie - Lionelo and take your electronic device back in hand. On this page are published all the documents necessary for the use of your device. Leonie by Lionelo.
USER MANUAL Leonie Lionelo
Should you have any remarks or questions concerning the product, please do not hesitate to contact us: help@lionelo.com
The product has been tested and complies with the following standard:
EN 1130:2019+AC:2020, EN 16890:2017+A1:2021
Before you use the product, please read this manual carefully.
Note: Only an adult is allowed to assemble the product.
A failure to follow these warnings and assembly instructions may lead to serious injuries or death.
Producer:
BrandLine Group Sp. z o. o.
ul. A. Kriegewskiego 1, 61-248 Poznań, Poland
NOTE!
IMPORTANT! READ
CAREFULLY AND KEEP FOR FUTURE REFERENCE
WARNING
- Do not use this product without reading the instructions for use first.
- Stop using the product as soon as the child can sit or kneel or pull itself up.
- Placing additional items in the product may cause suffocation.
- Do not place the product close to another product, which could present a danger of suffocation or strangulation, e.g.
strings, blind / curtain cords, etc.
- Do not use more than one mattress in the product.
- Position the product on a horizontal floor.
- Small children must not be allowed to play near the crib if unattended.
- The crib must be locked when the child is left unattended.
- All assembly elements must always be properly tightened. Make sure no screws and bolts are loose as the child may catch its body part or clothes on them (e.g. strings, necklaces, toy ribbons, etc.), which may lead to suffocation risk.
- The maximum thickness of the mattress is marked with a red line on the internal side of the crib. Do not use mattresses thicker than permitted.
- Be aware of threat posed by cigarettes, naked flame or other sources of high temperature, such as electric heaters, gas water heaters, etc., elements near the crib.
- Do NOT use the crib if any of its parts is missing or when it is broken or damaged. If necessary, contact Lionelo for spare parts and guidelines. Do NOT replace parts of the crib on your own.
WARNING FOR MATTRESS:
- Do not use mattress if any of its elements is broken, torn or lost. Use only spare parts approved by the manufacturer.
- Do not use more than one mattress in the crib.
- Be aware of the risk of open fire and other sources of strong heat, such as electric bar fires, gas fires, etc. in the near vicinity of the cot.
- Do NOT use an bedside sleeper if any of its parts is missing, damaged or broken. If necessary, contact Lionelo for spare parts and guidelines. Do NOT replace parts.
- The distance from the floor of the adult's bed which the bedside sleeper is intended for is max. 38cm (fig. 13).
-
The bedside sleeper is intended only for standard adults' beds. Do not use the product with waterbeds or rounded beds.
-
Do not use other fixing systems than described in the manual.
- Never use the bedside sleeper if it is inclined.
- To avoid suffocation risk, always attach the bedside sleeper to the parents' bed with the use of fixing systems described in the manual.
- There must not be any free space between the lower part of the bedside sleeper and adult bed's mattress.
- Before every use, check the bed fixing system tension. To do so, try to pull the bedside sleeper away from the parents' bed.
- If there is free space between the bedside sleeper and adults' bed, DO NOT USE the product.
- The gap between the bedside sleeper and adults' bed must not be filled with pillows, blankets and other items.
- DANGER! Always completely raise the drop side when not attached to the adult's bed.
- WARNING: To avoid hazards from the child's neck being caught on the top rail on the side that is next to the adult bed, the top rail must not be higher than the adult bed mattresses.
- WARNING: To avoid the risk of your child being strangled the attachment system to the adult's bed shall always be kept away from and out of the crib.
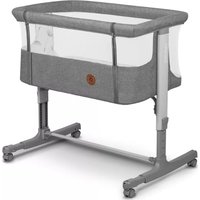
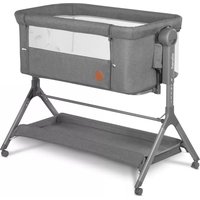
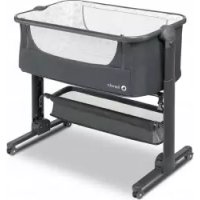
1. Description of parts from the box (see fig. 1):
- Carrycot
- Supporting belt (x3)
- Mattress
- Screw (x4)
- Frame legs (x2)
- Allen bolt
- Support
2. How to assemble
- Connect the support (C) to frame legs (A and B) as showed by arrows in the figure. Connectors are equipped with locking screw holes (6). To tighten up screws, use the Allen bolt (7) (see fig. 2).
-
Connect the frame of the carrycot to the frame of the base (with two fasteners) until you can hear a „click“ and the frame engages. Next put the mattress (2) into the crib (see fig. 3).
-
Close the side wall of the crib by lifting the moving upper rail. Connect the connector of the rail until it engages. Next zip up and cover the connector (see fig. 4).
- Zip up sides of the crib with the use of side zips (see fig. 5).
3. How to use
How to move crib:
- Hold the rail of carrycot, lift it and push to move the crib. Rear bases of frame legs are anti-skidding, which prevents accidental movement of the crib (see fig. 6).
How to adjust height:
- Press the bed height adjustment key and set the desired height. There are 6 height levels available. It is also possible to set various heights on both sides (see fig. 7).
WARNING: Permissible maximum inclination of the bed is a difference of 2 levels. Child's head must always be on the higher position.
NOTE! Before you change the height, take the child out of the crib.
Cradle function:
- To change the crib into cradle, take out leg supports and turn upwards (see fig. 8).
4. How to disassemble
- Take the mattress out.
- Detach side zips of the carrycot and rail zip. Release the protection connecting the rail and drop the side wall of carrycot. Next secure the rail to the carrycot base with the use of clasps (see fig. 9).
- To separate the frame of the carrycot from frame of the base, simultaneously press both buttons on upper tips of the crib.
- To remove covering of the crib for washing, press the key from the internal side of the frame leg. Next grab and take the carrycot frame out (see fig. 10).
- Unlock the rail protection, detach all zips and remove the covering from the carrycot.
5. Beside sleeper function
To make use of the bedside sleeper function, it is necessary to prepare the product for use. To do so:
- Detach zips on both sides of the opening side.
- Unlock the rail protection and drop the side wall of the carrycot. Next secure the rail to the base of carrycot with the use of clasps (see fig. 9).
- Push the bedside sleeper closer to parents' bed and check height of the bedside sleeper in relation to mattress (see fig. 11).
NOTE! When using the crib as an bedside sleeper, its height must be identical on all sides.
- Use belts supplied to attach the bedside sleeper to the parents' bed. Lock the belt buckle positioned on the side o the bed's base. Next carry the belt from the bottom to the top, around the structure of parents' bed and lock the buckle on the other side.
- Tighten up belts and make sure the bedside sleeper has been properly attached to parents' bed (see fig. 12).
WARNING! Before every use, make sure there is no gap between parents' mattress and side wall of the bedside sleeper.
6. How to clean and maintain
- Wash the crib's covering in the washing machine at the temperature of 30^ .
- Use soft agents.
- Never use a bleach. Do not dry in the sun. Avoid direct sunlight or heat.
- Do not iron or wash dry.
- Every time you wash it, check resistance of fabrics and seams.
- Clean metal and plastic parts with a sponge, lukewarm water and soft detergent. Never use a bleach.
- Never clean any elements of the crib with abrasive materials, ammonia, bleaches and alcohol.
- Always store the crib in a dry place to avoid mold. Keep away from sources of heat and do not store the crib in the sun.
- You can clean the mattress with a wet cloth and natural agents. Hand washing in water is allowed up to 30^
The pictures are for reference only. The real design of products may differ from the pictures presented.
Drogi Kliencie!
WICHTIG! LESEN SIE DIESE
BEDIENUNGSANLEITUNG
SORGFÄLTIG UND
BEWAHREN SIE SIE FÜR
SPÄTERES NACHLESEN AUF
WARNING
Detailed warranty conditions are available on the website:
Thank you for purchasing our product