Avenue 30.2026 - Thermometer TFA - Free user manual and instructions
Find the device manual for free Avenue 30.2026 TFA in PDF.

User questions about Avenue 30.2026 TFA
0 question about this device. Answer the ones you know or ask your own.
Ask a new question about this device
Download the instructions for your Thermometer in PDF format for free! Find your manual Avenue 30.2026 - TFA and take your electronic device back in hand. On this page are published all the documents necessary for the use of your device. Avenue 30.2026 by TFA.
USER MANUAL Avenue 30.2026 TFA
Thank you for choosing this instrument from TFA.
1. Before you use this product
- Please make sure you read the instruction manual carefully.
- Following and respecting the instructions in your manual will prevent damage to your instrument and loss of your statutory rights arising from defects due to incorrect use.
- We shall not be liable for any damage occurring as a result of non-following of these instructions. Likewise, we take no responsibility for any incorrect readings or for any con- sequences resulting from them.
- Please pay particular attention to the safety notices!
- Please keep this instruction manual safe for future reference.
2. Field of operation and all the benefits of your new instrument at a glance
- Clear functional design
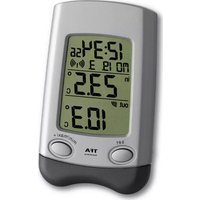
- Large digital display with 3 different modes:
1. Current temperature
2. Current temperature and time in sequence
3. Current, highest and lowest temperature and time in sequence
- Maximum and minimum values with auto reset
- Automatic backlight at dark
- Rod (separable) in aluminium
- For putting in the ground
- This product is exclusively intended for the field of application described above. It should only be used as described within these instructions.
- Unauthorised repairs, modifications or changes to the product are prohibited. Caution! Risk of injury:
- Keep this device and the batteries out of reach of children.
- Open the battery compartment by a screw driver.
- Insert the batteries (above: rechargeable battery 1 x 1,2 V AA for the illumination; down: bat- tery 1 x 1,5 V AA for all functions) into the battery compartment, observing the correct polar- ity.
- ATTENTION: The 1.2 V rechargeable battery for the backlight is not fully charged when shipped. For maximum efficiency it is advisable to have the rechargeable battery fully charged by the solar panel on a sunny day before the first use. Alternatively, the recharge- able battery can be recharged with an ordinary battery charger.
- Pull the protective foil off the display.
- The unit is now ready to use.
- All LCD segments will light up for about a few seconds
- 00:00 appears on the display and the DST symbol is flashing.
- Do we have Daylight Saving Time, press +1 button for confirmation while the symbol is flash- ing and the DST symbol remains on the display.
- During standard time press +1 button once again and the DST symbol disappears.
- Is there no confirmation within 15 seconds the DST symbol stops flashing and disap- pears.
- For a simple time switch with only one keypress you have to have a correct setting (see point: Daylight Saving Time / Standard Time switch)
- The buttons are located inside the battery compartment.
5.1 Setting of the clock
- Slide the switch to position B or C.
- As soon as the time appears in the display press MODE button to enter the setting mode.
- The hour digit is flashing.
- Press +1 button to set the hours. Hold and press the button for a fast count.
- Press MODE button again and set minutes in the same way.
- Press MODE button again and you will return to normal mode.
- The instrument will quit the setting mode, if there is no button used within 15 seconds period.
5.2 Display change °C/°F
- When the display shows the current temperature, press +1 button to change between °C or °F as temperature unit, at the same time the time system changes from 24 to 12 hour-system.
VENUE – Garden thermometer with solar lighting
- Batteries contain harmful acids and may be hazardous if swallowed. If a battery is swallowed, this can lead to serious internal burns and death within two hours. If you suspect a battery could have been swallowed or otherwise caught in the body, seek medical help immediately.
- Batteries must not be thrown into a fire, short-circuited, taken apart or recharged. Risk of explosion!
- Low batteries should be changed as soon as possible to prevent damage caused by leaking.
- Avoid contact with skin, eyes and mucous membranes when handling leaking batteries. In case of contact, immediately rinse the affected areas with water and consult a doctor. Important information on product safety!
- Attention: The solar panel is fragile. Do not drop the instrument and avoid collisions, vibra- tion or extreme temperatures.
- Do not expose the device to extreme temperatures, vibrations or shocks.
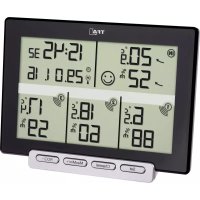
LCD display (Fig. 1): A: Battery symbol B: Indication time/temperature C: Symbol Daylight Saving Time (DST) D: Automatic reset (Auto Reset) E: Display mode A, B or C F: PM at 12-hours system G: Symbol maximum temperature H: Symbol minimum temperature Buttons (Fig. 2): I: MODE button (in the battery compartment) J: +1 button (in the battery compartment) K: Switch A-B-C (in the battery compartment) L: +/- 1Hr button M: ECO slide Housing (Fig. 1-2): N: Battery compartment (screwed) O: Temperature probe P: Solar panel TFA_No. 30.2026_Anleit_02_22 14.02.2022 16:30 Uhr Seite 7A VENUE – Garden thermometer with solar lighting
- If the ECO mode is not active the illumination will turn on automatically as soon as the light sensor indicates darkness.
- When the battery symbol appears on the display, the voltage of the rechargeable battery is low and the back light function can be temporarily disabled, until the power supply by the solar panel is sufficient again.
- Press the plate firmly into the ground.
- Mount the rod and put it into the ground passing through the hole in the middle of the plate. Fix the thermometer on the rod and turn the solar panel (rotatable 180°) to the direction where it receives the highest light supply.
6. Care and maintenance
- For best function keep the solar panel always clean. Clean it with a soft cloth and maybe a lit- tle glass- or display cleaner. Do not use solvents or scouring agents.
- Remove the battery if you do not use the product for a long period of time.
6.1 Battery replacement
- Please change the 1.5 V AA battery when the display becomes weak.
- Use alkaline batteries only. Observe correct polarity.
Problem Solutions No display ➜ Ensure correct polarity when inserting the battery Incorrect indication ➜ Change the battery No illumination ➜ Make sure that no objects cover the solar panel (see point 5.7)
This product and its packaging have been manufactured using high-grade materials and com- ponents which can be recycled and reused. This reduces waste and protects the environment. Dispose of the packaging in an environmentally friendly manner using the collection systems that have been set up.
VENUE – Garden thermometer with solar lighting
- PM appears on the display after noon.
- Close the battery compartment again.
5.3 Daylight Saving Time / Standard Time switch
- When the time appears on the display hold +/-1 Hr button outside the battery compartment for 3 seconds and summertime changes in to wintertime and vice versa (+/-1 hour).
- Please pay attention to the correct setting at the startup procedure.
- Switch position B: Current temperature and time alternately (display: >>)
- Switch position C: Current temperature, highest/lowest temperature and time alternately (dis- play: >>>)
5.5 Maximum and minimum temperatures
- There is an automatic update of maximum temperature at 8:00 and minimum temperature at 20:00. Please set the actual time to activate this function.
- The silver pin is the temperature probe. Please take care of it and do not break it. The tem- perature probe has no adjusting function. It only measures the temperature.
5.7 Backlight and fixing
- The supplied battery will be recharged in an environmentally friendly manner by the solar panel.
- Please consider when choosing a location that the solar panel needs at least 8-10 hours of light per day to guarantee a long-term sufficient power supply. Attention: Direct sunshine fal- sifies the measurement.
- The thermometer is provided with a light sensor to turn on the light automatically at dark between 5 and 9 o’clock and 18 and 23 o’clock. Avoid the closeness of artificial light (like: street lighting).
- With the ECO slide it is possible to turn the time controlled illumination on (left) or off (right) TFA_No. 30.2026_Anleit_02_22 14.02.2022 16:30 Uhr Seite 8A VENUE – Garden thermometer with solar lighting
Measuring range temperature: -25 °C…+70 °C (+13 °F…+158 °F) Accuracy: ±1°C 0°C...+45°C (+32°F...+113°F) ±1.5°C -25°C...0°C (-13°F…+32°F) and +45°C...+70°C (+113°F...+158°F) Resolution: 0,1 °C Power consumption: 1x 1.2 V AA rechargeable battery and 1x 1.5 V AA battery Housing dimension: 175 x 38 x 1145 mm Weight: 592 g (instrument only) TFA Dostmann GmbH & Co.KG, Zum Ottersberg 12, 97877 Wertheim, GermanyNo part of this manual may be reproduced without written consent of TFA Dostmann. The technical dataare correct at the time of going to print and may change without prior notice.The latest technical data and information about this product can be found in our homepage by simplyentering the product number in the search box.www.tfa-dostmann.de 02/22
VENUE – Garden thermometer with solar lighting
Disposal of the electrical device Remove non-permanently installed batteries and rechargeable batteries from the device and dispose of them separately. This product is labelled in accordance with the EU Waste Electrical and Electronic Equipment Directive (WEEE). This product must not be disposed of in ordinary household waste. As a consumer, you are required to take end-of-life devices to a designated collection point for the disposal of electrical and electronic equipment, in order to ensure environmentally- compatible disposal. The return service is free of charge. Observe the current regu- lations in place! Disposal of the batteries Batteries and rechargeable batteries must never be disposed of with household waste. They contain pollutants such as heavy metals, which can be harmful to the environment and human health if disposed of improperly, and valuable raw materi- als such as iron, zinc, manganese or nickel that can be recovered from waste. As a consumer, you are legally obliged to hand in used batteries and rechargeable batter- ies for environmentally friendly disposal at retailers or appropriate collection points in accordance with national or local regulations. The return service is free of charge. You can obtain addresses of suitable collection points from your city council or local authority. The names for the heavy metals contained are: Cd=cadmium, Hg=mercury, Pb=lead. Reduce the generation of waste from batteries by using batteries with a longer lifes- pan or suitable rechargeable batteries. Avoid littering the environment and do not leave batteries or battery-containing electrical and electronic devices lying around carelessly. The separate collection and recycling of batteries and rechargeable bat- teries make an important contribution to relieving the impact on the environment and avoiding health risks. WARNING! Damage to the environment and health through incorrect disposal of the batteries! TFA_No. 30.2026_Anleit_02_22 14.02.2022 16:30 Uhr Seite 9A VENUE – Thermomètre de jardin à éclairage solaire