SC24M1F - Monitor SCHNEIDER - Free user manual and instructions
Find the device manual for free SC24M1F SCHNEIDER in PDF.
User questions about SC24M1F SCHNEIDER
0 question about this device. Answer the ones you know or ask your own.
Ask a new question about this device
Download the instructions for your Monitor in PDF format for free! Find your manual SC24M1F - SCHNEIDER and take your electronic device back in hand. On this page are published all the documents necessary for the use of your device. SC24M1F by SCHNEIDER.
USER MANUAL SC24M1F SCHNEIDER
Section 2: Box contents


Section 3: Product Overview
3.1 - Monitor Buttons
Section 4: base installation

Section 5: Wall Mount
t de montage mural VESA (75 x 75 mm) et/ou accessoires de montage non inclus.
Section 6: Connectivity Options
Plug and Play impossible.
Section 12: Informations
- Excessive sound pressure from earphones and headphones can cause hearing loss.
- Please keep the monitor away from direct sunlight, very strong bright lights and other sources of heat. Prolonged exposure to these environments can cause discoloration and damage to the monitor.
- Remove any objects that may fall into the vents or prevent proper cooling of the monitor's electronics.
- Do not block the vents of the housing.
- When positioning the monitor, make sure the plug of the power cord and electrical outlet are easily accessible.
- If you turn off the monitor by
unplugging the power cable or DC power cord, wait 5 seconds before connecting the power cable or DC power cord for normal operation.
- Use only the bundled DC adapter to power the monitor.
- If the power cable is damaged, it must be replaced by the manufacturer or a qualified after-sales service to avoid a hazard.
-
Excessive use of the monitor can cause visual discomfort, it is best to take shorter breaks more often on your workstation than longer breaks and less often; for example a break of 5-10 minutes after 50-60 minutes. Screen continuous use is probably better than a 15 minutes break every two hours.
-
Try to protect your eyes from eyestrain when using the display for a constant period:
-
Looking something at varying distances from one centered on the screen for a long time.
-
Voluntarily blinking often while you work.
-
Closing and gently rolling your eyes to relax.
-
Repositioning your screen height and the appropriate angle according to your size.
-
Adjusting the brightness and contrast at the appropriate level.
-
Adjusting the lighting environment identical to the brightness of your screen, avoiding fluorescent lighting and surfaces that do not reflect
too much light.
-
Consulting a doctor if your symptoms persist.
-
Unplug the monitor if you need to clean it with a damp cloth. The screen may be wiped with a dry cloth when it is off. However, never use organic solvents, such as liquids containing alcohol or ammonia to clean your monitor.
-
To avoid the risk of shock or permanent damage to the set, do not expose the monitor to dust, rain, water or in environments with high humidity.
-
If your monitor gets wet, wipe it with dry cloth as soon as possible.
-
If a foreign substance or water gets in your monitor, please immediately turn off and unplug the power cord. Then, remove the foreign substance or water, and send it to the maintenance center.
- Do not store or use the monitor in locations exposed to heat, direct sunlight or extreme cold.
- To maintain the best performance of your monitor and use it for a longer period, please use the monitor in a location that is within the following temperature and humidity ranges:
Temperature: 0 - 40^ CHumidity: 20-80% RH
WARNING: Do not place the monitor in the rain, in a damp environment and do not open the monitor case to avoid shock, electrical hazards and / or mechanical hazard.
- Before cleaning, always unplug your monitor. It is advisable to use a dry or slightly damp cloth to clean your monitor. However, a dry cloth is the safest. If using a damp cloth, wait until the monitor is completely dry before reconnecting it.
- Do not use liquid and / or alcohol- based cleaners or ammonia to clean your monitor.
-
This monitor has ventilation openings at the back of the unit. Do not block these openings to prevent the monitor from overheating.
-
Avoid placing it near heat sources such as portable monitor radiators or heating ducts, as this may damage your monitor.
- Do not spray cleaner and / or liquid of any kind either directly on the monitor screen or on another part of the monitor.
- Do not insert anything into the monitor, especially in the ventilation openings.
- Always make sure that your monitor is placed on a flat surface and secure to prevent it from falling and being damaged.
- Unplug your monitor if you are not going to use it for an extended period.
-
Do not place heavy objects on the monitor or the monitor cables.
-
Do not disassemble or remove monitor elements. Disassembly or alteration etc. Not done (e) by an approved technician can damage the monitor and / or lead to possible exposure to the high-voltage electricity, which can cause serious injury or death.
- Never try to open the monitor cabinet. The dangerous high voltages inside the monitor may result in serious physical injury.
- The socket-outlet shall be installed near the equipment and shall be easily accessible.

HIGH DEFINITION MULTIMEDIA INTERFACE
The terms HDMI and HDMI High-Definition Multimedia Interface, and the HDMI Logo are trademarks or registered trademarks of HDMI Licensing Administrator, Inc. in the United States and other countries.
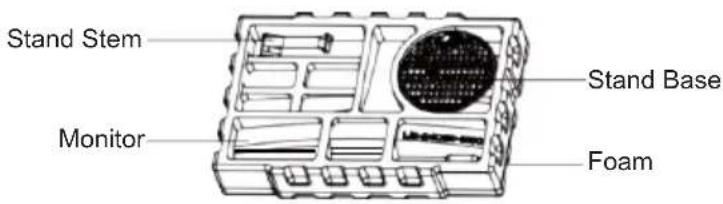
Section 2: Box contents


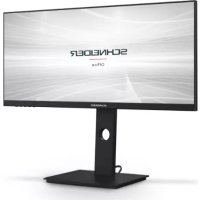
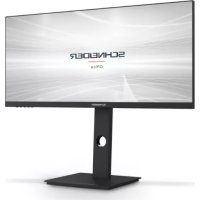
Monitor x 1 Stand Stem x 1 (Including Spindle)
Stand Base x 1
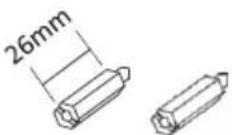

Hex bolts x 2 (M426mm)
Hex bolts x 2 (M410mm)

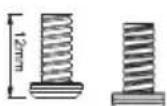
Screws x 2 (M4*12mm)
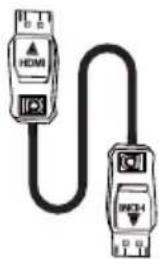
Power Adapter x 1 HDMI cable x 1
User Manual x 1
Terms and options may change depending on the model.
Section 3: Product Overview
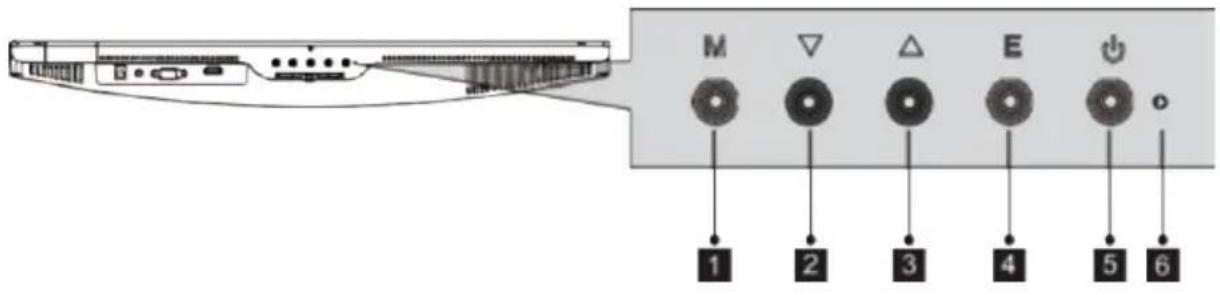
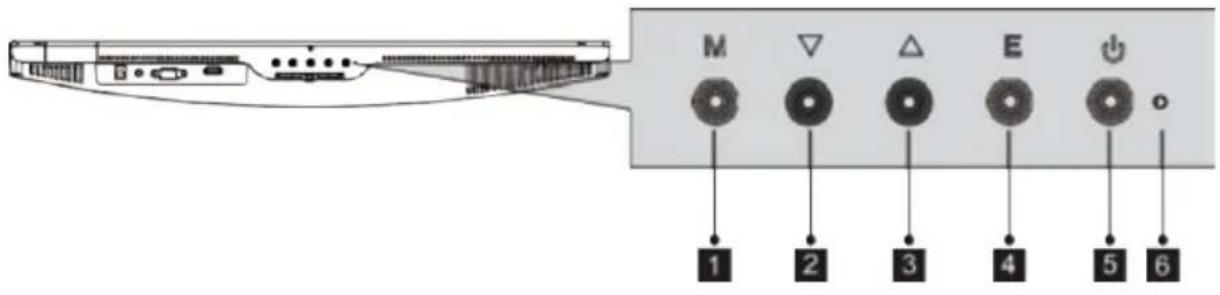
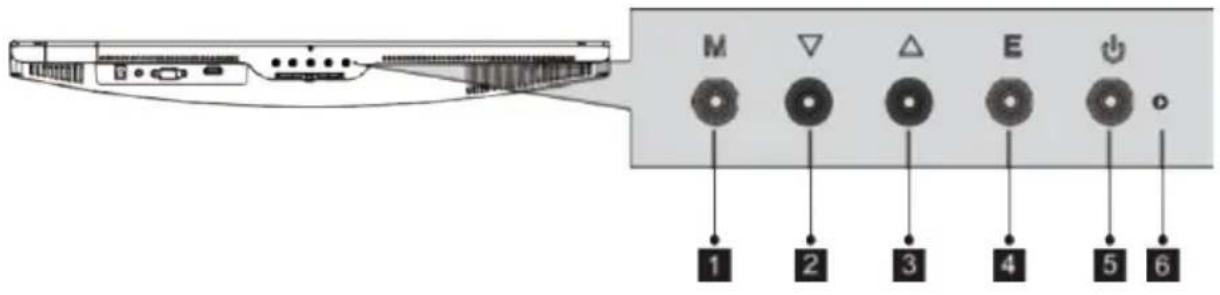
3.1 - Monitor Buttons

1 M Menu Button: Press to display the OSD menu or enter sub-menus.
2 Down Button: Press to move down in the menus.
3 Up Button: Press to move up in the menus.
4 E Exit Button: Press to exit.
Power Button: Press to turn the monitor on/off.
6 LED Indicator : Changes colors to indicate status.
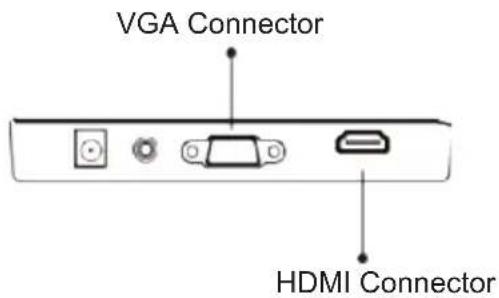
3.2 - Monitor Ports
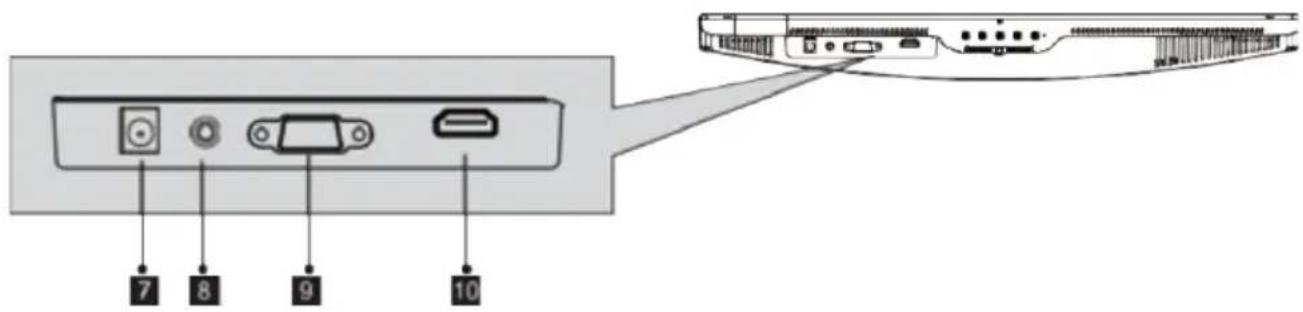
7 Power Connector: Insert the power cable to supply power to the monitor.
Audio Output : Insert the audio cable for output of audio signals.
9 VGA Connector: Insert one end of the VGA cable into the computer's VGA output and connect the other end to the monitor's VGA port.
10 HDMI Connector: Insert one end of the HDMI cable into the computer's HDMI output and connect the other end to the monitor's HDMI port.
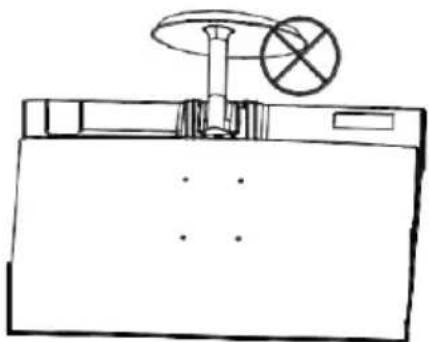
Section 4: base installation

Keep the foam underneath the monitor before attaching the stand.
- Open the package, take out the product with foam still attached, and gently place it on a desktop or table.
- Turn the bracket to a certain angle and align it with the circular slot of the base, stick it tightly, and then rotate clockwise to clamp the bracket into the base to complete the installation of the base.
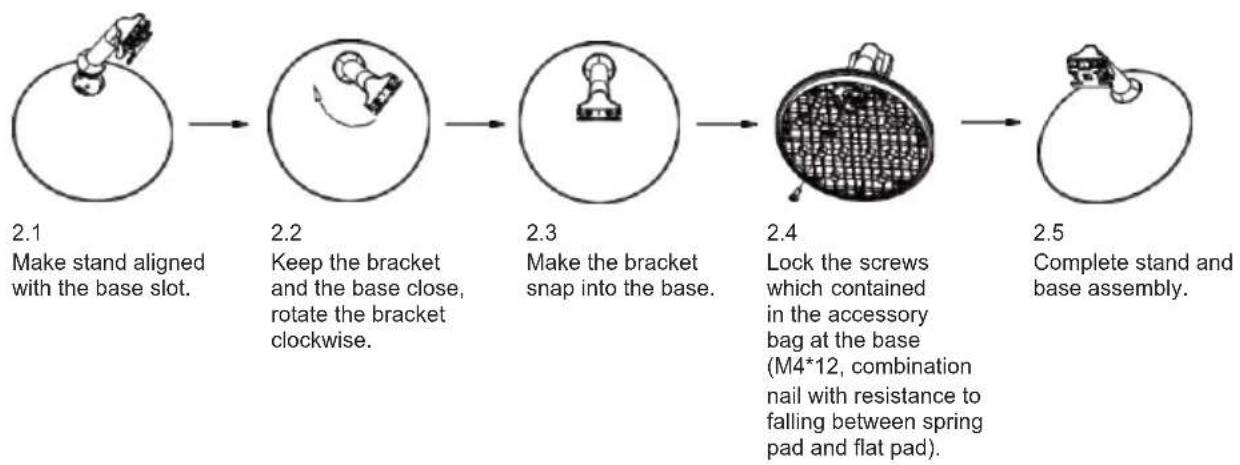
- Place the top of the mounted base frame flat on the lower side slot of the rear case, adhered and push up, to insert the base stand into the rear case.
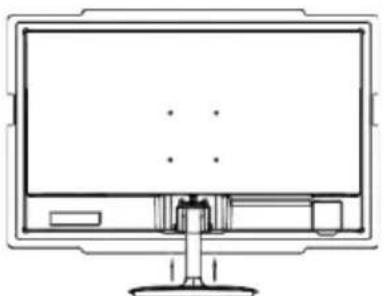
Stand close to the back shell, and pull up.
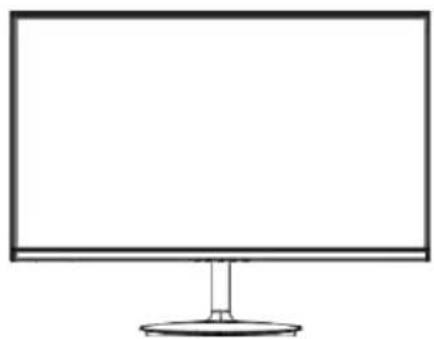
- Complete overall assembly.

Note 1: Please do not put your hand in the gap between the stand and the case to prevent pinching!
Note 2: After the base is instalde, please avoid holding the base and invert the machineto prevent falling!
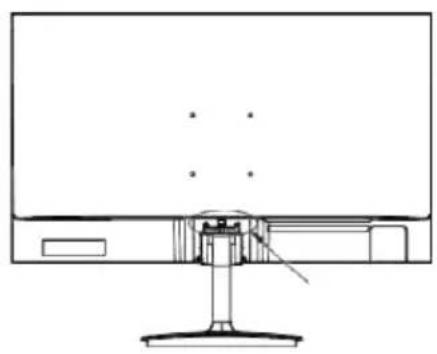
Note: Do not invert the machine to prevent falling.

To avoid damage,do not touch the screen when moving the monitor.
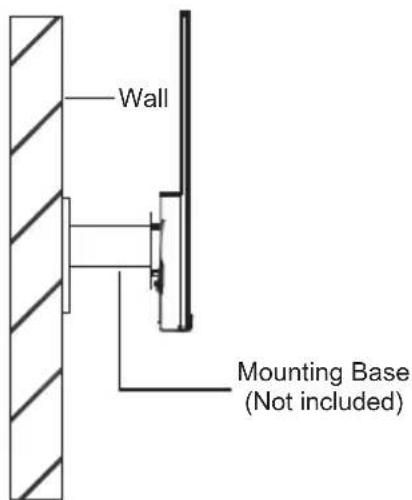
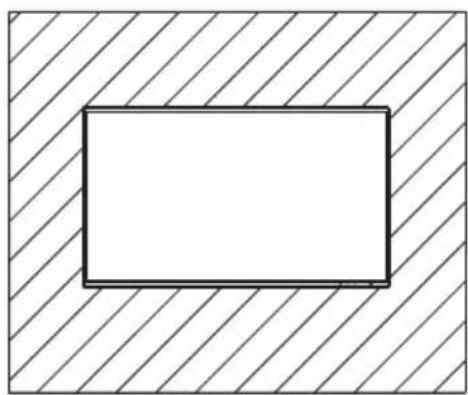
Section 5: Wall Mount

VESA wall mount kit (75 x 75 mm) and/or mounting accessories not included.
- Open the package, take out the monitor with the foam still attached, and gently place it on a desktop or table. If the monitor is attached to the stand, remove the stand by pressing the button on the back of the monitor just above the stand.
- At the back of the monitor, attach the four screws into the mounting holes on back of monitor.
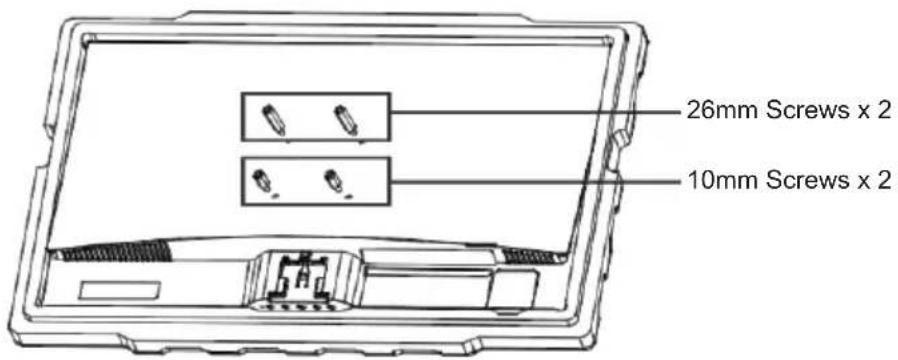
- Follow the directions that came with your mounting kit(not included) to mount the monitor on the wall or monitor stand.
Section 6: Connectivity Options
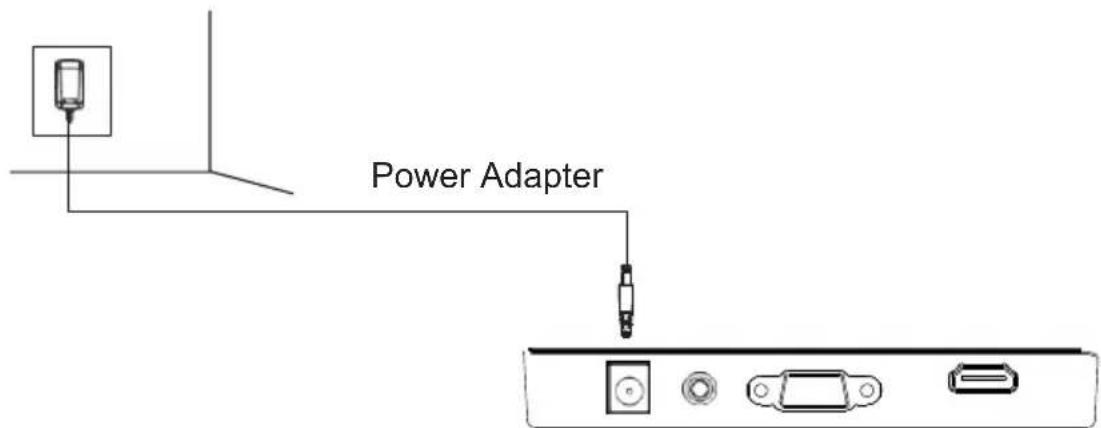
6.1 - Connecting the Power Cable
Connect the included power cable to the power connector, and then plug the other end into an wall outlet.
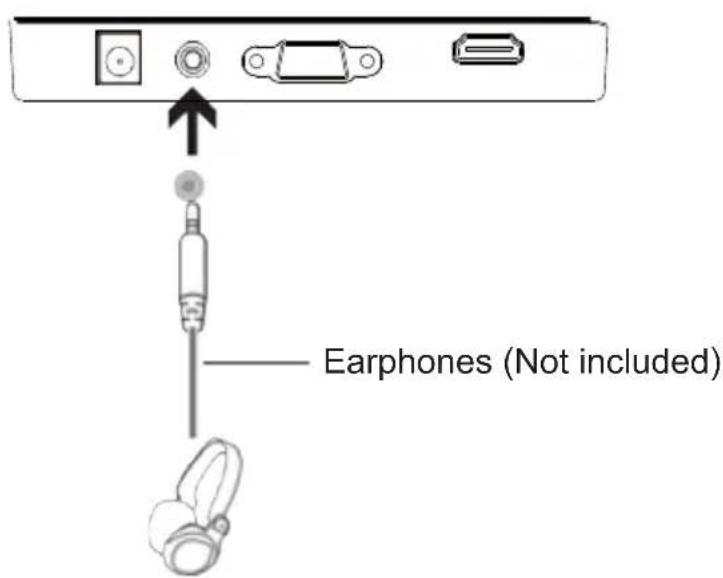
6.2 - Connecting Your Earphones
Plug in your earphones to receive audio signals from your monitor. If your earphones are connected to the monitor and audio devices are connected to your computer at the same time, the audio devices will not produce sound. Earphones and other audio devices not included.
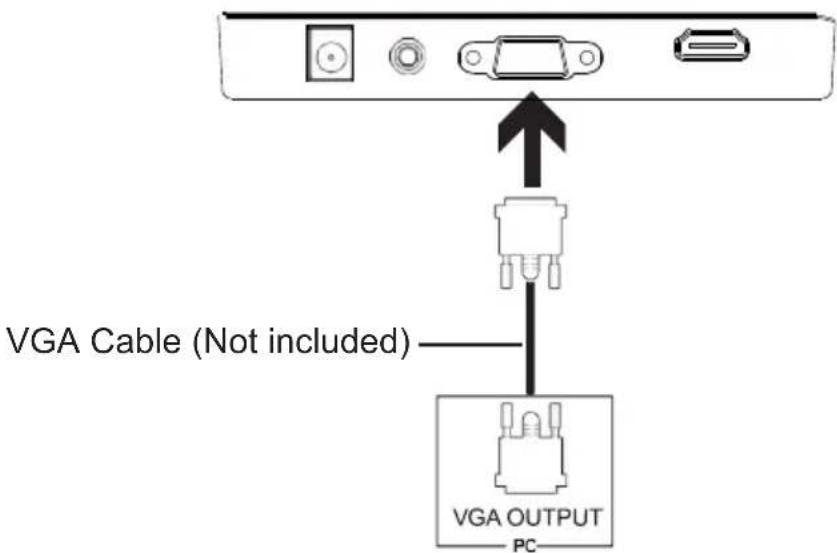
6.3 - VGA Connectivity
In order for the monitor to receive VGA signals from the computer, use a VGA cable to connect the monitor to the computer.
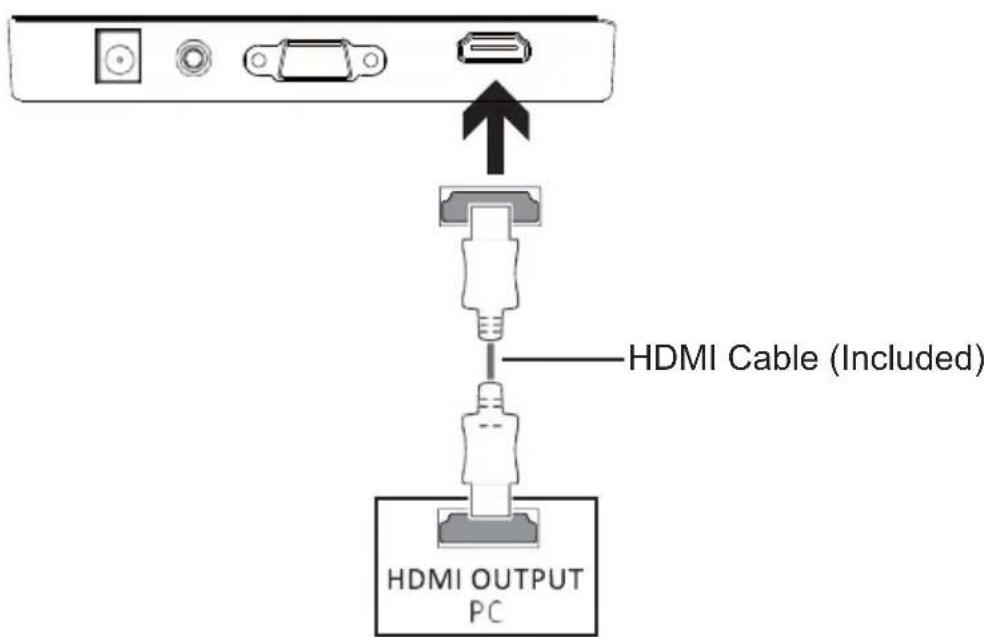
6.4 - HDMI Connectivity
In order for the monitor to receive HDMI signals from the computer, use a HDMI cable to connect the monitor to the computer.
Section 7: Basic Operation
- Insert one end of the HDMI cable into your PC's graphics card. An HDMI cable may also be used. A VGA cable not included.
- Connect the other end of the cable to the corresponding connector on your monitor.
- Connect the power cable to your monitor then connect the other end to your power source. It is recommended that you use a surge protector with adequate voltage if a wall outlet cannot be reached directly.
- Locate the power button on the monitor and press it to turn the monitor on.
Section 8: Indicator Light
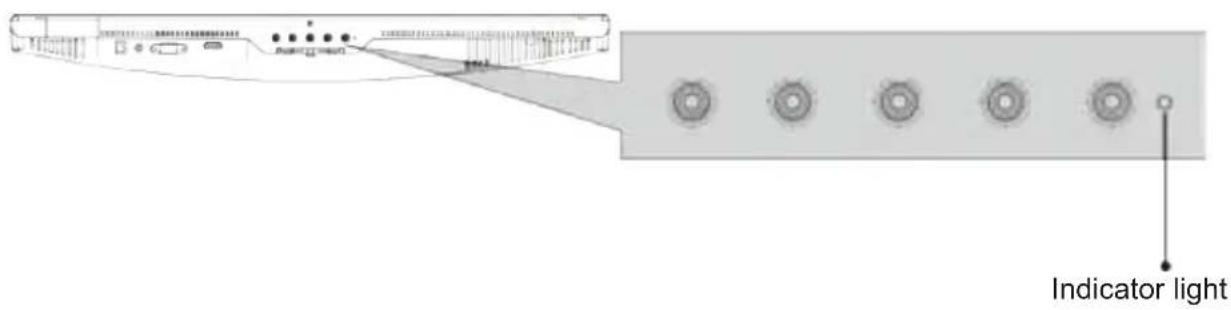
Solid blue light indicates power is on and the monitor is operating normally. Flashing blue light indicates no video source been detected.
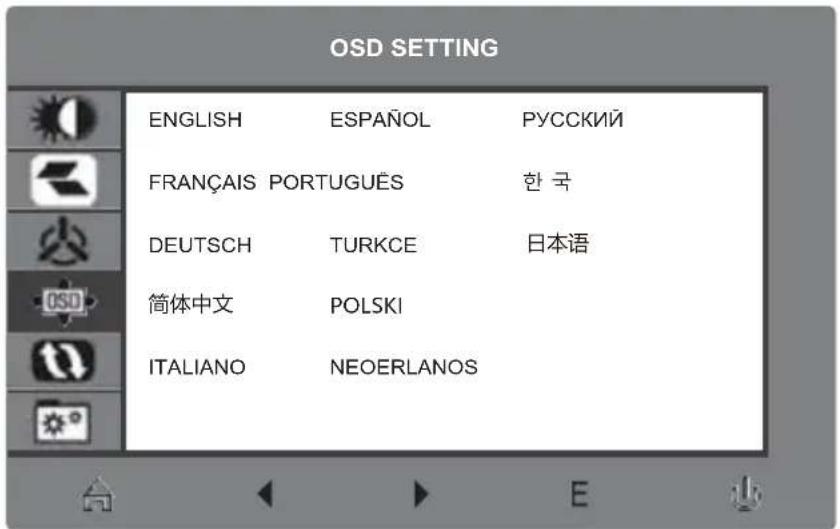
LANGUAGE SETTING
- Press any one of the buttons (M, , E, ) to activate the navigation window.

When using the monitor for the first time, settings will automatically adjust to optimal settings according to your computer's configuration.

- Press M to enter the OSD screen. Press to choose LANGUAGE.

- Press M to select your language.
Section 9: OSD
The On-Screen Display (OSD) Menu may be used to adjust your monitor's settings and appears on screen after turning on the monitor and pressing the M button.

When using the monitor for the first time, settings will automatically adjust to optimal settings according to your computer's configuration.
- Press any one of the buttons (M, , , E, ) to activate the navigation window.

- Press M to enter the OSD screen.
- Press to browse functions.
Highlight the desired function and then press M to enter the sub-menu.
- Press or to browse sub-menus then press M to highlight the desired function.
- Press or to highlight an option and then press M to confirm the settings and exit the current screen.
4. Press E to exit the current screen.
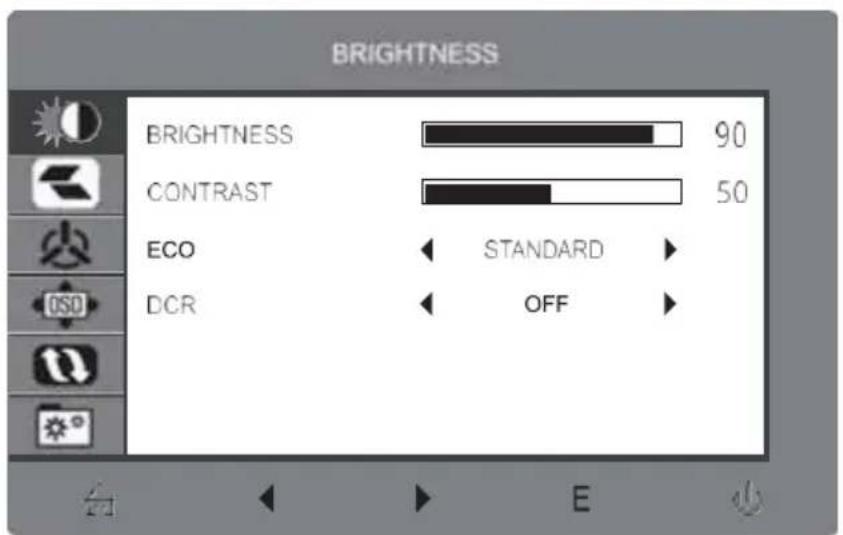
9.1 - OSD Menu Functions
| Main Menu | Sub-Menu | Options | Description |
| BRIGHTNESS | Brightness | 0-100 | Adjust display brightness |
| Contrast | 0-100 | Adjust display contrast | |
| ECO | Standard,Game,RTS,FPS, Movie, Text | Set visual mode | |
| DCR | On | Turn on DCR function | |
| Off | Turn off DCR function | ||
| IMAGE | H.Position | 0-100 | The default setting is "50".When adjusting in simulation mode |
| V.Position | 0-100 | ||
| Clock | 0-100 | ||
| Phase | 0-100 | ||
| Aspect | Wide, Auto, 4:3 | Set aspect ratio | |
| COLOR TEMP | Color temp. | Warm, User, Cool, | Adjust color temperature |
| Red | 0-100 | Customize RGB components | |
| Green | 0-100 | ||
| Blue | 0-100 | ||
| OSD SETTING | Language | English, Espanol, Yuczkyn, Francais, Hanse, Portugues, Deutsch, Türke, 简体中文, Polski, Italiano, Nederlandis, 日本语 | Set OSD language |
| OSD H. POS. | 0-100 | Adjust the OSD horizontal position | |
| OSD VPOS. | 0-100 | Adjust the OSD vertical position | |
| OSD Timer | 0-60 | Set how long the OSD remains open after non-use | |
| Transparency | 0-100 | Set the OSD overall transparency | |
| RESET | Image auto adjust | N/A | |
| Color auto adjust | N/A | ||
| Reset | N/A | Reset monitor configurations | |
| MISC | Signal source | HDM I, VGA | Display the input signal |
| Low blue ray | 0-100 | Set blue light filtering level | |
| Mute | On, Off | Turn mute function on/off | |
| Volume | 0-100 | Adjust audio volume |
Section 10: ECO Mode and Gameplus Switching
- Press any one of the buttons (M, , , E, ) to activate the navigation window.

- Press to switch Gameplus modes. According to the needs of your game, choose the corresponding game icon. These game icons are primarily designed to optimize your aim during shooting games, though they can be used for other scenarios.


- Press to switch ECO modes. These modes include Standard, Text, Movie, Game, FPS and RTS modes and can be used to optimize settings according to your activity. Standard mode is suitable for most activities.
Section 11: Troubleshooting
11.1 - General Issues
The screen is blank
- Press the On / Off button to turn the monitor.
- Check that the brightness and contrast parameters are set normally.
- Check if the light flashes. If that is the case, no signal coming from your video source.
If your source is a laptop, make sure it is on and set to mirror or extend mode.
The image is blurred
- Make sure the video cable is correctly inserted on both ends.
The screen flashes
- Try another power source. Insufficient power can cause this problem.
- Make sure appliances such as unshielded speakers, fluorescent lights, AC transformers, table fans, etc. are at a safe distance from your screen to avoid magnetic interference.
The color is spread or unusual visual effects appear.
- If your screen is entirely red or blue, or colors disappear, make sure the cable is inserted correctly. A loose connection may result in poor signal.
- Try connecting another video source for comparison.
The screen seems to scroll, rotate or move in unusual ways.
- Check that the frequency of your source is between 48 and 75 Hz .
- Reconnect and make sure that your video cable is connected.
The monitor needs cleaning
- Make sure that the monitor was turned off before cleaning.
Always use a dry, microfiber for cleaning. - Use a dry, dry cloth to gently remove debris or dust.
If necessary, lightly dampen a microfiber cloth with water and wipe the surface. - Never use cleaning solutions containing alcohol or ammonia.
- Never spray liquid directly on part of the monitor.
The light does not work
- Check whether the monitor is on.
- Make sure the power cable is properly connected to the monitor and the powersource.
Plug and Play impossible.
- Check the system requirements of the PC to make sure it is compatible with the monitor.
Check the system requirements on the graphics card to ensure it is compatible with the monitor.
Dark Image
- Adjust the brightness and contrast ratio.
Jitter / Moire
- Electrical equipment located nearby may interfere with the monitor.
The light is on or flashing, but no image is displayed on the screen
- Check whether the monitor is on.
- Check that the graphics card is installed correctly.
- Make sure the power cable is properly connected to the monitor and the power source.
The image position is not centered / size is not correct
- Please adjust settings Clock or Automatic.
Difference colors (the colors are not optimized)
- Adjust RGB color settings or reset the color temperature.
Care & Cleaning
- Before you lift or reposition your monitor, it is better to disconnect the cables and power cord. Follow the correct lifting techniques when positioning the monitor. When lifting or carrying the monitor, grasp the edges of the monitor. Do not lift the display by the stand or the cord.
- Cleaning. Turn your monitor off and unplug the power cord. Clean the monitor surface with a lint-free, non-abrasive cloth. Stubborn stains may be removed with a cloth dampened with mild cleaner.
- Avoid using a cleaner containing alcohol or acetone. Use a cleaner intended for use with the LCD. Never spray cleaner directly on the screen, as it may drip inside the monitor and cause an electric shock.
Section 12: Information
12.1 - Specifications
| Element Detail | |
| Model Number SC24-M1F | |
| Screen size 23.8" | |
| Format 16:9 | |
| Brightness | 200(±30)cd / m² |
| Panel type | IPS |
| Resolution VGA: 1920x10 | 80 @ 60Hz HDMI: 1920x1080 @ 75Hz |
| Refresh rate 75Hz | |
| Response time | GTG 14 ms |
| Viewing Angle 178° (H) / | 178° (V) |
| Contrast Ratio 1000:1 | |
| VESA Wall Mount | 75 x 75 mm |
| Color Support | 16.7 m |
| Adaptive-Sync | YES |
| Ports | VGA * 1, HDMI * 1 |
| Voltage | DC 12V---3.0A |
| Audio | YES |
| Speakers | NO |
| audio output | YES |
| Accessories | |
| Adapter | YES |
| HDMI cable | YES |
| Additional features | |
| Low blue light | YES |
| No flicker | YES |
| Dimensions | |
| Dimensions with stand together | 541.6x417.6x207.33mm |
| Dimensions of all footless | 541.6x319.1x207.33mm |
| Net weight 2.6kg | |
| Gross weight | 3.64kg |
SUPPORTED TIMING LIST
| VGA Timing | HDMI Timing | |
| 640 x 480 @60Hz 640 x 480 | @60Hz | 1366 x 768 @60Hz |
| 640 x 480 @75Hz | 640 x 480 @75Hz 1280 x 768 | @60Hz |
| 800 x 600 @60Hz | 800 x 600 @60Hz 640 x 480 | @60Hz |
| 800 x 600 @75Hz | 800 x 600 @75Hz | 720 x 480 @60Hz |
| 1024 x 768 @60Hz | 1024 x 768 @60Hz | 720 x 480 @59Hz |
| 1024 x 768 @75Hz 1024 x 768 | @75Hz | 1280 x 720 @60Hz |
| 1280 x 1024 @75Hz | 1280 x 1024 @75Hz | 1920 x 1080i @60Hz |
| 1152 x 864 @75Hz | 1152 x 864 @75Hz 1920 x 1080p @60Hz | |
| 1280 x 720 @60Hz | 1280 x 720 @60Hz 720 x 576 | @50Hz |
| 1280 x 1024 @60Hz | 1280 x 1024 @60Hz | 1280 x 720 @50Hz |
| 1440 x 900 @60Hz 1440 x 900 | @60Hz | 1920 x 1080i @50Hz |
| 1600 x 900 @60Hz | 1600 x 900 @60Hz | 1920 x 1080p @50Hz |
| 1680 x 1050 @60Hz 1680 x 1050 | @60Hz | 720 x 576 @50Hz |
| 1280 x 800 @60Hz 1280 x 800 | @60Hz | |
| 1280 x 960 @60Hz | 1280 x 960 @60Hz | |
| 1920 x 1080 @60Hz 1920 x 1080 | @60Hz | |
| 1366 x 768 @60Hz 1920 x 1080 | @75Hz | |
Information for external power supplies for Commission Regulation 2019/1782/EU
| Value | Unit | |
| Model identification | GQ24-120250-AG | |
| Manufacturer's name or trade mark | 3YE | |
| Input voltage | 100-240V | V |
| Input AC frequency | 50/60 | Hz |
| Output voltage | 12.00 | V |
| Output current | 2.5 | A |
| Output power | 30 | W |
| Average active efficiency | 87.73 | % |
| Efficiency at low load (10%) | 84.83 | % |
| No-load power consumption | 0.071 | W |
12.2 - Compatibility resolutions for HDMI / DP
The requirements below are the minimum for your X490 monitor. These requirements are recommended to properly use all the features of the monitor and ensure a high-quality image.
minimum requirements
Operating system: Windows 7 / Windows® 8/64-bit Windows 10 (latest service pack) or higher Processor (CPU): Intel® Core™ i5 or AMD Phenom™ II X3 or higher
Graphics Card: NVIDIA GeForce GTX 950 or AMD Radeon™ R9 380 or higher Memory: 6 GB RAM
All trademarks or trade names registered property of their respective owners.
DISPOSAL OF THE DEVICE

The logo on the product means that the recycling of this product falls under Directive 2012/19 / EU of 4 July 2012 concerning the electronic waste (WEEE).
The presence of hazardous substances in electrical and electronic equipment can have potential consequences on the
environment and human health in the reprocessing cycle of this product.
- Therefore, at the end of its life, this product should not be disposed with other non-recycled waste.
- As an end user, your role is of paramount importance in the reuse cycles, recycling and other forms of recovery of the electrical and electronic equipment. Local authorities and resellers have set special procedures to collect and recycle this product.
- You have an obligation to use the collection systems of waste set up by your local authorities.
Product Information sheet according to EU Regulation No. 2019/2013 Energy labeling for Electronic Display & Television can be found on below URL or QR code indicated on Energy label URL: https://eprel.ec.europa.eu/qr/400858
Section 2: Box contents


Monitor x 1 Brazo de la base
de soporte x 1
Section 3: Product Overview
3.1 - Monitor Buttons

Section 4: base installation

Section 5: Wall Mount

Section 6: Connectivity Options
Section 2: Box contents


Monitor x 1 Haste do suporte
Section 3: Product Overview
3.1 - Monitor Buttons
Section 4: base installation

Section 5: Wall Mount

Section 6: Connectivity Options
Plug and Play impossivel.
Section 2: Box contents

1 x Monitor 1 x Ständer
Section 3: Product Overview
3.1 - Monitor Buttons
Section 4: base installation

Section 5: Wall Mount