AeroVital Jumbo - Deep fryer Klarstein - Free user manual and instructions
Find the device manual for free AeroVital Jumbo Klarstein in PDF.
| Product Type | Air Fryer |
| Brand | Klarstein |
| Model | AeroVital Jumbo |
| Capacity | 18 liters |
| Power | 1550 W |
| Power Supply | 220-240 V ~ 50/60 Hz |
| Number of Programs | 10 (Air Fry, Toast, Bagel, Pizza, Bake, Broil, Dehydrate, Roast, Reheat x2) |
| Temperature Range | 30 °C to 230 °C depending on mode |
| Timer | 1 min to 72 h depending on mode |
| Display | LCD |
| Interior Light | Yes, with 30 s timer |
| Included Accessories | Metal basket, baking pan, cooking rack, drip tray |
| Optional Accessories | Rotisserie spit (ref. 10038340) |
| Interior Material | Non-stick |
| Cleaning | Hand wash accessories, do not put in dishwasher |
| Maintenance | Wipe with a soft cloth, do not use abrasive sponge |
| Safety | Auto shut-off, burn protection, post-shutoff ventilation |
| Manufacturer | Chal-Tec GmbH, Berlin, Germany |
Frequently Asked Questions - AeroVital Jumbo Klarstein
User questions about AeroVital Jumbo Klarstein
0 question about this device. Answer the ones you know or ask your own.
Ask a new question about this device
Download the instructions for your Deep fryer in PDF format for free! Find your manual AeroVital Jumbo - Klarstein and take your electronic device back in hand. On this page are published all the documents necessary for the use of your device. AeroVital Jumbo by Klarstein.
USER MANUAL AeroVital Jumbo Klarstein
Unit 6 Riverside Business Centre
Brighton Road
Shoreham-by-Sea
BN43 6RE
United Kingdom
Dear Customer,
Congratulations on purchasing this device. Please read the following instructions carefully and follow them to prevent possible damages. We assume no liability for damage caused by disregard of the instructions and improper use. Scan the QR code to get access to the latest user manual and more product information.

CONTENTS
Safety Instructions 19
Overview 22
Control Panel 23
For the First Use 24
Using your Toaster Oven 25
Useful Tips 28
Cleaning and Maintenance 28
Disposal Considerations 29
Manufacturer & Importer (UK) 29
TECHNICAL DATA
| Item number 10038338, 10038339 | |
| Power supply 220-240 V ~ 50/60 Hz | |
| Power input 1550 W | |
| Capacity 18 Liter | |
Accessories available to order
| Item number Article | |
| 10038340 Rotisserie skewer/tongs | |
| 10038341 Mesh basket | |
| 10038342 Baking tray | |
| 10038343 Baking rack | |
| 10038344 Drip tray |
SAFETY INSTRUCTIONS
- Before using for the first time, check that the voltage of your power outlet matches the specified voltage.
- To avoid electric shock, do not immerse the power cord or the device itself in water or other liquids.
- Keep children and pets away from the device during operation.
- After use, switch off the appliance and disconnect the mains plug from the socket.
- The unit should be operated separately from other units on a separate circuit. If the circuit is overloaded by other devices, this device may not work properly.
- Take extreme care when moving a container containing hot food.
- Do not let the power cord hang over the edge of tables or work surfaces, and be careful not to allow the power cord to come into contact with the hot surfaces of the equipment.
- Always place the unit securely in the center of the table or worktop.
- Do not touch hot device surfaces. Use the handles to move or lift.
- The device must not be used by children.
- Use of accessories not expressly recommended by the manufacturer may result in injury.
-
Do not place or use the unit on heat-sensitive glass surfaces, wooden surfaces or tablecloths. Be sure to place a heat-resistant plate with thermal protection under the unit on these surfaces.
-
Never use the device if the power cord is damaged, if the device malfunctions or has been damaged in any other way.
- Before cleaning or when not in use, switch off the device and disconnect the power plug from the socket. Allow the device to cool down before removing or adding any parts.
- Do not place the device in the immediate vicinity of hot gas or electric ovens or in a heated oven.
- If the power plug does not fit properly, always contact a qualified electrician to minimize the potential for electrical shock. Never try to manipulate the power plug in any way.
- Do not clean the device with metallic scouring pads. Small metal parts could break off and short out the electrical components of the device, which could result in electric shock or damage the device.
- To minimize the risk of electric shock, only prepare food in the supplied, coated, non-stick container.
- This device is designed for indoor use only.
- Use the device only for its intended purpose.
- Keep this manual for future reference.
- This device may be only used by children 8 years old or older and persons with limited physical, sensory and mental capabilities and / or lack of experience and knowledge, provided that they have been instructed in use of the device by a responsible person who understands the associated risks.

CAUTION
Risk of burns! During hot air frying, hot steam is released through the air outlets. Keep your hands and face at a safe distance from the steam and from the air outlets. Also be careful of hot steam and air when you remove appliance parts from the appliance.
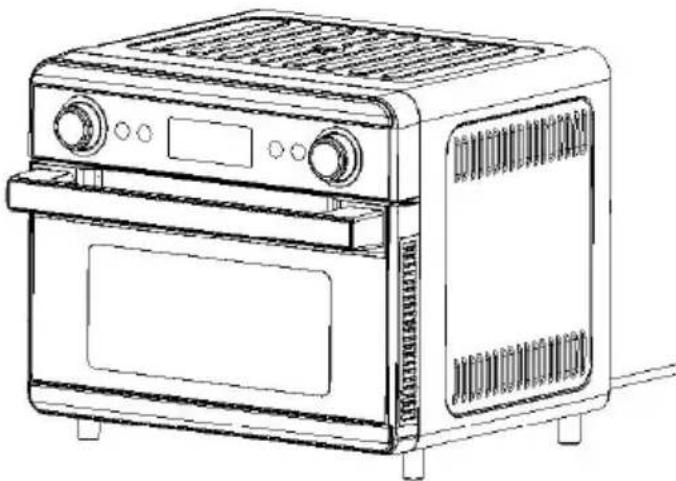
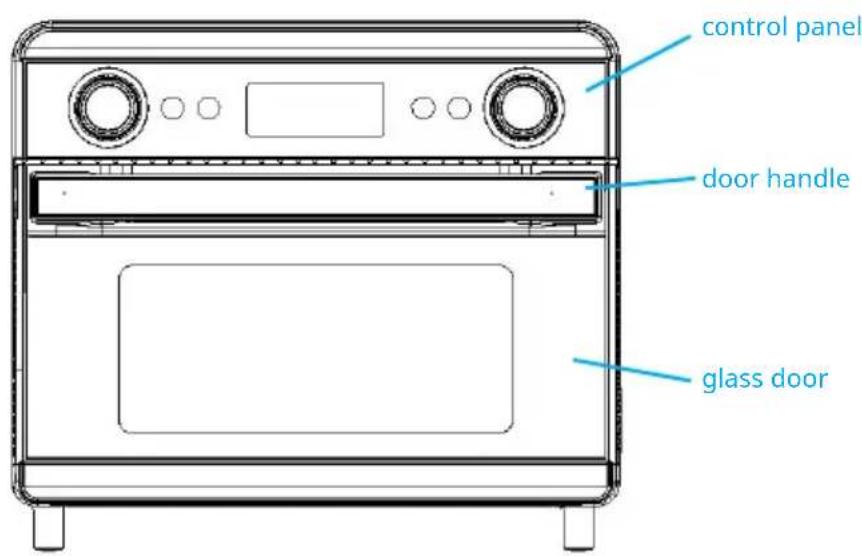
OVERVIEW
| Accessories | ||
| Fry Basket Baking Tray Baking Rack | ||
| Spit Rod Drip Tray Taking Rack | ||
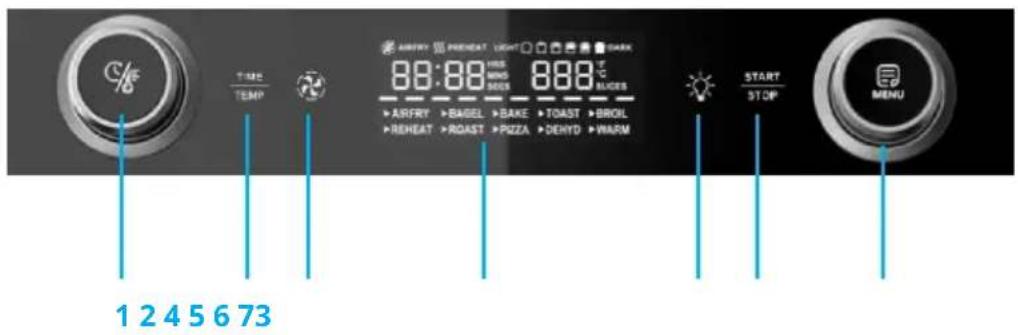
1 Time/Temp Knob
5 Lamp
2 Time/Temp
6 START/STOP
3 Fan
7 MENU Knob
4 LCD
Time/Temp knob After selecting the desired menu, press TIME/TEMP button and then turn the Time/Temp knob to adjust the time and temperature. Turn the Time/Temp knob clockwise to increase the time or temperature, and counterclockwise to decrease.
TIME/TEMP button After selecting the desired menu, press TIME/TEMP button to enter into the time-setting mode, and then turn the TIME/TEMP button to adjust the time. After setting the time, press the TIME/TEMP button again to enter into the temperature-setting mode, and then turn the Time/Temp knob to set the temperature.
Fan button If the function you chosen has fan function, you can press fan button to turn on or turn off the fan. You can't change fan status in Air fry mode and Dehydrate mode.
Lamp button After the unit is powered on, press the lamp button to turn on the lamp, and it will automatically go out after 30 seconds each time. When the program starts, the lamp will automatically turn on and go out automatically after 30 seconds. When the program ends, the lamp will automatically turn on and go out automatically after 30 seconds. When the countdown is 30 seconds, the lamp cannot be turned off by operating the lamp button.
START/STOP button You can interrupt the working process by pressing the START/STOP button at any time, and you can adjust the time and temperature in pause status. But Toast and Bagel setting cannot be paused. Press and hold the START/STOP button for 3 seconds to return to the menu selection mode. Press and hold the START/STOP button for 3 seconds again to turn off the unit.
MENU knob In standby mode, if you need to turn back to function choosing mode, you can turn the MENU knob. In the pause state, press and hold the START/STOP button for 3 seconds to return to the menu selection mode, then you can turn the MENU knob to choose the function again.
FOR THE FIRST USE
Remove the packing materials and any stickers. Remove the detachable accessories from oven.
Wash in sudsy water, rinse and dry with a cloth or paper towel. Replace all the detachable accessories in oven. Select a location for the unit. Do not place unit under cabinets or too close to the wall to allow heat to flow without damaging counter space. Plug unit into electrical outlet.
Notes:
- Initial start-up operation may result in minimal smell and smoke (about 15 min.). This is normal. It is due to the protective substance on heating elements which protect them from salt effects during shipping from factory. Keep the air draught in good condition in the initial use.
- The least limit between the food and the upper heating element should be 30mm , for the perfect result.
- The baking pan can just be placed on the grill rack.
- Always monitor the food at this setting to ensure that you are not overcooking
- The inner cavity is equipped with different height of slots for placing grill rack in order to get perfect result.
- Make sure the crumb tray is completely positioned in place before using.
- Plug the power cord into the outlet.
- LCD display light up, the defaulted mode is AIRFRY function. You can choose the function you need by turning the function knob. There are 10 functions, turning functions knob once for changing one function.
- After choosing the function you need, you can adjust the temperature by pressing TIME/TEMP button, then turning function knob, and you can adjust time by pressing TIME/TEMP button, then turning function.
Notes:
- Turn Time/Temp knob clockwise to add temperature/time, turn Time/Temp knob anticlockwise to decrease temperature/time.
- When the Toast/bagel menu is selected, press the TIME/TEMP button and turn the Time/Temp knob to adjust the number of slices of bread or bagel, and then press the TIME/TEMP button, and turn the Time/Temp knob to adjust the colour of the toast.
- You can shift Celsius and Fahrenheit by pressing and holding the TIME/TEMP button for 3 seconds.
- Press START/STOP button to start working, you may interrupt the toasting process by pressing the START/STOP button again at any time. But Toast and Bagel setting cannot be paused.
- The DC fan at the back of appliance continues to run for 5 minutes after the appliance is shut off. Unplug the appliance from the outlet after the fan stops working.
The function menu program table is as follows:
| Menu Default | toasting time | Time/color adjust-able range | Default toast temperature | |
| 1 AIRFRY 15 mins 1 min - 45 mins 205 °C (400 °F) | ||||
| 2 TOAST 4 colors 1-2-3-4-5-6 4 toast slide | ||||
| 3 BAGEL 4 colors 1-2-3-4-5-6 4bagel | ||||
| 4 PIZZA 15 mins 1 min - 1 h 190 °C (375 °F) | ||||
| 5 BAKE 60 mins 1 min - 4 h 165 °C (325 °F) | ||||
| 6 BROIL 10 mins 1 min - 20 mins 205 °C (400 °F) | ||||
| 7 DEHYDRATE 6 h 30 min - 72 h 49 °C (120 °F) | ||||
| 8 ROAST 60 mins 1 min - 4 h 175 °C (350 °F) | ||||
| 9 WARM 1 h 1 min - 4 h 70 °C (160 °F) | ||||
| 10 Reheat 15 mins 1 min - 2 h 160 °C (320 °F) | ||||
| Adjustable range of tem- perature/number of slices | Is there a preheat? | Default fan status | Fan opera- tion possible |
| 50-205 °C (120-400 °F) Yes On | No | ||
| 1-2-3-4-5-6 No Off No | |||
| 1-2-3-4-5-6 No Off No | |||
| 50-230 °C (120-450 °F) Yes On | Yes | ||
| 50-230 °C (120-450 °F) Yes On | Yes | ||
| Low setting 150 °C (300 °F) Yes On Yes | |||
| 30-80 °C (85-175 °F) No On No | |||
| 50-230 °C (120-450 °F) Yes Off No | |||
| Not adjustable No Off No | |||
| 50-230 °C (120-450 °F) No On | Yes |
USEFUL TIPS
- Condensation will appear on the oven door for some foods and then disappear. This is normal.
Cook food immediately after defrosting. - Frozen foods and thick meat will take longer to cook.
- Avoid opening the Oven Door too frequently to prevent heat loss.
- When baking, smoke will likely appear. Removing excess fat prior to baking can reduce this.
CLEANING AND MAINTENANCE

WARNING
Risk of burns! Before cleaning the toaster oven unplug it and allow it to cool completely.
- Wash all the attachments with mild, soaped water.
- Using a mild cloth to clean the inner of the oven, remember to clean it regularly.
- To clean the door by using a hot cloth with detergent or soap.
- Do not immerse the unit in the water to clean the appliance.
- To clean the crumb tray, open the oven door and simply pull crumb tray outwards. Wipe the interior of the crumb tray with a damp cloth. After cleaning, push the crumb tray into position.
- DO NOT use the dishwasher to clean any of the accessories which are included with this product.
- DO NOT use any abrasive cleaning products.
- CLEAN accessories with a soft cloth in hot water with liquid detergent or soap.
- Do not wipe the heating elements.
- Do not install the wire rack or baking pan on the lower heating element directly.
- Do not use any metal pad to clean the surfaces of oven to avoid reducing finish.
Attention: To prevent the worktop from being damaged, the toaster oven must be operated with the crumb tray in place, securely closed and cleaned of excess food. Never operate your toaster oven with the oven door open.
DISPOSAL CONSIDERATIONS
If there is a legal regulation for the disposal of electrical and electronic devices in your country, this symbol on the product or on the packaging indicates that this product must not be disposed of with household waste. Instead, it must be taken to a collection point for the recycling of electrical and electronic equipment. By disposing of it in accordance with the rules, you are protecting the environment and the health of your fellow human beings from negative consequences. For information about the recycling and disposal of this product, please contact your local authority or your household waste disposal service.
MANUFACTURER & IMPORTER (UK)
Manufacturer:
Chal-Tec GmbH, Wallstrasse 16, 10179 Berlin, Germany.
Importer for Great Britain:
Chal-Tec UK limited
Unit 6 Riverside Business Centre
Brighton Road
Shoreham-by-Sea
BN43 6RE
United Kingdom
Cher client, chere clientele,
Unit 6 Riverside Business Centre
Brighton Road
Shoreham-by-Sea
BN43 6RE
Royaume Uni
Estimado cliente:
Unit 6 Riverside Business Centre
Brighton Road
Shoreham-by-Sea
BN43 6RE
Reino Unido
Gentile clientele,
PRODUTTORE E IMPORTATORE (UK)
Produttore:
Chal-Tec GmbH, Wallstraße 16, 10179 Berlin, Germania.
Unit 6 Riverside Business Centre
Brighton Road
Shoreham-by-Sea
BN43 6RE
Regno Unito


KLARSTEIN