Deebot X1 Plus - Vacuum Cleaner ECOVACS - Free user manual and instructions
Find the device manual for free Deebot X1 Plus ECOVACS in PDF.
| Product type | Robotic vacuum and mop |
| Brand | ECOVACS |
| Model | Deebot X1 Plus |
| Robot power supply | 20 V DC, 1 A |
| Emptying station power supply | 220-240 V AC, 50-60 Hz, 0.3 A (charge) / 1000 W (emptying) |
| Charging time | Approximately 6.5 hours |
| Washing system | OZMO Pro 3.0 vibration mopping |
| Navigation | TrueMapping (laser), AIVI visual detection, TrueDetect 3D |
| Sensors | Anti-drop, anti-collision, carpet detection, bumper |
| Connectivity | Wi-Fi 2.4 GHz, ECOVACS HOME app |
| Automatic emptying | Yes, station with dust bag |
| Brushes | Replaceable dual side brushes, floating main brush |
| Filters | High-efficiency filter, sponge filter |
| Dust bin | Automatic emptying (integrated in robot) |
| Deodorizer | Deodorizing capsule (sold separately, lasts up to 60 days) |
| Included accessories | Emptying station, power cord, washable and disposable cloths, multifunction cleaning tool, replacement side brushes |
| Maintenance | Weekly cleaning of brushes and sensors, periodic replacement of filters and brushes |
| Safety | Anti-drop sensors, automatic stop on obstacle, CE certification, Class II |
| Use | Indoor only, hard floors and carpet (without mopping on carpet) |
| Warranty and repairability | Spare parts available from ECOVACS customer service |
Frequently Asked Questions - Deebot X1 Plus ECOVACS
User questions about Deebot X1 Plus ECOVACS
0 question about this device. Answer the ones you know or ask your own.
Ask a new question about this device
Download the instructions for your Vacuum Cleaner in PDF format for free! Find your manual Deebot X1 Plus - ECOVACS and take your electronic device back in hand. On this page are published all the documents necessary for the use of your device. Deebot X1 Plus by ECOVACS.
USER MANUAL Deebot X1 Plus ECOVACS
Important Safety Instructions IMPORTANT SAFETY INSTRUCTIONS
When using an electrical Appliance, basic precautions should always be followed, including the following:
READ ALL INSTRUCTIONS BEFORE USING THIS APPLIANCE SAVE THESE INSTRUCTIONS
- This Appliance can be used by children aged from 8 years and above and persons with reduced physical, sensory or mental capabilities or lack of experience and knowledge if they have been given supervision or instruction concerning use of the Appliance in a safe way and understand the hazards involved. Children shall not play with the Appliance. Cleaning and user maintenance shall not be made by children without supervision.
-
Clear the area to be cleaned. Remove power cords and small objects from the floor that could entangle the Appliance. Tuck rug fringe under the rug base, and lift items such as curtains and tablecloths off the floor.
-
If there is a drop off in the cleaning area due to a step or stairs, you should operate the Appliance to ensure that it can detect the step without falling over the edge. It may become necessary to place a physical barrier at the edge to keep the unit from falling. Make sure the physical barrier is not a trip hazard.
- Only use as described in this manual. Only use attachments recommended or sold by the manufacturer.
- Please make sure your power supply source voltage matches the power voltage marked on the Empty Station.
- For INDOOR household use ONLY. Do not use the Appliance in outdoor, commercial or industrial environments.
- Use only the original rechargeable battery and Auto-Empty Station provided with the Appliance from the manufacturer. Non-rechargeable batteries are prohibited.
- Do not use without dust bin and/or filters in place.
- Do not operate the Appliance in an area where there are lit candles or fragile objects.
- Do not use in extremely hot or cold environments (below -5^/23^ or above 40^/104^ ).
©
- Remove the Appliance from the Empty Station, and turn OFF the power switch to the Appliance before removing the battery for disposal of the Appliance.
- The battery must be removed and discarded according to local laws and regulations before disposal of the Appliance.
- Please dispose of used batteries according to local laws and regulations.
- Do not incinerate the Appliance even if it is severely damaged. The batteries can explode in a fire.
- When not using the Empty Station for a long period of time, please unplug it.
- The Appliance must be used in accordance with the directions in this Instruction Manual. ECOVACS ROBOTICS cannot be held liable or responsible for any damages or injuries caused by improper use.
- The robot contains batteries that are only replaceable by skilled persons. To replace the robot's battery, please contact Customer Service.
-
If the robot will not be used for a long time, power OFF the robot for storage and unplug the Empty Station.
-
WARNING: For the purposes of recharging the battery, only use the detachable supply unit CH2117 provided with the Appliance.
To satisfy RF exposure requirements, a separation distance of 20 cm or more should be maintained between this device and persons during device operation.
To ensure compliance, operations at closer than this distance is not recommended. The antenna used for this transmitter must not be co-located in conjunction with any other antenna or transmitter.
Device Update
Typically, some devices are updated bi-monthly, but not always so specific.
Some devices, especially those that went on sale more than three years ago, will only be updated if a critical vulnerability is found and fixed.
| [AKHO] | Class II |
 | Short-circuit-proof safety isolating transformer |
 | Switch mode power supply |
| [DBKW] | For indoor use only |
 | Direct current |
 | Alternating current |
For EU Countries
For EU Declaration of Conformity information, visit https://www.ecovacs.com/global/compliance

Correct Disposal of this Product
This marking indicates that this product should not be disposed of with other household waste throughout the EU. To prevent possible harm to the environment or human health from uncontrolled waste disposal, recycle it responsibly to promote the sustainable reuse of material resources. To recycle your used device, please use the return and collection systems or contact the retailer where the product was purchased. They can safely recycle this product.
The remote surveillance is for the absolute private use of non-public, private owned places for the pure self-protection and single control intended only. Please be aware of the local data protection based legal obligations in case of use. No surveillance of public places, especially with clandestine intent and/or on the part of the employer without justified reasons. Such not justified use is in the risk and responsibility of the user only.
Air Freshener Capsule (Wild Bluebell)
(sold separately) :
Main Ingredients for Capsule: PET, Polypropylene.
Main Ingredients for Air Freshener: Ethylene/Vinyl
Acetate copolymer, Fragrance.
See manufacturing date, expiration date, and lot number on pack.
*Each unit will last up to 60 days based on 1 hour of use per day on ambient temperature conditions.
CAUTION:
USE ONLY AS DIRECTED. KEEP OUT OF REACH OF CHILDREN AND PETS. EYE IRRITANT. Avoid contact with eyes, skin, and clothing. In case of contact with skin or eyes, wash immediately with plenty of water for 15 minutes. If eye irritation persists, consult a physician. Do not ingest. IF SWALLOWED, do not induce vomiting; call physician or poison control center immediately. DO NOT PLACE NEAR HEAT OR OPEN FLAME. The product is not to be used by persons with reduced physical, sensory or mental capabilities. Used on DEEBOT and for indoor air deodorization only. Do not disassemble the capsule. Wash hands after handling. Keep away from foodstuffs, beverages and feed. Keep in a dry and well-ventilated place. Dispose in accordance with local regulation.

WARNING:
May cause an allergic skin reaction.
Toxic to aquatic life with long lasting effects.
Harmful to aquatic life with long lasting effects.
Package Contents Product Diagram
Note: Figures and illustrations are for reference only and may differ from actual product appearance. Product design and specifications are subject to changes without notice.
* Air Freshener Capsule is sold separately that works with Air Freshener. Explore more accessories at https://www.ecovacs.com/global.

text_image
Microphone RESET Button Power Switch Wi-Fi Status Indicator Auto-Empty Dust Bin High Efficiency Filter Sponge Filter Auto-Empty Dust Bin Handle Filter Net Release Button Dust Disposal PortBottom View

text_image
Carpet Detection Sensor Floating Main Brush Universal Wheel Dual Side Brushes Driving Wheels Anti-drop Sensors Floating Main Brush Release Button Air Freshener (Pre-installed) Anti-drop Sensors

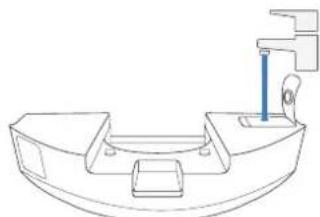
Empty Station (back)

text_image
Power Cord Wrap Power Cord PortDust Bag

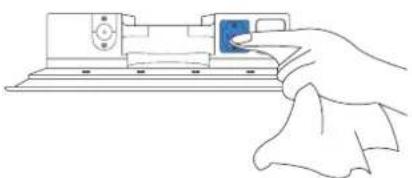
text_image
Dust Bag HandleNotes Before Cleaning

natural_image
Simple line drawing of a dining table with a lamp and floor plan (no text or symbols)Tidy up the area to be cleaned by putting furniture, such as chairs, in their proper place.
During the first use, make sure each room door is open to help DEEBOT fully explore your house.

It may be necessary to place a physical barrier at the edge of a drop to stop the unit from falling over the edge.

Make sure areas to be cleaned are well illuminated so Visual Detection works properly. Remove power cords and small objects from the floor to ensure cleaning efficiency.

Put away objects including cables, cloths and slippers, etc. on the floor to improve the cleaning efficiency.

Clean the AIVI Visual Detection Sensor and TrueMapping Distance Sensor with a clean cloth, and avoid using any detergent or cleaning spray.

Before using the product on a rug with tasseled edges, please fold the rug edges under.

Please do not stand in narrow spaces, such as hallways, and make sure not to block the Detection Sensor.
Quick Start
Before using DEEBOT, please remove all protective films or protective strips on DEEBOT and Empty Station.
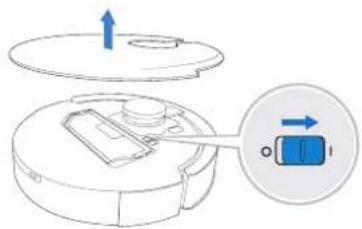
Install the Dual Side Brushes
Make sure the color of Dual Side Brushes are consistent with that of mounting slot.
text_image
Diagram illustrating a mechanical or electronic device with labeled components and a 'Click' button, showing directional arrows and component layout.ECOVACS HOME App
To enjoy all available features, it is recommended to control your DEEBOT via the ECOVACS HOME app.
Before you start, make sure that:
- Your mobile phone is connected to a Wi-Fi network.
- The 2.4GHz band wireless signal is enabled on your router.
- The Wi-Fi indicator light on DEEBOT is slowly flashing.


Wi-Fi Indicator Light
| Slowly flashing | Disconnected to Wi-Fi or waiting for Wi-Fi connection | |
| Rapidly flashing Connecting to Wi-Fi | ||
| Solid Connected to Wi-Fi | ||
Wi-Fi Connection
Before Wi-Fi setup, make sure DEEBOT, mobile phone, and Wi-Fi network meet the following requirements.
DEEBOT and Mobile Phone Requirements
- DEEBOT is fully charged and the power switch of DEEBOT is turned on.
• Wi-Fi status light slowly flashes. - Turn off mobile phone's cellular data (you can turn it back on after setup).
Wi-Fi Network Requirements
- You are using a 2.4GHz or 2.4/5 GHz mixed network.
- Your router supports 802.11b/g/n and IPv4 protocol.
- Do not use a VPN (Virtual Private Network) or Proxy Server.
- Do not use a hidden network.
- WPA and WPA2 using TKIP, PSK, AES/CCMP encryption.
- WEP EAP (Enterprise Authentication Protocol) is not supported.
- Use Wi-Fi channels 1-11 in North America and channels 1-13 outside North America (refer to local regulatory agency).
- If you are using a network extender/repeater, the network name (SSID) and password are the same as your primary network.
After Wi-Fi connection, DEEBOT will enter into Networked Standby mode if it has no signal input within 10 minutes.
Please be aware that the realization of intelligent functions such as remote startup, voice interaction, 2D/3D map display and control settings, and personalized cleaning (depending on different products) requires users to download and use ECOVACS HOME App, which is constantly updated. You need to agree to our Privacy Policy and User Agreement before we can process some of your basic and necessary information and enable you to operate the product. If you do not agree with our Privacy Policy and User Agreement, some of the aforementioned intelligent functions cannot be realized through ECOVACS HOME App, but you can still use the basic functions of this product for manual operation.
Charging DEEBOT
1 Connect Power Cord Empty Station Placement and Assembly

natural_image
Diagram of a device with a blue arrow pointing to a component, no text or symbols presentKeep the area around the Station clear of objects and reflective object surfaces.
text_image
Technical diagram illustrating a mechanical assembly process with dimension annotations in millimeters3

natural_image
Diagram of a robotic vacuum cleaner with a close-up view showing internal components and directional arrows (no text or symbols)Note: I = ON, O = OFF.
DEEBOT cannot be charged when being powered OFF.
4 Charge DEEBOTPower ON

text_image
≈ 6.5 hIt is recommended that DEEBOT start cleaning from the Station. Do not move the Station while cleaning.
When cleaning is complete, it is recommended to remove the Mopping Pad and manually place DEEBOT into the Station.
Operating DEEBOT
For the first-time cleaning, please ensure that DEEBOT is fully charged. During the first cleaning:
- Please make sure to install Air Freshener to create a home map in ECOVACS HOME App
- Please ensure that DEEBOT is fully charged.
- Please supervise DEEBOT and assist it should there be a problem.
1 Start

text_image
Install Air Freshener Click Press ⏻2 Pause/Wake Up

natural_image
Line drawing of a hand holding a circular object with a blue tab (no text or symbols)Note: The robot's Control Panel stops glowing after the robot is paused for a few minutes. Press the AUTO Mode Button on DEEBOT to wake up the robot.
3 Return to Charge
Press for 3 seconds to send DEEBOT back to the Empty Station.

text_image
3"OZMO™ Pro 3.0 Oscillating Mopping System
Note:
- Install OZMO™ Pro 3.0 Oscillating Mopping System for floor scrubbing.
- Before installing OZMO™ Pro 3.0 Oscillating Mopping System, please make sure the contacts are thoroughly dry.
- Please avoid using OZMO™ Pro 3.0 Oscillating Mopping System on the carpet.
- It is recommended to drench and wring out the Mopping Pad before installing it to have a better cleaning.
1 Add Water
natural_image
Technical line drawing of a mechanical component with no visible text or symbols* To prolong the service life of OZMO™ Pro 3.0 Oscillating Mopping System, it is recommended to use purified water or softened water.
* Do not soak OZMO™ Pro 3.0 Oscillating Mopping System in water.
2 Dry Contacts Thoroughly
natural_image
Line drawing of a hand pressing a small blue button on a mechanical device (no text or symbols)3 Install OZMO™ Pro 3.0 Oscillating Mopping System

text_image
Click4 Start Cleaning

natural_image
Hand holding a blue tab on a circular object (no text or symbols visible)Air Freshener
1 Install Air Freshener Capsule (sold separately)

natural_image
Technical line drawing of a mechanical component with a cylindrical part inserted into a housing (no text or symbols)2 Install Air Freshener

text_image
ClickRegular Maintenance
To keep DEEBOT running at peak performance, perform maintenance tasks and replace parts with the following frequencies:
| Robot Part Maintenance | Frequency Replacement Frequency | |
| Washable Mopping Pad / Every | 1-2 months | |
| Disposable Mopping Pad After each use Replace after each use | ||
| Air Freshener Capsule (sold separately) | / Every 2 months | |
| Dust Bag / Replace when voice prompts | ||
| Dual Side Brushes | Once every 2 weeks Every 3-6 months | |
| Floating Main Brush Once per week Every 6-12 months | ||
| Sponge Filter/High Efficiency Filter Once per week Every 3-6 months | ||
| TrueDetect 3D Sensor AIVI Visual Detection Sensor TrueMapping Distance Sensor Universal Wheel Anti-Drop Sensors Bumper Charging Contacts Empty Station Pins | Once per week / | |
| Auto-Empty Dust Bin | Once per month | / |
| Empty Station | Once per month | / |
Before performing cleaning and maintenance tasks on DEEBOT, turn the robot OFF and unplug the Empty Station.
A multi-function Cleaning Tool is provided for easy maintenance. Handle with care, this cleaning tool has sharp edges.
Note: ECOVACS manufactures various replacement parts and fittings. Please contact Customer Service for more information on replacement parts.
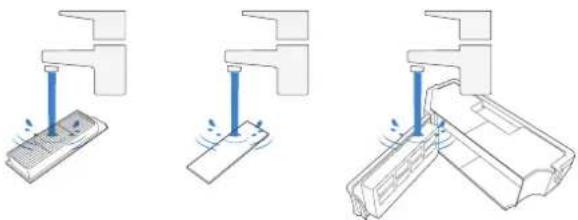
Maintain OZMO™ Pro 3.0 Oscillating Mopping System
1 Remove OZMO™ Pro 3.0 Oscillating Mopping System Washable Mapping Pad
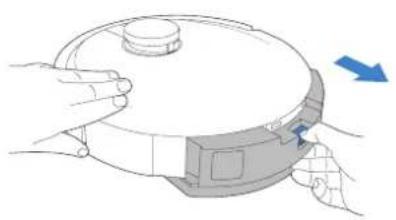
natural_image
Illustration of hands operating a robotic vacuum cleaner with a blue directional arrow indicating motion (no text or symbols)* After DEEBOT finishes mopping, please empty the reservoir.
2 Wipe OZMO™ Pro 3.0 Oscillating Mopping System Clean

natural_image
Line drawing of a hand using a tool to adjust or install a mechanical component (no text or symbols)* Wipe OZMO™ Pro 3.0 Oscillating Mopping System with a clean, dry cloth. Do not soak into water.

flowchart
graph TD
    A["Hand positioning on a surface"] --> B["Step 1: Hand positioning on a surface"]
    B --> C["Step 2: Hand positioning on a surface"]
    C --> D["Step 3: Hand positioning on a surface"]
    D --> E["Step 4: Hand positioning on a surface"]
    E --> F["Sun radiation at bottom"]
4 Disposable Mopping Pad

natural_image
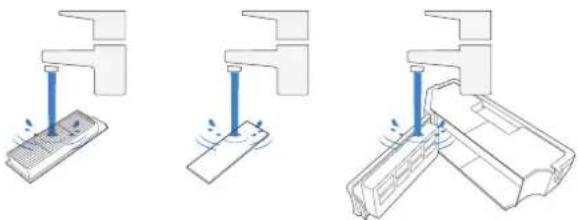
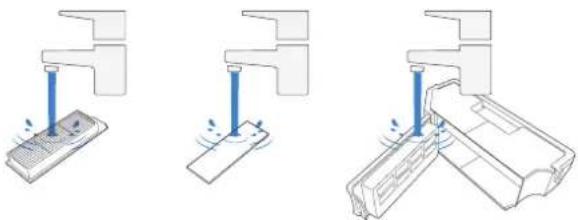
Illustration showing a hand holding a plastic container being placed into a paint bucket, with no text or symbols present.Maintain Auto-Empty Dust Bin and Filters

text_image
Three-step diagram illustrating a device cleaning process: adding particles, removing a container, and finally adjusting a tray.4

natural_image
Three technical line drawings showing mechanical assembly or mounting process with no visible text or symbolsNote:
- Please rinse the filter with water as shown above.
- Do not use finger or brush to clean the filter.
5

natural_image
Diagram of air conditioner unit with sun icon above (no text or symbols)Maintain Floating Main Brush and Dual Side Brushes
Floating Main Brush
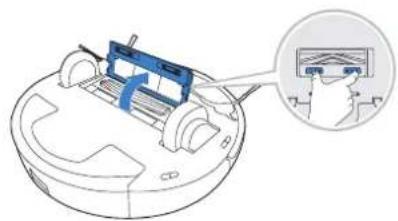
natural_image
Diagram of a robotic vacuum cleaner with a close-up view of its internal components (no text or symbols)
natural_image
Technical line drawing of a robotic vacuum cleaner with blue cable assembly (no text or symbols)
natural_image
Line drawing of a hand holding a pen over rolled paper or dough (no text or symbols)Dual Side Brushes

natural_image
Technical line drawing of a drone with top and side views showing internal components (no text or symbols)Maintain Empty Station
Note: Before performing cleaning and maintenance on Empty Station, unplug it first.
* For a proper maintenance, wipe with a clean dry cloth, and avoid using any detergent or cleaning spray.
Empty Station Pins

natural_image
Line drawing of a hand pressing a button on a computer monitor (no text or symbols)Dust Bag
1 Dispose the Dust Bag

natural_image
Diagram of a cylindrical device with an open lid and internal compartments, showing a blue arrow indicating rotation (no text or symbols present)
natural_image
Line drawing of a closed appliance with open lid and internal compartments (no text or symbols)
natural_image
Simple line drawing of a container with a lid and arrow, no text or symbols present* Hold the Handle to lift out the Dust Bag, which can effectively prevent dust leakage.
2 Clean the Blower Cover Install the Dust Bag Close the 3 Dust Container Lid

natural_image
Line drawing of a portable air conditioner unit with a hand pointing to the lid (no text or symbols)
natural_image
Line drawing of a multi-volume electronic device with open lid and internal compartments (no text or symbols)4

natural_image
Diagram of a device with an open lid and internal compartments, showing a blue arrow indicating rotation (no text or symbols present)Maintain Other Components
Note: Wipe the components with a clean, dry cloth. Avoid using cleaning sprays or detergents.
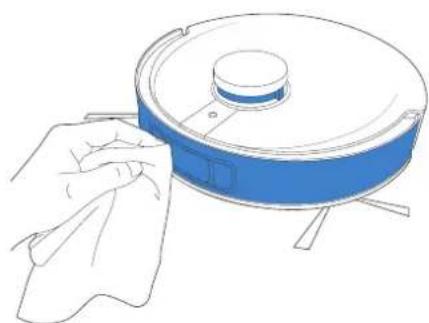
natural_image
Line drawing of a hand cleaning a blue robotic vacuum cleaner (no text or symbols)
natural_image
Line drawing of a hand cleaning a circular object with a lid and handle (no text or symbols)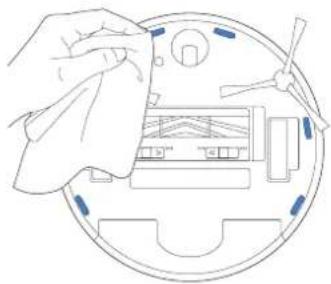
natural_image
Line drawing of a hand holding a tool over a circular mechanical component with no visible text or symbols
natural_image
Line drawing of a hand inserting a component into a circular device (no text or symbols)
natural_image
Line drawing of a hand using a tool to adjust or install a device on a circular device (no text or symbols present)Empty Station
The light effect of the Status Indicator on Empty Station corresponds to different conditions and solutions. For more support, please refer to ECOVACS HOME App or the Troubleshooting Section of this manual.
| Light Effect Status Solutions | ||
| Indicator light off | The Empty Station is in standby. / | |
| DEEBOT is in Do Not Disturb Mode. / | ||
| Glowing a solid WHITE | DEEBOT returns to the Empty Station and starts to Auto-Empty. | / |
| DEEBOT is Auto-Emptying. / | ||
| DEEBOT pairs successfully with Empty Station. / | ||
| Glowing a solid RED | The Empty Station's suction power decreased. Please check the Dust Bag. | |
| The Dust Bag is not installed. Please install the Dust Bag. | ||
| The Empty Station failed to Auto-Empty the dust. Please check the solution in the App. | ||
| The Dust Container Lid is not closed. Please make sure the Dust Container Lid is firmly closed. | ||
Troubleshooting
| No. | Malfunction Possible Causes | Solutions | |
| 1 | DEEBOT is not able to connect to ECOVACS HOME App. | Incorrect home Wi-Fi username or password entered. | Enter the correct home Wi-Fi username and password. |
| DEEBOT is not within range of your home Wi-Fi signal. | Make sure DEEBOT is within range of your home Wi-Fi signal. | ||
| DEEBOT is not in the configuration state. | Make sure DEEBOT is connected to the power supply and turned on. Open the cover, and press RESET Button. DEEBOT will enter the configuration state when you hear a voice prompt. | ||
| Incorrect App installed. Please download and install ECOVACS HOME App. | |||
| Not using a 2.4GHz or 2.4/5 GHz mixed network. | DEEBOT does not support 5G network. Please use a 2.4GHz or 2.4/5 GHz mixed network. | ||
| 2 | Unable to create furniture map on App. | DEEBOT does not start cleaning from the Station. | DEEBOT must start cleaning from the Station. |
| Move DEEBOT when cleaning might cause the mop lost. | During cleaning, do not move DEEBOT as far as possible. | ||
| Auto cleaning is not complete. | Make sure DEEBOT automatically return to the Station after cleaning. | ||
| 3No. | DEEBOT Dual Dual Side Brushes drop out of place during use.Malfunction Possible Causes Solutions | The Dual Dual Side Brushes are not correctly installed. | Make sure the Dual Dual Side Brushes click into place when installing. |
| 4 | No singal found. Unable to return to the Station. | The Station is incorrectly placed. | Please place the Station correctly according to the instructions in the [Charging DEEBOT] section. |
| The Station is out of power or manually moved. | Check whether the Station is connected to power supply. Do not move the Station. | ||
| DEEBOT does not start cleaning from the Station. | It is recommended that DEEBOT start cleaning from the Station. | ||
| The charging route is blocked. For example, the door of the room with the Station is closed. | Keep the charging route clear. | ||
| 5 | DEEBOT returns to the Station before it has finished cleaning. | The room is large and DEEBOT needs to return to recharge. | Please turn on Continuous Cleaning. For more details, please follow the App guidance. |
| DEEBOT is unable to reach certain areas blocked by furniture or barriers. | Tidy up the area to be cleaned by putting furniture and small objects in their proper place. | ||
| 6 | DEEBOT is not charging. | DEEBOT is not switched ON. Switch ON DEEBOT. | |
| DEEBOT's Charging Contacts are not connected to the Station Pins. | Make sure that the robot's Charging Contacts have connected to the Station Pins and the AUTO Mode Button flashes. Check whether DEEBOT'S Charging Contacts and the Station are dirty. Please clean these parts according to the instructions in the [Maintenance] section. | ||
| The Station is not connected to the power supply. | Make sure the Power Cord is firmly connected to the Station. | ||
| The battery is completely discharged. Please contact Customer Care for help. | |||
| 7 | Running is very loud during cleaning. | Dual Side Brushes and Floating Main Brush are entangled. Auto-Empty Dust Bin and filter are blocked. | It is recommended to clean the Dual Side Brushes, Floating Main Brush, Auto-Empty Dust Bin, filter, etc. regularly. |
| DEEBOT is in Strong Mode. Switch to Standard Mode. | |||
| No. | Malfunction Possible Causes | Solutions | |
| 8 | DEEBOT gets stuck while working and stops. | DEEBOT is tangled with something on the floor (electrical wires, curtains, carpet fringing, etc.). | DEEBOT will try various ways to free itself. If it is unsuccessful, manually remove the obstacles and restart. |
| DEEBOT might be stuck under furniture with an entrance of similar height. | Please set a physical barrier, or set a Virtual Boundary in the ECOVACS HOME App. | ||
| 9 | During cleaning, DEEBOT appears in the route disorder, running bias, repeated cleaning, small area leakage and so on. (If there is a large area that has not been swept temporarily, DEEBOT will make up the leakage independently. Sometimes DEEBOT will re-enter a cleaned room to find any missing area.) | Objects such as wires and slippers placed on the ground affect the normal operation of DEEBOT. | Please tidy up the scattered wires, slippers and other objects on the ground before cleaning. And reduce the scattered objects on the ground as far as possible. If there is any area leakage, DEEBOT will correct the leakage by itself, please do not interfere (such as moving DEEBOT or blocking the route). |
| It may be that the Driving Wheels slips on the ground when DEEBOT climbs steps, thresholds and door bars, thus affecting the its judgment of the whole house environment. | It is recommended to close the door of this area and clean the area separately. After cleaning, DEEBOT will return to the starting point. Please rest assured to use. | ||
| Work on freshly waxed and polished floors or smooth tiles, resulting in less friction between the Driving Wheels and the floor. | Please wait for wax to dry before cleaning. | ||
| Due to different home environments, some areas cannot be cleaned. | Clean the home environment to ensure that DEEBOT can enter for cleaning. | ||
| The TrueMapping Distance Sensor is dirty or blocked by foreign matters. | Wipe the TrueMapping Distance Sensor with a clean soft cloth or remove foreign matters. | ||
| 10 | Video Manager cannot open or has no screen. | Wi-fi connection failed. | Check the Wi-Fi connection status. DEEBOT must be in an area with good Wi-Fi signal to enable the Video Manager. |
| Due to the network latency, you may not be able to open Video Manager temporarily. | Try again later. | ||
| The AIVI Visual Detection Sensor is blocked. Remove the shield. | |||
| 11 | Delay in remote control. | The Wi-Fi signal is poor, causing the video loading to be slow. | Use DEEBOT in areas with good Wi-Fi signals. |
| 12 | AIVI Visual Detection Sensor cannot recognize objects. | The cleaning area is not well illuminated. | Smart Recognition requires sufficient lighting. Please make sure the areas to be cleaned are well illuminated. |
| AIVI Visual Detection Sensor lens is dirty or blocked. | Clean the lens with a clean soft cloth, and make sure the sensor is not blocked. Avoid using any detergent or cleaning spray while cleaning. | ||
| 13 | DEEBOT does not start auto-emptying after returning to the Empty Station. | The Dust Container Lid is not closed. Close the Dust Container Lid. | |
| The Dust Bag is not installed to the Empty Station. | Install the Dust Bag and close the Dust Container Lid. | ||
| Manually move DEEBOT to the Empty Station will not trigger Auto-Emptying. | In order to make sure DEEBOT starts auto-emptying successfully, avoid picking up and moving the Empty Station during the cleaning. | ||
| DEEBOT returns to the Auto-Emptying Station running Video Manager in the App. | This is normal. | ||
| Do Not Disturb mode is enabled in ECOVACS HOME App. | This is normal. Disable Do Not Disturb mode in the App, or start auto-emptying manually. | ||
| The Dust Bag is full. Replace the Dust Bag and close the Dust Container Lid. | |||
| If the possible causes are excluded, it might be a component malfunction. | Please contact customer service. | ||
| 14 | DEEBOT fails to auto-empty the Auto-Empty Dust Bin. | The Auto-Empty Dust Bin is not installed. Please install the Auto-Empty Dust Bin. | |
| The Dust Bag is full. Replace the Dust Bag and close the Dust Container Lid. | |||
| The Dust Disposal Port on the Auto-Empty Dust Bin is stuck by debris. | Uninstall the Auto-Empty Dust Bin and clean the debris on the Dust Disposal Port. | ||
| Dust Evacuation Tube is blocked. Clean the Dust Evacuation Tube. | |||
| 15 | There is debris in the Dust Container. | Fine particles are absorbed inside the Dust Container through the Dust Bag. | Clean the Dust Container Lid and inner wall. |
| The Dust Bag is damaged. Check the Dust Bag and replace it. | |||
| 16 | DEEBOT leaks dust or debris while cleaning. | The Dust Disposal Port is stuck by debris. Uninstall the Auto-Empty Dust Bin and clear the debris. | |
| 17 | Air Freshener makes an abnormal noise. | Objects have fallen into the Air Freshener. Please contact Customer Service for assistance. | |
| 18 | DEEBOT does not respond to the Station instruction. | DEEBOT is too far away from the Station. | If it is beyond the available distance, the ECOVACS HOME App can also be used to operate DEEBOT. |
| DEEBOT and the Station are not paired. | Unplug the Station plug and wait for 10 seconds to reinsert the plug. Manually push the robot up to the Station, and ensure that the charging pins are correctly connected. Then, DEEBOT will start charging, and voice prompt pairing successful. | ||
| 19 | Driving wheels are blocked. | Driving wheels are blocked by foreign objects. | Please rotate and press the driving wheels to check whether there is any foreign object wrapped or stuck. If there is any foreign object, please clean it in time. If this problem persists, please contact Customer Care for help. |
| 20 | DEEBOT OZMO^TM Pro 3.0 Oscillating Mopping System drops out of the place during use. | The OZMO^TM Pro 3.0 Oscillating Mopping System is not correctly installed. | Make DEEBOT OZMO^TM Pro 3.0 Oscillating Mopping System clicks into place when installing. |
| 21 | DEEBOT is stuck when cleaning with OZMO^TM Pro 3.0 Oscillating Mopping System installed. | DEEBOT may have difficulty climbing over obstacles when using OZMO^TM Pro 3.0 Oscillating Mopping System. | Please assist DEEBOT if there is a problem. |
Technical Specifications
| Model DEX55 | |
| Rated Input | 20V === 1A |
| Empty Station Model CH2117 | |
| Rated Input (Charging) | 220-240V~ 50-60Hz 0.3A |
| Rated Output | 20V === 1A |
| Power(Auto-Emptying) 1000W | |
| Frequency bands 2400-2483.5MHz | |
| Networked Standby Power Less than 2.00W | |
Output power of the Wi-Fi module is less than 100mW.
Note: Technical and design specifications may be changed for continuous product improvement.
Explore more accessories at https://www.ecovacs.com/global.
text_image
Architectural floor plan diagrams showing room layouts, furniture placement, and lighting fixtures with Chinese annotationstext_image
Diagram illustrating a mechanical or electrical system with labeled components and directional arrows, including a 'Click' button.ECOVACS HOME-App
Download on the App Store

GET IT ON Google Play
WLAN-Anzeige
natural_image
Diagram of a ventilation system with airflow path and component (no text or labels)
text_image
Technical diagram showing three-step assembly of a mechanical component with dimension annotationsnatural_image
Diagram of a robotic vacuum cleaner with a close-up view showing internal components and directional arrows (no text or symbols)Hinweis: I = EIN, O = AUS.
natural_image
Line drawing of a hand holding a circular object with a blue tab, no text or symbols presentnatural_image
Line drawing of a hand holding a circular object with a blue tab, no text or symbols presentnatural_image
Technical line drawing of a mechanical component with a clamping tool inserted (no text or symbols)natural_image
Line drawing of a hand pressing a blue button on a mechanical component (no text or symbols)natural_image
Technical line drawing of a mechanical component with a cylindrical part inserted into a housing (no text or symbols)natural_image
Illustration of hands operating a robotic vacuum cleaner with a blue directional arrow indicating motion (no text or symbols)natural_image
Line drawing of a hand using a tool to adjust or install a mechanical component (no text or symbols present)natural_image
Three-step diagram showing hand positioning of a mechanical component, with arrows indicating motion direction (no text or symbols)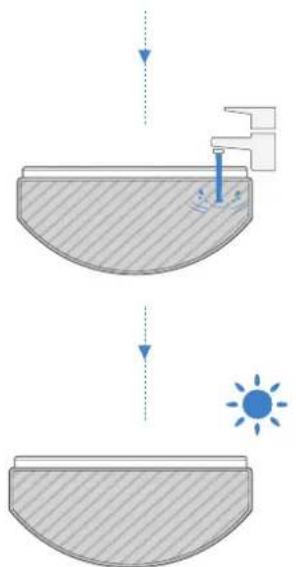
natural_image
Diagram showing a water tank being compressed by sunlight, with no text or symbols present.4 Einweg-Wischtuch

natural_image
Illustration showing a hand pouring liquid into a container with a blue arrow indicating rotation (no text or symbols)text_image
Three-step diagram illustrating a device cleaning process: adding particles, removing a container, and finally adjusting a plastic container.4
natural_image
Three technical line drawings showing mechanical assembly or mounting process with no visible text or symbolsHinweis:
natural_image
Diagram of air conditioner unit under a blue sun (no text or symbols)natural_image
Diagram of a robotic device with a blue internal component and a magnified inset showing a close-up of its screen (no text or symbols present)
natural_image
Technical illustration showing a robotic vacuum cleaner with blue ribbons and a hand holding a cable (no text or symbols present)Zwei Seitenbürsten

natural_image
Technical line drawing of a drone with top and side views, showing internal components and a handheld device (no text or symbols)natural_image
Line drawing of a hand pressing a button on a laptop keyboard (no text or symbols)Staubbeutel
natural_image
Diagram of a cylindrical device with an open lid and internal compartments, showing a blue arrow indicating rotation (no text or symbols present)
natural_image
Line drawing of a closed appliance with open lid and internal compartments (no text or symbols)
natural_image
Simple line drawing of a container with a lid and arrow indicating flow or direction (no text or symbols)natural_image
Line drawing of a portable air conditioner unit with a hand pointing to the lid (no text or symbols)
natural_image
Line drawing of a multi-compartment container with lid and side panels (no text or symbols)4

natural_image
Diagram of a device with an open lid and internal compartments, showing a blue arrow indicating rotation (no text or symbols present)text_image
Diagram showing four different interior and furniture layout designs with checkmarks and arrows indicating inspection or adjustment points.text_image
Diagram illustrating a mechanical or robotic system with labeled components and directional arrows, including a 'Click' button.natural_image
Diagram of a device panel with a blue arrow pointing to a component, no text or symbols presenttext_image
Technical diagram illustrating a mechanical assembly process with dimension annotations in millimeters3 Encendido

natural_image
Diagram of a robotic vacuum cleaner with a close-up view showing internal components and directional arrows (no text or symbols)4 Carga del DEEBOT

text_image
≈ 6.5 htext_image
≤ Click Pulse ⏻
natural_image
Hand holding a circular object with a blue tab, no text or symbols visiblenatural_image
Line drawing of a hand holding a circular object with a blue tab (no text or symbols)natural_image
Technical line drawing of a mechanical component with a bracket and mounting base (no text or symbols)natural_image
Line drawing of a hand pressing a blue button on a mechanical component (no text or symbols)natural_image
Line drawing of a hand holding a circular object with a blue tab, no text or symbols presentAmbientador
natural_image
Technical line drawing of a mechanical part with a cylindrical component and a circular feature, no text or symbols present.natural_image
Illustration of hands operating a circular device with a blue arrow indicating rotation (no text or symbols)natural_image
Line drawing of a hand using a tool to adjust or install a mechanical component (no text or symbols)flowchart
graph TD
    A["Hand positioning on left"] --> B["Heating down with blue arrows"]
    B --> C["Lightning down with blue arrows"]
    C --> D["Sun exposure to right"]
natural_image
Illustration showing two steps of a hand holding a plastic container with a curved lid and blue arrows indicating rotation (no text or symbols)text_image
Three-step diagram illustrating a device cleaning process: adding particles, removing a container, and finally adjusting a plastic container.4

natural_image
Three technical diagrams showing mechanical assembly steps with no visible text or symbolsNota:
natural_image
Line drawing of a solar panel with a sun icon above, showing various components (no text or symbols)text_image
Diagram illustrating three-step robotic vacuum cleaner installation: adding blue ribbons, adjusting a device, and using a tool.Dos cepillos laterales

natural_image
Technical line drawing of a drone with top and side views showing internal components (no text or symbols)natural_image
Line drawing of a hand pressing a button on a laptop keyboard (no text or symbols)Bolsa de polvo
1 Deseche la bolsa de polvo

natural_image
Diagram of a cylindrical device with an open lid and internal compartments, showing a blue arrow indicating rotation (no text or symbols present)
natural_image
Line drawing of a closed appliance with open lid and internal compartments (no text or symbols)
natural_image
Simple line drawing of a bottle with a lid and arrow indicating direction (no text or symbols)natural_image
Line drawing of a portable air conditioner unit with a hand pointing to the lid (no text or symbols)3 Coloque la bolsa de polvo

natural_image
Line drawing of a closed industrial container with ventilation grilles and a handle (no text or symbols)natural_image
Diagram of a device with an open lid and internal compartments, showing a blue arrow indicating rotation (no text or symbols present)natural_image
Simple line drawing of a dining table with a lamp and floor plan (no text or symbols)text_image
Diagram illustrating a mechanical or electrical system with labeled components and directional arrow, including a 'Click' button.Application ECOVACS HOME
natural_image
Diagram of a device with a blue arrow pointing to a component, connected by wires (no text or symbols)natural_image
Three-step diagram showing a mechanical assembly with arrows indicating motion, no text or symbols present.3 Mise sous tension

natural_image
Diagram of a robotic vacuum cleaner with a close-up view showing internal components and directional arrows (no text or symbols)Remarque : I = ON, O = OFF.
natural_image
Line drawing of a hand holding a circular object with a blue tab, no text or symbols present2 Pause/Réactivation

natural_image
Line drawing of a hand holding a circular object with a blue tab, no text or symbols presentnatural_image
Technical line drawing of a mechanical component with no visible text or symbolsnatural_image
Line drawing of a hand pressing a blue button on a mechanical device (no text or symbols)natural_image
Illustration of hands operating a circular robotic device with a blue arrow indicating rotation (no text or symbols)natural_image
Line drawing of a hand using a tool to clean or adjust a mechanical component (no text or symbols)flowchart
graph TD
    A["Initial state: Rolling part"] --> B["Step 1: Rotation of part"]
    B --> C["Step 2: Rotation of part"]
    C --> D["Step 3: Rotation of part"]
    D --> E["Final state: Sun at bottom"]
4 Lingette de lavage jetable

natural_image
Illustration showing a hand pouring liquid into a container with a blue arrow indicating rotation (no text or symbols)text_image
Three-step diagram illustrating a device cleaning process: adding particles, removing a container, and finally adjusting a plastic container.4

natural_image
Three technical line drawings showing mechanical assembly or mounting process with no visible text or symbolsRemarque :
natural_image
Diagram of air ducts and heat source with sun symbol (no text or labels)text_image
Safe hotkane
natural_image
Diagram of a robotic vacuum cleaner with blue cable assembly (no text or symbols)
natural_image
Hand holding a pen over rolled paper or dough (no text or symbols visible)natural_image
Technical line drawing of a drone with top and side views showing internal components (no text or symbols)Entretenir la station de vidage
natural_image
Line drawing of a hand pressing a button on a computer monitor (no text or symbols)Sac à poussière
natural_image
Diagram of a cylindrical device with an open lid and internal compartments, showing a blue arrow indicating rotation (no text or symbols present)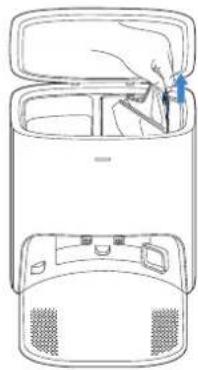
natural_image
Line drawing of a closed appliance with open lid and internal compartments (no text or symbols)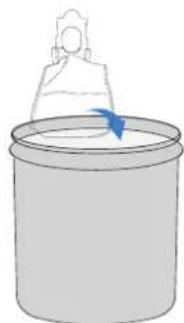
natural_image
Simple line drawing of a bucket with a handle and arrow indicating direction (no text or symbols)natural_image
Line drawing of a portable air conditioner unit with a hand pointing to the lid (no text or symbols)
natural_image
Line drawing of a closed industrial container with internal compartments and ventilation slots (no text or symbols)poussière

natural_image
Diagram of a device with open lid and internal compartments, showing a blue arrow indicating rotation (no text or symbols)text_image
Diagram showing four different interior layouts with labeled furniture and fixtures, including a floor plan, room layouts, and living areas.text_image
Diagram illustrating a mechanical or fluid system with labeled components and directional arrow, including a 'Click' button.App ECOVACS HOME
natural_image
Diagram of a device panel with a blue arrow pointing to a component, no text or symbols presenttext_image
Technical diagram showing three stages of a mechanical assembly with dimension annotations in millimeters3 Accensione (ON)
natural_image
Diagram of a robotic vacuum cleaner with a close-up view showing internal components and directional arrows (no text or symbols)Nota: I = ON, O = OFF.
text_image
≤Click Premere ⏻
natural_image
Line drawing of a hand holding a circular object with a blue tab, no text or symbols present2 Pausa/attivazione

natural_image
Line drawing of a hand holding a circular object with a blue tab, no text or symbols presentnatural_image
Technical line drawing of a mechanical component with a handle and base (no text or symbols)natural_image
Line drawing of a hand pressing a small blue component on a mechanical device (no text or symbols)natural_image
Technical line drawing of a mechanical component with a cylindrical part inserted into a housing (no text or symbols)natural_image
Illustration of hands holding a circular device with a blue arrow indicating rotation (no text or symbols)natural_image
Line drawing of a hand cleaning a mechanical component with tools (no text or symbols)flowchart
graph TD
    A["Initial state: Hand holding part with shaded area"] --> B["Step 1: Hand positioning"]
    B --> C["Step 2: Cover or pad assembly"]
    C --> D["Step 3: Cover or pad assembly with blue arrows indicating direction"]
    D --> E["Final state: Sun at bottom"]
    style A fill:#f9f,stroke:#333
    style E fill:#bbf,stroke:#333
natural_image
Illustration showing a hand pouring liquid into a container with a blue arrow indicating rotation (no text or symbols)text_image
Three-step diagram illustrating a cleaning or packaging process with labeled steps and directional arrows indicating material movement.4
natural_image
Three technical line drawings showing mechanical assembly or mounting process with no visible text or symbolsNota:
natural_image
Diagram of air conditioner unit with sun icon above (no text or symbols)text_image
cipale mobile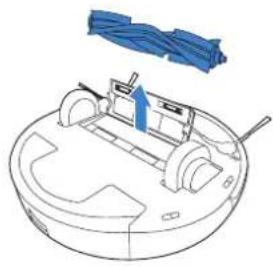
natural_image
Technical line drawing of a robotic device with blue ribbons above it (no text or symbols)
natural_image
Line drawing of a hand holding a pen over rolled paper or dough (no text or symbols)natural_image
Technical line drawing of a drone with top and side views showing internal components (no text or symbols)natural_image
Line drawing of a hand pressing a button on a laptop keyboard (no text or symbols)natural_image
Line drawing of a cylindrical device with an open lid and internal compartments, showing a blue arrow indicating rotation (no text or symbols)
natural_image
Line drawing of a closed refrigerator with open lid and side compartments (no text or symbols)
natural_image
Simple line drawing of a container with a lid and arrow indicating direction (no text or symbols)natural_image
Line drawing of a portable air conditioner unit with a hand pointing to the lid (no text or symbols)polvere
natural_image
Line drawing of a multi-tiered electronic device with open top and side compartments (no text or symbols)natural_image
Diagram of a device with open lid and internal compartments, showing a blue arrow indicating rotation (no text or symbols)natural_image
Line drawing of a hand cleaning a blue robotic vacuum cleaner (no text or symbols)
natural_image
Line drawing of a hand cleaning a circular kitchen appliance with a cloth (no text or symbols)
natural_image
Line drawing of a hand holding a tool over a circular mechanical component with no visible text or symbols
natural_image
Line drawing of a hand inserting a component into a circular device (no text or symbols)
natural_image
Line drawing of a hand using a tool to adjust or install a device on a circular device (no text or symbols present)text_image
Diagram illustrating a mechanical or electrical system with labeled components and a 'Click' button, showing directional arrows and component layout.natural_image
Diagram of a ventilation system with airflow path and component (no text or labels)text_image
Technical diagram showing three stages of a mechanical component with dimension annotations in Chinese3 Включение питания

text_image
Diagram showing a robotic device with directional arrows and a labeled component, likely illustrating a motion or control mechanism.natural_image
Line drawing of a hand holding a circular object with a blue tab (no text or symbols)natural_image
Technical line drawing of a mechanical component with a central shaft and base (no text or symbols)natural_image
Line drawing of a hand pressing a blue button on a mechanical device (no text or symbols)natural_image
Hand holding a circular object with a blue tab, no text or symbols visibleОсвежитель воздуха
natural_image
Technical line drawing of a mechanical component with a cylindrical part inserted (no text or symbols)natural_image
Illustration of hands operating a robotic vacuum cleaner with a blue arrow indicating motion (no text or symbols)natural_image
Line drawing of a hand using a tool to clean or inspect a mechanical component (no text or symbols)flowchart
graph TD
    A["Hand positioning on left"] --> B["Hand positioning on middle"]
    B --> C["Hand positioning on right"]
    C --> D["Water displacement with water drop"]
    D --> E["Sunlight exposure"]
natural_image
Illustration showing a hand pouring liquid into a container with a blue arrow indicating rotation (no text or symbols)text_image
Step-by-step diagram illustrating a device cleaning process with labeled steps and directional arrows indicating motion.4
natural_image
Three technical diagrams showing mechanical assembly steps with no visible text or symbolsПримечание.
natural_image
Diagram of air conditioner unit under a blue sun (no text or symbols)text_image
Diagram illustrating three-step cleaning process of a robotic vacuum cleaner, showing component assembly and tool path.natural_image
Technical line drawing of a drone with top and side views showing internal components (no text or symbols)natural_image
Line drawing of a hand pressing a button on a computer monitor (no text or symbols)Мешок для пыли
natural_image
Diagram of a cylindrical device with an open lid and internal compartments, showing a blue arrow indicating rotation (no text or symbols present)
natural_image
Line drawing of a closed appliance with open lid and internal compartments (no text or symbols)
natural_image
Simple line drawing of a container with a lid and arrow indicating direction (no text or symbols)natural_image
Line drawing of a portable air conditioner unit with a hand pointing to the lid (no text or symbols)natural_image
Line drawing of a multi-tiered electronic device with open lid and internal compartments (no text or symbols)пыли

natural_image
Diagram of a device with an open lid and internal compartments, showing a blue arrow indicating rotation (no text or symbols present)natural_image
Simple line drawing of a dining table with a lamp and floor plan (no text or symbols)text_image
Diagram illustrating a mechanical or electrical system with labeled components and a 'Click' button indicator.natural_image
Diagram of a device with a blue arrow pointing to a component, no text or symbols presenttext_image
Technical diagram showing three-step assembly of a mechanical component with dimension annotations3 Włączyć zasilanie

natural_image
Diagram of a robotic vacuum cleaner with a close-up view showing internal components and directional arrows (no text or symbols)Uwaga: I = WŁ., O = WYŁ.
natural_image
Line drawing of a hand holding a circular object with a blue tab, no text or symbols present2 Pauza/budzenie

natural_image
Line drawing of a hand holding a circular object with a blue tab, no text or symbols presentnatural_image
Technical line drawing of a mechanical component with a handle and base (no text or symbols)natural_image
Line drawing of a hand pressing a blue button on a mechanical device (no text or symbols)natural_image
Technical line drawing of a mechanical component with a cylindrical part inserted into a housing (no text or symbols)natural_image
Illustration of hands operating a circular device with a blue arrow indicating rotation (no text or symbols)natural_image
Line drawing of a hand using a tool to adjust or install a mechanical component (no text or symbols present)flowchart
graph TD
    A["Hand positioning on left"] --> B["Heating hand with blue arrows"]
    B --> C["Lightning down hand"]
    C --> D["Lighting down hand with blue arrows"]
    D --> E["Sun exposure to right"]
    E --> F["Sun exposure to right"]
natural_image
Illustration showing a hand pouring liquid into a container with a blue arrow indicating rotation (no text or symbols)text_image
Diagram illustrating three-step cleaning process for a device, showing hand positioning and packaging steps with blue arrows indicating motion.4

natural_image
Three technical diagrams showing mechanical assembly steps with no visible text or symbolsUwaga:
natural_image
Diagram of air ducts and heat source with sun symbol (no text or labels)text_image
Diagram illustrating three-step robotic vacuum cleaner installation: adding cable, adjusting component, and handling cable strips.natural_image
Technical line drawing of a drone with top and side views, showing internal components and a handheld device (no text or symbols)natural_image
Line drawing of a hand pressing a button on a computer monitor (no text or symbols)Worek na kurz
1 Wyrzuć worek na kurz
natural_image
Diagram of a cylindrical device with an open lid and internal compartments, showing a blue arrow indicating rotation (no text or symbols present)
natural_image
Line drawing of a closed refrigerator with open lid and side compartments (no text or symbols)
natural_image
Simple line drawing of a container with a lid and arrow indicating rotation (no text or symbols)natural_image
Line drawing of a portable air conditioner unit with a hand inserting a clip (no text or symbols)natural_image
Line drawing of a multi-tiered electronic device with open lid and internal compartments (no text or symbols)natural_image
Diagram of a device with an open lid and internal compartments, showing a blue arrow indicating rotation (no text or symbols present)Afzuigstation (bovenkant)

text_image
Stofzakaansluiting Stofafzuigslang Blazerklepnatural_image
Simple line drawing of a dining table with a lamp and floor plan (no text or symbols)text_image
Diagram illustrating a mechanical or electrical component with directional arrows and a labeled 'Click' button, likely from an electronics or control system.ECOVACS HOME-app
Download on the App Store

GET IT ON Google Play
natural_image
Diagram of a ventilation system with a fan, pipe, and indicator lights (no text or labels)
text_image
Technical diagram showing three-step assembly of a mechanical component with dimension annotationstext_image
Diagram showing a robotic device with labeled components and directional arrows indicating motion or movement.Opmerking: I = AAN, O = UIT.
natural_image
Line drawing of a hand holding a circular object with a blue tab, no text or symbols present2 Pauzeren/activeren

natural_image
Line drawing of a hand holding a circular object with a blue tab (no text or symbols)natural_image
Technical line drawing of a mechanical component with a central shaft and base (no text or symbols)natural_image
Line drawing of a hand pressing a blue button on a mechanical device (no text or symbols)natural_image
Technical line drawing of a mechanical component with a cylindrical part inserted into a housing (no text or symbols)
text_image
ClickRegulier onderhoud
natural_image
Illustration of hands holding a circular device with a lid and a blue arrow indicating rotation (no text or symbols)natural_image
Line drawing of a hand using a tool to adjust or install a mechanical component (no text or symbols present)flowchart
graph TD
    A["Initial state: Hand holding part with shaded area"] --> B["Step 1: Hand positioning"]
    B --> C["Step 2: Cutting down part"]
    C --> D["Step 3: Covering part"]
    D --> E["Final state: Sun at bottom"]
natural_image
Illustration showing a hand holding a plastic container being placed into a paint bucket, with no text or symbols present.text_image
Diagram illustrating three-step packaging process: adding granular material, splitting into a plastic container, and finally adjusting a plastic container.4

natural_image
Three technical diagrams showing mechanical assembly steps with no visible text or symbolsOpmerking:
natural_image
Diagram of air conditioner unit under a blue sun, showing internal components and housing (no text or labels)text_image
Diagram illustrating the step-by-step installation of a robotic vacuum cleaner, showing component manipulation and cleaning process.Dubbele zijborstels

natural_image
Technical line drawing of a drone with top and side views showing internal components (no text or symbols)natural_image
Line drawing of a hand pressing a button on a computer monitor (no text or symbols)Stofzak
natural_image
Diagram of a cylindrical device with an open lid and internal compartments, showing a blue arrow indicating rotation (no text or symbols present)
natural_image
Line drawing of a device with open lid and internal compartments (no text or symbols)
natural_image
Simple line drawing of a container with a lid and arrow indicating direction (no text or symbols)natural_image
Line drawing of a portable air conditioner unit with a hand pointing to the lid (no text or symbols)
natural_image
Line drawing of a closed refrigerator with lid open, showing internal compartments and ventilation slots (no text or symbols)4

natural_image
Diagram of a device with an open lid and internal compartments, showing a blue arrow indicating rotation (no text or symbols present)No.518 Songwei Road, Wusongjiang Industry Park, Guoxiang Street,
Wuzhong District, Suzhou, Jiangsu, China.
451-2115-0500