IAN 296062 - Garden hose FLORABEST - Free user manual and instructions
Find the device manual for free IAN 296062 FLORABEST in PDF.

| Product type | Garden hose with garden accessories |
| Brand | Florabest |
| Model | IAN 296062 |
| Hose length | Approximately 10 meters |
| Inner diameter | Approximately 9 mm |
| Outer diameter | Approximately 13.5 mm |
| Hose material | 3 layers with woven canvas |
| Max. working pressure | 6 bar |
| Burst pressure | 18 bar |
| Operating temperature | 0 °C to 50 °C |
| UV resistance | Yes |
| Hose weight | Approximately 1 kg |
| Wall bracket weight | Approximately 0.4 kg |
| Bracket dimensions | Approximately 19.5 × 23.5 × 13.5 cm |
| Spray nozzle | 10 spray settings, continuously adjustable flow |
| Nozzle weight | Approximately 170 g |
| Included connectors | Tap connector 3/4" with 1/2" adapter, connector without Aquastop 3/8", connector with Aquastop 3/8" |
| Aquastop function | Yes, on one connector: shuts off water when disconnecting |
| Use | Domestic water, private use |
| Maintenance | Clean with a damp cloth, check connector seals |
| Storage | Protect from frost, store away from direct sunlight |
| Safety | Do not use for drinking water, do not spray at people or animals |
Frequently Asked Questions - IAN 296062 FLORABEST
User questions about IAN 296062 FLORABEST
0 question about this device. Answer the ones you know or ask your own.
Ask a new question about this device
Download the instructions for your Garden hose in PDF format for free! Find your manual IAN 296062 - FLORABEST and take your electronic device back in hand. On this page are published all the documents necessary for the use of your device. IAN 296062 by FLORABEST.
USER MANUAL IAN 296062 FLORABEST
Assembly and safety advice
NL BE
TUINSLANGSET
Before reading, unfold the page containing the illustrations and familiarise yourself with all functions of the device.
FR BE
GB / IE Assembly and safety advice Page 8
natural_image
Color palette bar with grayscale shades and a central crosshair (no text or symbols)

| List of pictograms used | |||
 | Read the instructions! |  | Observe the warnings and safety notices! |
 | Risk of fatal injury and accidents for toddlers and children! |  | This hose is designed for tap water. |
 | Do not subject the hose to frost. Otherwise property damage may occur. |  | Hose length approx. 10 meters |
 | UV-resistant Bursting pressure 18 bar |  | |
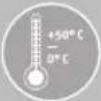 | Withstands temperatures from 0-50 °C | ||
Garden Hose Set
- Introduction

Congratulations on the purchase of your new product. You have selected a high quality product. The assembly and operating instructions are part of this product. Please read through all of these instructions and take note of the advice they contain before starting with assembly. These instructions contain important assembly and care information. Keep these instructions safe and if you pass on the product to anyone else please pass on the documentation as well.
Intended use
This product is suitable as an organizer for the garden. Only for private use. Not for commercial use.
Parts description
1 Spray nozzle
1a Trigger switch
1b Adjustment wheel
2 Hose connector without water stop (3/8")
1 Spray nozzle
1a Trigger switch
1b Adjustment wheel
2 Hose connector without water stop (3/8")
2a Tap connector (3/4")
2b Adapter (1/2")
3 Hose connector with water stop
4 Screw
5 Rawlplug
6 Hose
7 Hose holder
- Technical Data
Hose:
3-ply with mesh
Weight: approx. 1 kg
Inside diameter: approx. 9 mm
Outside diameter: approx. 13.5 mm
Length: approx. 10 m
Connector: 38
max. operating pressure: 6 bar
Bursting pressure: 18 bar
Hose holder:
Weight: approx. 0.4 kg
Dimensions:
approx. 19.5 x
23.5×13.5cm
(W×H×D)
8 GB/IE

Spray nozzle:
Weight: approx. 170 g
Dimensions:approx.
$$ 2 1 \times 1 1. 5 \times 6. 3 \mathrm{cm} $$
$$ (W \times H \times D) $$
- Scope of delivery
1 Spray nozzle
1 Hose connector without water stop (3/8")
1 Hose connector with water stop, 38
1 Tap connector (3/4") with adapter (1/2")
2 Screws
2 Rawlplugs
1 Hose
1 Hose holder
1 Instructions for assembly and use

Safety information
ATTENTION! READ ASSEMBLY- AND OPERATING INSTRUCTIONS BEFORE USE! KEEP THE ASSEMBLY AND OPERATING INSTRUCTIONS IN A SAFE PLACE!
图

KEEP OUT OF THE REACH OF CHILDREN. THIS PRODUCT IS NOT A TOY! INJURIES MAY
OTHERWISE OCCUR!
■

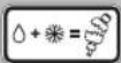
This hose is designed for tap water. Do not drink water from this hose. Otherwise there is a risk of injury.
Be sure water from the hose cannot return to the drinking water supply: Disconnect the hose from the tap after use, or install a backflow preventer or pipe interrupter between the tap and hose.
- Never leave the hose unsupervised - even if the water flow is temporarily interrupted. Otherwise injuries or property damage may occur.
■
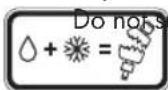
Subject the hose to frost. Otherwise property damage may occur.
■ Ensure particles of dirt do not plug the connectors or enter the hose. The fittings may otherwise be damaged.
- Do not aim the water jet at electrical equipment.
■ Do not aim the water jet at persons or animals.
■ Always close the water intake after every use.
- Assembly
You will need:
Cross-tip screwdriver (PH2)
Power drill, drill bit ∅ 6 mm
Important! Please refer to the operating instructions of your power drill.
Ensure that you do not damage any electrical cables, gas or water pipes when you drill into the wall.
• Installing the hose holder
☐ Install the hose holder 7 is shown in Figure A.
Use the included screws 4 and rawlplugs 5. These are only suitable when mounting to brick, concrete- or wooden walls. Please use suitable screws and rawlplugs when mounting to other materials. Consult your retailer for rawlplugs and screws suitable for the respective wall.
Note: To prevent backflow, do not mount the hose holder 7 higher than the tap, or install a backflow preventer or stop cock between the tap and hose 6.
Use
Connecting
□ Connect the hose 6 as shown in Figure B.
- Using the adapter
☐ Rotate the tap connector 2a clockwise onto the connection thread of the tap.
☐Theadapter 2b must be used for a 12 " connection thread.
☐ Rotate the adapter 2b clockwise into the tap connector 2a.
• Using the spray nozzle
Note: the spray nozzle 1 features ten different spray patterns. The flow rate is variable.
☐ Insert the spray nozzle 1 in the hose connector with water stop 3 (cf. Fig. C).
☐ Move the trigger switch 1a to the back to start water flow and for variable adjustment (cf. Fig. D).
Turn the wheel 1b to position „I“, to select or adjust the spray pattern (cf. Fig. D).
☐ Move the trigger switch 1a forward to stop the water flow (cf. Fig. D).
Note: When removing the spray nozzle 1 with the tap on, the hose connector with water stop 3 will interrupt the water flow.
Only use this option for interrupting the water flow when connecting a different item to the hose, e.g. a water sprinkler.
ATTENTION! Only use the options for interrupting the water flow described in this chapter to stop the flow temporarily! To stop the water flow for a longer period, close the tap.
- Cleaning and Care
Use a slightly dampened, lint-free cloth for cleaning and care.
■ Occasionally clean the connection to ensure the hose connector sits tight.
Service
Please dispose of the article in accordance with the local regulations.
Perceuse, forets ø 6mm
$$ (L \times A \times P) $$

23 PT
$$ (L \times A \times P) $$
Material fornecido
natural_image
Color palette bar with grayscale shades and a central crosshair (no text or symbols)