USER MANUAL DTC 550 WiFi MINOX
Fotogröbe: 0,3 MP, 2,0 MP, 4,0 MP, 8,0 MP, 12 MP, 16 MP
Tonsignal: Aus (Off), Ein (On)
4 MP: 2.688 × 1.512; 2 MP: 1.920 × 1.080;
0,3 MP: 640 × 480
1.920 × 1.080 (15fps),
1.280 × 720 (30fps),
848 × 480 (30fps),
720 × 480 (30fps)
Objektiv: f = 7.45 mm ; F / N O = 2.4 ; F O V = 46^
Auto IR-filter
Wildlife camera features 30
First operational steps 31
Using the camera 33
Connecting to a computer 38
MINOX WiFi Wildlife camera App 38
Troubleshooting 43
Technical data 44
Storage 45
Cleaning 45
INTRODUCTION
Congratulations on the purchase of your MINOX DTC 550 WiFi wildlife camera. These instructions are to help you take advantage of the full range of performance that your MINOX DTC 550 WiFi wildlife camera has to offer.
Note:
We have done our best to produce a complete and accurate manual. However, we cannot ensure that there are no errors or omissions during the printing process.
We cannot take responsibility for any damages caused by unauthorized attempts to upgrade software or for any data corruption while the product is being repaired.
- Please Back Up Your Files! We cannot be held liable for the loss of data caused by damaged products or damage due to unreadable memory cards or drives.
IMPRINT
MINOX GmbH
Ziegelstadel 20
Read instructions and store in a safe place
These instructions are explicitly for the MINOX DTC 550 WiFi Wildlife Camera (hereafter referred to only as "wildlife camera"). It is part of the product and contains important information about first use, handling and disposal. Please carefully read this manual, especially the safety instructions before using the camera for the first time. Failure to follow the instructions in this manual may result in data loss or damage to the wildlife camera. The operating instructions are based on the standards and rules applicable in the European Union. If used outside of the EU, make sure to observe the country-specific guidelines and laws! For future use, store this manual in a safe place. If you pass the wildlife camera on to a third party, make sure to include these instructions.
Legend
The following symbols and signal words are used in these instructions, on the device or on the packaging.
This symbol/signal word refers to a hazard with a high degree of risk which, if not avoided, will result in death or serious injury.
This symbol/signal word refers to a hazard with a medium degree of risk which, if not avoided, may result in death or serious injury.
This symbol/signal word refers to a hazard with a low degree of risk which, if not avoided, may result in minor or moderate injury.
Declaration of conformity: Products marked with this symbol comply with all applicable community legislations within the European Economic Area.
This signal word warns of possible damage to property.
This symbol indicates useful additional information on assembly or operation.
The wildlife camera can be operated using an external 6 V power source with a minimum of 2 A.
This symbol indicates a DC barrel connector plug, with the positive pole in the middle.
IP54: The wildlife camera is protected against dust and splashing water when firmly closed and when the protective cap is properly in place, and can be used outdoors.
Products marked with this symbol are operated with direct current
This wildlife camera is an information electronics device and is used for indoor and outdoor surveillance.
Examples:
- Photo trap for hunting,
- Animal or event surveillance,
Security camera for house, office,
Any indoor and outdoor surveillance where proof of an infringement, trespass etc. is required.
The wildlife camera is intended for private use only and is not suitable for commercial use.
Use the wildlife camera only as described in this manual. Any other use is considered improper and may result in damage to property or loss of data. The manufacturer or dealer accepts no liability for damage caused by improper or incorrect use and for unauthorized modifications.
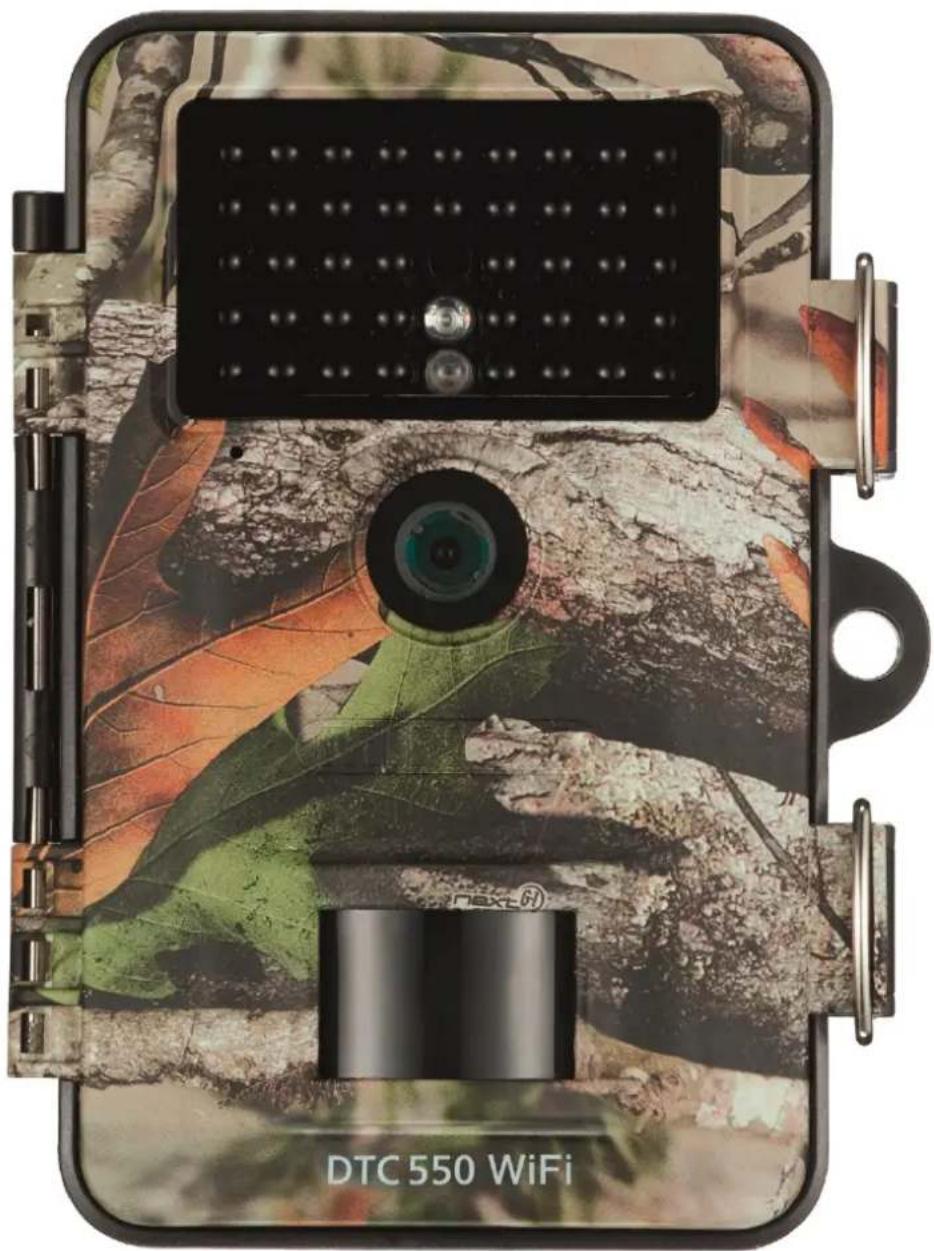
WILDLIFE CAMERA FEATURES
4-megapixel CMOS Sensor.
Color photos by day, black & white photos by night.
- Up to 6 months standby.
- Wide detection angle and fast reaction time.
Data transfer and camera settings via WiFi.
- Use in extreme temperatures from -20^ to +40^ .
- Compact size - suitable for covert use.
- Fast trigger release.
- Dust and splash proof according to IP54.
- Simple mounting on walls, ceilings, trees or similar.
- Simple alignment of the wildlife camera.
- Time stamp on photos and videos.
- Lockable and password protected.
- Low power alarm.
- Records sound via integrated microphone.
Video playback with sound via integrated speaker.
FIRST OPERATIONAL STEPS AND SCOPE OF DELIVERY
DANGER OF SUFFOCATION! There is a danger of suffocation for children playing with the packaging film.
Do not let children play with the packaging film. They can become entangled in it and suffocate while playing.
-
Take the wildlife camera out of its packaging and remove all protective film from the camera.
-
Make sure that the following is included in the delivery:
MINOX DTC 550 WIFI Wildlife Camera
- Mounting bracket
- Mounting plate
- 3 screws
3 dowels
- Mounting strap
USB cable
- Quickstart Guide
- Safety Instructions
- Check whether the wildlife camera or any of the individual parts are damaged. If so, do not use the wildlife camera.
Contact the manufacturer at the address indicated on the Quickstart Guide.
Inserting the batteries and memory card
The battery and memory card compartments are located inside the wildlife camera.
Opening the wildlife camera
Release the two metal brackets from the locking clamps to open the wildlife camera.
Inserting or changing the batteries
Before inserting the batteries, make sure that the contacts inside the battery compartment are clean and intact. Clean
To remove the SD card, gently push the visible end of the card upwards. The card will then be ejected and can now be removed.
SD/SDHC and microSD/SDHC memory cards with a memory of up to 32 GB are supported.
Use only Speed Class 10 memory cards. Cards with less speed can cause errors.
- Recording photos and videos are only possible if an SD card has been inserted.
It is recommended to format the memory card before use. Take into consideration that files might be stored on the memory card, which will be deleted when formatting the card. In this case, first back up your files on a computer.
Closing the wildlife camera
RISK OF DAMAGE!
The dust and splashproof protection is only guaranteed when the wildlife camera is completely closed.
Make sure that the wildlife camera has been properly closed and latched.
Make sure that the protective cover for the 6 V DC port is properly in place.
Make sure that the rubber seal around the inside of the camera is not damaged and is properly in place. If necessary, push the rubber seal into the proper position.
- Close the wildlife camera.
- Place the metal brackets over the locking clamps.
- Push the plastic tabs down.
To lock both halves of the wildlife camera, attach a padlock (not included in the delivery) to the eyelet.
External power source
The wildlife camera can be operated either with batteries or with an external power source (not included in the delivery). To permanently supply the camera with power, a 6 V mains adapter with a minimum of 2 A will be required. The DC barrel connector plug must have an outer diameter of 3.5mm and an inner diameter of 1.35mm , with a positive pole in the middle and negative pole on the outside. Rechargeable batteries inside the camera cannot be charged using the external power supply. By attaching the camera to an external power supply, the IP 54 protection cannot be maintained.
- Open the protective covering of the 6 V DC port.
- Connect the external power supply with the 6 V DC port.
Attaching the mounting strap
It is important to choose a spot to mount the wildlife camera that is not subject to direct sunlight.
- Make sure that there are no branches or twigs in the near vicinity of the motion sensor. Moving branches can lead to undesired triggering of the camera.
- Use the mounting strap to attach the wildlife camera to a tree or other suitable objects.
- Insert the strap through the mounting brackets.
- Attach the wildlife camera to a tree or suitable object and feed the strap through the brackets.
Pull the strap tightly until the camera is firmly in place and close the tab on the buckle.
- Pull on the tab of the buckle to loosen the mounting strap.
Mounting bracket
ELECTRICAL SHOCK HAZARD! Contact with a live wire can lead to electrical shock.
When drilling holes, make sure that you will not damage any water pipes, or electrical and telephone wiring. Using the mounting bracket, you can attach your wildlife camera to walls or ceilings. Use the mounting bracket as a template to mark the spots where you wish to drill the holes.
OPERATION
Mode switch
| Mode | Function |
| OFF (Off mode) | The wildlife camera is completely turned off. |
| SETUP (Test mode) | You can make settings on your camera, as well as take and view photos/videos while in the test mode (see “Setting your preferences”). |
| ON (Live mode) | The wildlife camera will be activated and can take pictures on its own (Live mode). |
- Push the switch to SETUP to activate the display. A melody will sound and the red LED in the LED window will light up briefly when motion is detected in front of the sensor.
- Various functions can be activated and settings made using the control buttons.
The following control buttons are available for this purpose:
| Control button | Function |
| MENU | Settings menu |
| REPLAY | Playback mode |
| / | • Manual recording mode for videos.
• In SETUP, activate the video mode.
• Start and stop video recording. |
| / | • Manual capture mode for photos.
• in SETUP, activate the photo mode.
• Take a photo. |
| OK < | Turn the camera off if the energy saving mode has been activated. |
To turn the camera completely off again, push the mode switch to OFF. A melody will sound.
The battery symbol in the display indicates the available battery power.
Setting your preferences (Test mode)
In the test mode, not only can you set your preferences, but you can also take photos and videos with your wildlife camera and subsequently view them on the camera's display.
- Push the mode switch to SETUP to enter the test mode. A melody will sound.
- Press the MENU button to enter the settings menu.
Basic operation
Below is a description of the control buttons in the settings menu.
| Control buttons | Function |
| MENU | Open and close the settings menu.
In the sub-menus: one step back to the main menu. |
| ▲ | Go up to the previous menu point or increase a value by 1. |
| ▼ | Go down to the next menu point or decrease a value by 1. |
| OK | Open the chosen menu or verify the desired setting. |
Confirm every setting change with the OK button. If you do not confirm with the OK button, the new setting will be lost when leaving the menu.
If you do not press any buttons, the display will automatically switch off after the time period that has been set under the menu item "Illumination duration". Push any button to reactivate the display and continue making your settings.
All menu options and possible setting preferences for the auto-record mode are listed below. The default factory settings are marked in bold and are underlined.
Mode: Photo, Video, Photo+Video
Select whether to capture photos or videos when motion has been detected. In the "Photo+Video" mode, the camera will take a predetermined number of photos and then record a video.
Photo size: 0.3 MP, 2.0 MP, 4.0 MP, 8.0 MP, 12 MP, 16 MP
Choose the desired size for your photos. A higher resolution leads to higher quality photos. Be aware that higher quality photos require more space on your memory card. If the files are larger, it will take longer to save them to the card.
Video size: 1,920 × 1,080 (30 fps), 1,920 × 1,080 (15 fps), 1,280 × 720, 848 × 480, 720 × 480
Choose the desired size for your videos. A higher resolution leads to higher quality videos. Be aware that higher quality videos require more space on your memory card. The videos will be recorded in AVI format, which can be played on most video devices and programs. If the files are larger, it will take longer to save them to the card.
Number of photos: 1 photo to 9 photos
Select the number of photos that should be taken in a row when the camera is set in photo mode.
Video length: 10 to 180 seconds (in 5 second intervals)
Choose the length of each video that should be recorded when the camera has been triggered.
Delay: 5 seconds - 59:59 minutes (factory setting: 30 seconds).
Select the shortest amount of time the wildlife camera should wait before it reacts to the next detection of motion. During the chosen delay intervals, the camera will not record any images. This will help to prevent the memory card from being filled with too many redundant images.
Interval recording: Off / On
Set the camera to "Photo" mode to access this setting. Select "On" to activate the interval recording function. Select "Off" to deactivate this function. When set to "On", the wildlife camera automatically takes pictures according to a selected time interval, regardless of whether the motion sensor has been triggered or not. This is helpful when observing ectothermic (cold-blooded) animals such as snakes, or the blossoming of plants etc.
As soon as you confirm "On" with the OK button, you can use the "Set Interval" function to enter the intervals at which photos should be taken.
Set intervals*: 00:00:00 - 23:59:59 (factory setting: 00:00:30).
Select the interval times at which photos should be taken.
*This option is only available if the interval recording function has been activated.
Record sound: Off, On
Choose "On" to record sound.
Choose "Off" to deactivate.
Acoustic signal: Off, On
Select "On" to activate the button sounds, and "Off" to deactivate them.
Automatic deactivation: Off, 3, 5, 10 minutes
Select when the wildlife camera should automatically turn off while in SETUP mode. If none of the control buttons are pressed within the specified time, the wildlife camera will switch off. Push the OK button to reactivate the camera.
- Illumination duration: Off, 1, 3, 5 minutes
Select when the display should automatically switch off while the wildlife camera is in SETUP mode. If none of the control buttons are pressed within the specified time, the display will switch off. Push any button to reactivate the camera.
- IR light: Automatic, high, low: The IR illumination depends on the existing voltage of the batteries. If the batteries are full, the IR LEDs light up at full power. When the voltage of the batteries decreases, the power of the IR LEDs is halved in order to provide longer operation of the wildlife camera.
High: The IR LEDs always light up at full intensity.
Low: The IR-LEDs always light up a half intensity.
Timer: Off, On
Set the timer to "On" to activate the wildlife camera during a certain period of time. You can specify two time periods that should not overlap.
After the timer has been activated, the following options are available: "Start 1", "Start 2", "Stop 1" and "Stop 2". If two time periods overlap, the earliest start time and the latest stop time will apply.
- Start 1/Stop 1 and Start 2/Stop 2^* : As soon as you have activated the timer function, you can set two start and stop times – these should not overlap. If, for example, the Start 1 has been set to 18:35 and the Stop 1 has been set to 21:25, the wildlife camera will be active from 18:35 until 21:25. If you additionally set Start 2 to 23:00 and Stop 2 to 06:00, the camera will then reactivate on the same day at 23:00 and will continue operation until 06:00 on the next day. Outside of these preset time periods, the wildlife camera will not take any photos or record any videos.
*This option is only available if the timer function has been activated.
- Date and time: Set the date and time. The date will be displayed in the following format: "YYYYMMDD".
Using the and buttons, change to the values to be set and with the and buttons, select the desired values. Confirm using the OK button.
Time format: 12 hours, 24 hours
If set to the 12-hour format, the times before noon will be displayed with AM and afternoon to evening times with PM.
Select "On" if the date, time, temperature and moon phase should be displayed in the photos. Otherwise, select "Off". The time stamp can also be displayed on videos.
- Camera name: To identify a specific camera, you can give it a name. Use the and buttons to select one of the
13 positions where a character should appear and the and buttons to select the desired numeral or letter for the camera name.
Camera password: Off, Ein
Select "On" if you wish to protect your camera from unauthorized access. Enter a four-digit password. Select Off to deactivate this function. This password will now be requested every time you turn on the camera and are in Test Mode. If you have forgotten your password, you will be unable to use the trail camera. To unlock the camera, send the camera to our service with your proof of purchase.
Activate the WiFi: Off, On
Select "On" if you wish to connect the MINOX WiFi Wildlife Camera app with your device. This will activate the WiFi function on your wildlife camera. After you have selected "On", the current WiFi password will be displayed. You now have the option to keep this password or to create a new one. Please note that you can create a password with up to eight characters (capital letters and/or digits from 0-9, e.g. "BERLIN87"). Make sure to note the password down. You will need this later when connecting your app to the camera.
Language: English, German, Spanish, Dutch, French, Polish, Danish, Italian, Hungarian, Slovenian, Mandarin Chinese, Traditional Chinese, Japanese.
Set the desired language for the menu.
Format card: No, Yes
Select "Yes" if you wish to format your memory card. Warning: When formatting, all data on the memory card will be irretrievably deleted! You will not be prompted to confirm before deleting.
Factory setting: No, Yes
Reset all of your settings. All previously made settings will be lost.
- System: Here you have 2 options.
With the option "FW Update" you can install a new firmware. The wildlife camera is equipped with the latest version on delivery.
New versions are offered by the manufacturer if required. With the option "FW Version", you can check to see which firmware is currently on your wildlife camera.
Playback mode
In SETUP mode, press the REPLAY button to enter playback mode. Below is a description of the control buttons in playback mode.
| Control buttons | Function |
| > | ·Photo playback: When viewing an enlarged image, pressing this button moves the image to the right.
·Video playback: Increase playback speed (normal, 2x or 4x). |
| < | ·Photo playback: When viewing an enlarged image, pressing this button moves the image to the left.
·Video playback: Enable reverse search (normal, 2x or 4x). |
| OK | ·Turn camera on and off, if the energy-saving function has been activated in the menu item "Illumination duration".
·Photo playback: Press the OK button and select "Yes". Enlarged image sections are saved. The original image will be kept.
·Video playback: Start or pause video playback.
·Press the OK button to switch back to normal playback speed when the fast forward or fast rewind has been activated. |
| MENU | Delete images. |
| REPLAY | Turn the playback menu on and off. |
| ▲ | ·Scroll backwards through existing images.
·Photo playback: When viewing an enlarged image, press this button to move the image up.
·Video playback: Increase playback volume.
Available settings: OFF, L (low), M (medium), H (loud). |
| ▼ | ·Scroll forward through existing recordings.
·Photo playback: When viewing an enlarged image, press this button to move the image down.
·Video playback: Decrease playback volume.
Available settings: OFF, L (low), M (medium), H (loud). |
| /® | ·Photo playback: Zoom in on photo (up to 8x magnification).
·Video playback: Video playback: Increase playback volume.
Available settings: OFF, L (low), M (medium), H (loud). |
| /θ | ·Photo playback: Reduce enlarged images again.
·Video playback: Decrease playback volume.
Available settings: OFF, L (low), M (medium), H (loud). |
Delete images
In playback mode, the delete option is available in the menu.
One: Select "One" to delete a single image. After confirming with the OK button, the image will be displayed that should be deleted. Verify the deletion by marking it with the "Yes" button and confirming it with the OK button.
To cancel the deletion process, select "No" and confirm with OK.
All: Select the "All" option to delete all images and recordings on the memory card.
To delete all of your files, select "Yes" and press the OK button.
To cancel the deletion process, select "No" and confirm with OK.
Night images
For night images, the infrared LEDs on the front of the wildlife camera provide the necessary light to make the shots possible. The wildlife camera uses infrared LEDs with a high wavelength to keep the amount of red light as low as possible. The number of infrared LEDs in the camera generates a high light emission angle, allowing for night shots at a distance of approx. 3m to 15m without overexposing the object. However, reflective objects can cause overexposure even within this range (e.g. road signs). Note that the infrared LEDs create black and white images at night.
Operating principle of the motion sensor
As soon as wild animals or other objects come directly into the detection range of the motion sensor, the wildlife camera is automatically activated and starts recording photos and/or videos. If no further movement is detected for five minutes after the last triggering, the wildlife camera returns to standby mode.
Advantages of motion sensors
As soon as the motion sensor detects wildlife, the wildlife camera turns on and begins taking pictures. The time between activation and the start of a recording is called the shutter release time. However, if wildlife passes by very quickly, it is possible that the image may show only the back of the body or possibly nothing at all. However, with the camera's 40^ angle of coverage, and the shutter release speed of 0.4 seconds, this issue is almost completely solved.
Capturing images (Live mode)
The standard application of the wildlife camera is when it is in the so-called live mode. In this mode, images are captured either via the motion sensor, or periodically in accordance with the settings.
Push the mode switch to the ON position to activate the live mode. The blue status LED on the front of the wildlife camera will blink for about 5 seconds, after which the wildlife camera will go into standby mode.
Aligning the camera
The Test Mode is very helpful in determining the best angle of detection and range of the motion sensor.
- Push the mode switch to the SETUP and close the wildlife camera.
Mount the wildlife camera on a tree at a height of approx. 1 to 2m and align the camera to the desired position.
- Now slowly move from one side of the area of detection to the other. Move parallel to the wildlife camera. Try different angles and distances.
If the red LED on the front of the wildlife camera lights up, you have been detected by the motion sensor.
In this way, you can find the best position to align the wildlife camera.
An LED does not light up in live mode. To avoid false signals and unnecessary recordings, please also observe the instructions about where to mount the camera in the chapter "Attaching the mounting strap".
Optimal camera alignment is to the north or south. The detection zone of the motion sensor and the lens is about 40^
The best results are achieved with your MINOX DTC 550 WiFi at a distance of approx. 2m . The focus of the lens is oriented to this distance.
Also make sure that the wildlife camera is aligned at the correct height in relation to the area to be observed. If necessary, the wildlife camera should be tilted somewhat to be optimally aligned.
The wildlife camera complies with IP protection class 54. The wildlife camera is dust and splashproof and can be used regardless of weather conditions.
The wildlife camera stores photos and videos on the memory card in a folder named "DCIM\100STLTH". Photos are given a file name ending with ".JPG" (example: "STC_0010.JPG"); video names end with ".AVI" (example: "STC_0080.AVI").
In the SETUP and OFF modes, you can use the supplied USB cable to transfer files to a computer. Alternatively, you can insert the memory card into a card reader on your computer.
The video files can be viewed with most standard programs like Windows Media Player, Quick-Time etc.
CONNECTING TO A COMPUTER
You can connect your wildlife camera to a computer via USB cable.
- Insert the plug of the supplied USB cable into the mini-USB port.
The wildlife camera automatically switches to USB mode, regardless of the position of the mode switch.
- The wildlife camera will now install itself as a "removable disk" drive on the computer.
Double click on this drive; you will now find the folder "DCIM".
The recorded photos and videos are located within the sub folders of the "DCIM" folder.
- You can now copy or move the photo and video files to your computer.
On Mac computers, a new drive will appear on the desktop. If you click on this drive, the Finder will be launched.
System requirements
Windows®
Hardware: Pentium® III or newer
Operating system: Windows XP/Vista/7/8/10
Working memory: 512 MB RAM
Hard disk space: 1 GB available
Screen resolution: 1,024 × 768 or higher
Port: Available USB 2.0 port
Macintosh
Hardware: PowerPC G3/G4/G5
Operating system: OS 10.3.9 or newer system
Working memory: 512 MB RAM
Hard disk space: 1 GB available
Screen resolution: 1,024 × 768 or higher
Anschluss: Available USB 2.0 port
Smartphone
Minimum requirement, iOS: iOS 10 or newer
Minimum requirement, Android: Android 4.4 or newer, (smartphone with Bluetooth LE support)
MINOX WIFI WILDLIFE CAMERA APP
Download the free "MINOX WiFi Wildlife Camera" app onto your smartphone.
Turn the camera on by sliding the power switch to the Setup position. Open the menu of the camera with the menu button, select "Enable WiFi" and then select ON. Confirm your selection with the OK button.
After the WiFi has been activated, you will see the current WiFi password (12345678).
You have the option of leaving the WiFi password as it is or assigning a new password. Please note that the password must consist of up to 8 characters (capital letters and numbers from 0-9, e.g. "BERLIN87").
Write the WiFi password down. You will need it to connect the app to the camera later. Then push the wildlife camera's power switch to the "On" position.
If you reset the camera to the factory default, the camera name and WiFi password will also be reset to the factory default password (12345678), and the camera settings will need to be reconfigured in the app.
Setting up a wildlife camera in the app
To set up and access the wildlife camera from the app, you must be within 10 meters of the camera! Make sure to activate the Bluetooth and WLAN functions on your smartphone.
Then open the app on your smartphone. After the start screen, the selection window for the camera(s) will appear. If a camera has not yet been set up, click the plus sign on this screen to add a new wildlife camera to the app.
If cameras have already been added, the selection window will display icons for those cameras instead of the plus sign. If you want to add another camera, select the "Add" option at the bottom of this selection screen.
The camera setup wizard will now open. Using the "Pair" option, the app will search for available wildlife cameras and will display a list of all cameras in the area around you. Select the camera you wish to pair by tapping on its name. As long as no name has been assigned to the camera, the camera will be displayed here as "WildCam-XXXX", otherwise with the name of the camera already assigned. Confirm your selection with "Next". To establish the Bluetooth connection between the camera and the smartphone, enter the Bluetooth password.
This is identical to the WiFi password. You can find the password in the "WiFi password" option in the camera's menu. The factory default password is "12345678". After entering the password, tap on "Connect".
The Bluetooth connection between your smartphone and the camera is established and confirmed in the following screen. Tap on "Next".
The next step is to establish a WiFi connection to your camera. Tap on "Connect" in the new setup window and then tap on "Device Settings" on the screen that follows.
The "Connection" menu on your phone will now open and show you all available WiFi networks. Select the "WildCamXXXX" network. If you have already assigned a new name to the camera via the menu, the camera's network will be displayed with that name.
This procedure refers to setting up the camera with an iOS operating system. With an Android system, the smartphone automatically connects to the camera's WiFi network.
When the WiFi connection between the wildlife camera and the smartphone has been established, please switch back to the app. The connection is now confirmed by the app. Click on "Next". The selection window of all connected cameras will appear. To connect more cameras to the app, click "Add" on this page.
To access a desired camera, select the image representing the camera. The options screen will open and display the current status of the camera. You will see the currently selected "Capture Mode", current "Battery Status" and the remaining free space on the memory card. You will also be offered the options "Overview", "Media", "Settings" and "Disconnect Camera".
Overview
Tap on the "Overview" option in the options screen. The overview page will open. Here, you can see the current capture settings of your wildlife camera, as well as information on the battery status, memory card, and the photo and video resolution settings. You cannot change any settings here. This page is only used to provide you with a clear overview of this information. To exit the "Overview" option, tap on "Back" in the top left corner.
The "Media" option gives you access to the photos and videos that have been recorded by the camera. You can choose from a selection of photos and videos that can be downloaded via WiFi from the camera to your phone.
Tap on "Media" in the Options screen. The media gallery will now open. At the bottom of the display, you can choose to view your photos l Videos
Using the symbol, you can choose between image preview and list. To select the files that you wish to download or delete on your phone, tap on each file. Using the symbol, you can select or deselect all of the files you wish to download
and delete - and then either download or delete them. You can find the downloaded files in the gallery of your smartphone, or on your Android device in a subfolder of the gallery. To leave the "Media" (E) option, tap on "Back" in the upper left corner.
Previewing the photos and videos may take a few seconds, depending on the number of files.
Settings
The "Settings" option allows you to change all settings on your camera via the "MINOX WiFi Wildlife Camera" app.
Tap the "Settings" option in the options screen. The "Settings page" will now open and offer you various categories for setting changes.
The individual setting options of these categories are explained in the following chapter.
Icon
Change the camera icon for the installed camera. By tapping on the camera icon, the smartphone gallery will now open. Choose an image that you wish to use as an icon to represent your camera.
Name
Enter a new name for the wildlife camera so that the cameras can be uniquely identified if several cameras will be or have been installed. The name of the camera may contain a maximum of 13 characters, consisting of upper- and lower-case letters and numbers (e.g. Garden01).
After changing the name, the Bluetooth ID and WiFi ID (SSID) of the camera will change to the newly assigned name. After saving the new name, the camera will restart and the app will jump back to the camera selection window. Tap the icon of the camera. The Bluetooth connection will be automatically re-established. The WiFi connection setup will now be displayed. Tap on "Device Settings" and select the WiFi network of the camera, which is now displayed under the newly assigned name of the camera (e.g. Garden01). This procedure refers to setting up the camera using an iOS operating system. With an Android system, the smartphone automatically connects to the camera's WiFi network.
Enter the WiFi password again. After the WiFi connection has been re-established, the camera can be selected under its new name in the selection window of the camera (Fig.3).
Notes
Here you can enter notes, such as the location of the camera. Save your changes and entries with the "Save" button or cancel the process with "Back".
Capturing
Delay
Set the length of time between each shot.
Mode
Set the capture mode of the camera. You can choose between photo, video or both (photo & video). Save your changes and entries with the "Save" button or cancel the process with "Back".
Photo
Photo size
Set the photo resolution.
Number of photos
Select the number of photos taken when motion is detected.
Interval shots
Activate interval shots. After activating interval shots, you can set the length of time between one shot to the next.
Save your changes and entries with the "Save" button or cancel the process with "Back".
Video
Video size
Set the video resolution.
Video length
Select the length of the video recording, when motion is detected.
Record sound
Activate sound recording for videos. Save your changes and entries with the "Save" button or cancel the process with "Back".
Time
Timer
Set up to 2 automatic start and stop times during which the camera is activated and deactivated.
Choose between a 12- or 24-hour time format.
Time stamp
Turn the time on or off to be displayed in recorded photos and videos.
Save your changes and entries with the "Save" button or cancel the process with "Back".
System
IR light
Set the IR LED light intensity in your wildlife camera.
Automatic The IR illumination depends on the existing voltage of the batteries. If the batteries are full, the IR LEDs light up at full power. When the voltage of the batteries decreases, the power of the IR LEDs is halved in order to provide a longer operational time of the wildlife camera.
High The IR LEDs always light up at full intensity.
Low The IR-LEDs always light up a half intensity.
Acoustic signal
Activate or deactivate the acoustic signals on your camera.
Automatic deactivation
Select the period of time during which the wildlife camera is to be automatically switched off in SETUP mode if no control button has been pressed.
Duration of illumination
Select the period of time during which the wildlife camera monitor will automatically turn off in SETUP mode if no control button has been pressed.
Select the menu language for your wildlife camera.
Format the memory card in your wildlife camera. When formatting, all data on the memory card will be irretrievably deleted! Make sure that you have transferred any files to your smartphone or computer before formatting your card.
Save your changes and entries with the "Save" button or cancel the process with "Back".
Firmware
WiFi
Information about the current WiFi firmware in your camera. Updating is not possible via the app. If important updates are provided by the manufacturer, you will be notified via the app.
Camera
Information about the current WiFi firmware in your camera. Updating is only possible directly via the camera. If important updates are provided by the manufacturer, you will be notified via the app and the manufacturer's homepage (www.minox.com). To leave this page tap on "Back".
Delete camera
Use this function to delete the currently connected wildlife camera from the app. To access this camera again, you must reconnect the camera to the app. See "Setting up a wildlife camera in the app".
Disconnect camera
Use the "Disconnect camera" feature to send any changes made within the app's settings menu to the camera. The new settings are applied and the WiFi connection to the phone is terminated. Changes are also automatically submitted and applied 3 minutes after you close the app.
Accessing a previously installed camera in the app
After you have set up the wildlife camera and installed it at its location, you will want to access the camera after a certain period of time to view the photos or videos, or to change the settings of the camera. Proceed as follows.
- Move within a maximum radius of 10 meters from the camera. Activate the Bluetooth and WLAN settings on your smartphone.
- Open the app. After the start screen, you are will now see the selection window listing all of the connected cameras. Tap on the camera you wish to access.
- The Bluetooth connection between the camera and the smartphone will be automatically established. After the connection has been completed, the WIFI setup wizard will open.
- Click on "Device settings" and connect your phone to the camera's WiFi network (the network name is the same as the camera name). This procedure refers to setting up the camera using an iOS operating system. With an Android system, the smartphone will automatically connect to the camera's WiFi network.
- Go back to the app. The options screen will open automatically. You now have access to the "Overview", "Media", "Settings" and "Disconnect camera" options and can view the status of the camera, transfer or delete your photos or videos to your phone, or change and transfer camera settings to the camera.
TROUBLESHOOTING
| Problem | Solution |
| Camera does not turn on. | Replace all batteries with fresh ones.
(see chapter “Inserting or changing the batteries”) |
| Camera does not take photos / record videos. | Check the batteries and replace them if necessary.
Reset the camera to factory default.
(see chapter “Settings menu (MENU)”).
Insert a new memory card. |
| Night images are too dark. | Check that the power saving mode is set to “ON” and replace the batteries. |
| Camera turns off with a countdown after power is turned on. | In live mode, the wildlife camera switches off after a short countdown to enter standby mode. If the motion sensors detect motion, the wildlife camera automatically switches on and takes pictures in accordance with the current settings. |
| Only photos are taken even though the wildlife camera is in “Photos & videos” mode. | Check the “Video length” and “Delay” settings. Reset the camera to factory default if necessary. |
| Forgot camera password. | Contact the MINOX customer service. |
| “Batt. low” is displayed. | The batteries are low on power and must be exchanged. |
| Photos without animals. | Make sure that there are no branches or other objects in the motion sensor's detection range that could trigger unwanted images due to movement. |
| Overexposed night images. | Make sure that the camera is mounted at spot where it cannot be influenced by reflecting signs, windows or similar. |
| WiFi connection of the wildlife camera does not connect to your mobile device. | Check if your mobile device meets the minimum requirements of iOS 10 or newer, or Android 4.4 or newer. Smartphones with Android must have Bluetooth LE support. |
| Static discharge may cause the device to no longer function as desired. | In this case, please switch off the device and switch it on again after about 10 seconds. The device should now function as it should. |
TECHNICAL DATA
Model: DTC 550 WiFi
Image sensor: 1/3^ , 4-megapixel CMOS sensor
Photo resolutions: 16 MP: 5,376 x 3,024 (interpolated)
12 MP: 4,608 × 2,592 (interpolated);
8 MP: 3,840 × 2,160 (interpolated);
4 MP: 2,688 × 1,512; 2 MP: 1,920 × 1,080;
0.3 MP: 640 × 480
Display: 6 cm (2.36") TFT LCD color display;
480× 234 Pixel
External memory: SD/SDHC and microSD/ SDHC memory cards with a minimum
speed class 10 (Class 10) up to 32 GB (optional)
Video resolution: 1,920 × 1,080 (30fps),
1,920× 1,080 (15fps),
1,280× 720 (30fps),
848 × 480 (30fps),
720 × 480 (30fps)
Lens: f = 7.45 mm ; F / N O = 2.4 ; F O V = 46^
Auto IR filter
Range of focus: Day: 1 m - infinity; night: 15 m
Range: up to 20 meters
Trigger release: approx. 0.4 seconds
IR flash range: 15 meters
Detection range: Motion sensor: 40^
IP protection: IP54 (protected against dust and splashing water)
File formats: Photo: JPEG; Video: AVI motion JPEG
Ports: Mini-USB 2.0 (USB)
WLAN security: WPA2 PSK AES
Bluetooth version: 4.2 BLE
Bluetooth profile: Max. Bluetooth BLE GATT
Transmission power: -15 dBm
Signal range: 10 meters
Bluetooth frequency band: Bluetooth 2.4 GHz
Frequency range: 2402 - 2480 MHz
Power supply:
8x type LR6 (AA) batteries; or 8x type HR6 (AA) NiMH rechargeable batteries with low self-discharge at 2,000mAh ; external 6 V mains adapter, min. 2 A
Standby time: approx. 6 months (with 8x AA batteries)
Dimensions: approx. 135mm (H) × 101mm (W) × 72mm (D)
Illumination: LED
WLAN standards: 802.11 b/g/n - Design and technical data can be changed without max.
radio frequency announcement.
WiFi: 2472 MHz
Recommended storage
temperature: -20^ to +40^ Celsius
Recommended temperature
for use: -20° to +40° Celsius
Weight of wildlife camera: 300g
STORAGE
When not in use, disconnect the wildlife camera from the power supply and store it out of the reach of children in a clean and dry place. Remove the batteries before storing.
To avoid damage during transport, pack the wildlife camera in its original packaging.
CLEANING
SHORT-CIRCUIT HAZARD! Water that has penetrated the housing can cause a short circuit. Never submerge the wildlife camera in water. Make sure that no water gets inside the housing.
RISK OF DAMAGE! Improper handling of the wildlife camera may result in damage.
- Do not use any aggressive solvents/cleaning agents, brushes with metal or nylon bristles, or sharp or metallic cleaning objects such as knives, hard spatulas and similar. These can damage the surfaces.
- Never put the wildlife camera into a dishwasher. This will destroy the camera.
- If the camera is connected to an external power source, detach the camera before cleaning it.
- Detach all connections.
- Remove all of the batteries.
- Wipe the outside of the camera off with a slightly moistened cloth. Afterwards, let the wildlife camera dry completely.
TABLE DES MATIÈRES
Aperçu 47
Avant-propos 48
Généralités 49
Réglages (mode Test)
Taille des photos: 0,3 MP, 2,0 MP, 4,0 MP, 8,0 MP, 12 MP, 16 MP
4 MP: 2.688 × 1.512; 2 MP: 1.920 × 1.080;
0,3 MP:640×480
1.920 × 1.080 (15 fps),
1.280 × 720 (30 fps),
848 × 480 (30 fps),
720 × 480 (30 fps)
Portedu flash IR:15 metres
Ports: Mini-USB 2.0 (USB)
Securité WLAN: WPA2 PSK AES
Version Bluetooth: 4.2 BLE
Bluetooth Profil : Max. Bluetooth- BLE GATT
Portedu signal:10 metres Bande
Disparo a intervals: Off/On
En los modos SETUP y OFF,又能 utilize the cable USB inductively to transfer data from the USB port to the network.
1.920 × 1.080 (15 fps),
1.280 × 720 (30 fps),
848 × 480 (30 fps),
720 × 480 (30 fps)
Dimensione delle fotto: 0,3 MP, 2,0 MP, 4,0 MP, 8,0 MP, 12 MP, 16 MP
1.920 × 1.080 (15fps),
1.280 × 720 (30fps),
848 × 480 (30fps),
720 × 480 (30fps)
Obiettivo: f = 7.45 mm ; F / N O = 2.4 ; F O V = 46^
filtro IR Auto