
UDP20EW - Dehumidifier SHARP - Free user manual and instructions
Find the device manual for free UDP20EW SHARP in PDF.
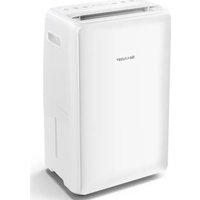
| Product type | Dehumidifier |
| Brand | Sharp |
| Model | UDP20EW |
| Dimensions (W x H x D) | 355 x 567 x 259 mm |
| Net weight | 15.5 kg |
| Power supply | 220-240 V ~ 50 Hz |
| Maximum power consumption | 330 W |
| Water tank capacity | 3.8 L |
| Dehumidification (30 °C, 80% RH) | 20 L/day |
| Dehumidification (27 °C, 60% RH) | 11 L/day |
| Recommended room area | 35 to 46 m² |
| Refrigerant | R290 (propane) - 60 g |
| Fan speeds | 2 (low and high) |
| Operating modes | Dehumidification, Clothes drying |
| Special functions | Timer (1-8h), Child lock, Oscillation, Auto defrost, Continuous drainage, Mode memory |
| Filter type | Washable dust filter |
| Maintenance | Regular cleaning of filter and tank |
| Safety | Auto shut-off when tank full, Compressor protection, High/low temperature protection, Low humidity protection |
| Repairability | Have it serviced by a Sharp authorized professional |
| Power cord length | 2 m |
| Operating temperature | 5 °C to 35 °C |
Frequently Asked Questions - UDP20EW SHARP
User questions about UDP20EW SHARP
0 question about this device. Answer the ones you know or ask your own.
Ask a new question about this device
Download the instructions for your Dehumidifier in PDF format for free! Find your manual UDP20EW - SHARP and take your electronic device back in hand. On this page are published all the documents necessary for the use of your device. UDP20EW by SHARP.
USER MANUAL UDP20EW SHARP
CE
Sharp Consumer Electronics Poland sp. z o.o.
Made in China
[Unreadable]
www.sharpconsumer.eu
SHARP
User manual
UD-P16E-W
UD-P20E-W
Dehumidifier
ENESITNLDEFRPL
□ □ □ □

natural_image
3D model of a rectangular device with dimension annotations (20 cm, 25 cm) and grid background, no readable text or symbols beyond measurement labels

EN: Thank you for purchasing this SHARP Dehumidifier. Please read this manual carefully before using the product. This manual should be kept in a safe place for handy reference.
EN: For service and your warranty rights go to www.sharpconsumer.com/support/ or contact the retailer where you purchased your product.
EN: Declarations of Conformity are available from www.sharpconsumer.com/documents-of-conformity/
Please read before operating your new Dehumidifier
- The dehumidifier draws air in through the air intake via the dust filter. This air is cooled to release the moisture and then exits the unit via the louvered vent at the top.
- The dehumidifier is designed to remove moisture from the air and collect this in its internal water tank for disposal. The process to remove moisture can take many hours and is not instantaneous. Depending on the size of the room and sources of moisture, not all moisture will be removed from the air.
- Do not install and use the unit before carefully reading this instruction guide. Please keep this manual for product warranty and future use.
- Use your dehumidifier with the correctly specified mains supply voltage.
- Do not place the machine near the any heat sources as this may cause damage to the cabinet or cause a fire.
- Do not expose the unit to direct sunlight as this will avoid the decolouring of the plastic parts.
- Do not operate the machine in place with dust or corrosive/flammable/explosive gas.
- Give guidance if used by children.
- Never disassemble the unit.
- Do not repair or replace the unit's spare parts by yourself. Only allow a professional person to repair the appliance.
- Place the machine in the flat and stable surface to prevent vibration and noise.
- Unplug from the mains supply when not in use.
- Never cover the machine when it is running.
- Make sure the air inlet and outlet are not blocked while in use.
- Do not spray water on the unit, as spraying water may cause malfunctioning and electric shock.
- Never pull the mains plug when your hands are damp or wet.
• Always switch off before unplugging to avoid electric shock. - If you are not going to use the dehumidifier for a long time, turn off and unplug the mains plug, then pour away any water in the tank and wipe it clean.
- Do not pull the mains cable as this may cause damage.
- Dot not insert finger other small parts into the air inlet or outlet, to prevent contact the live part inside or the rotating blower. It will damage the machine and cause danger.
- Before moving, pour the water out of the tank.
- When used in a low temperature and high humidity environment, i.e., during winter, please set the unit operating in dry clothes mode. In this condition the dehumidifier can operate continuously whatever the relative humidity is.
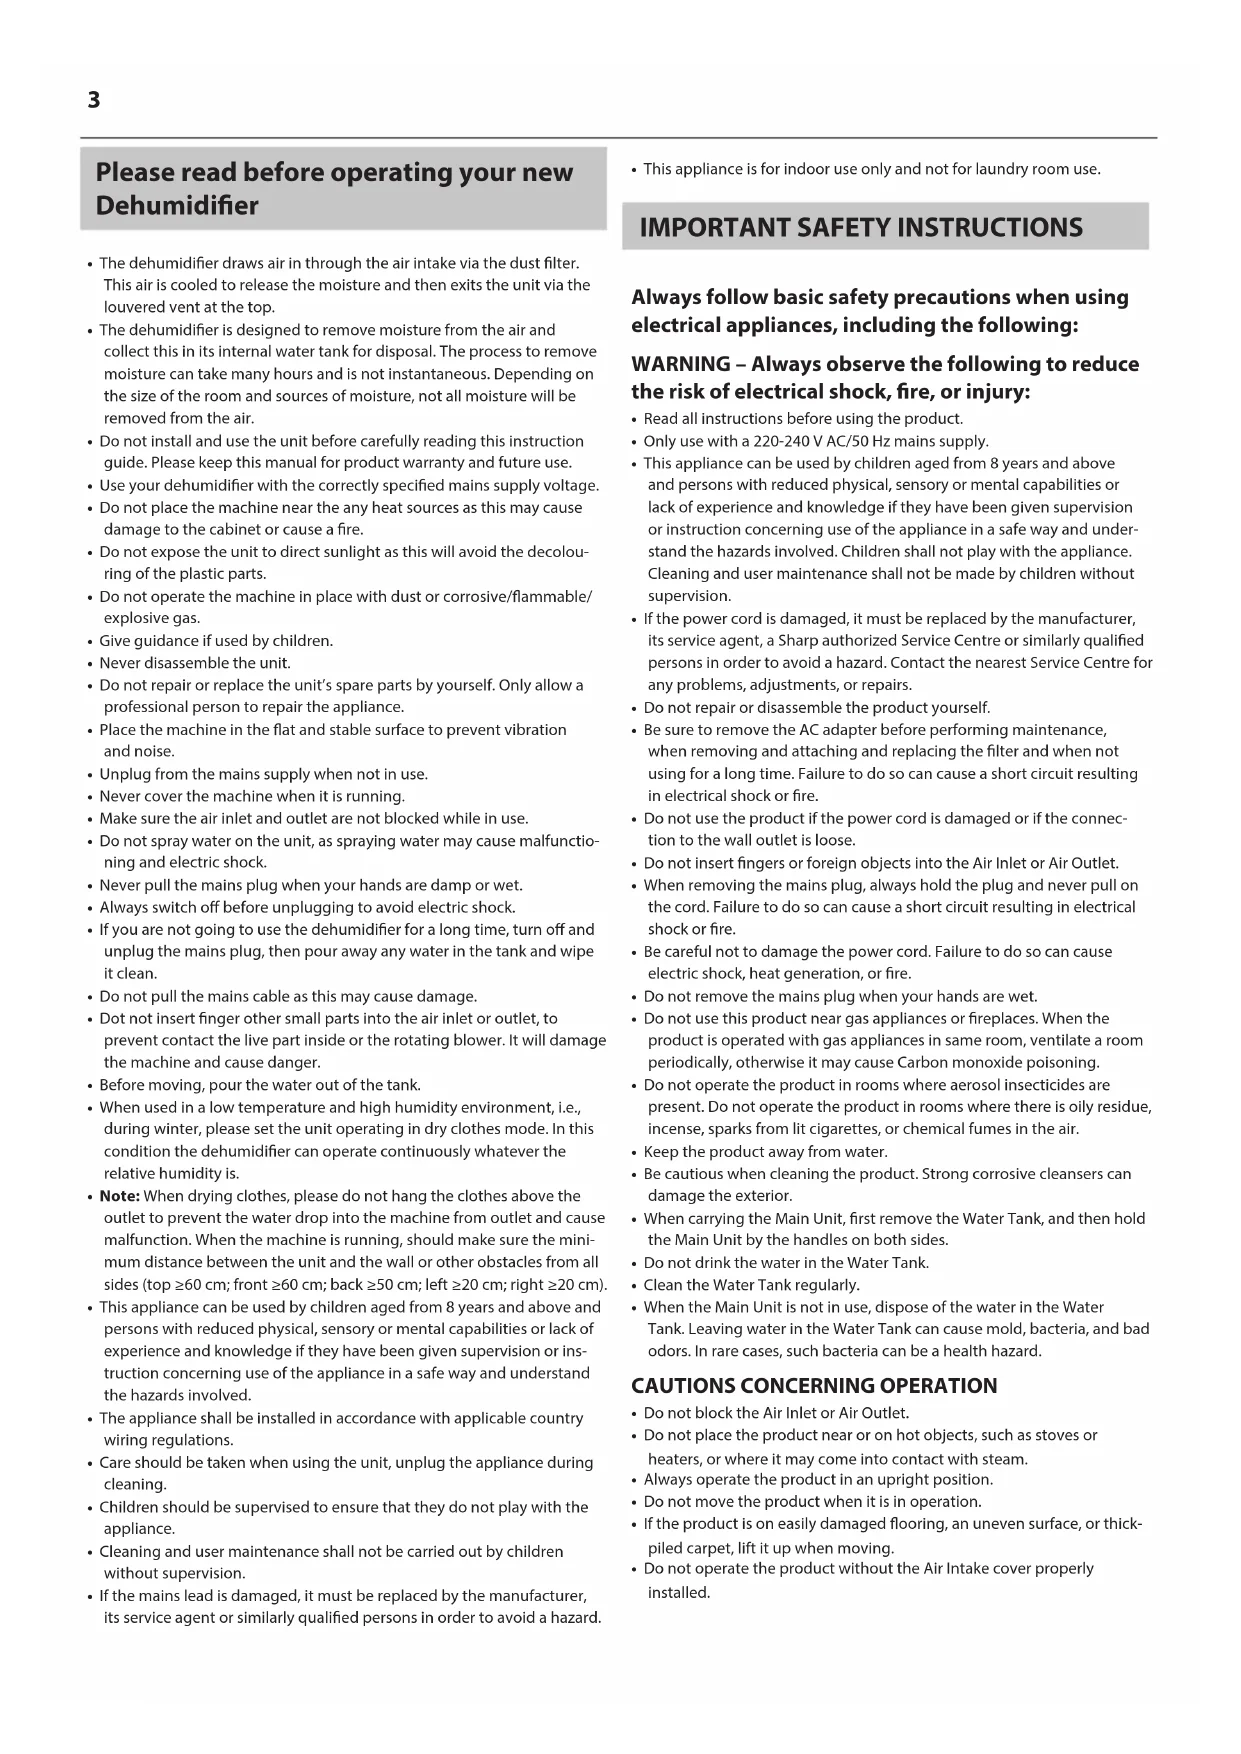
- Note: When drying clothes, please do not hang the clothes above the outlet to prevent the water drop into the machine from outlet and cause malfunction. When the machine is running, should make sure the minimum distance between the unit and the wall or other obstacles from all sides (top ≥60 cm; front ≥60 cm; back ≥50 cm; left ≥20 cm; right ≥20 cm).
- This appliance can be used by children aged from 8 years and above and persons with reduced physical, sensory or mental capabilities or lack of experience and knowledge if they have been given supervision or instruction concerning use of the appliance in a safe way and understand the hazards involved.
- The appliance shall be installed in accordance with applicable country wiring regulations.
- Care should be taken when using the unit, unplug the appliance during cleaning.
- Children should be supervised to ensure that they do not play with the appliance.
- Cleaning and user maintenance shall not be carried out by children without supervision.
- If the mains lead is damaged, it must be replaced by the manufacturer, its service agent or similarly qualified persons in order to avoid a hazard.
- This appliance is for indoor use only and not for laundry room use.
IMPORTANT SAFETY INSTRUCTIONS
Always follow basic safety precautions when using electrical appliances, including the following:
WARNING – Always observe the following to reduce the risk of electrical shock, fire, or injury:
- Read all instructions before using the product.
- Only use with a 220-240 V AC/50 Hz mains supply.
- This appliance can be used by children aged from 8 years and above and persons with reduced physical, sensory or mental capabilities or lack of experience and knowledge if they have been given supervision or instruction concerning use of the appliance in a safe way and understand the hazards involved. Children shall not play with the appliance. Cleaning and user maintenance shall not be made by children without supervision.
- If the power cord is damaged, it must be replaced by the manufacturer, its service agent, a Sharp authorized Service Centre or similarly qualified persons in order to avoid a hazard. Contact the nearest Service Centre for any problems, adjustments, or repairs.
- Do not repair or disassemble the product yourself.
- Be sure to remove the AC adapter before performing maintenance, when removing and attaching and replacing the filter and when not using for a long time. Failure to do so can cause a short circuit resulting in electrical shock or fire.
- Do not use the product if the power cord is damaged or if the connection to the wall outlet is loose.
- Do not insert fingers or foreign objects into the Air Inlet or Air Outlet.
- When removing the mains plug, always hold the plug and never pull on the cord. Failure to do so can cause a short circuit resulting in electrical shock or fire.
- Be careful not to damage the power cord. Failure to do so can cause electric shock, heat generation, or fire.
- Do not remove the mains plug when your hands are wet.
- Do not use this product near gas appliances or fireplaces. When the product is operated with gas appliances in same room, ventilate a room periodically, otherwise it may cause Carbon monoxide poisoning.
- Do not operate the product in rooms where aerosol insecticides are present. Do not operate the product in rooms where there is oily residue, incense, sparks from lit cigarettes, or chemical fumes in the air.
- Keep the product away from water.
- Be cautious when cleaning the product. Strong corrosive cleansers can damage the exterior.
- When carrying the Main Unit, first remove the Water Tank, and then hold the Main Unit by the handles on both sides.
- Do not drink the water in the Water Tank.
- Clean the Water Tank regularly.
- When the Main Unit is not in use, dispose of the water in the Water Tank. Leaving water in the Water Tank can cause mold, bacteria, and bad odors. In rare cases, such bacteria can be a health hazard.
CAUTIONS CONCERNING OPERATION
- Do not block the Air Inlet or Air Outlet.
- Do not place the product near or on hot objects, such as stoves or heaters, or where it may come into contact with steam.
• Always operate the product in an upright position. - Do not move the product when it is in operation.
- If the product is on easily damaged flooring, an uneven surface, or thick-piled carpet, lift it up when moving.
-
Do not operate the product without the Air Intake cover properly installed.
-
Clean the exterior with a soft cloth only. Do not use volatile fluids or detergents. The product surface may be damaged or cracked with Benzine paint thinner, alcohol or polishing powder.
- Do not get or lean on the product.
Locating the Unit
Avoid locations where furniture, fabrics, or other objects can come in contact with the product and interfere with the Air Inlet and Air Outlet. Avoid locations where the product is exposed to condensation or drastic changes in temperature. Appropriate room temperature is between 0 °C to 35 °C.
Place the product on a level and stable surface with sufficient air circulation. Place the product in the centre of the room for better air circulation. When placed on heavy carpet, the product may vibrate slightly. Avoid locations with grease, oil smoke, alcohol, hypochlorous acid, or chemicals in the air. Doing so can cause the product exterior to crack. The surrounding walls and floor of the product may become dirty over time. When using the product for an extended period of time at the same location, periodically clean the walls and floor adjacent to it.
Attention:
Your product is marked with this symbol. It means that used electrical and electronic products should not be mixed with general household waste.
There is a separate collection system for these products.

Information on Disposal for Users (private households)
In the European Union
IF YOU WISH TO DISPOSE OF THIS EQUIPMENT, DO NOT USE THE ORDINARY WASTE BIN, AND DO NOT PUT THEM INTO A FIREPLACE!
Used electrical and electronic equipment should always be collected and treated SEPARATELY in accordance with local law.
Separate collection promotes an environment-friendly treatment, recycling of materials, and minimizing final disposal of waste. IMPROPER DISPOSAL can be harmful to human health and the environment due to certain substances! Take USED EQUIPMENT to a local, usually municipal, collection facility, where available.
If in doubt about disposal, contact your local authorities or dealer and ask for the correct method of disposal.
ONLY FOR USERS IN THE EUROPEAN UNION, AND SOME OTHER COUNTRIES; FOR INSTANCE NORWAY AND SWITZERLAND: Your participation in separate collection is requested by law.
The symbol shown above appears on electrical and electronic equipment (or the packaging) to remind the users of this.
Users from PRIVATE HOUSEHOLDS are requested to use existing return facilities for used equipment. Return is free of charge.
If the equipment has been used for BUSINESS PURPOSES, please contact your SHARP dealer who will inform you about take-back. You might be charged for the costs arising from take-back. Small equipment (and small quantities) might be taken back by your local collection facility. For Spain: Please contact the established collection system or your local authority for take-back of your used products.
In other Countries outside the EU
If you wish to discard this product, please contact your local authorities and ask for the correct method of disposal.
For Switzerland: Used electrical or electronic equipment can be returned free of charge to the dealer, even if you don't purchase a new product.
Further collection facilities are listed on the homepage of www.swico.ch or www.sens.ch.
Information on Disposal for Business Users.
In the European Union
If the product is used for business purposes and you want to discard it: Please contact your SHARP dealer who will inform you about the take-back of the product. You might be charged for the costs arising from take-back and recycling. Small products (and small amounts) might be taken back by your local collection facilities.
For Spain: Please contact the established collection system or your local authority for take-back of your used products.
In other Countries outside the EU
If you wish to discard of this product, please contact your local authorities and ask for the correct method of disposal.
Flammable material. This appliance contains R290/Propane a flammable refrigerant. Do not attempt to re-gas the appliance. Do not release refrigerant to the atmosphere.
Installation
BEFORE FIRST USE Let the machine stand for 4 hours as this will allow the refrigerant to settle.
- Your dehumidifier must be operated in an enclosed area to be most effective.
- Close all doors, windows, and other outside openings to the room. The effectiveness of the dehumidifier depends on the rate at which new moisture-laden air enters the room.
- Place dehumidifier in a location that does not restrict airflow through the front of the unit.
- A dehumidifier operating in a room will have little or no effect in drying an adjacent enclosed storage area, such as a closet, unless there is adequate circulation of air in and out of the area. let may be necessary to install a second dehumidifier in the enclosed area for satisfactory drying.
- Ensure that the unit is placed on a stable and flat surface. If the surface is not stable there is a risk that the unit may be unstable and cause excessive vibration and that water will be released.
- The dehumidifier must have at least 20 cm free space around it. Refer to the 📂 1 on page 1.
Operating environment
• Working temperature: 5 °C to 35 °C.
- This machine is suitable for indoors, e.g. Living room, study, office room, warehouse, basement, underground garage.
- Make sure the door and window are closed before turning on the unit to get the best result.
- Ensure that the unit is placed on a stable and flat floor surface. If the floor's surface is not even, there is a risk that the unit may be unstable and topple over. Also excessive vibration and noise may be result.
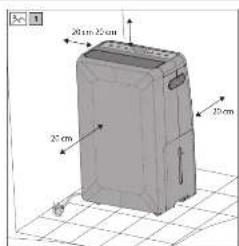
Components diagrams – parts names
Refer to the 2 and 3 on page 1 for the location of the following parts:
- Top casing
- Handle
- Control panel
- Front cover
- Louver (air outlet)
- Mains lead and plug
- Castor
- Water tank
- Drain pipe (not supplied)
- Air intake and dust filter
Operating Introduction – How to operate
Control panel
Refer to the 4 of the control panel on page 1.
The name and function of control panel
- POWER – Press this button to switch the power on and off.
- MODE – Press this button to set the dry clothes mode or dehumidify mode
- HUMIDITY – Press this button to set the desired humidity.
-
TIMER/LOCK – Press this button to set the machine shutdown time. The display will show the shutdown time accordingly. Press this button for 3 seconds, could turn on or off the child lock function, the lock icon will show or off on the display.
-
SPEED – Press this button to adjust the fan speed (there are 2 fan speeds).
-
SWING – Press this button to turn on or off the swing function.
-
ON/OFF INDICATOR – Lights up when the unit is on, turns off when unit is off.
-
DRY INDICATOR – Turns on during the drying function.
-
DEHYMIDIIFNG INDICATOR – Turns on when the unit is dehumidifying.
-
DEFROST INDICATOR – Lights up when the unit is in the defrost mode.
-
DISPLAY – Shows the current status of the dehumidifying function (humidity in the air) and other functions.
-
TANK FULL – Lights up when the water tank is full.
-
KEY LOCK INDICATOR – When the key lock is active, this indicator lights up.
-
TIMER ON INDICATOR – When the timer is active, this indicator lights up.
-
FAN SPEED INDICATOR – When the speed of the fan is high or low the respective light illuminates.
-
LOUVER ON INDICATOR – When the louver is in operation, this indicator turns on.
Operating introduction
Power on
Plug in the appliance to the mains supply and press the POWER button, it will start and the air outlet louver will open.
When powered on, the unit will start to dehumidify with the fan set to high. The compressor will activate after three minutes.
If the appliance is turned off via the POWER switch and not unplugged from the mains supply, it will start up again in the same mode.
Power off
While the appliance is operating, press the POWER button to turn it off.
Mode setting button
You can change the mode of the dehumidifier to dry clothes or dehumidify. To do this press the MODE button.
-
Dry Clothes Function: When the DRY indicator is illuminated the unit will continually dehumidify whatever the ambient humidity is. The fan speed will be locked in the DRY function and can not be changed.
-
Dehumidify Function: When the DEHUMIDIFY indicator is illuminated the unit will dehumidify the air. While in this mode, the fan speed can be set and the humidity setting can be controlled.
Humidity setting
To change the humidity level, press the humidity setting button, each time the button is pressed, the display will change as follows CO\~40%\~45%\~50%\~55%\~60%\~65%\~70%\~CO. After setting the humidity level, the display will revert to the current moisture level detected by the internal sensor. When the machine detects that the ambient humidity is 2 % lower than the set humidity, the machine will stop dehumidifying, the fan will keep working in low speed. When the machine detects that the ambient humidity is 2 % higher than the set humidity, the machine will start dehumidifying and the fan come back to work at set speed. When the ambient humidity is ≤30 %, the LO icon will be displayed; When the ambient humidity is ≥80 %, the HI icon will be displayed. CO means Continuously dehumidify whatever the ambient humidity is. The machine default setting is CO when switch on the machine in the beginning.
When operating in the dry clothes function, the machine is running in CO status.
Timer
To start the timer function, press the TIMER button; the timer indicator will illuminate. On each press of the TIMER button, the display will change from 1 to 8 hours in 1 hour steps. 0H means that the timer mode is canceled. While in the timer mode, if the water tank is full or if it enters the auto defrost mode, the unit will stop.
Fan Speed setting
To control the speed of the fan, press the FAN button. There are two fan speeds which are low or high; each time the FAN button is pressed, the speed of the fan toggles between these two speeds. Note that the fan speed can not be set while in the DRY function.
Swing
To make the air outlet louver open and close continually, press the SWING button. Pressing the SWING button again disables this function.
Lock function
To prevent accidental operaiton of the unit, the keypad can be locked.
Memory function
- If the unit is turned off via the POWER button, when turned back on again it will resume from the function it was turned off in. Note that if the timer was set or if the unit was in the lock mode, these settings are not stored.
- If the mains power is disconnected while the unit is operating, it will not start automatically when the mains is reconnected. When the mains power is applied again, you will need to press the POWER button to restart operation. The unit will start up in the initial mode.
Water tank full auto-stop function
When the water tank is full, the unit will stop operation, the air outlet louver will close and a buzzer will sound. To reset, remove the water tank, empty and replace. When the empty water tank is put back into the unit, it will restart. Note that the compressor will take about 3 minutes to operate.
Auto defrost
If the unit is used in a low temperature environment, the internal evaporator may be covered by frost. In order to make sure the machine operates normally, the machine has auto-defrost function. Should the internal sensor detect a temperature of ≤-1 ^ the machine will enter auto-defrost function. That means it will run continuously in the dehumidification mode for 30 minutes, then the machine will start the defrost cycle, the DEFROST light will illuminate, the compressor will stop and that fan will operate at high speed.
When temperature of evaporator is ≥2 ^ and the unit has been in the defrost mode for 10 minutes, the auto-defrost mode will turn off and the compressor turns on. At this point the unit will start to dehumidify and the DEFROST light will turn off.
While in the defrost mode and the temperature of the evaporator is ≥0^ for two minutes, the defrost function is cancelled.
Compressor protection function
Should there be a problem with the unit causing the compressor to stop, the compressor will turn off for 3 minutes. Normally the compressor will restart after 3 minutes, if it does not unplug the unit for an hour and try again. If it still does not start, call for service.
High/Low temperature protection function
If the unit detects that the ambient temperature is outside of the normal operating range of 5 °C to 38 °C, it will shut down. When the normal operating range is reached, the compressor will start. Note that it will take the compressor 3 minutes to start working once the normal temperature range is met.
Low humidity protection function
If the unit detects low humidity of <30% the display will indicate LO and it will stop any dehumidifying action and the fan will operate a the lowest speed.
If the humidity is over 80 %, the display will indicate HI and keep dehumidifying.
High temperature fan speed switch function
When the unit is dehumidifying in a high temperature environment and the fan speed is set to low, it will switch automatically to the high speed. This is to prevent excessive load on the compressor. When the ambient air temperature reduces, the fan speed will return to the low setting.
Error codes
There are number of error codes which may appear in the display, these are as below. When the error code is displayed, it will flash. If any of these error codes are experienced, call for service.
C1 – Indicates that there is a fault with the evaporator temperature sensor. In this condition, the unit will stop working.
C2 – Indicates that there is a fault with the ambient air temperature sensor. In this condition, the unit will stop working.
C8 - The temperature of the evaporator checked every 8 minutes, if this is within ≤ 3^ of the ambient air temperature for 5 consecutive checks, the unit will shut down and the error code C8 is displayed.
Continuous drainage function
Should it be necessary to provide continuous drainage, this can be achieved by fitting a 15 mm inner diameter pipe to the drainage hole on the rear of the unit. When installed, water will drain through the pipe and not into the water tank.
Ensure that the drainage pipe runs in a downwards direction, and it not bent or damaged in any way so that the water runs freely out of the unit. When fitting the drainage pipe, make sure that it is pushed all the way into the drainage hole so that it pushed over the drain outlet which is located about 70mm inside the unit from the rear cover of the unit.
Refer to the 📂 3 on page 1 for the location of the drainpipe connection port.
Maintenance
When cleaning your dehumidifier:
- Use a soft clean cloth.
- Do not use the alcohol, gasoline, and other benzene chemical solvents.
- To clean the filter, remove it, then use a vacuum cleaner to clear any dust which may have built up. If necessary, use water to clean, then place it in ventilated area until dry.
- Unplug the unit from the mains supply before cleaning.
Other advice:
- Before moving the unit, unplug the mains supply and pull out the water in tank.
- If not using the unit for a long time, unplug the unit from the mains supply, empty the water tank, wait for 2 days to make sure the unit inside completely dry before packing.
• Always store the unit in an upright position. - Do not tilt the unit horizontally or turn upside down.
- If the unit requires repair, seek help of a professional person.
Troubleshooting
| Problem Cure | |
| Dehumidifier does not work | Check that the unit is plugged into the mains supply and turned on.Check that the water tank is not full. If it is full, empty the tank. |
| Does not dehumidify | Check that the water tank is installed correctly.Check that the water tank is not full. If it is full, empty the tank.Clean the air filter.Ensure that the air flow through the unit is not obstructed. |
| Does not remove enough moisture from the air | Reduce ventilation (closed doors and windows).Ensure that there are not too many sources of humidity.Ensure that the unit is not being used to dehumidify a room in excess of the size noted in the specificaitons. |
| Unit does not run smoothly on the castors | Ensure that the castors are clean and not clogged with debris. |
What to do if the product interferes with radio or TV reception.
If the dehumidifier interferes with radio or television reception, try one or more of the following measures:
- Adjust or reposition the receiving antenna.
- Increase the distance between the product and the radio or TV.
- Connect the equipment into an outlet on a circuit different from that of the radio or TV receiver.
- Consult the dealer or a qualified radio or TV technician.
Technical specification
| Model UD-P16E-W UD-P20E-W | |||
| Dehumidification (Litres per day) | 30 °C, 80% RH 16 20 | ||
| 27 °C, 60% RH 9 11 | |||
| Rated voltage 220–240 V AC /50 Hz 220–240 V AC /50 Hz | |||
| Power consumption (W) | 35 °C, 90% RH 310 W | 330 W | |
| 30 °C, 80% RH 270 W | 280 W | ||
| 27 °C, 60% RH 230 W | 250 W | ||
| Air flow volume (m3/h) | 146 | 175 | |
| Room Size (m2) | 29 to 38 | 35 to 46 | |
| Refrigerant | R290 | R290 | |
| Refrigerant volume (g) | 50 60 | ||
| Water tank capacity (l) | 3,8 | 3,8 | |
| Unit size (W x H x D in mm) | 355 x 567 x 259 | 355 x 567 x 259 | |
| Weight (kg) | 15,4 | 15,5 | |
| Cord length (cm) | 200 | 200 | |
| Standby power (W) | 0,25 | 0,25 | |
NOTE:
- RH - Relative Humidity
- Room size based on JEMA (Japan Electrical Manufacturers' Association) standard.


- User manual
- Please read before operating your new Dehumidifier
- IMPORTANT SAFETY INSTRUCTIONS
- Always follow basic safety precautions when using electrical appliances, including the following:
- WARNING – Always observe the following to reduce the risk of electrical shock, fire, or injury:
- CAUTIONS CONCERNING OPERATION
- Locating the Unit
- Attention:
- Information on Disposal for Users (private households)
- In the European Union
- In other Countries outside the EU
- Information on Disposal for Business Users.
- Installation
- Operating environment
- Components diagrams – parts names
- Operating Introduction – How to operate
- Control panel
- The name and function of control panel
- Operating introduction
- Power on
- Power off
- Mode setting button
- Humidity setting
- When operating in the dry clothes function, the machine is running in CO status.
- Timer
- Fan Speed setting
- Swing
- Lock function
- Memory function
- Water tank full auto-stop function
- Auto defrost
- Compressor protection function
- High/Low temperature protection function
- Low humidity protection function
- High temperature fan speed switch function
- Error codes
- Continuous drainage function
- Maintenance
- When cleaning your dehumidifier:
- Other advice:
- What to do if the product interferes with radio or TV reception.
- NOTE:
Brand : SHARP
Model : UDP20EW
Category : Dehumidifier