XType AWDM6W - Warming drawers and cabinets AMICA - Free user manual and instructions
Find the device manual for free XType AWDM6W AMICA in PDF.
| Brand | Amica |
| Model | XType AWDM6W |
| Product type | Heating drawer and warming drawer |
| Power supply | 220-240 V ~ 50/60 Hz |
| Power | 1000 W |
| Maximum load capacity | 25 kg |
| Temperature range | 40 °C to 80 °C (depending on function) |
| Functions | Keep warm, plate/cup/glass warming, low-temperature cooking |
| Controls | Touch panel with LED display |
| Opening type | Drawer with automatic soft-close mechanism |
| Front material | Glass or metal depending on version |
| Cleaning | Damp sponge and dish soap; do not use steam cleaner |
| Non-slip mat | Hand wash, air dry |
| Safety | Contact switch: heating and fan operate only when drawer is closed |
| Installation | Built-in under an oven or other compatible appliance |
| Warranty | According to the provided warranty card |
Frequently Asked Questions - XType AWDM6W AMICA
User questions about XType AWDM6W AMICA
0 question about this device. Answer the ones you know or ask your own.
Ask a new question about this device
Download the instructions for your Warming drawers and cabinets in PDF format for free! Find your manual XType AWDM6W - AMICA and take your electronic device back in hand. On this page are published all the documents necessary for the use of your device. XType AWDM6W by AMICA.
USER MANUAL XType AWDM6W AMICA
EN- Table of contents
NOTES ON SAFETY 12
UNPACKING
DISPOSAL OF OLD APPLIANCE 16
TECHNICAL DATA 17
BEFORE USING FOR THE FIRST TIME 17
BEFORE USING FOR THE FIRST TIME 17
CLEANING AND HEATING UP FOR THE FIRST TIME 17
GUIDE TO THE APPLIANCE 18
CONTROL PANEL 18
OPERATION
FUNCTION SETTINGS 18
SPECIFICATIONS
TEMPERATURE SETTINGS 19
CAPACITY
KEEPING FOOD WARM 20
SETTINGS
LOW TEMPERATURE COOKING 21
HOW TO USE IT 21
OTHER USES 27
CLEANING AND CARE 28
APPLIANCE FRONT AND INTERIOR
CLEANING AND CARE
ANTI-SLIP MAT
PROBLEM SOLVING GUIDE
SAFETY INSTRUCTION FOR INSTALLATION
BUILD-IN
WARRANTY AND AFTER SALES SERVICE
WARRANTY
16
18
19
19
20
28
28
28
29
30
30
32
32
GARANTIE, NACHVERKAUF-SERVICE 55
GARANTIE 55
CS- Obsah
BEZPECNOSTNI POKNY 57
POUZIVANI 60
VYBALENI 61
LIKVIDACE OPOTRBOVANYCH ZARIZENI 62
TECHNICKE_PARAMETER 63
PRED PRVNIM POUZITIM ZARIZENI 63
PRED PRVNIMPOUZITIM ZARIZENI 63
PRVNI CISTENI A ZAHRIVANI 63
POPIZARIZENI 64
OVLADACI PANEL 64
OBSLUHA
NASTAVENI FUNKCI 64
TECHNICÉ UDAJE 65
NASTAVENI TEPLOTY 65
OBJEM
UDRZOVÁNÍ TEPLOTY 66
NASTAVENI 66
PECENI PRI NIZKÉ TEPLOTE
JAKPOUZIVAT
JINAPOUZITI
CISTENI A UDRZBA
PRENDI STRANA A VNITREK ZARIZENI
CISTENIA UDRZBA
PROTISKLUZOVÁ PODLOZKA
ODSTRANOVI NEJCASTEJI SE VYSKYTUIJICICH PROBLEMU
BEZPECNOSTNI POKNY K MONTAZI
ZASTAVBA
ZÁRUKA, POPRODEJNÍ SERVIS
ZARUKA
64
65
67
67
73
74
74
74
74
75
76
76
78
78
SK- Obsah
BEZPECNOSTNÉ POKNYPOUZÍVANIA 80
POUZITIE 83
ROZBALENIE
LIKVIDÁCIA ZARIADENI 85
TECHNICKÉ PARAMETRE 86
PRED PRVYM POUZITIM ZARIADENIA 86
PRED PRVYM POUZITIM ZARIADENIA 86
PRVE CISTENIE A OHRIEVANIE 86
OPIS ZARIADENIA 87
OVLADACI PANEL 87
OBSLUHA
NASTAVENIE FUNKCIE 87
TECHNICKÉ PARAMETRE 88
NASTAVENIE TEPLOTY 88
KAPACITA
UDRZIAVANIE TEPLA 89
NASTAVENIA
NIZKOTEPLOTNÉ PECENIE 90
SPOSOBPOUZIVANIA
INEPOUZITIA
CISTENIE A UDRZBA
CELO A VNUTRO ZARIADENIA
CISTENIE A UDRZBA
PROTISMYKOVÁ PODLOZKA
ODSTRANOVANIE NAJCASTEJSICH PROBLEMOV
BEZPECNOSTNÉ POKNYA ODPORUCANIA TYKAJUCE SA MONTAZE
VSTAVANIE
ZÁRUKA, POPREDAJNY SERVIS
ZARUKA
85
87
88
89
96
97
97
97
97
98
99
01
101
From now on, your daily housework will be easier than ever before. Your appliance Air-conditionally easy to use and extremely efficient. After reading these Operating Instructions, operating the appliance will be easy.
Before being packaged and leaving the manufacturer, the appliance was thoroughly checked with regard to safety and functionality.
Before using the appliance, please carefully read these Operating Instructions. By following these instructions carefully you will be able to avoid any problems in using the appliance. It is important to keep these Operating Instructions and store them in a safe place so that they can be consulted at any time.
Follow these instructions carefully in order to avoid possible accidents.
Sincerely,
Amica
NOTES ON SAFETY
- Before using the appliance, please carefully read this manual!
- The appliance is designed for household use only.
- The manufacturer reserves the right to introduce changes, which do not affect operation of the appliance.
- The manufacturer shall not be liable for any damage or fire caused by the appliance resulting from failure to follow instructions in this manual.
- Ensure that it is possible to disconnect the appliance from the mains by removing the plug on switching off the bi-polar switch.
- Particular attention should be paid not to allow unaccompanied children to use the appliance.
- Make sure voltage indicated on the 'nameplate' corresponds to the local mains supply voltage.
- Before use, extend and straighten the power cord.
- Packaging materials (bags, polyethylene, polystyrene, etc.) should be kept away from children during unpacking.
- WARNING! Failure to install the screws or fixing device in accordance with these instructions may result in electrical hazards.
- WARNING: This appliance can be used by children aged 8 years and older or by persons with physical, mental or sensory handicaps, or by those who are inexperienced or unfamiliar with the appliance, provided they are supervised or have been instructed how to safely use the appliance and are familiar with risks associated with the use of the appliance. Ensure that children do not play with the appliance. Cleaning and maintenance of the appliance should not be performed by children unless they are 8 years or older and are supervised by a competent person.
- Important! If the power cord is damaged, it should
be replaced by the manufacturer or specialist repair centre or a qualified person in order to avoid danger.
- This appliance is intended for use at home or in facilities, such as: kitchen for employees; in shops, offices and other working environments, use by the customers of hotels, motels and other residential facilities, in rural residential buildings, in the accommodation facilities;
- This appliance is not intended for use by persons (including children) with physical, mental or sensory handicaps, or by persons inexperienced or unfamiliar with the appliance, unless under supervision or in accordance with the instructions as communicated to them by persons responsible for their safety. Children shall not play with the appliance.
- Do not immerse the power cord or plug in water.
- Keep cord away from heated surfaces.
- Do not allow the connection cord hanging over the edge of a table or counter.
- The surface of the appliance may become damaged if it is not cleaned properly, which will reduce the life of the appliance and may lead to dangerous situations.
- The appliances are not intended to be operated by means of an external timer or separate remote-control system.
- Surface of a storage cabinet can get hot.
- Children must not be allowed to clean the appliance unsupervised.
- The appliance gets hot when in use and remains hot for quite a while after being switched off. Keep children well away from the appliance until it has cooled down and there is no danger of burning.
-
A damaged appliance can be dangerous. Before installation, check the appliance for visible signs of damage. Do not use a damaged appliance.
-
The electrical safety of this appliance can only be guaranteed when correctly earthed. It is most important that this basic safety requirement is observed and regularly tested, and where there is any doubt, the house hold wiring system should be inspected by a qualified electrician.
- Do not connect the appliance to the mains electricity supply by a multi-socket adapter or an extension lead. These do not guarantee the required safety of the appliance (e.g. danger of overheating).
- For safety reasons, this appliance may only be used when it has been built in. This appliance must not be used in a non-stationary location (e.g. on a ship).
- The appliance must be disconnected from the mains electricity supply during installation, maintenance and repair work. Ensure that power is not supplied to the appliance until after it has been installed or until any maintenance or repair work has been carried out.
- In areas which may be subject to infestation by attention to cockroaches or other vermin, pay particular keeping the appliance and its surroundings in a clean condition at all times. Any damage which may be caused by cockroaches or other vermin will not be covered by the guarantee.
- The power cord can only be routed through the hole in the bottom of the cabinet to avoid touching the back shell of the oven.
- Do not use a steam cleaning appliance to clean this appliance. The steam could reach electrical components and cause a short circuit.
- Do not immerse the appliance in water or other liquid when cleaning.
- The appliance is not intended for outdoor use
- THE DRAWER IS DESIGNED TO KEEP HOT FOOD WARM AND NOT TO WARM FOOD UP. ENSURE
FOOD IS REALLY HOT WHEN PLACED IN SIDE THE WARMING DRAWER
- You could burn yourself on the hot drawer or crockery. Protect your hands with heat-resistant pot holders or gloves when using the appliance. Do not let them get wet or damp, as this causes heat to transfer through the material more quickly with the risk of scalding or burning yourself.
- Do not store any plastic containers or flammable bjects in the warming drawer. They could melt or catch fire when the appliance is switched on, causing a fire hazard.
- Due to the high temperatures radiated, objects left near the appliance when it is in use could catch fire. Do not use the appliance to heat up the room.
- Never replace the anti-slip mat supplied with the appliance (according to the model) with paper kitchen towel or similar
- If you overload the drawer, or sit or lean on it, the telescopic runners will be damaged. The telescopic runners can support a maximum load of 25kg .
- Do not heat up unopened tins or jars of food in the drawer, as pressure will build up in the tin or jar causing it to explode. This could result in injury and scalding or damage.
- The underside of the drawer gets hot when switched on. Be careful not to touch it when the drawer is open.
- Do not use plastic or aluminium containers. These melt at high temperatures and could catch fire. Use only heat-resistant crockery made of glass, porcelain, etc.
-
Take care when opening and closing the loaded drawer, that liquids do not spill over and get through the vents. This can cause the appliance to short circuit.
-
Bacteria can develop on the food if the temperature is too low. Make sure that you set a high enough temperature to keep food warm
UNPACKING

During transportation, protective packaging was used to protect the appliance against any damage. After unpacking, please dispose of all elements of packaging in a way that will not cause damage to the environment.
All materials used for packaging the
appliance are environmentally friendly; they are 100 % recyclable and are marked with the appropriate symbol.
Important! Packaging materials (bags, polyethylene, polystyrene, etc.) should be kept away from children during unpacking.
DISPOSAL OF OLD APPLIANCE


In accordance with European Directive 2012/19/EU and local legislation regarding used electrical and electronic goods, this appliance is marked with the symbol of the crossed-out waste container. This marking indicates that the appliance must not be disposed of together with other household waste
after it has been used.
The user is obliged to hand it over to waste collection centre collecting used electrical and electronic goods. The collectors, including local collection points, shops and local authority departments provide recycling schemes.
Proper handling of used electrical and electronic goods helps avoid environmental and health hazards resulting from the presence of dangerous components and the inappropriate storage and processing of such goods.
TECHNICAL DATA
Power supply voltage: 220-240V
Frequency: 50/60Hz
Power rating: 1000W
BEFORE USING FOR THE FIRST TIME
Before using for the first time
A display test is carried out for 10 seconds after the appliance has been installed and after a power cut. The fan comes on at the same time.
The appliance cannot be used during this time.
Cleaning and heating up for the first time
Remove any protective foil and sticky labels.
Remove the anti-slip mat and, if applicable, the rack from the drawer, and sponge both with warm water and a little washing-up liquid. Dry using a soft cloth.
Wipe the appliance inside and out with a damp cloth only, and then dry with a soft cloth.
Replace the anti-slip mat and the rack (if applicable) in the drawer.
Then heat the empty drawer for at least two hours.
Switch the appliance on by touching the sensor.
Touch the sensor repeatedly until the LED light.
Touch the sensor repeatedly until the LED on the far right lights up.
Touch the sensor repeatedly until 2h lights up.
Close the drawer.
The warming drawer is fitted with a softclose self-closing mechanism. It also has a contact switch, which ensures that the heating element and fan in the appliance only work when the drawer is closed.
Metal components have a protective coating which may give off a slight smell when heated up for the first time. The smell and any vapours will dissipate after a short time, and do not indicate a faulty connection or appliance. Ensure that the kitchen is well ventilated whilst the appliance is being heated up for the first time.
GUIDE TO THE APPLIANCE
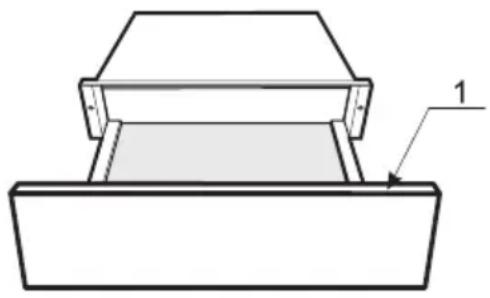
1. Control panel
For appliances with no handle: Press the middle of the drawer to open or close it. When opening, the drawer pops out slightly. You can then pull it out towards you.
CONTROL PANEL


For warming cups and glasses Cancel Button

For warming plates and dishes Start Button

For keeping food warm

For setting the temperature

For setting the duration

For adjust temperature and time
The appliance can be used to keep food warm at the same time as warming plates and dishes. But the food must be covered properly and dry the dishes when finished.
Take care. The plates and dishes will take longer to warm up, but can get very hot on this function.
OPERATION
Function settings
- In waiting state, press key to start the function of warming cups and glasses with 40^ . 40^ will display
- Touch for to adjust the temperature
- Touch and then touch or to adjust the warming time.
- Touch to save the temperature and time.
- Close the door and there will be a beep. Then the appliance will start working.
Note:
- During parameters setting, you can press other function keys to change the function among and .
- Before closing the door, you can touch to cancel the setting. And the appliance will go back to waiting state.
- During the process of working, open the door to enter to the parameters adjusting mode. And then press for to adjust the temperature. You can press the or to change the parameter which you want to adjust. And then press to save the setting.
After saving the setting as above, you can press to enter to the waiting state, or close the door to start working.
Specifications
- When the appliance is electrified, open the door. The buzzer will ring once and the appliance will enter to waiting state. "0" will display.
- In the process of clock setting, if there is no operation within 3 minute, the oven will go back to the waiting state.
- The buzzer sounds once by efficient press.
- The buzzer will sound thrice to remind you when cooking is finished.
Temperature settings
Each function has its own temperature range. The factory-set recommended temperatures are printed in bold. The temperature can be altered in 5^ steps. The last temperature selected is automatically activated the next time the drawer is switched on, and this is shown in the display
| Temperature °C* | ||
| 40 60 | 60 | |
| 45 65 | 65 | |
| 50 70 | 70 | |
| 55 75 | 75 | |
| 60 80 | 80 | |
- Approximate temperature values, measured in the middle of the drawer when empty
Capacity
The quantity that can be loaded will depend to a great extent on the size and weight of your own crockery. Do not overload the drawer. The maximum load bearing capacity of the drawer is 25kg . Under the maximum load bearing capacity, the drawer should be opened or closed slightly.
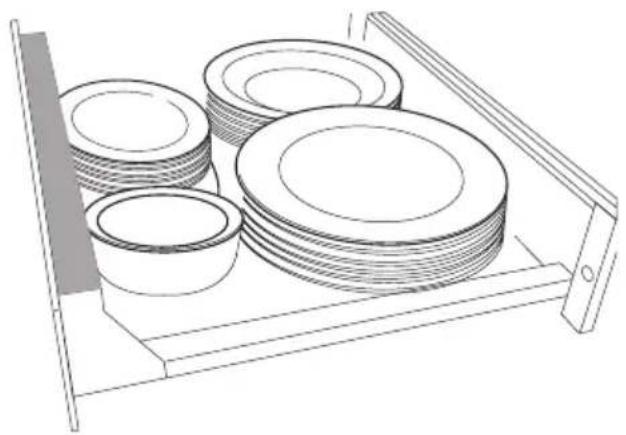
The loading examples shown here are suggestions only.
Preheat dinner ware for persons:
6dinner plates 26cm
6 soup plates 23cm
6 dessert dishes 19cm
1 oval platter 32cm
1 medium serving bowl 16cm
1 small serving bowl 13cm
KEEPING FOOD WARM
Settings
| Food Cover the container? | Temperature for the setting | |
| Steak (rare) yes 65 | ||
| Bake/gratin yes 80 | ||
| Roast meat yes 75 | ||
| Casserole yes 80 | ||
| Fish fingers no | 80 | |
| Meat in a sauce | yes 80 | |
| Vegetables in a sauce | yes 80 | |
| Goulash | yes 80 | |
| Mashed potato | yes 75 | |
| Plated meal yes 80 | ||
| Baked potatoes / New potatoes | yes 75 | |
| Breaded escalope | no | 80 |
| Pancakes/ potato pancakes | no | 80 |
| Pizza | no | 80 |
| Boiled potatoes | yes 80 | |
| Gravy | yes 80 | |
| Strudel | no | 80 |
| To warm bread | no | 65 |
| To warm rolls | no | 65 |
- Depending on model
- The containers depend on the quantity, or food, or type of recipe
LOW TEMPERATURE COOKING
What it is?
It is any cooking procedure where the cooking temperature is at or close to the desired final core temp. In traditional cooking, the cooking temperature always exceeds the desired ready-to-eat temperatures low temperature cooking meat cooks at a low temperature over a long period of time. Using this method, meat loses less liquid (less molecule breaking), maintain organoleptic characteristic (vitamins, proteins and so on) keeping Freshness, flavor and juiciness intact.
This cooking method is particularly suitable for large and tender pieces of meat.
For precision we recommend using a proprietary food thermometer to monitor the core temperature.
Core temperature
Food can be cooked to a core temperature of up to 70^ in the food warming drawer. Meat which needs to be cooked to a core temperature higher than 70^ is not suitable for cooking in the food warming drawer.
The core temperature reading gives information about the degree of cooking in the middle of a piece of meat. The lower the core temperature, the less cooked the meat is in the middle:
45-50°C = rare
55-60°C = medium
65^ C = well done
How to use it
- Preheat the hot cabinet for 15 min to 70^ .
- Cover the meat properly with cling wrap.
- The cooking duration depends on the size of the individual
- Put the covered meat on a plate and use a chronometer to calculate the time.
- Sear the meat to give flavour (check the table)
Cooking table - Beef and Veal
| Part Thickness | Doneness | Time Searing | time and indications | |
| Whole Fillet | 50mm | Rare Medium Well done | 1h 35min 2h 35min 3h 30min | |
| 90 seconds for outer side with full power of the stove | ||||
| 3 min. for outer side with medium-high power of the stove | ||||
| 60mm | Rare Medium Well done | 1h 45min 2h 50min 4h | ||
| 90 seconds for outer side with full power of the stove | ||||
| 3 min. for outer side with medium-high power of the stove | ||||
| 70mm | Rare Medium Well done | 2h 3h 4h 40min | ||
| 90 seconds for outer side with full power of the stove | ||||
| 3 min. for outer side with medium-high power of the stove | ||||
| Medallions Rib eye T-bone Rump Steak | 20mm | Rare Medium Well done | 50min 1h 30min 2h | |
| 90 seconds for side with full power of the stove | ||||
| 3 min. for side with medium-high power of the stove | ||||
| 30mm | Rare Medium Well done | 1h 5min 1h 50min 2h 20min | ||
| 90 seconds for side with full power of the stove | ||||
| 3 min. for side with medium-high power of the stove | ||||
| 40mm | Rare Medium Well done | 1h 20min 2h 10min 3h | ||
| 2 min for side with full power of the stove | ||||
| 4 min. for side with medium-high power of the stove | ||||
| Sirloin joint Roast Beef | 60mm | Rare Medium Well done | 1h 45min 2h 50min 4h | |
| 4 min. for outer side with medium-high power of the stove | ||||
| 6 min. for outer side with medium power of the stove | ||||
| 70mm | Rare Medium Well done | 2h 3h 4h 40min | ||
| 4 min. for outer side with medium-high power of the stove | ||||
| 6 min. for outer side with medium power of the stove | ||||
| 80mm | Rare Medium Well done | 2h 20min 3h 30min 5h 40min | ||
| 4 min. for outer side with medium-high power of the stove | ||||
| 6 min. for outer side with medium power of the stove |
Cooking table - Pork
| Part Thickness | Doneness | Time Searing | time and indications | |
| Whole Fillet | 40mm | Medium Well done | 2h 20min 3h 10min | 90 secondsf or outer side with full power of the stove |
| 3 min. for outer side with medium-high power of the stove | ||||
| 50mm | Medium Well done | 2h 35min 3h 25min | 90 seconds for outer side with full power of the stove | |
| 3 min. for outer side with medium-high power of the stove | ||||
| 60mm | Medium Well done | 3h 4h 5min | 90 seconds for outer side with full power of the stove | |
| 3 min. for outer side with medium-high power of the stove | ||||
| Boned gammon Roulades Roast pork Whole pork loin | 30mm | Medium Well done | 1h 50min 2h 40min | 2 min. for outer side with high power of the stove |
| 3 min. for outer side with medium-high power of the stove | ||||
| 40mm | Medium Well done | 2h 20min 3h 10min | 2 min. for outer side with high power of the stove | |
| 3 min. for outer side with medium-high power of the stove | ||||
| 50mm | Medium Well done | 2h 35min 3h 25min | 4 min. for outer side with medium-high power of the stove | |
| 6 min. for outer side with medium power of the stove | ||||
| 60mm | Medium Well done | 3h 4h 5min | 4 min. for outer side with medium-high power of the stove | |
| 6 min. for outer side with medium power of the stove | ||||
| 70mm | Medium Well done | 3h 20min 4h 45min | 4 min. for outer side with medium-high power of the stove | |
| 6 min. for outer side with medium power of the stove | ||||
| 80mm | Medium Well done | 3h 40min 5h 30min | 4 min. for outer side with medium-high power of the stove | |
| 6 min. for outer side with medium power of the stove | ||||
| Chop loin | 10mm | Medium Well done | 1h 10min 1h 30min | 60 seconds for side with full power of the stove |
| 2 min. for side with full power of the stove | ||||
| 20mm | Medium Well done | 1h 10min 2h 10min | 90 seconds for side with full power of the stove | |
| 3 min. for side with high power of the stove |
Cooking table - Poultry
| Part Thickness | Doneness | Time Searing | time and indications | |
| Chicken breast | 25mm | Medium 1h 30min | ||
| Well done 2h | ||||
| 35mm | Medium 1h 45min | 60 seconds for side with full power of the stove | ||
| Well done 2h | 90 seconds for side with full power of the stove | |||
| Duck breast (Magret) | 35mm | Rare 1h | ||
| Medium 1h 30min | 4 min. for the skin side with medium-high power of the stove | |||
| Well done 2h | ||||
| 40min | Rare 1h 45min | 4 min. for the skin side with medium-high power of the stove | ||
| Medium 2h 20min | 4 min. for the skin side with medium-high power of the stove | |||
| Well done 3h | ||||
| Turkey breast | 40mm | Medium 3h | ||
| Well done 4h | ||||
| 50mm | Medium 3h 50min | 90 seconds for side with full power of the stove | ||
| Well done 5h | ||||
| Foie Medallion (Duck or Goose liver) | 10mm Medium | 30min | ||
| 20mm Medium | 40min | |||
| 30mm Medium | 50min | |||
| Whole Foie (Duck or Goose liver) | 35mm Medium | 48min | ||
| 45mm Medium | 1h | |||
| 55mm Medium | 1h 15min | |||
| Part Thickness\(\mathbf{s}\) Doneness | Time Searing | time and indications | ||
| Rack of lamb | 40mm | Rare Medium Well done | 1h 20min 2h 10min 3h | 90 seconds for outer side with full power of the stove |
| 3 min. for outer side with medium-high power of the stove | ||||
| 50mm | Rare Medium Well done | 1h 35min 2h 35min 3h 30min | 90 seconds for outer side with full power of the stove | |
| 3 min. for outer side with medium-high power of the stove | ||||
| 60mm | Rare Medium Well done | 1h 45min 2h 50min 4h | 90 seconds for outer side with full power of the stove | |
| 3 min. for outer side with medium-high power of the stove | ||||
| Saddle of Lamb | 60mm | Rare Medium Well done | 1h 45min 2h 50min 4h | 90 seconds for side with full power of the stove |
| 3 min. for side with medium-high power of the stove | ||||
| 70mm | Rare Medium Well done | 2h 3h 4h 40min | 90 seconds for side with full power of the stove | |
| 3 min. for side with medium-high power of the stove | ||||
| 80mm | Rare Medium Well done | 2h 20min 3h 30min 5h 40min | 2 min for side with full power of the stove | |
| 4 min. for side with medium-high power of the stove | ||||
| Boned leg of lamb Gigot | 60mm | Rare Medium Well done | 1h 45min 2h 50min 4h | 4 min. for outer side with medium-high power of the stove |
| 6 min. for outer side with medium power of the stove | ||||
| 70mm | Rare Medium Well done | 2h 3h 4h 40min | 4 min. for outer side with medium-high power of the stove | |
| 6 min. for outer side with medium power of the stove | ||||
| 80mm | Rare Medium Well done | 2h 20min 1h 10min 5h 40min | 4 min. for outer side with medium-high power of the stove | |
| 6 min. for outer side with medium power of thestove | ||||
| Lamb chops | 10mm | Rare Medium Well done | 35min 1h 10min 2h | 60 seconds for side with full power of the stove. |
| 60 seconds for side with full power of the stove. | ||||
| 90 seconds for side with full power of the stove. | ||||
| 20mm | Rare Medium Well done | 50min 1h 30min 2h 30min | 60 seconds for side with full power of the stove. | |
| 60 seconds for side with full power of the stove. | ||||
| 90 seconds for side with full power of the stove. | ||||
Cooking table - Eggs
| Type of food Container | Cover the container | Temperature of the setting | Duration in hours | |
| Defrosting berries | Plate no 65°C 1 hour | |||
| Defrosting Frozen Vegetables | Plate no 65°C 1 hour | |||
| Proving dough Bowl yes 45°C 0,5 hour | ||||
| Making yoghurt | Yoghurt jars with lids | yes 45°C 6 hours | ||
| Melt chocolate Bowl no 50°C 1 hour | ||||
| Infusion oil | Bowl covered with cling wrap | yes 75°C 4 hours | ||
| Infusion water | Bowl covered with cling wrap | yes 65°C 4 hours | ||
| Dry tomatoes | Plate with baking paper | no 60°C 20 hours | ||
| Dry Vegetable Plate | Plate no 60°C 12 hours | |||
| Dry sliced fruits | Plate no 60°C 12 hours | |||
| Dry herbs Plate no 70°C 4 hours | ||||
| Dry bread for bread crumbs | Plate no 80°C 4 hours | |||
| Confited Fish in oil | Tupperware Microwaveable | cover and open the vent | 50°C | Depends on size between 1 to 2h. |
| White Melba toast | Plate no 80°C 2 hours | |||
| Slow cooking vstew | Pyrex container yes 80°C | Between 1 to 12 hours |
CLEANING AND CARE
- Danger of injury- Do not use a steam cleaning appliance to clean this appliance. The steam could reach electrical components and cause a short circuit.
- Danger of damage- Unsuitable cleaning agents can damage the surfaces of the appliance. Only use domestic washing-up liquid to clean the appliance.
- Clean and dry the entire appliance after each use. Allow the appliance to cool down to a safe temperature before cleaning.
Appliance front and interior
- Remove any soiling immediately. If this is not done, it might become impossible to remove and could cause the surfaces to alter or discolour.
- Clean all surfaces with a clean sponge and a solution of hot water and washing-up liquid. Then dry with a soft cloth. A clean, damp microfibre E-cloth without cleaning agent can also be used.
- All surfaces are susceptible to scratching. Scratches on glass surfaces could even cause a breakage.
- Contact with unsuitable cleaning agents can alter or discolour the surfaces.
Cleaning and care
To avoid damaging the surfaces of your appliance, do not use:
- Cleaning agents containing soda, ammonia, acids or chlorides,
- Cleaning agents containing descaling agents,
- Abrasive cleaning agents, e.g. powder cleaners and cream cleaners,
- Solvent-based cleaning agents,
- Stainless steel cleaning agents,
- Dishwasher cleaner,
Oven sprays,
Glass cleaning agents, - Hard, abrasive sponges and brushes, e.g. pot scourers,
Sharp metal scrapers.
Anti-slip mat
- Remove the anti-slip mat from the drawer before cleaning it.
- Clean the anti-slip mat by hand only, using a solution of hot water and a little washing-up liquid, and then dry with a cloth.
- Do not put the anti-slip mat back into the drawer until it is completely dry.
- Do not wash the anti-slip mat in a dishwasher or washing machine.
- Never place the anti-slip mat in the oven to dry.
PROBLEM SOLVING GUIDE
With the help of the following guide, minor faults in the performance of the appliance, some of which may result from incorrect operation, can be put right without contacting the Service.
Installation work and repairs to electrical appliances must only be carried out by a suitably qualified person in strict accordance with current local and national safety regulations. Repairs and other work by unqualified persons could be dangerous.
| Problem Possible | Cause Remedy | |
| The appliance does not heat up. | The appliance is not correctly plugged in and switched on at the mains socket. | Insert the plug and switch on at the socket. |
| The mains fuse has tripped. | Reset the trip switch in the mains fuse box (minimum fuse rating - see data plate).If, after resetting the trip switch in the mains fuse box and switching the appliance back on, the appliance will still not heat up, contact a qualified electrician. | |
| The food is not hot enough. | The function for keeping food warm is not selected. | Select the correct function. |
| The temperature setting is too low. | Select a higher temperature. | |
| The vents are covered. | Ensure that the air can circulate freely. | |
| The food is too hot. | The function for keeping food warm is not selected. | Select the correct function. |
| The temperature setting is too high. | Select a lower temperature. | |
| The crockery is not warm enough. | The function for warming plates and dishes is not selected | Select the correct function |
| The temperature setting is too low. | Select a higher temperature. | |
| The vents are covered. | Ensure that the air can circulate freely. | |
| The crockery has not been allowed to heat up for a sufficiently long time. | Various factors will affect how long the crockery will take to heat up (see "Warming crockery"). | |
| The crockery is too hot. | The function for warming plates and dishes or warming cups and glasses is not selected. | Select the correct function. |
| The temperature setting is too high. | Select a lower temperature. | |
| A noise can be heard when the drawer is being used. | The noise is caused by the fan which distributes the heat evenly through the drawer. The fan operates at intervals when the functions for keeping food warm and low temperature cooking are being used. | This is not a fault. |
SAFETY INSTRUCTION FOR INSTALLATION
- Before connecting the appliance to the mains electricity supply make sure that the connection data on the data plate (voltage and frequency) correspond with the mains electricity supply, otherwise the appliance could be damaged. Consult a qualified electrician if in any doubt.
- The socket and on-off switch should be easily accessible after the appliance has been built in.
- The warming drawer may only be built in combination with those appliances quoted by the manufacturer as being suitable. The manufacturer cannot guarantee trouble-free operation if the appliance is operated in combination with appliances other than those quoted by the manufacturer as being suitable
- When building in the warming drawer in combination with another suitable appliance, the food warming drawer must be fitted above a fixed interim shelf in the housing unit. Please ensure that the housing unit can support both its weight and that of the other appliance.
- As the combination appliance is placed directly on top of the warming drawer once it is built in, an interim shelf is not necessary between the two appliances.
- The appliance must be built in so that the contents of the drawer can be seen. This is to avoid scalding from hot food spilling over. There must be enough space for the drawer to be pulled out fully.
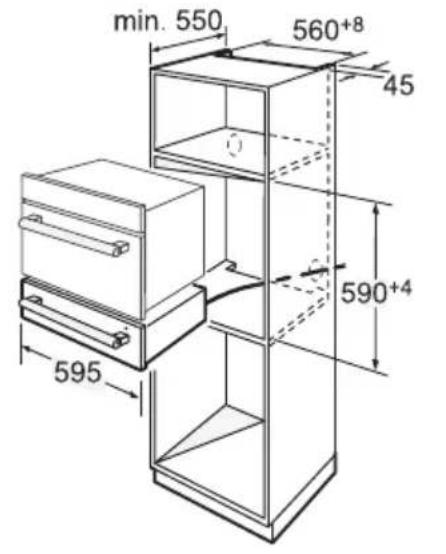
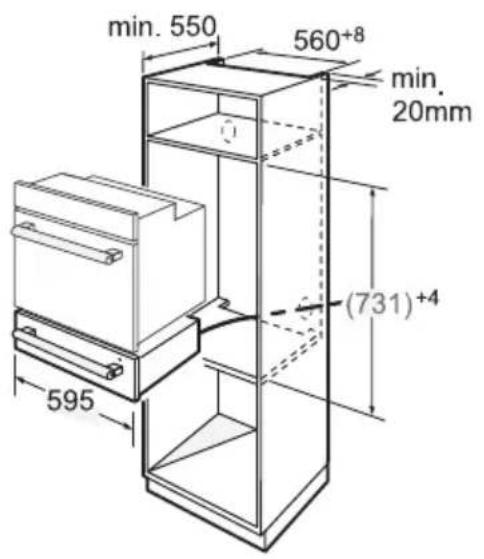
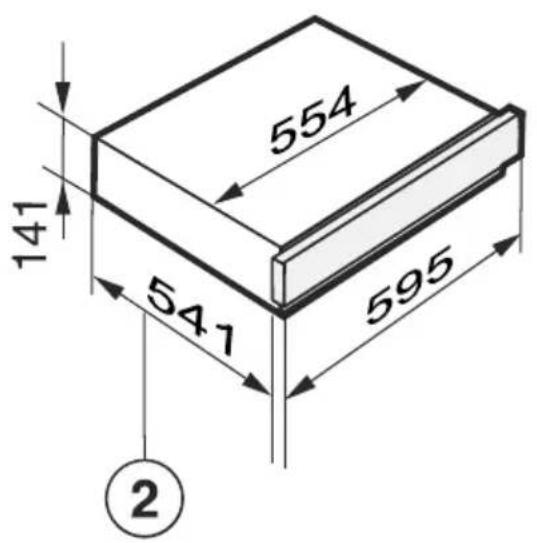
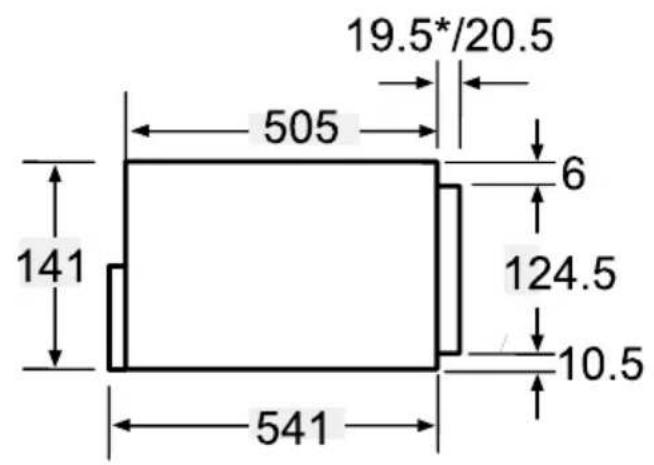
- The warming drawer is available in two models, which differ in opening the door. The building-in dimensions for the warming drawer must be added to the building-in dimensions for the combination appliance to establish the niche size required
- When building in the combination appliance, it is essential to follow the instructions given in the operating and installation instructions supplied with the combination appliance.
- All dimensions in this instruction booklet are given in mm.
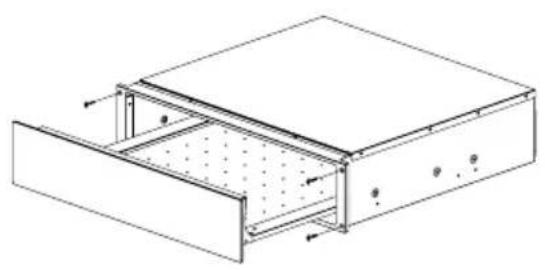
BUILD-IN
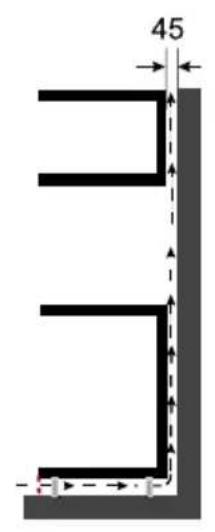
- Ventilation cut-out required when combined with a pyrolytic oven
- Building-in dimension including mains supply cable connection Connection cable L = 1000 mm
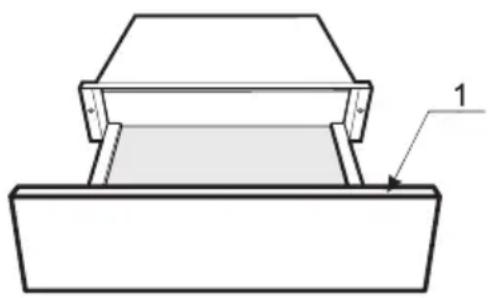
- Appliances with glass front
** Appliances with metal front
NOTE:
- The maximum power of compact appliances is 3350W
- The power cord can only be routed through the hole in the bottom of the cabinet to avoid touching the back shell of the oven.
- Drawings of product and furniture You will find on the back on this user manual

WARRANTY AND AFTER SALES SERVICE
Warranty
Warranty service as stated on the warranty card. The manufacturer shall not be held liable for any damage caused by improper use of the product.

The manufacturer recommends that all repairs and adjustments be carried out by the Factory Service Technician or the Manufacturer's Authorized Service Point. Repairs should be carried out by a qualified technician only.
Manufacturer's Declaration
The manufacturer hereby declares that this product meets the requirements of the following European directives:
Low Voltage Directive 2014/35/EC
- Electromagnetic Compatibility (EMC) Directive 2014/30/EC
ErP Directive 2009/125/EC
- Directive RoHS 2011/65/EC
and has thus been marked with the symbol and been issued with a declaration of compliance made available to market regulators.
Pro ohrivani salku a sklenic Tlacitko delete

Pro ohrivani taliru a jidel Tlačitko spusteni

BESCHRIJVING VAN HET APPARAAT
- Bedieningspaneel