Premium Pet R25P.2 - Vacuum Cleaner Riccar - Free user manual and instructions
Find the device manual for free Premium Pet R25P.2 Riccar in PDF.


User questions about Premium Pet R25P.2 Riccar
0 question about this device. Answer the ones you know or ask your own.
Ask a new question about this device
Download the instructions for your Vacuum Cleaner in PDF format for free! Find your manual Premium Pet R25P.2 - Riccar and take your electronic device back in hand. On this page are published all the documents necessary for the use of your device. Premium Pet R25P.2 by Riccar.
USER MANUAL Premium Pet R25P.2 Riccar
Important Safety Instructions 2
Polarization Instructions 3
Description of the Vacuums 4-7
Assembling the Vacuum
Attaching the Handle 8
Unwinding the Power Cord 8
Storing the Vacuum 8
Operation
Reclining the Handle 9-10
Vacuuming Carpet and Area Rugs 9-10
Bare Floor Cleaning 9-10
Brushroll Auto Shutoff Feature 9-10
Vacuuming Under Furniture 11
Carrying the Vacuum 11
Attachment Cleaning
Wand Cleaning 12
Cleaning Tools 13
Adjusting the Suction Power for Tool Cleaning 14
Disconnecting the Hose 14
Maintenance and Care
When to Replace The Vacuum Bag 15
Replacing the Vacuum Bag 16
Replacing the Filters 17
Jammed Brushroll 18
18
Cleaning the Dirt Sensor Eye 18
Belt Protection Breaker Reset 19
Thermal Motor Protection 19
Lifetime Belt 20
Annual Checkup 20
Power Cord Care 20
Problem Solving Guide
Troubleshooting 21
How to Contact Your Authorized Vacuum Retailer 21
Key Replacement Parts 21
For Best Performance 21
Warranty 22
IMPORTANT SAFETY INSTRUCTIONS
When using an electrical appliance, basic precautions should always be followed, including the following:
READ ALL INSTRUCTIONS BEFORE USING THIS APPLIANCE. FOR HOUSEHOLD USE ONLY.
IMPORTANT: The manufacturer cannot accept responsibility for damage caused when the appliance is not used according to the instructions, or for uses other than those for which it was intended.
WARNING: To reduce the risk of fire, electric shock, damage or injury:
- Do not leave appliance when plugged in. Unplug from outlet when not in use and before servicing.
- Do not use outdoors or on wet surfaces.
- Do not allow to be used as a toy. Close attention is necessary when used by or near children.
- Use only as described in this manual. Use only manufacturer's recommended attachments.
- Do not use with a damaged cord or plug. If appliance is not working as it should, has been dropped, damaged, left outdoors, or dropped into water, return it to an Authorized Vacuum Retailer for service.
- Do not pull or carry by the cord, use the cord as a handle, close a door on the cord, or pull the cord around sharp edges or corners. Do not run appliance over the cord. Keep the cord away from heated surfaces.
- Do not unplug by pulling on the cord. To unplug, grasp the plug, not the cord.
-
Do not use the pet hair remover tool on pets.
-
Do not handle the plug or appliance with wet hands.
- Do not put any object into openings. Do not use with any opening blocked; keep free of dust, lint, hair and anything that may reduce air flow.
- Keep hair, loose clothing, fingers and all parts of the body away from openings and moving parts.
- Do not pick up anything that is burning or smoking, such as cigarettes, matches or hot ashes.
- Do not use without a vacuum bag and/or filters in place.
- Turn off all controls before unplugging.
- Use extra care when cleaning on stairs.
- Do not use to pick up flammable or combustible liquids such as gasoline or use in areas where they may be present.
- Do not attempt to service the unit while appliance is plugged in.
Power Cord, 2-Wire Polarized Cord
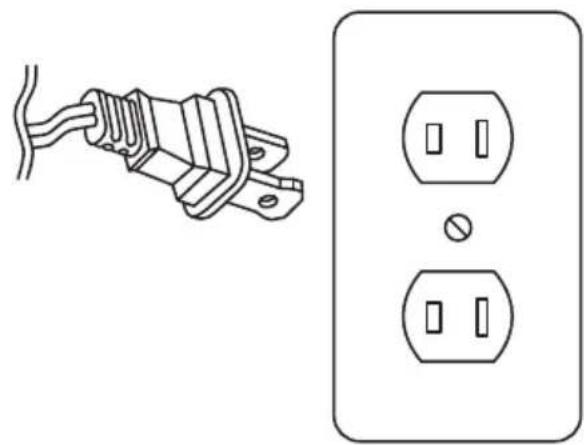
To reduce the risk of electric shock, this product is equipped with a polarized alternating current line plug (a plug having one blade wider than the other). This plug will fit into the power outlet only one way. This is a safety feature. If you are unable to insert the plug fully into the outlet, try reversing the plug. If the plug should still fail to fit, contact a qualified electrician to replace the obsolete outlet. Do not defeat the safety purpose of the polarized plug.
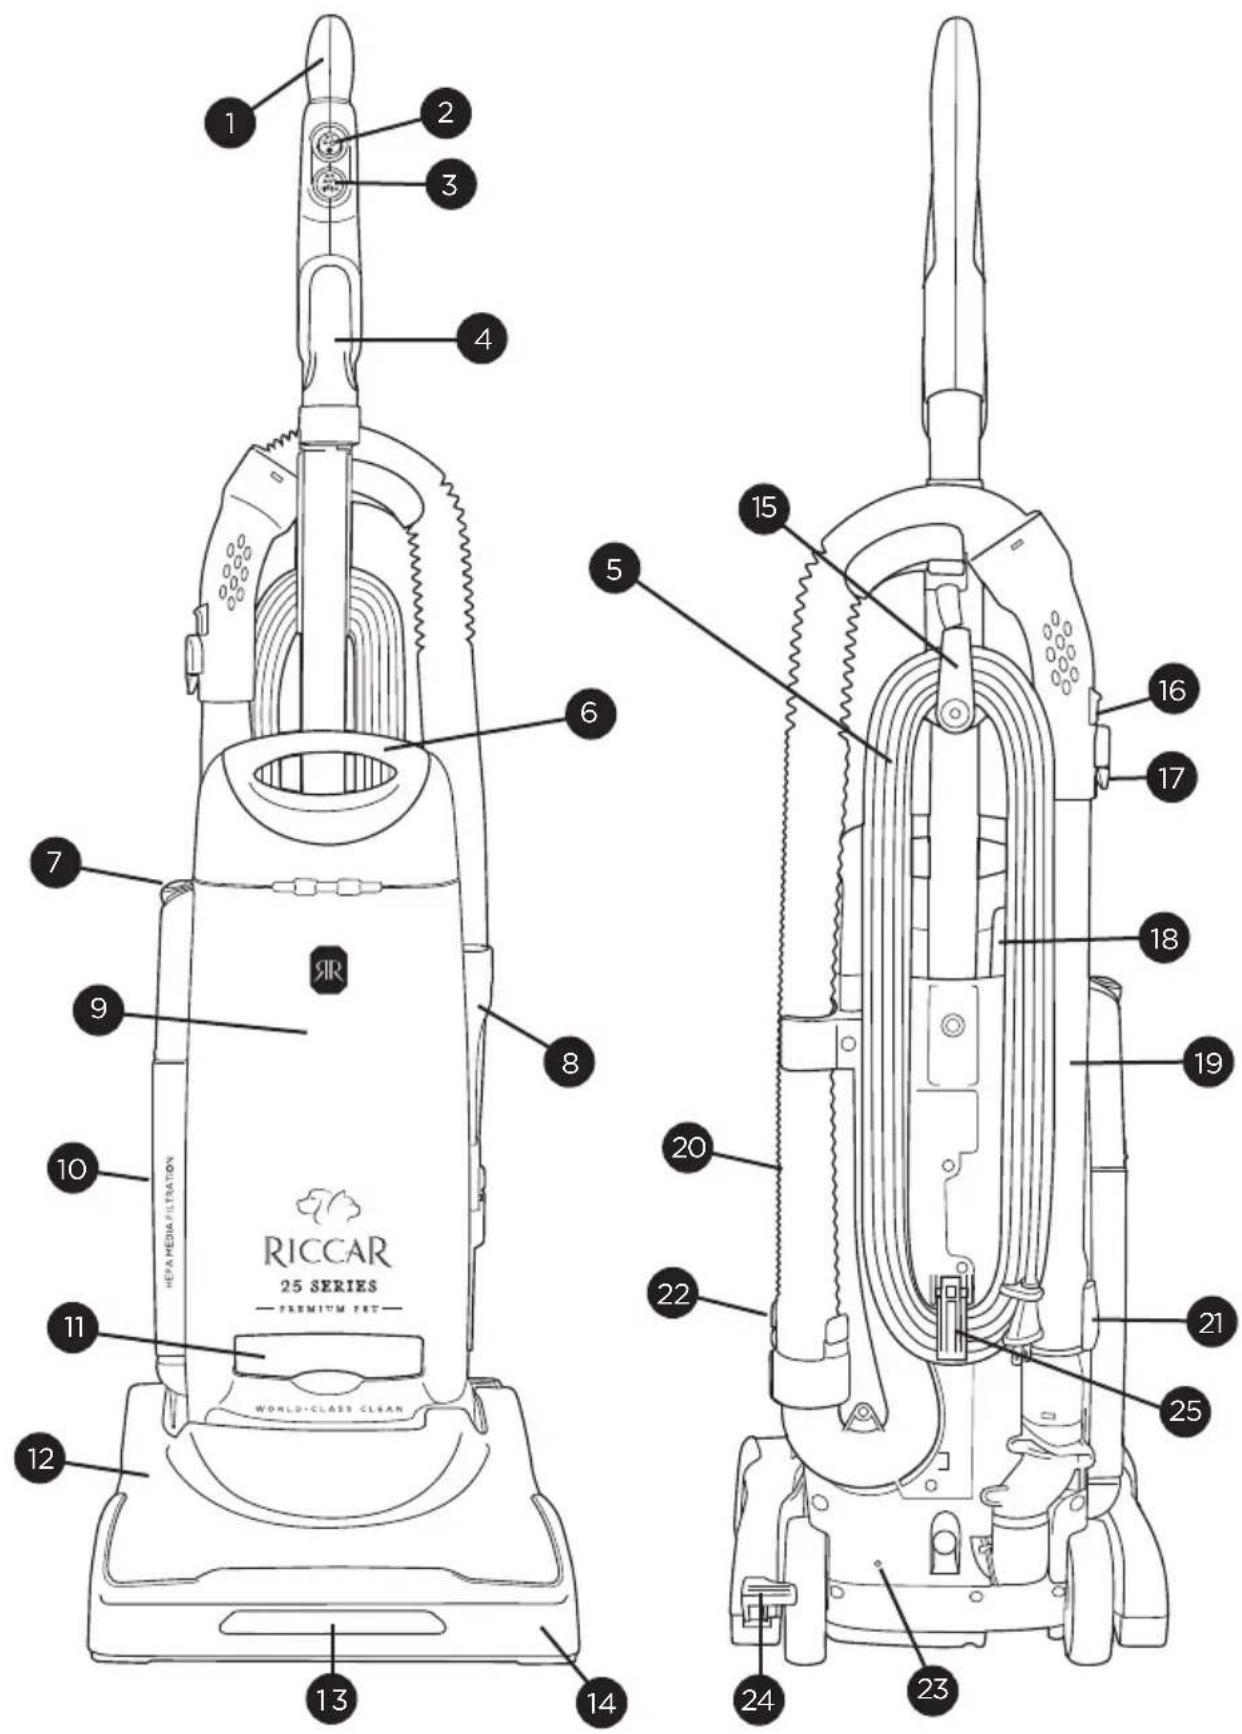
R25P & R25D Models
R25P & R25D Models
1 ComfortGrip™ Handle
2 On/Off Switch
3 Carpet/Hardwood Floor Button
4 Dusting Brush/Upholstery Tool
5 Power Cord
6 Carrying Handle
7 Full Bag/Clog Indicator Light
8 Crevice Tool
9 Bag Compartment
10 Post Filter
11 Secondary Filter
12 Vacuum Nozzle
13 LED Headlights/Brushroll Jam Indicator Lights
13 Dirt Sensor Lights (R25P only)
14 Furniture Guard
15 Quick Release Cord Hook
16 Suction Relief Valve
17 Wand Release Button
18 Bag Compartment Button
19 Telescopic Wand
20 Stretch Hose
21 Wand Extension Button
22 Hose Disconnect Cuff
23 Thermal Reset Button
24 Handle Release Pedal
25 Lower Cord Hook
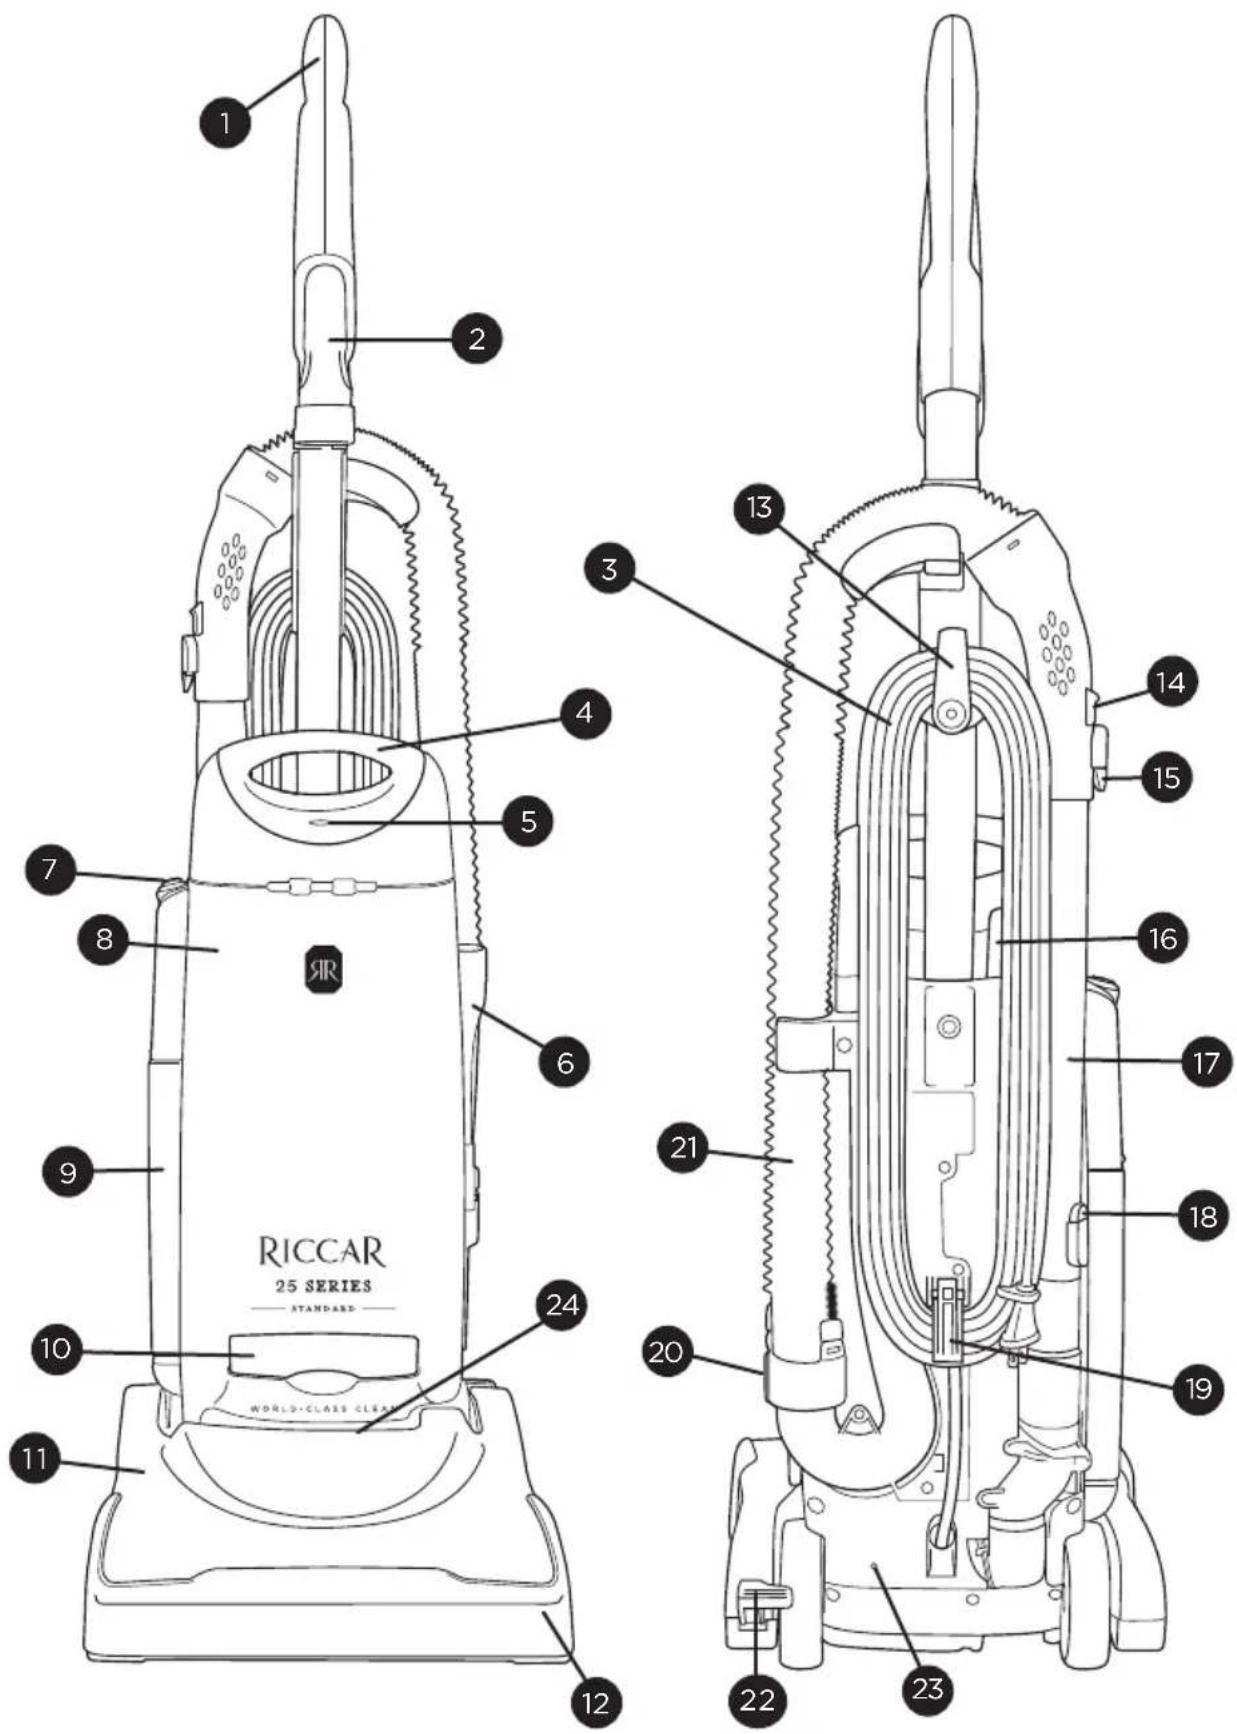
R25S Model
R25S Model
1 Molded Handle Grip
2 Dusting Brush/Upholstery Tool
3 Power Cord
4 Carrying Handle
5 Full Bag/Clog Indicator
6 Crevice Tool
7 On/Off Switch
8 Bag compartment
9 Post Filter
10 Secondary Filter
11 Vacuum Nozzle
12 Furniture Guard
13 Quick Release Cord Hook
14 Suction Relief Valve
15 Wand Release Button
16 Bag Compartment Button
17 Telescopic Wand
18 Wand Extension Button
19 Lower Cord Hook
20 Hose Disconnect Cuff
21 Stretch Hose
22 Handle Release Pedal
23 Thermal Reset Button
24 Belt Protection Breaker Reset Button
Attaching the Handle to the Vacuum
NOTE: Do not plug in the vacuum until it is completely assembled.
The vacuum cleaner and the handle are packed separately and require assembly.
- Remove the handle screw located on the back of the vacuum (Fig. 1). Insert the handle downward into the body of the vacuum. Insert screw and tighten.
- Thread the cord through the two cord guides on the back of the vacuum (Fig. 2). Model R25S only.
- Secure the cord under the cord guide above upper cord hook (Fig. 3).
- Open the bag compartment cover by pressing the bag compartment button on the back of the vacuum to ensure a vacuum bag is in place.
Unwinding the Power Cord
- The Quick Release Upper Cord Hook rotates to allow for quick access to the power cord. Turn the upper cord hook downward and you can quickly drop the power cord to the floor without unwinding it from the cord hooks (Fig. 4).
- Your vacuum is now ready for use.
Storing the Vacuum
- When storing the vacuum cleaner, turn the Quick Release Upper Cord Hook to the upright position and wrap the power cord around the upper cord storage hook (Fig. 4) and the spring-activated lower cord hook (Fig. 5). Fasten the plug to the wrapped cord using the channel on the plug.
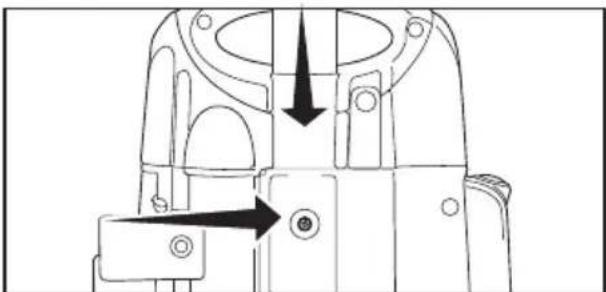
Fig. 1
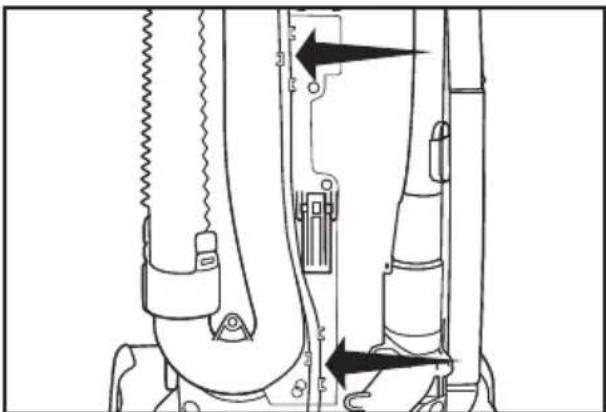
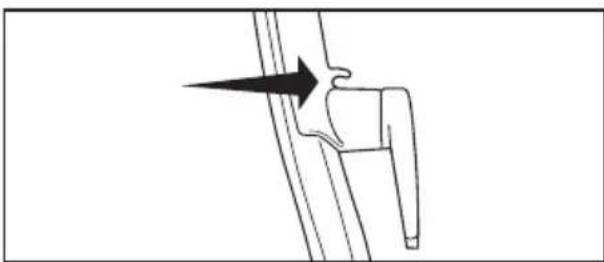
Fig. 2
Fig. 3
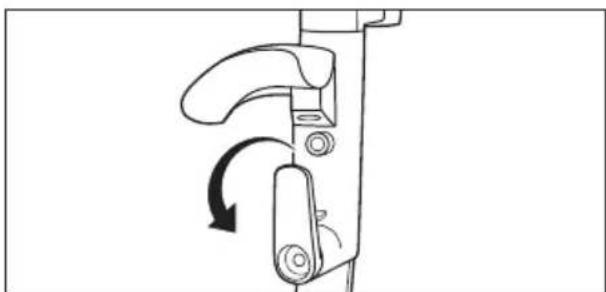
Fig. 4
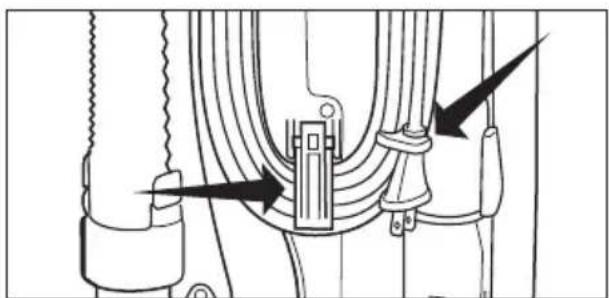
Fig. 5
R25P & R25D Models
Reclining the Handle
Press the Handle Release Pedal with your foot to recline the handle (Fig. 1).
Vacuuming Carpet
For carpet cleaning, recline the handle and push the On/Off Switch to the "On" position. The Brushroll Mode Button will illuminate green indicating the brushroll is in the carpet cleaning "High" setting (Fig. 2).
NOTE: For vacuuming plush or very thick carpet, open the Suction Relief Valve on the hose handle to reduce the suction power (see Page 14).
Vacuuming Area Rugs
Recline the handle and push the On/ Off switch to the "On" position. Push the Brushroll Mode Button once so it is flashing indicating the brushroll is in "Low Setting" for cleaning delicate rugs, wool and silk carpet (Fig. 3).
Vacuuming Bare Floors
Recline the handle and push the On/Off switch to the "On" position. Push the Brushroll Mode Button twice so it is no longer illuminated indicating the brushroll is "Off" for cleaning bare floors (i.e. tile, wood, vinyl) (Fig. 4).
Brushroll Auto Shut-Off Feature
When the vacuum is turned on in carpet and rug mode and in the upright position, the brushroll will stop spinning to reduce the possibility of damaging flooring surfaces. The brushroll will spin when the handle is reclined.
Always turn the vacuum cleaner off before unplugging it from the electrical outlet.
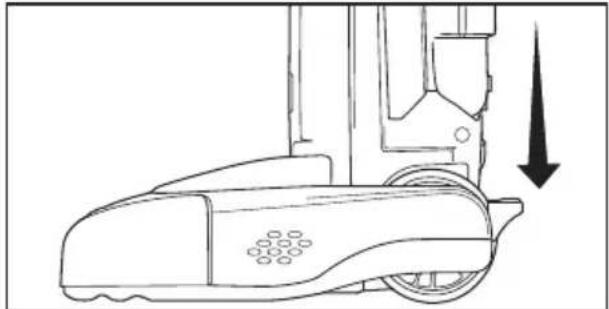
Fig.1

Fig. 2
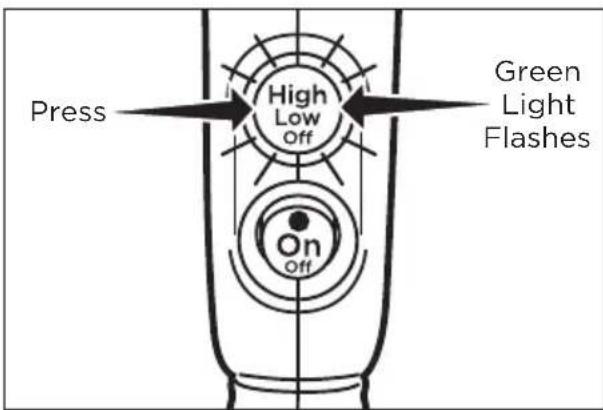
Carpet Cleaning
Fig. 3
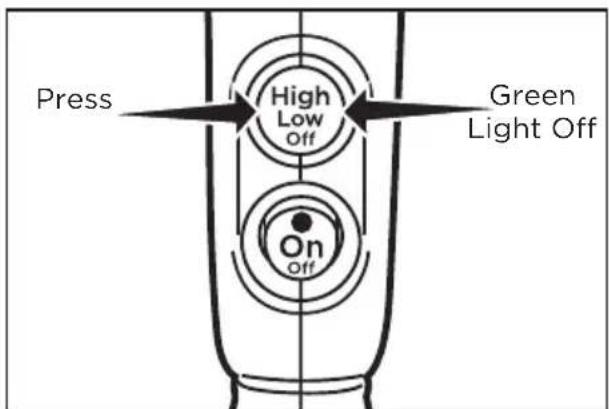
Area Rug Cleaning
Fig. 4
Bare Floor Cleaning
R25S Model
Reclining the Handle
Press the Handle Release Pedal with your foot to recline the handle (Fig. 1).
Vacuuming Carpet
For carpet cleaning, recline the handle and push the On/Off Switch to the Carpet position (Fig. 1).
Vacuuming Rugs and Bare Floors
Recline the handle and push the On/Off switch to the Floors position (Fig. 2).
Brushroll Auto Shut-Off Feature
When the vacuum is turned on in carpet mode and in the upright position, the brushroll will stop spinning to reduce the possibility of damaging flooring surfaces. The brushroll will spin when the handle is reclined.
Always turn the vacuum cleaner off before unplugging it from the electrical outlet.
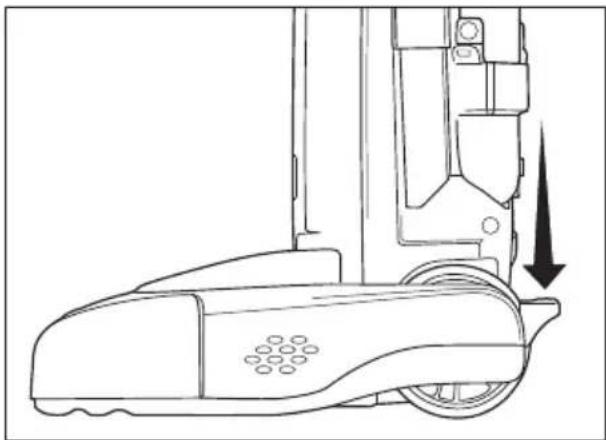
Fig. 1
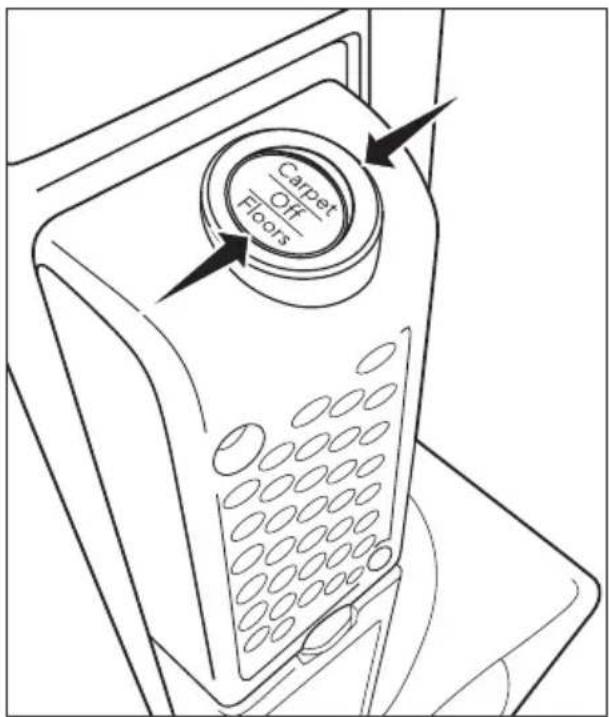
Fig. 2
Vacuuming Under Furniture
Your vacuum will lie flat on the floor for effective cleaning under beds and tables.
- Press the Handle Release Pedal once for normal vacuuming (Fig. 1).
- Press the Handle Release Pedal a second time to enable the vacuum to lie flat on the floor (Fig. 2).
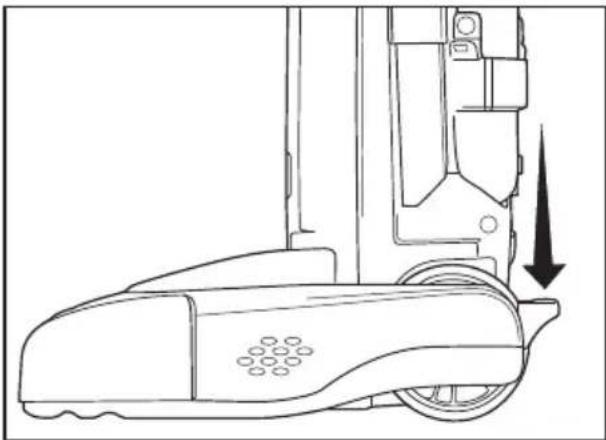
Fig.1
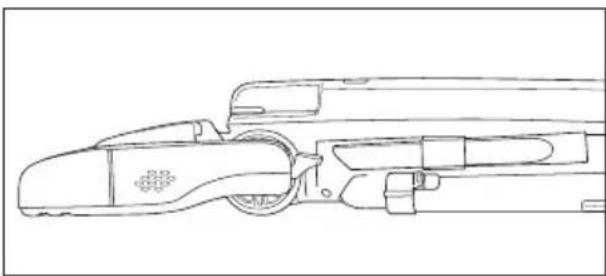
Fig. 2
Carrying the Vacuum
To safely transport your vacuum, especially when carrying the vacuum up and down stairs, use the Carrying Handle located at the top of the bag compartment (Fig. 3).
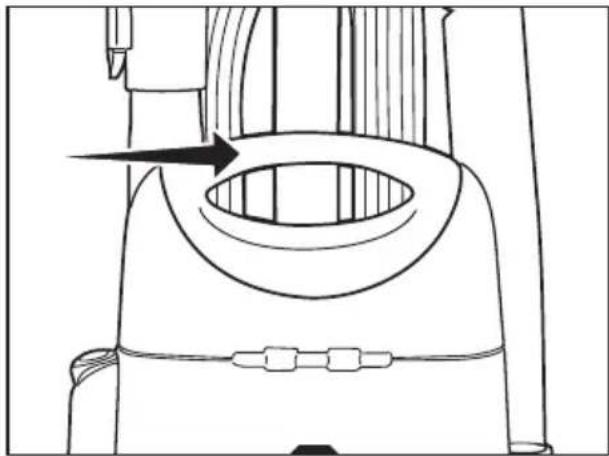
Fig. 3
Telescopic Wand Cleaning
Your vacuum is a comprehensive cleaning system equipped with a dusting brush/upsolstery tool, crevice tool, telescopic wand and a stretch hose.
The vacuum must be in the upright position for attachment cleaning (Fig. 1).
- Remove the Telescopic Wand from the body of the vacuum by pulling it up and out of the holder.
- Extend the wand by sliding the Wand Extension Button forward while extending the wand to desired length (Fig. 2).
- Attach any of the tools to the end of the Telescopic Wand.
- When finished with wand cleaning, insert the wand back into the vacuum and secure it by pushing the wand into the holder.
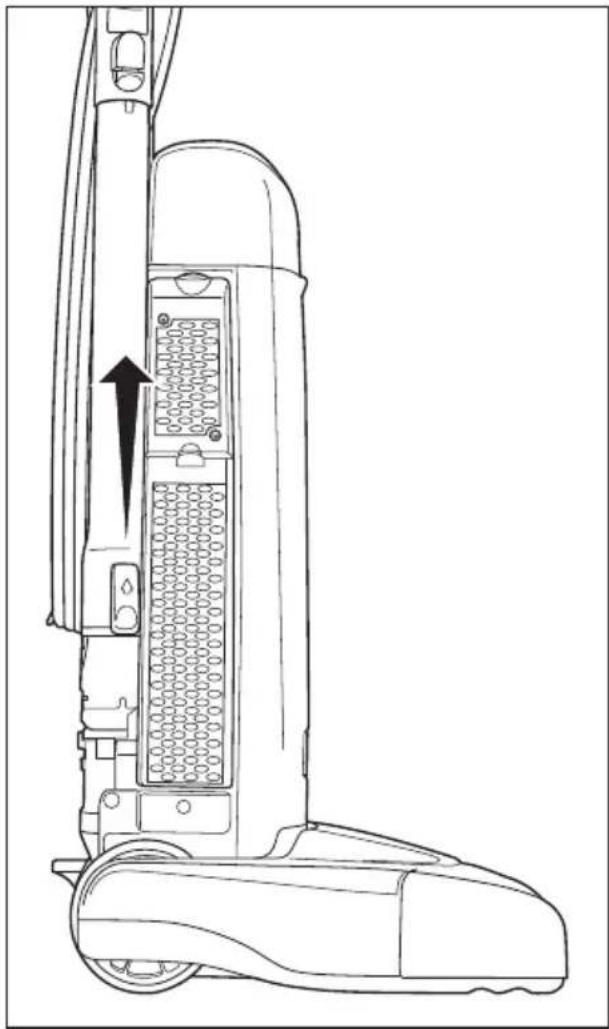
Fig. 1
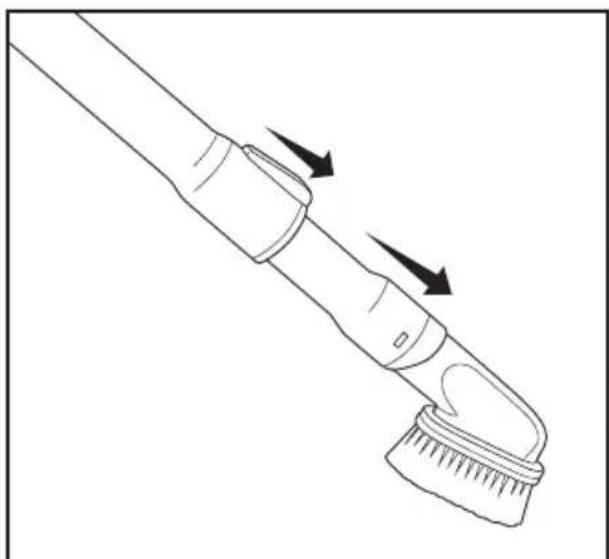
Fig. 2
Cleaning Tools
Your vacuum is equipped with a dusting brush/upsolstery tool and crevice tool.
- Remove the telescopic wand from the vacuum.
- Insert any of the tools onto the end of the wand.
Dusting Brush
Ideal for table tops, shelves, blinds or hard surface floors (Fig. 1).
Upholstery Tool
Ideal for soft surfaces and furniture. Remove the dusting brush clip for upholstery cleaning (Fig. 2).
C revice Tool
Ideal for tight places like between seat cushions or corners (Fig. 3).
Fur Get It Pet Hair Remover Tool (R25P Model)
Ideal for removing pet hair from upholstery, stairs and vehicles (Fig. 4).
NOTE: Do not use the pet hair remover tool on pets.
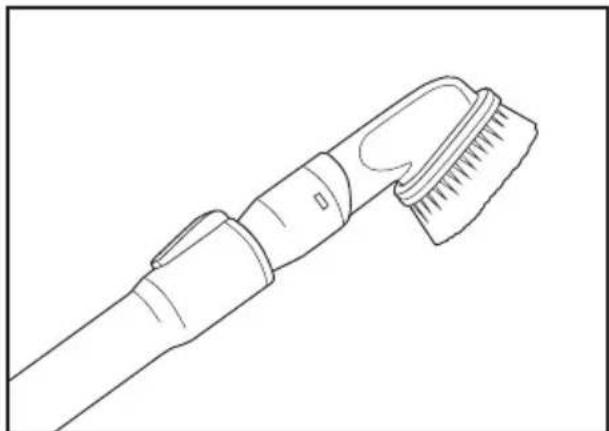
Fig.1
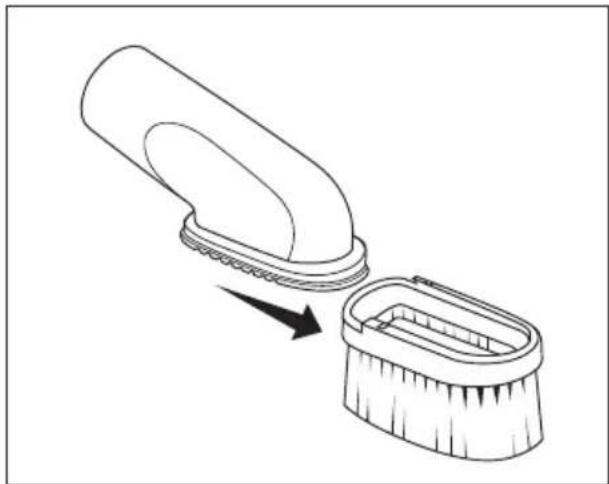
Fig. 2
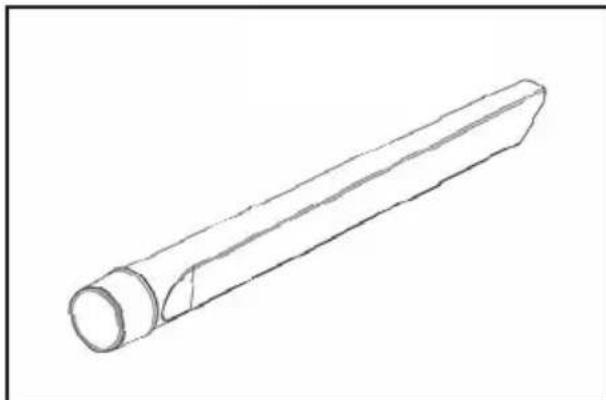
Fig. 3
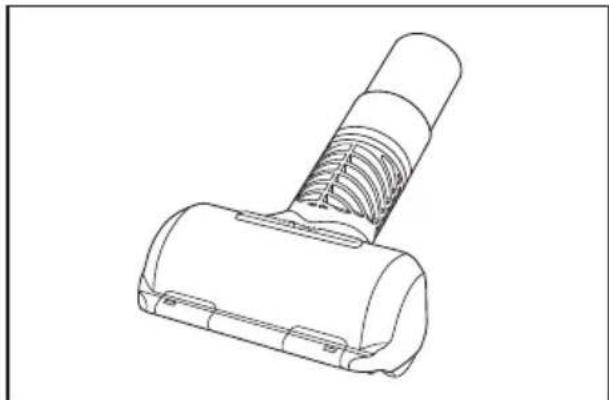
Fig. 4
Cleaning Tools
The cleaning tools can also be attached to the curved handle for tasks where the wand is not needed.
- Disconnect the wand from the curved handle by pressing the Wand Release Button (Fig. 1).
- Attach any of the cleaning tools directly to the curved handle (Fig. 2).
Adjusting the Suction Power for Tool Cleaning and Plush Carpet
Full suction power may be too strong for some cleaning situations. For example, reduced suction power would be appropriate for cleaning sheer curtains or plush, thick carpet.
- Locate the Suction Relief Valve on the hose handle and slide it back (Fig. 3). This reduces the suction power coming through the tool. Slide the valve forward when finished to restore full suction power.
Disconnecting the Hose
The hose can be disconnected from the vacuum by pressing the two buttons on the sides of the Hose Disconnect Cuff located low on the back of the vacuum (Fig. 4). This provides a method for removing debris from the hose.
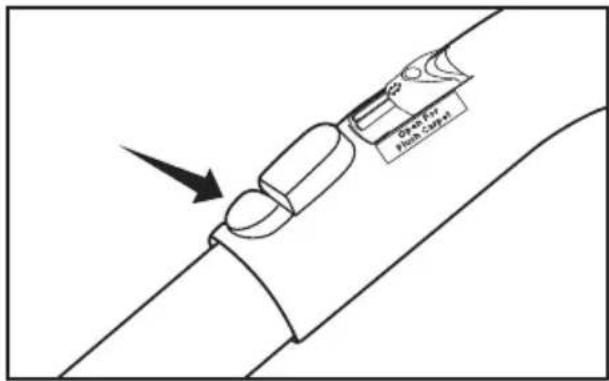
Fig.1
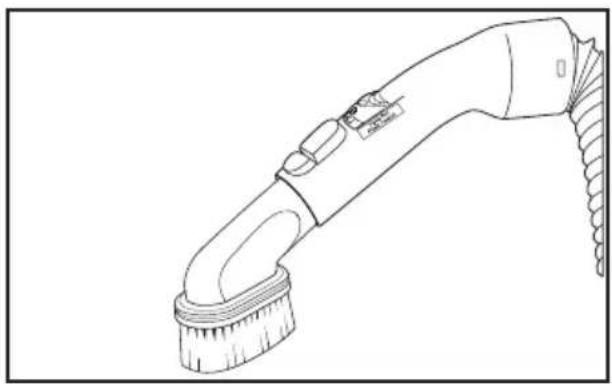
Fig. 2
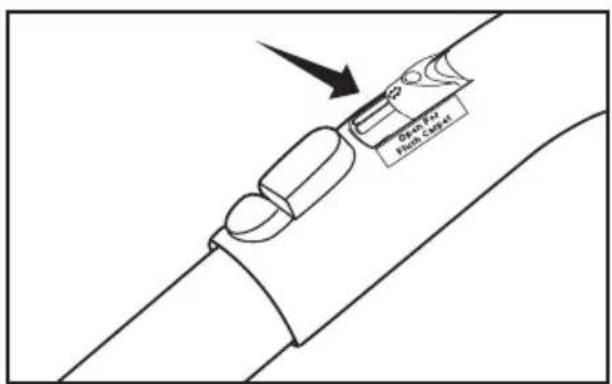
Fig. 3
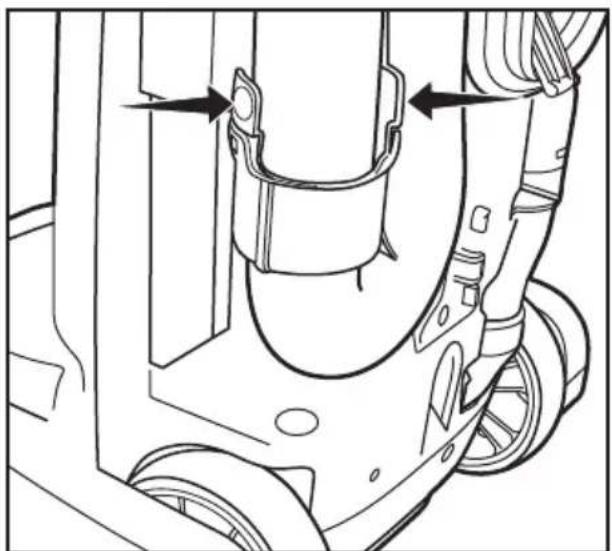
Fig. 4
R25P & R25D Models
When to Replace the Vacuum Bag (Full Bag Indicator Light)
The Full Bag Indicator Light is designed to show when the bag is full or when there is a clog in the vacuum (Fig. 1).
The light can also come on when vacuuming fine powders such as flour or drywall dust. Before the bag is actually full these materials can quickly block the bag pores, significantly reducing airflow. The vacuum bag should still be changed.
The light may also come on during attachment cleaning. If the light goes off when attachments are no longer in use, the vacuum bag does not need to be changed.
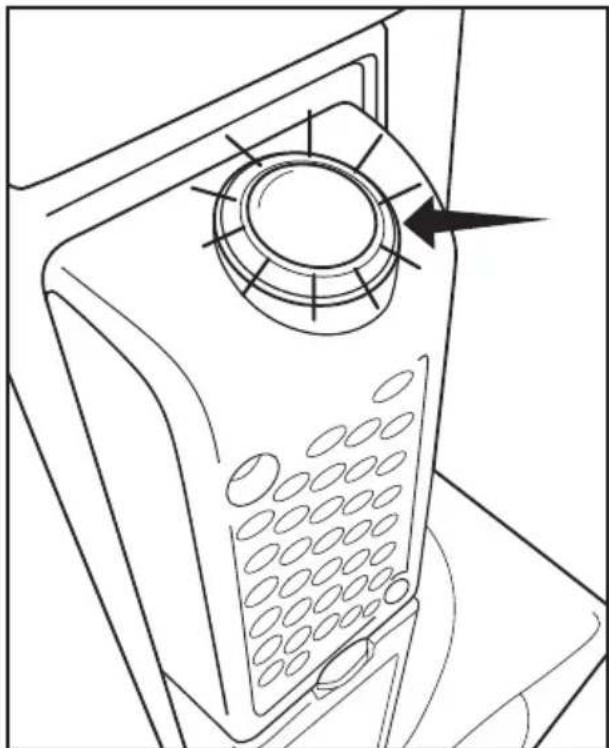
Fig.1
R25S Model
When to Replace the Vacuum Bag (Full Bag Indicator)
The Full Bag Indicator is designed to show when the bag is full or when there is a clog in the vacuum (Fig. 2).
The indicator can turn red when vacuuming fine powders such as flour or drywall dust before the bag is actually full. These materials can quickly block the bag pores, significantly reducing airflow. The vacuum bag should still be changed.
The indicator may also turn red during attachment cleaning. If so, the vacuum bag does not need to be changed.
NOTE: The vacuum bags are disposable and intended to only be used once. Do not attempt to reuse the bag, as suction and filtration performance will be greatly reduced.
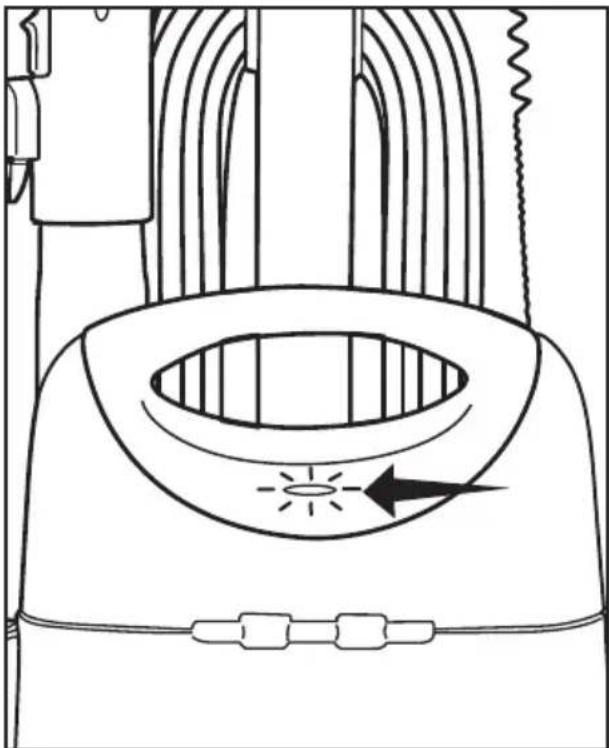
Fig. 2
NOTE: Unplug the vacuum cleaner from the electrical outlet before changing the bag.
Replacing the Vacuum Bag
To access the vacuum bag press the bag compartment button on back of vacuum (Fig. 1).
- Open the bag compartment lid (Fig. 2).
- Remove the used vacuum bag by lifting up on the collar ring and pulling straight up (Fig. 3). Discard the used bag.
- To install a new bag, drop the bag into the bag compartment, ensuring the bag collar is aligned in the top of the compartment (Fig. 4).
- Replace the cover and press the lid release button to secure it into place (Fig. 5).
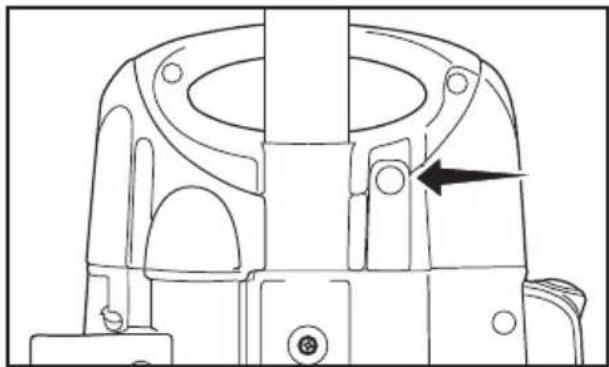
Fig.1
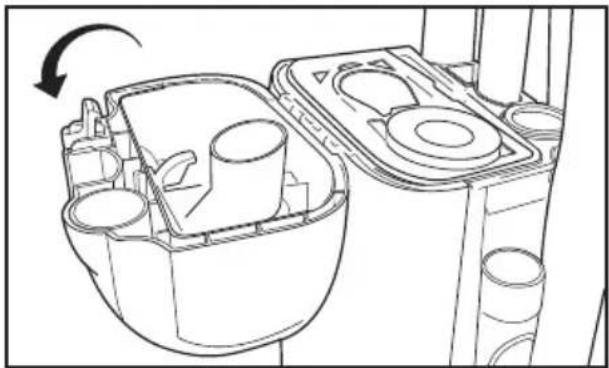
Fig. 2
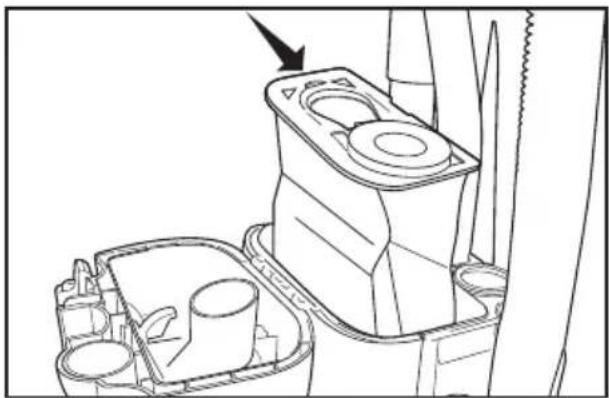
Fig. 3
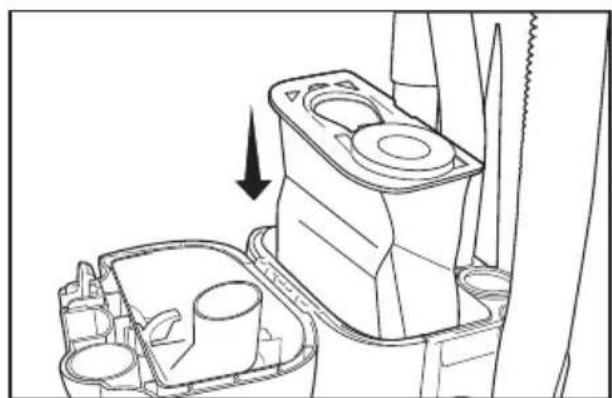
Fig. 4
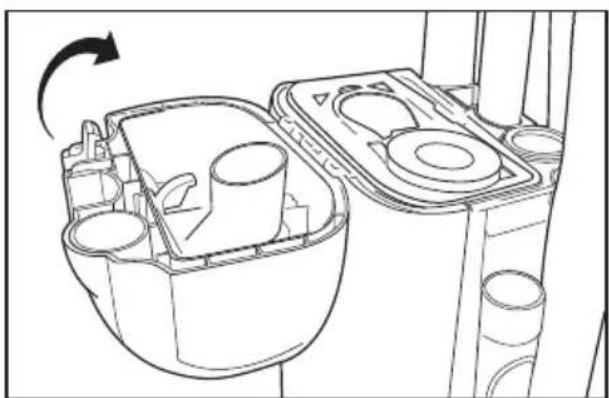
Fig. 5
NOTE: Unplug the vacuum cleaner from the electrical outlet before changing the bag.
Replacing the Post Filter
- The post filter is located on the side of the vacuum (Fig. 1).
- Push down on the tab on the top to remove the used filter and discard it (Fig. 2).
- To insert a new filter, position the tabs on the bottom of the filter cartridge into the vacuum. Then snap it into place.
Replacing the Secondary Filter
Pull the filter holder compartment on the front of the vacuum straight out (Fig. 3).
- Remove and throw away the used filter.
- Insert a new filter under the tabs in the holder (Fig. 4). Then align the filter holder into the vacuum and slide it into place.
NOTE: Filters cannot be washed and reused.
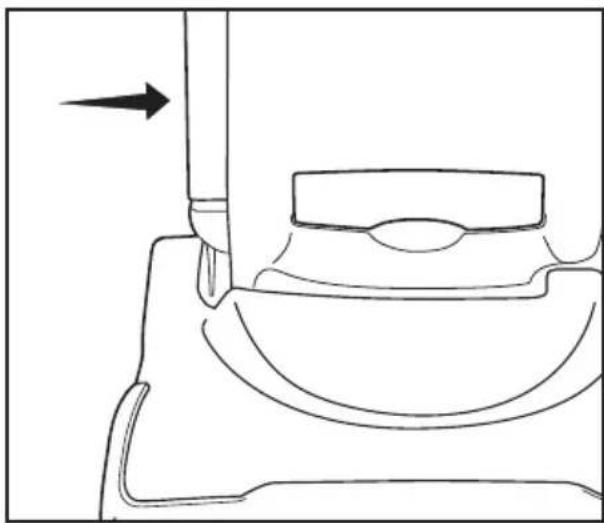
Fig.1
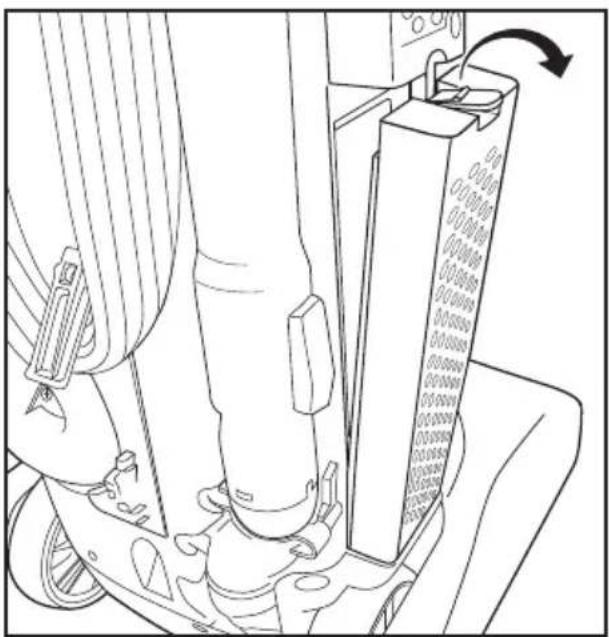
Fig. 2
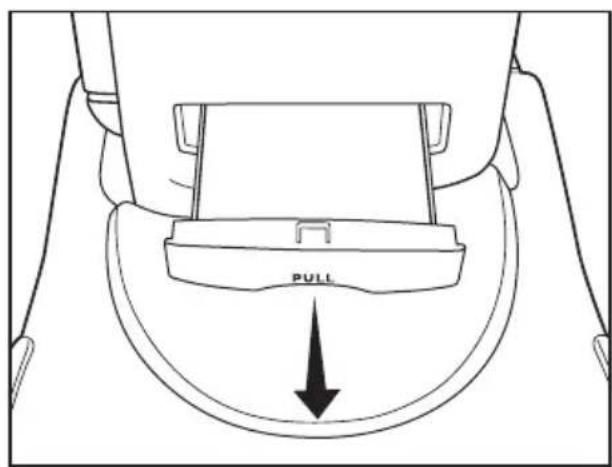
Fig. 3
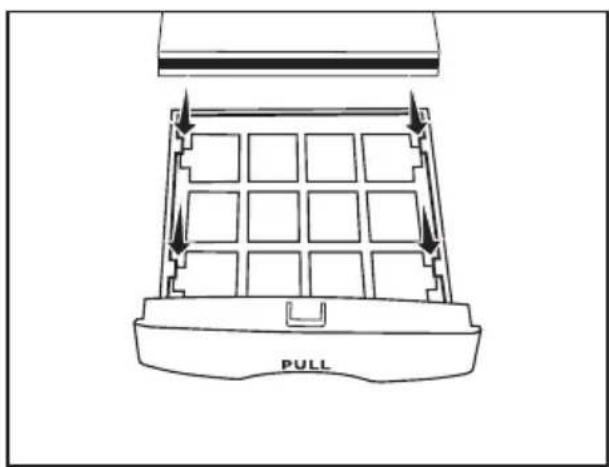
Fig. 4
CAUTION! To Reduce the Risk of Injury From Moving Parts, Unplug Before Servicing.
Jammed Brushroll (R25P & R25D models)
If an object, such as a throw rug or article of clothing is ever picked up into your vacuum, the vacuum will sense this jammed brushroll condition and turn off the brushroll. When this happens the headlight will flash red.
- Turn off and unplug the vacuum.
- Remove the cause of the jam.
- Turn the vacuum back on.
- If the brushroll is free of obstructions and the headlight still flashes, it's likely there is an issue with the brushroll motor. If so, please take your vacuum to an Authorized Vacuum Retailer for service.
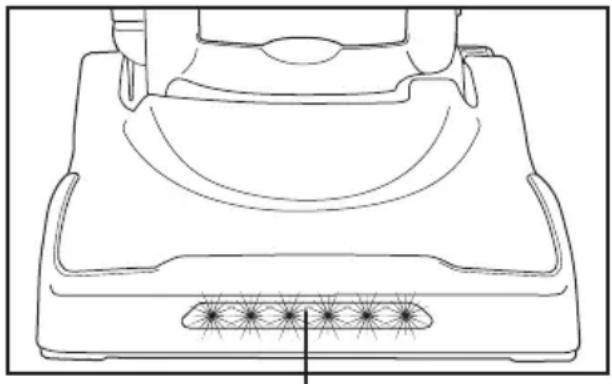
Red Lights
Red lights flash indicating a brushroll jam
Dirt Sensing Display (R25P Model)
This model is equipped with two amber lights (Fig. 3) that illuminate the edges of the cleaning path when your vacuum detects that dirt is being picked up by the machine (while in the carpet cleaning mode). Continue vacuuming this area until the amber lights no longer illuminate.
When only the white headlights are illuminated, then all of the deeply embedded dirt has been removed from your carpet, and you should move on to a new area.
Cleaning the Dirt Sensor Eye (R25P model)
If the amber lights run continuously, it may be the dirt sensor eye has become coated with moist dirt. To remedy this situation, simply vacuum up a small amount of uncooked rice which works to clean the eye. Repeat, if necessary. If the problem persists, contact an Authorized Vacuum Retailer.
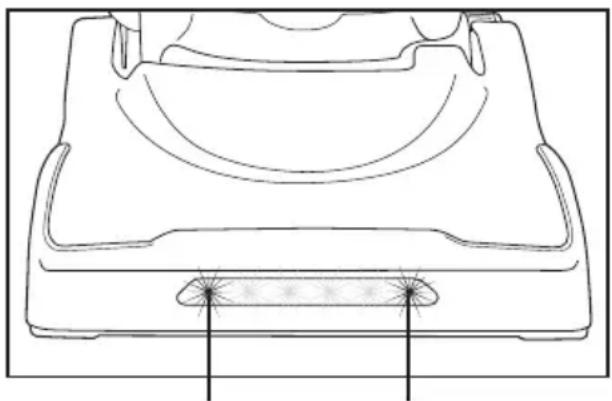
Fig. 3
Amber Light Amber Light
When the amber lights are no longer illuminated, your carpet is clean.
CAUTION! To Reduce the Risk of Injury From Moving Parts, Unplug Before Servicing.
Belt Protection Breaker Reset (R25S model)
If the Belt Protection System shuts off your vacuum, follow these steps:
- Unplug the vacuum.
- Recline the vacuum to the flat position.
- Locate the Breaker Reset Button under the top of the nozzle (Fig. 1).
- Press the Reset Button and resume vacuuming.
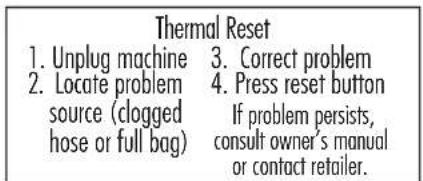
Thermal Motor Protection
Your vacuum is equipped with a safeguard to recognize when the vacuum might overheat and shuts itself off. When this happens the headlights are still on but the motors shut off. Common reasons why a vacuum may overheat include operating with a full bag or when there is a clog in the vacuum.
If the Thermal Motor Protection System shuts off your vacuum, follow these steps:
- Unplug the vacuum.
- Inspect the vacuum for a full bag condition or a hose clog and correct the problem.
- Locate the Thermal Motor Protection Reset Button on the back of the vacuum (Fig. 2). Press the button and resume vacuuming.
If problem continues, contact an Authorized Vacuum Retailer.
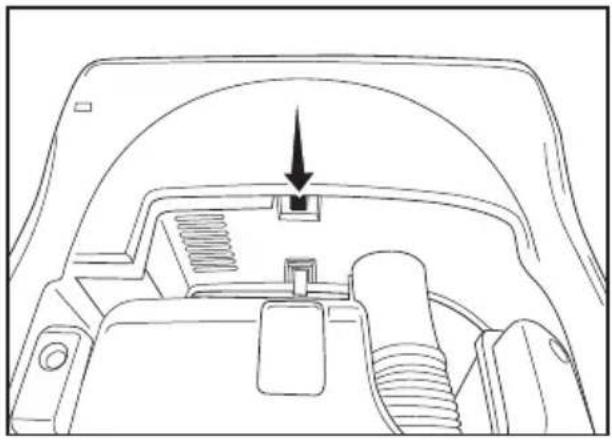
Fig.1
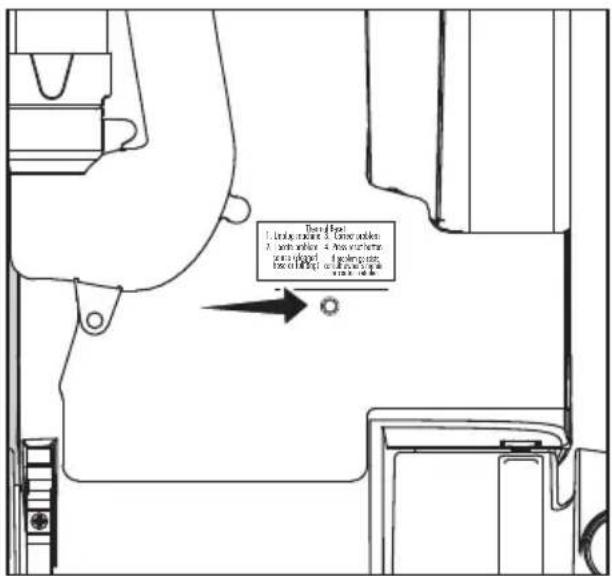
Fig. 2
Lifetime Belt
Your vacuum belt is covered with a lifetime warranty. Should the vacuum belt break, simply bring your vacuum to an Authorized Vacuum Retailer for a free replacement.
Annual Checkup
To keep your vacuum in peak operating condition, it is recommended you bring your vacuum to an Authorized Vacuum Retailer for an annual checkup. The Retailer will conduct a comprehensive examination to ensure your vacuum is in top operating condition.
Power Cord Care
- If the cord or plug has any apparent damage, refrain from using the vacuum. Please visit an Authorized Vacuum Retailer for a new cord or plug.
- When the vacuum is in use, hold the cord to keep from running over it.
- Avoid obstructions and do not pull the cord around sharp edges or corners.
- Always keep the cord away from heated surfaces and never close doors on it as this may cause damage to the wiring.
- To unplug, always grasp the plug, not the cord.
Troubleshooting
WARNING! To reduce the risk of electrical shock or injury from moving parts, unplug the vacuum before servicing or cleaning the vacuum.
CAUTION! To Reduce the Risk of Electric Shock, Do Not Handle Plug or Appliance with Wet Hands.
| PROBLEM | CHECK POINT POSSIBLE SOLUTION | |
| Vacuum won't turn on. | Power Cord Plug unit in firmly. | |
| House Fuse or Breaker | Check house fuse or breaker. Replace fuse/reset breaker. | |
| Vacuum Bag or Hose Rep | ace bag or remove obstacle. | |
| Thermal Motor Protection Reset Button | Press reset button. | |
| Needs Service Take to an Authorized Vacuum Retailer. | ||
| Vacuum won't pick up or low suction. | Carpet Button | Press "Carpet" button on - it will illuminate when it's on. |
| Vacuum Bag Replace full | bag. | |
| Filter Replace clogged filter. | ||
| Hose Remove obstacle. | ||
| Brushes Replace brush strips (R25P & R25D models). | ||
| Belt Take to an Authorized Vacuum Retailer. | ||
| Dust escaping from vacuum | Bag Compartment Lid Secure latch on bag compartment lid. | |
| Filter Review filter installation (pages 17). | ||
How to Contact an Authorized Vacuum Retailer
Any other service should be performed by an Authorized Riccar Vacuum Retailer.
To locate your nearest Authorized Vacuum Retailer, visit our website at Riccar.com or call 888-674-2227.
Key Replacement Parts
- Genuine HEPA Media Vacuum Bags: R25H-6
- Genuine Filter Set (HEPA media and granulated charcoal): R25P-F
- Genuine Filter Set (HEPA media and charcoal): R25D-F
- Genuine Filter Set (Electrostatic Media): R25S-F
For Best Performance
- Keep your vacuum clean and in good operating condition.
- Change the vacuum bag once a month or when the full bag light is illuminated to maximize cleaning performance.
- Always use genuine vacuum bags and replacement parts. Use of other products may result in poor cleaning performance, potential vacuum cleaner damage and may void vacuum warranty. Genuine products are designed for maximum cleaning performance.
- Have your vacuum checked annually by an Authorized Vacuum Retailer.
- Store your vacuum carefully in a dry area.
- For optimum cleaning performance and safety, follow your owner's manual instructions.
What is Covered:
This warranty covers any defects in material and workmanship in your new vacuum and applies exclusively to the original purchaser.
How Long Coverage Lasts:
Warranty coverage for the R25P model lasts five years. Warranty coverage for the R25D model lasts three years. Warranty coverage for the R25S model lasts one year. Household models used commercially are only warranted for 90 days.
What is Not Covered:
- Damage to the vacuum which occurs from neglect, abuse, alterations, accident, misuse or improper maintenance.
- Normal replacement items: disposable bags, disposable filters and (brushstrips R25P & R25D models).
- Damage associated with or resulting from the use of non-genuine parts including normal replacement items.
What We Will Do:
This warranty provides, at no cost to you, all labor and parts to keep this vacuum in correct operating condition during the warranted period.
How to Get Service:
Warranty service can only be obtained by presenting the vacuum to an Authorized Riccar Vacun Retailer. A proof-of-purchase and product serial number will be required before service is rendered. To locate your nearest service center, please call 888-674-2227 or visit Riccar.com.
THIS WARRANTY IS EXCLUSIVE AND IN LIEU OF ANY AND ALL OTHER WARRANTYES WHEHER WRITTEN, ORAL, EXPRESSED OR IMPLIED, (INCLUDING ANY WARRANTY OF MERCHANTABILITY OR FITNESS FOR A PARTICULAR PURPOSE). THIS WARRANTY DISCLAIMS LIABILITY FOR INCIDENTAL OR CONSEQUENTIAL DAMAGES.
How State Law Applies:
This warranty gives you specific legal rights, and you may also have other rights which vary from state to state.
Owner's Warranty Information (keep this for your records)
Store name
Store Address City State Zip
Telephone Date of purchase
Serial number Model number
RiCCAR
Manual del Nombre
R25P, R25D
R25S