CS16i - Saw JONSERED - Free user manual and instructions
Find the device manual for free CS16i JONSERED in PDF.
| Product type | Battery-powered electric chain saw |
| Brand | Jonsered |
| Model | CS16i |
| Weight (without battery and cutting equipment) | 4.68 kg |
| Motor voltage | 58 V DC |
| Motor power | 2000 W |
| Motor type | Brushless |
| Battery (default) | 280Li, 58 V |
| Charger (default) | 440Ci |
| Oil tank capacity | 250 cm³ |
| Oil pump flow | 15 ml/min at 8000 rpm |
| Lubrication | Automatic |
| Standard guide bar length | 40 cm (16 in) |
| Effective cutting length | 38 cm (15 in) |
| Chain pitch | 9.52 mm (3/8 in) |
| Drive link thickness | 1.1 mm (0.043 in) |
| Maximum chain speed | 18.4 m/s |
| Number of sprocket teeth | 6 |
| Sprocket type | Star sprocket |
| Chain brake | Yes, with front hand guard |
| Felling claw | Yes |
| Chain catcher | Yes |
| Chain efficiency indicator | Yes, with LED indicators |
| Power modes | Standard and boost |
| Daily maintenance | Cleaning, brake check, lubrication, sharpening |
| Spare parts | Chain, guide bar, sprocket, battery, charger |
Frequently Asked Questions - CS16i JONSERED
User questions about CS16i JONSERED
0 question about this device. Answer the ones you know or ask your own.
Ask a new question about this device
Download the instructions for your Saw in PDF format for free! Find your manual CS16i - JONSERED and take your electronic device back in hand. On this page are published all the documents necessary for the use of your device. CS16i by JONSERED.
USER MANUAL CS16i JONSERED
EN Operator's manual 2-19
The initial language of this operator's manual is English. Operator's manuals in other languages are translations from English.
8:00 AM to 7:00 PM EST
Consumer support
1-800-487-5951 (U.S.)
Overview
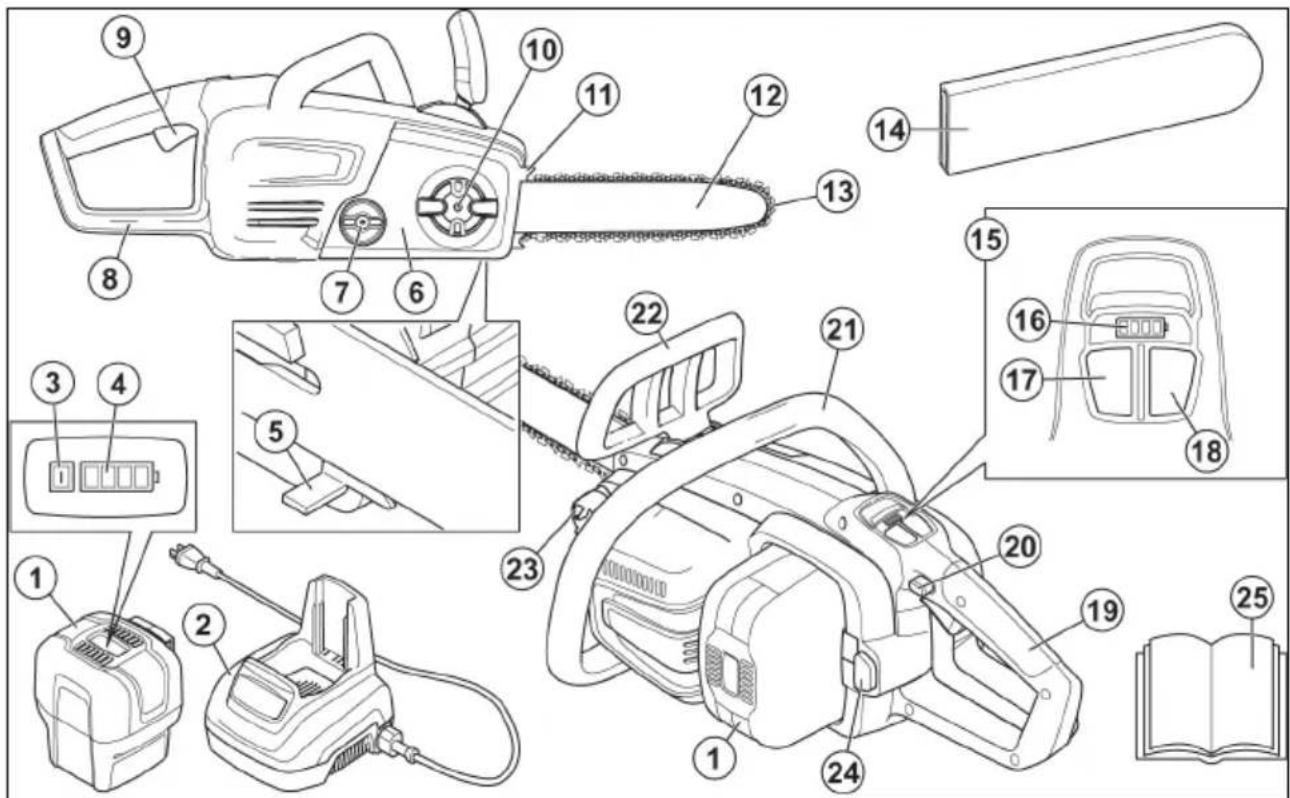
- Battery pack
- Battery charger
- Battery status indicator
- Battery state of charge LED
- Chain catcher
- Clutch cover
- Chain tension knob
- Rear handle guard
- Trigger
-
Sprocket cover retaining knob
-
Spiked bumper
- Guide bar
- Saw chain
- Guide bar cover
- Digital control center
- Battery state of charge LED
- Saw chain efficiency button / Boost button
- Power button
- Rear handle
-
Trigger lockout
-
Front handle
- Chain brake and front handle guard
- Chain oil tank
- Battery release button
- Operator's manual
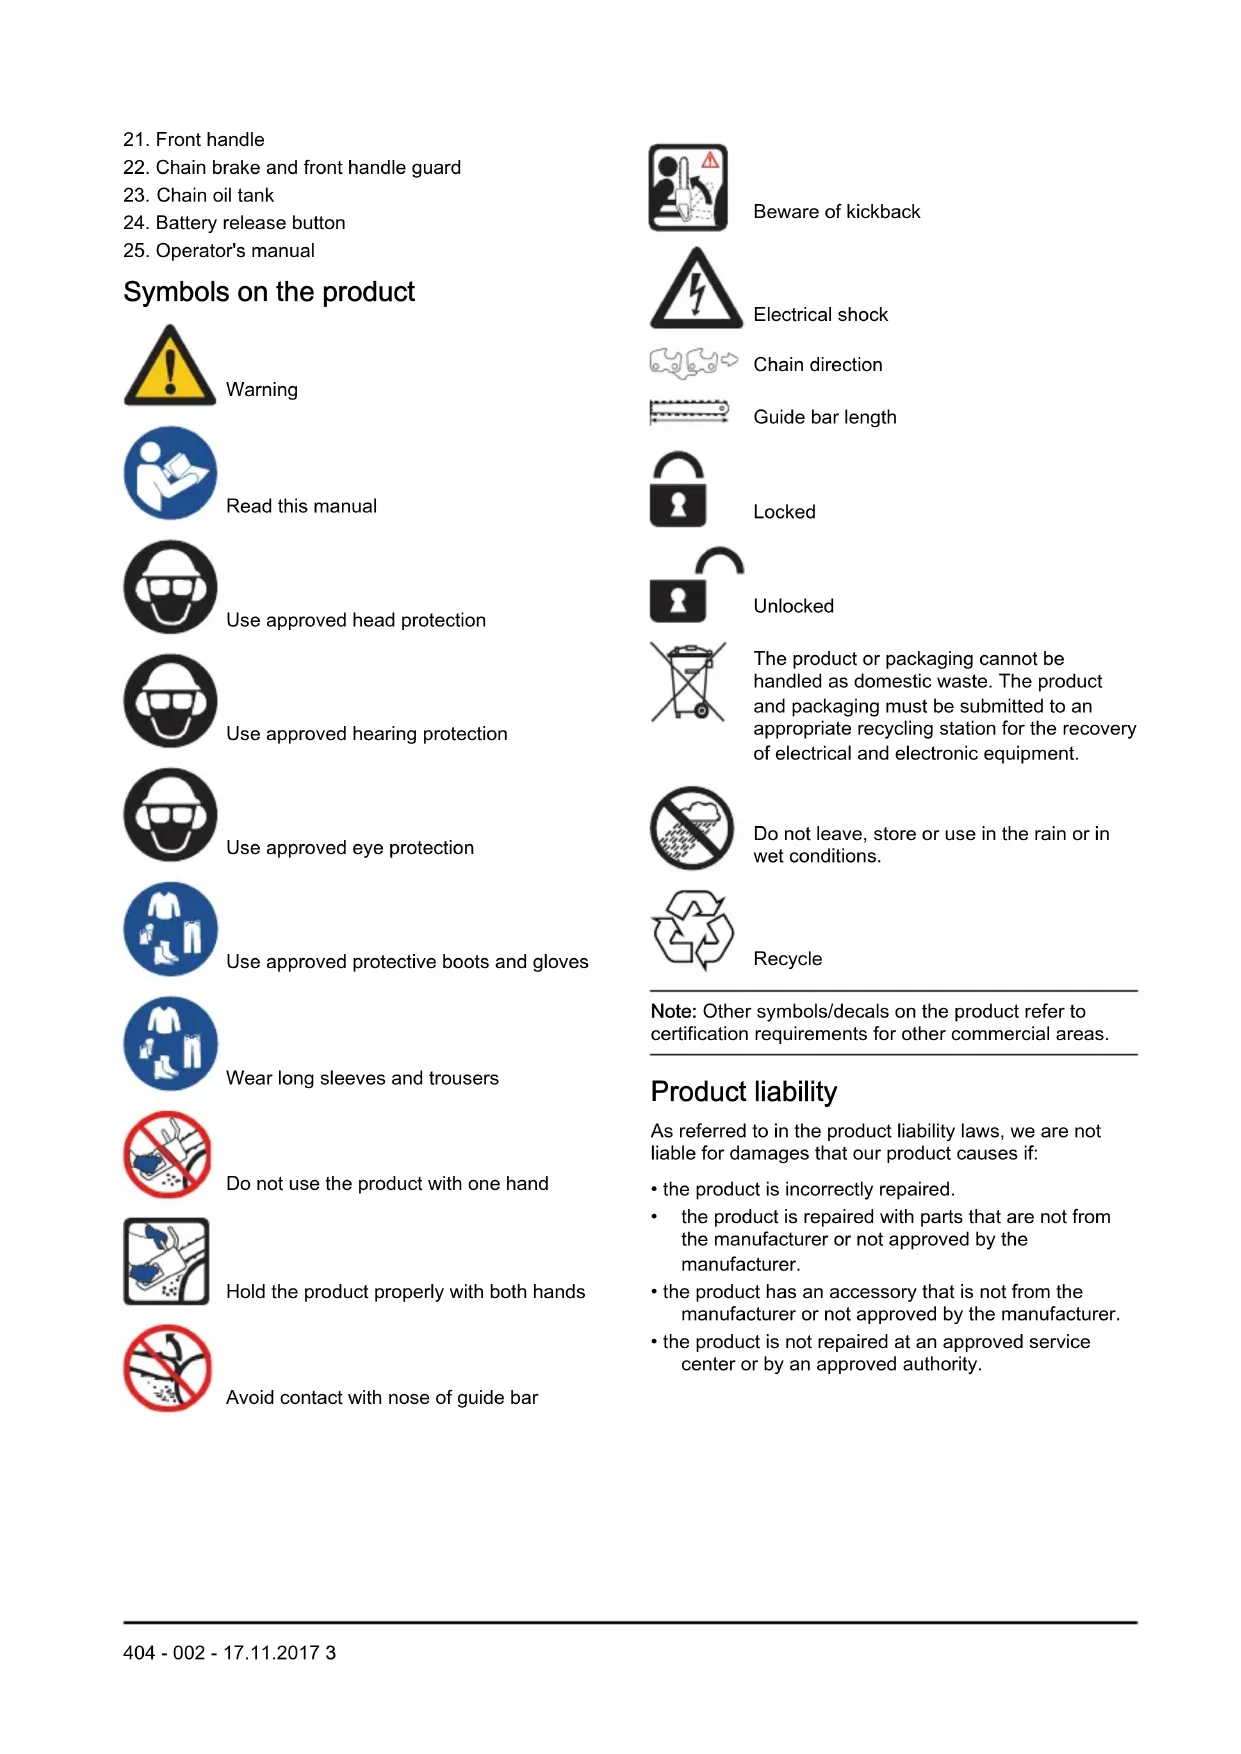
Symbols on the product
Warning

Read this manual

Use approved head protection

Use approved hearing protection

Use approved eye protection
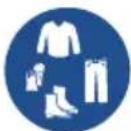
Use approved protective boots and gloves

Wear long sleeves and trousers

Do not use the product with one hand.
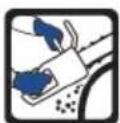
Hold the product properly with both hands
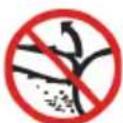
Avoid contact with nose of guide bar
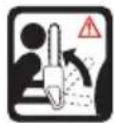
Beware of kickback
Electrical shock
Chain direction
Guide bar length

Locked

Unlocked
The product or packaging cannot be handled as domestic waste. The product and packaging must be submitted to an appropriate recycling station for the recovery of electrical and electronic equipment.

Do not leave, store or use in the rain or in wet conditions.

Recycle
Note: Other symbols/decals on the product refer to certification requirements for other commercial areas.
Product liability
As referred to in the product liability laws, we are not liable for damages that our product causes if:
- the product is incorrectly repaired.
the product is repaired with parts that are not from the manufacturer or not approved by the manufacturer. - the product has an accessory that is not from the manufacturer or not approved by the manufacturer.
- the product is not repaired at an approved service center or by an approved authority.
SAFETY
Safety definitions
The definitions below give the level of severity for each signal word.

WARNING: Injury to persons.

CAUTION: Damage to the product.
Note: This information makes the product easier to use.
General power tool safety warnings

WARNING: Read all safety warnings and all instructions. Failure to follow the warnings and instructions may result in electric shock, fire and/or serious injury.
Save all warnings and instructions for future reference.
The term "power tool" in the warnings refers to your mains-operated (corded) power tool or battery-operated (cordless) power tool.
Work area safety
- Keep work area clean and well lit. Cluttered or dark areas invite accidents.
- Do not operate power tools in explosive atmospheres, such as in the presence of flammable liquids, gases or dust. Power tools create sparks which may ignite the dust or fumes.
- Keep children and bystanders away while operating a power tool. Distractions can cause you to lose control.
Electrical safety
- Power tool plugs must match the outlet. Never modify the plug in any way. Do not use any adapter plugs with earthed (grounded) power tools. Unmodified plugs and matching outlets will reduce risk of electric shock.
- Avoid body contact with earthed or grounded surfaces, such as pipes, radiators, ranges and refrigerators. There is an increased risk of electric shock if your body is earthed or grounded.
- Do not expose power tools to rain or wet conditions. Water entering a power tool will increase the risk of electric shock.
- Do not abuse the cord. Never use the cord for carrying, pulling or unplugging the power tool. Keep cord away from heat, oil, sharp edges or moving
parts. Damaged or entangled cords increase the risk of electric shock.
- When operating a power tool outdoors, use an extension cord suitable for outdoor use. Use of a cord suitable for outdoor use reduces the risk of electric shock.
- If operating a power tool in a damp location is unavoidable, use a ground fault circuit interrupter (GFCI) protected supply. Use of a GFCI reduces the risk of electric shock.
Personal safety
- Stay alert, watch what you are doing and use common sense when operating a power tool. Do not use a power tool while you are tired or under the influence of drugs, alcohol or medication. A moment of inattention while operating power tools may result in serious personal injury.
- Use personal protective equipment. Always wear eye protection. Protective equipment such as dust mask, non-skid safety shoes, hard hat, or hearing protection used for appropriate conditions will reduce personal injuries.
- Prevent unintentional starting. Ensure the switch is in the off-position before connecting to power source and/or battery pack, picking up or carrying the tool. Carrying power tools with your finger on the switch or energising power tools that have the switch on invites accidents.
- Remove any adjusting key or wrench before turning the power tool on. A wrench or a key left attached to a rotating part of the power tool may result in personal injury.
- Do not overreach. Keep proper footing and balance at all times. This enables better control of the power tool in unexpected situations.
- Dress properly. Do not wear loose clothing or jewellery. Keep your hair, clothing and gloves away from moving parts. Loose clothes, jewellery or long hair can be caught in moving parts.
- If devices are provided for the connection of dust extraction and collection facilities, ensure these are connected and properly used. Use of dust collection can reduce dust-related hazards.
Power tool use and care
- Do not force the power tool. Use the correct power tool for your application. The correct power tool will do the job better and safer at the rate for which it was designed.
- Do not use the power tool if the switch does not turn it on and off. Any power tool that cannot be controlled with the switch is dangerous and must be repaired.
- Disconnect the plug from the power source and/or the battery pack from the power tool before making any adjustments, changing accessories, or storing
power tools. Such preventive safety measures reduce the risk of starting the power tool accidentally.
- Store idle power tools out of the reach of children and do not allow persons unfamiliar with the power tool or these instructions to operate the power tool. Power tools are dangerous in the hands of untrained users.
- Maintain power tools. Check for misalignment or binding of moving parts, breakage of parts and any other condition that may affect the power tool's operation. If damaged, have the power tool repaired before use. Many accidents are caused by poorly maintained power tools.
- Keep cutting tools sharp and clean. Properly maintained cutting tools with sharp cutting edges are less likely to bind and are easier to control.
- Use the power tool, accessories and tool bits etc. in accordance with these instructions, taking into account the working conditions and the work to be performed. Use of the power tool for operations different from those intended could result in a hazardous situation.
Battery tool use and care
- Recharge only with the charger specified by the manufacturer. A charger that is suitable for one type of battery pack may create a risk of fire when used with another battery pack.
- Use power tools only with specifically designated battery packs. Use of any other battery packs may create a risk of injury and fire.
- When battery pack is not in use, keep it away from other metal objects, like paper clips, coins, keys, nails, screws or other small metal objects, that can make a connection from one terminal to another. Shorting the battery terminals together may cause burns or a fire.
- Under abusive conditions, liquid may be ejected from the battery; avoid contact. If contact accidentally occurs, flush with water. If liquid contacts eyes, additionally seek medical help. Liquid ejected from the battery may cause irritation or burns.
Service
- Have your power tool serviced by a qualified repair person using only identical replacement parts. This will ensure that the safety of the power tool is maintained.
Chain saw safety warnings
- Keep all parts of the body away from the saw chain when the chain saw is operating. Before you start the chain saw, make sure the saw chain is not contacting anything. A moment of inattention while operating chain saws may cause entanglement of your clothing or body with the saw chain.
- Always hold the chain saw with your right hand on the rear handle and your left hand on the front handle. Holding the chain saw with a reversed hand
configuration increases the risk of personal injury and should never be done.
- Hold the power tool by insulated gripping surfaces only, because the saw chain may contact hidden wiring or its own cord. Saw chains contacting a live wire may make exposed metal parts of the power tool live and could give the operator an electric shock.
- Wear safety glasses and hearing protection. Further protective equipment for head, hands, legs and feet is recommended. Adequate protective clothing will reduce personal injury by flying debris or accidental contact with the saw chain.
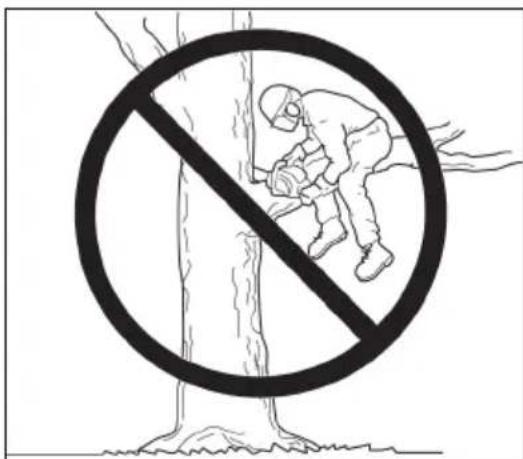
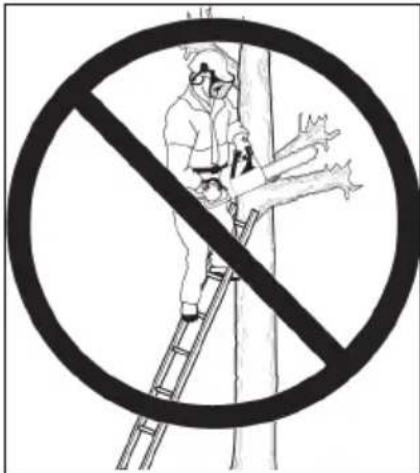
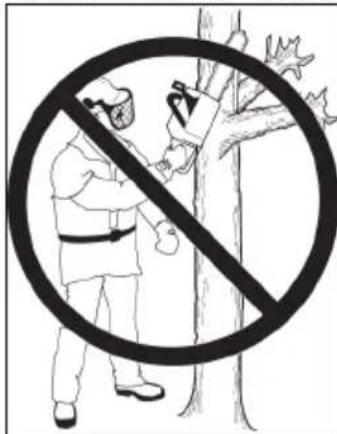
- Do not operate a chain saw in a tree. Operation of a chain saw while up in a tree may result in personal injury.
- Always keep proper footing and operate the chain saw only when standing on fixed, secure and level surface. Slippery or unstable surfaces such as ladders may cause a loss of balance or control of the chain saw.
- When cutting a limb that is under tension be alert for spring back. When the tension in the wood fibres is released the spring loaded limb may strike the operator and/or throw the chain saw out of control.
- Use extreme caution when cutting brush and saplings. The slender material may catch the saw chain and be whipped toward you or pull you off balance.
- Carry the chain saw by the front handle with the chain saw switched off and away from your body. When transporting or storing the chain saw always fit the guide bar cover. Proper handling of the chain saw will reduce the likelihood of accidental contact with the moving saw chain.
- Follow instructions for lubricating, chain tensioning and changing accessories. Improperly tensioned or lubricated chain may either break or increase the chance for kickback.
- Keep handles dry, clean, and free from oil and grease. Greasy, oily handles are slippery causing loss of control.
- Cut wood only. Do not use chain saw for purposes not intended. For example: do not use chain saw for cutting plastic, masonry or non-wood building materials. Use of the chain saw for operations different than intended could result in a hazardous situation.
Causes and operator prevention of kickback
Kickback may occur when the nose or tip of the guide bar touches an object, or when the wood closes in and pinches the chain in the cut.
Tip contact in some cases may cause a sudden reverse reaction, kicking the guide bar up and back towards the operator.
Pinching the saw chain along the top of the guide bar may push the guide bar rapidly back towards the operator.
Either of these reactions may cause you to lose control of the chain saw which could result in serious personal injury. Do not rely exclusively upon the safety devices built into your chain saw. As a chain saw user, you should take several steps to keep your cutting jobs free from accident or injury.
Kickback is the result of tool misuse and/or incorrect operating procedures or conditions and can be avoided by taking proper precautions as given below:
- Maintain a firm grip, with thumbs and fingers encircling the chain saw handles, with both hands on the chain saw and position your body and arm to allow you to resist kickback forces. Kickback forces can be controlled by the operator, if proper precautions are taken. Do not let go of the chain saw.
- Do not overreach and do not cut above shoulder height. This helps prevent unintended tip contact and enables better control of the chain saw in unexpected situations.
- Only use replacement bars and saw chains specified by the manufacturer. Incorrect replacement bars and saw chains may cause saw chain breakage and/or kickback.
- Follow the manufacturer's sharpening and maintenance instructions for the saw chain. Decreasing the depth gauge height can lead to increased kickback.
General safety instructions
- Use the product correctly. Injury or death is a possible result of incorrect use. Only use the product for the tasks found in this manual. Do not use the product for other tasks.
- Read, understand and obey the instructions in this manual. Obey the safety symbols and the safety instructions. If the operator does not obey the instructions and the symbols, injury, damage or death is a possible result.
- Do not discard this manual. Use the instructions to assemble, to operate and to keep your product in good condition. Use the instructions for correct installation of attachments and accessories. Only use approved attachments and accessories.
- Do not use a damaged product. Obey the maintenance schedule. Only do the maintenance work that you find an instruction about in this manual. An approved service center must do all other maintenance work.
-
This manual cannot include all situations that can occur when you use the product. Be careful and use your common sense. Do not operate the product or do maintenance to the product if you are not sure about of the situation. Speak to a product expert, your dealer, service agent or approved service center for information.
-
Remove the battery pack before you assemble the product, put the product into storage or do maintenance.
- Do not use the product if it is changed from its initial specification. Do not change a part of the product without approval from the manufacturer. Only use parts that are approved by the manufacturer. Injury or death is a possible result of incorrect maintenance.
- Do not start the product indoors or near flammable material.
- This product makes an electromagnetic field during operation. The electromagnetic field can cause damage to medical implants. Speak to your physician and medical implant manufacturer before you operate the product.
- Do not let a child operate the product.
- Do not let a person, without knowledge of the instructions, operate the product.
- Always monitor a person, with decreased physical capacity or mental capacity, that uses the product. A responsible adult must be there at all times.
- Lock the product in an area that children and not approved persons cannot access.
- The product can eject objects and cause injuries. Obey the safety instructions to decrease the risk of injury or death.
- Do not go away from the product when the motor is on. Stop the motor and make sure that the chain does not turn.
- The operator of the product is responsible if an accident occurs.
Make sure that parts are not damaged before you use the product. - Refer to national or local laws. They can prevent or decrease the operation of the product in some conditions.
Safety instructions for operation
- Continuous or regular operation of the product can cause "white finger" or equivalent medical problems from vibrations. Examine the condition of your hands and fingers if you operate the product continuously or regularly. If your hands or fingers have discoloration, have pain, tingle, or are numb, stop work and speak to a physician immediately.
Make sure the product is fully assembled before you use it. - The product can cause objects to eject, which can cause damage to the eyes. Always use approved eye protection when you operate the product.
- Be careful, a child can come near the product without your knowledge during operation.
- Do not operate the product if there are persons in the work area. Stop the product if a person goes into the work area.
Make sure that you are always in control of the product.
The product must be operated with two hands. Do not operate the product with one hand. Serious injury to the operator, workers, bystanders, or a combination of these persons can result from operation with only one hand.
- Hold the front handle with your left hand and the rear handle with your right hand. Hold the product on the right side of your body.
- Do not operate the product when you are tired, ill or under the influence of alcohol or other drugs.
- Do not use the product if you cannot receive aid if an accident occurs. Tell others before you operate or start the product.
- Do not turn with the product before you make sure that no persons or animals are in the safety area.
- Remove all unwanted materials from the work area before you start. If the chain hits an object, the object can eject and cause injury or damage. Unwanted material can wind around the chain and cause damage.
- Do not use the product in bad weather, such as fog, rain, strong winds, risk of lightning or other weather conditions. Dangerous conditions, such as slippery surfaces, can occur because of bad weather.
Make sure that you can move freely and work in a stable position. - Make sure that you cannot fall when you use the product. Do not tilt when you operate the product.
- Stop the motor before you move the product.
- Do not put down the product with the motor on.
- Before you remove unwanted materials from the product, stop the motor. Let the chain stop before you remove the cut material.
- Do not operate this product in a tree. Operation of the product while up in a tree may result in injury.
- Obey all safety instructions to help prevent kickback, skating, bouncing, and dropping, which can result in serious injury.
- Adjust the saw chain tension regularly to make sure that the saw chain has the correct tension. A saw chain without the correct tension can jump off and cause serious injury or death.
- Do not fell trees using an incorrect procedure. This can cause injury to persons, hit a utility line or cause damage to property.
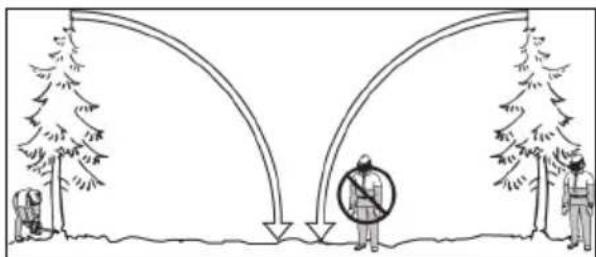
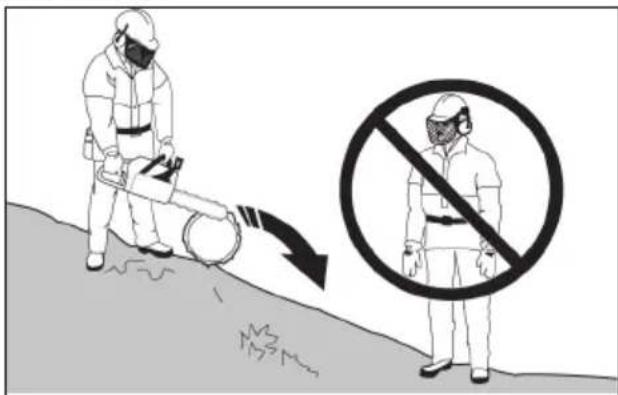
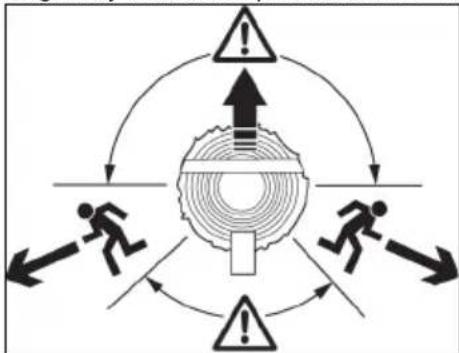
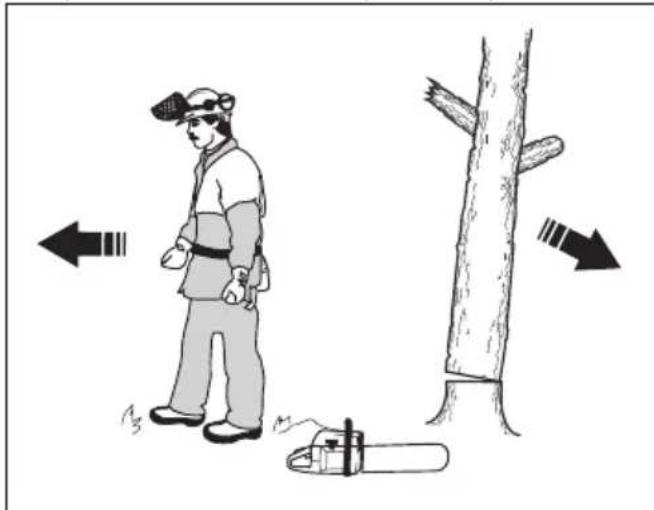
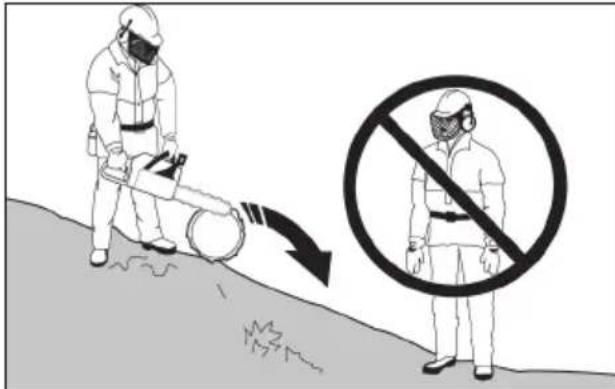
- The operator must stay on the uphill side of the terrain as the tree is likely to roll or slide downhill after it is felled.
- Plan and clear an escape path before cuts are started. The escape path must extend back and diagonally behind the possible line of fall.
- Always stop the motor before you move the product between the trees.
Make sure you correctly plant your feet on the ground and apply your weight equally.
- Always keep correct footing and operate the product only on safe and level surfaces. Slippery or not stable surfaces, such as ladders, can cause a loss of balance or control.
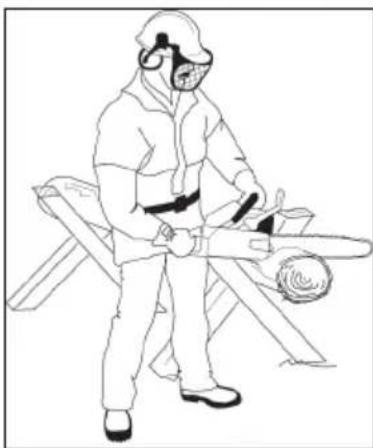
- The first-time user should cut logs on a saw-horse or cradle as basic practice.
Kickbacks, skating, bouncing and dropping
Different forces can have an effect on the safe control of the product.
- Skating is when the guide bar moves quickly across the wood.
- Bouncing is when the guide bar lifts off the wood and touches it again and again.
- Dropping is when the product drops down after the cut is made. This can cause the moving chain to touch a part of the body or other objects, causing injury or damage.
- Kickback is when the end of the guide bar touches objects and moves rearward, up or suddenly forward. Kickback also occurs when the wood closes in and pinches the saw chain during the cut. Loss of control can result if the product touches an object in wood.

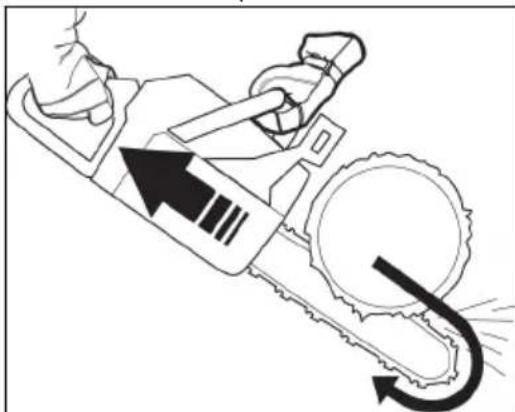
- Rotational Kickback can occur when the moving chain touches an object at the top of the guide bar. This can cause the chain to bury into the object and cause the chain to stop immediately. The result is a very fast, reverse reaction that moves the guide bar up and rearward in the direction of the operator.
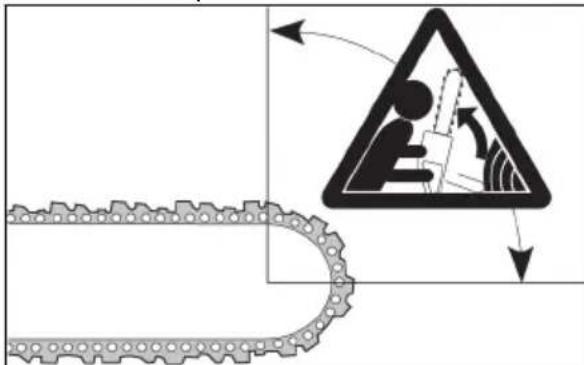
- Pinch-Kickback can occur when the saw chain suddenly stops during the cut. The wood closes in and pinches the moving saw chain along the top of the guide bar. The sudden stop of the chain reverses the chain force and causes the product to move in the opposite direction of the turn of the chain. The product moves rearward in the direction of the operator.
- Pull-In can occur when the saw chain suddenly stops when the moving chain touches an object in the wood along the bottom of the guide bar. The sudden stop pulls the product forward and away from the operator, which can easily cause the loss of control of the product by the operator.

Make sure that you understand the different forces and how to prevent them before you operate the product. See To prevent kickbacks, skating, bouncing and dropping on page 9.
To prevent kickbacks, skating, bouncing and dropping
- While the motor runs, make sure to hold the product tightly. Keep your right hand on the rear handle and the left hand on the front handle. Tightly hold with thumbs and fingers around the handles. Do not let go.
- Keep control of the product during the cut and after the wood falls to the ground. Do not let the weight of the product drop down after the cut is made.
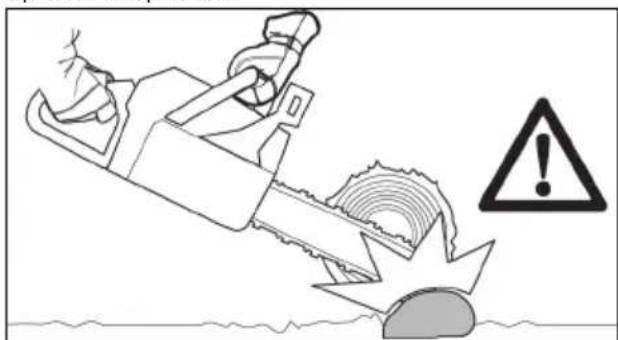
- Make sure that the area in which you are cutting is free from blockage. Do not let the nose of the guide bar touch a log, branch or other blockages while you operate the product.
- Cut at high motor speeds.
- Do not overreach or cut above shoulder height.
- Obey the sharpening and maintenance instructions by the manufacturer for the saw chain.
Only use replacement guide bars and saw chains specified by the manufacturer.
The risk of kickback is increased if the depth gauge is set too large.
Personal protective equipment
Always use the correct personal protective equipment when you operate the product. Personal protective equipment decreases the grade of injury if an accident occurs, but does not erase it.
- Do not use loose clothing that can become caught in the saw chain.
- Use an approved protective helmet.
Always use approved ear protection while you operate the product. Noise for a long period can cause hearing loss.
- Use protective glasses or a face visor to decrease the risk of injury from flying objects. The product can move objects with strong force, such as wood chips and small pieces of wood. This can result in serious injury, including to the eyes.
- Use gloves with chainsaw protection.
- Use pants with chainsaw protection.
- Use boots with chainsaw protection, steel toe-caps and nonslip soles.
Make sure that you have a first aid kit near.
- Sparks can come from the guide bar, saw chain or other sources. Always keep fire extinguishing tools and a shovel to help prevent forest fires.
Protective devices on the product
- Do not use a product with damaged protective equipment. If the product is damaged, speak to an approved service center.
Power button
Make sure that the motor stops when you push the power button.
To examine the trigger lockout
- Push the trigger lockout and make sure that it goes back to its initial position when you release it.
- Push the trigger and make sure that it goes back to its initial position when you release it.
Guard
The guard prevents objects from being ejected in the direction of the operator. The guard also prevents accidental touch between the operator and the saw chain.
Make sure that the guard is permitted for operation in combination with the product.
- Do not use the product without the guard.
Make sure that the guard is not damaged. Replace the guard if it is worn or has cracks.
Safety instructions for maintenance
- Remove the battery pack before doing maintenance on the product.
- Have all product servicing done by an approved dealer, not including the tasks in MAINTENANCE on page 14.
- Make sure the saw chain stops moving when the trigger is released.
- Keep the handles dry, clean, and free from oil.
- Keep caps and fasteners correctly tightened.
- Replacement components that are not approved or the removal of safety devices can cause damage to the product. This can also cause possible injury to the operator or bystanders. Only use accessories and replacement parts as recommended. Do not change your product.
- Keep the saw chain sharp and clean for safe and high performance.
- Obey the instructions for lubricating and changing accessories.
- Examine the product for damaged parts. Before more use of the product, make sure the damaged guard or part operates correctly. Examine for broken or incorrectly aligned parts, and parts that do not move freely. Examine for other conditions that can have an effect on the operation of the product. Make sure the product is correctly installed. A guard or other damaged part must be repaired or replaced by an approved dealer unless written in the operator's manual.
- When not in operation, keep the product in a dry, high or locked area away from children.
- During transportation or storage of the product, use a guide bar cover or case to move the product.
- Do not use waste oil. Waste oil can be dangerous to you and can cause damage to the product and environment.
Battery safety
Only use battery packs from the manufacturer and only charge them in a battery charger from the manufacturer.
The rechargeable battery packs are only used as a power supply for related cordless products. To prevent injury, the battery pack must not be used as a power source for other devices.
- Do not disassemble, open or shred battery pack.
-
Do not keep battery packs in open sunlight or heat. Keep battery packs away from fire.
-
Regularly examine the battery pack charger and the battery pack for damage. Damaged or changed battery packs can cause a fire, explosion or risk of injury. Do not repair or open damaged battery packs.
- Do not use a battery pack or product that is defective, changed or damaged.
- Do not change or repair products or the battery pack. Only let your approved dealer do repairs.
- Do not short circuit a cell or battery pack. Do not save battery packs in a box or drawer where they can be short circuited by other metal objects.
- Do not remove a battery pack from its initial package until necessary for operation.
- Do not mechanically shock battery packs.
- If there is a battery leak, do not let the liquid touch the skin or eyes. If you have touched the liquid, clean the area with a large quantity of water and get medical aid.
- Do not use a battery charger other than what is specified for operation with the battery pack.
- Look at the plus (+) and minus (-) marks on the battery pack and product to make sure of correct operation.
- Do not use a battery pack not made for operation with the product.
- Do not mix battery packs of a different voltage or manufacturer in a device.
- Keep battery packs away from children.
- Always purchase the correct battery packs for the product.
- Keep batteries clean and dry.
- Clean the battery pack terminals with a clean dry cloth if they become dirty.
- Secondary battery packs must be charged before use. Always use the correct battery charger and refer to the manual for correct charging instructions.
- Do not keep a battery pack on continuous charge when not in operation.
- Save the manual to refer to it in the future.
- Only use the battery pack for its necessary operation.
- Remove the battery pack from the product when not in operation.
- Keep the battery pack away from paper clips, keys, nails, screws, or other small metal objects while in operation. This can make a connection between terminals. Shorting the battery pack terminals together can cause burns or a fire.
ASSEMBLY

WARNING: Read the safety chapter before you assemble the product.
To assemble the guide bar and saw chain
-
Remove the battery pack during assembly to prevent an accidental start.
-
Pull the front hand guard rearward in the direction of the front handle to disengage the chain brake.
- Turn the guide bar retaining knob counterclockwise and remove it.
- Remove the drive sprocket cover.
- Put on protective chainsaw gloves.
- Lift the saw chain above the drive sprocket and engage it in the groove on the guide bar. Start on the top edge of the guide bar.
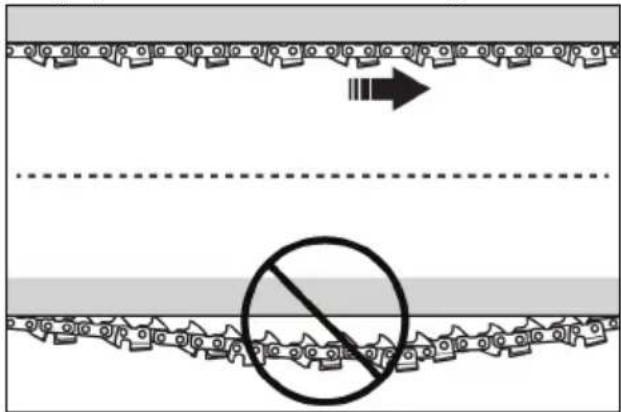
- Make sure that the edges of the cutting links are turned forward on the top edge of the guide bar.
- Assemble the sprocket cover and steer the chain adjuster pin to the hole in the guide bar.
- Make sure that the drive links of the saw chain fit correctly on the drive sprocket. Also make sure that the saw chain is correctly engaged in the groove in the guide bar.
- Tighten the guide bar retaining knob finger tight.
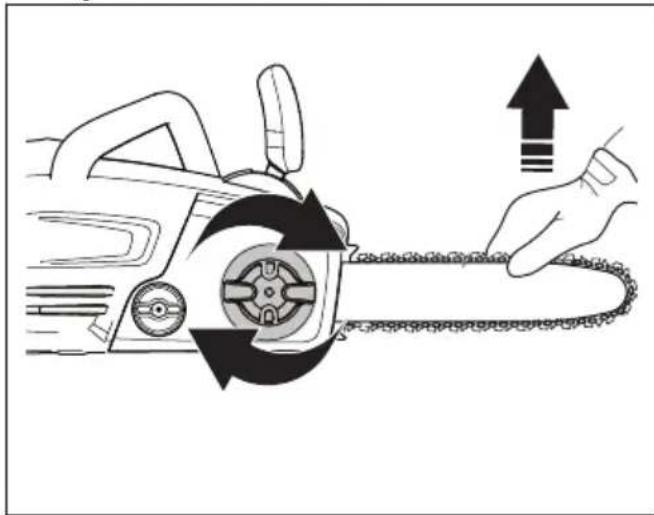
- Tighten the saw chain by turning the chain tension knob clockwise. Tighten the saw chain until it does not sag from below the guide bar, but you can turn it easily by hand.
-
Hold up the guide bar tip and tighten the guide bar retaining knob fully.
-
Examine the chain tension frequently after you assemble a new saw chain, until the saw chain has been run-in.
- Examine the chain tension regularly. A saw chain stretches during operation. Correct chain tension results in good cutting performance and a long life.
OPERATION

WARNING: Read and understand the safety chapter before you operate the product.
To lubricate the saw chain
The product has an automatic lubrication system. Make sure to only use the correct chain oil and obey the instructions.
- Use vegetable-based saw chain oil or a standard chain oil.
- Make sure that the area near the cap of the saw chain oil tank is clean.
- Remove the cap of the saw chain oil tank.
- Fill the saw chain oil tank with the recommended saw chain oil.
- Put back the cap of the saw chain oil tank.
Before you start the product
- Examine the product for missing, damaged, loose or worn parts.
- Examine the nuts, screws and bolts.
- Examine the trigger for correct operation.
- Examine the power button for correct operation.
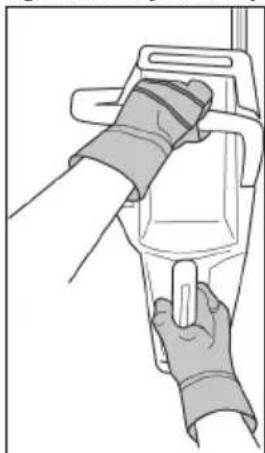
To install the battery pack
- Align the ribs of the battery pack with the slots in the battery compartment. Push the battery pack into the battery compartment until you hear a click.
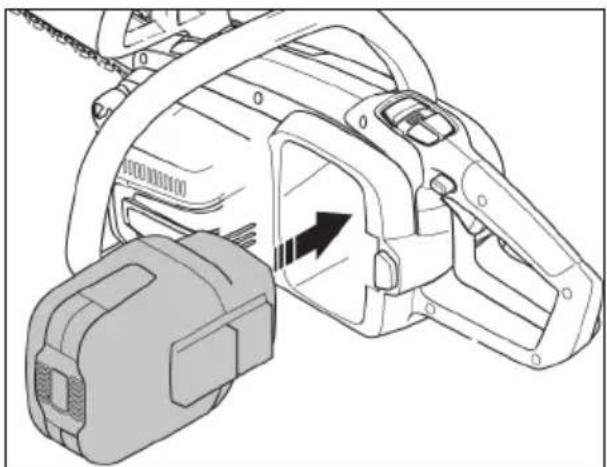
- To remove the battery pack, push and hold the battery release button and pull out the battery pack.
Chain efficiency test indicator
Use the saw chain efficiency test indicator to make sure the saw chain tension and system is correct before you use the product.
- Add bar and chain oil to the chain oil tank.
- Press and hold the efficiency mode button until it flashes to start the saw chain efficiency test indicator.
- Hold the product with two hands and pull the trigger fully until the lights on the power meter stop.
The power meter shows the saw chain efficiency. If the saw chain efficiency is too low, the 2 lights on the left side of the power meter will be on. If the saw
chain efficiency is too high, the 2 lights on the right side of the power meter will be on. The saw chain efficiency is correct when the 2 lights in the center of the power meter are on.
- For low saw chain efficiency, increase the saw chain tension.
- For high saw chain efficiency, decrease the saw chain tension.
Note: Use the saw chain efficiency test indicator as a guide only. Always examine the product and do the necessary maintenance.
To start the motor
- Move the front hand guard forward to engage the chain brake.
- Install the battery pack. See To install the battery pack on page 11.
- Press the power button until the light is on.
- Hold the rear handle with your right hand and the front handle with your left hand.
- Pull the front hand guard rearward in the direction of the front handle to disengage the chain brake.
- Press and hold the trigger lockout with your right hand.
- While you continue to hold the trigger lockout, squeeze and hold the trigger.
- Continue to squeeze the trigger to operate. Squeeze the trigger lightly for lower speed. Squeeze the trigger more for higher speed.
- Use the product.
To stop the motor
- Release the trigger.
- Push the power button until the light is off.
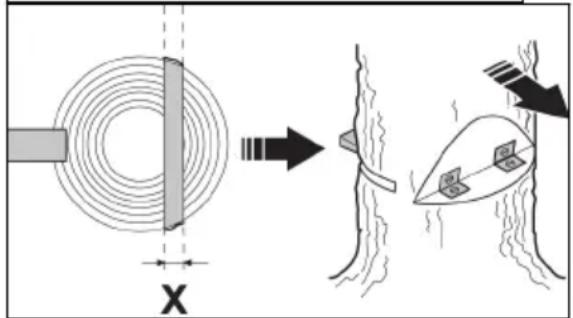
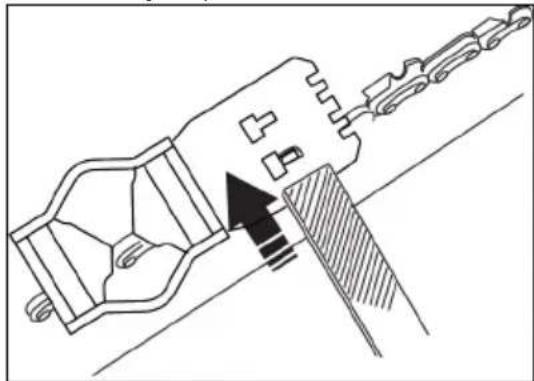
To use a spike bumper
A spike bumper prevents kickbacks and holds the wood as you cut. The spike bumper is a pivot between the motor body and the guide bar.
- Put the lower end of the spike bumper at the correct hinge width.
- Press, with your left hand, against the front handle while you lift the rear handle with your right hand.
- Saw until you get the correct hinge width.
Note: The hinge must have an equal thickness.
- Saw more than half of the diameter and then put the felling wedge into the saw cut.
To fell a tree
-
Remove dirt, stones, loose bark, nails, staples and wire from the tree.
-
Make a notch 1/3 the diameter of the tree, perpendicular to the direction of the fall.
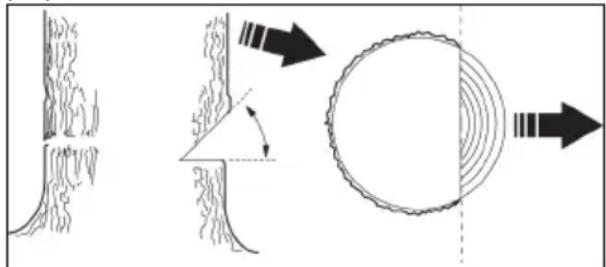
- Make the lower horizontal notch cut. This helps prevent pinching the saw chain or the guide bar when the second notch is made.
- Make the felling back cut (X) a minimum of 50~mm (2 in) higher than the horizontal notch cut. Keep the felling back cut parallel to the horizontal notching cut so sufficient wood is left to be a hinge. Do not cut through the hinge. The hinge wood keeps the tree from twisting and falling in the incorrect direction.
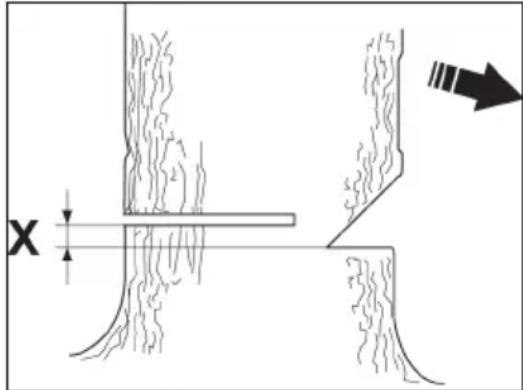
- As the felling back cut nears the hinge, the tree starts to fall. Make sure that the tree can fall in the correct direction and not rock rearward and pinch the saw chain. Stop the cut before the felling back cut is complete to prevent this. Use wedges of wood, plastic or aluminum to open the cut and let the tree fall along the necessary line of fall.
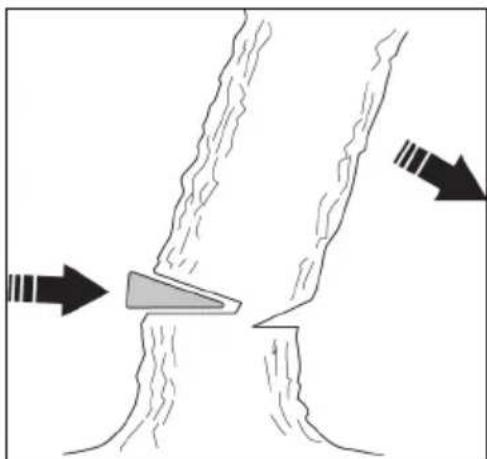
- When the tree starts to fall, remove the product from the cut. Stop the motor, put the product down and use the planned escape path. Be careful of limbs falling from above and monitor your footing.
To limb a tree
- Use larger limbs to hold the log off the ground.
- Remove small limbs in one cut.
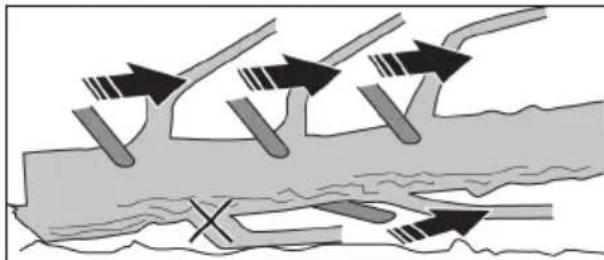
- Cut branches that have tension from the bottom to the top to prevent pinching the saw chain or the guide bar.
To buck a log
CAUTION: Do not let the saw chain touch the ground.
- If the log has support along its full length, cut from the top of the log (known as overbucking).
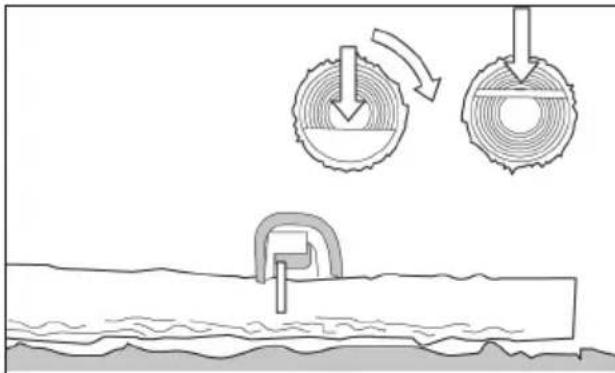
- If the log has support on one end, cut 1/3 the diameter from below the log (known as underbucking).
If the log has support on the two ends, cut 1/3 the diameter from the top. Complete the cut by underbucking the lower 2/3 of the log to touch the first cut.
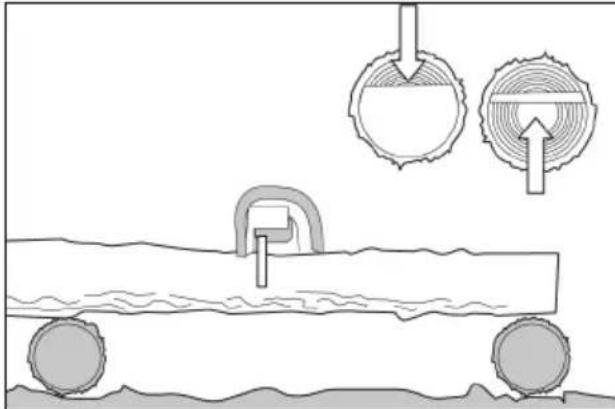
- If you buck a log on a slope, always stay on the uphill side of the log. Cut through the log while you keep complete control of the product. Then release the cutting pressure near the end of the cut while tightly holding the rear handle and front handle.
To change the power mode
The power mode of the product can be changed while the product is in operation. There are 2 power modes:
- Standard mode - Saves energy and maximizes run time. Standard mode is applicable for most tasks.
Note: The product is set to Standard mode when started.
- Boost mode - The product operates at high speed in Boost mode. Boost mode runs at maximum power for tasks that are not easy. To start Boost mode, push the Boost mode button until the light is on. To stop Boost mode, push the Boost mode button until the light is off.
Note: If the trigger is released during operation, the product starts in the last mode. If the product automatically stops, or if the operator pushes the power button, the last used mode is erased from memory. The product is set to Standard mode again when started.
Battery state of charge LED
The status of the battery pack is shown until you pull the trigger. When you release the trigger, the status of the battery pack is shown again.
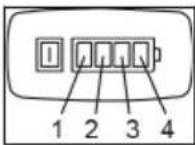
The number of LEDs that are on show the current charge level of the battery pack.
| LED lights Battery status | |
| All Green LEDs come on | Fully Charged (100% - 76%) |
| LED lights Battery status | |
| LED 1, 2 and 3 come on | The battery pack is 75% - 51% charged. |
| LED 1 and 2 come on | The battery pack is 50% - 26% charged. |
| LED 1 comes on | The battery pack is 25% - 6% charged. |
| LED 1 flashes The battery pack is 5% - 0% charged. | |
Note: If the motor stops and the power LED stays on, push the button on the battery pack. For possible solutions, see Error codes on page 18.
Note: When the battery pack is fully discharged, the motor stops immediately.
Note: The motor automatically stops if the battery pack or motor controller is too hot during heavy operation. Let the motor and battery pack cool. The product then resets.
MAINTENANCE
WARNING: Read and understand the safety chapter before you clean, repair or do maintenance on the product.
Maintenance schedule
Make sure that you obey the maintenance schedule. The intervals are calculated from daily use of the product. The intervals are different if you do not use the product each day. Only do the maintenance work that is found in this manual. Speak to an approved service center about other maintenance work not found in this manual.
Daily maintenance
Clean the external surfaces.
- Make sure that the trigger lockout and trigger work correctly.
- Clean the chain brake and make sure that it operates correctly.
- Examine the chain catcher for damage. Replace the chain catcher if it is damaged.
- Turn the guide bar daily for more equal wear.
- Make sure that the lubrication hole in the guide bar is not clogged.
- Remove saw dust and other unwanted material from below the sprocket cover.
Clean the guide bar groove.
Make sure that the guide bar and saw chain get sufficient oil.
- Examine the saw chain for:
- a crack in the rivets and links.
- irregularly worn rivets and links.
the correct tension. - burrs on the chain drive links.
If necessary, replace the saw chain.
- Sharpen the saw chain. See To sharpen the saw chain on page 15.
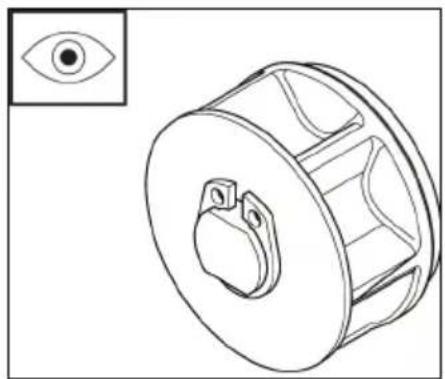
- Examine the drive sprocket for too much wear and replace if necessary.
- Clean the air intake of the motor housing.
Make sure that the nuts and screws are tight. - Make sure that the power switch works correctly.
To sharpen the saw chain
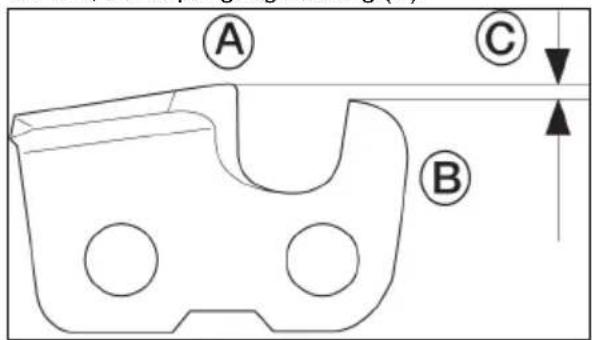
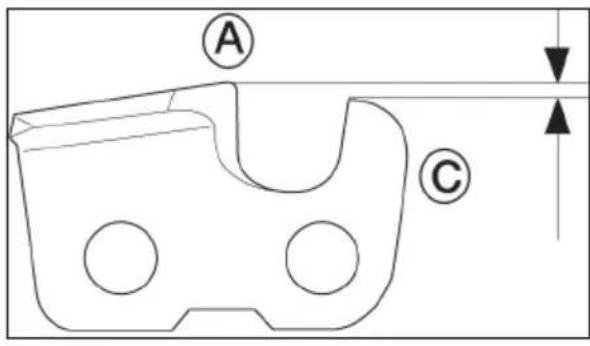
The cutter
The cutter is the cutting part of the saw chain and has a cutting tooth (A) and depth gauge (B). The cutting depth of the cutter is made by the difference in height between the two, the depth gauge setting (C).
Make sure to correctly sharpen the cutting teeth by using four important criteria:
File angle

- Cutting angle
- File position
- Round file diameter
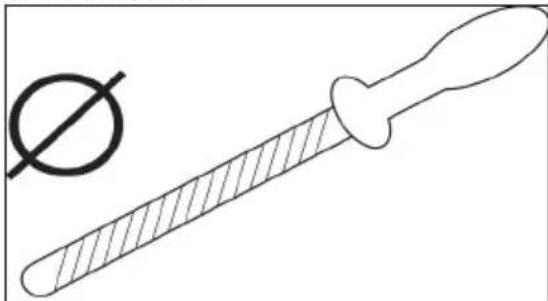
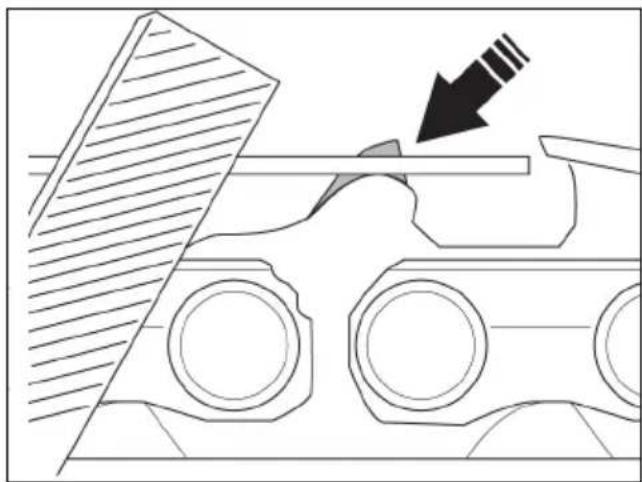
To sharpen the cutting teeth
Use a round file and a file gauge to sharpen the cutting teeth. See Saw chain filing and saw chain combinations on page 19 for information on the recommended dimension of the file and gauge for the saw chain installed on your product.
- Make sure that the saw chain has the correct tension. A chain without the correct tension moves to one side does and not sharpen correctly.
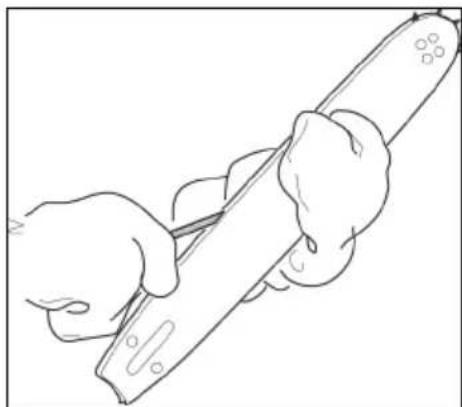
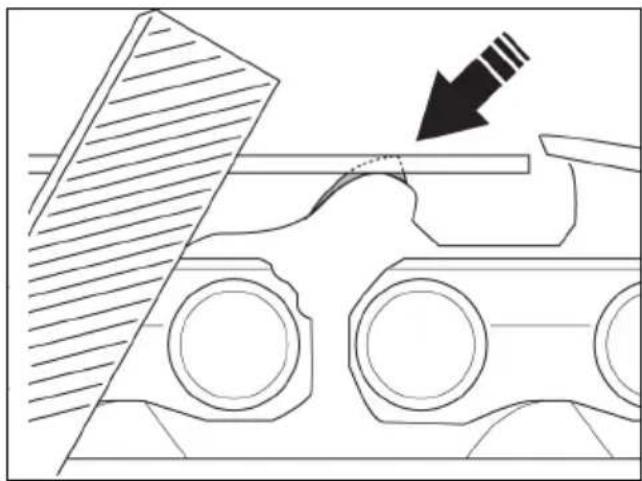
- Use the file on all the teeth on one side. Then use the file on the cutting teeth from the inner face and decrease the pressure in the reverse direction.
- Turn the product on the opposite side and use the file on the teeth.
- Use the file to keep all teeth the same length. Replace a worn saw chain when the length of the cutting teeth decreases to 4 mm (5/32 in).
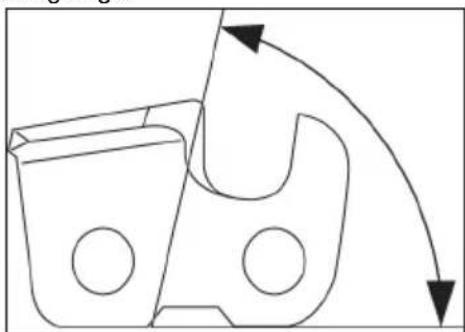
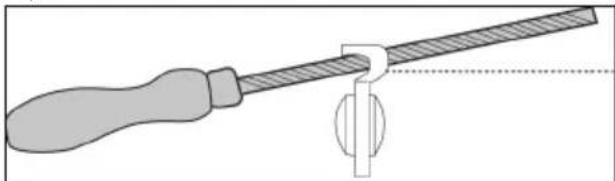
To adjust the depth gauge setting
Sharpen the cutting teeth before you set the depth gauge. See To sharpen the cutting teeth on page 15. After you sharpen the cutting tooth (A), the adjustment of the depth gauge (C) will decrease. To keep the best cutting performance, use a file on the depth gauge (B) to get the recommended depth gauge adjustment. See Guide bar and saw chain combinations on page 19 to find the correct depth gauge adjustment for your chain.
Note: These recommendations are for when the length of the cutting teeth has not been significantly decreased.
Use a flat file and depth gauge tool to adjust the depth gauge.
- Put the depth gauge tool above the saw chain. More information about operation can be found on the package of the depth gauge tool.
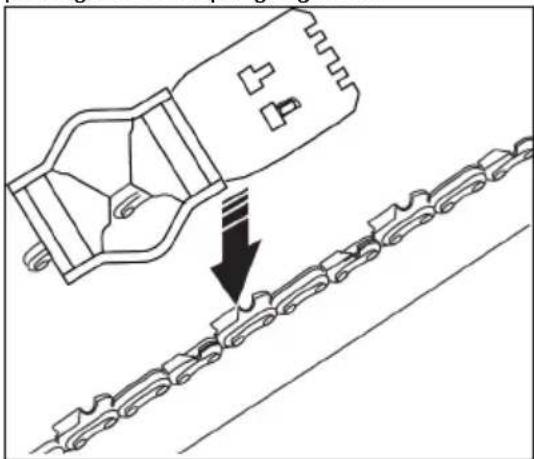
- Use the flat file on the top of the depth gauge that extends through the depth gauge tool. The depth gauge is adjusted correctly when there is no resistance as the file is pulled along the depth gauge tool.
To add tension to the saw chain
Note: Examine the tension of a new saw chain frequently during its running-in period.
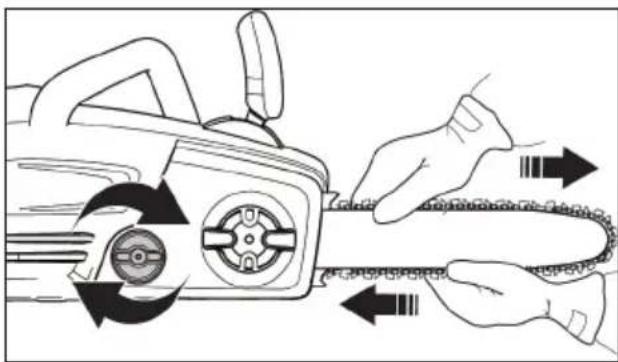
- Turn the guide bar retaining knob counterclockwise to loosen the guide bar.
- Lift the top of the guide bar and extend the saw chain by turning the chain tension knob clockwise. Tighten the saw chain until it does not hang from the bottom of the guide bar.
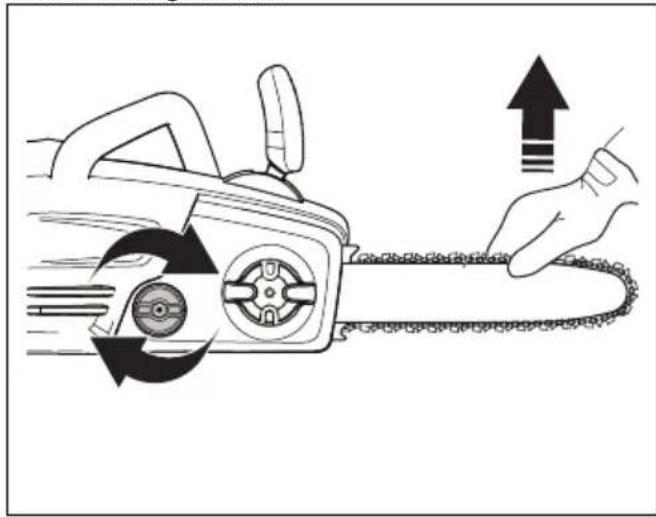
- Tighten the guide bar retaining knob and lift the top of the guide bar at the same time.
To examine the saw chain lubrication
- Start the product and let it run at 3/4 speed. Point the nose of the guide bar at a light color surface almost 20~cm (8 in) away.
- After 1 minute of running, a line of oil shows on the light surface.
- If you cannot see the line of oil after 1 minute, clean the oil channel in the guide bar. Clean the groove in the edge of the guide bar.
- Start the product and let it run at 3/4 speed. Point the nose of the bar at a light color surface almost 20 cm (8 in) away.
- After 1 minute of running, a line of oil shows on the light surface.
-
If you cannot see the line of oil after 1 minute, speak to your approved dealer.
-
Make sure that you can pull the saw chain around freely by hand and that it does not hang down.
TROUBLESHOOTING
| Problem Possible cause Solution | ||
| Bar and chain hot and smoking during operation | Examine chain tension to make sure it is not too tightened. | See To add tension to the saw chain on page 16. |
| Add bar and chain oil to the chain oil tank. | Examine the chain oil tank. Fill the tank if empty. | |
| Motor operates but chain does not rotate | Chain tension is too tight. To add tension to the chain. See To add tension to the saw chain on page 16. | |
| Examine the guide bar and chain assembly. | Examine the guide bar and chain for damage. See To assemble the guide bar and saw chain on page 10. | |
| Motor operates, chain rotates but does not cut | Chain is not sharp. Sharpen the chain. | |
| Chain installed in the incorrect direction. | Reverse the direction of the chain. | |
Error codes
The error codes help you do troubleshooting on the battery pack and/or the battery charger while it charges.
| LED screen Possible faults Possible steps | ||
| LED 1 is red and LED 4 is green, battery pack does not charge or operate correctly in product | Internal fuse is blown | Speak to an approved service center. |
| LED 1 is red Irregular cell volt- age | Speak to an approved service center. | |
| LED 4 is green Battery pack is overcharged | Remove the battery pack from the battery charger and install in the product. Operate the product. Battery charger may be defective. Speak to an approved service center. | |
| LED 1 is red and LED 2 is green, battery pack does not charge or operate correctly in product | Battery pack failure | Remove battery pack from the product. Do not charge. Battery pack is damaged and must be replaced. Speak to an approved service center. |
| RED LED comes on, LED 2 is green and flashes during charging or when the battery pack is in the battery charger | Internal battery tempature is too low or too high for charging | Move the battery charger and battery pack to a location where the internal temperature of the battery pack can be between 5°C (41°F) and 45°C (113°F). |
| RED LED flashes and LED 2 flashes green when the battery pack is installed. | Internal battery temperature is too low or too high | The internal temperature in the battery must be between -15°C (5°F) and 70°C (158°F). The environment temperature in the battery pack is too low or too high. · If the battery pack is too cold from the ambient environ- ment, move the battery pack and battery charger to a warm environment. · If the battery pack is too hot, especially after operation, move the battery pack and battery charger away from the hot environment. |
TECHNICAL DATA
| unit CS1 | 6i (BCS58VJN) | |
| Motor specifications | ||
| Motor type Brushless | ||
| Motor voltage V (DC) 58 | ||
| Motor power W 2000 | ||
| Battery and charger specifications | ||
| Default battery pack type 280Li | ||
| Default battery charger type 440Ci | ||
| Product dimensions | ||
| Weight (excluding cutting equipment and battery) kg 4.68 (10.3) | ||
| Oil tank volume cm | 3 | 250 |
| Lubrication system | ||
| Oil pump capacity at 8000 min-1 | ml/min 15 | |
| Type of oil pump Automatic | ||
| Saw chain and guide bar | ||
| Standard guide bar length cm (in.) 40 (16) | ||
| Usable cutting length cm (in.) 38 (15) | ||
| Maximum saw chain speed m/s 18.4 | ||
| Saw chain pitch mm (in.) 9.52 (3/8) | ||
| Thickness of drive links (gauge) mm (in.) 1.1 (0.043) | ||
| Type of drive sprocket | Spur | |
| Number of drive sprocket teeth | 6 | |
ACCESSIONS
Guide bar and saw chain combinations
| Guide bar | Saw chain | ||||
| Length - cm (in) | Pitch - mm (in) | Gauge - mm (in) | Max. nose radius | Type | Drive link count |
| 40 (16) | 9.52 (3/8) | 1.1 (0.043) | 6T | 90PX056G, R56 | 56 |
Saw chain filing and saw chain combinations
| Chain type | Round file size - mm (in) | Side plate angle Top plate angle File guide angle Depth gauge setting - mm (in) | |||
| 90PX056G, R56 | 4.5 (11/64) | 55° | 30° | 0° | 0.635 (0.025) |
Contedio
INTRODUCCION. 20
MANTENIMIENTO. 34
SEGURIDAD. 22
SOLUTION DE PROBLEMAS 37
ARMADO. 30
DATOS TECNICOS. 38
OPERACION 30
ACCESORIOS. 39
INTRODUCCION
Manual del usuario
1-800-805-5523 (Canada)
8:00 a.m. a 7:00 p.m. (EST)