
BD 5040 RS Bp Pack - Broom Kärcher - Free user manual and instructions
Find the device manual for free BD 5040 RS Bp Pack Kärcher in PDF.
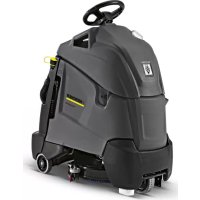


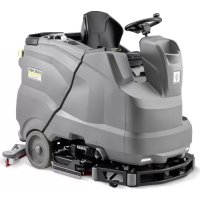
| Product type | Self-propelled sweeper-scrubber |
| Brand | Kärcher |
| Model | BD 5040 RS Bp Pack |
| Power supply | Battery 36 V (3 x 12 V/70 Ah, gel, maintenance-free) |
| Working width | 508 mm |
| Fresh/ Waste water tank volume | 38 L / 38 L |
| Max. travel speed | 4.3 km/h |
| Max. permissible slope | 10 % |
| Transport weight | 255 kg |
| Dimensions (L × W × H) | 1118 × 691 × 1316 mm |
| Average power consumption | 1080 W |
| Suction motor power | 470 W |
| Brush motor power | 209 W |
| Air flow (suction) | 34 L/s |
| Vacuum (suction) | 7 kPa |
| Brush speed | 180 rpm |
| Detergent application rate | 1.25 L/min |
| Theoretical cleaning area | 1840 m²/h |
| Main functions | Wet cleaning, suction, self-propelled movement, program selection (eco, intensive, suction, solution application) |
| Safety | Emergency stop button, safety pedal, electric parking brake |
| Maintenance | Emptying fresh/waste water, cleaning float, checking brush and suction lip wear, charging battery |
| Spare parts | Brush disks, rubber lips, battery, charger (available from Kärcher) |
| General information | Professional/industrial use (hotels, schools, factories, etc.); operating temperature +5 to +40 °C |
Frequently Asked Questions - BD 5040 RS Bp Pack Kärcher
User questions about BD 5040 RS Bp Pack Kärcher
0 question about this device. Answer the ones you know or ask your own.
Ask a new question about this device
Download the instructions for your Broom in PDF format for free! Find your manual BD 5040 RS Bp Pack - Kärcher and take your electronic device back in hand. On this page are published all the documents necessary for the use of your device. BD 5040 RS Bp Pack by Kärcher.
USER MANUAL BD 5040 RS Bp Pack Kärcher
Czech 151
Slovenian 161
Polish 171
Romanian 181
Slovak 191
Croatian 201
Serbian 211
Bulgarian 221
Estonian 232
Latvian 241
Lithuanian 251
Ukrainian 261
Register and win! www.kaercher.com/register-and-win

EAC


59663620 05/19
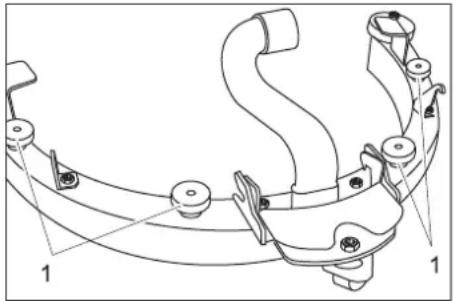
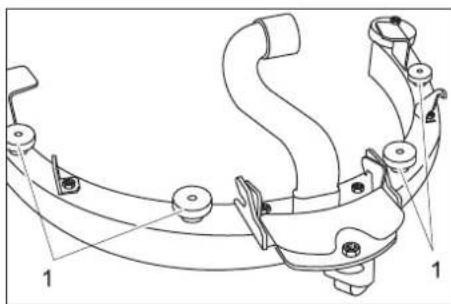
Mounting points
Storage
△CAUTION
1 Suction hose
2 Suction bar coupling
1 Thumb screw
Chairman of the Board of Management
S. Reiser
Director Regulatory Affairs & Certification
71364 Winnenden (Germany)
Tel.: +49 7195 14-0
Fax: +49 7195 14-2212
Winnenden, 2019/05/01

Please read and comply with these original instructions prior
to the initial operation of your appliance and store them for later use or subsequent owners.
Contents
Safety instructions ..... EN 1
Function.....EN 1
Proper use.....EN 1
Environmental Protection, Disposal....EN 1
Operating and Functional Elements....EN 2
Before Commissioning ..... EN 3
Operation.....EN 4
Transport....EN 5
Storage....EN 5
Maintenance and care.....EN 6
Faults.....EN 7
Accessories....EN 8
Specifications ..... EN 9
Accessories and Spare Parts . EN 9
Warranty ...... EN 9
EU Declaration of Conformity . EN 9
Safety instructions
Before using the appliance for the first time, read and observe these operating instructions and the accompanying brochure:
Safety information for brush cleaning units and spray-extraction units, No.
5.956-251.0
The machine has been approved for use on surfaces with gradients of up to 10%.
Behaviour in emergency situations
Press emergency stop button in an emergency. The appliance will be shut off and the park brake will be locked.
Safety Devices
Safety devices serve to protect the user and must not be rendered in operational or their functions bypassed.
Emergency-stop button
To put all functions out of operation immediately: Press emergency-stop button.
Safety pedal
The drive can only be activated when the operated keeps the pedal depressed with the foot.
Hazard levels
DANGER
Indicates an immediate danger that will lead to severe injuries or death.
⚠ WARNING
Indicates a potentially dangerous situation that could lead to severe injuries or death.
△CAUTION
Indicates a potentially dangerous situation that could lead to minor injuries.
ATTENTION
Indicates a potentially dangerous situation that could lead to property damage.
Function
The scrubbing vacuum cleaner is used for wet cleaning of level floors.
- By selecting a suitable cleaning program via the program selection switch, you can easily adapt to the cleaning task at hand.
- A working width of 500 mm and a capacity of 38 liters in the fresh water tank enable effective cleaning when the machine is used for longer periods. – The appliance is self-propelled.
- The batteries can be charged using a charger connected to a 230 V socket.
- Battery and charger are included with the packaged units.
Note:
The appliance can be equipped with various accessories depending on the cleaning task.
Please request our catalogue or visit us on the Internet at www.kaercher.com.
Proper use
Use this appliance only as directed in these operating instructions.
- This appliance is suited for commercial use, e.g. in hotels, schools, hospitals, factories, shops, offices, and rental companies.
- The appliance may only be used for the cleaning of hard surfaces that are not sensitive to moisture and polishing operations.
- The application temperature ranges from +5°C to +40°C.
- The appliance is not suited for the cleaning of frozen grounds (e.g. in cold stores).
- The appliance may only be equipped with original accessories and spare parts.
- The appliance was designed for the cleaning of floors inside or of covered surfaces. – The appliance is not intended for the cleaning of public traffic routes.
- Please consider the allowed load per surface unit of the floor. Details of load per surface unit can be found in the technical data.
- The appliance is not suited for use in potentially explosive environments.
- The machine should not be used to suck in inflammable gases, undiluted acids or solvents.
This includes petrol, thinning agents or hot oil that can form an explosive mixture when it comes in contact with sucked air. Do not use acetone, undiluted acids and solvents as they are aggressive towards the materials from which the appliance is made.
- Reactive metal dusts (e.g. aluminium, magnesium, zinc) can form explosive gases when they come in contact with highly alkaline or acidic detergents.
Environmental Protection, Disposal

The packaging materials are recyclable. Please do not throw packaging in the domestic waste but pass it on for recycling.
Old units contain valuable recyclable materials. Batteries, oil and similar substances may not be released into the environment. Therefore please dispose of old units through suitable collection systems.
Notes about the ingredients (REACH)
You will find current information about the ingredients at:
www.kaercher.com/REACH
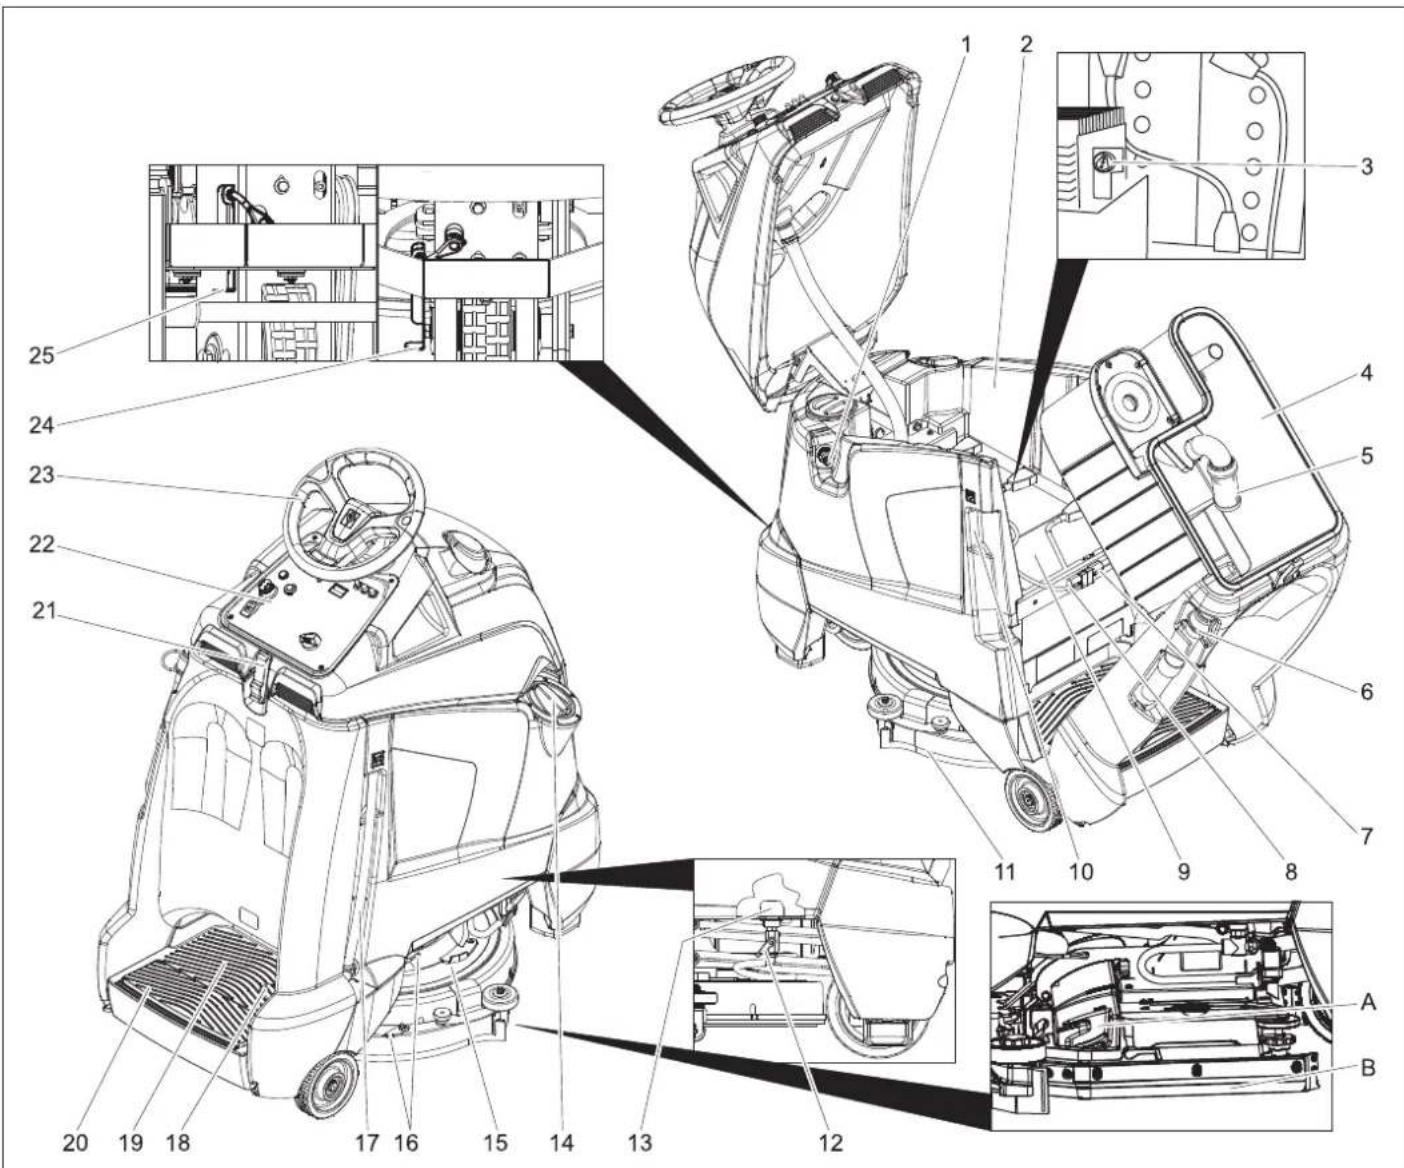
Operating and Functional Elements
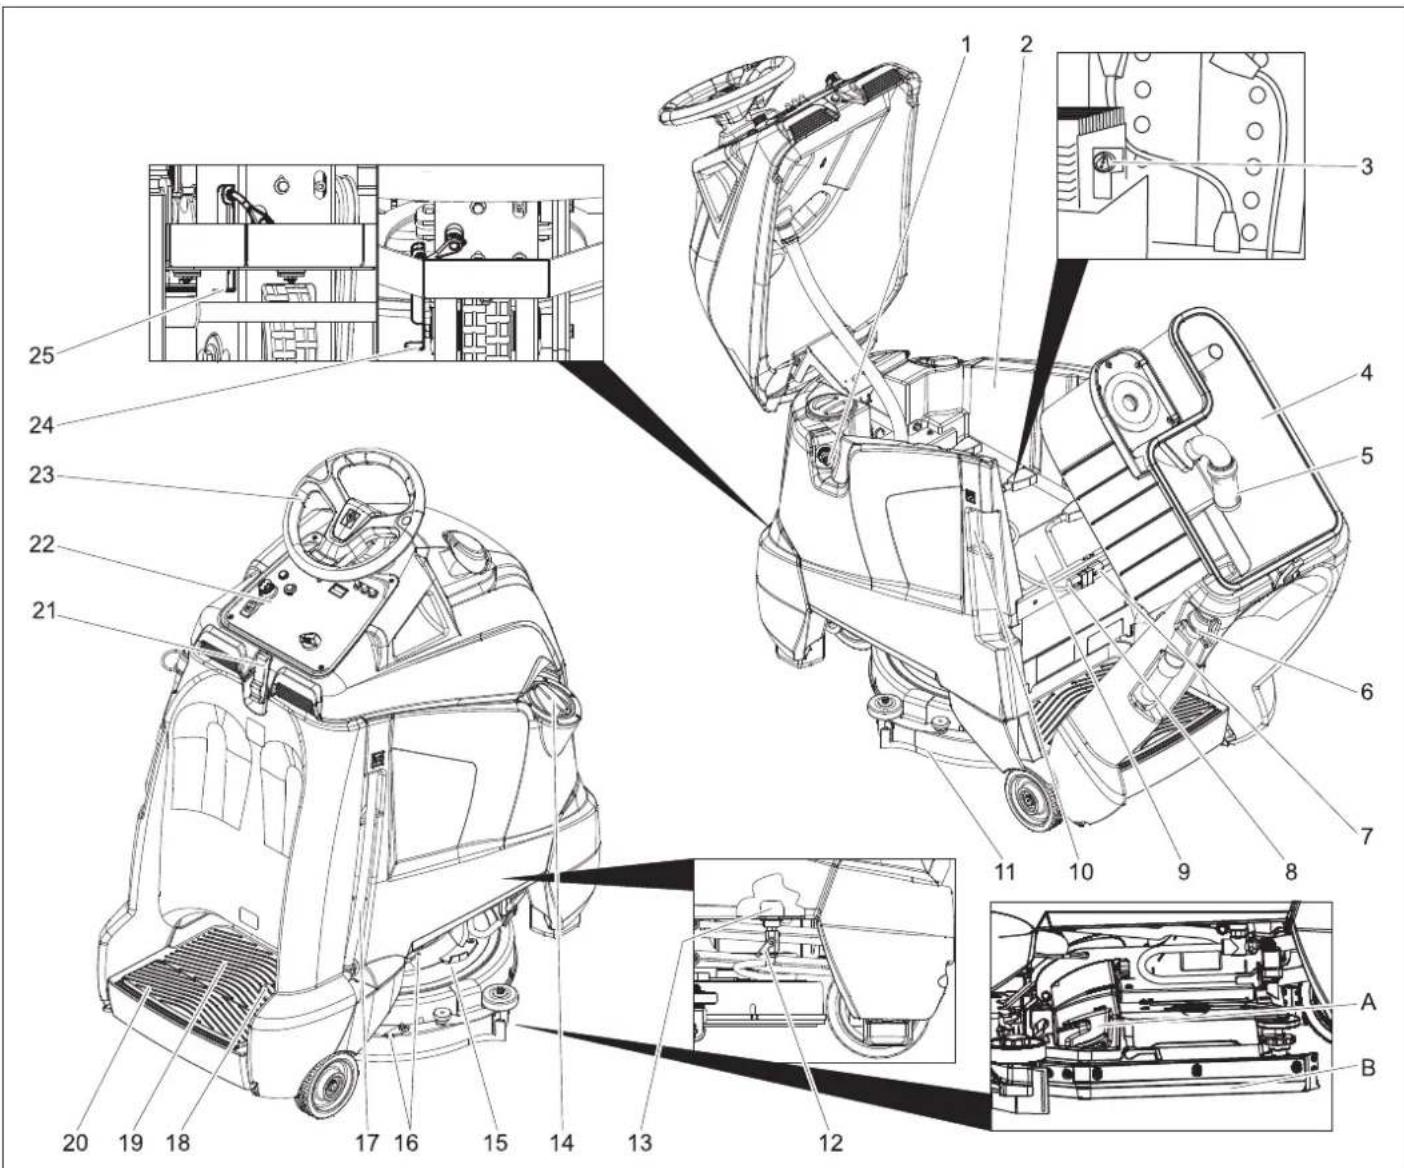
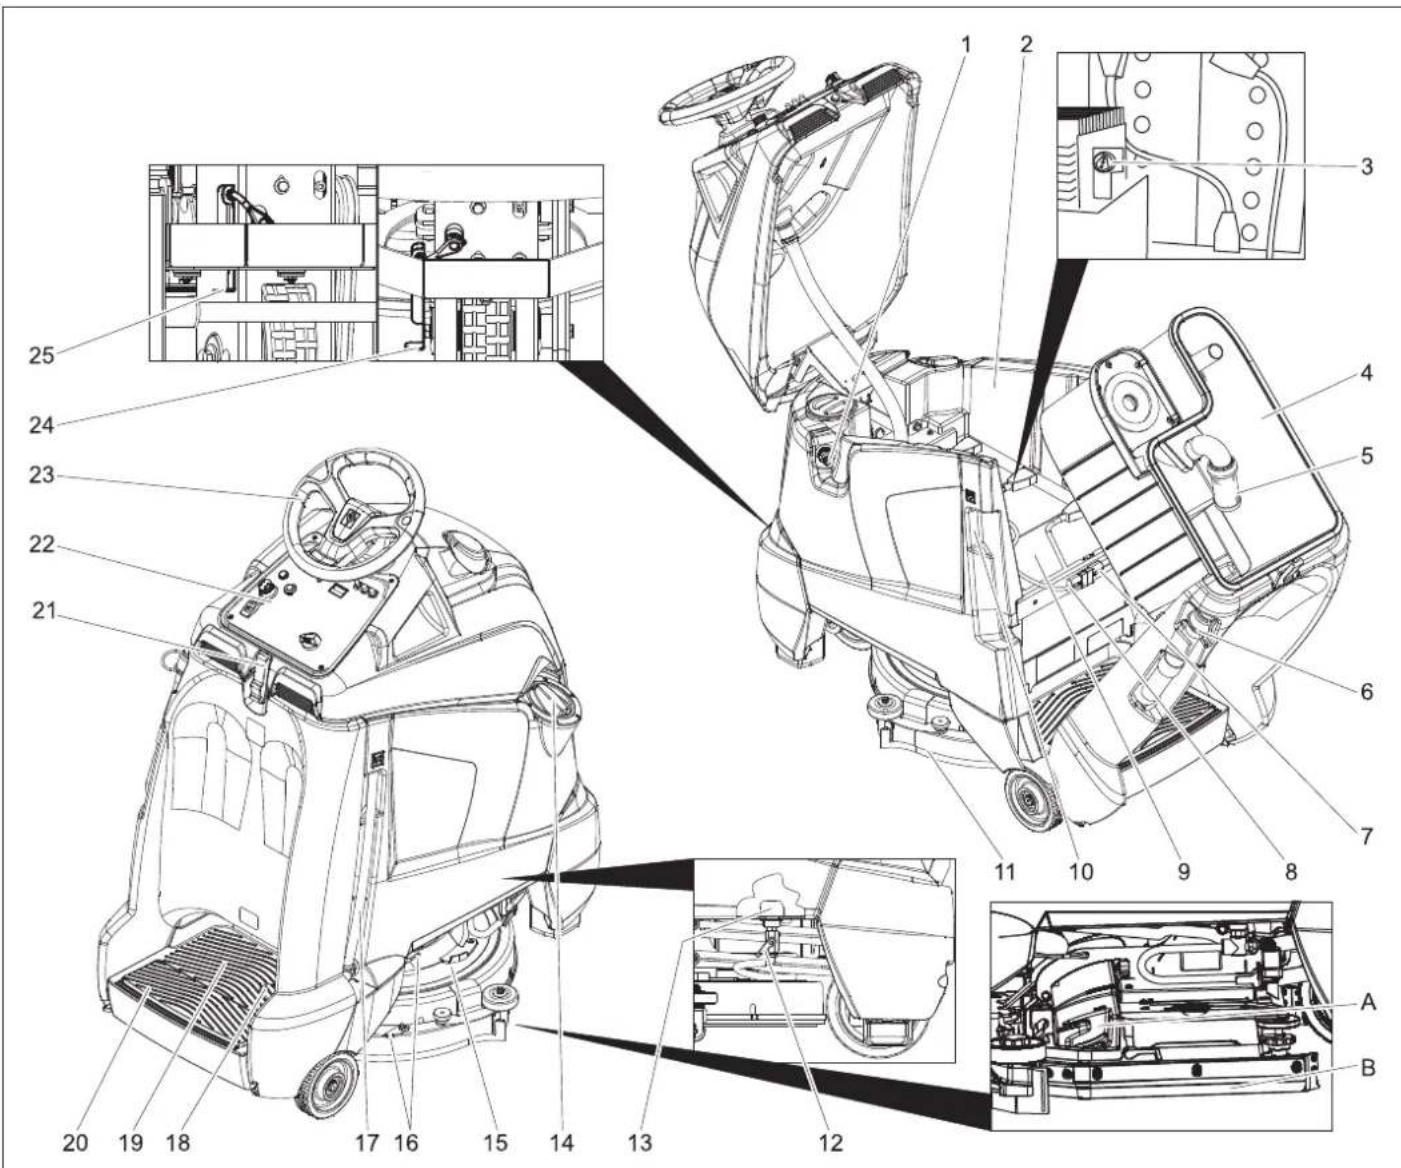
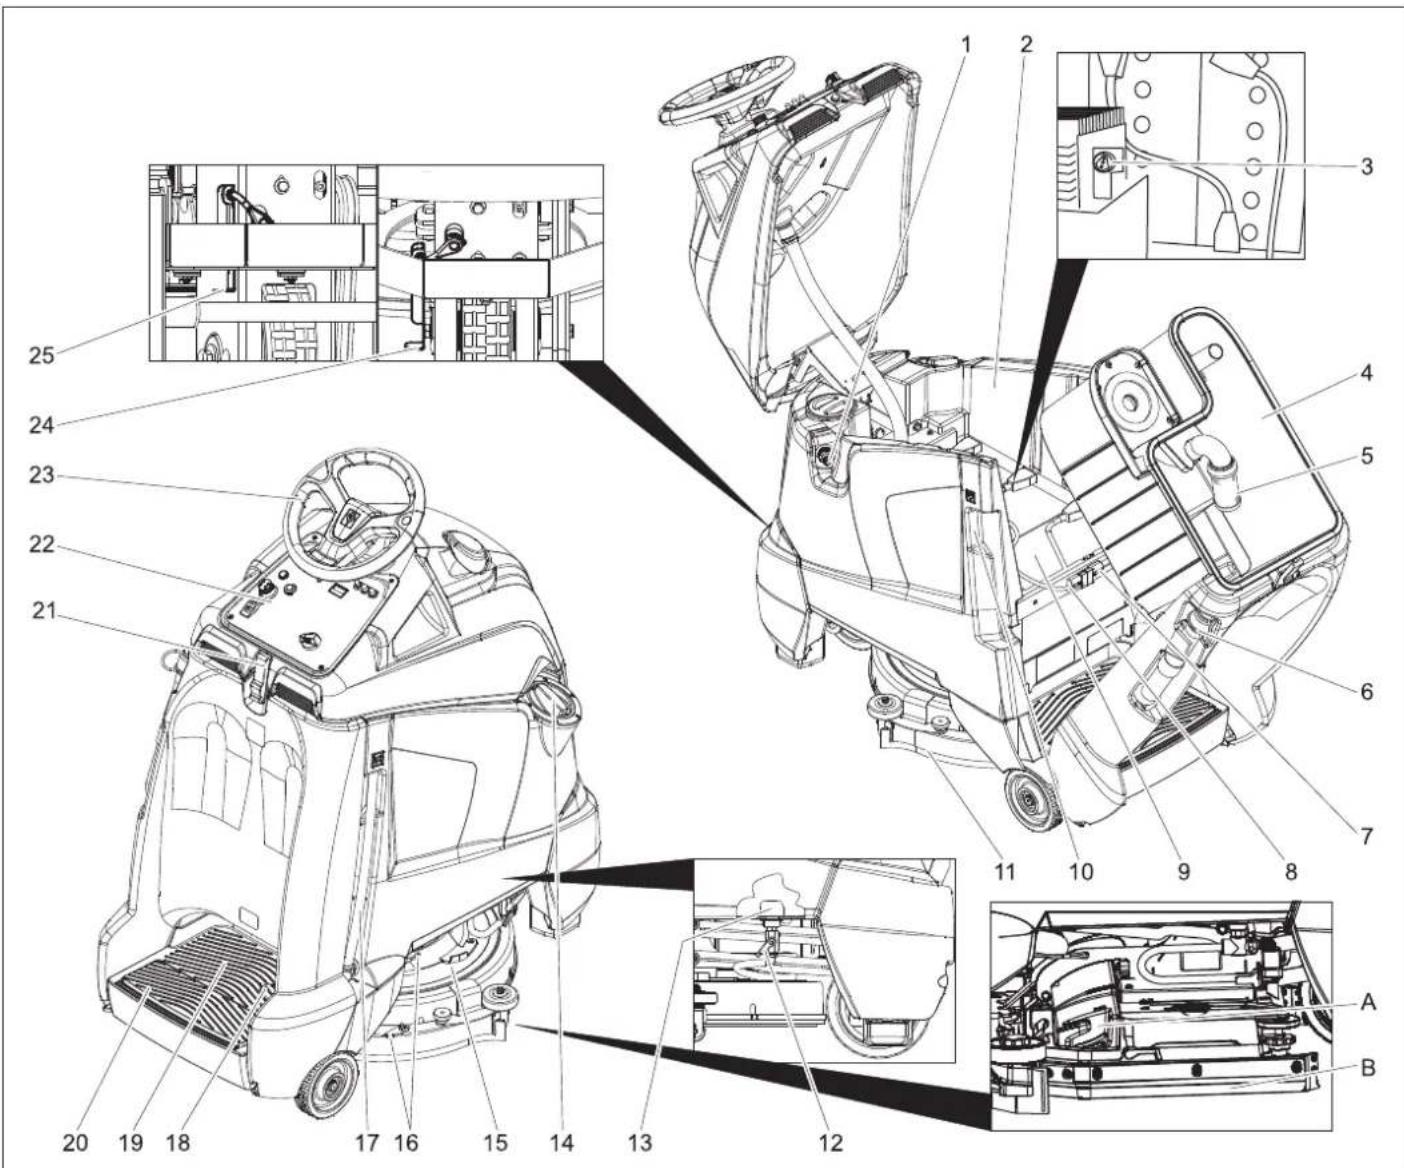
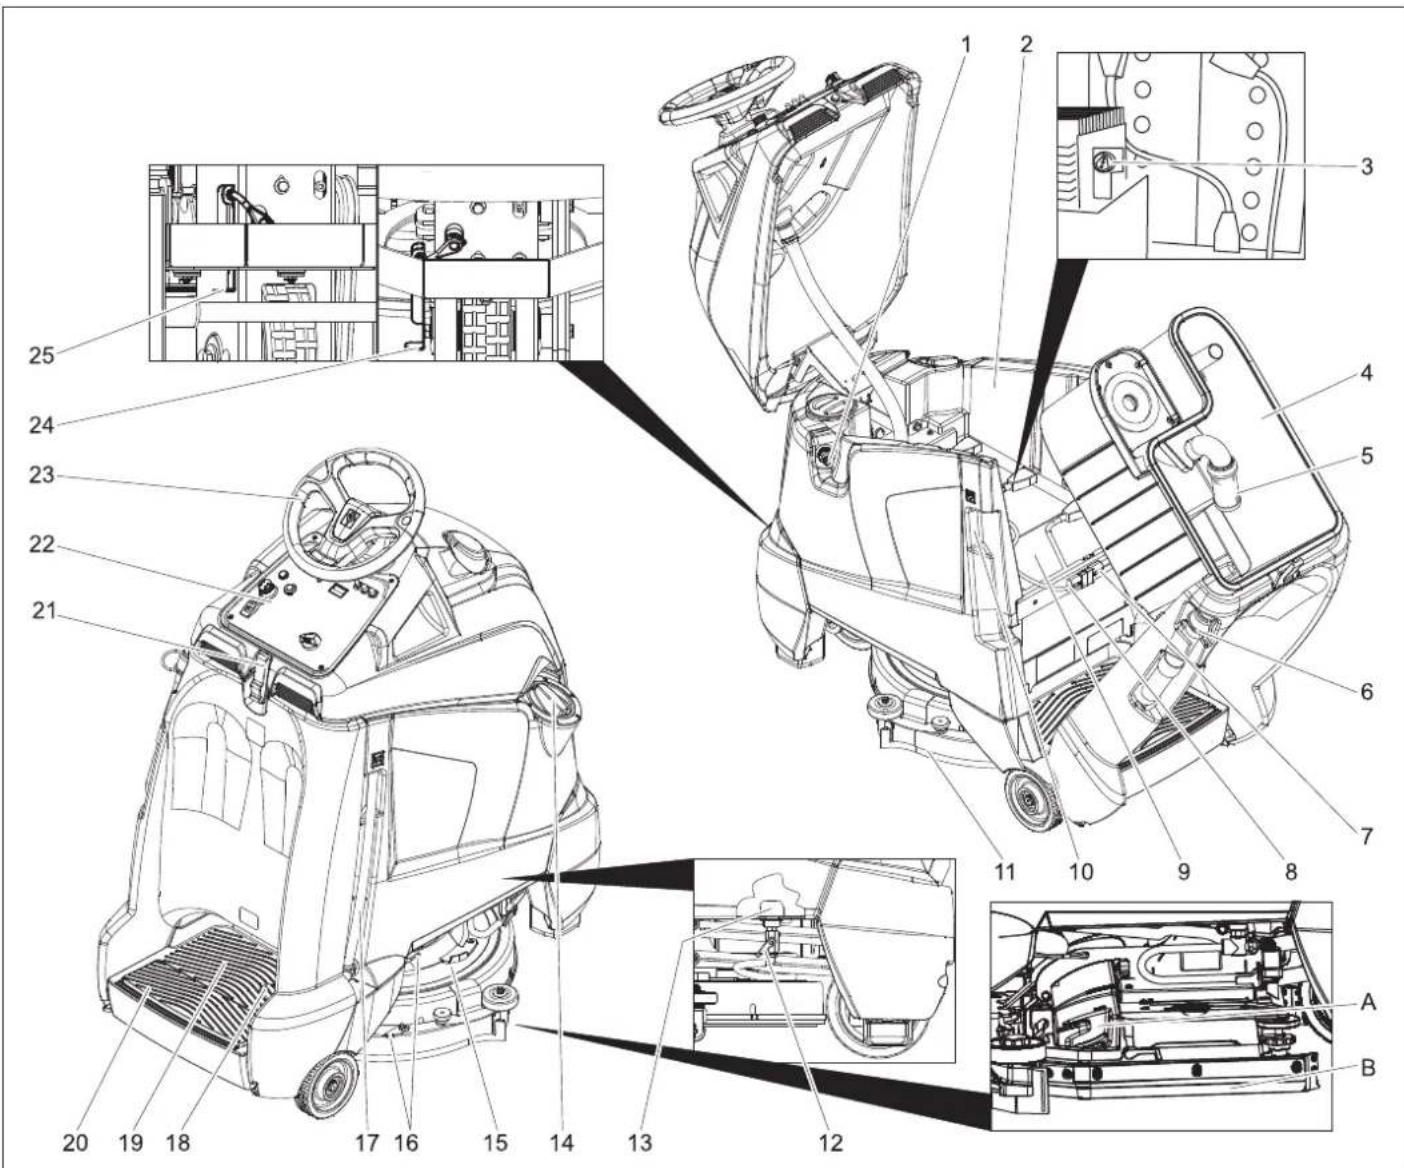
1 Hose connection, automatic filling
2 Fresh water tank
3 Charge status indicator (only Bp Pack model)
4 waste water tank
5 Float
6 Dirt water discharge hose
7 Appliance plug
8 Battery socket
9 Battery
10 Power plug for charger (only Bp Pack model)
11 Vacuum bar
12 Fresh water valve
13 Fresh water strainer
14 Fresh water tank cover
15 Cleaning head
16 Suction bar support for severe soiling (two-step method)
17 Fresh water level display Drainage hose for fresh water
18 Drive pedal
19 Standing area for operator
20 Safety pedal
21 Lock
22 Operator console
23 Steering wheel
24 Unlock lever, driving
25 Unlock lever, pushing
A Coarse dirt pan (BR model only)
B Spray protection, side (BR model only)
Colour coding
- The operating elements for the cleaning process are yellow.
- The controls for the maintenance and service are light gray.
Battery load indicator
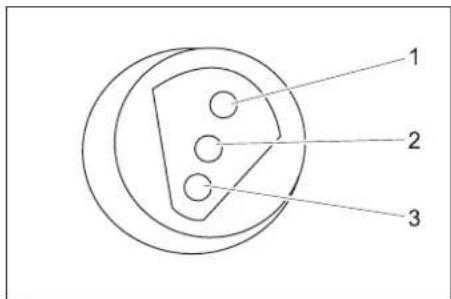
| 1 green Illuminated: Charge is completed. |
| 2 yellow Illuminated: Final phase of charging process. |
| 3 red Illuminated: Charging process.Blinking: Initialisation of charger. |
Operator console
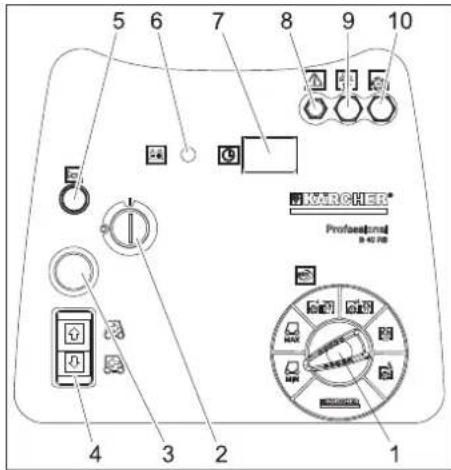
1 Program selection switch 2 Key switch 3 Emergency-stop button (turn to release) 4 Driving direction switch, selected driving direction will illuminate 5 Horn 6 Battery display 7 Operating hour counter 8 Fuse for controls 9 Fuse for suction turbine 10 Fuse for brush drive
Battery display
| glows Battery is charged. |
| blinking The battery must be charged,the brush drive and detergentapplication are deactivated. |
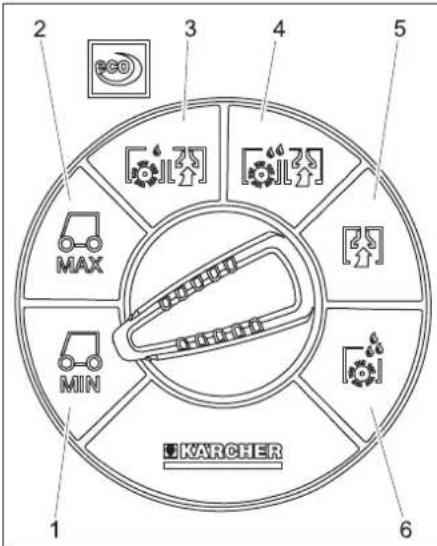
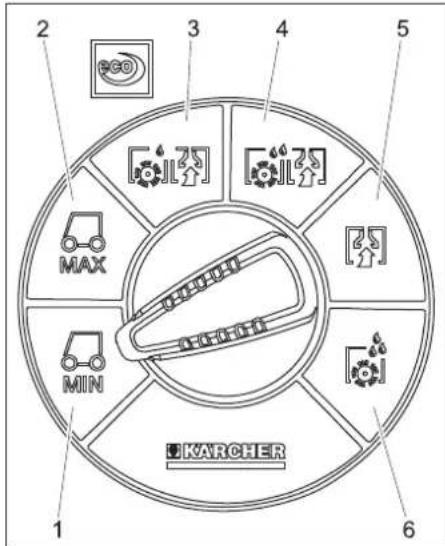
Program selection switch
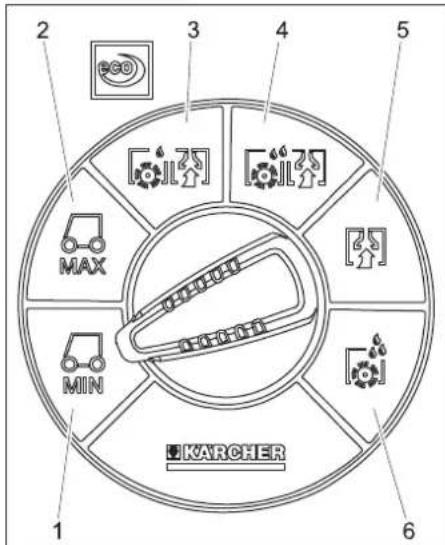
1 Driving, limited speed range 2 Driving, maximum speed range 3 Light cleaning intensity (eco) 4 High cleaning intensity 5 Vacuuming 6 Apply detergent solution
Before Commissioning
Install the batteries (only Bp model)
Please observe the following warning notes when handling batteries:
 | Observe the directions on the battery, in the instructions for use and in the vehicle operating instructions |
 | Wear eye protection |
 | Keep children away from acid and batteries |
 | Danger of explosion |
 | Fire, sparks, naked flames and smoking must be strictly avoided |
 | Danger of chemical burns |
 | First aid |
 | Warning note |
 | Disposal |
 | Do not throw the battery into the regular waste |
| Pb |
Pb
⚠️ DANGER
Risk of explosion. Do not place tools or the like on the battery, i.e. on the terminal poles and cell connectors.
Risk of injury. Ensure that wounds never come into contact with lead. Always clean your hands after having worked with batteries.
Maximum battery dimensions
| Length Width | Height | |
| 330 mm 172 mm | 236 mm |
If you use wet batteries in the Bp model, then follow the following instructions:
- It is necessary to conform to the maximum battery dimensions.
- The battery cover needs to be opened while charging wet (maintenance-free) batteries.
- While charging wet batteries, follow the specifications of the battery manufacturer.
| Battery set Order No. | |
| 3 x 12V/70 A, maintenance-free (Gel) | 6.654-093.0 |
Insert batteries and connect
The Bp package model contains a built-in battery.
The deep discharge protection of the appliance is set to the respective planned battery type. Therefore, only the battery type mentioned in the following must be in-
stalled into the appliance as new equipment or replacement.
| Device Battery type | |
| 1.533-170.0 mainten | ance-free battery (gel) |
| 1.533-171.0 | |
| 1.533-172.0 | |
| 1.533-173.0 |
→ Open the lock. → Swivel the top of the appliance forward. → Tilt the waste water tank backwards.
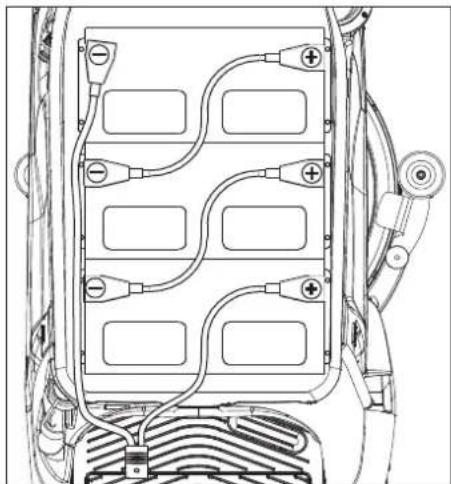
Insert the batteries into the appliance. Connect the poles with the enclosed connecting cables.
ATTENTION
Risk of damage. Mind correct polarity.
Connect the connection cable to the free battery poles (+) and (-).
ATTENTION
The battery can be damaged by deep discharge. Charge the battery before commissioning the machine.
Charging battery
Note:
The appliance is equipped with a total discharge protection, i.e. if the still admissible minimum of the capacity is reached, only vacuuming and driving is possible.
Drive the machine directly to the charging station; avoid any steep gradients in the process. Remove the power plug of the appliance from the holder and connect it to the mains supply (model Bp Pack only). Average charging time is approx. 10 hours.
After charging
Remove the power plug from the charger and hook the holder into the appliance (model Bp Pack only).
Removing the batteries
Open the lock. Swivel the top of the appliance forward. Tilt the waste water tank backwards. Clamp off the minus pole of the battery. Clamp off the remaining cables from the battery. Remove the batteries. Dispose of the used batteries according to the local provisions.
Pushing the device
While standing, the device is protected against rolling off with the help of an electrical immobilising brake. To push the device, you need to first unlock the immobilising brake.
Press the unlocking lever down to unlock the parking brake.
DANGER
Risk of accident if the device rolls away. After completion of the pushing procedure, pull down the unlocking lever and thus reactivate the parking brake.
ATTENTION
Risk of damage. Do not push the device faster than 7 km/h.
Unloading
Note:
Take the foot off the accelerator pedal, press the emergency-stop button and turn the key switch to "0" to immediately deactivate all functions.
Remove the cardboard packaging towards the top of the appliance. Put the accompanying cardboard aside. Cut and remove the strap retainer.
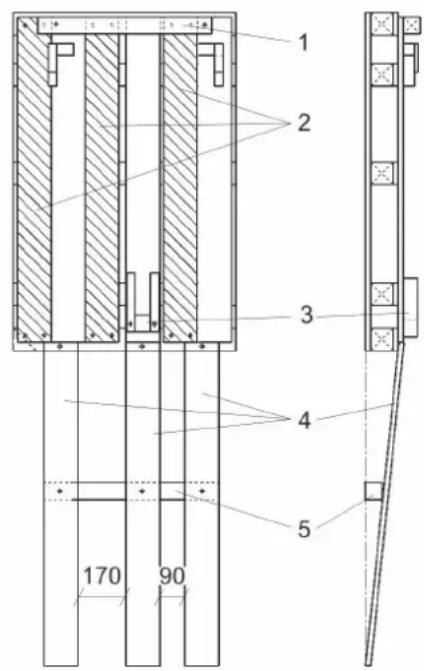
1 Squared timber, condition on delivery 2 Roll-off ramp, condition on delivery 3 Fixation front wheel 4 Roll-off ramp, after conversion 5 Squared timber, after conversion
Unscrew the squared timber and the roll-off ramps from the pallet. Screw down the roll-off ramps and squared timber as shown above. Remove the front wheel lock. Press the unlocking lever down to unlock the parking brake. Push the appliance forward off the pallet. Press the unlocking lever upward to unlock the parking brake.
Operation
WARNING
Long hours of using the appliance can cause circulation problems in the hands on account of vibrations.
It is not possible to specify a generally valid operation time, since this depends on several factors:
– Proneness to blood circulation deficiencies (cold, numb fingers). – Low ambient temperature. Wear warm gloves to protect hands. – A firm grip impedes blood circulation. – Continuous operation is worse than an operation interrupted by pauses.
In case of regular, long-term operation of the device and in case of repeated occurrence of the symptoms (e.g. cold, numb fingers) please consult a physician.
Note:
Take the foot off the accelerator pedal, press the emergency-stop button and turn the key switch to "0" to immediately deactivate all functions.
→ Carry out maintenance jobs "Prior to operation" (see section "Maintenance and Care").
Check immobilizing brake
DANGER
Risk of accident. Prior to every operation, the parking brake must be checked for proper function on a level ground.
→ Set main switch to "0". → Press emergency-stop button.
If the appliance can be moved by hand, the parking brake is not engaged.
→ Pull up the reset lever of the parking break.
If the appliance can still be moved by hand, the parking break is defective. Shut down the appliance and call Customer Service.
Brakes
DANGER
Risk of accident. If the device does not have an adequate braking effect on an incline, press the emergency stop button:
Filling in detergents
Fresh water
→ Close the lid of the fresh water tank.
⚠ WARNING
Observe regulations of water supplier. According to applicable regulations, the appliance must never be used on the drinking water net without a system separator. A suitable system separator by KÄRCHER or alternatively a system separator according to EN 12729 type BA must be used. Water that was flowing through a system separator is considered non-drinkable.
△CAUTION
Always connect the system separator to the water supply, never directly to the appliance!
→ Connect the hose to the automatic filling system and open the water supply (max. 60 °C, max. 5 bars).
→ Monitor the appliance - the automatic filling system will interrupt the water supply when the tank is full. → Shut off the water supply and disconnect the hose from the appliance.
or
→ Open the cover of the fresh water reservoir. → Fill in fresh water (maximum 60 °C). Leave sufficient space for the detergent. → Close the cover of the fresh water reservoir.
Note:
Fill up the fresh water tank completely prior to the initial start-up to bleed the water pipe system.
If the pipe system is empty, it can take up to 2 minutes until the detergent solution exits the cleaning head.
Detergent
⚠ WARNING
Risk of damage. Only use the recommended detergents. With other detergents, the operator bears the increased risk regarding the operational safety and danger of accident.
Only use detergents that are free from solvents, hydrochloric acid and hydrofluoric acid. Follow the safety instructions for using detergents.
Note:
Do not use highly foaming detergents.
Recommended detergents:
| Application Detergent | |
| Routine cleaning of all water resistant floors | RM 780RM 746 |
| Routine cleaning of glossy surfaces (e.g. granite) | RM 755 es |
| Routine cleaning and basic cleaning of industrial floors | RM 69 ASF |
| Routine cleaning and basic cleaning of fine stoneware tiles | RM 753 |
| Routine cleaning of tiles in sanitary areas | RM 751 |
| Cleaning and disinfection in sanitary areas | RM 732 |
| Removal of coating from all alkali-resistant floors (e.g. PVC) | RM 752 |
| Removal of coating from li-noleum floors | RM 754 |
→ Add the detergent to the fresh water reservoir.
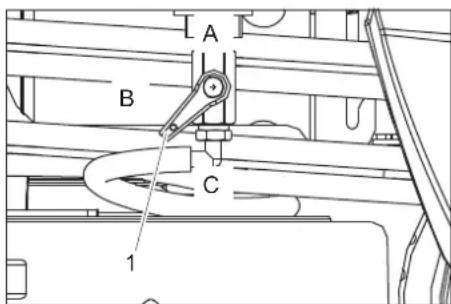
1 Fresh water valve
A Maximum fresh water volume B Half of the fresh water volume C Valve for fresh water closed
→ Turn the valve of the fresh water into the desired position.
Driving
Carry out the initial trials in an open surface so that you familiarise yourself with the appliance.
⚠️ DANGER
Danger of tipping if gradient is too high.
→ The gradient in the direction of travel should not exceed 10%.
Danger of tipping when driving round bends at high speed.
Danger of slipping on wet floors.
→ Drive slowly when cornering.
Danger of tipping on unstable ground.
→ Only use the machine on sound surfaces.
Danger of tipping with excessive sideways tilt.
→ The gradient perpendicular to the direction of travel should not exceed 10%. → Step on the standing platform. → Do not press the accelerator pedal. → Release emergency-stop button by turning. → Set main switch to "1". → Set the speed range on the programme selection switch. → Set the drive direction using the drive direction button at the operator console.
Note:
The travel direction switch also serves as a safety switch. Hence, it must be pressed, even if the desired direction of travel has already been selected before.
→ Press the accelerator carefully to drive.
Note:
The direction of travel can also be changed while driving. This way, even heavily soiled spots can be cleaned by driving back and forth several times.
Overload
In case of overloading, the drive motor automatically switches off after a certain period.
→ Allow the appliance to cool down at least for 5 minutes.
Cleaning
Note:
The detergent supply and brush drive are interrupted till further movement if the device stands at one place for more than 2 seconds.
→ Step on the standing platform. → Do not press the accelerator pedal. → Release emergency-stop button by turning. → Set main switch to "1". → Turn the program selection switch to the desired cleaning program. → Set the forward drive direction using the drive direction button at the operator console. → Press accelerator pedal and drive to the surface to be cleaned.
Severe soiling (two-step method)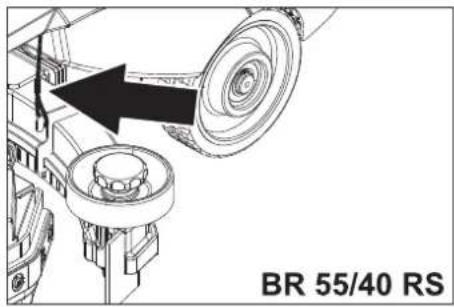
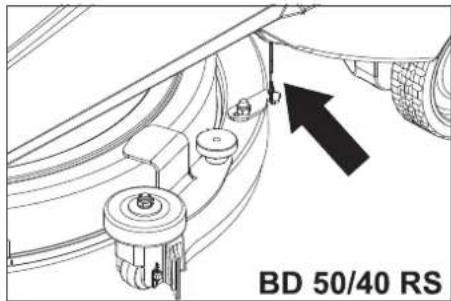
→ Hook in both ropes on the suction bar so that the suction bar is not lowered. → Set programme selection switch to "Apply detergent". → Apply detergent solution to the severely contaminated surface and let it soak in. → Unhook both ropes from the suction bar. → Perform the second cleaning run with light or high cleaning intensity.
Complete cleaning
→ Set the program selection switch to suction or vacuuming. → Push the appliance a little further to vacuum up the remaining water.
Shutting down
→ Park the machine on an even surface. → Turn key to "0" and remove it.
Empty tanks
Drain off dirt water
Note:
Overflow waste water tank. The suction flow is interrupted by a float when the waste water tank is full. Empty the waste water tank.
⚠ WARNING
Please observe the local provisions regarding the wastewater treatment.
→ Take the wastewater discharge hose from the support and open the lid of the drain hose. → Press the hose end together and lower it over the disposal unit. → Regulate the force of the dirt waster stream by pressing the hose end together. → Swivel the top of the appliance forward. → Clean the swimmer and check the movement of the swimmer ball. → Rinse the waste water tank with clear water. → Clean the interior of the top of the appliance. → Press the wastewater hose into the holder on the appliance.
Drain off clean water
→ Take the fresh water discharge hose from the support and lower above a suitable collection device. → Drain off the detergent liquid. → Remove the lid from the fresh water reservoir. → Rinse the fresh water reservoir with clear water (max. 60°C).
ATTENTION
Risk of damage for fresh water container, valves and seals. Never leave the cleaning solution in the fresh water reservoir after operation.
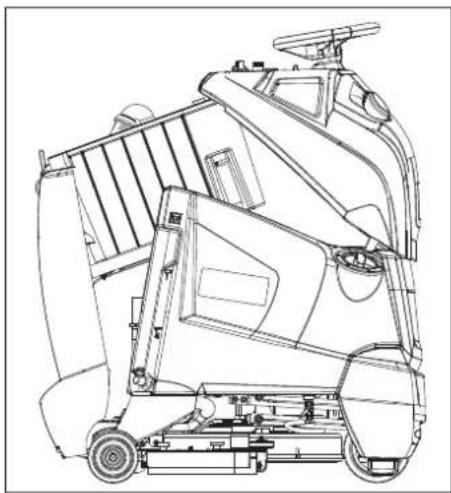
→ Store the appliance as shown above to dry off the tanks.
Transport
DANGER
Risk of injury! When loading or unloading the machine, it may only be operated on gradients of max. 10%. Drive slowly.
⚠CAUTION
Risk of personal injury or damage! Mind the weight of the appliance during transport.
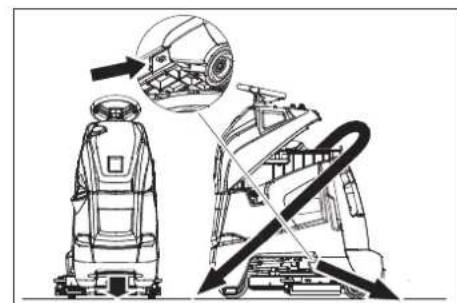
→ Remove the suction bar and the brush from the appliance. → When transporting in vehicles, secure the appliance according to the guidelines from slipping and tipping over.
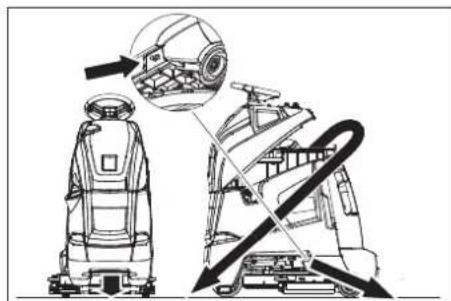
Fastening points
Storage
CAUTION
Risk of personal injury or damage! Consider the weight of the appliance when storing it.
This appliance must only be stored in interior rooms.
Maintenance and care
DANGER
Risk of injury! Before carrying out any tasks on the machine, set the main key to "0" and remove it. Pull the battery plug.
⚠ WARNING
Suction turbine will continue to run for a while after switch-off. Carry out maintenance tasks only after the suction turbine has come to a halt.
→ Drain and dispose of the dirt water and the residual fresh water.
Maintenance schedule
Prior to operation:
→ Check and ensure that the top of the appliance is seated properly on the waste water tank. → Check tyre status. → Check if brush is fitted properly. → Check the inserts of the suction hose for leaks. → Check fastening of the suction bar (see "Maintenance tasks"). → Check the lid of the drain hose for the wastewater tank for tightness. → Check the correct positioning of both drain hoses in their holders. → Check accelerator pedal, brake and steering wheel for correct functioning → Check acid level in wet batteries; refill distilled water, if required.
After operation:
→ Empty the waste water tank. → Rinse the waste water tank with clear water. → Clean the sieve and the swimmer in the waste water tank (see "Maintenance tasks"). → Clean fresh water tank. → Switch on the suction for drying the system. → Empty and clean the coarse dirt pan (BR model only). → Check brush for wear and tear and clean it. → Clean vacuum lips in the vacuum bar and check for wear. → Clean the outside of the appliance with a damp cloth which has been soaked in mild detergent. → Check device externally for damage. → Store the appliance as shown above to dry off the tanks (see "Empty tanks"). → Charge the battery: If the charging state of the battery is under 50%, charge the battery fully and without interruption.
If the charging state of the battery is over 50%, only recharge the battery if the entire operation duration will be required when next used.
Weekly
→ When used regularly, charge the battery fully and without interruption at least once a week.
Every 50 operating hours
→ Clean upper side of the batteries. → Check acid density in wet batteries. → Check battery cable for correct positioning. → Clean the sieve in the fresh water reservoir.
BR 55/40 RS only:
→ Check the side spray protection on the cleaning head.
Monthly
→ For long periods of disuse, only turn the device off when the battery is fully charged. Fully recharge the battery at least every month.
Every 100 operating hours
→ Clean battery room and battery casing.
Every 200 operating hours
→ Check immobilising brake. * → Clean the joints on the cleaning head hookup. → Check carbon brushes and commutators of all motors for wear and tear. * → Check tension of steering chain. * → Check the tension of the drive chains on the drive. *
* To be done by Customer Service.
Maintenance contract
To ensure reliable operation of the appliance, maintenance contracts can be concluded with the competent Kärcher sales office.
Maintenance BR 55/40 RS
Dismantling the vacuum bar
→ Pull out the suction hose from the vacuum bar.
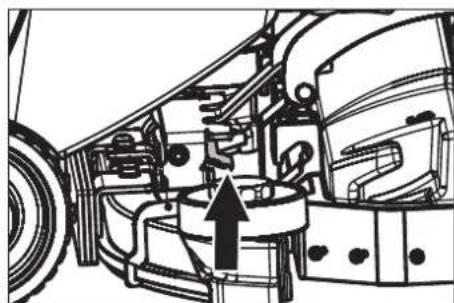
→ Raise the handle of the suction bar coupling. → Remove the vacuum bar.
Turn or replace vacuum lips
→ Remove the vacuum bar.
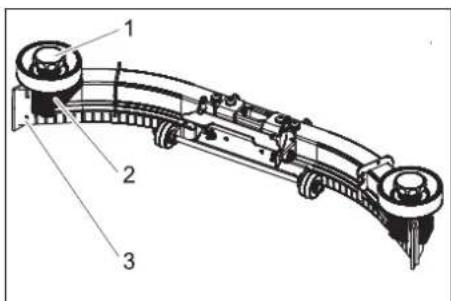
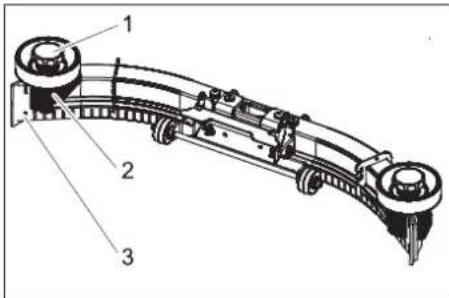
1 Star handle 2 Plastic part 3 Vacuum lip
→ Unscrew the star grips. → Remove the plastic parts. → Remove the vacuum lips. → Turn the vacuum lips or insert new ones. → Insert the plastic parts. → Screw in and tighten the star grips.
Replacing the brush rollers
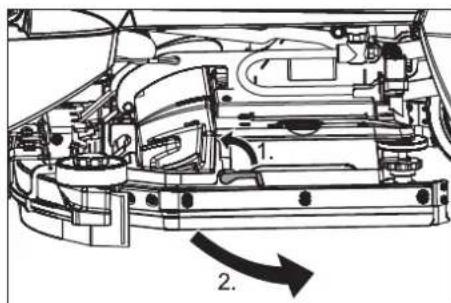
→ Swivel the unlocking lever upward. → Swivel the spray protection toward the front.
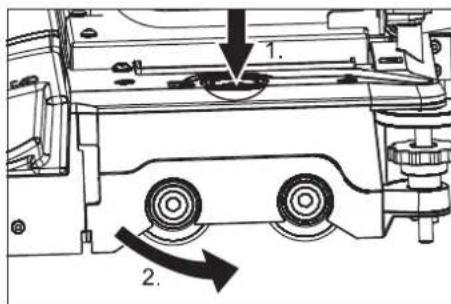
→ Press the brush change key and tilt the cover on the brush head towards the side. → Pull out the brush rollers. → Insert and lock into place the new brush rollers. → Close the cover, align the brushes and lock in the cover. → Swivel the spray guard back. → Swivel the unlocking lever downward.
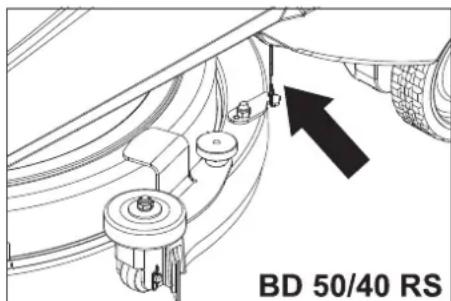
Maintenance tasks BD 50/40 RS
Dismantling the vacuum bar
→ Set programme selection to "Drive". → Turn key to "0" and remove it. → Pull out the suction hose from the vacuum bar.
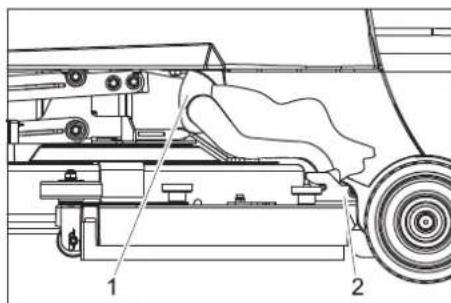
1 Suction hose 2 Suction bar coupling
→ Pull out the suction hose from the vacuum bar. → Loosen the suction bar coupling. → Remove the vacuum bar.
Replace or turn vacuum lips
→ Dismantle the vacuum bar.
1 Lock nut
→ Unscrew the knurled nuts. → Remove the suction bar insert from the bottom of the suction bar.
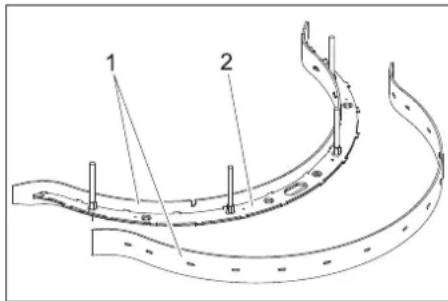
1 Vacuum lip
2 Suction bar insert
→ Remove the vacuum lips from the suction bar insert.
Note:
The vacuum lip can be turned around 3 times until all edges are worn. Then a new vacuum lip is required.
→ Reverse the suction lip or replace it and rehook it into the hooks of the suction bar insert. → Place the suction bar insert into the suction bar. → Screw on the knurled nuts and tighten them.
Replacing the disk brushes
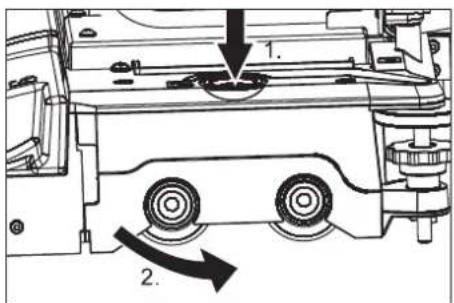
→ Lift the cleaning head. → Turn key to "0" and remove it. → Turn the unlocking lever of the sliding brush in an anti-clockwise direction - the brushes will fall downward and can be pulled outward at the bottom of the device.
→ Hold the new brush under the cleaning head.
→ Turn the unlocking lever of the sliding brush in a clockwise direction and press the brush upward.
→ Release the unlocking lever and check that the brush is seated properly.
Maintenance tasks - all types
Cleaning the floater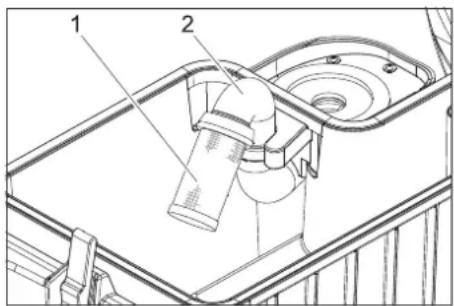
1 Sieve with floater ball 2 Pipe
→ Clean the sieve from the outside and rinse it. → Check the mobility of the floater ball. → Hold the pipe firmly and pull the sieve out of the pipe. → Clean the sieve and ball. → Hold the pipe firmly and reinsert the sieve.
If it is too dirty:
Frost protection
In case of danger of frost:
→ Empty the fresh and waste water tanks. → Store the appliance in a frost-protected room.
Faults
DANGER
Risk of injury! Before carrying out any tasks on the machine, set the main key to "0" and remove it. Pull the battery plug.
⚠ WARNING
The suction turbine will continue to run for a while after switch-off. Carry out maintenance tasks only after the suction turbine has come to a halt.
In case of faults that cannot be remedied using the table below, please contact the customer service.
Errors shown by the battery indicator
| A blinking battery display indicates the following faults. The time sequence of the fault. | ||
| Number of flashes Fault Remedy | ||
| 1 Battery discharged oder battery cable damaged. Check battery cable, charge battery. | ||
| 2 Cable to drive motor interrupted. Inform Customer Service. | ||
| 3 Cable to drive motor shorted. | ||
| 4 Deep discharge power not reached Charge battery. | ||
| 5 | - | - |
| 6 Drive attempt while charger is connected (Bp Pack model only). | Remove the power plug from the charger and hook the holder into the appliance (model Bp Pack only). | |
| 7 Fault in drive pedal. Release the drive pedal prior to turning on the appliance. | ||
| 8 Control faulty. Inform Customer Service. | ||
| 9 Parking brake fault. | ||
| 10 Shorted connection on battery connection. Check the terminal is on the batteries. | ||
| Once every 5 seconds | Control idle. | Turn the main switch to "0" and turn it back to "1". |
Errors shown by the charge status indicator (only Bp Pack model)
| Blinking signal | Fault Remedy | |
| Blinks red | Battery poled or is not connected | Check battery cable for correct sitting. |
| Blinks green and yellow. | Cable connection between battery and charger is poor. | Check battery cable for correct sitting.Check whether the connection to the battery was interrupted during the charge process. |
| Battery defective | Check battery. |
→ Before restarting the charger, pull the plug out of the socket, wait until the charge status indicator shuts off and plug the mains plug back in.
Faults
| Fault Remedy By whom | ||
| Appliance cannot be started Insert | the battery plug on the device. Operator | |
| Swivel the top of the appliance down and close the lock. Operator | ||
| Release emergency-stop button by turning. Operator | ||
| Check battery cable for correct sitting. Operator | ||
| Check battery cable for corrosion; clean, if required. Operator | ||
| Battery capacity exhausted; recharge battery. Operator | ||
| Remove the power plug from the charger and hook the holder into the appliance (mode Bp Pack only). | Operator | |
| Device does not drive or drives only slowly | Release accelerator pedal, turn the key switch to "0", turn the key switch to "1", press the accelerator pedal. | Operator |
| Reset fuse of control system. Operator | ||
| Set the unlock lever to "drive". Operator | ||
| Charge battery. Operator | ||
| Motor or control overheated; switch off the appliance and let it cool down for 5 minutes. | Operator | |
| Remove obstacles from the wheels or push the appliance away from the obstacle. Operator | ||
| Device does not brake | Park brake deactivated; pull the unlock lever down to activate. | Operator |
| No or inadequate suction power | Empty the waste water tank. | Operator |
| Reset fuse of suction turbine. | Operator | |
| Foam generated in waste water tank? Use less or a different detergent. Use defoamer. | Operator | |
| Clean the seals between waste water tank and top of the appliance and check for leaks replace if required. | Operator | |
| Clean the vacuum lips on the vacuum bar, turn or replace if required. | Operator | |
| Check suction hose for blockages; clean if required. Operator | ||
| Check connection between suction hose and suction bar and suction hose and waste-water tank. | Operator | |
| Check the suction hose for tightness; replace if required. | Operator | |
| Check if the cover on the dirt water discharge hose is closed | Operator | |
| Clean the floater in the waste water tank. | Operator | |
| The battery indicator blinks | Charge battery. Operator | |
| See "Faults with display". | Operator | |
| Insufficient cleaning result | Select a more intensive cleaning program. | Operator |
| Check the brushes for wear, replace if required. | Operator | |
| Check brush for contamination and clean it. | Operator | |
| Check whether the detergent and the brush are suitable for the cleaning task. | Operator | |
| Charge battery. Operator | ||
| Brushes do not turn | Reset fuse of brush drive. | Operator |
| Check the brush for blockage by foreign objects; remove the foreign objects. | Operator | |
| Charge battery. Operator | ||
| No or very little detergent solution gets added | Check level of detergent solution in the fresh water tank; refill, if required. | Operator |
| Open fresh water valve. | Operator | |
| Select a more intensive cleaning program. | Operator | |
| Check fresh water sieve; clean if required. | Operator | |
| The cleaning head is not lowered. | Reset fuse of control system. Operator | |
| The suction bar is not lowered. | Unhook the ropes from the suction bar. | Operator |
Accessories
| Description | Part no.: | Description | Piece | Machine requires piece |
| Battery * | 6.654-093.0 | 12V/70 Ah, maintenance-free (gel), | 1 | 3 |
| Dosing station | 2.641-811.0 | To fill the appliance with water and detergent. | 1 | 1 |
| * Only suited for appliances with maintenance-free batteries (gel). | ||||
Accessories BR 55/40 RS
| Description | Part no.: | Description | Piece | Machine requires piece |
| Brush roller, white (soft) | 4.762-409.0 | For cleaning slightly dirtied or sensitive floors. | 1 | 2 |
| Brush roller, red (medium, standard) | 4.762-393.0 | For all floors. | 1 | 2 |
| Brush roller, hard (green) | 4.762-411.0 | Hard, for severe contamination and basic cleaning; only suitable for insensitive floor coverings. | 1 | 2 |
| Brush roller, black (very hard) | 4.777-412.0 | Very hard, for extreme contamination and basic cleaning; only suitable for insensitive floor coverings. | 1 | 2 |
| Description | Part no.: | Description | Piece | Machine requires piece |
| Brush roller, high/low (medium hardness) | 4.762-410.0 | Medium hardness, to clean structured floors and deeper grouts. | 1 | 2 |
| Pad roller shaft 4.762-415.0 For intake of roller pads. | of roller pads. | 1 2 | ||
| Pad, soft, yellow 6.369-732.0 For polishing floors. | 1 | 2 | ||
| Pad, medium soft, red 6.369-734.0 For cleaning slightly dirtied floors. | 1 2 | |||
| Pad, hard, green 6.369-733.0 For cleaning normal to heavily dirtied floors. | 1 2 | |||
| Rubber lips of vacuum bar 6.273-294.0 | 1 set 1 set |
Accessories BD 50/40 RS
| Description | Part no.: | Description | Piece | Machine requires piece |
| Disk brush, blue (medium, standard) | 8.600-042.0 | For cleaning slightly dirtied or sensitive floors. | 1 | 1 |
| Disk brush, grey (hard) | 8.600-043.0 | For cleaning heavily dirtied floors. | 1 | 1 |
| Driver plate | 8.600-041.0 | For intake of pads. | 1 | 1 |
| Rubber lips of vacuum bar 8.634-020.0 | 1 set 1 set |
Specifications
| BR55/40RS | BD50/40RS | ||
| Power | |||
| Nominal voltage | V | 36 | |
| Battery capacity (Pack model) | Ah(5h) | 70 | |
| Average power consumption | W | 1480 | 1080 |
| Drive motor output (rated output) | W | 157 | |
| Suction engine output | W | 470 | |
| Brush engine output | W | 600 | 209 |
| Vacuuming | |||
| Cleaning power, air quantity | l/s | 34 | |
| Cleaning power, negative pressure | kPa | 11,7 | |
| Cleaning brushes | |||
| Working width | mm | 559 | 508 |
| Brush diameter | mm | 96 | 508 |
| Brush speed | 1/min | 1500 | 180 |
| Dimensions and weights | |||
| Detergent application | l/min | 1,25 | |
| Drive speed (max.) | km/h | 4,3 | |
| Climbing capability (max.) | % | 10 | |
| Theoretical surface cleaning performance | m2/h | 2350 | 1840 |
| Fresh/waste water tank volume | l | 38/38 | |
| Length | mm | 1118 | |
| Width | mm | 744 | 691 |
| Height mm 1316 | |||
| Permissible overall weight | kg 330 | ||
| Transport weight | kg | 275 | 255 |
| Surface load | kPa | 2190 | |
| Values determined as per EN 60335-2-72 | |||
| Vibration total value on arms | m/s2 | 3,6 | |
| Vibration total value on feet | m/s2 | <2,5 | |
| Uncertainty K | m/s2 | 1 |
| Sound pressure level LpA | dB(A) | 60 |
| Uncertainty KpA | dB(A) | 6 |
| Sound power level LWA + Uncertainty KWA | dB(A) | 79 |
| Charger (only Bp Pack model) | ||
| Nominal voltage | V | 85...264 |
| Frequency | Hz | 50/60 |
| Current pickup, max. A | 15 | |
| Type of protection | IP66 | |
| Humidity, max. | % | 90 |
| Ambient temperature | °C | +5...+45 |
Accessories and Spare Parts
Only use original accessories and spare parts, they ensure the safe and trouble-free operation of the device.
For information about accessories and spare parts, please visit www.kaercher.com.
Warranty
The warranty terms published by the relevant sales company are applicable in each country. We will repair potential failures of your appliance within the warranty period free of charge, provided that such failure is caused by faulty material or defects in manufacturing. In the event of a warranty claim please contact your dealer or the nearest authorized Customer Service centre. Please submit the proof of purchase.
EU Declaration of Conformity
We hereby declare that the machine described below complies with the relevant basic safety and health requirements of the EU Directives, both in its basic design and construction as well as in the version put into circulation by us. This declaration shall cease to be valid if the machine is modified without our prior approval.
Product: Floor cleaner
Type: 1.006-xxx
Type: 1.002-xxx
Relevant EU Directives
2006/42/EC (+2009/127/EC)
2014/30/EU
Applied harmonized standards
EN 55014-1: 2006+A1: 2009+A2: 2011
EN 55014-2: 2015
EN 60335-1
EN 60335-2-29: 2004+A2: 2010
EN 60335-2-72
EN 61000-3-2: 2014
EN 61000-3-3: 2013
EN 62233: 2008
Applied national standards
The signatories act on behalf of and with the authority of the company management.
Chairman of the Board of Management
S. Reiser Director Regulatory Affairs & Certification
Documentation supervisor:
S. Reiser
Alfred Kärcher SE & Co. KG
71364 Winnenden (Germany)
Tel.: +49 7195 14-0
Fax: +49 7195 14-2212
Winnenden, 2019/05/01
Storage .... EN 6
www.kaercher.com/REACH
Attachment points
Storage
⚠ CAUTION
1 Knurled nut
2006/42/EC (+2009/127/EC)
2014/30/EU
Chairman of the Board of Management
S. Reiser
Director Regulatory Affairs & Certification
71364 Winnenden (Germany)
Tel.: +49 7195 14-0
Fax: +49 7195 14-2212
Winnenden, 2019/05/01

www.kaercher.com/REACH
Attachment points
Support
⚠ CAUTION
1 cross handle
2 plastic part
1 knurled nut
2006/42/EC (+2009/127/EC)
2014/30/EU
71364 Winnenden (Germany)
Tel.: +49 7195 14-0
Fax: +49 7195 14-2212
Winnenden, 2019/05/01

Accessories ....NL 9
www.kaercher.com/REACH
Program selector switch
Mounting points
Storage
⚠CAUTION
1 star handle
1 knurled nut
Chairman of the Board of Management
S. Reiser
Director Regulatory Affairs & Certification
71364 Winnenden (Germany)
Tel.: +49 7195 14-0
Fax: +49 7195 14-2212
Winnenden, 2019/05/01
www.kaercher.com/REACH
Attachment points
Storage
△CAUTION
1 star handle
2 plastic part
1 knurled nut
2006/42/EC (+2009/127/EC)
2014/30/EU
71364 Winnenden (Germany)
Tel.: +49 7195 14-0
Fax: +49 7195 14-2212
Winnenden, 2019/05/01

Read the original manual before using your device.
www.kaercher.com/REACH
Controls and operating elements
Disassembling the batteries
Attachment points
Storage
△CAUTION
1 Star grip
2 Plastic part
1 Knurled screw
2006/42/EC (+2009/127/EC)
2014/30/EU
Chairman of the Board of Management
S. Reiser Director Regulatory Affairs & Certification
71364 Winnenden (Germany)
Tel.: +49 7195 14-0
Fax: +49 7195 14-2212
Winnenden, 2019/05/01

www.kaercher.com/REACH
Attachment points
Storage
⚠ CAUTION
1 Suction hose
2 Suction bar coupling
1 Thumb screw
2006/42/EC (+2009/127/EC)
2014/30/EU
Chairman of the Board of Management
S. Reiser
Director Regulatory Affairs & Certification
71364 Winnenden (Germany)
Tel.: +49 7195 14-0
Fax: +49 7195 14-2212
Winnenden, 2019/05/01

www.kaercher.com/REACH
1 Hose connection, filling automation 2 Fresh water tank 3 Charge level indicator (only Bp Pack variants) 4 Waste water tank 5 Float 6 Waste water drain hose 7 Appliance plug 8 Battery contact 9 Battery 10 Charger power plug (only Bp Pack variants) 11 Suction bar 12 Fresh water valve 13 Fresh water strainer 14 Fresh water tank cover 15 Cleaning head 16 Suction bar holder for heavy soiling (two-stage method) 17 Fresh water level indicator Fresh water drain hose 18 Drive pedal 19 Operator platform 20 Safety pedal 21 Lock 22 Control panel 23 Steering wheel
Attachment points
Storage
⚠️CAUTION
1 Star handle 2 Plastic part 3 Squeegee lip
Maintenance (BD 50/40 RS)
Disassemble the suction bar
1 Suction hose
2 Suction bar coupling
→ Remove the suction hose from the suction bar. → Loosen the suction bar coupling. → Remove the suction bar.
Replace or turn the suction lip
→ Disassemble the suction bar.
1 Wing nut
1 Suction lip 2 Suction bar insert
2006/42/EC (+2009/127/EC)
2014/30/EU
Chairman of the Board of Management
Director Regulatory Affairs & Certification
71364 Winnenden (Germany)
Tel.: +49 7195 14-0
Fax: +49 7195 14-2212
Winnenden, 2019/05/01

www.kaercher.com/REACH
Attachment points
Storage
⚠CAUTION
1 Star knob
2 Plastic part
3 Suction lip
1 Suction hose 2 Suction bar coupling
1 Ribbed nuts
1 Suction lip
2 Suction bar insert.
71364 Winnenden (Germany)
Tel.: +49 7195 14-0
Fax: +49 7195 14-2212
Winnenden, 2019/05/01
Table of contents
www.kaercher.com/REACH
Attachment points
Storage
△WARNING
1 Star handle
2 Plastic part
3 Suction nozzle
1 Suction hose
2 Suction bar switch
1 Knurled nut
1 Suction nozzle
2 Suction bar insert
Chairman of the Board of Management
S. Reiser Director Regulatory Affairs & Certification
71364 Winnenden (Germany)
Tel.: +49 7195 14-0
Fax: +49 7195 14-2212
Winnenden, 2019/05/01
www.kaercher.com/REACH
Mounting points
Storage
CAUTION
Chairman of the Board of Management
S. Reiser
Director Regulatory Affairs & Certification
71364 Winnenden (Germany)
Tel.: +49 7195 14-0
Fax: +49 7195 14-2212
Winnenden, 2019/05/01

www.kaercher.com/REACH
Mounting points
Storage
CAUTION
1 Star arm 2 Plastic part 3 Suction lip
1 Suction hose 2 Suction arm coupling
1 Knurled nut
1 Suction lip
2 Suction arm adapter
Chairman of the Board of Management
Director Regulatory Affairs & Certification
71364 Winnenden (Germany)
Tel.: +49 7195 14-0
Fax: +49 7195 14-2212
Winnenden, 2019/05/01

www.kaercher.com/REACH
Mounting points
Storage
CAUTION
Chairman of the Board of Management
Director Regulatory Affairs & Certification
71364 Winnenden (Germany)
Tel.: +49 7195 14-0
Fax: +49 7195 14-2212
Winnenden, 2019/05/01

www.kaercher.com/REACH
Mounting points
Storage
CAUTION
Chairman of the Board of Management
Director Regulatory Affairs & Certification
71364 Winnenden (Germany)
Tel.: +49 7195 14-0
Fax: +49 7195 14-2212
Winnenden, 2019/05/01

www.kaercher.com/REACH
Mounting points
Storage
⚠WARNING
1 Knurled nut
2006/42/EC (+2009/127/EC)
2014/30/EU
Chairman of the Board of Management
Director Regulatory Affairs & Certification
71364 Winnenden (Germany)
Tel.: +49 7195 14-0
Fax: +49 7195 14-2212
Winnenden, 2019/05/01

Before first use of your device, read this original manual.
www.kaercher.com/REACH
→ Insert batteries into the device. → Connect the poles with the provided connecting cables.
CAUTION
Mounting points
Storage
PRECAUTION
→ Lift the handle of the suction bracket. → Remove the suction bracket.
→ Press the brush replacement button and tilt the cover on the brush head to the side. → Pull out the brush rollers. → Insert new brush rollers and snap them into place. → Close the cover, align the brushes, and snap them into the cover. → Turn the splash guard back. → Turn the release lever downwards.
1 Flexible suction hose 2 Suction bracket connection
→ Remove the suction hose from the suction bracket. → Unscrew the suction bracket connection. → Remove the suction bracket.
1 Knurled nut
→ Unscrew the knurled nuts. → Remove the suction support insert downwards from the suction support.
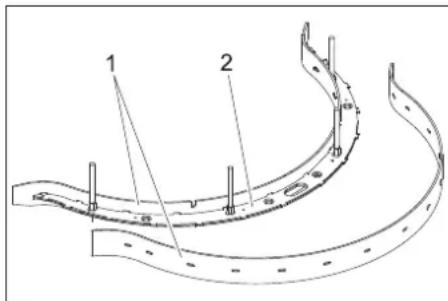
1 Suction nozzle 2 Suction support insert
→ Remove the suction nozzles from the suction support insert.
Warning:
1 Strainer with ball float
2 Hose
→ Clean and rinse the strainer from the outside.
→ Check the mobility of the ball float.
In case of heavy soiling:
2006/42/EC (+2009/127/EC)
2014/30/EU
Chairman of the Board of Management
Director Regulatory Affairs & Certification
71364 Winnenden (Germany)
Tel.: +49 7195 14-0
Fax: +49 7195 14-2212
Winnenden, 2019/05/01
www.kaercher.com/REACH
Mounting points
Storage
⚠CAUTION
2006/42/EC (+2009/127/EC)
2014/30/EU
71364 Winnenden (Germany)
Tel.: +49 7195 14-0
Fax: +49 7195 14-2212
Winnenden, 2019/05/01

www.kaercher.com/REACH
Indicator accumulator
Mounting points
Storage
⚠CAUTION
1 Suction hose 2 Suction tube coupling
1 Knurled nut
EU Directives complied with:
2006/42/EC (+2009/127/EC)
2014/30/EU
Harmonized standards used:
EN 55014-1: 2006+A1: 2009+A2: 2011
EN 55014-2: 2015
EN 60335-1
EN 60335-2-29: 2004+A2: 2010
EN 60335-2-72
EN 61000-3-2: 2014
EN 61000-3-3: 2013
EN 62233: 2008
Chairman of the Board of Management
Director Regulatory Affairs & Certification
71364 Winnenden (Germany)
Tel.: +49 7195 14-0
Fax: +49 7195 14-2212
Winnenden, 2019/05/01

www.kaercher.com/REACH
Mounting location
Storage
⚠ WARNING
→ Press the brush replacement button and fold the brush head cover to the side. → Pull out the cylindrical brushes. → Insert new cylindrical brushes and let them snap into place. → Close the cover, adjust the brushes, and let the cover snap into place. → Tighten the splash guard back. → Fold down the release lever.
1 Suction hose 2 Suction attachment coupling
→ Pull the suction hose off the suction attachment.
1 Slotted nut
→ Unscrew the slotted nuts. → Remove the suction nozzle insert downwards from the suction nozzle.
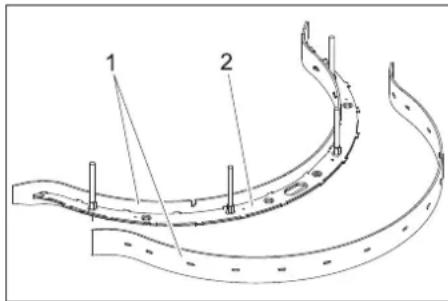
1 Strainer with float cone 2 Pipe
2006/42/EC (+2009/127/EC)
2014/30/EU
Harmonized standards applied:
EN 55014-1:2006+A1:2009+A2:2011
EN 55014-2: 2015
EN 60335-1
EN 60335-2-29: 2004+A2: 2010
EN 60335-2-72
EN 61000-3-2: 2014
EN 61000-3-3: 2013
EN 62233: 2008
H. Jenner Chairman of the Board of Management
S. Reiser Director Regulatory Affairs & Certification
71364 Winnenden (Germany)
Tel.: +49 7195 14-0
Fax: +49 7195 14-2212
Winnenden, 2019/05/01

Before first use of your device, read these original instructions.
www.kaercher.com/REACH
→ Insert the batteries into the device. → Connect the poles with the supplied connecting cables.
CAUTION
Risk of damage. Ensure correct pole connection.
→ Connect the supplied connecting cable to the free poles of the battery (+) and (-).
CAUTION
Attachment points
Storage
△CAUTION
→ Raise the coupling handle of the suction console. → Remove the suction console.
1 Star-shaped fastener 2 Plastic part 3 Suction rubber
→ Unscrew the star-shaped fasteners. → Remove the plastic parts. → Remove the dirt suction rubbers. → Turn the rubbers inside out or insert new ones. → Attach the plastic parts. → Insert and tighten the star-shaped fasteners.
→ Turn the release lever upwards. → Turn the splash guard forwards.
1 Suction hose 2 Suction console coupling
→ Remove the suction hose from the suction console. → Release the suction console coupling. → Remove the suction console.
1 Serrated head nuts
2006/42/EZ (+2009/127/EZ)
2014/30/EU
Chairman of the Board of Management
S. Reiser
Director Regulatory Affairs & Certification
71364 Winnenden (Germany)
Tel.: +49 7195 14-0
Fax: +49 7195 14-2212
Winnenden, 2019/05/01

Read these original instructions before using your device for the first time.
www.kaercher.com/REACH
1 Hose connection, automatic filling 2 Fresh water tank 3 Battery charge indicator (only for Bp Pack version) 4 Dirty water tank 5 Float 6 Dirty water drain hose 7 Device plug 8 Battery plug 9 Battery 10 Charger power plug (only for Bp Pack version) 11 Suction console 12 Fresh water valve 13 Fresh water strainer 14 Fresh water tank lid 15 Cleaning block 16 Suction console holder for heavy soiling (two-step operation) 17 Fresh water tank fill level indicator Fresh water drain hose 18 Drive pedal 19 Standing platform during operation 20 Safety pedal 21 Lock
22 Control panel 23 Steering wheel 24 Release lever, driving 25 Release lever, pushing
A Drawer for collected coarse dirt (only BR variant)
B Side splash guard (only BR variant)
Color marking
- Control elements for the cleaning process are yellow.
- Control elements for maintenance and service are light gray.
Battery status indicator
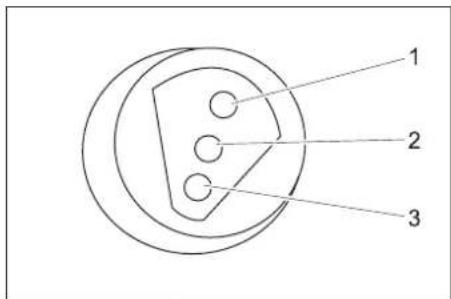
| 1 zelena Svetli: | Postupak punjenja je završen. |
| 2 žuto Svetli: Završna faza punjenja. | |
| 3 crveno Svetli: | Postupak punjenja.Treperi: Inicijalizacija punjača. |
Control panel
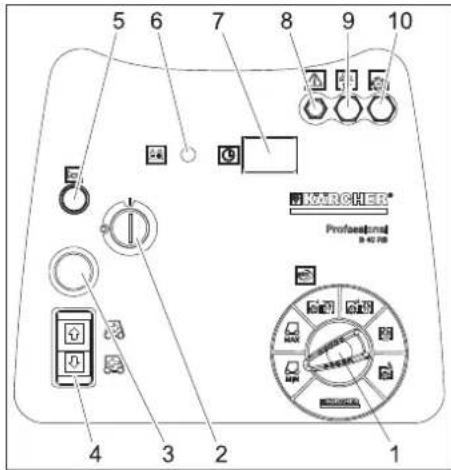
1 Program selection switch 2 Key switch 3 Emergency stop switch (unlock by turning) 4 Direction of travel selector switch, selected direction lights up 5 Horn 6 Battery charge display 7 Operating hours counter 8 Control unit fuse 9 Suction turbine fuse 10 Brush drive fuse
Battery charge display
| svetli Akumulator je napunjen. |
| treperi Akumulator mora da se napuni.Pogon četki i nanošenjerastvora deterdženta su deaktivirani. |
Program selection switch
→ Place the batteries in the device. → Connect the poles with the supplied connecting cables.
CAUTION
Risk of damage. Ensure correct polarity when connecting.
Mounting points
Storage
△CAUTION
Risk of injury and damage! Consider the weight of the device when storing. This device may only be stored indoors.
Care and maintenance
△DANGER
Risk of injury! Before any work on the device, set the key switch to "0" and remove the key. Disconnect the battery plug.
⚠WARNING
After switching off, the suction turbine continues to run for some time. Perform maintenance work only after the suction turbine has completely stopped.
→ Drain and remove dirty and residual fresh water.
Maintenance schedule
Before starting work:
→ Check the seal of the upper part of the device on the dirty water tank. → Check the condition of the tires on the wheels. → Check the correct position of the brush. → Check the tightness of the plug connections of the suction hose. → Check the attachment of the suction bracket (see "Maintenance work"). → Check the tightness of the closure on the dirty water drain hose. → Check that both drain hoses are correctly seated in the holders. → Check the functionality of the drive pedal, brake, and steering. → For electrolytic batteries, check the acid level and top up with distilled water if necessary.
After finishing work:
→ Empty the dirty water tank. → Rinse the dirty water tank with clean water. → Clean the mesh and float in the dirty water tank (see "Maintenance work"). → Clean the fresh water tank. → Turn on the suction for one minute to dry the system. → Empty and clean the tray for collected coarse dirt (only BR variant). → Check the brush for wear, clean it if necessary. → Check the squeegee rubbers on the suction bar for wear, clean them if necessary. → Wipe the device externally with a damp cloth soaked in a solution of mild detergent.
→ Raise the handle of the suction bar coupling. → Remove the suction bar.
Turning or replacing the squeegee rubbers
→ Remove the suction bar.
1 Star-shaped fastener 2 Plastic part 3 Squeegee rubber
→ Unscrew the star-shaped fasteners. → Remove the plastic parts. → Remove the squeegee rubbers. → Turn the rubbers over or insert new ones. → Attach the plastic parts. → Screw in and tighten the star-shaped fasteners.
Replacing the roller brush
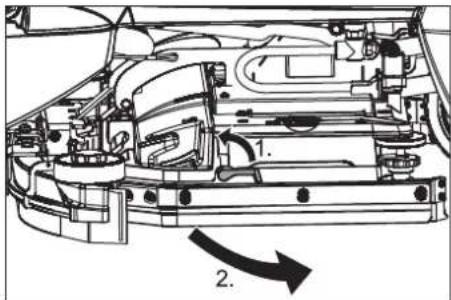
→ Fold the release lever upwards. → Fold the splash guard forward.
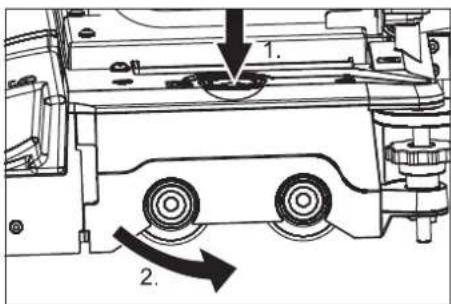
→ Press the brush replacement button, then turn the cover on the brush block to the side. → Pull out the roller brush. → Insert and lock the new roller brush. → Close the cover, align the brushes and lock them into the cover. → Fold the splash guard back. → Lower the release lever.
Maintenance work BD 50/40 RS
Removing the suction bar
1 Suction hose
2 Suction bar coupling
→ Remove the suction hose from the suction bar. → Release the suction bar coupling. → Remove the suction bar.
Replacing or turning the dirt suction rubbers
→ Remove the suction console.
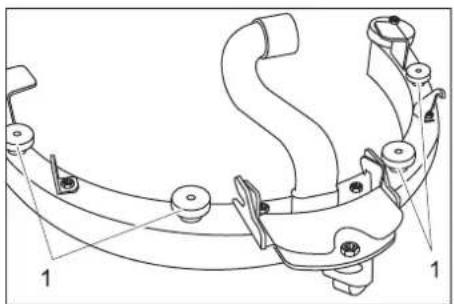
2006/42/EZ (+2009/127/EZ)
2014/30/EU
Chairman of the Board of Management
Director Regulatory Affairs & Certification
71364 Winnenden (Germany)
Tel.: +49 7195 14-0
Fax: +49 7195 14-2212
Winnenden, 2019/05/01

www.kaercher.com/REACH
Attachment points
Storage
⚠CAUTION
1 Knurled nut
Chairman of the Board of Management
Director Regulatory Affairs & Certification
71364 Winnenden (Germany)
Tel.: +49 7195 14-0
Fax: +49 7195 14-2212
Winnenden, 2019/05/01

www.kaercher.com/REACH
Mounting the suction nozzle
Attachment points
Storage
CAUTION
Mounting the suction nozzle
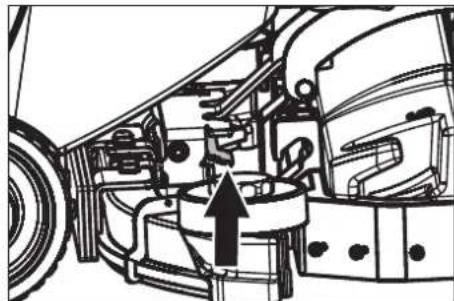
→ Pull the suction hose off the suction nozzle.
1 Star knob 2 Plastic part 3 Suction lip
Mounting the suction nozzle
1 Suction hose
1 Nut
1 Suction hose 2 Suction connection
→ Remove the suction hoses from the suction connection.
Note:
71364 Winnenden (Germany)
Tel.: +49 7195 14-0
Fax: +49 7195 14-2212
Winnenden, 2019/05/01

www.kaercher.com/REACH
1 Suction hose
1 Grooved nut
Chairman of the Board of Management
S. Reiser
Director Regulatory Affairs & Certification
71364 Winnenden (Germany)
Tel.: +49 7195 14-0
Fax: +49 7195 14-2212
Winnenden, 2019/05/01

www.kaercher.com/REACH
1 Hose connection, automatic filling
2 Clean water tank
3 Charger status indicator (only on "Bp Pack" model)
4 Dirty water tank
5 Float
Mounting points
Storage
CAUTION
→ Lift the suction frame coupling handle. → Remove the suction frame.
1 Suction hose
2 Suction frame coupling
1 Knurled nut
Chairman of the Board of Management
Director Regulatory Affairs & Certification
71364 Winnenden (Germany)
Tel.: +49 7195 14-0
Fax: +49 7195 14-2212
Winnenden, 2019/05/01
www.kaercher.com/REACH
Mounting points
Storage
⚠CAUTION
1 Knurled nut
Chairman of the Board of Management
Director Regulatory Affairs & Certification
71364 Winnenden (Germany)
Tel.: +49 7195 14-0
Fax: +49 7195 14-2212
Winnenden, 2019/05/01
- STORAGE
- △CAUTION
- CONTENTS
- SAFETY INSTRUCTIONS
- BEHAVIOUR IN EMERGENCY SITUATIONS
- SAFETY DEVICES
- EMERGENCY-STOP BUTTON
- SAFETY PEDAL
- HAZARD LEVELS
- DANGER
- ⚠ WARNING
- ATTENTION
- FUNCTION
- NOTE
- PROPER USE
- ENVIRONMENTAL PROTECTION, DISPOSAL
- NOTES ABOUT THE INGREDIENTS (REACH)
- OPERATING AND FUNCTIONAL ELEMENTS
- COLOUR CODING
- BATTERY LOAD INDICATOR
- OPERATOR CONSOLE
- PROGRAM SELECTION SWITCH
- BEFORE COMMISSIONING
- INSTALL THE BATTERIES (ONLY BP MODEL)
- ⚠️ DANGER
- INSERT BATTERIES AND CONNECT
- CHARGING BATTERY
- AFTER CHARGING
- REMOVING THE BATTERIES
- PUSHING THE DEVICE
- UNLOADING
- OPERATION
- WARNING
- CHECK IMMOBILIZING BRAKE
- BRAKES
- FILLING IN DETERGENTS
- FRESH WATER
- DETERGENT
- DRIVING
- OVERLOAD
- CLEANING
- COMPLETE CLEANING
- SHUTTING DOWN
- EMPTY TANKS
- DRAIN OFF DIRT WATER
- DRAIN OFF CLEAN WATER
- TRANSPORT
- ⚠CAUTION
- CAUTION
- MAINTENANCE AND CARE
- MAINTENANCE SCHEDULE
- PRIOR TO OPERATION
- AFTER OPERATION
- WEEKLY
- EVERY 50 OPERATING HOURS
- BR 55/40 RS ONLY
- MONTHLY
- EVERY 100 OPERATING HOURS
- EVERY 200 OPERATING HOURS
- MAINTENANCE CONTRACT
- MAINTENANCE BR 55/40 RS
- DISMANTLING THE VACUUM BAR
- TURN OR REPLACE VACUUM LIPS
- REPLACING THE BRUSH ROLLERS
- MAINTENANCE TASKS BD 50/40 RS
- REPLACE OR TURN VACUUM LIPS
- REPLACING THE DISK BRUSHES
- MAINTENANCE TASKS - ALL TYPES
- IF IT IS TOO DIRTY
- FROST PROTECTION
- FAULTS
- ACCESSORIES AND SPARE PARTS
- WARRANTY
- EU DECLARATION OF CONFORMITY
- APPLIED NATIONAL STANDARDS
- ⚠ CAUTION
- KNURLED NUT
- SUPPORT
- PROGRAM SELECTOR SWITCH
- CONTROLS AND OPERATING ELEMENTS
- DISASSEMBLING THE BATTERIES
- KNURLED SCREW
- ⚠️CAUTION
- MAINTENANCE (BD 50/40 RS)
- DISASSEMBLE THE SUCTION BAR
- REPLACE OR TURN THE SUCTION LIP
- RIBBED NUTS
- TABLE OF CONTENTS
- △WARNING
- ⚠WARNING
- PRECAUTION
- IN CASE OF HEAVY SOILING
- COLOR MARKING
- BATTERY STATUS INDICATOR
- CONTROL PANEL
- CARE AND MAINTENANCE
- △DANGER
- BEFORE STARTING WORK
- AFTER FINISHING WORK
- TURNING OR REPLACING THE SQUEEGEE RUBBERS
- REPLACING THE ROLLER BRUSH
- MAINTENANCE WORK BD 50/40 RS
- REMOVING THE SUCTION BAR
- REPLACING OR TURNING THE DIRT SUCTION RUBBERS
- MOUNTING THE SUCTION NOZZLE
- NUT
Brand : Kärcher
Model : BD 5040 RS Bp Pack
Category : Broom