
ETS EC 1505 EQ - Sander FESTOOL - Free user manual and instructions
Find the device manual for free ETS EC 1505 EQ FESTOOL in PDF.
| Product type | Random orbital sander |
| Brand | Festool |
| Model | ETS EC 1505 EQ |
| Power consumption | 400 W |
| No-load speed | 6,000 – 10,000 rpm |
| Sanding stroke | 5.0 mm |
| Pad diameter | 150 mm |
| Weight (according to EPTA 01:2014) | 1.2 kg |
| Power supply | Mains (Plug-it connection cable) |
| Protection class | II (double insulation) |
| Sound pressure level | 69 dB(A) (uncertainty K = 3 dB) |
| Sound power level | 80 dB(A) (uncertainty K = 3 dB) |
| Vibration emission value | 4.8 m/s² (uncertainty K = 1.5 m/s²) |
| Electronic system | Soft start, constant speed control, speed reduction in case of vibrations, thermal fuse |
| Electronic extraction detection | No (only on EQA version) |
| Extraction connection | Yes, 27 mm diameter (for Festool extractor) |
| Abrasive attachment | StickFix (self-adhesive) |
| Intended use | Sanding wood, plastics, composites, paints, varnishes, fillers |
| Maintenance | Regular cleaning of ventilation slots and extraction channels |
| Original accessories | Sanding pads of different hardnesses, polishing felts, StickFix abrasives |
| Repairability | Repair only by authorized Festool workshop, original spare parts |
| General information | Contains a data recording chip for diagnostics and warranty |
Frequently Asked Questions - ETS EC 1505 EQ FESTOOL
User questions about ETS EC 1505 EQ FESTOOL
0 question about this device. Answer the ones you know or ask your own.
Ask a new question about this device
Download the instructions for your Sander in PDF format for free! Find your manual ETS EC 1505 EQ - FESTOOL and take your electronic device back in hand. On this page are published all the documents necessary for the use of your device. ETS EC 1505 EQ by FESTOOL.
USER MANUAL ETS EC 1505 EQ FESTOOL
natural_image
Close-up of a black industrial cleaning brush with circular base and handle (no visible text or symbols)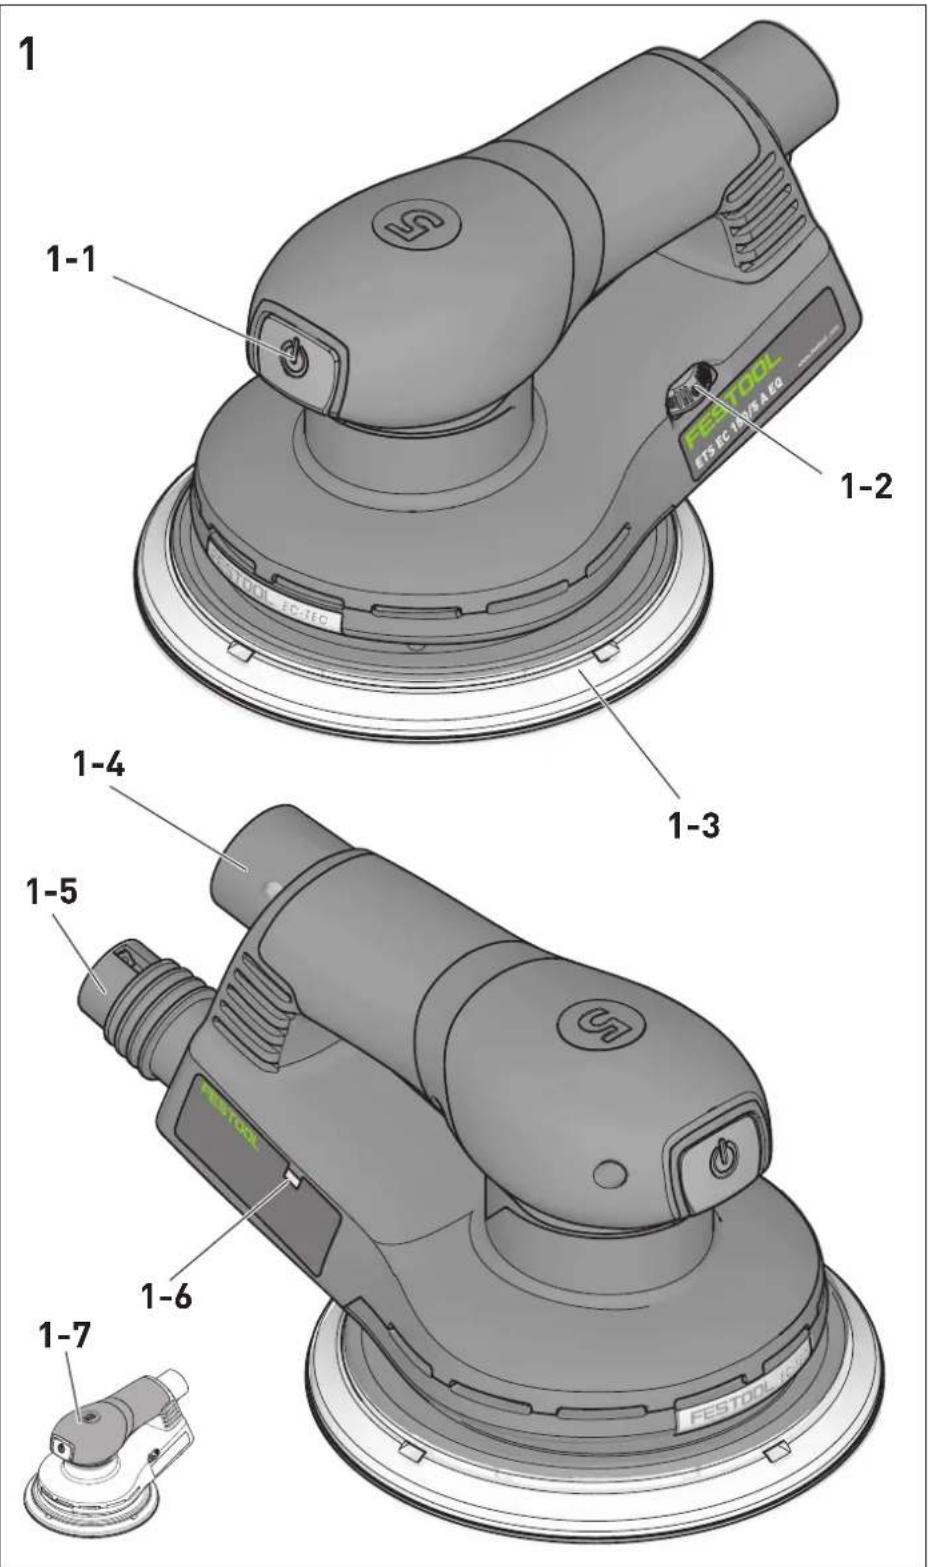
text_image
1 1-1 1-2 FESTOOL ETSEC IN A EQ 1-3 1-4 1-5 1-6 1-7 FESTOOL FESTOOL NO.1
text_image
2 ① ② ① ②
4
text_image
4 4-3 FESTOOL ETS EC-16/4.5A ESG 4-1 4-2| Exzenterschleifer | Seriennummer * |
| Eccentric sander | Serial number * |
| Ponceuse excentrique | N° de série *(T-Nr.) |
ETS EC 150/3 EQ 204770
ETS EC 150/5 EQ 204769
ETS EC 150/3 EQA 202874
ETS EC 150/5 EQA 202875
en EU Declaration of Conformity. We declare under our sole responsibility that this product is in conformity with all relevant provisions of the following directives including their amendments and complies with the following standards:
Head of Product Development

text_image
i.A.Q.B andRalf Brandt
Head of Product Conformity
Warning of general danger

Warning of electric shock

Read the operating instructions and safety instructions.

Wear ear protection.

Wear a dust mask.

Wear protective goggles.

Connecting the mains power cable

Disconnecting the mains power cable

Do not dispose of it with domestic waste.

Safety class II

CE marking: Confirms the conformity of the power tool with the European Community directives.

Tool contains a chip which stores data. See section 12.1

Tip or advice

Handling instruction
2 Safety warnings
2.1 General power tool safety warnings

WARNING! Read all safety warnings, instructions, illustrations and specifications provided with this power tool. Failure to follow all instructions listed below may result in electric shock, fire and/or serious injury.
Save all warnings and instructions for future reference.
The term "power tool" in the warnings refers to your mains-operated (corded) power tool or battery-operated (cordless) power tool.
- Only for AS/NZS: The tool shall always be supplied via residual current device with a rated residual current of 30 mA or less.
2.2 Machine-related safety instructions
- Harmful/toxic dusts can be produced during your work (e.g. lead-containing paint, some types of wood and metal). Aontact with these dusts, especially inhaling them, can represent a hazard for operating personnel or persons in the vicinity. Comply with the safety regulations that apply in your country. Connect the electric power tool to a suitable extraction system.

To protect your health, wear a P2 protec- mask.

Always wear protective goggles to protect st sanding hazards.
- Use a residual current protective device when metal grinding, as well as when the operation of the power tool in a wet environment cannot be avoided. In the event of an electric shock, the protective switch protects you against life-threatening current through the body.
- Clean work equipment soaked in oils, for example sanding pad or polishing felt, with water and allow to dry. Work equipment soaked in oil may combust spontaneously.
- Attention: Risk of fire! Avoid overheating the grinding material and the sander. Always empty the dust container before taking a break. Swarf in the dust bag, microfilter, paper bag (or in the filter bag or filter of the mobile dust extractor) may spontaneously combust in unfavourable conditions such as flying sparks when sanding metals. Particular danger exists if the
English
swarf is mixed with paint, polyurethane residue or other chemical materials and the grinding material is hot after long periods of work.
- Always use original Festool sanding pads. Foreign pads are not suitable for the speed of the sander and may break.
- If the power tool is dropped or falls, check for damage to the machine and sanding pad. Remove the sanding pad for closer inspection. Repair damaged parts before using again. Broken sanding pads and damaged machines can cause injuries and machine instability.
2.3 Mixed dust containing metal and sanding damp surfaces

With mixed dust containing metal (such as resulting from paint sanding in the auto-ve field) and when sanding damp surfaces, following measures must be observed for ons of safety:
- Install a residual-current circuit breaker (GFCI, PRCD) upstream.
- Connect the machine to a suitable dust extractor.
- Regularly blow out the motor housing of the machine to remove dust deposits.

Wear protective goggles.
2.4 Emission levels
The levels determined in accordance with EN 62841 are typically:
Sound pressure level L _PA = 69 dB(A)
Sound power level L _WA = 80 dB(A)
Uncertainty K = 3 dB


CAUTION
Noise generated when working Risk of damage to hearing
▶ Use ear protection.
Vibration emission level a_h (vector sum for three directions) and uncertainty K measured in accordance with EN 62841:
Vibration emission value (three-axle)
$$ a _ {h} = 4. 8 \mathrm{m} / \mathrm{s} ^ {2} $$
$$ K = 1. 5 \mathrm{m} / \mathrm{s} ^ {2} $$
The specified emission levels (vibration, noise)
- are used to compare machines.
- They are also used for making preliminary estimates regarding vibration and noise load during operation.
- They represent the primary applications of the power tool.

CAUTION
The emission values may deviate from the specified values. This is dependent on how the tool is used and the type of workpiece being machined.
- The actual load during the entire operating cycle must be evaluated.
▶ Depending on the actual load, suitable protective measures must be defined in order to protect the operator.
3 Intended use
The sanders are designed for sanding wood, plastic, composite, paint/varnish, filler and similar materials as directed. With mixed dust containing metal (such as dust resulting from paint sanding in the automotive industry) and when sanding damp surfaces, special safety instructions must be followed. The sanders are not intended to be suitable for grinding bare metal. Material containing asbestos cannot be processed.

The user is liable for improper or non-in-tended use.
4 Technical data
ETS EC eccentric sander 150/3 EQ 150/3 EQA 150/5 EQ 150/5 EQA
Power 400 W 400 W
No-load speed 6000–10,000 rpm 6000–10,000 rpm
Sanding stroke 3.0 mm 5.0 mm
ETS EC eccentric sander 150/3 EQ 150/3 EQA 150/5 EQ 150/5 EQA
Sanding pad D 150 mm D 150 mm
Electronic extraction detection - x - x
1.2 kg 1.2 kg Weight as per EPTA procedure 01:20
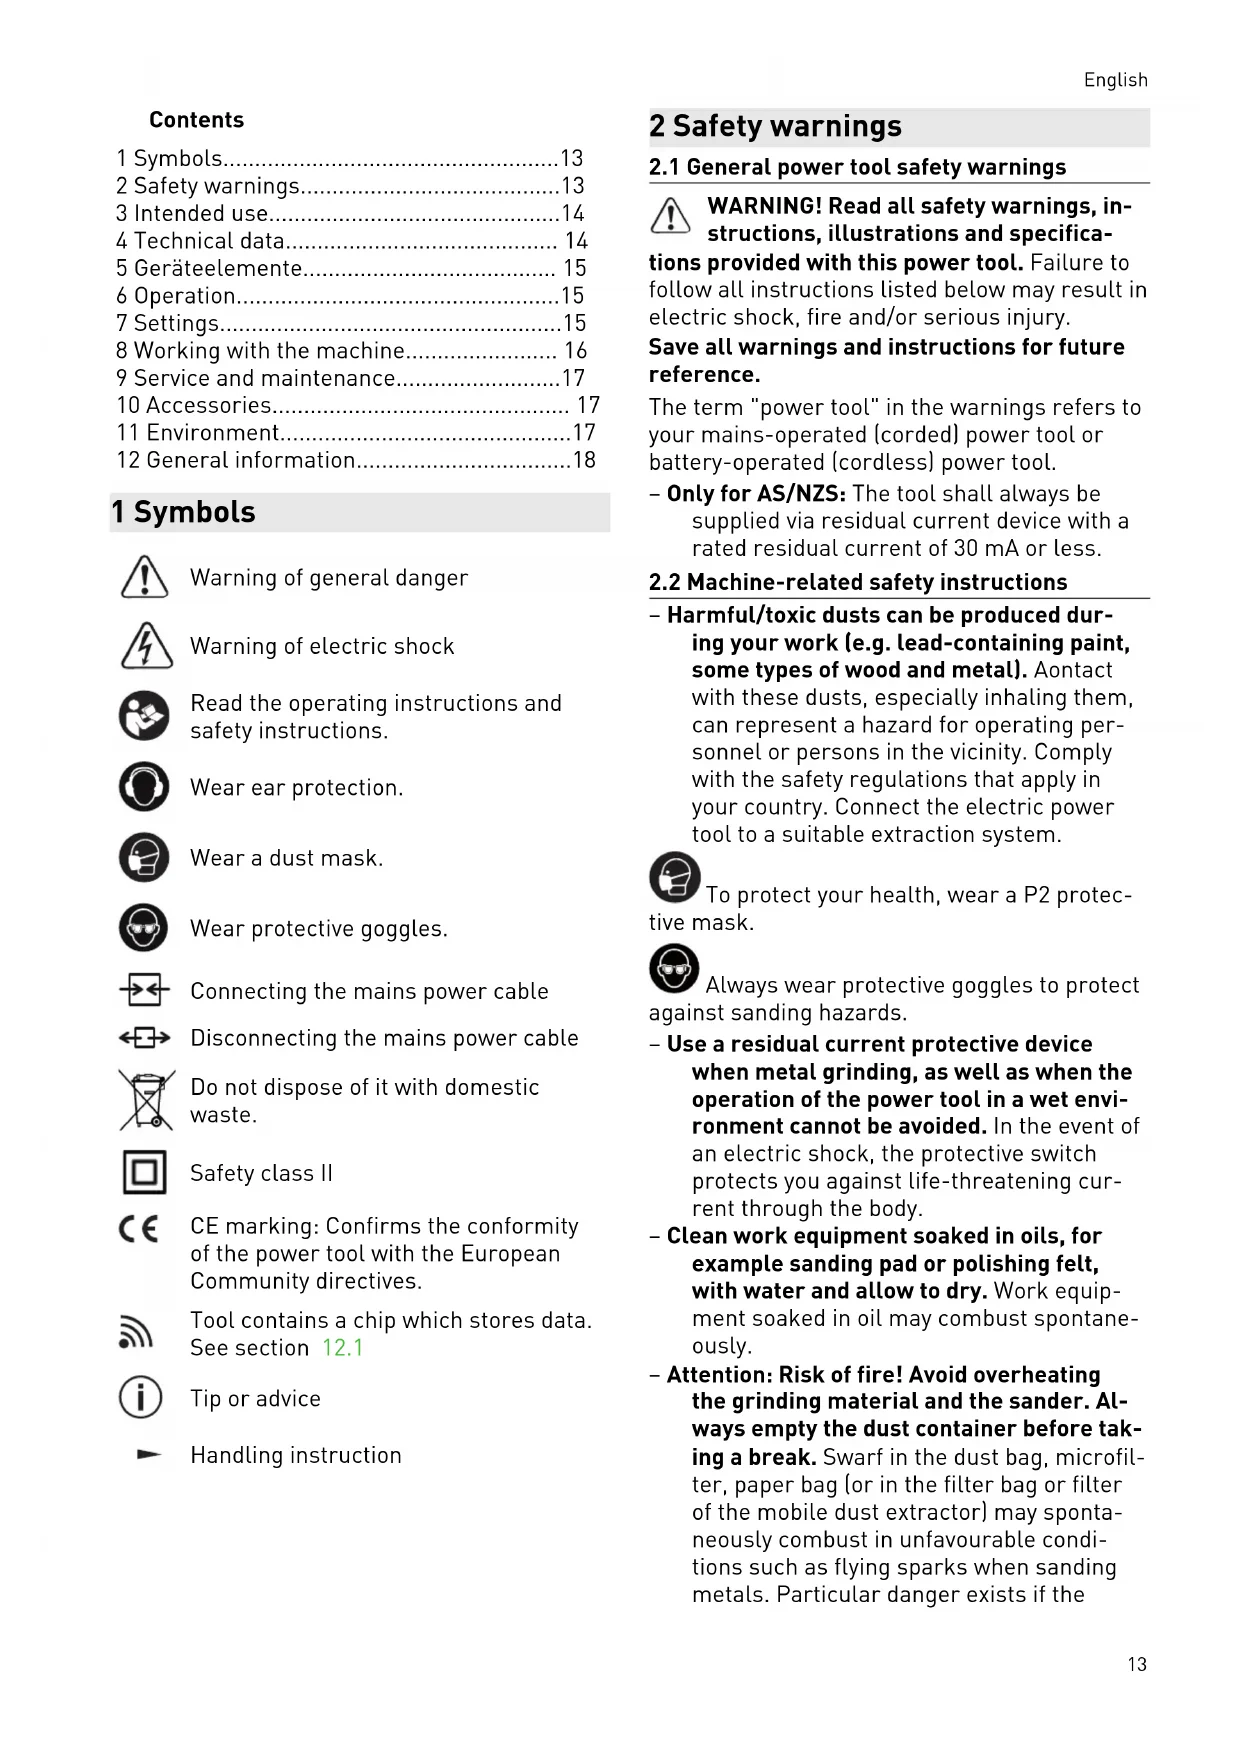
5 Geräteelemente
[1-1] ON/OFF button
[1-2] Speed control
[1-3] Sanding pad
[1-4] Plug-it connection
[1-5] Extractor connector
[1-6] LED for extractor signal *
[1-7] Insulated gripping surfaces (grey shaded area)
* Only for power tools with electronic extractor signal (see technical data).
The specified illustrations appear at the beginning of the Operating Instructions.
6 Operation

WARNING
Unauthorised voltage or frequency.
Risk of accidents
- The mains voltage and the frequency of the power source must correspond to the specifications on the name plate.
▶ In North America, only Festool machines with the voltage specifications 120 V/60 Hz may be used.

CAUTION
Heating of the Plug it connection if bayonet fitting is not completely locked
Risk of burns
▶ Before switching on the power tool, make sure that the bayonet fitting at the mains cable is closed fully and locked.
Connecting and disconnecting the mains power cable - see fig. [2].
6.1 Switching on/off [1-1]
ON Press the ON/OFF button[1-1]
OFF Press the ON/OFF button[1-1]
When the extractor signal is active, the power tool cannot be switched on without a connected extractor hose – see chapter.
7 Settings

WARNING
Risk of injury, electric shock
▶ Always disconnect the mains plug from the socket before performing any work on the machine.
7.1 Electronics
The machine features full-wave electronics with the following properties:
Smooth start-up
The electronically controlled smooth start-up function ensures that the power tool starts up smoothly.
Constant speed
The preselected motor speed is kept constant through electronic control. This ensures a uniform cutting speed even when under load.
Speed reduction in the event of high vibrations If high vibrations and oscillations occur at the power tool, e.g. with the use of an interface pad, the speed is automatically reduced in order to protect the power tool and the user.
Temperature cut-out
To avoid the motor overheating, the power consumption is limited at an excessive motor temperature. If the temperature continues to rise, the power tool switches off. and can only be switched on again once the motor has cooled sufficiently.
7.2 Setting and adjusting the speed
The speed can be set [1-2] between 6000 and 10000min^-1 using the adjusting wheel. This enables you to optimise the sanding speed to suit the material (see chapter 8).
7.3 Extractor signal \*
The electronic extractor signal detects whether an extractor hose is connected at the power tool. Upon activation, the power tool can only be switched on with a connected extractor hose.
English
* Only for power tools with electronic extractor signal (see technical data).
Operating mode
The operating mode is indicated via the LED [1-6]:


Steady light: Extractor hose connected


Flashing light: No extractor hose connected, power tool cannot be switched on.
No light: Extractor signal is not active.
Switching the extractor signal ON/OFF
The extractor signal is supplied in a deactivated state.
▶ Switch on power tool by briefly pressing the ON/OFF button [1-1].
▶ Switch off the power tool again and hold down the ON/OFF button [1-1].
Power tool beeps once.
▶ Turn speed control [1-2] to both end positions (Level 1 and 6).
Power tool beeps three times for ON and twice for OFF.
▶ Release ON/OFF button [1-1].
Extractor signal is activated or deactivated.
7.4 Replacing the sanding pad [3]
![FESTOOL ETS EC 1505 EQ - Replacing the sanding pad [3] - 1](/content/2026/03/556841/images/371cb1da52aacdb688fae7f3b2d2d19636efe34bbd9954feec2a49a78ede61ec.jpg)
An optimal work result can only be achieved using original accessories and con-
sumables. The use of non-original accessories or consumables invalidates the right to claim under warranty.
![FESTOOL ETS EC 1505 EQ - Replacing the sanding pad [3] - 2](/content/2026/03/556841/images/4dc28f091ca5845fba608b212dbb24386e4500a1a5bbeb222f54009c327a0e11.jpg)
Warning! do not perform any structural changes in the open interior space of the ne when the sanding pad is dismantled.
![FESTOOL ETS EC 1505 EQ - Replacing the sanding pad [3] - 3](/content/2026/03/556841/images/b8ba48fd6be4e70f0d8b838db7fe3b4ca3eb488cd0510a1140a1f6a44487d401.jpg)
Health risk: Fitting sanding pads of incorrect size causes excessive vibration of machine.
Tuned to the surface being processed, the machine can be equipped with three sanding pads of different hardnesses.
Hard: Coarse and fine sanding on surfaces. Sanding edges.
Soft: Universal for coarse and fine sanding, for flat and convex surfaces.
Extra-soft: Fine sanding of moulded parts, arches, radii. Do not use on edges.
7.5 Attaching sanding accessories using StickFix [3b]
The suitable StickFix sandpaper and StickFix sanding cloth can be attached quickly and simply to the StickFix sanding pad.
- Affix the self-adhesive sanding accessory to the sanding pad.[1-3]
In the case of a weakening adhesive effect of the StickFix surface, the sanding pad accessories, in particular those which are not yet touching the workpiece, may come loose from the sanding pad and cause injuries. Replace the sanding pad!
7.6 Extraction

WARNING
Health risk due to dust
▶ Always work with an extractor.
▶ Comply with national regulations.
The power tool does not have its own extractor unit. At the extractor connector [1-5] , a Festool mobile dust extractor with an extraction hose diameter of 27 mm should be connected.
Recommendation: Use an antistatic extractor hose. This helps reduce the electric charge.
8 Working with the machine

WARNING
Risk of injury
▶ Always secure the workpiece in such a manner that it cannot move.
Observe the following information:
- Do not overload the machine by applying too much pressure. The best sanding results are achieved with moderate application pressure. The sanding performance and quality depend mainly on selecting the correct abrasive.
- Hold the machine with two hands – one on the motor housing and one on the gear head – to ensure safe guidance.
For sanding, we recommend the following settings for the adjusting wheel [1-2]:
Sanding work Adjusting wheel set- ting
- Sanding with max. abrasion 5-6
- Sanding off old paint
- Sanding of wood and veneered surface prior to paintwork
- Intermediate sanding of paintwork on surfaces
- Sanding thinly applied undercoat 4-5
- Sanding wood with sanding cloth
- Edge breaking on wooden parts
- Smoothing primed wooden surfaces
- Sanding solid wood and veneered edges 3–4
- Sanding rebate of windows and doors
- Intermediate sanding of paintwork at edges
– Light sanding of natural wood windows using sanding cloth - Smoothing wooden surfaces using sanding cloth before staining
- Rubbing stained surfaces with a sanding cloth
- Rubbing or removing excess limestone residue using sanding cloth
- Intermediate sanding of paintwork on 2-3 stained surfaces
- Cleaning natural wood window rebate using sanding cloth
- Sanding stained edges 1-2
- Sanding thermoplastics
9 Service and maintenance

WARNING
Risk of injury, electric shock
▶ Always pull the mains plug from the socket before performing any servicing and maintenance work.
▶ All maintenance and repair work which requires the motor housing to be opened should always be carried out by an authorised service workshop.

WARNING
Incorrect testing may damage the machine and injure users
▶ Special information is required for testing the electrical safety. This is available from your country's Festool service workshop.

Customer service and repairs must only be carried out by the manufacturer or service workshops. Find the nearest address at: www.festool.co.uk/service

Always use original Festool spare parts. Order no. at: www.festool.co.uk/service
To ensure constant air circulation, always keep the cooling air openings in the motor housing clean and free of blockages.
In the event of a slowdown in performance or increased vibrations, blow and clean cooling air openings.
9.1 Cleaning the extraction channels
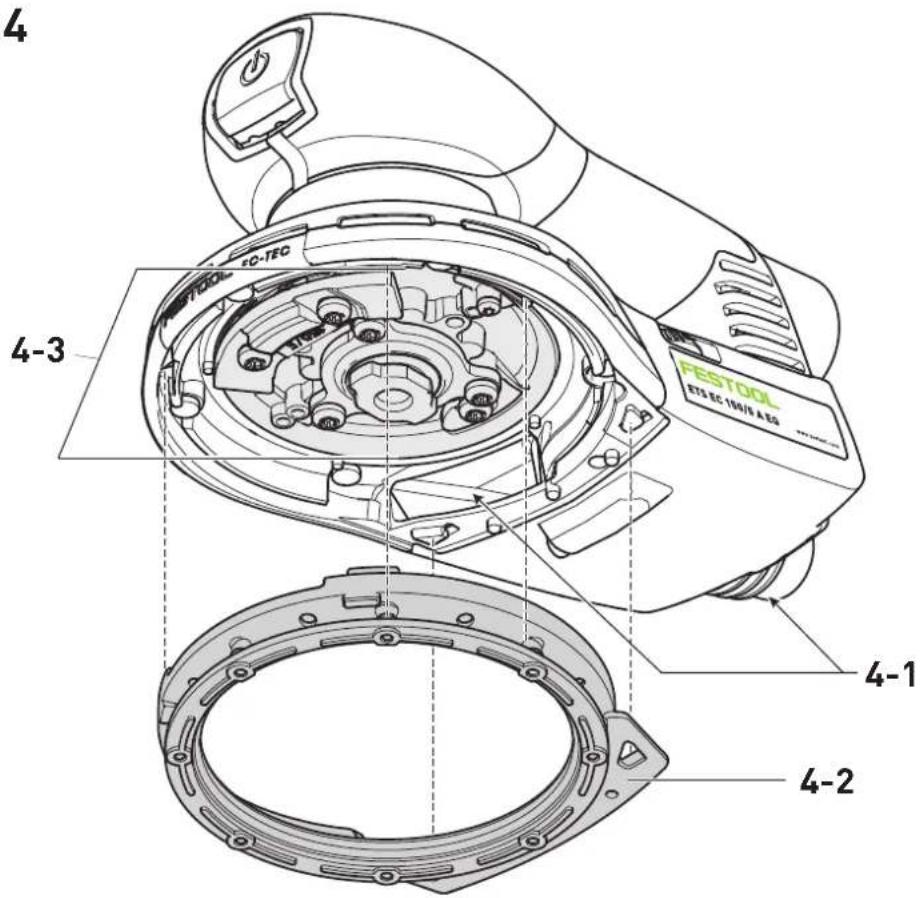
We recommend cleaning the extraction channels in the machine [4-1] roughly once a week (particularly if sanding synthetic resin, in the case of wet sanding and if sanding plaster) using a small flat brush or a cloth.
9.2 Cleaning the inside of the power tool
Regularly clean the inside of the power tool at the bottom of the fan, [4-3] otherwise the vibration values worsen as a result of the dust accumulation.
9.3 Replace the sanding pad and sanding pad brake
The rubber sleeve [4-2] brushes off the sanding pad and prevents uncontrolled turning of the sanding pad. The sanding pad brake is almost wear-free thanks to the pins used.
In the case of a decreasing braking effect, first check the sanding pad for wear and replace it if necessary. Replace the damaged sanding pad brake/rubber sleeve.
10 Accessories
Only use original Festool sanding and polishing pads. Low-quality sanding and polishing pads may cause serious machine imbalance that decreases the quality of the working results and increases machine wear.
The PO numbers of the accessories and filters can be found in the Festool catalogue or on the Internet at "www.festool.co.uk".
11 Environment

Do not dispose of the device in the household waste! Recycle devices, accessories and packaging. Observe appli-national regulations.
English
EU only: In accordance with the European Directive on waste electrical and electronic equipment and implementation in national law, used power tools must be collected separately and handed in for environmentally friendly recycling.
Information on REACH: www.festool.com/reach
12 General information
12.1 Information on data privacy
The power tool contains a chip which automatically stores machine and operating data. The data saved cannot be traced back directly to an individual.
The data can be read in a contactless manner using special devices and shall only be used by Festool for fault diagnosis, repair and warranty processing and for quality improvement or enhancement of the power tool. The data shall not be used in any other way without the express consent of the customer.
Sommaire
text_image
Diagram showing two scenarios of a vehicle with connected and unconnected components, possibly illustrating a scenario or concept.Órbita 3,0 mm 5,0 mm
text_image
Diagram showing two scenarios of a vehicle with connected and unconnected components, possibly illustrating a scenario or concept.text_image
Diagram showing two vehicle illustrations with connected and unconnected lines, possibly indicating a road or pipeline system.text_image
Diagram showing two vehicle illustrations with connected and unconnected lines, possibly indicating a road or pipeline system.Lyser konstant: Udsugningsslange tilsluttet
Órbita 3,0 mm 5,0 mm
Prato de lixar D 150 mm D 150 mm
cordo com EPTA-Procedure 01:2014
1,2 kg 1,2 kg
[1-2] Regulace otáček
[1-3] Brusný talíř
[1-4] Přípojka plug it