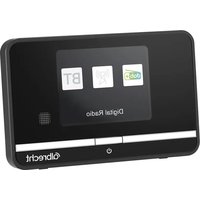
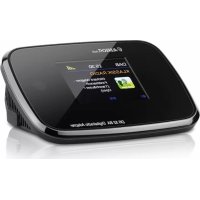
DR 50 B - Audio Receiver ALBRECHT - Free user manual and instructions
Find the device manual for free DR 50 B ALBRECHT in PDF.
| Product Type | DAB+/FM/Bluetooth Audio Receiver |
| Brand | Albrecht |
| Model | DR 50 B |
| Dimensions | Diameter 95 mm, Height 50 mm |
| Weight | 210 g |
| Power Supply | Power adapter 5 VDC/1 A, input 100-240 VAC |
| Display | 2.4-inch TFT color display |
| Radio Bands | DAB+ (Band III, 174-240 MHz), FM (87.5-108 MHz) |
| Bluetooth | Version 2.402-2.480 GHz, power 1 mW |
| Connectivity | Auxiliary output (3.5 mm), micro USB input (charging), coaxial antenna |
| Main Functions | DAB+/FM radio, Bluetooth, 20 favorites per band, dual alarm, DRC, DAB slideshow, remote control |
| Favorite Memory | Up to 20 stations per band (DAB+ and FM) |
| Alarm | 2 alarms with frequency, time, duration, and tone source settings |
| Dynamic Range Control (DRC) | 3 levels: off, low, high |
| Menu Languages | 5 languages: English, German, French, Italian, Spanish |
| Time Update | Automatic via DAB/FM or manual |
| Backlight | Adjustable (delay, operating level, standby level) |
| Maintenance and Cleaning | Unplug before cleaning; use a soft dry cloth; avoid moisture |
| Safety | Do not open (no user-serviceable parts); keep out of reach of children; avoid heat sources and water |
| Spare Parts and Repairability | No user-replaceable parts; contact technical support |
| Warranty | 2 years from purchase date |
| Package Contents | DR 50 B adapter, USB power supply, antenna cable, remote control with batteries, 3.5 mm/RCA audio cable, RCA/3.5 mm adapter |
Frequently Asked Questions - DR 50 B ALBRECHT
User questions about DR 50 B ALBRECHT
0 question about this device. Answer the ones you know or ask your own.
Ask a new question about this device
Download the instructions for your Audio Receiver in PDF format for free! Find your manual DR 50 B - ALBRECHT and take your electronic device back in hand. On this page are published all the documents necessary for the use of your device. DR 50 B by ALBRECHT.
USER MANUAL DR 50 B ALBRECHT
- Appearance and Key Descriptions 15
1.1. Remote Control 16
2.Delivery content 16
3.Before you start 17
3.1. Power connection 17
4. Basic functions 17
4.1. Adjusting the volume 17
4.2.MENU navigation 17
4.3. Change mode between DAB+, FM and Bluetooth 17
5.DAB+Mode 18
5.1. Saving a DAB Station as Favourite 18
5.2. Recall a Favorite Station 18
5.3.Changing DAB stations. 18
5.4. Scanning for new DAB stations 18
5.5. Empty / clean the station list 18
5.6.DAB Display Information 18
5.6.1.DAB-Slideshow 18
5.7. Dynamic Range Control (DRC) 19
6.FM Mode 19
6.1.Tuning to a FM station 19
6.1.1.Manual Tuning 19
6.1.2. Automatic scan for FM stations 19
6.2. Scan settings 19
6.3. Audio Setting 19
6.4. Saving a FM station as Favorite 20
6.5. Recalling a Favorite station 20
6.6.FM Display Information 20
7. Bluetooth 20
8. Alarm Settings 21
8.1.Setting an Alarm 21
8.2. Stop the alarm 21
9. System Settings 21
9.1.Time and Date 21
9.2.Backlight 22
9.2.1.Lightning 22
9.3. Language 22
9.4. Factory Reset 22
9.5. Software Version 22
10. Technical Details 22
11. Important Safety Notes 23
11.1. General Safety Information 23
11.2.Power Source 23
11.3. Moisture and Water 23
11.4. Heat Sources and Flames 23
12. Warranty and Recycling Information 24
13. Service Address And Technical Hotline 24
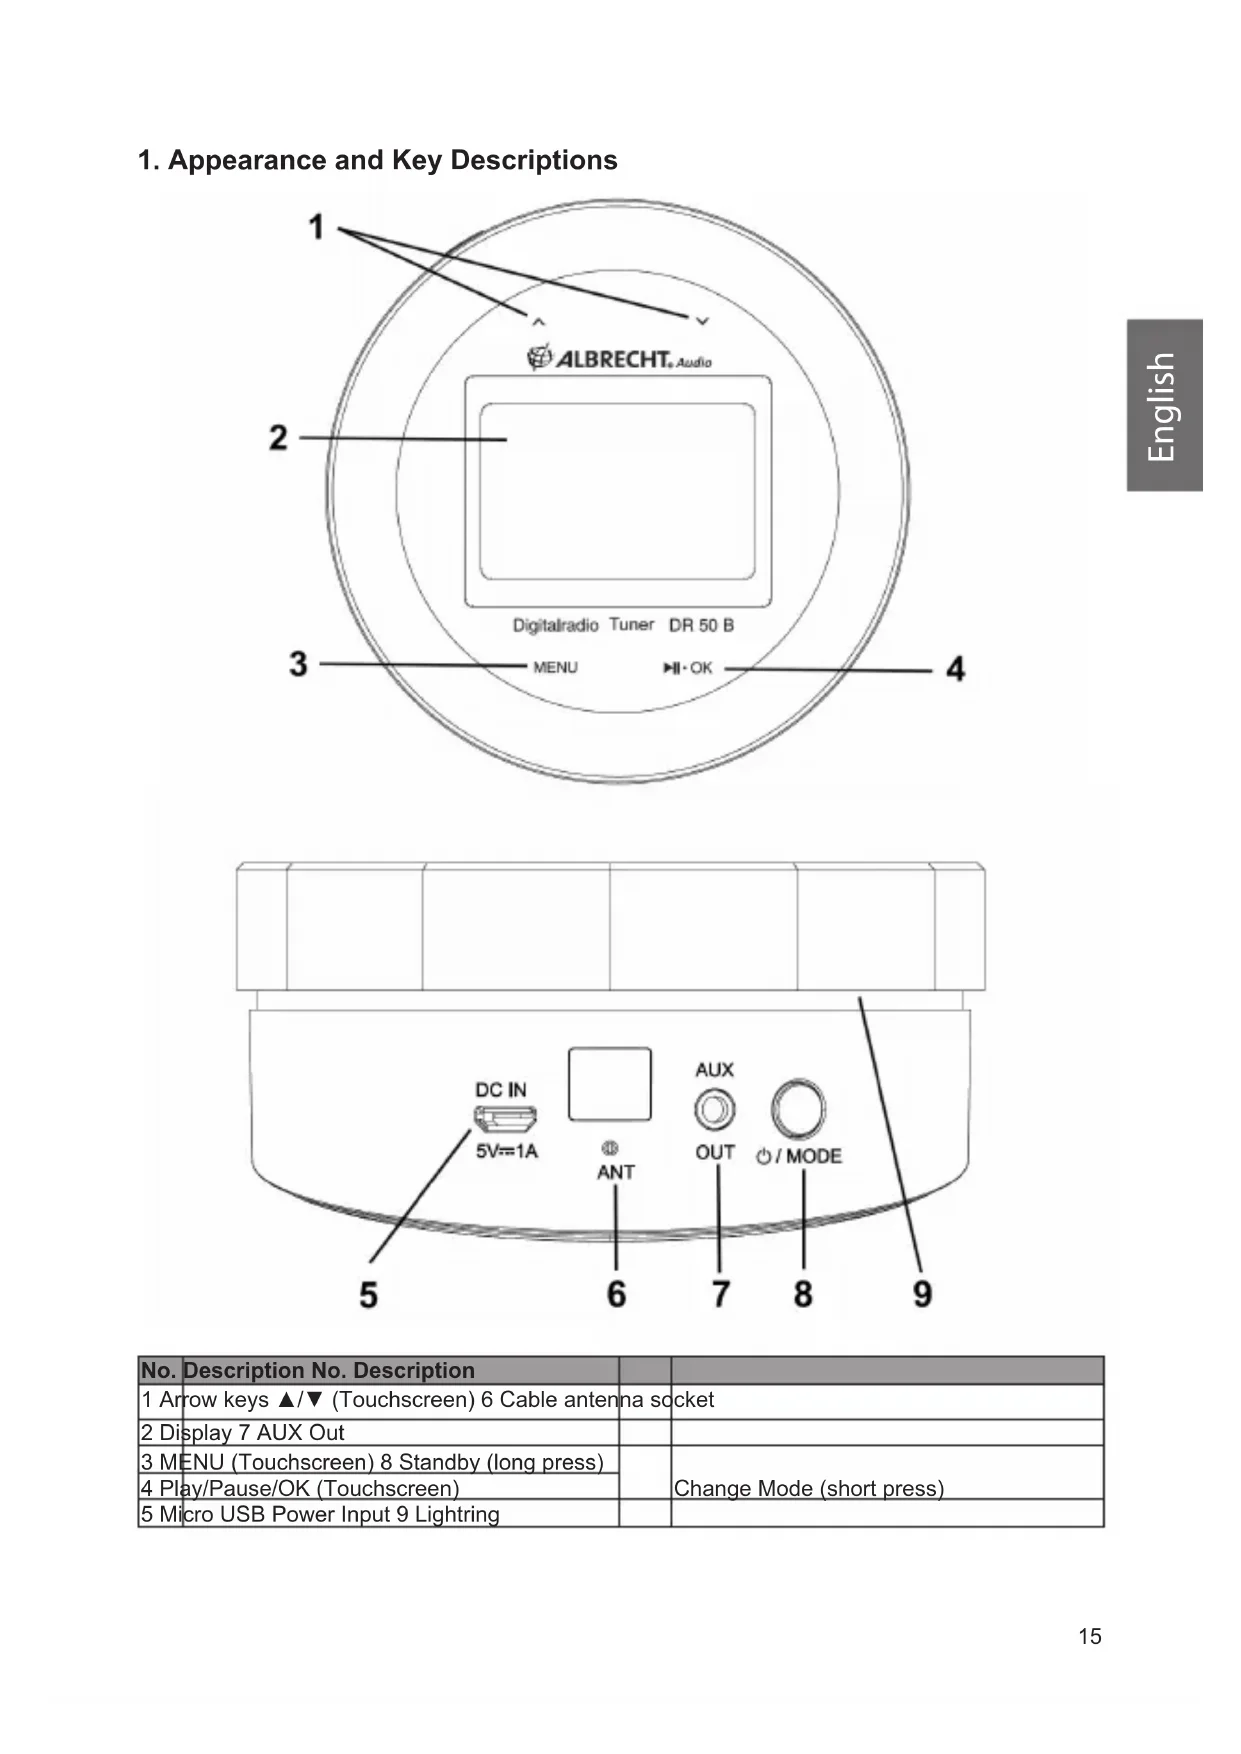
1. Appearance and Key Descriptions
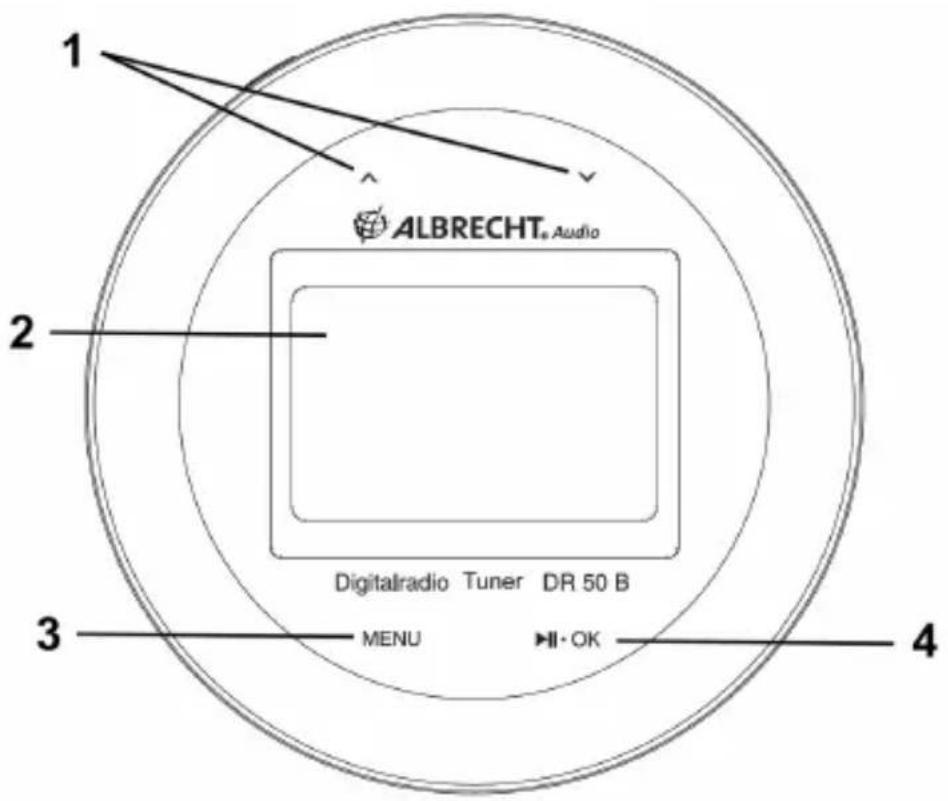
| No. | Description No. Description | ||
| 1 | Arrow keys ▲/▼ (Touchscreen) 6 Cable antenna socket | ||
| 2 | Display 7 AUX Out | ||
| 3 | MENU (Touchscreen) 8 Standby (long press) | Change Mode (short press) | |
| 4 | Play/Pause/OK (Touchscreen) | ||
| 5 | Micro USB Power Input 9 Lightning |
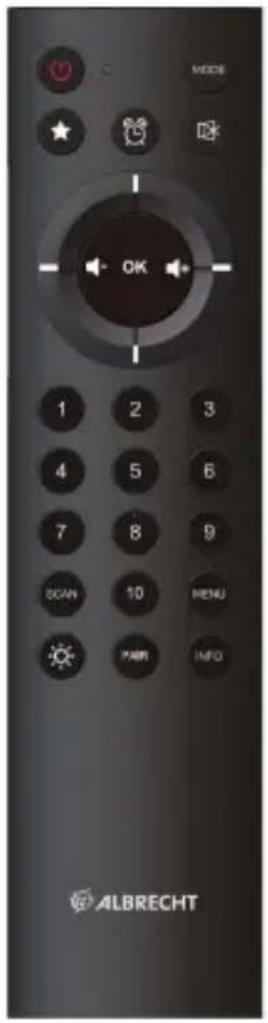
1.1. Remote Control
| Key Function | |
| Turn on/off (Standby) | |
| MODE | Change mode: DAB+ / FM / Bluetooth |
| ☆ | Open favorite list / save favorites |
| Alarm clock settings | |
| Mute | |
| Control pad ▲ / ▼ | Navigation through MENUs |
| Change the volume | |
| OK | Confirm your selection |
| Numbers 1-10 | Save / recall favorites 1-10 |
| SCAN | Scan for available stations |
| MENU | Open main MENU for settings |
| Lightning control (see chapter „9.2.1. Lichtning“) | |
| PAIR | Connect the Albrecht DR50B with Bluetooth device |
| INFO | Information about the currently played song |
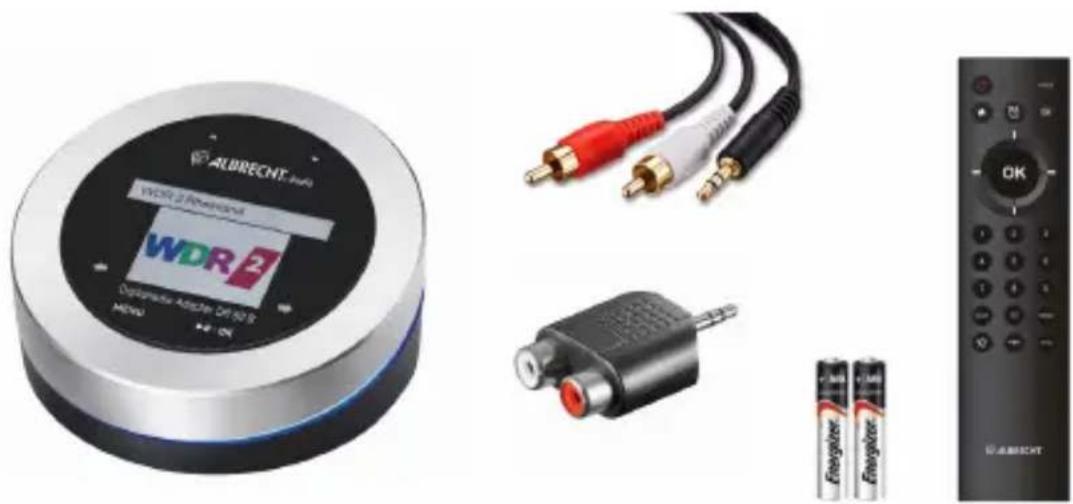
2. Delivery content
- Albrecht DR 50 B adapter
- USB power supply
- Cable antenna
- Remote control with batteries
- 3.5mm to RCA audio cable
RCA to 3.5mm adapter
3. Before you start
3.1. Power connection
- Connect the power supply into the socket on the back of the radio and place the cable antenna to a free space to obtain the maximum signal strength.
- Connect the 3.5mm audio cable with the AUX socket of the Albrecht DR 50 B and the other end to a suitable audio output device like home stereo system, active speakers, etc.
- Plug the power adaptor into the mains power wall socket.
- The adapter starts automatically and performs a full scan of the DAB+ band the first time it is used.
- When scanning is complete, the radio will select the first available station and begin the playback. By default, stations are sorted first by numbers and then by letter.
- Press the button to put the adapter into standby.
4. Basic functions
4.1. Adjusting the volume
Use the arrow keys in the remote control to adjust the volume.
4.2. MENU navigation
- Use the arrow keys / to scroll through the MENUs.
- Move to the next sub MENU by using the arrow key or confirm your selection by pressing OK.
- Go back to the previous MENU by pressing .
4.3. Change mode between DAB+, FM and Bluetooth
Press the Mode button on the remote control or at the backside of the adapter to switch between DAB+ / FM / Bluetooth mode
5. DAB+ Mode
Check that your radio is in DAB mode. If you are not already in DAB mode, press the Mode button. The first time you use the radio, your radio will automatically begin a full scan of all available DAB+ radio stations. A progress bar will show the progress of the scan and the number of stations found. If you were listening to a DAB station when you switched the radio off, this station will automatically start playing again once you switch the radio back on.
5.1. Saving a DAB Station as Favourite
Your radio can store up to 20 DAB radio stations in its memory for instant access to your favourite stations.
- Tune the Radio to the DAB radio station that you wish to save
- Press and hold the (Favorite) button for about 2 seconds until the list of favorite appears
- Select a memory slot
- Press OK to confirm your selection
NOTE: If the selected memory is already occupied by a different DAB radio station, it will be overwritten when you store the new station.
5.2. Recall a Favorite Station
- Press the (Favorite) button and select the desired station and confirm with OK
- Alternatively you can select Favorites 1-10 directly with the key numbers on the remote control
5.3. Changing DAB stations
Use the arrow keys / to open the complete station list. Select the desired station with / and confirm with OK.
5.4. Scanning for new DAB stations
It is recommended to scan for new available stations from time to time. Especially when you have moved your radio to a different geographical region.
Press the SCAN button to start the full scan. The display will change to 'Scanning...'. A progress bar will show the progress of the scan and the number of stations found during the scan will also be displayed.
5.5. Empty / clean the station list
This option removes the DAB stations in the station list that cannot be received in your area (anymore). These are listed with a '?' prefix.
Press the MENU button, select Prune Invalid and confirm with YES.
5.6. DAB Display Information
When listening to a DAB station you can change the information that will appear on the display. There are several different types of information that are sent by the broadcaster. Repeatedly short press the INFO button to cycle through the different information options.
5.6.1.DAB-Slideshow
The Albrecht DR 50 B is also able to show the DAB slideshow transmitted by the broadcasters. The pictures shown in the slideshow contain different information from album cover, weather information or pictures from the broadcasting studio. The content depends on the radio station.
When the slideshow is available you can select between different views by clicking OK repeatedly.
5.7. Dynamic Range Control (DRC)
If you are listening to music with a high dynamic range in a noisy environment, you may wish to compress the audio dynamic range. This makes quiet sounds louder, and loud sounds quieter.
Press MENU and select DRC. There are 3 levels of compression:
- DRC off - no compression. This is the default setting.
- DRC low - medium compression.
- DRC high - maximum compression.
Note: This function is only working correctly if the radio station is supporting this feature.
6. FM Mode
If you are not already in FM mode, press the Mode button to go to FM mode. If you were listening to a FM station when you switched the radio off, then this station will automatically be selected when you switch the radio back on.
6.1. Tuning to a FM station
6.1.1. Manual Tuning
Use the arrow keys / , to change the current frequency in 0.05 MHz steps. Press and hold the arrow keys to start an automatic scan until the next available station is found.
6.1.2. Automatic scan for FM stations
Press the Scan button to automatically scan through the complete FM band for available stations. The first 20 found stations will be saved in your favorites.
Attention: the scan overwrites all your previously saved favorites!
6.2. Scan settings
Press MENU and select Scan settings.
There are two different options to choose from:
- Strong stations - The scan will only stop when a strong signal strength is received which should also result in a better audio quality. It is possible that the station you are scanning for may be missed using this option.
- All stations - The scan will stop for every station it receives, even if the signal strength is poor.
6.3. Audio Setting
The radio will automatically switch between Stereo and Mono, depending on the quality of the signal being received but you can override this function and manually switch between Forced Mono and Stereo Allowed.
- Press MENU and select Audio setting
- Now you can select between the options Stereo allowed or Forced Mono.
6.4. Saving a FM station as Favorite
Your radio can store up to 20 FM radio stations in its preset memories for instant access to your favourite stations.
- Tune the Radio to the FM radio station that you wish to save
- Press and hold the (Favorite) button for about 2 seconds until the station list appears
- Select the desired memory slot
- Press OK to confirm your selection
NOTE: If the selected memory is already occupied by a different FM radio station, it will be overwritten when you store the new station.
6.5. Recalling a Favorite station
- Press the (Favorite) button and select the desired station and confirm with OK
- Alternatively you can select Favorites 1-10 directly with the key numbers on the remote control
6.6. FM Display Information
When listening to a FM station you can change the information that will appear on the second line of the display. Repeatedly press and release the INFO button to cycle through the different information options.
- Radiotext (RT) - This is scrolling text information supplied by the broadcaster. Information could be the name of an artist or music title, DJ's name, contact details for the radio station etc.
- Program Type (PTY) - Such as 'Rock', 'Pop', Talk' or News
- Station name or frequency - Such as WDR2 or 93.30MHz
Audio mode - Mono or Stereo - Time and date - supplied by the broadcaster.
7. Bluetooth
To switch to Bluetooth mode, press MODE on the remote control or on the backside of the adapter and select Bluetooth.
Then enable Bluetooth on your mobile device (e.g. smartphone, tablet, etc.), search for active devices and connect to "Albrecht DR50B".
If the radio is successfully connected, music can now be streamed to the adapter.
8. Alarm Settings
8.1. Setting an Alarm
- Press the Alarm button on the remote control.
- Select between Alarm 1 and Alarm 2 and confirm with OK.
Now you can set the following alarm options:
- Alarm: Select between On or Off.
- Frequency: choose between Daily, Once, Weekdays or Weekends.
- Wake Up Time: here you can set the time at which the alarm starts. In case you selected Once in the Frequency settings you also have to specify the date.
Source: Buzzer - Duration: specifies the duration (in seconds) for which the alarm sounds.
Once the alarm is set correctly the alarm symbol is shown in the display.
8.2. Stop the alarm
Once the alarm started, you can turn it off by pressing the Standby or Alarm button. Press any other button to start the snooze alarm. It will start an alarm again after 9 minutes. The adapter shows a countdown timer with the remaining time until the next alarm.
9. System Settings
Press MENU and then select System settings.
9.1. Time and Date
The first time you listen to DAB radio the device will automatically update the time and date. If you do wish to set the time and date manually, follow the steps below.
Seelct MENU / System settings / Time/Date. You can now choose:
- manually change the Time/Date
- Auto Update the time
- Set 12/24 Hour time format
- Select Date Format between TT-MM-JJJJ / MM-TT-JJJJ / JJJJ-MM-TT
- choose a Clock Style (in Standby): Normal, Big, Classic, Modern
9.2.Backlight
In the MENU Backlight you can select between the following options:
- Time Out - select a duration after which the Display will be dimmed automatically in Standby mode.
- On Level - select a brightness level (High/Medium/Low) for the display during operation
- Dim Level - select a brightness level to which the adapter is dimmed in Standby mode.
9.2.1. Lightring
Press the button on the remote to control the lightring:
Key LED always on: the lightring is constantly illuminated
Key LED timeout off: if no action is done at the adapter, the lightring will turn off after 3 minutes
9.3. Language
Select an language for the MENU of the adapter. You can select between 5 languages:
English, Deutsch, Francais, Italiano, Espanol
The currently selected language is marked by .
9.4. Factory Reset
Here you can reset the adapter to the factory settings.
ATTENTION: If you perform the factory reset, all your saved favorites will be deleted!
9.5. Software Version
Here you can check the currently installed software version of the adapter
10. Technical Details
| Model name DR 50 B | |
| Description DAB/FM Radio | |
| Display 2,4" TFT color display | |
| Power Supply Output voltage 5 V DC/1 A | Input voltage 100 – 240 V AC |
| DAB Band III, 174 MHz to 240 MHz | |
| FM 87,5 MHz to 108 MHz | |
| Bluetooth 2.402 – 2.480 GHz; 1 mW | |
| Connections AUX-Out | |
| Dimensions Diameter 95 mm / Height 50 mm | |
| Weight 210g |
11. Important Safety Notes
Please read these instructions carefully. They contain important information which will help you get the best from your product and ensure safe and correct installation and operation.
11.1. General Safety Information
- Keep the product and all its parts out of reach of small children.
Do not attempt to open the product. This product does not contain any user serviceable parts. Unauthorised handling of the device may damage it and will void your warranty. - Do not use your Radio near emergency/intensive care medical equipment; if you have a pacemaker fitted or during an electrical storm.
To avoid possible hearing damage, do not listen to this radio at high volume levels for long periods of time. Always keep the volume within reasonable limits.
11.2. Power Source
- Only use the power supply that came with the product. Using an unauthorised power supply will invalidate your guarantee and may irrecoverably damage the product.
- Disconnect your Radio from the mains power supply during thunderstorms.
- Always check that you have completely switched off your Radio, before you change or disconnect the power supply.
- Where the mains power plug or an appliance coupler is used as the disconnect device, the disconnect device shall remain readily operable.
- If the Radio will not be used for a long period of time, make sure that the mains power is unplugged.
- Only use recommended batteries or those of the same or equivalent type.
- Do not mix old and new batteries or batteries of different types.
- Batteries are to be inserted with the correct polarity.
- The supply terminals are not to be short-circuited.
- Never throw batteries in a fire or attempt to open the outer casing.
- Batteries are harmful if swallowed, so keep away from young children.
- Danger of explosion if batteries are incorrectly replaced. Replace only with the same or equivalent type.
11.3. Moisture and Water
- Keep it dry. Avoid exposure to precipitation, humidity and liquids which could all affect the product circuitry.
- Do not leave it in low temperatures as moisture can form inside the product, which may damage the circuit board.
11.4. Heat Sources and Flames
- Do not leave it in high temperatures as electronic devices and plastic parts may warp in heat.
- Keep it away from bright sunlight or heat sources, such as a radiator.
12. Warranty and Recycling Information
We are legally obliged to include disposal and warranty information as well as EU declaration of conformity with the use instructions in different countries for every unit. Please find this information on the following pages.
2-Year Warranty from Date of Purchase
The manufacturer/retailer guarantees this product for two years from date of purchase. This warranty includes all malfunctions caused by defective components or incorrect functions within the warranty period excluding wear and tear, such as exhausted batteries, scratches on the display, defective casing, broken antenna and defects due to external effects such as corrosion, over voltage through improper external power supply or the use of unsuitable accessories. Defects due to unintended use are also excluded from the warranty.
Please contact your local dealer for warranty claims. The dealer will repair or exchange the product or forward it to an authorized service center. You can also contact our service partner directly. Please include your proof of purchase with the product and describe the malfunction as clearly as possible.
WEEE and Recycling
The European laws do not allow any more the disposal of old or defective electric or electronic devices with the household waste. Return your product to a municipal collection point for recycling to dispose of it. This system is financed by the industry and ensures environmentally responsible disposal and the recycling of valuable raw materials.
13. Service Address And Technical Hotline
(for units sold in Germany)
Contact our service hotline by phone +49 (0) 6103 9481 66 (regular costs for German fixed network) or e-mail at service@albrecht-midland.de
Declaration of Conformity
Hereby, Alan Electronics GmbH declares that the radio equipment type Albrecht DR50B is in compliance with Directive 2014/53/EU. The full text of the EU declaration of conformity is available at the following internet address: www.alan-electronics.de

Printing errors reserved.
Information in this user manual are subject to change without prior notice.