
Alan 42 DS - Radio MIDLAND - Free user manual and instructions
Find the device manual for free Alan 42 DS MIDLAND in PDF.
| Product type | Portable CB radio |
| Brand | Midland |
| Model | Alan 42 DS |
| Number of channels | 40 (depending on frequency band) |
| Frequency range | 26.565 – 27.99125 MHz |
| Modulation modes | AM and FM |
| Transmit output power | 4 W AM/FM (max) |
| Power supply | 6 AA alkaline batteries or 8 AA NiMH rechargeable batteries, or 12.6 V DC mains adapter |
| Dimensions (W x H x D) | 70 x 140 x 30 mm |
| Weight (without batteries) | 220 g |
| Antenna impedance | 50 ohms |
| Speaker | 8 ohms, 0.5 W |
| Microphone | Condenser |
| Receiver sensitivity | 0.5 µV (AM) / 0.25 µV (FM) for 10 dB S/N |
| Receiver selectivity | Greater than 60 dB |
| Audio output power | 0.5 W into 8 ohms |
| Distortion | 3% at 1 kHz |
| Audio bandwidth | 400 – 2400 Hz |
| Standby consumption | 100 mA (economy mode off) / 45 mA (economy mode on) |
| Transmit consumption | 900 mA |
| Main functions | Squelch (analog and digital), Dual Watch, Scan, Emergency channel (EMG) on channel 19, Key lock (LOCK), Backlit display, Power selector (H/L), Noise blanker |
| Frequency band selection | I (Italy), I2, D4 (Germany), EU (Europe), EC (CEPT), E (Spain), F (France), PL (Poland), UK (England) |
| Maintenance and cleaning | Clean with a soft, dry cloth. Do not use abrasive products. |
| Safety | Use only the supplied charger. Do not charge non-rechargeable batteries. Recycle used batteries. |
| Spare parts and repairability | Contact Midland after-sales service. Parts available on request. |
Frequently Asked Questions - Alan 42 DS MIDLAND
User questions about Alan 42 DS MIDLAND
0 question about this device. Answer the ones you know or ask your own.
Ask a new question about this device
Download the instructions for your Radio in PDF format for free! Find your manual Alan 42 DS - MIDLAND and take your electronic device back in hand. On this page are published all the documents necessary for the use of your device. Alan 42 DS by MIDLAND.
USER MANUAL Alan 42 DS MIDLAND
Modulazione F3E (FM), A3E (AM)
Impedenza antenna. 50 ohm
Altoparlante 8ohm 0.5W
1portable CB transceiver
wal charger for 8 penlight battery pack
empty pack for 6 penlight AA type alkaline batteries
empty pack for 8 penlight AA type rechargeable batteries with charge jack
car adapter with SO 239 external antenna jack
scratchproof case
Xantenna
beltclip
wrist band
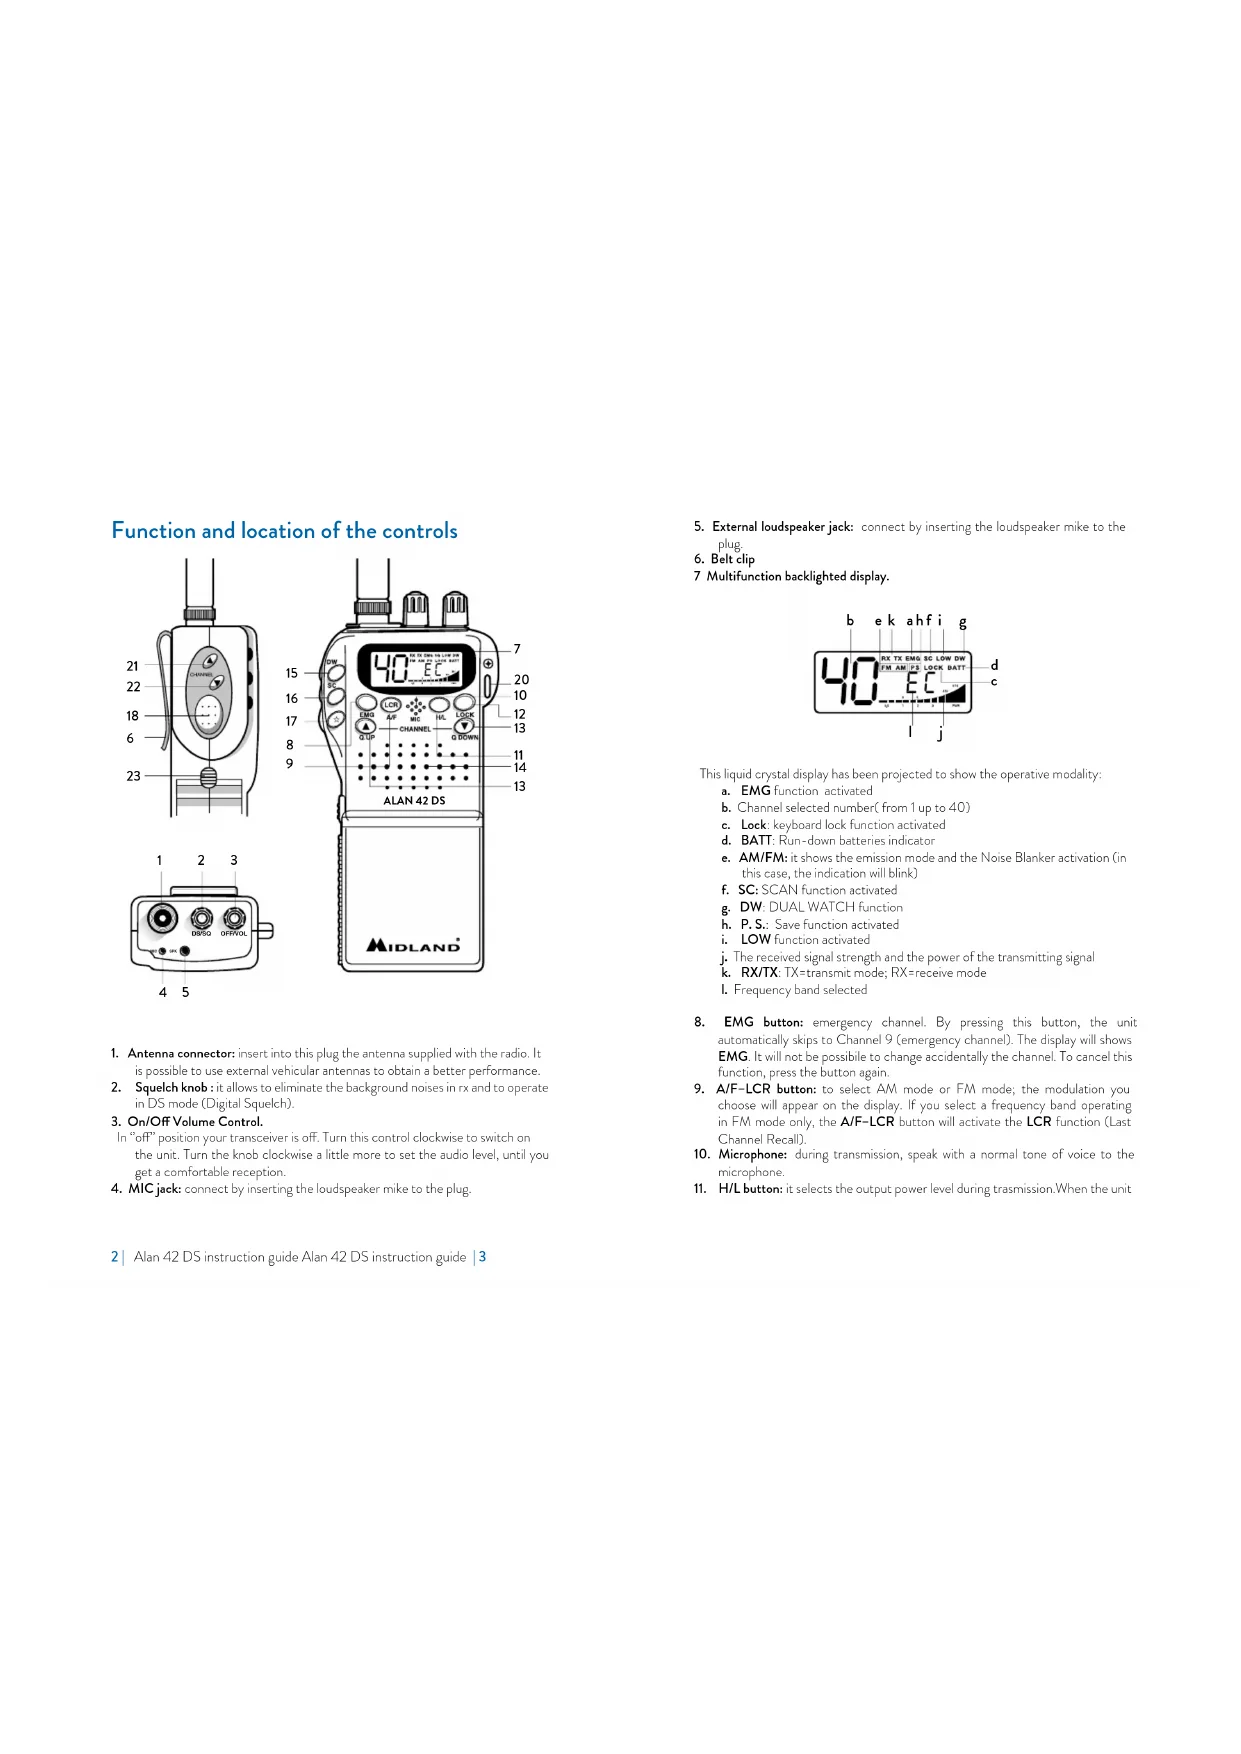
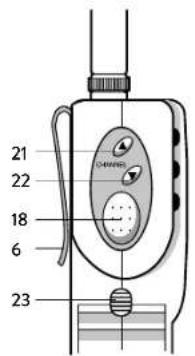
Function and location of the controls
45
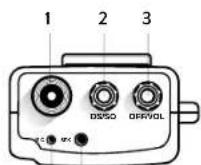
- Antenna connector: insert into this plug the antenna supplied with the radio. It is possible to use external vehicular antennas to obtain a better performance.
- Squelch knob: it allows to eliminate the background noises in rx and to operate in DS mode (Digital Squelch).
- On/Off Volume Control
In "off" position your transceiver is off. Turn this control clockwise to switch on the unit. Turn the knob clockwise a little more to set the audio level, until you get a comfortable reception.
4. MIC jack: connect by inserting the loudspeaker mike to the plug.
2 Alan 12 DS instruction guide Alan 12 DS instruction guide
- External loudspeaker jack: connect by inserting the loudspeaker mike to the plug.
- Belt clip
7 Multifunction backlighted display.
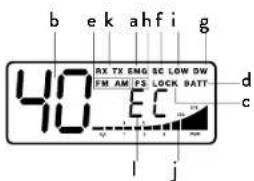
This liquid crystal display has been projected to show the operative modality:
a. EMG function activated
b. Channel selected number (from 1 up to 40)
c. Lock: keyboard lock function activated
d. BATT: Run-down batteries indicator
e. AM/FM: it shows the emission mode and the Noise Blanker activation (in this case, the indication will blink)
f. SC: SCAN function activated
g. DW: DUAL WATCH function
h. P.S.: Save function activated
i. LOW function activated
j. The received signal strength and the power of the transmitting signal
k. RX/TX: TX=transmit mode; RX=receive mode
1. Frequency band selected
- EMG button: emergency channel. By pressing this button, the unit automatically skips to Channel 9 (emergency channel). The display will show EMG. It will not be possible to change accidentally the channel. To cancel this function, press the button again.
- A/F-LCR button: to select AM mode or FM mode; the modulation you choose will appear on the display. If you select a frequency band operating in FM mode only, the A/F-LCR button will activate the LCR function (Last Channel Recall).
- Microphone: during transmission, speak with a normal tone of voice to the microphone.
- H/L button: it selects the output power level during transmission. When the unit
is turned on, it always transmits with high power (4W). By pressing this button, the unit will transmit with low power (1W). The display will show "LOW". Press again the H/L button to return to "HIGH" power level.
- LOCK button: it allows you to lock the keyboard, thus avoiding accidental use of the keys.
13.QUP-Q.DOWNButtons:to skip 10 channels up(Q.UP)or 10 channels down(Q.DOWN).
-
Loudspeaker
-
Dual Watch: this function allows the synchronization on two different channels at the same time. Thanks to this function, you can monitor a second channel. When a signal on the second channel is received, the conversation on the first channel is automatically interrupted and the receiver switches on the second channel. The monitoring starts again 4 seconds after the signal end.
To activate this function, operate as follows:
Select the desired channel through the channel selector
- Press the DW button
Select the second channel
Press the button DW again
To cancel the function press again the DW button or the PTT button.
-
SCAN / Noise Blanker button: with this control, you can automatically seek for a busy channel.
-
Rotate the squelch clockwise until the background noise is no longer heard; or rotate the knob totally anti-clockwise to use the digital squelch. Press the "SCAN" button; the transceiver will scan automatically all the channels until a carrier is being received.
- When it finds the carer, it stops and starts again some seconds aft end of the communication on the channel.
- When the radio is transmitting, the scan function is deactivated.
-
Keep pressed the SCAN button for 2 seconds to activate the Noise Bank filter; "AM" or "FM" will blink on the display.
-
button: display lighting (temporized). This function allows to operate in darkness conditions. By pressing this button, the display is lighted for 5 seconds.
-
Push to talk button (PTT): Its pressure activates the transmission. When it is released, the receiver is activated.
-
Battery compartment: insert 6 alkaline batteries or 8 rechargeable Ni-Mn batteries.
-
Hole for wrist belt
- Channel UP: to skip to the next channel. Keeping this button pressed, the "autorepeat" function is obtained.
- Channel DOWN: to skip to the previous channel. Keeping this button pressed,
4 | Alan 42 DS instruction guide Alan 42 DS instruction guide | 5
the "autorepeat" function is obtained.
- Battery pack contact: lift the button and take the batteries out (see drawing).
- Auxiliary antenna contact: for the connection to the vehicular adaptor.

Installing/removing the battery case
Alan 42 DS works with both Alkaline and with Ni-Mh rechargeable batteries.
For this reason, 2 kinds of battery case are supplied: empty battery case for 8 penlight AA type rechargeable batteries with charge jack and an empty battery case for 6 penlight AA type alkaline batteries.
To remove the battery case, lift the side trigger and slide the battery case off. Put the batteries in.
To replace the battery case, slide it again onto the dual track system of the back side of the transceiver.
Recharge of the batteries
The battery recharge can be possible only by using the NiMH rechargeable battery case.
Do not try to charge alkaline batteries or non rechargeable batteries. Make sure that when you charge the radio, only rechargeable N1-MH batteries should be contained in the battery compartment!
Use a socket ready accessible for ac/dc adaptor; Connect the socket of the wall adaptor to a mains power socket and insert the jack of the wall adaptor into the charge jack of the battery case.
When charging is complete detach the socket of the wall adaptor from the mains. To obtain the maximum performance and capacity, at the first use of the radio, it is highly recommended to completely discharge/recharge the batteries 2 or 3 times.
Warnings
! The supplied wall charger is using "standard charging" method. This is a method, where the charging current is about 10% of the capacity. Using this method, chargers do not automatically disconnect charging when batteries are fully charged.
! You should avoid to keep the radio permanently connected to the wall charger, when you do not need it.
! The charger is only designed for NiMH rechargeable batteries and cannot be used for standard Alkaline or other not chargeable batteries. Trying to charge such kind of batteries can be a risk. Such batteries may leak, explode or even burn and cause damage or personal injuries!
Please use only the supplied wall charger type and no other charger.
! Dispose of the batteries according to the procedures set out by local regulations.
! Mains plug used shall remain readily operable.
How to operate with your Alan 42 DS
- Insert the antenna in the antenna connector.
- Insert the batteries into the battery compartment, noting polarity.
- Rotate the ON/OFF volume control clockwise to turn the unit on. Adjust the volume for a normal listening level.
- Adjust the SQUEELCH control
- Select the desired channel by the UP/DOWN or QUICK UP/QUICK/DOWN buttons
Note: if the channel does not change,control that the EMG or LOCK button has not been pressed. In this case, press the EMG or LOCK button to deactivate this function.
As far as the other functions are concerned, refer to previous instructions.
To transmit: press and hold the PTT button, then talk to the microphone.
To receive: simply release the PTT button.
CAUTION: DON'T EXPOSE THE DISPLAY TO EXTREME TEMPERATURES.
Frequency band selection
The frequency bands must be chosen according to the country where you are oper- rating.
Procedure:
- Switch off the unit.
- Turn it on while pushing the "A/F-LCR" and "SC" buttons.
- By pushing the and buttons at the left hand side of the radio, select the desired frequency band (see the chart).
- To fix your selection, press the "A/F-LCR" button.
NOTE: If you select a frequency band which operates in FM mode only, the "A/F-LCR" control activates the LCR function (Last Channel Recall).
NOTE: In the UK frequency band, you can select directly the I (Italy) band by pushing the "AM/FM" button for 2 seconds.
Frequency band chart
| Displayed digits Country |
| I Italy 40 CH AM/FM 4Watt |
| I2 Italy 3/1 CH AM/FM 4Watt |
| D4 Germany 80 CH FM 4Watt / 40 CH AM 4 Watt |
| EU Europe 40 CH FM 4Watt / 40 CH AM 1 Watt |
| EC CEPT 40 CH FM 4Watt |
| E Spain 40 CH AM/FM 4Watt |
| F France 40 CH FM 4Watt / 40 CH AM 1 Watt |
| PL Poland 40 CH AM/FM 4Watt |
| UK England 40 CH FM 4Watt English frequencies + I (Italy) 40 CH AM/FM 4Watt |
ATTENTION!
The frequency band allowed all over Europe is 40CH FM 4W (EC) - See the "Restrictions on the use" table.
Technical specifications
Channels 40 FM (see the Frequency bend chart)
Frequency Range* 26.565-27.99125 MHz
Operating mode. F3E (FM), A3E (AM).
Antenna impedance 50 Ohm.
Loudspeaker 8 Ohm 0.5W.
Microphone condenser type
Power supply.. min 7.2Vdc;max 13,8Vdc; nom 12,6Vdc
Dimensions 30x70x140 mm
Weight 220 gr. (without batteries).
RECEIVER
Sensitivity at 10dB S/N. .0.5μV (AM), 0.25μV (FM)
Selectivity more than 60dB
Squelch range. 0.25V-500uV
Audio output power. 0.5W 8 ohm (10% distortion)
Distortion at 1000 pV. 3%
Audio frequency response 400-2400 Hz
Intermediate frequency. 10.695 MHz
455KHz
Spurious response. more than 60 dB
Current drain at stanby. 100 mA when the save mode is off
45 mA when the save mode is on
TRANSMITTER
RF Output Power. duty cycle 10% 4W AM/PM
Frequency Tolerance 0.005%
Harmonic Suppression.. .more than 70 dB
Current Drain. 900 mA
Modulation. AM 90% (± 5%)
FM dev. 2.0KHz
- (covering all approved EU frequency bands)
Specifications are subject to change without notice.
WARNING: Direct plug-in acdc power supply must be used for disconnecting the transceiver from the mains; the desktop charger must be positioned close to the unit and easily accessible.
Lieferumfang
- Taste SC/Noise Blanker
Modulationsarten F3E (FM), A3E (AM)
Antennenimpedanz. 50 Ohm
Sensibilidad a 10 dB S/N. 0.5 V (AM); 0.25 V (FM)
Selectivdad.. mejrorque60dB@5Klhz
18. Touche Push to talk (PTT)
Modulation. AM 90% (±5%)
FM dev. 2.0 kHz
Modul de operare. F3E (FM), A3E (AM)
Comanda freventei.. PLL
Sirul temperaturii de fonctionare. -10/+55C
Voltajul de intrare DC min 7.2Vcc;max 13,8Vcc; nom 12,6Vcc
Marimea. 30(L) x 140(H) x 70(D) mm
Greutatea. 220 gr. (fãa baterii)
RECEPTOR
Sistemul de receptionare......... conversie duala superheterodina
Frecventa intermediara . 10.695MHz ^回 455 MHz
Sensibilitatea. 0.5 V (AM), 0.25 V (FM) in Modul FM
Puterea de scoatere audio @10% THD. 8 Ohm 0.5W
Distorsiunea audio la 1000 V 3%
Scurgerea curenta in standby. 45mA
TRANSMITATOR
Puterea de iesire. ciclu 10% 4WAM/FM
Modulatia AM: de la 85% la 95%
FM: 1,8 KHz ± 0,2 KHz
Raspunsul frecventei de la 400 Hz la 2.5 KHz
Impedanta de iesire. RF 50 Ohm neechilibrat
Rata semnalului/ zgomot. 40 dB MIN
Scurgerea curenta. 100mA (pozitia poterii fara modulatie)
- (acoprind toate benzile de frecventa aprobate in EU)
Hereby Cte International Srl declares that this product is in compliance with the essential requirements and other relevant provisions of Directive 2014/58/UE. The declaration of conformity is available on the web site http://www.midlandeurope.com/it/pagina/10090-certifications
AT/DE/CH/LI
Produced or imported by:
CTE INTERNATIONAL s.r.l.
Via.R.Sevardi 7-42124 Mancasale Reggio
Emilia Italy
Imported by: ALAN-NEVADA UK
Unit 1 Fitzherbert Spur Farlington Portsmouth
Hants. P061TT - United Kingdom
www.nevada.co.uk
The use of this transceiver can be subject to national restrictions. Read the instructions carefully before installation and use.
Importado por:
MIDLAND IBERIA, S.A.
C/Cobalt, 48 - 08940 Cornellá de Llobregat
Espana - www.midland.es
- Function and location of the controls
- Installing/removing the battery case
- Recharge of the batteries
- Warnings
- How to operate with your Alan 42 DS
- Frequency band selection
- Procedure:
- ATTENTION!
- Technical specifications
- RECEIVER
- TRANSMITTER
- Lieferumfang
- Touche Push to talk (PTT)
- RECEPTOR
- TRANSMITATOR
- AT/DE/CH/LI
- CTE INTERNATIONAL s.r.l.
- www.nevada.co.uk
- MIDLAND IBERIA, S.A.
Brand : MIDLAND
Model : Alan 42 DS
Category : Radio