
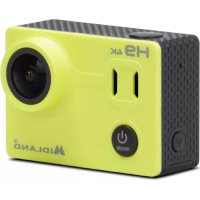
H5+ - Sports camera MIDLAND - Free user manual and instructions
Find the device manual for free H5+ MIDLAND in PDF.
| Product type | Sportscam |
| Brand | Midland |
| Model | H5+ |
| Sensor | 4 MP |
| Viewing angle | 140° |
| Maximum video resolution | 4K at 25 fps |
| Maximum photo resolution | 12 MP |
| Recording formats | Video: MOV; Photo: JPEG |
| Storage | microSD, microSDHC, SDXC card up to 32 GB (class 10 recommended) |
| Connectivity | Wi-Fi b/g/n, micro-USB 2.0, micro-HDMI |
| Waterproof | Up to 30 meters with provided waterproof housing |
| Battery | Li-ion 1050 mAh, rechargeable via USB |
| Battery life | Up to 90 minutes at 1080p@30fps (Wi-Fi off) |
| Charging time | 3 to 5 hours |
| Dimensions | 59.3 x 30 x 41 mm |
| Weight | 58 g with battery |
| Shooting modes | Video, photo, burst (3 photos in 1.5 s), time-lapse (intervals from 2 to 60 s) |
| Additional functions | Video loop, date/time, adjustable exposure, screen rotation, screen saver, battery saver |
| Menu languages | French, English, German, Italian, Spanish, Portuguese, Dutch, Czech, Polish, Turkish, Russian, Japanese |
| Included accessories | Waterproof housing 30m, 2 quick mounts, standard photo mount, curved/flat mounts, frame, adapter, tripod mount, helmet bandage, 90°/180° mounts, straps, back door, USB cable, lens cloth |
| Mobile app | Ez iCam (iOS and Android) |
| Limited warranty | Details at www.midlandeurope.com |
Frequently Asked Questions - H5+ MIDLAND
User questions about H5+ MIDLAND
0 question about this device. Answer the ones you know or ask your own.
Ask a new question about this device
Download the instructions for your Sports camera in PDF format for free! Find your manual H5+ - MIDLAND and take your electronic device back in hand. On this page are published all the documents necessary for the use of your device. H5+ by MIDLAND.
USER MANUAL H5+ MIDLAND

Waterproof
up to 30m

1.5 HoursWide Ang
The multi-language user manual is available on our website
www.midlandeurope.com
Time Lapse (Foto ad intervalli di tempo): 2s/3s/5s/10s/20s/30s/60s
Lapse continuo: off/on
Frequenza alim.: 50Hz / 60Hz / Auto
Suoni: Scatto on/off, Start up 1/2/3/nessuno, Beep on/off, volume 0/1/2/3)
Ruota LCD 180°: On/off
Auto LCD off: off/1 min/3min/5min
Auto spegnimento: off/1 min/3min/5min
Formatta: No/Si
iOS / Android
App Download
COMPATIBILITÀ
CARATTERISTICHE TECNICHE
Video: 4K@25fps, 2.7K@30fps, 1080p@60/30fps formato MOV
Foto: 12/8/5/4 MP formato jpg
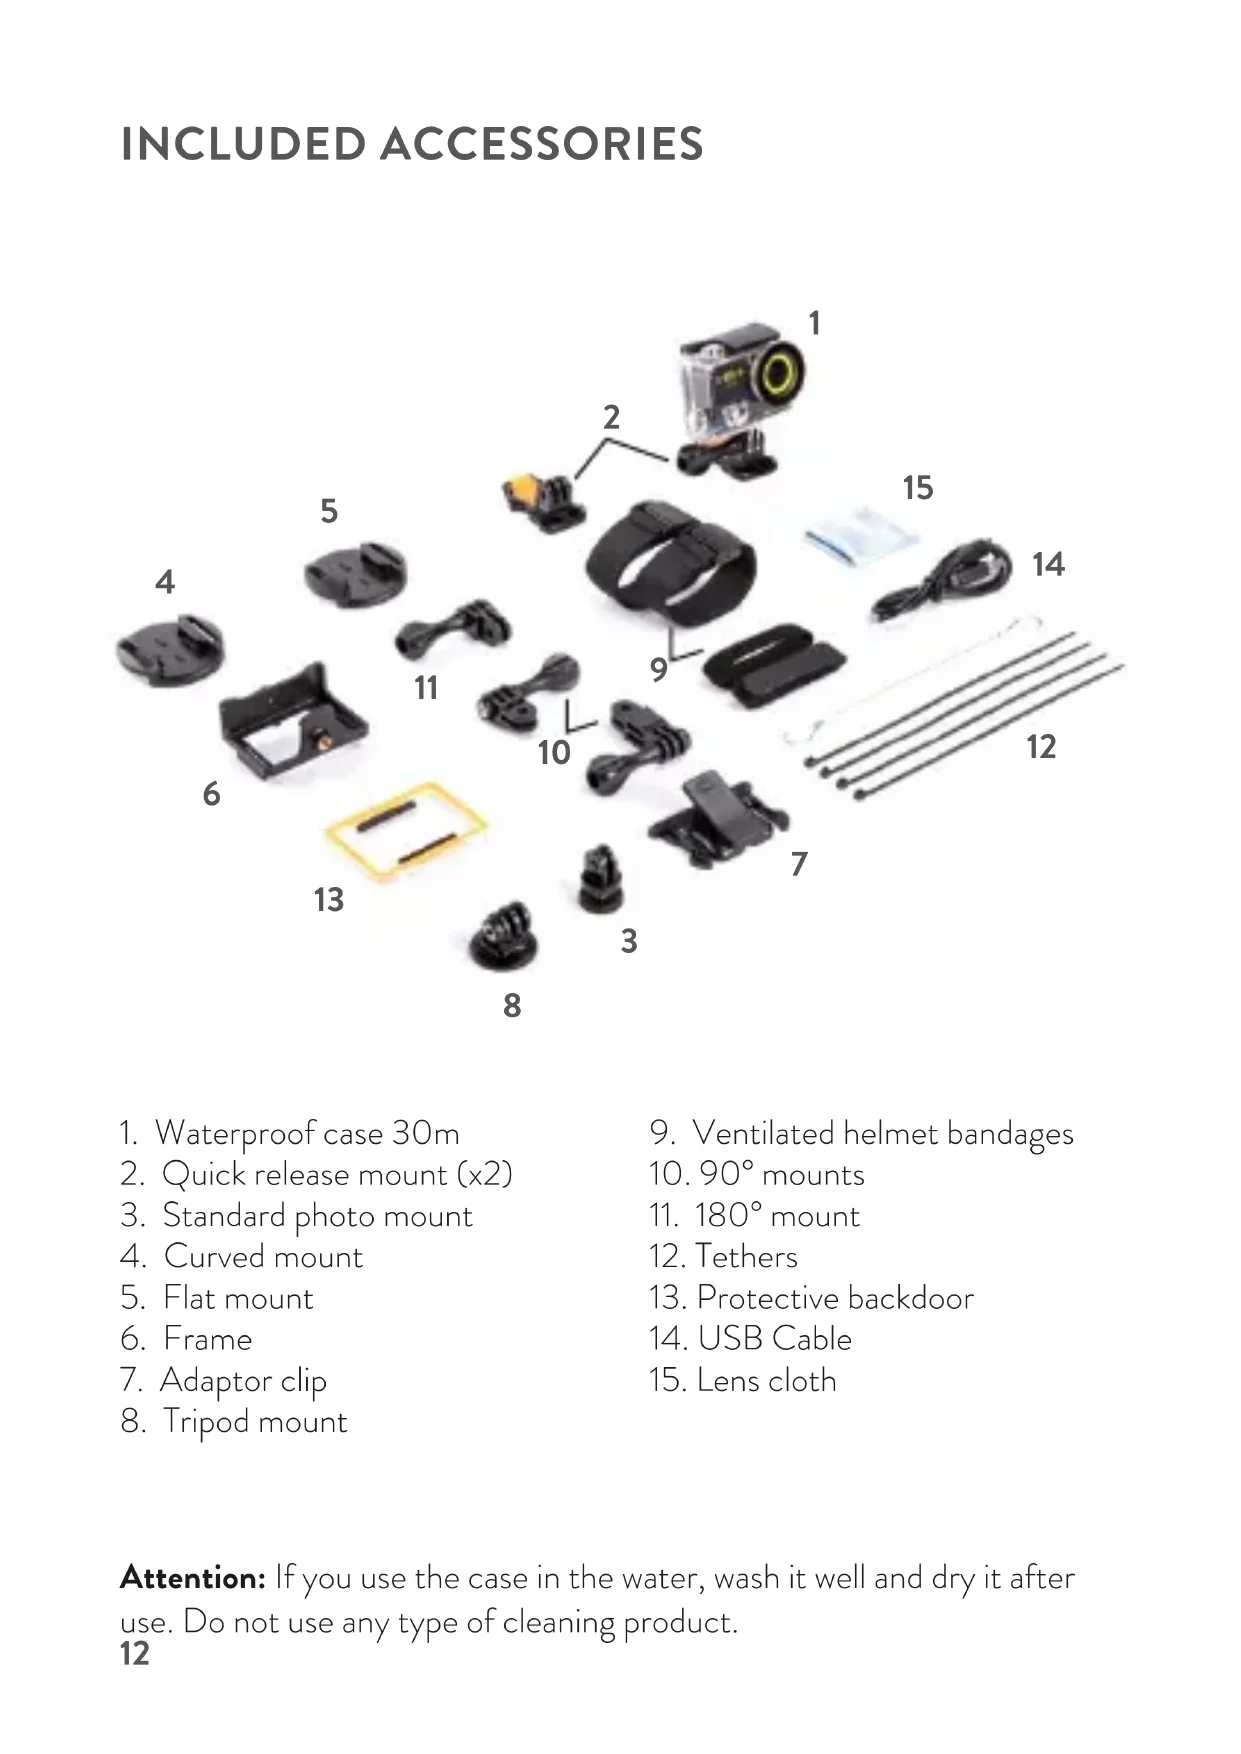
INCLUDED ACCESSORIES
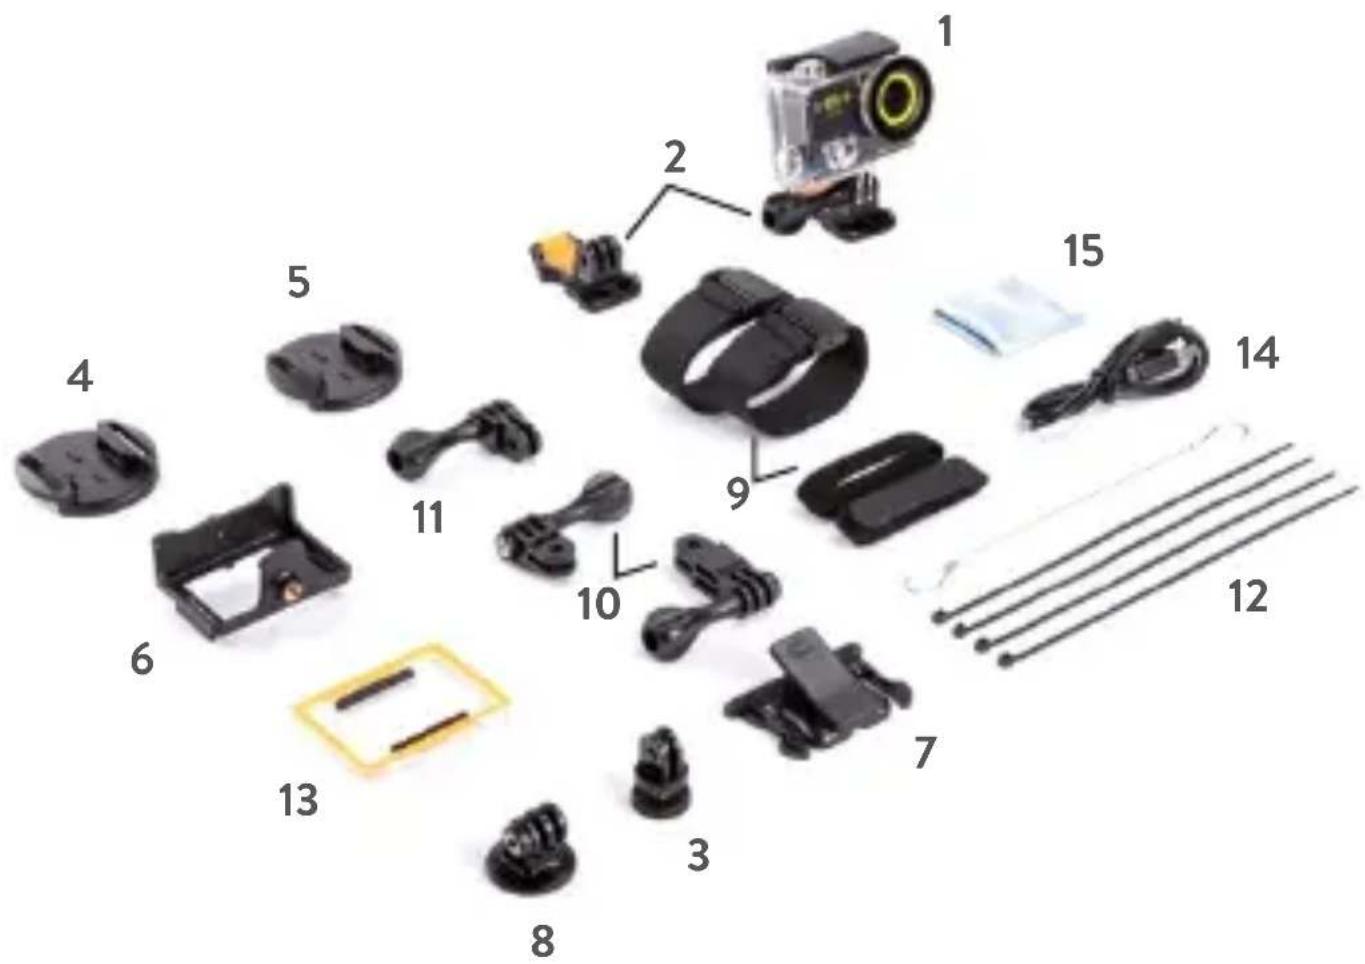
- Waterproof case 30m
- Quick release mount (x2)
- Standard photo mount
- Curved mount
- Flat mount
- Frame
- Adaptor clip
-
Tripod mount
-
Ventilated helmet bandages
- 90^ mounts
- 180^ mount
- Tethers
- Protective backdoor
- USB Cable
- Lens cloth
Attention: If you use the case in the water, wash it well and dry it after use. Do not use any type of cleaning product.
GETTING STARTED
Congratulations on your new camera! This user manual will help you learn the basics of capturing life's most incredible moments.
To power ON: Press the Power/mode button.
To power OFF: Press and hold the Power/mode button.
OVERVIEW
Turn camera ON and repeatedly press the Power/mode button to cycle through camera modes and settings. The modes will appear in following order:

flowchart
graph TD
    A["屏幕 capture: 演示器"] --> B["60: 160V"]
    B --> C["60: 160V"]
    C --> D["60: 160V"]
    D --> E["Video Output"]
Video Photo Burst Photo Time Lapse
Video Playback
Photo Playback
& Settings
 | Video Record video | |
 | Photo Capture a single photo | |
 | Burst Photo Capture photo bursts | |
 | Time Lapse Shoot a series of photos at set time intervals | |
 | Settings | Adjust camera settings, resolution and more |
  | Video&Photo playback | Video & Photo playback |
SETTINGS

flowchart
graph LR
    A["Video Production"] --> B["Video Production"]
    B --> C["Audio Production"]
    C --> D["Audio Production"]
    D --> E["Power Frequency"]
    E --> F["Power Frequency"]
    F --> G["Sound Sound"]
    G --> H["Sound Sound"]
    H --> I["Sound Sound"]
Press the Shutter/Select button to enter the settings menu. Repeatedly press the Power/ Mode to cycle through options and press the Shutter/ Select button to select the desired option.
Video resolution: 4K/25fps 1080p/60/30fps
MicroSD Card 4K
25fps
1080p 60fps 1080p 30fps
32 GB 60 min 180 min 300 min
16 GB 30 min 90 min 150 min
Looping Video: On/Off
Time Stamp: Off/Date/Date & Time
Exposure: ±2.0/±1.7/±1.3/±1.0/±0.7/±0.30/0
Photo resolution: 12M/8M/5M/4M
Burst Photo: 3 photos
Time Lapse: 2s/3s/5s/10s/20s/30s/60s
Continuous Lapse: Off/On
Power Frequency: 50Hz/60Hz/Auto
Language: English /German /Italian /Spanish /Portuguese /Dutch /
French / Czech / Polish / Turkish / Russian / Japanese
Date and Time: time adjust and format selection MM/DD/YY, YY/MM/
DD or DD/MM/YY
Sound Indicator: Shutter On/Off, StartUp On/Off, Beep On/Off,
Volume 0/1/2/3
Upside Down: Yes/No
Screen saver: Off/1min/3min/5min
Power saver: Off/1min/3min/5min
Format: No/Yes
Reset: No/Yes
Version
VIDEO MODE

Video
To record video verify the camera is in Video mode. If the Video icon on your camera's LCD screen is not showing, press the Power/mode button repeatedly until it appears.
To start recording:
Press the Shutter/Select button. The camera will emit one beep and the Camera Status Light (Red Led) will flash while recording.
To stop recording:
Press the Shutter/Select button. The Camera Status Light will stop flashing and the camera will emit one beep to indicate recording has stopped. This camera automatically stops recording when the battery is out of power. Your video will be saved before the camera powers OFF.
PHOTO MODE

Photo
To capture a Photo verify the camera is in Photo mode. If the Photo icon on your camera's LCD screen is not showing, press the Power/mode button repeatedly until it appears.
To take a photo:
Press the Shutter/Select button. The camera will emit the camera shutter sound.
BURST PHOTO MODE

Burst Photo
To capture a Burst Photo series, verify the camera is in Burst Photo mode. If the Burst Photo icon on your camera's LCD screen is not showing, press the Power/mode button repeatedly until it appears. In Burst Photo mode, your camera will take 3 photos in 1.5 seconds.
To take a Burst Photo series:
Press the Shutter/Select button. The camera will emit the camera shutter sound.
TIME LAPSE MODE

Time Lapse
To capture a Time Lapse photo series, verify the Continuous Lapse is ON and the camera is in Time Lapse mode. If the Time Lapse icon on your camera's LCD screen is not showing, press the Power/mode button repeatedly until it appears. In Time Lapse mode, your camera captures a series of photos at 2, 3, 5, 10, 20, 30 or 60 second intervals.
To take Time Lapse:
Press the Shutter/Select button. The camera initiates countdown and emits the camera shutter sound each time a Photo is taken.
PLAYBACK


Playing Videos and Photos
- Press the Power/mode button to select Video or Photo.
- Press the Shutter/Select button to enter the Playback menu.
- Use the Power/mode button to select the file you want to play.
- Press the Shutter/Select button to playback or pause.
- To return to the Playback menu, press the Shutter/Select button to pause the video, then press the Power/mode button
STORAGE/MICRO SD CARDS
This camera is compatible with 16GB and 32GB capacity microSD, microSDHC, and microSDXC memory cards.
You must use a microSD card with a Class 10 speed rating.
We recommend using brand name memory cards for maximum reliability in high-vibration activities.
BATTERY
To charge the battery
- Connect the camera to a computer or USB power supply.
- The Charging Status Light (Blue Led) remains ON while the battery is charging.
- The Charging Status Light (Blue Led) will turn OFF when the battery is fully charged.
* Charging Time: 3-5 hours.
CAMERA APP
The Ez iCam APP allows you to control your camera remotely using a smartphone or tablet. Features include full camera control, live preview, photo playback and sharing of select content and more.
-
Download the Ez iCam APP to your smartphone or tablet at the Apple Store or Google Play.
-
Press the Power/mode button to power camera ON.
-
Make sure the camera is in Camera modes.
-
Press the Wi-Fi button to turn on Wi-Fi
-
In your smartphone or tablet's Wi-Fi settings, connect to the network called "Midland H5+", followed by a series of numbers.
-
Enter the password:"1234567890"
-
Open the Ez iCam APP on your smartphone or tablet.
-
Press and hold the Wi-Fi button for three seconds to turn OFF Wi-Fi.
The Ez iCam App is compatible with smart-phones and tablets listed below:
For Apple iOS:
- iPhone 5,5S,6,6S,7(Plus) (iOS 10)
- iPad Air & Mini (iOS 10)
For Android:
• *Android 4x Quad-core devices

iOS / Android App Download
COMPATIBILITY
Compatibility varies by device. Content playback, sharing and access to the camera's memory card might be not available on some devices.
LIMITED WARRANTY
For information about the warranty, please visit www.midlandeurope.com

SPECIFICATIONS
Video: 4K@25fps, 2.7K@30fps, 1080p@60/30fps MOV format
Photo: 12/8/5/4MP JPEG format
View Angle: 140°
Sensor: 4MP
Wi-Fi: b/g/n
Water Resistance: up to 30m with Waterproof case
Display LCD: colour 2"
Battery life: up to 90' (1080p@30fps) with Wi-Fi turned OFF
Speaker and Microphone built-in
Operational Mode: Video/Photo/Time Lapse/Player
Configurable functions: Video/photo resolution, date, exposure, photo burst, time lapse, language, date&time, screen rotation, auto power off,
Multilanguage Menu: EN/DE/IT/ES/PT/DU/FR/CZ/PL/TR/RU/JP
Connections: microUSB 2.0 & microHDMI
Memory: microSD card slot, class 10 up to 32GB
Battery: Li-ion 1050mAh
Dimensions: 59.3 x 30 x 41mm
Weight: 58g with battery
Specifications are subject to change without notice.
DEUTSCH
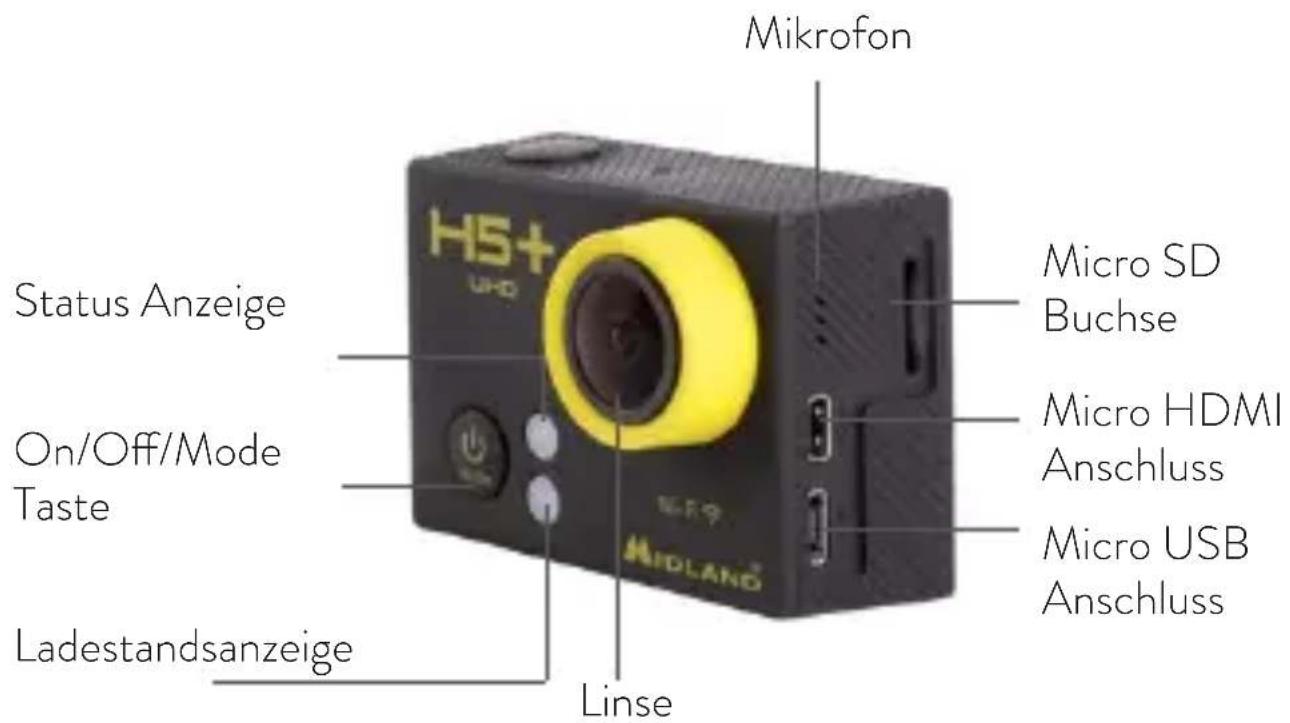
BEDIENELEMENTE
Zeitraffer: Aus/2s/3s/5s/10s/20s/30s/60s
App Download

www.midlandeurope.comiOS/
TECHNISCHE DATEN
Time Lapse: 2s/3s/5s/10s/20s/30s/60s
Foto Continua: Off/On
Frecuencia red: 50Hz/60Hz/Auto
iOS / Android App Download
COMPATIBILIDAD
Time Lapse: 2s/3s/5s/10s/20s/30s/60s
IOS/ Android
- caixa estanque waterproof 30mt
- Suporte carro (x2)
- Suporte de montajem Standar
- Base curva
- Base plana
- Suporte de montajem câmara sem caixa
-
Clip adaptador
-
Suporte para tripe
- Cintas para capacete ventilado
- Suportes 90°
- Suporte 180°
- Bracadeiras
- Tampa traseira
- Cabo USB
- Pano limpeza
Time Lapse: 2s/3s/5s/10s/20s/30s/60s
Foto Continua: Off/On
Sons: Obturador On/Off, Start Up On/Off, Bepp On/Off, Volume 0/1/2/3
iOS / Android App Download
COMPATIBILIDADE
iOS / Android App Download
ZGODNOŚĆ
DANE TECHNICZNE
Wideo: 4K@25klatek, 2,7K@30klatek/sek.,1080P@60/30klatek/sek., format MOV
Video Photo Burst Photo Time Lapse
Settings,
Video&Photo
playback

Video&Photo playback
Time Lapse: 2s/3s/5s/10s/20s/30s/60s
iOS / Android App Download
ΣΥΜΒΑΤ'ΟΤΗΤΑ
- All articles displaying this symbol on the body, packaging or instruction manual of same, must not be thrown away into normal disposal bins but brought to specialised waste disposal centres. Here, the various materials will be divided by characteristics and recycles, thus making an important contribution to environmental protection.
Hereby Cte International Srl declares that this product is in compliance with the essential requirements and other relevant provisions of Directive 2014/53/UE. The declaration of conformity is available on the web site http://www.midland-europe.com/it/pagina/10090-certifications
AT / DE / CH / LI
it/pagina/10090-certifications
BE
PRODUKT JEST WOLNY OD WE WSZYSTKICH KRAJACH UE.
Produced or imported by:
CTE INTERNATIONAL srl
Via. R.Sevardi 7 42124 Mancasale, Reggio Emilia - Italy
www.midlandeurope.com
Read the instructions carefully before installation and use.
Importado por:
MIDLAND IBERIA, SA
- COMPATIBILITÀ
- CARATTERISTICHE TECNICHE
- INCLUDED ACCESSORIES
- GETTING STARTED
- OVERVIEW
- SETTINGS
- VIDEO MODE
- Video
- To start recording:
- To stop recording:
- PHOTO MODE
- Photo
- To take a photo:
- BURST PHOTO MODE
- Burst Photo
- To take a Burst Photo series:
- TIME LAPSE MODE
- Time Lapse
- To take Time Lapse:
- PLAYBACK
- Playing Videos and Photos
- STORAGE/MICRO SD CARDS
- BATTERY
- To charge the battery
- CAMERA APP
- For Apple iOS:
- For Android:
- COMPATIBILITY
- LIMITED WARRANTY
- SPECIFICATIONS
- Speaker and Microphone built-in
- DEUTSCH
- BEDIENELEMENTE
- TECHNISCHE DATEN
- COMPATIBILIDAD
- COMPATIBILIDADE
- ZGODNOŚĆ
- DANE TECHNICZNE
- ΣΥΜΒΑΤ'ΟΤΗΤΑ
- AT / DE / CH / LI
- BE
- CTE INTERNATIONAL srl
- MIDLAND IBERIA, SA
Brand : MIDLAND
Model : H5+
Category : Sports camera