
Flow TP800P - Water pump Eurom - Free user manual and instructions
Find the device manual for free Flow TP800P Eurom in PDF.
| Brand | Eurom |
| Model | Flow TP800P |
| Product type | Self-priming centrifugal water pump |
| Power | 800 W |
| Maximum capacity | 53 l/min |
| Maximum priming height | 40 m |
| Maximum suction height | 8 m |
| Connections | 1" - 1" |
| Supply voltage | 230 V ~ 50 Hz |
| Thermal protection | Integrated |
| Recommended circuit breaker | 30 mA differential |
| Pump body material | Plastic |
| Weight | 6.7 kg |
| Maximum water temperature | 35 °C |
| Installation | Sheltered, near water source, secure if permanent use |
| Maintenance | Drain after use, clean and store dry, protect from frost |
| Safety | Never run dry; use a 30 mA circuit breaker |
| Repairability | Spare parts available via after-sales service (impeller, valve, injector) |
Frequently Asked Questions - Flow TP800P Eurom
User questions about Flow TP800P Eurom
0 question about this device. Answer the ones you know or ask your own.
Ask a new question about this device
Download the instructions for your Water pump in PDF format for free! Find your manual Flow TP800P - Eurom and take your electronic device back in hand. On this page are published all the documents necessary for the use of your device. Flow TP800P by Eurom.
USER MANUAL Flow TP800P Eurom
Operating instructions (EN) (page 6)
Thank you very much for choosing for a Eurom device. You have made a good choice! We hope you will be satisfied about its functioning. To get maximum profit from your panel, it is important to read this manual attentive and totally before use, and to understand what is written. Read especially the safety instructions: they are there to protect you and your environment. Keep the manual in a safe place for future reference. Store also the package: that is the best protection for your heater in times of no-use. And if you at any time pass the appliance on, pass on the manual and package too.
We wish you a lot of fun with the Garden pump!
Eurom
Kokosstraat 20
8281 JC Genemuiden (NL)
info@eurom.nl
www.eurom.nl
This manual has been complied with the utmost care. Nevertheless, we reserve the right to optimize this manual at any time and to adjust it technically. The images used may differ.
General information
This instruction manual has been compiled to ensure correct installation, correct use and adequate maintenance of the EUROM TP garden pumps. We urgently advise you to read it carefully before use.
The EUROM TP garden pumps are electric centrifugal pumps, self-priming and equipped with an injector system that allows suction up to 8 metres. You only need to connect a foot valve.
The pumps are designed for use with clean water with a maximum temperature of 35^ . Use with dirty water, warmer water or other liquids should be avoided.
EUROM TP garden pumps are made of top quality materials, subjected to the toughest hydraulic and electrical tests and carefully inspected.
Strictly following the instructions and electrical table described in this booklet will help you to ensure proper installation. Failure to do so could result in engine overload and all kinds of other unwanted complications. The manufacturer and importer do not accept any liability for the consequences of incorrect, improper and negligent use.
Technical specifications
| Type | TP800P | TP800R | TP1200R |
| Power | 800W | 800W | 1200W |
| Capacity max. | 53 l/m | 53 l/m | 63 l/m |
| Discharge head max. | 40m | 40m | 48m |
| Suction height max. | 8m | 8m | 8m |
| Connections | 1” - 1” | 1” - 1” | 1” - 1” |
| Supply voltage | 230V-50Hz | 230V-50Hz | 230V-50Hz |
| Pump housing | plastic | Stainless Steel | Stainless Steel |
| Weight | 6,7 kg | 7,8 kg | 8,5 kg |
Installation
The electric pump should be placed as close to the water surface as possible to achieve a minimum suction height and thus reduce the loss of discharge head.
When installing the pump permanently, secure it to the surface using the holes in the pump support.
The pump must be installed in a dry location so that it will not be submerged under any circumstances.
Failure to comply with the above conditions may result in damage to the pump and the entire system!
Hose connections
The suction hose must be resistant to negative pressure. The end should be kept at least 30~cm under water to prevent the formation of vortices with the inevitable air intake.
Connections and connectors must be absolutely watertight. Keep the number of bends and kinks in the hoses as minimal as possible! Make sure that the tilt of the suction hose is at least 2% .
The drain hose must have a diameter equal to or greater than the pump outlet.
Electrical connections
The electrical installation must be installed in compliance with the applicable regulations and equipped with a 30mA earth leakage circuit breaker.
The socket used must deliver 230V - 50Hz.
The power cable must comply with EEC standards and be of type H07 RN-F in compliance with VDE0620.
The motor has a built-in thermal protection.
Failure to comply with the above conditions may result in damage to the pump and the entire system and create a risk of electric shock. The manufacturer and importer do not accept any liability for this!
Checks before start-up
Before starting up the pump for the first time, make sure that:
✓ voltage and frequency of the power source correspond to the specifications on the nameplate of the garden pump
✓ the pump shaft rotates smoothly and freely
- the pump body is completely filled with water; unscrew the relevant power plug on top of the pump to do this.
Check that the direction of rotation of the engine is as indicated on the impeller cover.
Failure to comply with the above conditions may result in damage to the pump and the entire system!
Starting
Open all flow valves in the suction and discharge pipes.
Plug into the power socket, set the switch to "ON" (I pressed) and wait for suction to complete. If a foot valve is fitted, this is done immediately.
Check if the rotation of the engine is clockwise; this is possible through the peephole on the back of the motor. To turn off, first set the switch to OFF (O pressed) and then unplug the plug from the power socket.
If the motor does not start or does not supply water, consult the fault indicator further on in this booklet and take the recommended action.
Maintenance
The electric pump requires no special maintenance. Nevertheless, we recommend that you drain the pump if the pump will not be used for a longer period. If the pump will not be used for a significantly long period it should be cleaned and stored in a dry, well-ventilated place.
In cold periods (and definitely when frost is expected), allow the pump to drain out to prevent freezing.
Fault indicator
Fault:
The motor will not start: Cause and solution 1, 4 or 6
The pump is not sucking: Cause and solution 3, 5, 8, 9 or 11
The motor is running but not building up any pressure: Cause and solution 5, 6, 8, 9 or 11
Insufficient water yield: Cause and solution 2, 3, 5, 7 and 12
The motor is overheating: Cause and solution 4 or 10
The motor keeps starting and stopping automatically: Cause and solution 1, 4 and 10
Cause and solution:
- Pump is blocked; switch off and take to after-sales service
- Foot valve is blocked; clean or replace.
- Water level is too low; check the suction height.
- Incorrect supply voltage: check if the mains voltage matches the required voltage on the nameplate.
- The water level has dropped too low; make sure that the suction height is correct.
- Blown fuse or thermal protection has tripped the pump; replace the fuse or allow the thermal protection to cool down.
- Fuse impeller is worn out; take the pump to your customer service
- Foot valve is above the water level; make sure the suction hose is properly submersed.
- Pump has not had enough time to prime; fill the pump housing with water.
- Space is poorly ventilated; provide adequate ventilation and/or cooling.
- Air in the system; seal connections and connectors properly.
- Injector is clogged; take the pump to your customer service.
Removal

In the EU this symbol indicates that this product may not be disposed of as ordinary household waste. Old equipment contains valuable materials, suitable for recycling. These materials should be made suitable for reuse in order to prevent any adverse effects to health and the environment caused by unregulated waste collection. Therefore, please make sure that you bring old equipment to a designated collection point. Alternatively, contact the original supplier, who can make sure that as many of the components as possible can be recycled
CE-declaration
See page 34.
Dank
declares the following device in sole responsibility:
Product: garden pump
Brand name: EUROM
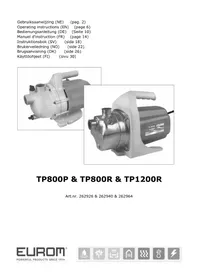
Model: TP800P & TP800R & TP1200R
Item number: 262926 & 262940 & 262964
Complies with the following harmonization rules:
Low Voltage Directive: LVD 2014/35/EU
Electromagnetic compatibility Directive: EMC 2014/30/EU
Restriction of Hazardous Substances RoHS Directive: 2011/65/EU&(EU)2015/863
Applied harmonized standards:
EN 60335-1:2012+A11+A13
EN 60335-2-41:2003+A1+A2
EN 62233:2008
EN 55014-1:2017
EN 55014-2:2015
EN 61000-3-2:2014
EN 61000-3-3:2013
Genemuiden, 17-11-2020
W.J. Bakker, alg. Dir.

Eurom
Kokosstraat 20
8281 JC Genemuiden
The Netherlands
info@eurom.nl
www.eurom.nl
171120

Brand : Eurom
Model : Flow TP800P
Category : Water pump