LTR 1830 Battery Set - Lawn mower Kärcher - Free user manual and instructions
Find the device manual for free LTR 1830 Battery Set Kärcher in PDF.
User questions about LTR 1830 Battery Set Kärcher
0 question about this device. Answer the ones you know or ask your own.
Ask a new question about this device
Download the instructions for your Lawn mower in PDF format for free! Find your manual LTR 1830 Battery Set - Kärcher and take your electronic device back in hand. On this page are published all the documents necessary for the use of your device. LTR 1830 Battery Set by Kärcher.
USER MANUAL LTR 1830 Battery Set Kärcher
natural_image
3D rendering of a metal detector with lever and handle (no text or symbols visible)Deutsch 6
English 15
Français 23
Italiano 33
Nederlands 42
Español 51
Português 60
Dansk 69
Norsk 77
Svenska 85
Suomi 93
Ελληνικά 102
Türkçe 111
Русский 120
Magyar 131
Čeština 140
Slovenščina 148
Polski 157
Românește 166
Slovenčina 175
Hrvatski 184
Srpski 192
Български 201
Eesti 211
Latviešu 220
Lietuviškai 228
Українська 237
日本語 247
Қазақша 255
العربيه 266
A
text_image
Labeled diagram of a metal detector with numbered parts for identification and assembly reference.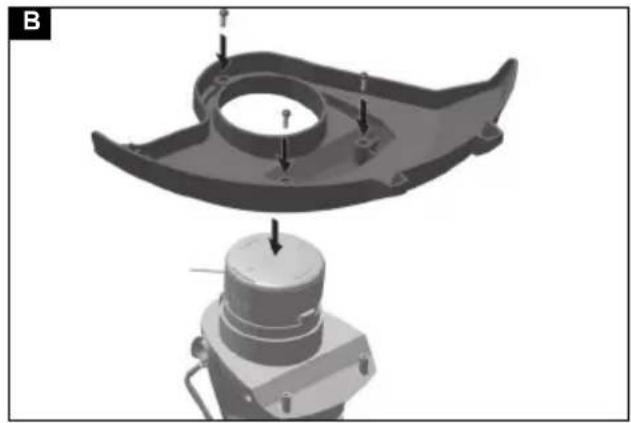
natural_image
Mechanical assembly diagram showing a component being inserted into a housing (no text or symbols visible)
text_image
c b a c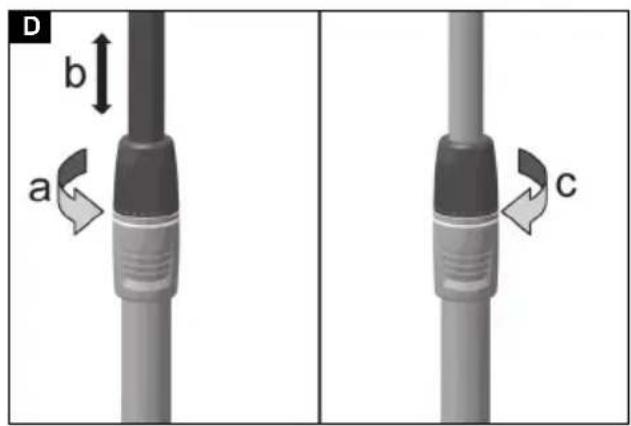
text_image
D b a c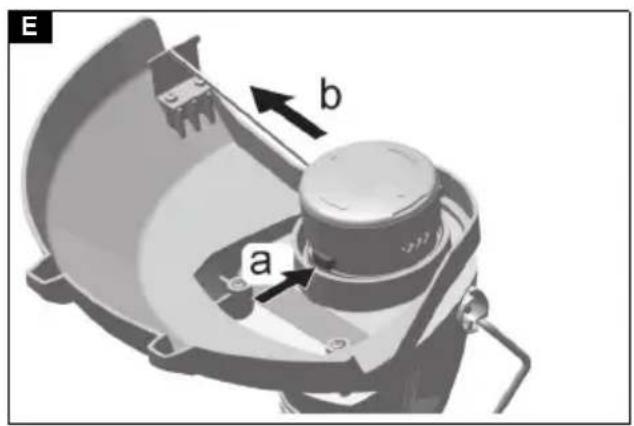
text_image
E a b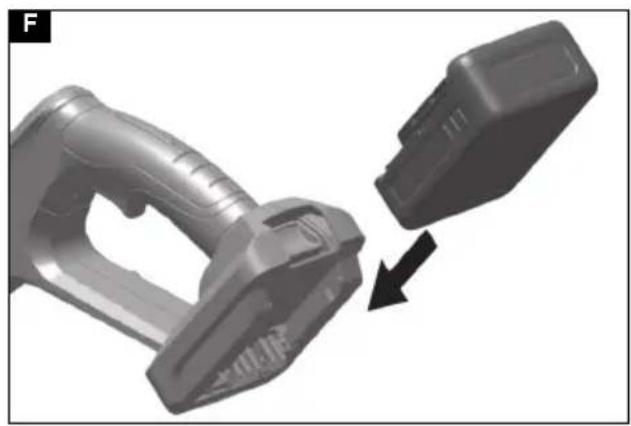
natural_image
3D rendered mechanical component with a close-up view of its side, showing a curved handle and a separate housing (no text or symbols visible)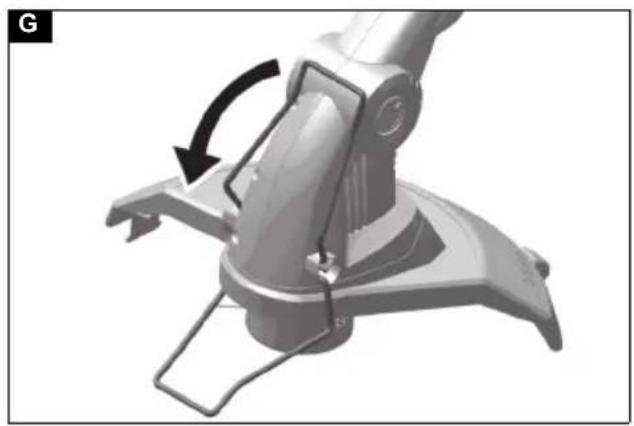
natural_image
Mechanical component diagram showing a lever mechanism with an arrow indicating rotational motion (no text or symbols present)
text_image
H a b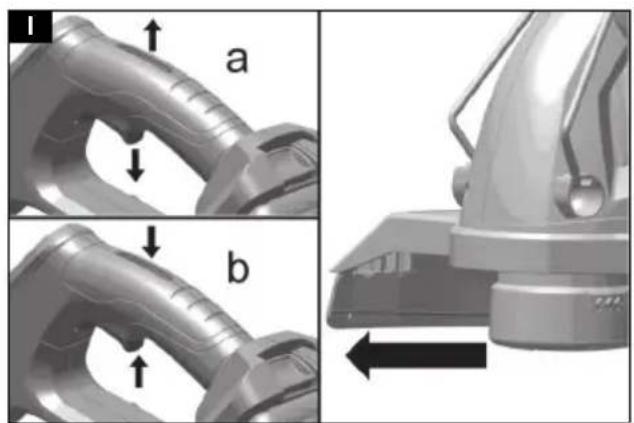
natural_image
Mechanical assembly diagrams showing pipe connection and component alignment (no text or symbols)
natural_image
Mechanical device with a magnified inset showing a component detail (no visible text or symbols)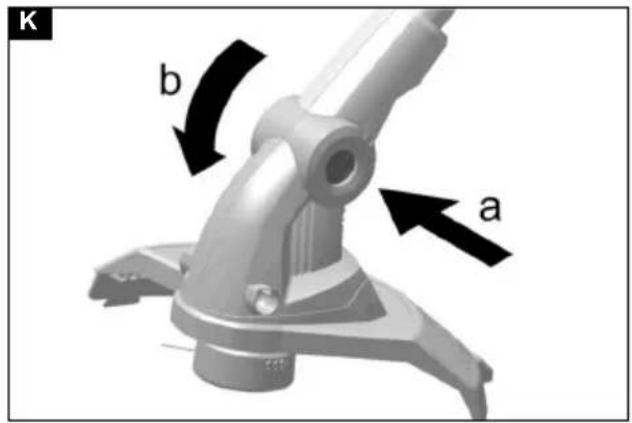
text_image
K b a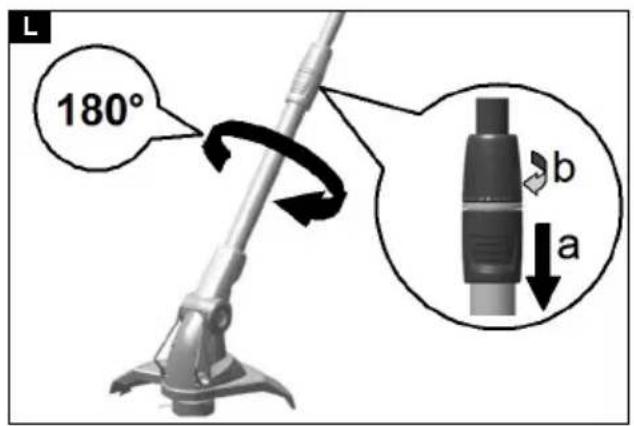
text_image
L 180° b a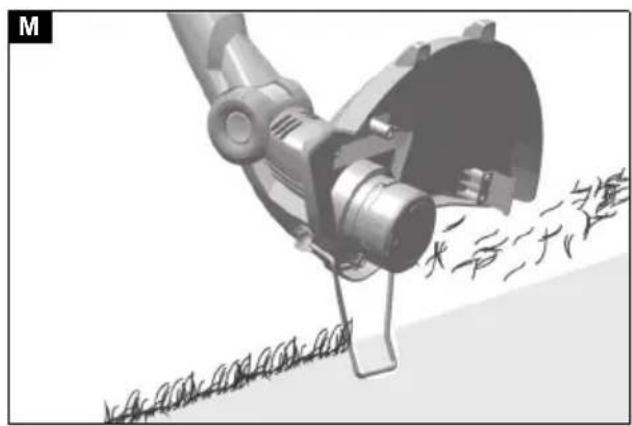
natural_image
Close-up of a metallic connector with a curved arrow indicating rotation (no text or symbols)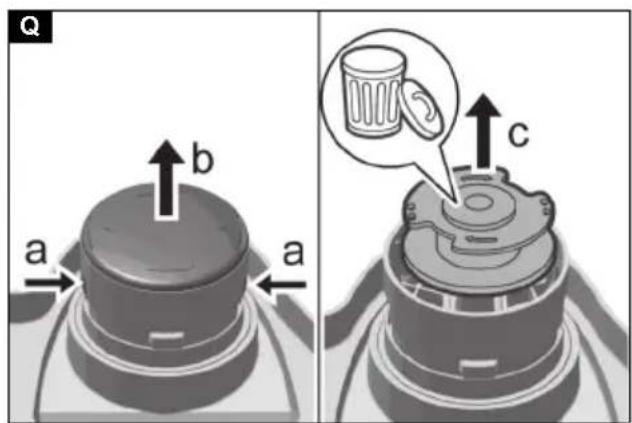
text_image
Q a b a c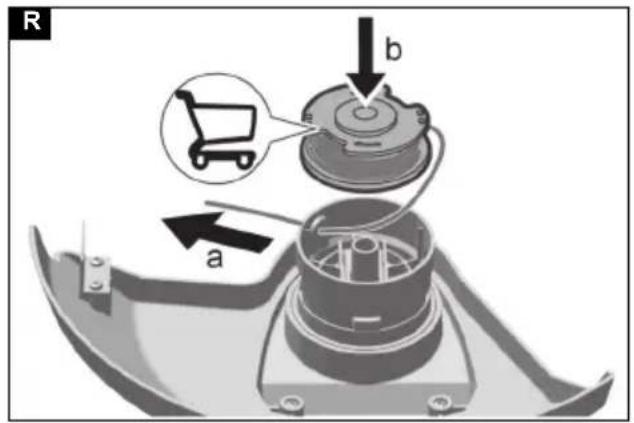
text_image
R b a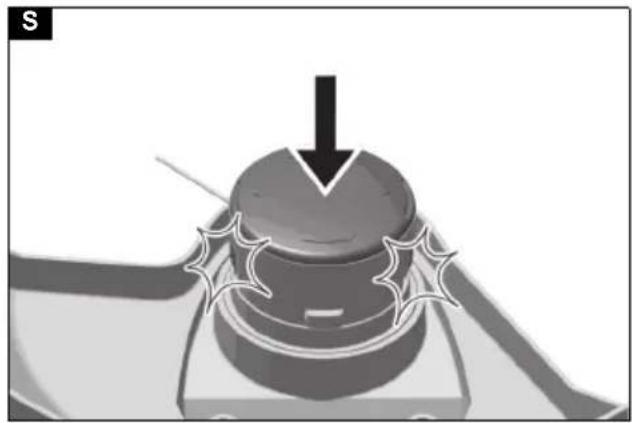
natural_image
Illustration of a mechanical device with a downward arrow and starburst pattern (no text or symbols)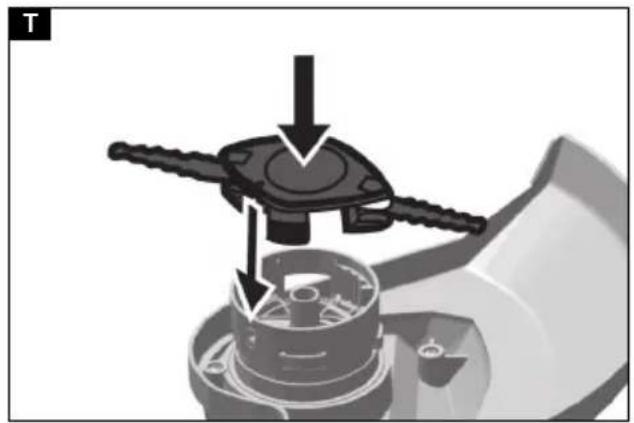
natural_image
Mechanical assembly diagram showing a motor or gear mechanism with no visible text or symbolsInhalt
Chairman of the Board of Management

S. Reiser
Director Regulatory Affairs & Certification
71364 Winnenden (Germany)
Tel.: +49 7195 14-0
Fax: +49 7195 14-2212
Winnenden, 2018/07/01
Contents
Safety instructions .... 15
Intended use.... 19
Environmental protection.... 19
Accessories and spare parts 19
Scope of delivery.... 20
Symbols on the device 20
Description of the device 20
Installation 20
Initial startup 20
Operation.... 21
Transport 21
Storage.... 21
Care and service 21
Troubleshooting guide.... 22
Warranty.... 22
Technical data 22
Vibration value.... 23
EU Declaration of Conformity.... 23
Safety instructions

Read these safety instructions, these original instructions, the safety instructions provided with the battery pack and the operating instructions supplied with the battery pack/standard charger
before using the device for the first time. Proceed accordingly. Keep the booklets for future reference or for future owners. In addition to the notes in the operating instructions, you also need to take into consideration the general safety regulations and accident prevention guidelines applicable by law.
Hazard levels
⚠️DANGER
- Indication of an imminent threat of danger that will lead to severe injuries or even death.
⚠ WARNING
- Indication of a potentially dangerous situation that may lead to severe injuries or even death.
△CAUTION
- Indication of a potentially dangerous situation that may lead to minor injuries.
ATTENTION
- Indication of a potentially dangerous situation that may lead to damage to property.
General safety instructions
⚠️ DANGER ● Danger of explosion. The device creates sparks that may ignite dust, gas or vapours. Do not operate the device in explosive atmospheres, such as in the presence of flammable liquids, gases or dusts.
⚠ WARNING ● Danger of accident. Keep your work area clean and well-lit. ● Keep children and other persons out of the work area while you are using the device. ● Risk of electric shock. Protect the device from rain and moisture. ● Avoid switching the device on unintentionally. Make sure that the on/off switch is in the off position before connecting the battery pack, lifting or carrying the device. ● Injuries through an adjustment key left in a rotating part of the tool. Remove the adjusting key before switching the device on. ● Do not run but rather walk when working with the device. Do not walk backwards. Avoid an abnormal posture, keep a stable, safe footing and maintain your balance. ● Never use the device if the on/off switch on the handle does not switch on and off correctly. ● Do not overload the device. ● Keep the cutting tools sharp and clean. Sharp cutting tools are easier to control and do not block so easily. ● Switch the motor off, remove the battery pack and make sure that all moving parts have stopped moving:
- Before making any adjustments.
● Before leaving the device un-attended.
● Before checking, cleaning or servicing the device.
● Before removing a blockage or cleaning the ejection chute.
● Before changing accessories.
● After hitting a foreign object. First check the device for damage and repair any damage before restarting the device.
- When the device starts to vibrate unusually. First check the device for damage and repair any damage before restarting the device.
⚠️ CAUTION • You must not operate the device when you are under the influence of medication or drugs which restrict your reactive capacity. Only work with the device when you are well rested and are in good health.
- Wear suitable personal protective equipment when working with the device. Protective equipment such as dust masks, non-slip shoes, safety helmet or hearing protection reduce the risk of injury. • Wear especially safety glasses and hearing protection. • Hearing protection can impair your ability to hear warning sounds, so pay attention to hazards in your vicinity and in the work area. • Wear head protection when working in areas with a danger of falling objects. WARNING • Wear long, heavy trousers, clothing with
long arms and non-slip boots when working with the device. Do not work barefoot. Do not wear sandals or short trousers. Avoid wearing loose clothing or clothing with cords and straps. CAUTION ● Risk of injury when loose fitting clothing, hair or jewellery is caught by moving parts of the device. Keep clothing and jewellery away from moving parts of the device. Tie long hair back. ● Use the device and accessories only according to these instructions and take the working conditions and the work to be performed into consideration to avoid dangerous situations.
Safe operation
⚠️DANGER ● Severe injuries when objects are flung by the cutting blade or when the cutting tool becomes entangled in wires or cords. Inspect the work area thoroughly for objects such as stones, sticks, metal, wires, bones or toys and remove these before using the device.
⚠ WARNING • The device is not intended for use by children, persons with restricted physical, sensory or mental abilities or persons unfamiliar with these instructions. • Use the device only in daylight or under good artificial lighting. • Do not operate the device on wet grass or in the rain. ● Maintain a minimum distance of 15 m from persons and animals. Stop the device when any persons or animals enter this area. ● Keep the cutting head below the level of your hips. ● Never use the device with damaged or absent safety devices. ● Never use a metallic cutting string. ● Only operate the device outdoors. ● Keep your hands and feet away from the cutting area, especially when switching on the motor. ● Risk of injury because the blades continue rotating after the motor has been switched off. ● Danger of injury. The blade on the protective cover for shortening the cutting string is very sharp and you must avoid touching this, especially when cleaning the device.
- Make sure that the ventilation openings are free of deposits. - Check the device for damage before each use and after any impacts. Damaged parts, e.g. a switch, must be repaired or replaced by the authorised Customer Service department.
- Ensure that the drive head attachment is correctly fitted and fastened. - Ensure that all protective devices, deflectors and handles are correctly fitted and securely fastened. - Check that the string cutter is correctly positioned and secured each time before use. - Use only replace-
ment strings from the original manufacturer. Do not use any other cutting attachment. ● Danger of injury. Do not make any modifications to the device.
Note • Regulations may restrict the use of this device in some regions. Seek advice from your local authorities.
Safe servicing and care
⚠ WARNING • After pushing out a new string, bring the device into the normal operating position before switching it on.
- Ensure that the device is in a safe condition by regularly checking that all bolts, nuts and screws are screwed tight.
- Check that the moving parts function correctly and are not blocked, and that no parts are broken or damaged. Have a damaged device repaired before using it.
- Switch the motor off, remove the battery pack and make sure that all moving parts have stopped moving:
● Before cleaning or servicing the device.
- Before changing accessories. △CAUTION • Only use accessories and spare parts which are approved by the manufacturer. Only original accessories and original spare parts ensure that the appliance will run fault-free and safely.
ATTENTION • Clean the product with a soft, dry cloth each time after use.
Note • Service and maintenance work may only be performed by suitably qualified and specially trained personnel. We recommend sending the product to an authorised service centre for repair. • You may only perform the adjustments and repairs described in these operating instructions. Contact your authorised Customer Service department for other repairs. • Have damaged or illegible warning signs on the device replaced by the authorised Customer Service department.
Safe transport and storage
⚠ WARNING ● Switch the device off, allow it to cool down and remove the battery pack before storage or transportation.
△CAUTION ● Risk of injury and damage to the device. Secure the device against movement or falling down during transport.
ATTENTION • Remove all foreign bodies from the device before storage or transportation.
- Store the device in a dry, well ventilated location out of the reach of children. Keep the device away from corrosive substances such as garden
chemicals. • Do not store the device outdoors.
Residual risks
⚠ WARNING
- Certain residual risks remain present, even when the device is operated in the prescribed manner. The following dangers can be present when using the device:
- Vibration can cause injuries. Use the correct tools for the job, use the handles provided and restrict the working time and hazard exposure time.
- Noise can cause hearing injuries. Wear hearing protection and limit the duration of exposure.
● Injuries due to flung objects.
Risk reduction
⚠️ CAUTION
- Using the device for longer periods can cause poor circulation in the hands due to vibrations. A general period of use cannot be set, because this depends on several influencing factors:
● Personal tendency to suffer from poor circulation (fre- quently cold fingers, tingling sensation in the fingers) - Low ambient temperature. Wear warm gloves to protect your hands.
● Holding the device too tightly hindering blood circulation.
● Continuous operation is more harmful than operation interrupted by work breaks.
You should see a doctor if using the device regularly and for lengthy periods of time, and in the event of repeated occurrences of symptoms such as tingling in the fingers or cold fingers.
Intended use
DANGER
Improper use
Risk of fatal injury from incision injuries
Only use the device for its proper use.
Never use metal blades such as saw blades or brush blades.
⚠ WARNING
Flying objects
Risk of injury and damage
Maintain a minimum distance of 15 m from persons, animals and other objects.
● The device is intended for outdoor use.
- The device can be used for trimming grass along walls, fences, trees and on edgings.
- The device can also be used for mowing in places that are difficult to access with lawnmowers, e.g.ditches, slopes and clearings.
- Modifications and changes not authorised by the manufacturer are prohibited.
- Never use the device in a wet environment or in the rain.
● Never mow wet grass or other growth.
Environmental protection

The packing materials can be recycled. Please dispose of packaging in accordance with the environmental regulations.

Electrical and electronic appliances contain valuable, recyclable materials and often components such as batteries, rechargeable batteries or oil, which - if handled or disposed of incorrectly - can
pose a potential threat to human health and the environment. However, these components are required for the correct operation of the appliance. Appliances marked by this symbol are not allowed to be disposed of together with the household rubbish.
Notes on the content materials (REACH)
Current information on content materials can be found at: www.kaercher.com/REACH
Accessories and spare parts
Only use original accessories and original spare parts. They ensure that the appliance will run fault-free and safely.
Information on accessories and spare parts can be found at www.kaercher.com.
Scope of delivery
The scope of delivery for the appliance is shown on the packaging. Check the contents for completeness when unpacking. If any accessories are missing or in the event of any shipping damage, please notify your dealer.
Symbols on the device
Follow all warning notices and safety instructions. Read and comprehend all instructions before using the product.

Always wear suitable eye protection and hearing protection when working with the device.

Do not subject the device to rain or moist conditions.

Do not use saw blades or metal blades.
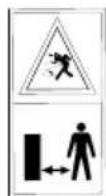
Danger due to flung objects. Keep a safe distance away.
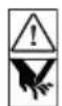
Hand injuries from sharp cutting tool.
Description of the device
The maximum amount of equipment is described in these operating instructions. Depending on the model used, there are differences in the scope of delivery (see packaging).
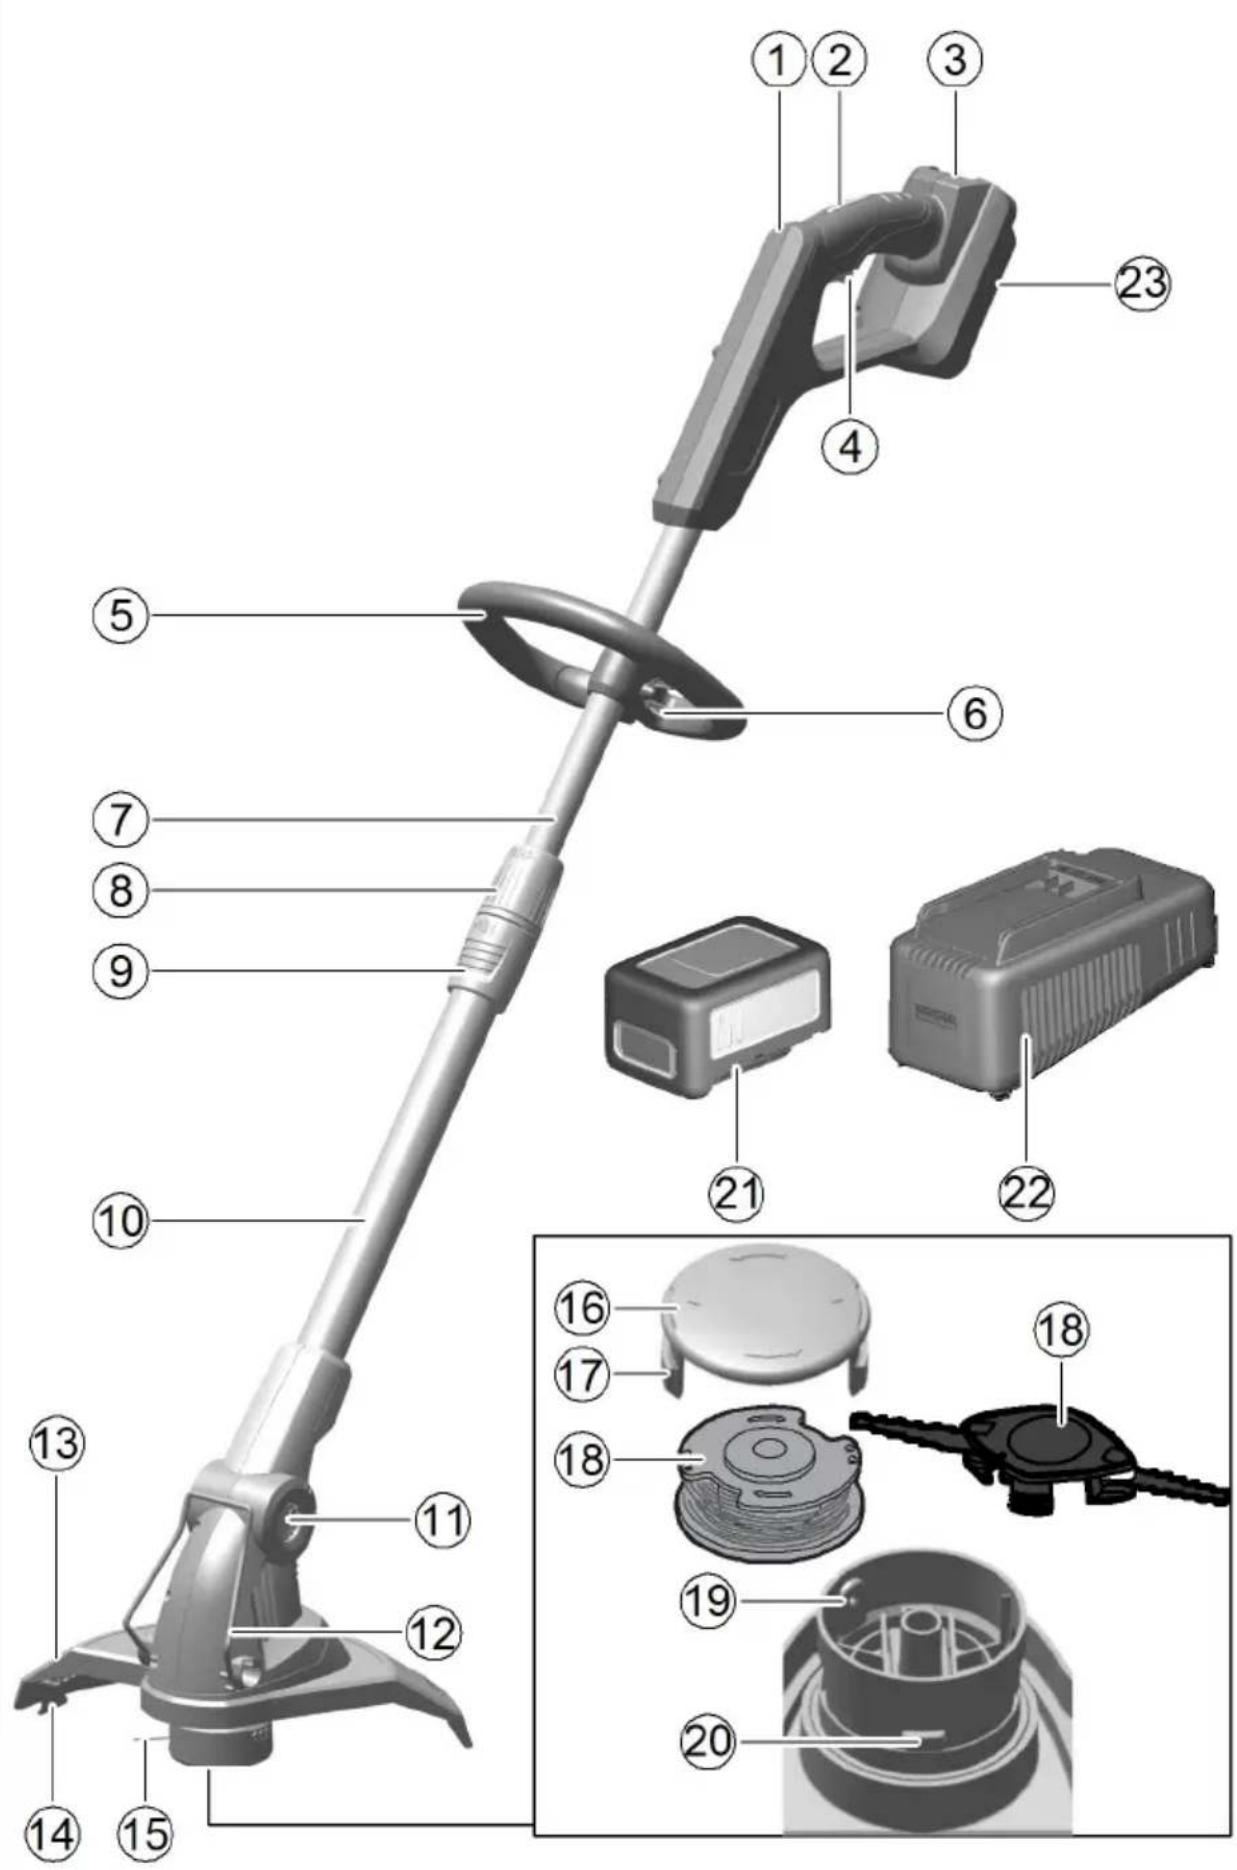
For the illustrations, refer to the graphics page Illustration A
① Rear handle
② Unlocking button
③ Battery pack release
④ Power switch
⑤ Front handle
⑥ Handle screw
⑦ Upper shaft
⑧Telescoping collar
⑨ Twist collar
⑩ Lower shaft
⑪ Pivoting head
⑫ Plant guard bracket
⑬ String guard
⑭Cutting edge
⑮ Cutting string
⑯Reel cover
17 Reel cover release
18 Cutting tool
a) String reel
b) Trimmer blade
⑲Eye
20 Button for releasing the string
21*Rechargeable battery pack
22*Charger
23Type plate
* optional
Rechargeable battery pack
The device can be operated with a Kärcher 18 V Battery Power battery pack.
Installation
Installing the string guard
⚠ WARNING
Blade on the string guard
Incision injuries
Install the string guard before using the device for the first time.
⚠ WARNING
Exposed string
Incision injuries
Never use the device without the string guard.
Illustration B
The string guard must face the operator.
- Insert the string guard into the bracket.
- Screw the string guard to the bracket.
Mounting the string reel
When assembling the components, make sure that the side recesses match.
- Assemble the sprocket.
- Mount the string guard cover.
-
Insert a tool (e.g. screwdriver) through the recesses on the side to prevent the support from rotating.
-
Mount the string reel.
Installing the front handle
- Screw the front handle to the upper shaft section at the desired height.
Illustration C
Initial startup
Adjusting shaft length
- Release the telescoping collar counterclockwise. Illustration D
- Pull out the upper shaft until the desired length is reached.
- Tighten the telescoping collar clockwise.
Adjusting the string length
- Press the button for releasing the string and pull the string out of the string reel and up to the cutting edge. If necessary, press the button several times. Illustration E
Installing the battery pack
- Push the battery pack into the mounting in the device until it audibly latches into place. Illustration F
Operation
Bringing the plant guard into the operating position
The plant guard bracket protects plants, for example, when mowing alongside flowerbeds or tree trunks.
- Before starting the mowing process, fold down the plant guard bracket. Illustration G
Working techniques
△CAUTION
Obstacles in the mowing area
Risk of injury and damage
Before starting mowing, check the work area for objects that may be flung away, e.g. wires, stones, cords or glass.
- Press the unlocking button.
Illustration H
- Press the power switch. The device starts up.
- Guide the cutting head parallel to the ground.
- Guide the device in a semi-circular movement over the cutting area.
- Mow long grass in several passes.
Extending the string length during operation
The string on the device wears during mowing and becomes shorter due to fraying and being torn off. A string that is too short will result in unsatisfactory mowing results.
Note
The string length can be extended during operation.
- Release the unlocking button and power switch. Illustration I
- Press the unlocking button and power switch. The string extends automatically and is automatically trimmed to the correct length by the cutting blade. Illustration J
Note
You must replace the string reel if the string no longer extends automatically (see Chapter Replacing the string reel).
Mowing edges
- Press the pivoting button and move the cutting head to the middle position. Illustration K
- Push the twist collar down and turn the lower shaft 180° clockwise until the twist collar snaps into place. Illustration L
- Press the unlocking button.
- Press the power switch.
- Mow the edge regions. Illustration M
Changing the cutting tool
The string reel and the trimmer blade are available as cutting tools.
- Remove the battery pack (see Chapter Removing the battery pack).
- Remove the unneeded cutting tool and fit the desired cutting tool (see Chapter Replacing the cutting tool).
Removing the battery pack
Note
During longer work breaks, remove the battery pack from the device and secure it against unauthorised use.
- Pull the battery pack unlocking button in the direction of the battery pack.
Illustration N
- Press the battery pack unlocking button to unlock the battery pack.
- Remove the battery pack from the device.
Finishing operation
- Remove the battery pack from the device (see Chapter Removing the battery pack).
- Clean the device (see Chapter Cleaning the device).
Transport
△CAUTION
Failure to observe the weight
Risk of injury and damage
Be aware of the weight of the device during storage.
- Remove the battery pack (see Chapter Removing the battery pack).
- Secure the device against slipping and tipping over when transporting in vehicles.
Storage
Clean the device before storing (see Chapter Cleaning the device).
- Release the telescoping collar and press the shaft sections together.
Illustration O
- Tighten the telescoping collar. Illustration P
- Press the pivoting button and fold the cutting head in as far as possible.
- Store the device in a dry, well ventilated location. Keep away from corrosive substances such as garden chemicals and defrosting salt. Do not store the device outdoors.
Care and service
△CAUTION
Uncontrolled startup
Incision injuries
Remove the battery from the device before all work on the device.
△CAUTION
Risk of injury from sharp blades
Wear safety goggles and protective gloves when working on the device.
Cleaning the device
- Remove any remaining cutting residue from the string guard and the cutting head.
- Clean the device components with a damp cloth if required.
- Clean the battery mount and electric contacts of dirt and foreign bodies regularly.
Replacing the cutting tool
Replacing the string reel
- Press the two unlocking buttons on the string reel.
- Remove the reel cover.
-
Pull the string reel off the support and dispose of it properly.
-
Possibly. wind a cutting string on the new string reel.
- Fit the string reel in the support.
- Fit the string reel cover in the support. Take care to ensure that the string reel cover audibly latches into place.
Replacing the string reel
- Press the string reel cover unlocking mechanism and remove the string reel cover.
Illustration Q
- Remove and dispose of the string reel.
- Feed the end of the string on the new string reel through the eye.
Illustration R
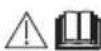
- Fit the string reel in the support.
- Fit the string reel cover in the support. Take care to ensure that the string reel cover audibly latches into place.
Illustration S
- Adjust the string length (see Chapter Initial startup).
Replacing the trimmer blade
- Press the trimmer blade unlocking mechanism and remove the trimmer blade.
- Fit the new trimming blade into the support. Note the correct position via the marking.
Illustration T
Troubleshooting guide
Malfunctions often have simple causes that you can remedy yourself using the following overview. When in doubt, or in the case of malfunctions not mentioned here, please contact your authorised Customer Service.
As the battery pack ages, even if it is looked after, its capacity reduces such that the full run time will no longer be reached when fully charged. This does not indicate a defect.
| Fault Cause Rectification | ||
| The device does not start up | Battery pack is not inserted correctly. | ● Push the battery pack into the mounting until it latches into place. |
| Battery pack is empty ● Charge the battery pack. | ||
| Battery pack is defective. ● Replace the battery pack. | ||
| The device stops during operation | String is too long and is causing the motor to overload | ● Install the string guard.The string will automatically be shortened. |
| Cutting head blocked by cutting residue | ● Remove the cutting residue. | |
| Motor is overloaded ● Mow only suitable | ● cutting material, see Chapter Intended use. | |
| Motor has overheated ● Stop working and allow the motor to cool down. | ||
| The battery has overheated | ● Stop working and allow the battery to cool down to normal battery temperature. | |
Warranty
The warranty conditions issued by our relevant sales company apply in all countries. We shall remedy possible malfunctions on your appliance within the warranty period free of cost, provided that a material or manufacturing defect is the cause. In a warranty case, please contact your dealer (with the purchase receipt) or the next authorised customer service site.
(See overleaf for the address)
Technical data
Device performance data
| Working voltage of the battery | V | 18 |
| Working width | mm | 300 |
| Cutting string, diameter | mm | 1,65 |
| Idle speed | 1/min | 7700 +/- 10% |
Determined values in acc. with EN 50636-2-91
| Sound pressure level L_pA | dB(A) 85,8 | |
| Uncertainty K_pA | dB(A) 2,5 | |
| Sound power level L_WA + K uncertainty_WA | dB(A) 96 | |
| Front handle hand-arm vibration value | m/s ^2 | 1,4 |
| Rear handle hand-arm vibration value | m/s ^2 | 0,6 |
| Uncertainty K | m/s ^2 | 1,5 |
| Dimensions and weights | ||
| Length x width x height | mm | 1329 x 312 x 327 |
| Weight (without battery pack) | kg | 2,2 |
Subject to technical modifications.
Vibration value
△WARNING
The specified vibration value was measured using a standard test procedure and may be used to compare devices.
The specified vibration value may be used in a provisional assessment of the load.
Depending on the way the device is used, the vibration emission can deviate from the specified overall value during the current use of the device.
Device with a hand-arm vibration value > 2.5 m/s ^2 (see chapter Technical Data in the operating instructions)
⚠️CAUTION • Uninterrupted use of the device for several hours can lead to numbness.
- Wear warm gloves to protect your hands. • Take regular breaks from work.
EU Declaration of Conformity
We hereby declare that the machine described below complies with the relevant basic safety and health requirements in the EU Directives, both in its basic design and construction as well as in the version placed in circulation by us. This declaration is invalidated by any changes made to the machine that are not approved by us.
Product: Lawn trimmer/edge trimmer Type: LTR 18-30 Battery 1.444-31x.0
Currently applicable EU Directives
2000/14/EC (+2005/88/EC)
2006/42/EC (+2009/127/EC)
2011/65/EU
2014/30/EU
Harmonised standards used
EN 60335-1:2012+A11:2014+A13:2017
EN 50636-2-91:2014
EN 50581:2012
EN 55014-1:2017
EN 55014-2:2015
Conformity evaluation procedure used
2000/14/EC and amended by 2005/88/EC: Annex VI
Sound power level dB(A)
Measured:93,2
Guaranteed:96
Name and address of the notified body involved
The signatories act on behalf of and with the authority of the company management.

H. Jenner
Chairman of the Board of Management

S. Reiser
Director Regulatory Affairs & Certification
Documentation supervisor: S. Reiser
Alfred Kärcher SE & Co. KG
Alfred-Kärcher-Str. 28 - 40
71364 Winnenden (Germany)
Ph.: +49 7195 14-0
Fax: +49 7195 14-2212
2006/42/CE (+2009/127/CE)
2011/65/EU
2014/30/UE

H. Jenner
Chairman of the Board of Management

S. Reiser
Director Regulatory Affairs & Certification
Responsable de la documentation : S. Reiser
Alfred Kärcher SE & Co. KG
Alfred-Kärcher-Str. 28 - 40
71364 Winnenden (Germany)
Chairman of the Board of Management

S. Reiser
Director Regulatory Affairs & Certification
71364 Winnenden (Germany)
Tel.: +49 7195 14-0
Fax: +49 7195 14-2212
Winnenden, 07/01/2018
Inhoud
Reduceren van risico's
⚠ VOORZICHTIG
Chairman of the Board of Management

S. Reiser
Director Regulatory Affairs & Certification
71364 Winnenden (Germany)
Tel.: +49 7195 14-0
Fax: +49 7195 14-2212
Winnenden, 2018/07/01
2006/42/CE (+2009/127/CE)
2011/65/UE
2014/30/UE
Chairman of the Board of Management
S. Reiser
Director Regulatory Affairs & Certification
71364 Winnenden (Germany)
Tel.: +49 7195 14-0
Fax: +49 7195 14-2212
Winnenden, 01/07/2018
Indice
2006/42/CE (+2009/127/CE)
2011/65/UE
2014/30/UE
Chairman of the Board of Management
S. Reiser
Director Regulatory Affairs & Certification
2006/42/EF (+2009/127/EF)
2011/65/EU
2014/30/EU

H. Jenner
Chairman of the Board of Management

S. Reiser
Director Regulatory Affairs & Certification
71364 Winnenden (Germany)
Tlf.: +49 7195 14-0
Fax: +49 7195 14-2212
Winnenden, 2018/07/01
Indhold
2006/42/EF (+2009/127/EF)
2011/65/EU
2014/30/EU
Anvendte harmoniserte standarder
EN 60335-1:2012+A11:2014+A13:2017
EN 50636-2-91:2014
EN 50581:2012
EN 55014-1:2017
EN 55014-2:2015
Chairman of the Board of Management

S. Reiser
Director Regulatory Affairs & Certification
71364 Winnenden (Germany)
Tlf.: +49 7195 14-0
Chairman of the Board of Management

S. Reiser
Director Regulatory Affairs & Certification
D-71364 Winnenden (Germany)
Tfn: +49 7195 14-0
Fax: +49 7195 14-2212
Winnenden, 2018/07/01
Sisältö
www.kaercher.com/REACH

H. Jenner
Chairman of the Board of Management
S. Reiser
Director Regulatory Affairs & Certification
Dokumentointivastaava: S. Reiser
Alfred Kärcher SE & Co. KG
Alfred-Kärcher-Str. 28 - 40
71364 Winnenden (Germany)
Puh.: +49 7195 14-0
Chairman of the Board of Management

S. Reiser
Director Regulatory Affairs & Certification
71364 Winnenden (Germany)
Tηλ.: +49 7195 14-0
Φαξ: +49 7195 14-2212
Winnenden, 2018/07/01
İçindekiler
2006/42/AT (+2009/127/AT)
2011/65/AT
2014/30/AB
H. Jenner
Chairman of the Board of Management

S. Reiser
Director Regulatory Affairs & Certification
Chairman of the Board of Management

S. Reiser
Director Regulatory Affairs & Certification
71364 Winnenden (Germany)
Тел.: +49 7195 14-0
Факс: +49 7195 14-2212
H. Jenner
Chairman of the Board of Management
S. Reiser
Director Regulatory Affairs & Certification
Winnenden, 2018/07/01
Obsah
2006/42/ES (+2009/127/ES)
2011/65/EU
2014/30/EU
H. Jenner
Chairman of the Board of Management

S. Reiser
Director Regulatory Affairs & Certification
Zmocněnec pro dokumentaci: S. Reiser
Alfred Kärcher SE & Co. KG
Alfred-Kärcher-Str. 28 - 40
Winnenden, 2018/07/01
Kazalo
Varnostna navodila.... 148
Namenska uporaba.... 153
Varovanje okolja.... 153
Pribor in nadomestni deli.... 153
Obseg dobave.... 153
Simboli na napravi.... 153
Opis naprave.... 153
Montaža 154
Zagon....154
Upravljanje 154
Transport.... 155
Shranjevanje 155
Nega in vzdrževanje.... 1 5 5
Pomoč pri motnjah 155
Garancija.... 156
Tehnični podatki 156
Vrednost tresljajev.... 156
Izjava EU o skladnosti.... 15 6
Varnostna navodila

Varen transport in shranjevanje
2006/42/ES (+2009/127/ES)
2011/65/EU
2014/30/EU
H. Jenner
Chairman of the Board of Management

S. Reiser
Director Regulatory Affairs & Certification
Winnenden, 1. 7. 2018
Spis treści

Chairman of the Board of Management

S. Reiser
Director Regulatory Affairs & Certification
71364 Winnenden (Germany)
Tel.: +49 7195 14-0
Directive UE relevante
2000/14/CE (+2005/88/CE)
2006/42/UE (+2009/127/UE)
2011/65/UE
2014/30/UE
Norme armonizate aplicate
EN 60335-1:2012+A11:2014+A13:2017
EN 50636-2-91:2014
EN 50581:2012
EN 55014-1:2017
EN 55014-2:2015

H. Jenner
Chairman of the Board of Management
S. Reiser
Director Regulatory Affairs & Certification
71364 Winnenden (Germania)
Tel.: +49 7195 14-0
Fax: +49 7195 14-2212
Winnenden, 2018/07/01
Obsah
2006/42/ES (+2009/127/ES)
2011/65/EÚ
2014/30/EÚ
Chairman of the Board of Management

S. Reiser
Director Regulatory Affairs & Certification
71364 Winnenden (Germany)
Tel.: +49 7195 14-0
Fax: +49 7195 14-2212
Winnenden, 01.07.2018
Sadržaj
Sigurnosni napuci.... 184
2006/42/EZ (+2009/127/EZ)
2011/65/EU
2014/30/EU
Primijenjene uskladene norme
EN 60335-1:2012+A11:2014+A13:2017
EN 50636-2-91:2014
EN 50581:2012
EN 55014-1:2017
EN 55014-2:2015

H. Jenner
Chairman of the Board of Management

S. Reiser
Director Regulatory Affairs & Certification
Opunomoćenik za dokumentaciju: S. Reiser
Alfred Kärcher SE & Co. KG
Alfred-Kärcher-Str. 28 - 40
71364 Winnenden (Njemačka)
Tel.: +49 7195 14-0
Telefaks: +49 7195 14-2212
Winnenden, 1.7.2018.
Sadržaj
Sigurnosne napomene 192
Namenska upotreba 197
Zaštita životne sredine 197
Pribor i rezervni delovi.... 197
Obim isporuke 197
2006/42/EZ (+2009/127/EZ)
2011/65/EU
2014/30/EU
Primenjene harmonizovane norme
EN 60335-1:2012+A11:2014+A13:2017
EN 50636-2-91:2014
EN 50581:2012
EN 55014-1:2017
EN 55014-2:2015
Chairman of the Board of Management

S. Reiser
Director Regulatory Affairs & Certification
Lice ovlašćeno za dokumentaciju: S. Reiser
Alfred Kärcher SE & Co. KG
Alfred-Kärcher-Str. 28 - 40
71364 Winnenden (Germany)
Tel.: +49 7195 14-0
Winnenden, 2018/07/01
Съдържание
Указания за безопасност.... 201
Употреба по предназначение.... 207
Chairman of the Board of Management
S. Reiser
Director Regulatory Affairs & Certification
71364 Winnenden (Germany)
Тел.: +49 7195 14-0
Факс: +49 7195 14-2212
Виненден, 2018/07/01
Sisukord
Ohutusjuhised 211
2006/42/EÜ (+2009/127/EÜ)
2011/65/EL
2014/30/EL
Chairman of the Board of Management
S. Reiser
Director Regulatory Affairs & Certification
71364 Winnenden (Germany)
Tel: +49 7195 14-0
Winnenden, 2018/07/01
Saturs
Chairman of the Board of Management

S. Reiser
Director Regulatory Affairs & Certification
Pilnvarotais sagatavot dokumentāciju: S. Reizers (S. Reiser)
Alfred Kärcher SE & Co. KG
Alfred-Kärcher-Str. 28 - 40
Chairman of the Board of Management
S. Reiser
Director Regulatory Affairs & Certification

H. Jenner
Chairman of the Board of Management

S. Reiser
Director Regulatory Affairs & Certification
71364 Winnenden (Germany)
Тел.: +49 7195 14-0
Факс: +49 7195 14-2212

H. Jenner
Chairman of the Board of Management
S. Reiser
Director Regulatory Affairs & Certification
文書の全権委員:S. Reiser
Alfred Kärcher SE & Co. KG
Alfred-Kärcher-Str. 28 - 40
71364 Winnenden (Germany)
電話番号:+49 7195 14-0

H. Jenner
Chairman of the Board of Management

S. Reiser
Director Regulatory Affairs & Certification
Winnenden, 2018/07/01
5 retirement because Highway في الحامل.
- retirement because Highway في الحامل.
- retirement becauseخط.
www.kaercher.com/REACH
natural_image
Black silhouette of a hand giving a thumbs-up gesture (no text or symbols)THANK YOU!
MERCI! DANKE! iGRACIAS!

Register your product and benefit from many advantages.
www.kaercher.com/welcome


Rate your product and tell us your opinion.
natural_image
Icon showing a gear and wrench inside a square frame (no text or symbols)www.kaercher.com/dealersearch
Alfred Kärcher SE & Co. KG
Alfred-Kärcher-Str. 28-40
71364 Winnenden (Germany)
Tel.: +49 7195 14-0
Fax: +49 7195 14-2212