
Meat Machine - Grill plate Klarstein - Free user manual and instructions
Find the device manual for free Meat Machine Klarstein in PDF.
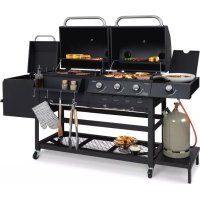
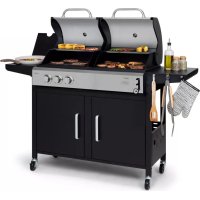
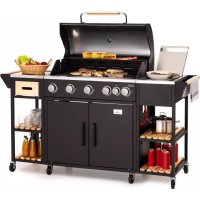
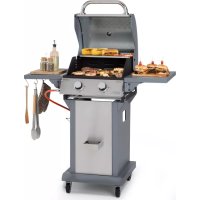
| Product type | Charcoal barbecue |
| Brand | Klarstein |
| Model | Meat Machine |
| Use | Outdoor only |
| Main material | Steel |
| Cooking grates | 2 grates + 1 warming rack |
| Thermometer | Integrated in lid |
| Wheels | 2 wheels for mobility |
| Side tables | 2 bamboo shelves |
| Ash drawer | Yes |
| Chimney | Adjustable |
| Legs | 4 legs with casters |
| Height-adjustable handle | Yes |
| Integrated bottle opener | Yes |
| Fuel | Charcoal |
| Maintenance | Clean after use, store dry |
| Safety | Do not use indoors, risk of CO poisoning; do not use alcohol or gasoline to ignite |
| Spare parts available | Yes, detailed list in manual |
| Manufacturer | Chal-Tec GmbH, Berlin, Germany |
Frequently Asked Questions - Meat Machine Klarstein
User questions about Meat Machine Klarstein
0 question about this device. Answer the ones you know or ask your own.
Ask a new question about this device
Download the instructions for your Grill plate in PDF format for free! Find your manual Meat Machine - Klarstein and take your electronic device back in hand. On this page are published all the documents necessary for the use of your device. Meat Machine by Klarstein.
USER MANUAL Meat Machine Klarstein
Berlin Brands Group UK Limited
PO Box 42
272 Kensington High Street
London, W8 6ND
United Kingdom
SICHERHEITSHINWEISE

WARNING
Congratulations on purchasing this device. Please read the following instructions carefully and follow them to prevent possible damages. We assume no liability for damage caused by disregard of the instructions and improper use. Scan the QR code to get access to the latest user manual and more product information.

CONTENTS
Safety Instructions 18
Parts 20
Assembly 23
MANUFACTURER & IMPORTER (UK)
Manufacturer:
Chal-Tec GmbH, Wallstrasse 16, 10179 Berlin, Germany.
Importer for Great Britain:
Berlin Brands Group UK Limited
PO Box 42
272 Kensington High Street
London, W8 6ND
United Kingdom
SAFETY INSTRUCTIONS

WARNING
Risk of suffocation! Do not use the barbecue in a confined and/or habitable space e.g. houses, tents, caravans, motor homes, boats. Danger of carbon monoxide poisoning fatality.
- Always place the grill on a firm, level and heat-resistant surface, away from fences, overhanging branches and other flammable materials.
- The grill must always be supervised by a knowledgeable adult.
- The charcoal grill is only intended for outdoor use. Do not use indoors!
- Do not use spirit or petrol for lighting or relighting! Use only firelighters complying to EN 1860-3! Never use denatured alcohol, paraffin oil, methyl alcohol, gasoline or similar solvents to light the grill. Use a suitable liquid lighter for lighting and follow the manufacturer's instructions. Stop adding a liquid lighter when the charcoal is burning.
- Most metal parts get hot. Wear protective gloves when touching the grill or turning the food. The grill must not be moved during operation.
- If fat drips on the charcoal, it will fl are up. Have a finely adjusted water sprayer ready to put out such fl ames and prevent the food from burning.
- When the grilling is finished, extinguish the charcoal with a fine spray or cover the charcoal with sand.
This grill will become very hot do not move it during operation. - Make sure the grill is completely cool before moving it or emptying the ashes.
- Extend the life of the metal parts by not leaving the grill unprotected outdoors. Ideally, the grill should be stored in a garage or garden shed when not in use.
- Do not place the food on the grill until the fuel is covered with a coating of ash!
- Keep children and animals away from the device.
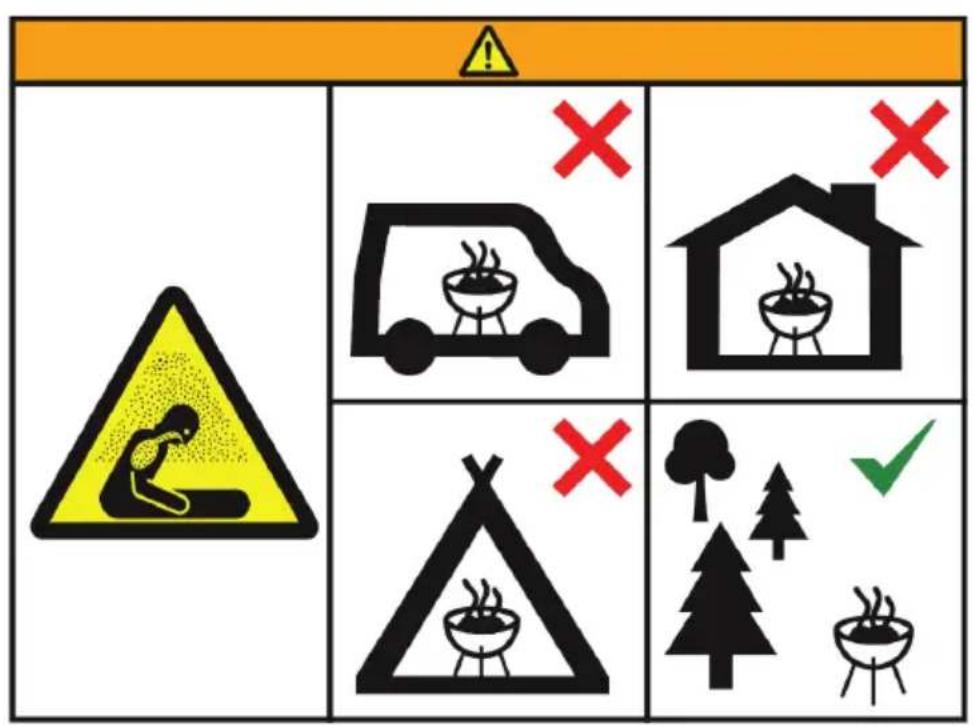
CAUTION!
DO NOT USE ALCOHOL OR GASOLINE TO LIGHT OR RE-LIGHT!
PARTS
| No. | Description Picture Pc. | ||
| 1 | Side wall | 2 | |
| 2 | Front wall | 1 | |
| 3 | Back wall | 1 | |
| 4 | Leg-A | 2 | |
| 4.1 Leg A1 | 3 | ||
| 5 | Leg-B | 2 | |
| 5.1 Leg-B1 | 1 | ||
| 6 | Lower frame | 1 | |
| 7 | Frame-A | 1 | |
| 8 | Wheels | 2 | |
| 9 | Axis | 1 | |
| 10 | Charcoal board | 1 | |
| 11 | Hinge-A | 2 | |
| 12 | Hinge-B | 2 | |
| 13 | Cover | 1 | |
| 14 Lid | handle | 1 | |
| 15 Washer-A | 2 | ||
| 16 Chimney | 1 | ||
| 17 Fire bowl handle | 1 | ||
| 18 Washer-B | 1 | ||
| 19 Thermometer | 1 | ||
| 20 Frame-B | 1 | ||
| 21 Side tables 2 | |||
| 22 Ash drawer | 1 | ||
| 23 Heat-retaining grill | 1 | ||
| 24 Barbecue grill | 2 | ||
| 25 Height-adjustable handle | 1 | ||
| 26 Ventilation | 2 | ||
| 27 Bamboo table | 2 | ||
| 28 Opener | 1 |
Hardware
| No. | Description Picture Pc. | ||
| A | Screw M6-12 | 26 | |
| B | Nut M6 | 19 | |
| C | Screw M6-35 | 8 | |
| D | screw M6-55 | 4 | |
| E | Safety clamps | 4 | |
| F | Locking pins | 2 | |
| G | Screw M5-16 | 4 | |
| H | Washer-H | 2 |
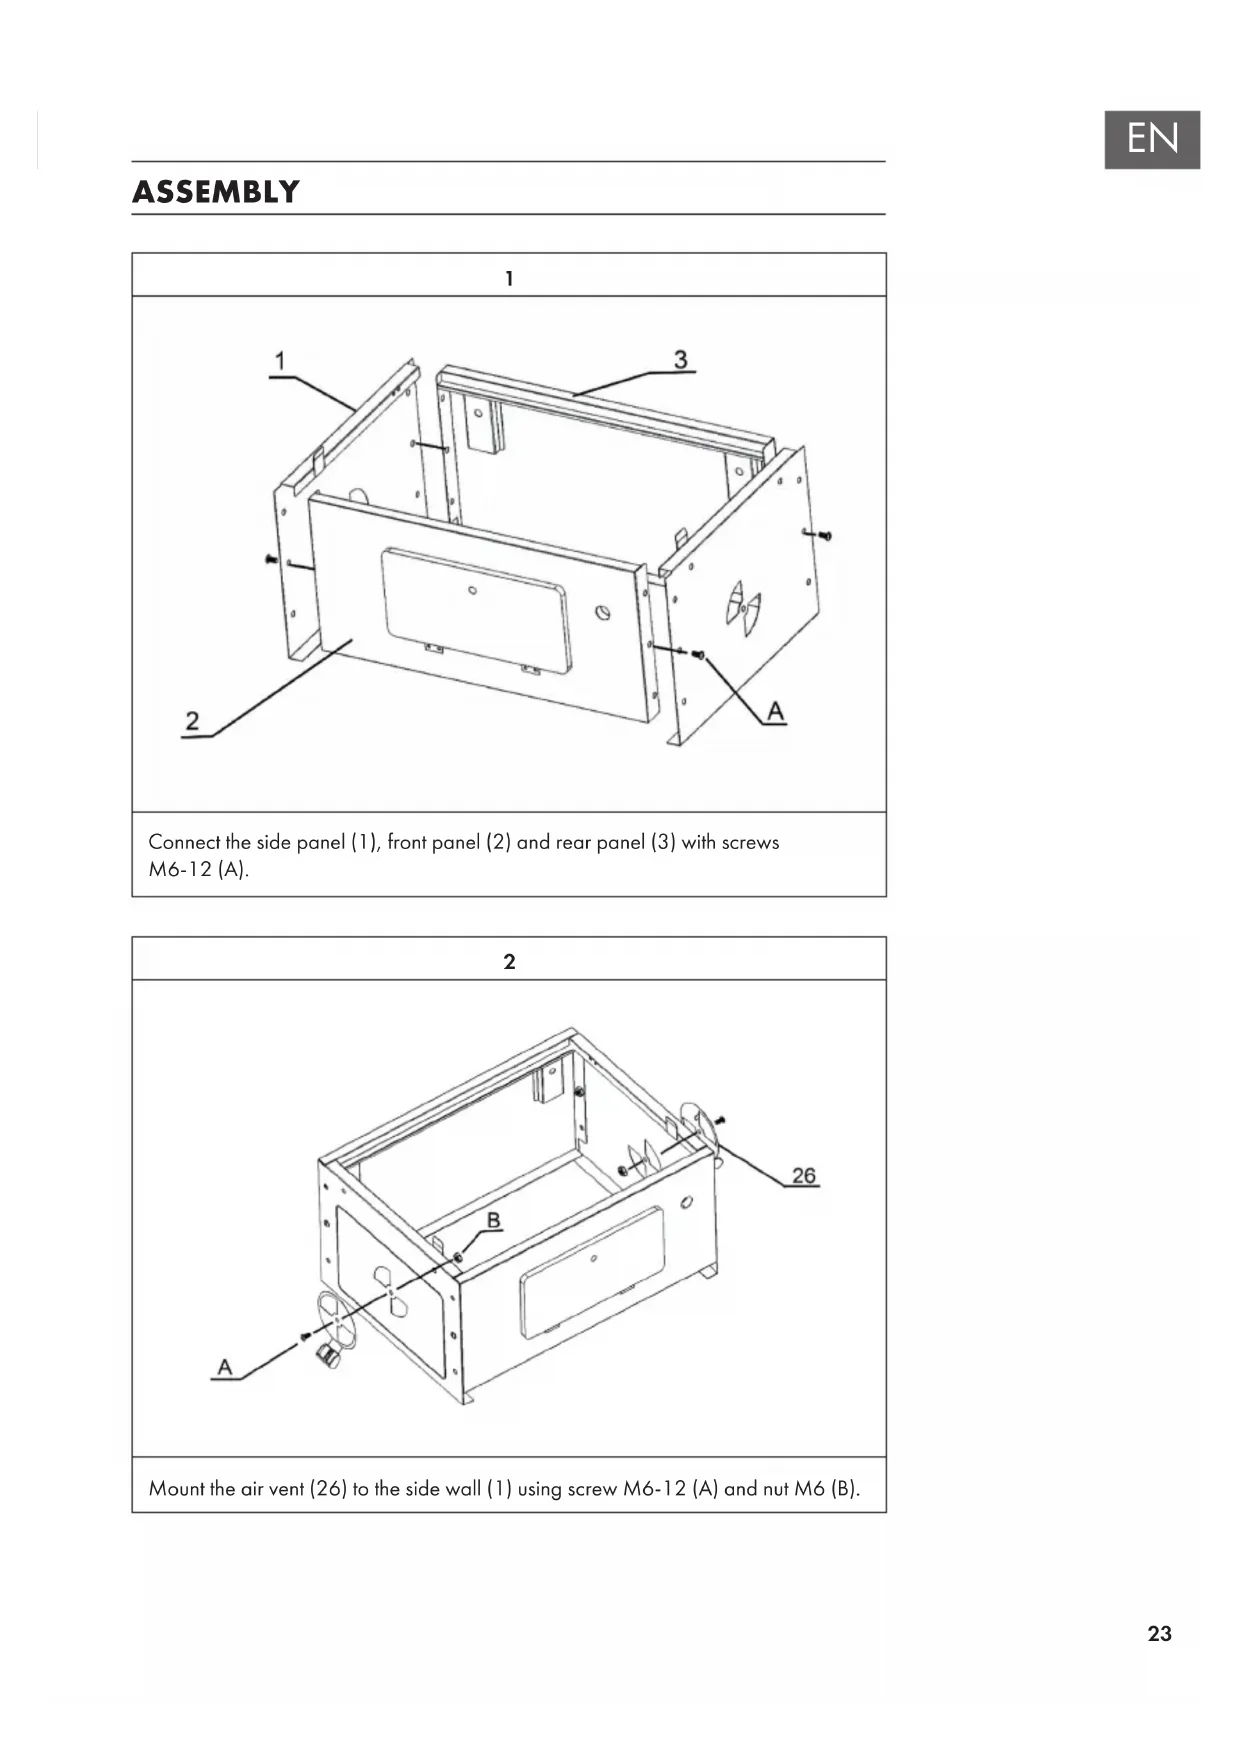
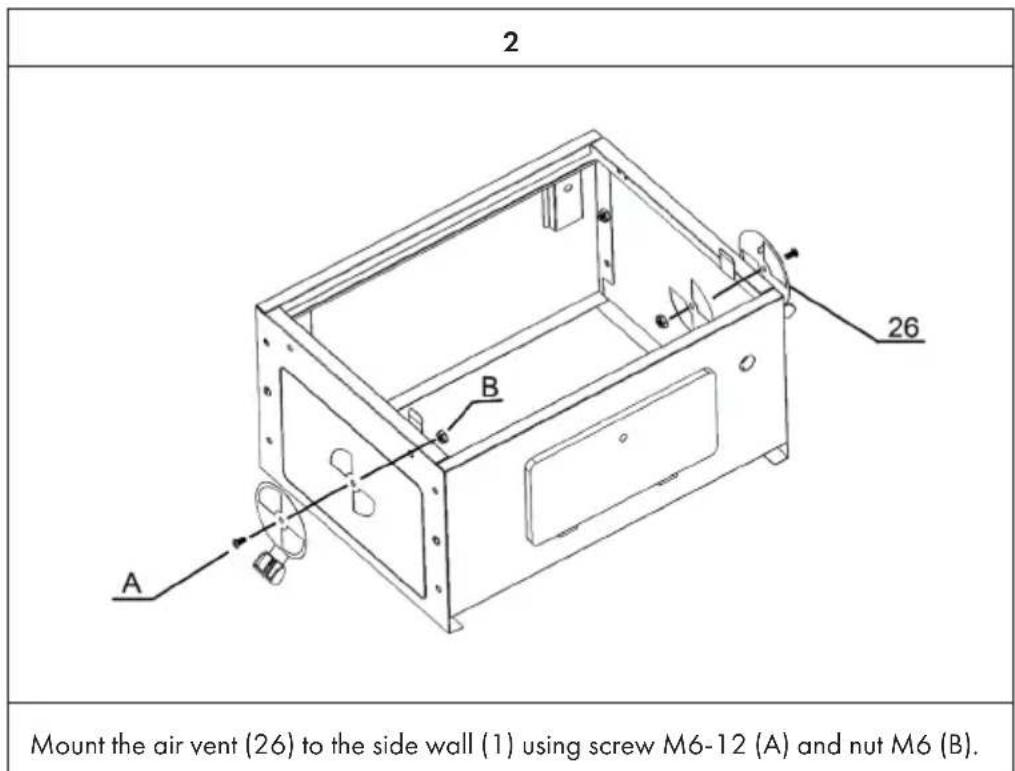
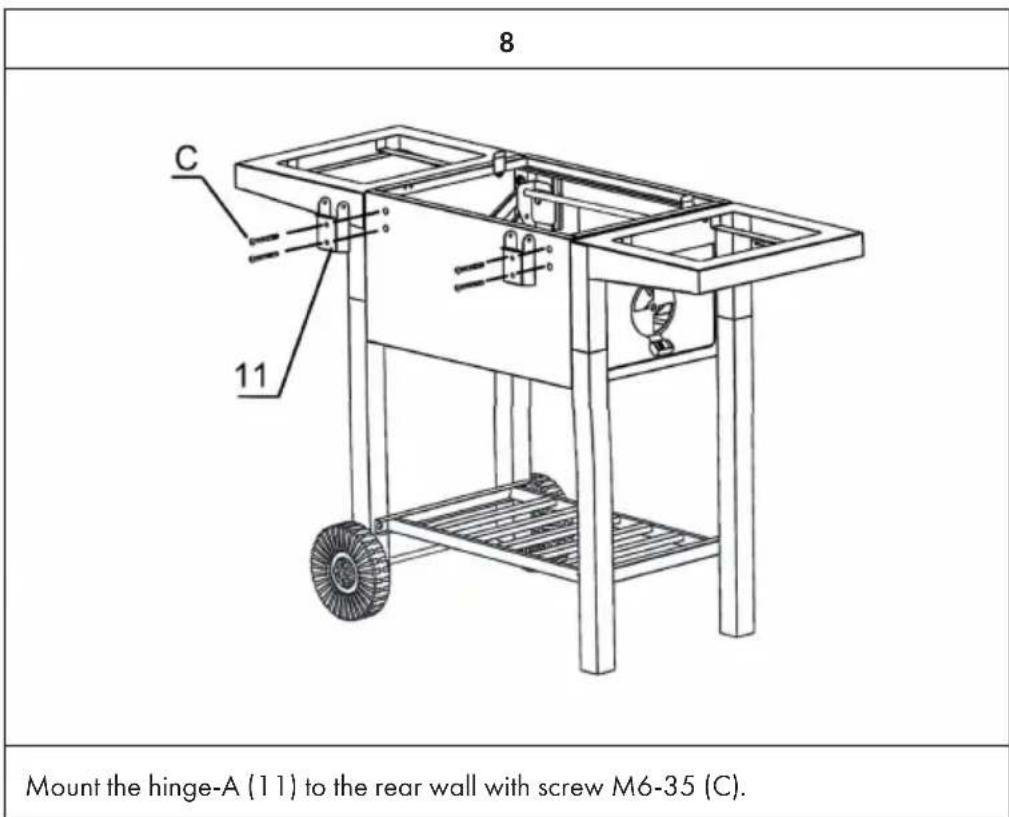
ASSEMBLY
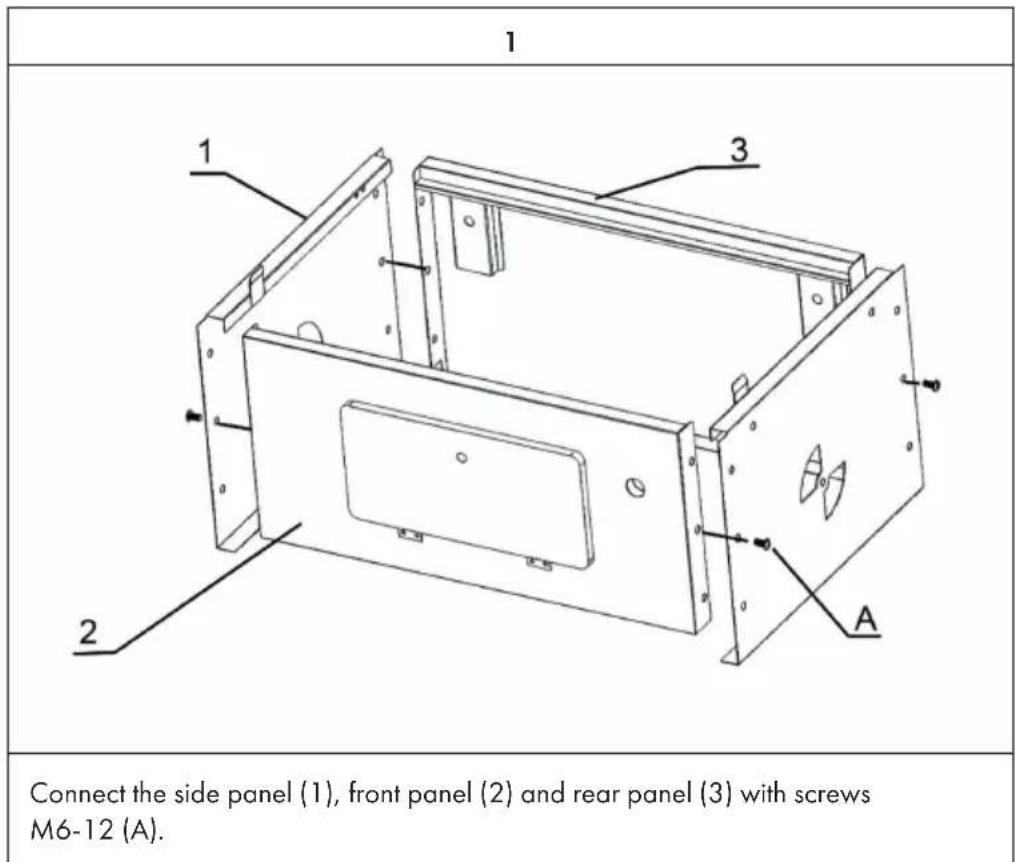
3
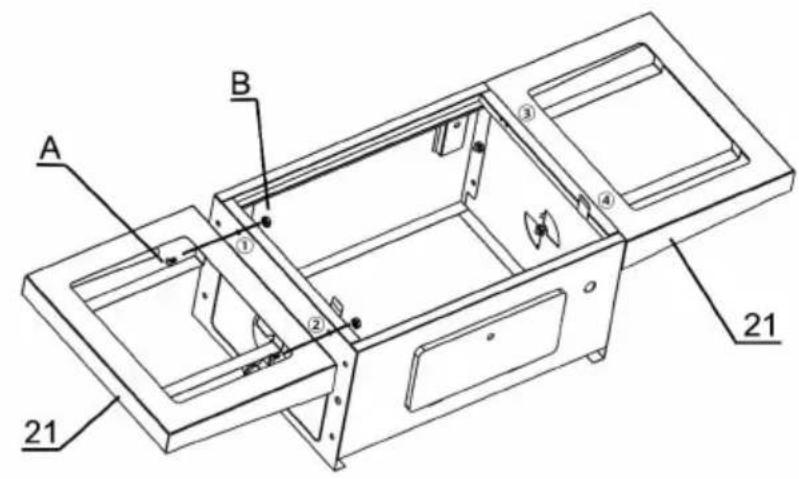
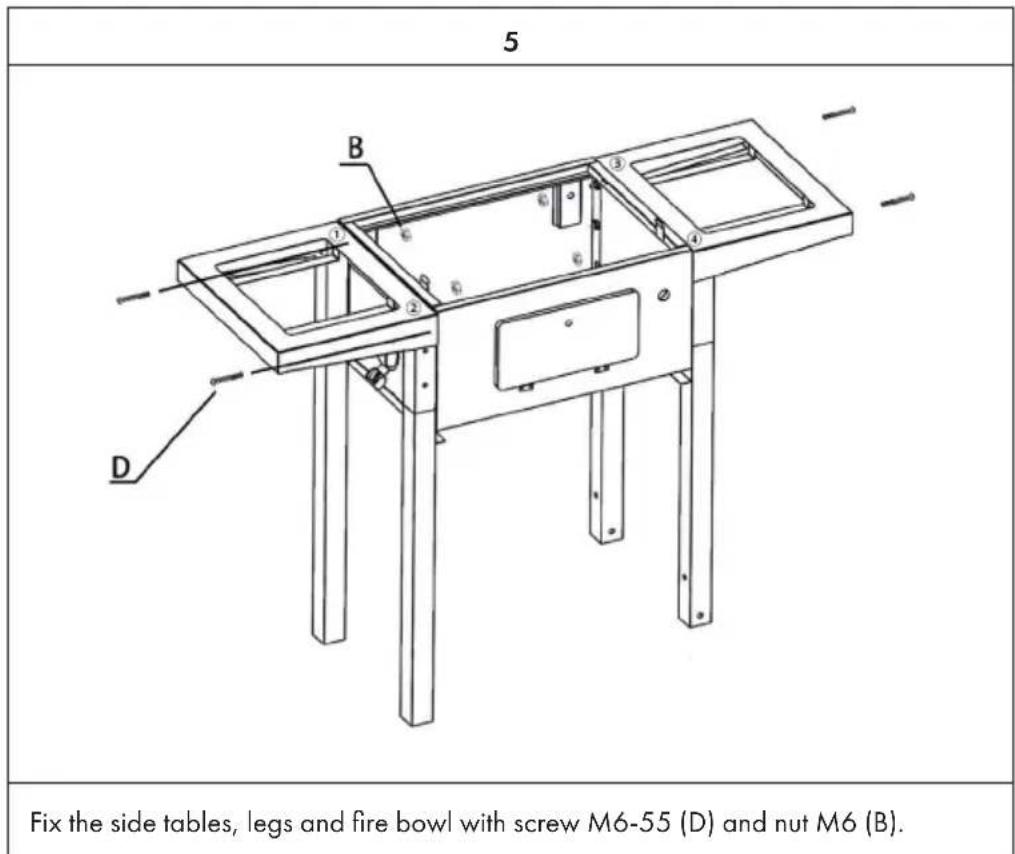
Fix the 2 side tables (21) to the side wall (1) with M6-12 (A) screw and M6 nut.
4

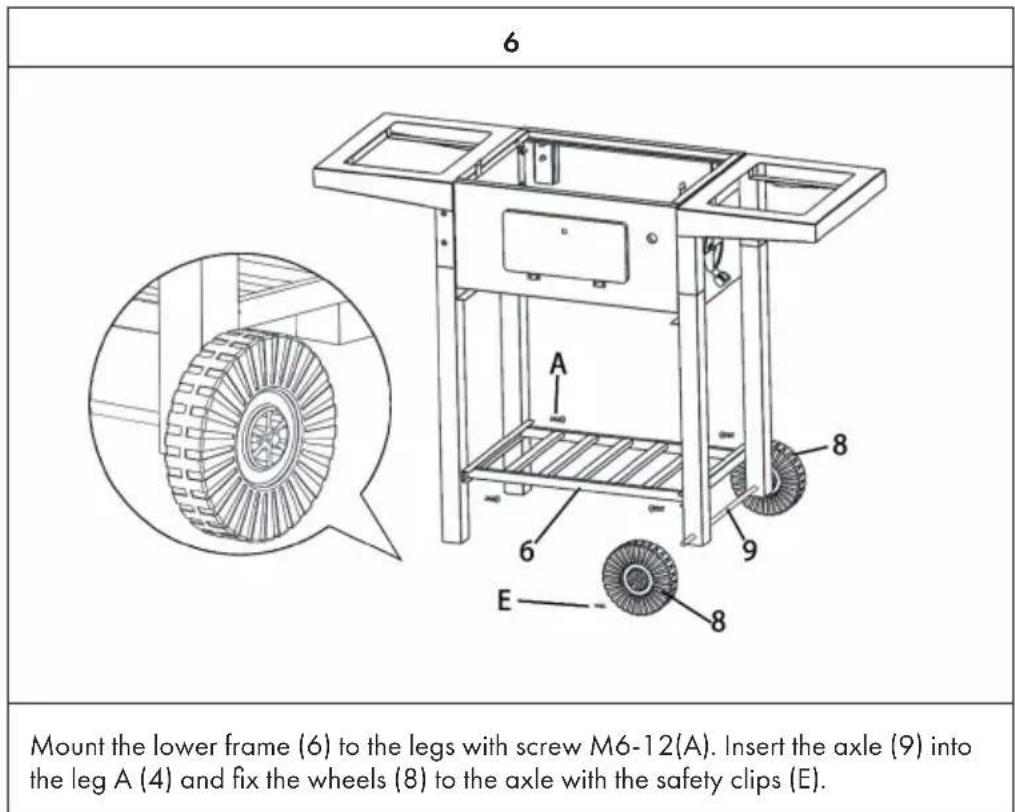
First connect leg A1 (4.1) and leg B1 (5.1) with leg B (5). Then connect the leg A1 (4.1) to the leg A (4) and fix the 4 legs to the fire bowl with screw M6-12 (A).
EN
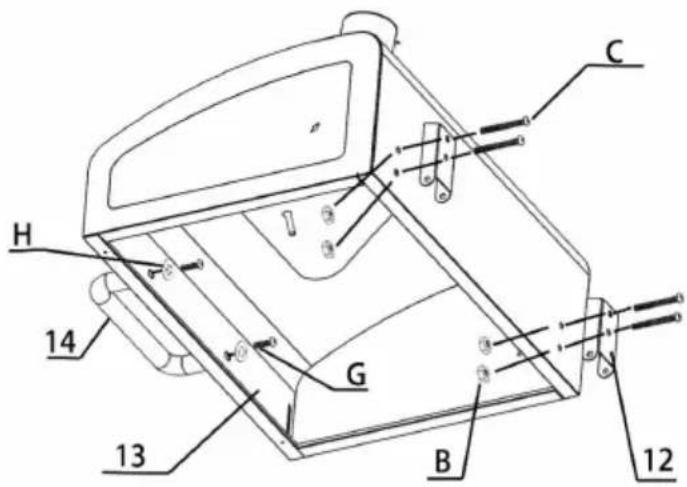
9
Fit the hinge-B (12) to the cover (13) with the M6-35 bolt (C) and M6 nut (B). Fix the lid handle (14) to the lid (13) with washer-A (15), screw M6-35 (C) and nut M6 (B).
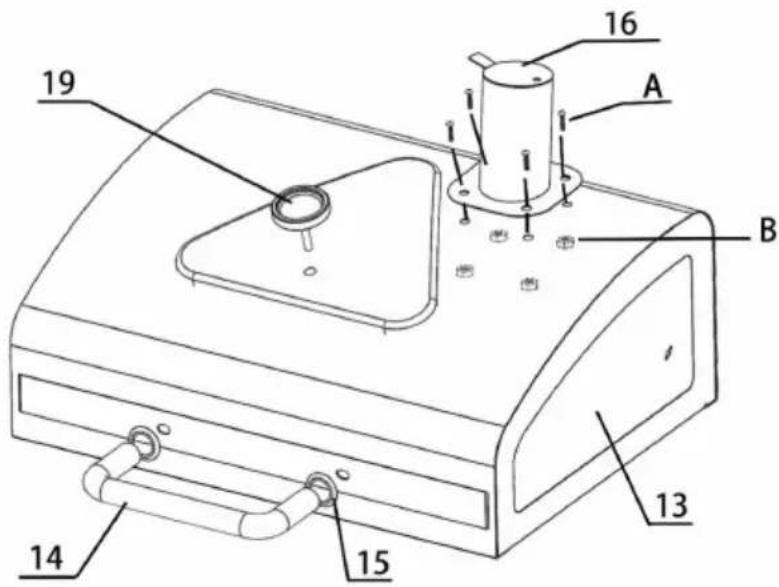
10
Fasten the chimney (16) to the cover (13) with screw M6-12 (A) and nut M6 (B). Then fix the thermometer (19) to the cover (13).
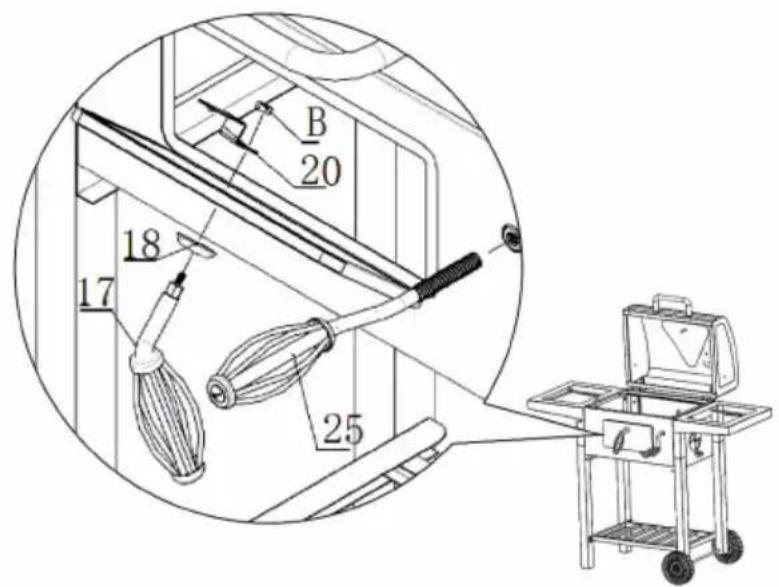
11
Push the handle of the fire bowl (17) through the washer-B (18) and the frame (20) and secure it with an M6 nut (B). Then attach the adjustment handle (25) to the fire bowl.
12
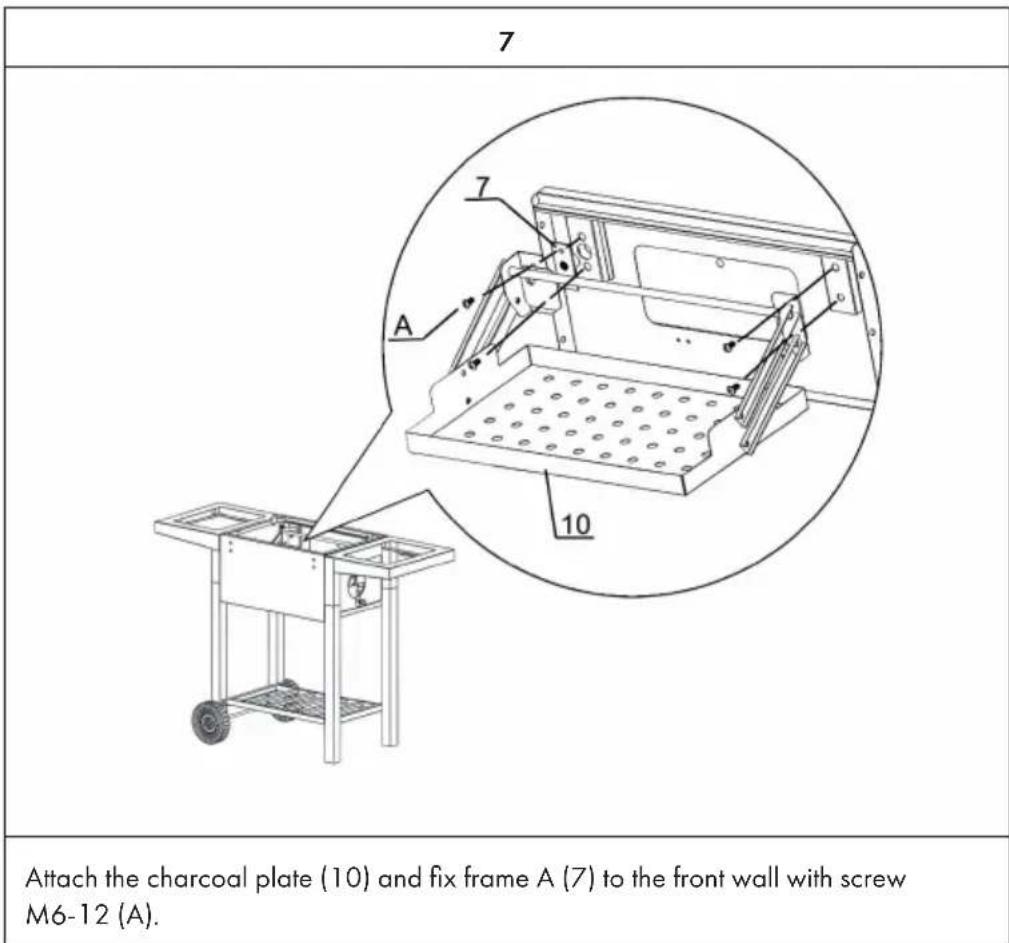
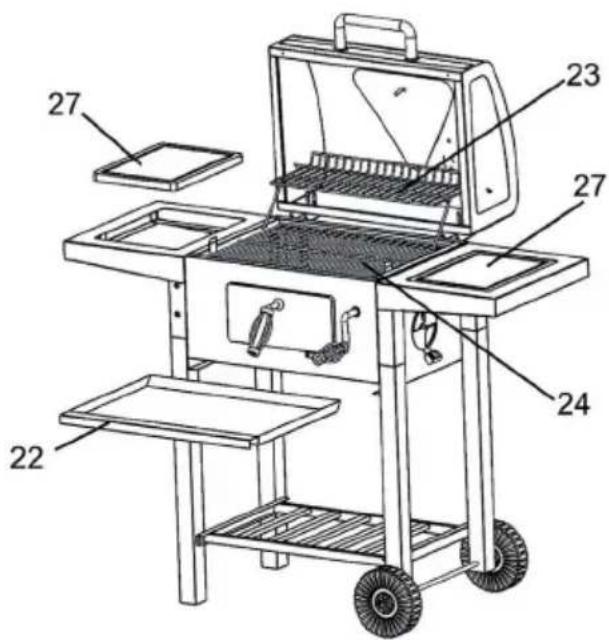
Place 2 bamboo tables (27) on the side tables. Place the ash drawer (22) in the fire bowl. Then open the lid and place the 2 grills (23) and the warming grill (24) in the fire bowl.
13
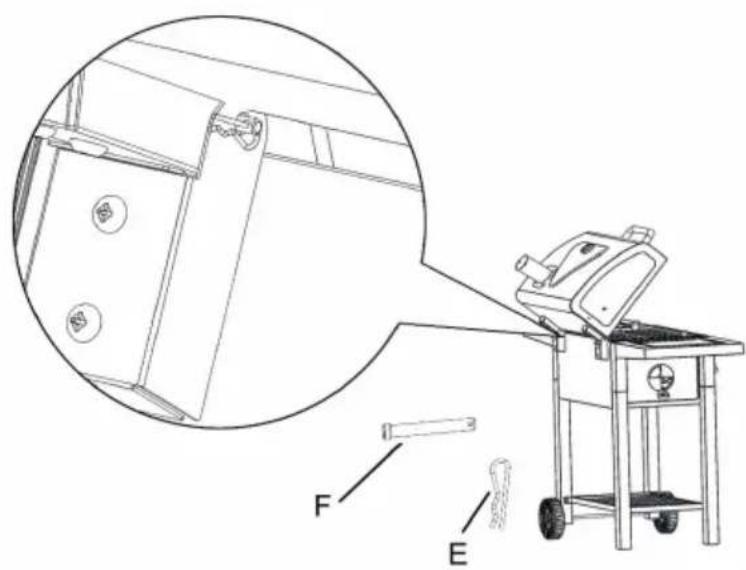
Secure the fire bowl and lid with safety pins (F) and safety clips (E) as shown in the drawings.
14
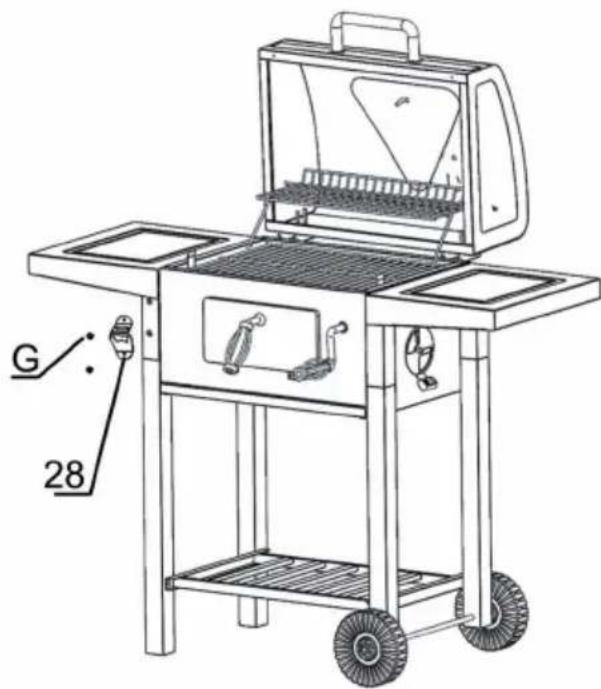
Fix the bottle opener (28) and the legs with screw M5-16 (G).
Estimado cliente:
Berlin Brands Group UK Limited
PO Box 42
272 Kensington High Street
London, W8 6ND
United Kingdom
Chere cliente, cher client,
Berlin Brands Group UK Limited
PO Box 42
272 Kensington High Street
London, W8 6ND
United Kingdom
CONSIGNES DE SECURITE

MISE EN GARDE
PRODUTTORE IMPORTATORE (UK)
Brand : Klarstein
Model : Meat Machine
Category : Grill plate