Aberdeen - Grill plate Klarstein - Free user manual and instructions
Find the device manual for free Aberdeen Klarstein in PDF.
| Brand | Klarstein |
| Model | Aberdeen |
| Product type | Combined gas barbecue with side burner |
| Total heat output (Hs) | 13.5 kW (982 g/h) |
| Main burners | 3 x 3.6 kW |
| Side burner | 1 x 2.7 kW |
| Gas category | I3B/P(30) / I3+(28-30/37) |
| Gas type | Propane, Butane or mixture |
| Gas pressure | 28-30 mbar or 28-30/37 mbar (depending on country) |
| Injector diameter (main) | 0.91 mm |
| Injector diameter (side) | 0.76 mm |
| Number of pages in manual | 108 |
| Use | Outdoor only |
| Safety precautions | Leak test before each use, lid open when lighting, keep children away |
| Maintenance | Regular cleaning of grates and burners, monthly hose check |
| Hose replacement | Every 2 years |
| Reparability | Do not modify the appliance, contact a certified technician |
| Article number | 10045150 |
Frequently Asked Questions - Aberdeen Klarstein
User questions about Aberdeen Klarstein
0 question about this device. Answer the ones you know or ask your own.
Ask a new question about this device
Download the instructions for your Grill plate in PDF format for free! Find your manual Aberdeen - Klarstein and take your electronic device back in hand. On this page are published all the documents necessary for the use of your device. Aberdeen by Klarstein.
USER MANUAL Aberdeen Klarstein
text_image
QR code image containing encoded data, no visible human-readable textOBSAH
natural_image
Line drawing of a portable electric grill with wheels and control panel (no text or symbols)
text_image
Exploded view diagram of a household appliance with numbered parts and labeled partsZOZNAM DIELOV

text_image
OFF HIGH LOWTipy na úsporu energie
natural_image
Symbol of a trash bin crossed with a diagonal line, no text or numbers presentBerlin Brands Group UK Ltd
P.O. Box 42
272 Kensington High Street
Londýn, W8 6ND
Spojené královstvo
Dear Customer,
Congratulations on purchasing this device. Please read the following instructions carefully and follow them to prevent possible damages. We assume no liability for damage caused by disregard of the instructions and improper use. Scan the QR code to get access to the latest user manual and more product information.

text_image
QR code image containing encoded data, no visible human-readable textCONTENTS
Safety Instructions 23
Gas Connection 26
Leak Test 27
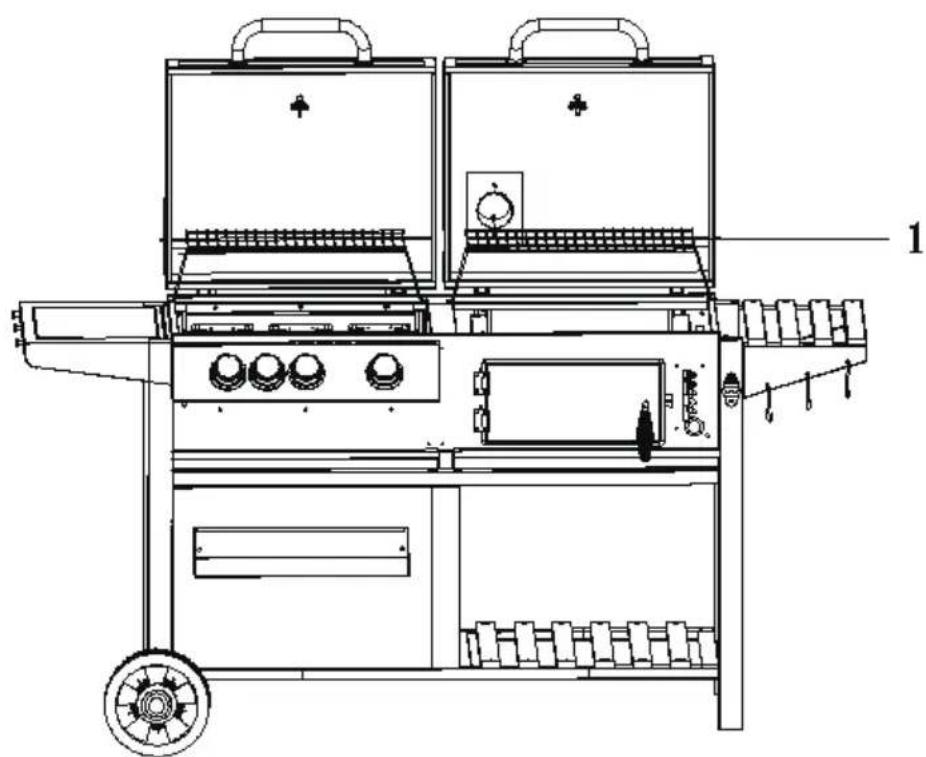
Device Overview 28
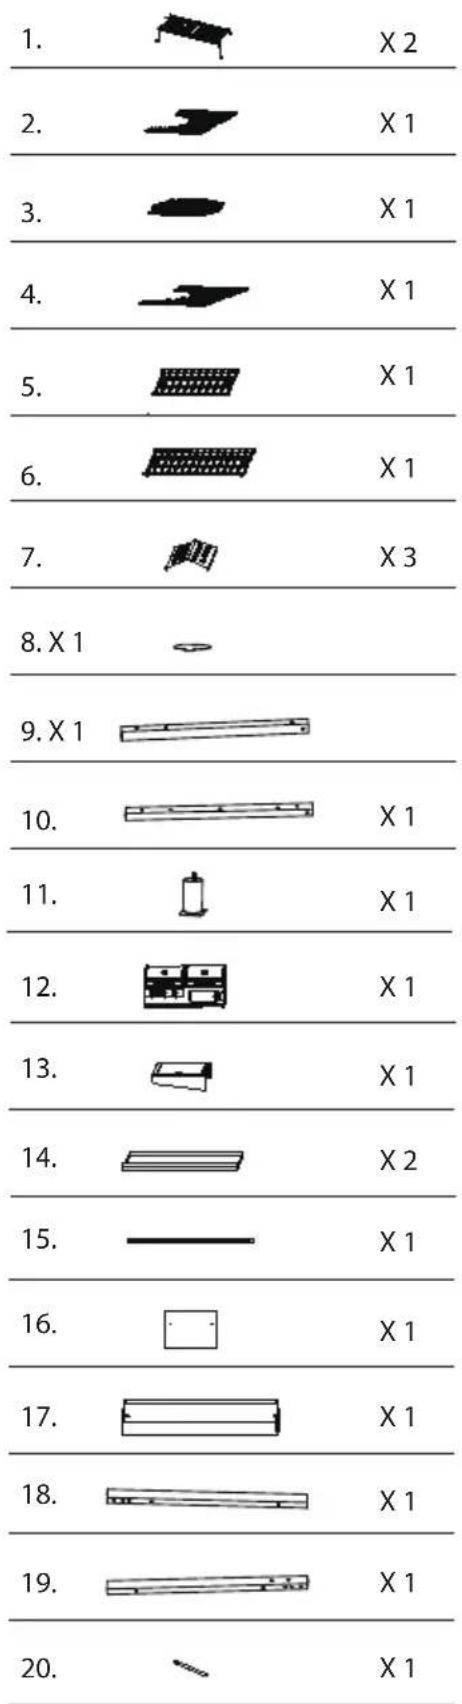
Scope of Delivery 29
Parts List 30
Assembly 31
Installation 32
Operation 34
Storage 35
Cleaning and Maintenance 36
Troubleshooting 37
Disposal Considerations 38
Manufacturer & Importer (UK) 38
Assembly Instructions 93
TECHNICAL DATA
| Article number 10045150 | ||
| Total nominal heat inputs (Hs) | 13.5 kW (982 g/h) | |
| - per main burner (number) 3.6 | kW (3) | |
| - per side burner (number) 2.7 | kW (1) | |
| Gas category I3B/P(30) I3+(28~30/37) | ||
| Countries LU, NL, DK, FI, SE, CY, | CZ, EE, LT, LV, MT, SK, SI, BG, IS, NO, HR, RO, IT, HU, BE, GB, FR | BE, FR, IT, LU, LV, IE, GB, GR, PT, ES, CY, CZ, LT, SK, CH, SI, TR |
| Gas Propane, butane | and mixtures | Butane/propane |
| Gas pressure 28~30 mbar 28~30 | /37 mbar | |

KLARSTEIN
Product name:
Aberdeen Combo Grill
Article number: 10045150
Pin code: 2531CS-0077
Chal-Tec GmbH, Wallstr. 16, 10179 Berlin, Germany
WWW.KLARSTEIN.DE
| Country ofdestination | Appliance category Gas type andgas pressure | Mainburner | Sideburner | Totalnominalheatinputs(Hs) | |
| Injectorsize ∅ | Injectorsize ∅ | ||||
| LU, NL, DK, FI, SE,CY, CZ, EE, LT, LV,MT, SK, SI, BG, IS,NO, HR, RO, IT,HU, BE, GB, FR | I3B/P(30)  | Propane,butaneand mixtures:28~30 mbar | 0.91 mm 0.76 mm 13.5 kW | W(982 g/h) | |
| BE, FR, IT, LU, LV,IE, GB, GR, PT, ES,CY, CZ, LT, SK, CH,SI, TR | I3+(28~30/37)  | Butane/propane:28~30/37 mbar | 0.91 mm 0.76 mm | ||
| PL I3B/P(37) |  | Propane,butaneand mixtures:37 mbar | 0.91 mm 0.76 mm | ||
| AT, DE, CH, SK I3B/P(50) | Propane,butaneand mixtures:50 mbar | 0.80 mm 0.66 mm | |||
WARNING: Accessible parts can be very hot.Keep small children away.Read the instructions before using the device.Only use the device outdoors.Do not place the gas bottle inside the gas grill.  2531-22 2531-22 | |||||
SAFETY INSTRUCTIONS
- Read the operating instructions carefully before using the device.
- Keep these operating instructions for future reference.
- The grill is only suitable for outdoor use. Do not operate the grill inside buildings, garages or other enclosed areas.
- Children must not use the appliance! Mentally, sensory and physically impaired persons may only use the device if they have been informed in detail about the functions and safety precautions by a supervisor responsible for them beforehand and understand the associated risks.
CAUTION
Risk of burns! Accessible parts of the device can be very hot during operation and after use. Use oven gloves to protect against burns and make sure that small children and pets are at a safe distance from the grill.
- Keep the device away from fl ammable materials during use.
- Do not move the device during use.
• After use, turn off the gas supply at the gas cylinder. - Do not make any changes to the device.
- Do not place the gas cylinder under or near the device.
- Store the gas cylinder in accordance with the applicable regulations.
- Use only propane and butane gas specified in the owner's manual.
- Do not use fl ammable liquids to light or relight the grill.
- Follow the assembly instructions in this manual. Do not alter the structure or change any individual parts. Failure to follow these instructions may result in risk during use.
- In the event of a gas leak, immediately shut off the gas supply to the gas cylinder, extinguish any open flames and open the lid. Check the hoses for damage and/or a bad connection. If the leak persists, contact an authorised gas dealer. Do not use an open flame to check for gas leaks.
- Before switching on the device, always carry out a leak test as described in this manual. Check the hose, regulator, valve, and all other gas lines for punctures. Do not use the device if you find a gas leak.
- Should rain, snow, hail, sleet or any other form of precipitation get inside the grill while cooking with oil or shortening, cover the cooking vessel immediately and turn off the burner and gas supply. Do not try to move the appliance or the cooking bowl.
- Do not attempt to disconnect gas fittings and connections while using the appliance.
- When grilling, the appliance must be on a level, stable, non-combustible surface and a safe distance from combustible materials.
- Never leave your grill unattended when it is in use. Always use the grill with great care.
-
This appliance should never be used as a heater.
-
This device should be cleaned regularly. When cleaning, make sure that no components such as burners or valves are damaged.
- Check the fl exible hose at least once a month and every time you change the gas cylinder. If you find any signs of cracking or damage, replace with a new hose of similar length and quality.
- When changing the gas bottle, make sure that there are no sources of ignition nearby, e. g. fi re, cigarettes, open fl ames, etc. Make sure the device is turned off.
- It is recommended that this appliance be serviced by an approved technician at least once a year. Do not attempt to service this device yourself.
- Place the device in a ventilated area before use.
- The fl exible hose must be changed every 2 years. It is necessary to change the hose when national conditions require it. The fl exible hose should conform to the relevant standard and local regulations.
- The device or device components may not be modified by the user. Do not tamper with parts sealed by the manufacturer or its agent. Do not attempt to repair the device yourself. Modifi cations to the device or the device components can lead to property damage and/or personal injury or death. Repairs should only be carried out by qualified personnel.
- Before each use of the appliance, check whether there are any insects or nests of insects visible in the burner, in the pipes and in the appliance openings. Remove them, if present. Spiders and small insects may nest in the pipes and unit openings when the unit is not in use. This can block the flow of air and gas, causing a yellow flame to flash back and cause a fire below the burner. Therefore, remove insects and insect nests before each use, if present.
Instructions for using the charcoal grill compartment
WARNING
Risk of burns! This grill gets very hot, do not move it during operation.
- Place the grill on a safe, level surface before use.
- Before using the grill for the first time, the grill must be preheated for at least 30 minutes and the fuel must be red hot for at least 30 minutes.
- Do not grill before the fuel has a layer of ash.
- Do not use the grill indoors!
- Keep children and pets away from the grill.
WARNING
Danger of fire and explosion! Do not use petrol or spirits to light or relight! Only use fire relighters that comply with EN 1860-3!
• The maximum amount of fuel is 1.5 kg.
Gas requirements
Note: A gas pressure regulator approved according to EN 16129 and a gas hose approved according to EN 16436-1 with a length of at least one metre must be used for the device. If not included in the scope of delivery, these must be purchased additionally.
- Contact your local gas cylinder dealer for the exact use of your gas cylinders.
- Never use a gas cylinder with a damaged tank, valve, base or ring.
- A deformed or rusted gas cylinder can be dangerous and should therefore be checked for functionality by your local gas cylinder dealer before use.
- Never connect the appliance to a non-regulable gas source. Turn off the gas when the appliance is not in use.
- The appliance may only be operated with propane or butane gas or a gas mixture of both types of gas. The gas bottle must not be dropped or handled roughly. The gas bottle must be disconnected when the grill is not in use. After disconnecting, put the cap back on the gas bottle.
- Before connecting the gas bottle to the grill, make sure the gas valve is turned off, there are no open flames near the appliance and the sealing ring is in good condition. Then connect the pressure regulator to the gas bottle.
- The connection hose must be replaced every two years.
- Check the connection hose once a month and every time the gas cylinder is changed. If the connection hose shows cracks or other signs of deterioration, it must be replaced with a new one.
- Make sure that the connection hose is not kinked or twisted and does not come into contact with the surfaces of hot devices.
- Before changing the gas bottle, make sure that the gas has been turned off and that there are no naked flames or other heat sources near the appliance. Make sure the gas cylinder is always in an upright position.
- Only use the connections and accessories of the device for their intended purposes.
- Do not turn the gas bottle upside down to use the remaining gas.
- Should local regulations require it, the flexible hose must be replaced.
GAS CONNECTION
The gas connection line between the gas pressure regulator and the grill can be made using metal bellows or a gas-approved rubber hose with a maximum length of 1.5 m. Gas grills that run on liquefied petroleum gas (LPG) should be connected with a gas approved rubber hose.
- If a rubber hose is used, a universal air inlet fitting is required.
- The two ends of the gas hose are connected to the grill and the gas valve respectively. Please install the rubber hose adapter directly on the main gas pipe without any adapters in between. The diameter of the gas hose is 8-10 mm and varies depending on the adapter used. If in doubt, ask your local gas dealer which adapter and gas hose is compatible with the gas bottles available in your country. Never operate the device if you have any doubts about compatibility or if you are unsure whether the connection is properly insulated.
- Only approved gas hoses and regulators may be connected to a (refillable) gas cylinder. All components should comply with local regulations.
- Make sure that the gas hose is not twisted, kinked or bent by other objects. After installation is complete, a gas leak detection (leak test) should be performed.
- Do not expose the gas hose to high temperatures.
- It is recommended that an annual air tightness test be carried out on the gas grill.
- Before each use, make sure the rubber hose is in good condition. Replace it if it shows signs of wear or cracks.
| Gas connection with Type E adapter | Gas connection (France) |
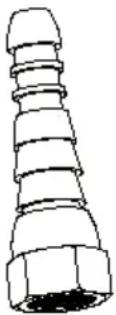 | 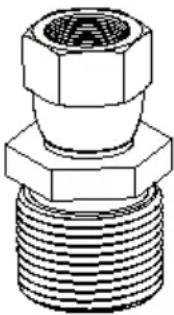 |
| If a rubber hose is being used, please install the appropriate adapter (see image above) directly on the main gas pipe without any adapters in between. | When using the gas grill in France, please ensure that the appropriate adapter (see image above) is connected to the main gas line. |
LEAK TEST
- Perform the leak test each time the gas cylinder is connected or reconnected.
- Never use an open flame to check for gas leaks.
- Never smoke while performing the leak test.
- Always perform the leak test outdoors, in a well-ventilated area, and away from sources of ignition such as gasoline, open flames, sparks, or electrical equipment.
- The device must be checked regularly for gas leaks. If a smell of gas is noticeable, the leak test must be carried out immediately.
Carrying out the leak test
- Make a soapy solution of soap and water in a 1:3 ratio. The soap solution can be applied with a bottle, brush, dish soap bottle or cloth to the areas to be tested: gas cylinder valve, pressure regulator, all gas connections, hose connections and along the entire length of the connection hose.
- The gas valve must be turned to the "OFF" position when applying the soap solution. Once the soapy solution has been applied all over, turn on the gas valve to the "ON" position.
- If there is a leak at one point, soap bubbles will appear at the corresponding point.
- If there is a leak, close the gas valve immediately. Tighten the leaking connectors, open the gas valve and recheck all points.
- If the leak does not stop after several attempts, contact your local gas dealer or similarly qualified person. Do not use the grill under any circumstances while there is a leak!
DEVICE OVERVIEW
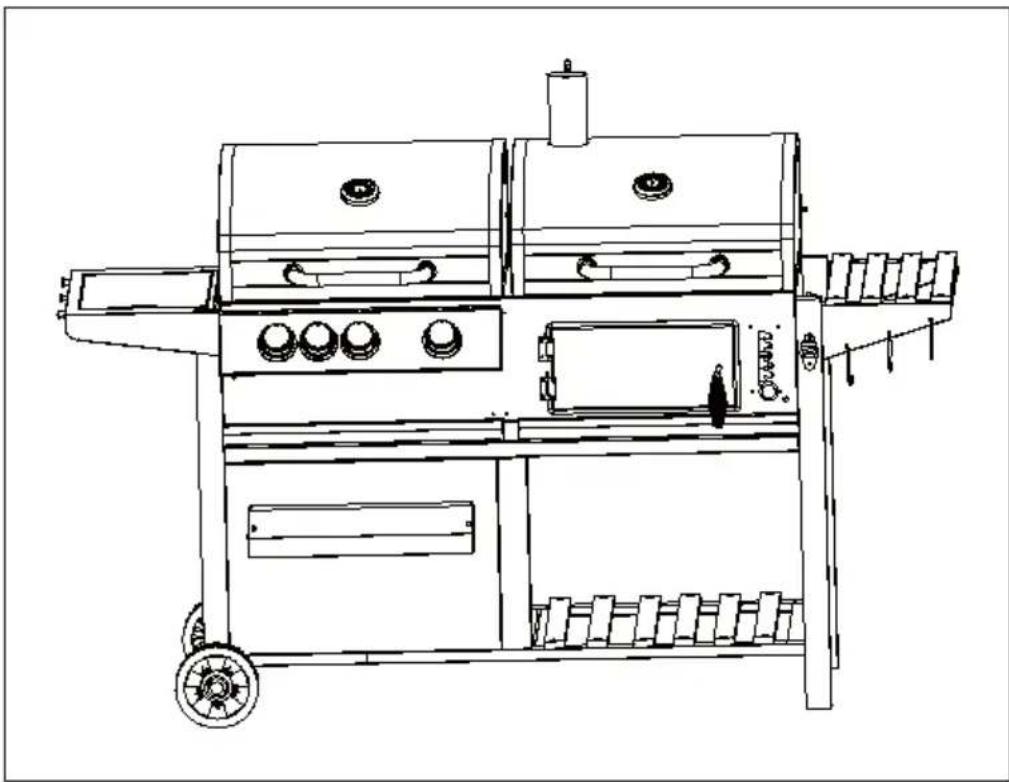
natural_image
Line drawing of a portable electric grill with wheels and control panel (no text or symbols)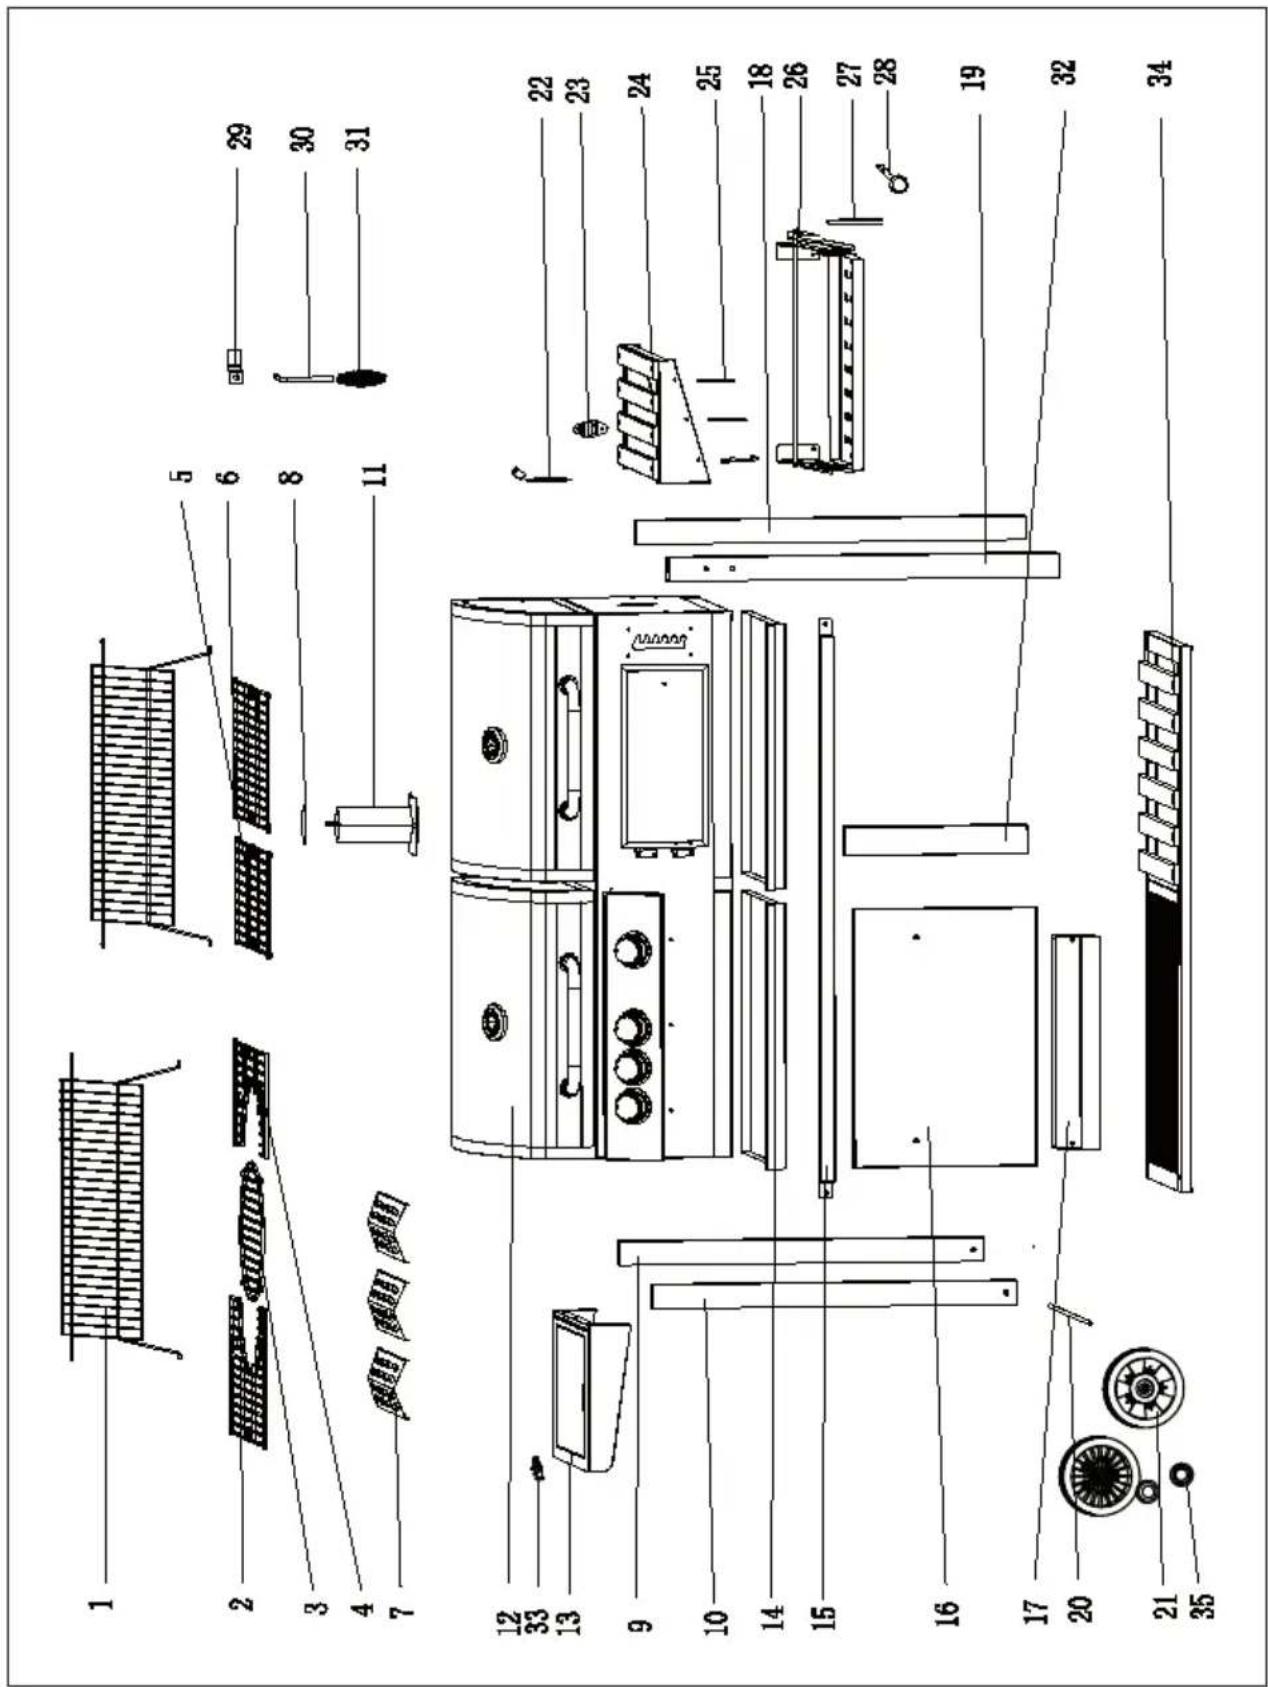
text_image
Exploded view diagram of a household appliance with numbered parts and labeled partsPARTS LIST

Make sure your grill is assembled correctly. Each grill comes with detailed assembly instructions that include assembly procedures specific to each model. Follow these instructions carefully to ensure the correct and safe assembly of the grill.

CAUTION
Risk of injury! Despite all efforts to make assembly as easy as possible, when handling the steel parts it is possible that corners and edges can cause cut injuries if handled improperly during assembly. Be careful when handling parts during assembly. It is strongly recommended to wear work gloves during assembly.
INSTALLATION
Preparation
- To operate this gas grill you need a gas bottle (liquid gas) and a suitable gas pressure regulator. Regulators should comply with standard EN 16129 (as amended) and national regulations.
- Connect the hose and regulator to the gas bottle on the left side of the gas grill, making sure the gas bottle is kept away from heat and in a secure position.
The hose should have a diameter of 8-10 mm. The recommended length of the hose is 1.5 m maximum. The fl exible hose should conform to the relevant standard and local regulations.
Installation
After purchasing a suitable gas bottle, you can set it up with your gas grill.
- Check all parts and make sure that no part is missing. If parts are missing, contact customer service.
- You will need a suitable screwdriver and spanner for assembly. Only use tools that are intact and suitable for the task at hand.
- Choose a suitable place to set up the device. Place the device on a flat, sufficiently large surface where it is stable. Make sure the inlet and outlet regulators are correct and suitable for the gas cylinder valve and the device.
- If the regulator is used outdoors, make sure it is protected from the elements.
- You will need a suitable spanner to connect the gas bottle.
- When connecting the hose, make sure it is not twisted.
Connecting and changing the gas cylinder
- Carry out the changing of the gas cylinder away from any source of ignition. Position the gas bottle on the left side of your gas grill, it should not be placed inside the grill. Note that the gas cylinder must be protected from heat and kept in a safe position.
- When your gas grill is ready to use, insert the regulator into the gas cylinder valve and tighten securely.

WARNING
Risk of injury and damage to property! Before attempting to light your gas grill, read and understand all instructions, warnings, and safety precautions outlined in this owner's manual.
- Check the hose for cracks, cuts or abrasions before each use. If the hose is damaged in any way, do not use your gas grill.
- When changing the gas bottle, make sure that there are no sources of ignition nearby, e. g. fire, cigarettes, open flames, etc. Make sure the device is turned off.
- The device may only be used with liquid gas cylinders in accordance with the information in the "Technical data" section and the gas label shown in these instructions. The gas bottle used must comply with national regulations.
OPERATION
Notes on operation
• After connecting, always check the gas line with soapy water for leaks at the connection.
• The top lid must always be open when the burner is lit.
- Use oven gloves and sturdy, long-handled gas grilling tools when grilling on the appliance.
- Be prepared should an accident or fi re occur. You must know where the fi rst aid kit and fi re extinguishers are and how to use them.
- Keep electrical supply cords and gas hose away from all hot surfaces.
• Always exercise extreme care when grilling.
- Do not heat unopened glass or metal containers with food on the grill. Pressure can build up and rupture the container, resulting in serious injury or damage to the grill.
- It is recommended that you wear protective gloves when operating the device, especially when handling particularly hot components.
Lighting the grill

CAUTION
Fire and burn hazard! The lid must be open when lighting the burner! When lighting the gas grill, do not place your face directly over the gas grill.
-
Open the grill lid.
-
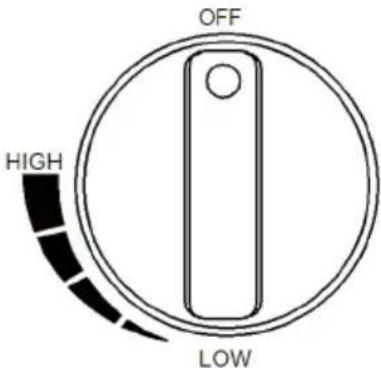
Set all rotary knobs to "OFF".
-
Open the gas cylinder valve as described in the instructions.
-
Push the dial down and turn it anti-clockwise to HIGH. Then press the "IGNITOR" button quickly several times to ignite the burner.
-
If the burner flame is not burning, turn all the knobs to "OFF". Wait 5 minutes and repeat the ignition process.
-
After using the grill, turn the device knobs to the "OFF" position and turn off the gas cylinder valve.
text_image
OFF HIGH LOWTips for energy-saving use
- Reduce the time that the lid is open.
- Switch off the grill as soon as the cooking process is complete.
- Preheat the gas barbecue for 10 to 15 minutes only (except when using it for the first time).
- Do not preheat the gas grill longer than recommended.
- Do not use a higher setting than required.
STORAGE
Storage of the gas cylinder
- Your gas cylinder must be stored outdoors in a well-ventilated area. Unplug the gas bottle from the gas grill when not in use. Make sure you are outdoors and away from any ignition source before attempting to disconnect your gas cylinder from the gas grill.
Storage of the gas grill
- When you return your gas grill to service after a period of storage, check the unit and all connections for gas leaks.
- Also, before use, check to see if the burners or nozzles are clogged. Follow the cleaning instructions to ensure the gas grill is safe to use.
- If the gas grill is stored outdoors, ensure that all areas under the front panel are clear of obstructions (insects, etc.). This area must be kept clear, otherwise the flow of combustion or ventilation air may be restricted.
- Store your grill in a cool, dry place. If you use a cover, it may be necessary to dry the grill and the inside of the cover.
- Chrome-plated warming racks etc. should be rubbed with cooking oil. Wrap the burners in aluminium foil to prevent insects or other debris from clogging the burners.
CLEANING AND MAINTENANCE
CAUTION
Risk of burns! All cleaning and maintenance work must only be carried out when the gas grill has cooled down and the connection to the gas cylinder has been disconnected.
Maintenance
- It is recommended that the gas grill be serviced by a competent technician every 90 days, or at least once a year. Do not attempt to service the device yourself.
Cleaning
- Allow the grill to "burn off" after each use to minimise food residue on the grill grate. To do this, switch on the burner for 15 to 20 minutes. The drops of fat on your grill will be burned off. Make sure the device has cooled down before proceeding with the cleaning.
- Clean the grill grates regularly by soaking them in soapy water and washing them.
- The inside surfaces of the grill housing cover should also be cleaned with hot soapy water. Use a wire brush, steel wool or a scouring pad to remove stubborn stains.
- Check the burner regularly to make sure it is free of insects and spiders that could clog the gas line and divert the gas flow. Be sure to clean the venturi tubes on the burner very carefully, and make sure there are no blockages. It is recommended that you use a tube cleaner to clean the venturi area.
- Any modifications to this device could be dangerous and are not permitted.
TROUBLESHOOTING
| Problem Potential cause | Potential solution | |
| The grill cannot be lit. The | clearance between the ignition pin and the burner is greater than 5/32 to 3/16 inches. | Loosen the firing pin and adjust the distance. Then fasten it again. |
| The electrode tip does not produce sparks at the burner orifice. | Reinsert the electrode. | |
| The gas supply is not working. | Turn on the regulator valve. | |
| The burner flame goes out. | The gas bottle is empty. Replace the gas bottle. | |
| The gas supply is not sufficient. | Check the gas hose and make sure there are no leaks or knots. | |
| Low heat even though the dial is set to HIGH. | The gas bottle is empty. Replace the gas bottle. | |
| Low heat (caused by the gas pipe system) | The gas regulator assembly contains an overflow device that provides an adequate supply of gas to the grill. Rapid changes in gas pressure can trip the overflow device, resulting in a low flame and low temperature. | Follow these instructions:Make sure all rotary knobs are in the "OFF" position.Open the gas cylinder valve and wait 5 minutes.Light the burners one by one, following the ignition instructions listed on the door panel. |
DISPOSAL CONSIDERATIONS
natural_image
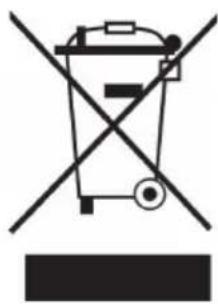
Symbol of a trash bin crossed with a diagonal line, no text or numbers presentIf there is a legal regulation in your country regarding the disposal of electrical and electronic equipment, this symbol on the product or on the packaging indicates that this product must not be disposed of with household waste. Instead, it must be taken to a collection point for the recycling of electrical and electronic equipment. By disposing of this product in accordance with the regulations, you are protecting the environment and the health of those around you from negative consequences. For information on recycling and disposal of this product, contact your local government or household waste disposal service.
MANUFACTURER & IMPORTER (UK)
Manufacturer:
Chal-Tec GmbH, Wallstrasse 16, 10179 Berlin, Germany.
Importer for Great Britain:
Berlin Brands Group UK Limited
PO Box 42
272 Kensington High Street
London, W8 6ND
United Kingdom
Cher client, chère cliente,
text_image
QR code image containing encoded data, no visible human-readable textSOMMAIRE
natural_image
Line drawing of a portable electric grill with wheels and control panel (no text or symbols)
text_image
Exploded view diagram of a household appliance with numbered parts and Chinese labelsLISTE DES PIÈCES
| A. | (M6x60mm) | X 12 |
| B. | (M6x12mm) | X 29 |
| C. | X 3 | |
| D. | X 1 | |
| E. | X 1 | |
| F. | X 1 | |
| G. | X 5 | |
| H. | X 3 | |
| I. | X 1 |
| A. | (M6x60mm) | X 12 |
| B. | (M6x12mm) | X 29 |
| C. | X 3 | |
| D. | X 1 | |
| E. | X 1 | |
| F. | X 1 | |
| G. | X 5 | |
| H. | X 3 | |
| I. | X 1 |
| A. | (M6x60mm) | X 12 |
| B. | (M6x12mm) | X 29 |
| C. | X 3 | |
| D. | X 1 | |
| E. | X 1 | |
| F. | X 1 | |
| G. | X 5 | |
| H. | X 3 | |
| I. | X 1 |
| A. | (M6x60mm) | X 12 |
| B. | (M6x12mm) | X 29 |
| C. | X 3 | |
| D. | X 1 | |
| E. | X 1 | |
| F. | X 1 | |
| G. | X 5 | |
| H. | X 3 | |
| I. | X 1 |
| A. | (M6x60mm) | X 12 |
| B. | (M6x12mm) | X 29 |
| C. | X 3 | |
| D. | X 1 | |
| E. | X 1 | |
| F. | X 1 | |
| G. | X 5 | |
| H. | X 3 | |
| I. | X 1 |
| A. | (M6x60mm) | X 12 |
| B. | (M6x12mm) | X 29 |
| C. | X 3 | |
| D. | X 1 | |
| E. | X 1 | |
| F. | X 1 | |
| G. | X 5 | |
| H. | X 3 | |
| I. | X 1 |
| A. | (M6x60mm) | X 12 |
| B. | (M6x12mm) | X 29 |
| C. | X 3 | |
| D. | X 1 | |
| E. | X 1 | |
| F. | X 1 | |
| G. | X 5 | |
| H. | X 3 | |
| I. | X 1 |
| A. | (M6x60mm) | X 12 |
| B. | (M6x12mm) | X 29 |
| C. | X 3 | |
| D. | X 1 | |
| E. | X 1 | |
| F. | X 1 | |
| G. | X 5 | |
| H. | X 3 | |
| I. | X 1 |
| A. | (M6x60mm) | X 12 |
| B. | (M6x12mm) | X 29 |
| C. | X 3 | |
| D. | X 1 | |
| E. | X 1 | |
| F. | X 1 | |
| G. | X 5 | |
| H. | X 3 | |
| I. | X 1 |
| A. | (M6x60mm) | X 12 |
| B. | (M6x12mm) | X 29 |
| C. | X 3 | |
| D. | X 1 | |
| E. | X 1 | |
| F. | X 1 | |
| G. | X 5 | |
| H. | X 3 | |
| I. | X 1 |
ASSEMBLAGE
text_image
OFF HIGH LOWnatural_image
Symbol of a trash bin crossed with a diagonal line, no text or numbers presentBerlin Brands Group UK Limited
PO Box 42
272 Kensington High Street
London, W8 6ND
United Kingdom
Estimado cliente:
text_image
QR code image containing encoded data, no visible human-readable textÍNDICE
Aberdeen Combi Grill
natural_image
Line drawing of a portable electric grill with control panel and wheels (no text or symbols)
text_image
Exploded view diagram of a household appliance with numbered parts and Chinese labelsLISTA DE PIEZAS

| A. | (M6x60mm) | X 12 |
| B. | (M6x12mm) | X 29 |
| C. | X 3 | |
| D. | X 1 | |
| E. | X 1 | |
| F. | X 1 | |
| G. | X 5 | |
| H. | X 3 | |
| I. | X 1 |
| A. | (M6x60mm) | X 12 |
| B. | (M6x12mm) | X 29 |
| C. | X 3 | |
| D. | X 1 | |
| E. | X 1 | |
| F. | X 1 | |
| G. | X 5 | |
| H. | X 3 | |
| I. | X 1 |
| A. | (M6x60mm) | X 12 |
| B. | (M6x12mm) | X 29 |
| C. | X 3 | |
| D. | X 1 | |
| E. | X 1 | |
| F. | X 1 | |
| G. | X 5 | |
| H. | X 3 | |
| I. | X 1 |
| A. | (M6x60mm) | X 12 |
| B. | (M6x12mm) | X 29 |
| C. | X 3 | |
| D. | X 1 | |
| E. | X 1 | |
| F. | X 1 | |
| G. | X 5 | |
| H. | X 3 | |
| I. | X 1 |
| A. | (M6x60mm) | X 12 |
| B. | (M6x12mm) | X 29 |
| C. | X 3 | |
| D. | X 1 | |
| E. | X 1 | |
| F. | X 1 | |
| G. | X 5 | |
| H. | X 3 | |
| I. | X 1 |
| A. | (M6x60mm) | X 12 |
| B. | (M6x12mm) | X 29 |
| C. | X 3 | |
| D. | X 1 | |
| E. | X 1 | |
| F. | X 1 | |
| G. | X 5 | |
| H. | X 3 | |
| I. | X 1 |
| A. | (M6x60mm) | X 12 |
| B. | (M6x12mm) | X 29 |
| C. | X 3 | |
| D. | X 1 | |
| E. | X 1 | |
| F. | X 1 | |
| G. | X 5 | |
| H. | X 3 | |
| I. | X 1 |
| A. | (M6x60mm) | X 12 |
| B. | (M6x12mm) | X 29 |
| C. | X 3 | |
| D. | X 1 | |
| E. | X 1 | |
| F. | X 1 | |
| G. | X 5 | |
| H. | X 3 | |
| I. | X 1 |
| A. | (M6x60mm) | X 12 |
| B. | (M6x12mm) | X 29 |
| C. | X 3 | |
| D. | X 1 | |
| E. | X 1 | |
| F. | X 1 | |
| G. | X 5 | |
| H. | X 3 | |
| I. | X 1 |
| A. | (M6x60mm) | X 12 |
| B. | (M6x12mm) | X 29 |
| C. | X 3 | |
| D. | X 1 | |
| E. | X 1 | |
| F. | X 1 | |
| G. | X 5 | |
| H. | X 3 | |
| I. | X 1 |
| A. | (M6x60mm) | X 12 |
| B. | (M6x12mm) | X 29 |
| C. | X 3 | |
| D. | X 1 | |
| E. | X 1 | |
| F. | X 1 | |
| G. | X 5 | |
| H. | X 3 | |
| I. | X 1 |
| A. | (M6x60mm) | X 12 |
| B. | (M6x12mm) | X 29 |
| C. | X 3 | |
| D. | X 1 | |
| E. | X 1 | |
| F. | X 1 | |
| G. | X 5 | |
| H. | X 3 | |
| I. | X 1 |
| A. | (M6x60mm) | X 12 |
| B. | (M6x12mm) | X 29 |
| C. | X 3 | |
| D. | X 1 | |
| E. | X 1 | |
| F. | X 1 | |
| G. | X 5 | |
| H. | X 3 | |
| I. | X 1 |
| A. | (M6x60mm) | X 12 |
| B. | (M6x12mm) | X 29 |
| C. | X 3 | |
| D. | X 1 | |
| E. | X 1 | |
| F. | X 1 | |
| G. | X 5 | |
| H. | X 3 | |
| I. | X 1 |
| A. | (M6x60mm) | X 12 |
| A. | (M6x60mm) | X 12 |
| A. | (M6x60mm) | X 12 |
| A. | (M6x60mm) | X 12 |
| A. | (M6x60mm) | X 12 |
| A. | (M6x60mm) | X 12 |
| A. | (M6x60mm) | X 12 |
| A. | (M6x60mm) | X 12 |
A. (M6x60mm) X 12
| A. | (M6x60mm) | X 12 |
| A. | (M6x60mm) | X 12 |
| A. | (M6x60mm) | X 12 |
| A. | (M6x60mm) | X 12 |
| A. | (M6x60mm) | X 12 |
| A. | (M6x60mm) | X 12 |
| A. | (M6x60mm) | X 12 |
A. (M6x60mm) X 12
A. (M6x60mm) X 12
A. (M6x60mm) X 12
A. (M6x60mm) X 12
A. (M6x60mm) X 12
A. (M6x60mm) X 12
A. (M6x60mm) X 12
A. (M6x60mm) X 12
A. (M6x60mm) X 12
INSTALACIÓN
Preparación
text_image
OFF HIGH LOWnatural_image
Symbol of a trash bin crossed with a diagonal line, no text or numbers presentBerlin Brands Group UK Limited
PO Box 42
272 Kensington High Street
London, W8 6ND
United Kingdom
Gentile cliente,
text_image
QR code image containing encoded data, no visible human-readable textINDICE
natural_image
Line drawing of a portable electric grill with wheels and control panel (no text or symbols)
text_image
Exploded view diagram of a household appliance with numbered parts and Chinese labelsLISTA DELLE PARTI

| A. | (M6x60mm) | X 12 |
| B. | (M6x12mm) | X 29 |
| C. | X 3 | |
| D. | X 1 | |
| E. | X 1 | |
| F. | X 1 | |
| G. | X 5 | |
| H. | X 3 | |
| I. | X 1 |
| A. | (M6x60mm) | X 12 |
| B. | (M6x12mm) | X 29 |
| C. | X 3 | |
| D. | X 1 | |
| E. | X 1 | |
| F. | X 1 | |
| G. | X 5 | |
| H. | X 3 | |
| I. | X 1 |
| A. | (M6x60mm) | X 12 |
| B. | (M6x12mm) | X 29 |
| C. | X 3 | |
| D. | X 1 | |
| E. | X 1 | |
| F. | X 1 | |
| G. | X 5 | |
| H. | X 3 | |
| I. | X 1 |
| A. | (M6x60mm) | X 12 |
| B. | (M6x12mm) | X 29 |
| C. | X 3 | |
| D. | X 1 | |
| E. | X 1 | |
| F. | X 1 | |
| G. | X 5 | |
| H. | X 3 | |
| I. | X 1 |
| A. | (M6x60mm) | X 12 |
| B. | (M6x12mm) | X 29 |
| C. | X 3 | |
| D. | X 1 | |
| E. | X 1 | |
| F. | X 1 | |
| G. | X 5 | |
| H. | X 3 | |
| I. | X 1 |
| A. | (M6x60mm) | X 12 |
| B. | (M6x12mm) | X 29 |
| C. | X 3 | |
| D. | X 1 | |
| E. | X 1 | |
| F. | X 1 | |
| G. | X 5 | |
| H. | X 3 | |
| I. | X 1 |
| A. | (M6x60mm) | X 12 |
| B. | (M6x12mm) | X 29 |
| C. | X 3 | |
| D. | X 1 | |
| E. | X 1 | |
| F. | X 1 | |
| G. | X 5 | |
| H. | X 3 | |
| I. | X 1 |
| A. | (M6x60mm) | X 12 |
| B. | (M6x12mm) | X 29 |
| C. | X 3 | |
| D. | X 1 | |
| E. | X 1 | |
| F. | X 1 | |
| G. | X 5 | |
| H. | X 3 | |
| I. | X 1 |
| A. | (M6x60mm) | X 12 |
| B. | (M6x12mm) | X 29 |
| C. | X 3 | |
| D. | X 1 | |
| E. | X 1 | |
| F. | X 1 | |
| G. | X 5 | |
| H. | X 3 | |
| I. | X 1 |
| A. | (M6x60mm) | X 12 |
| B. | (M6x12mm) | X 29 |
| C. | X 3 | |
| D. | X 1 | |
| E. | X 1 | |
| F. | X 1 | |
| G. | X 5 | |
| H. | X 3 | |
| I. | X 1 |
MONTAGGIO
text_image
OFF HIGH LOWnatural_image
Symbol of a trash bin crossed with a diagonal line, no text or numbers presentPRODUTTORE E IMPORTATORE (UK)
Produttore:
Chal-Tec GmbH, Wallstraße 16, 10179 Berlino, Germania.
Berlin Brands Group UK Limited
PO Box 42
272 Kensington High Street
London, W8 6ND
United Kingdom
MONTÁŽNY NÁVOD
ASSEMBLY INSTRUCTIONS
INSTRUCTION DE MONTAGE
INSTRUCCIONES DE MONTAJE
natural_image
Technical line drawing of a mechanical cart with wheels and structural components (no text or symbols)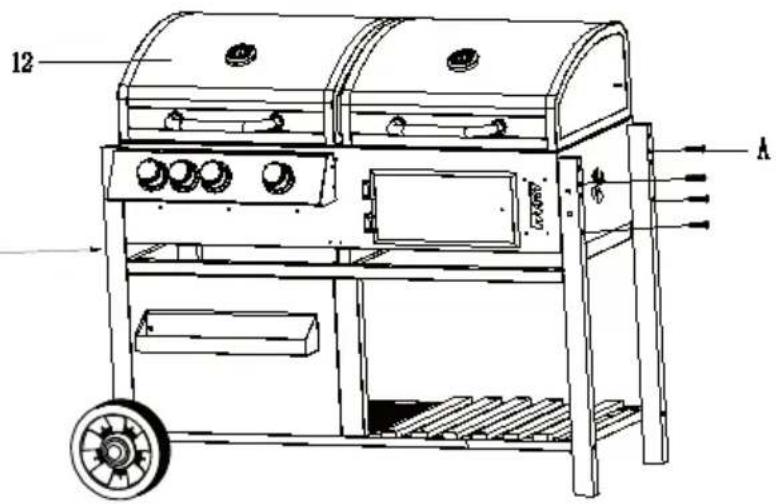
text_image
12 A7
A X 6
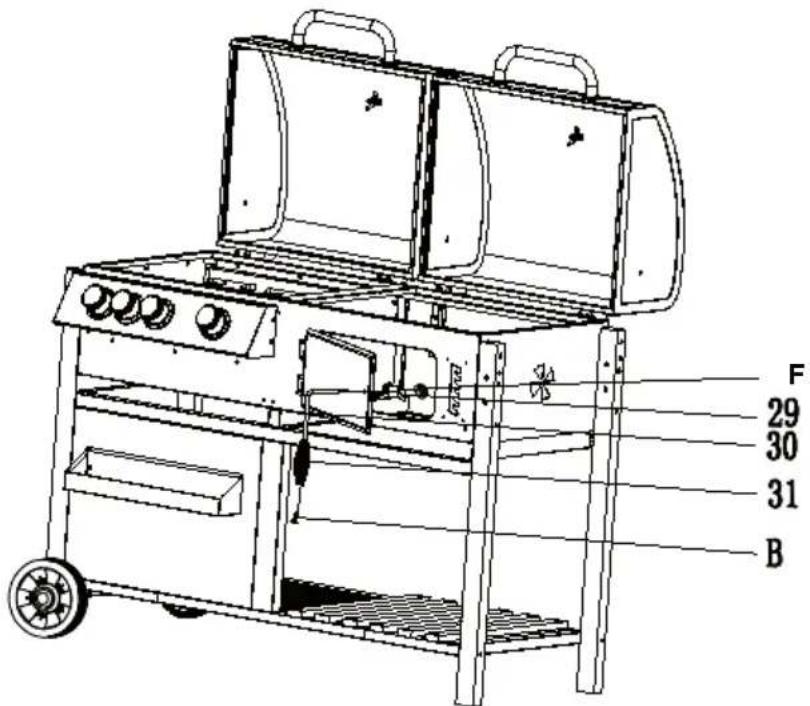
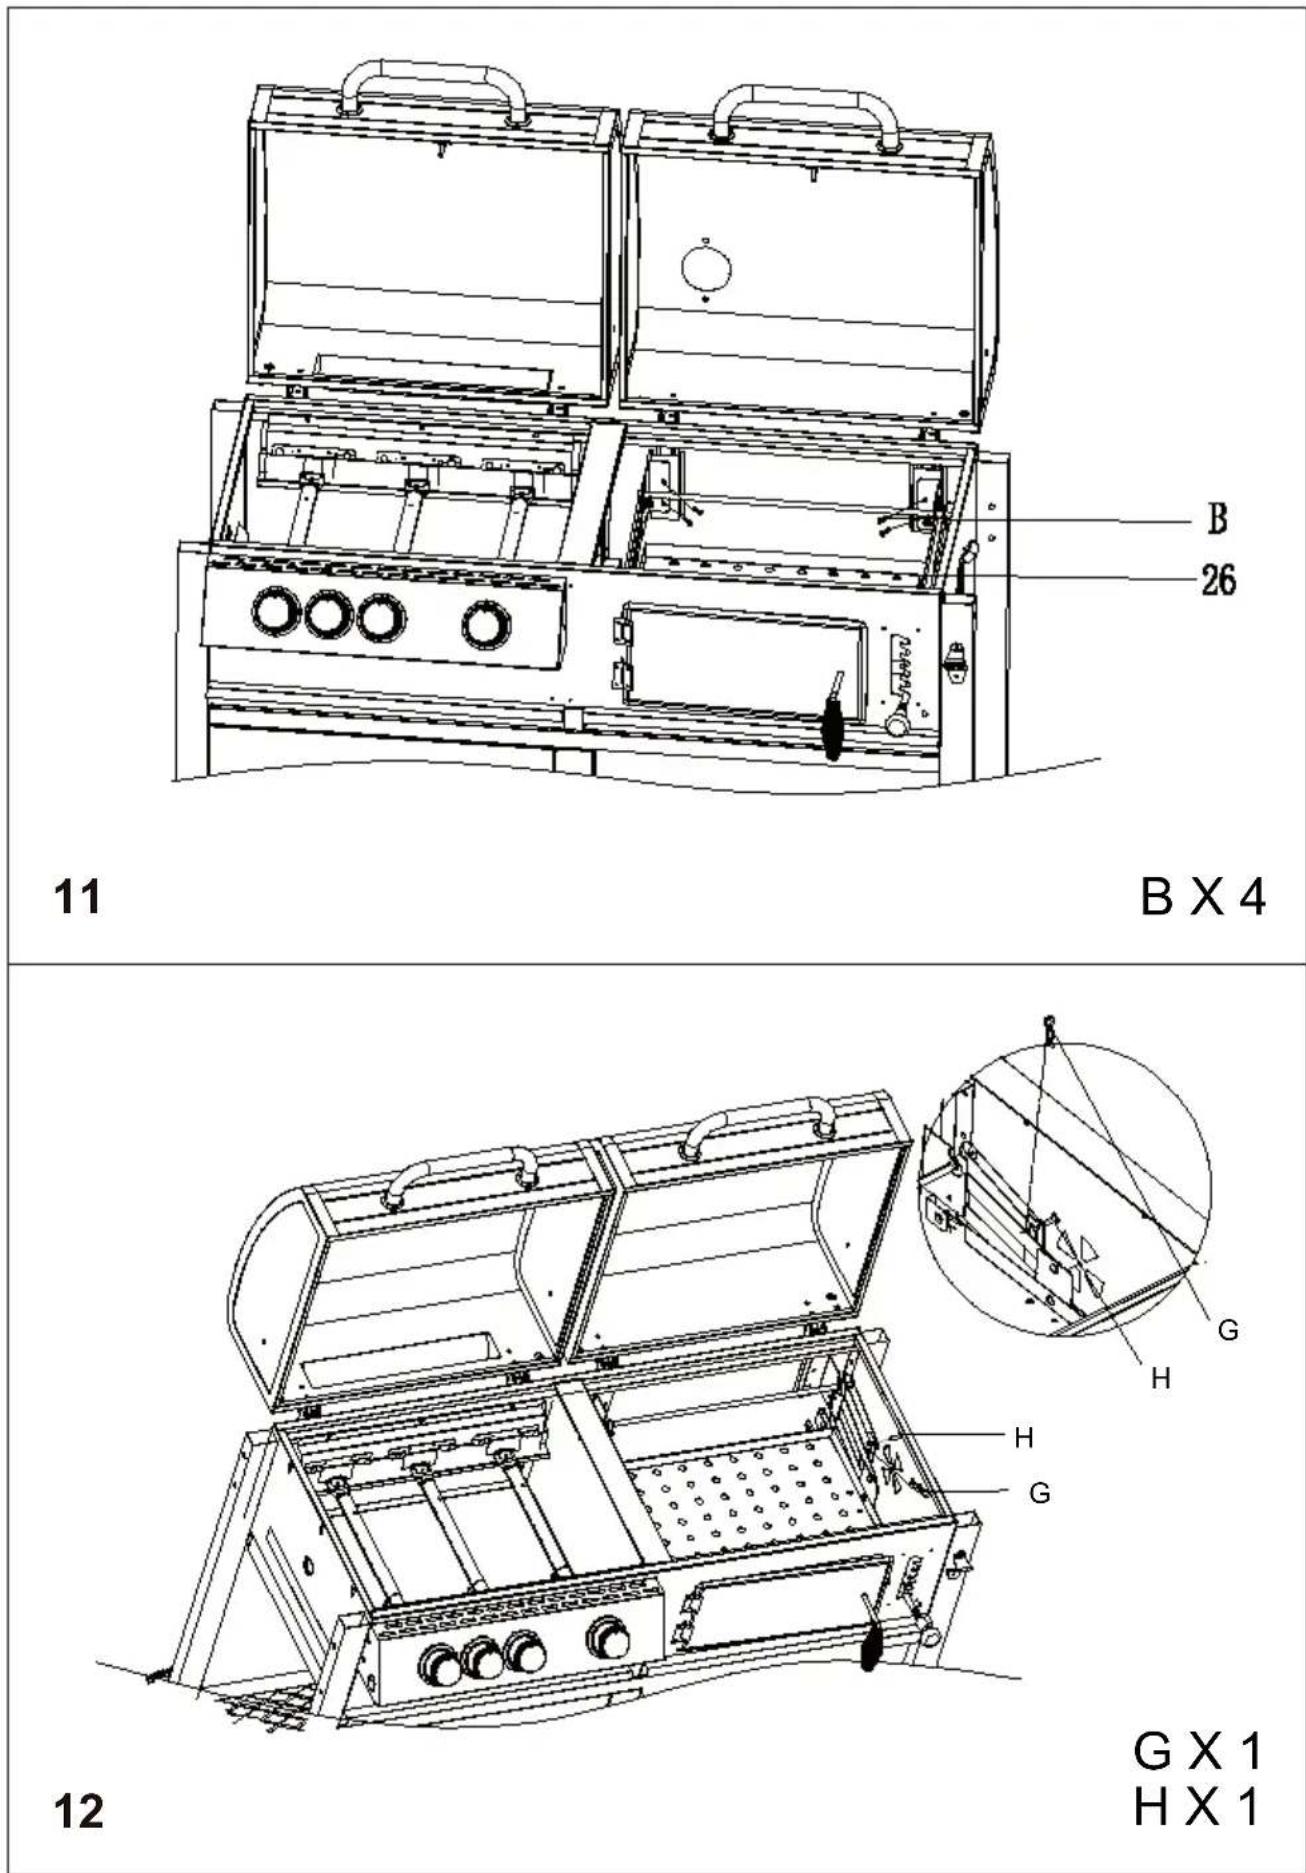
text_image
F 29 30 31 BBX1
8FX1
9
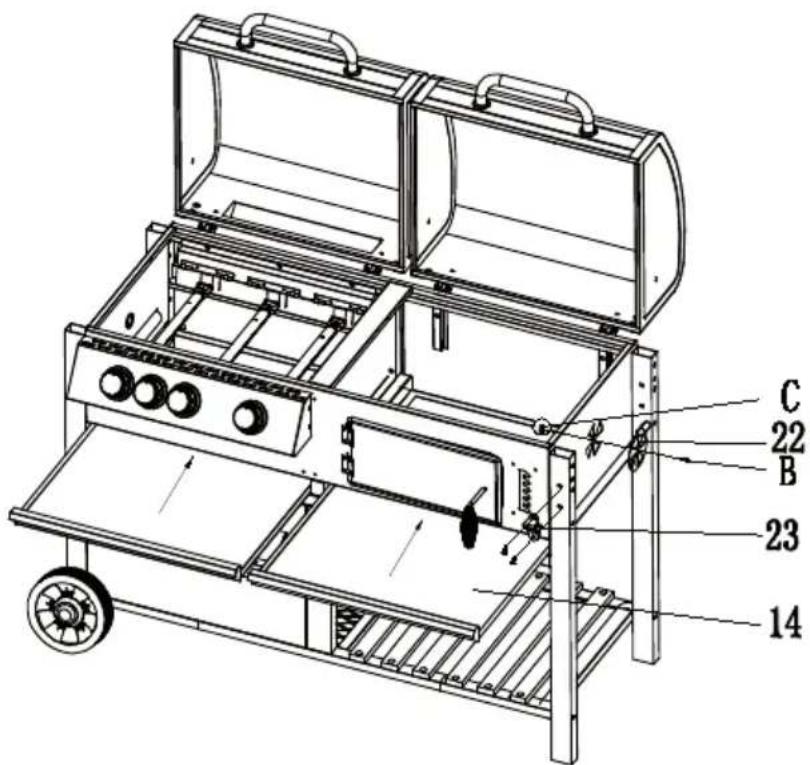
text_image
C 22 B 23 14BX3
C X 1
text_image
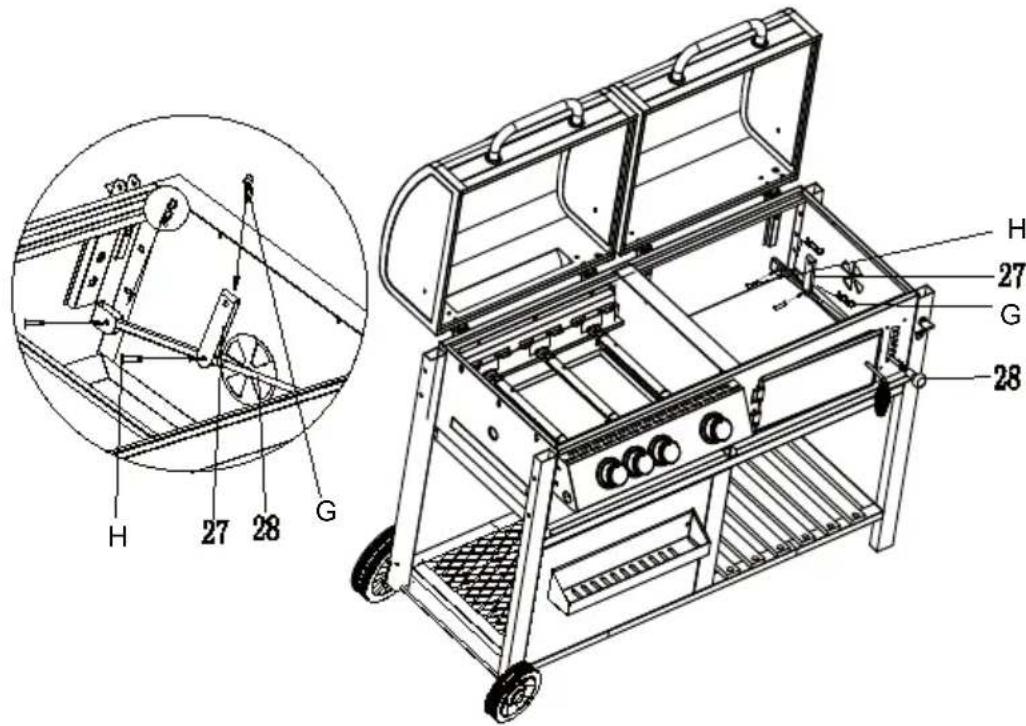
Technical diagram of a portable electric vehicle chassis with labeled components and an inset showing mechanical assembly details.10
GX2
HX2
natural_image
Technical line drawing of an open industrial machine with internal components and a close-up inset showing mechanical assembly detail (no text or symbols)13
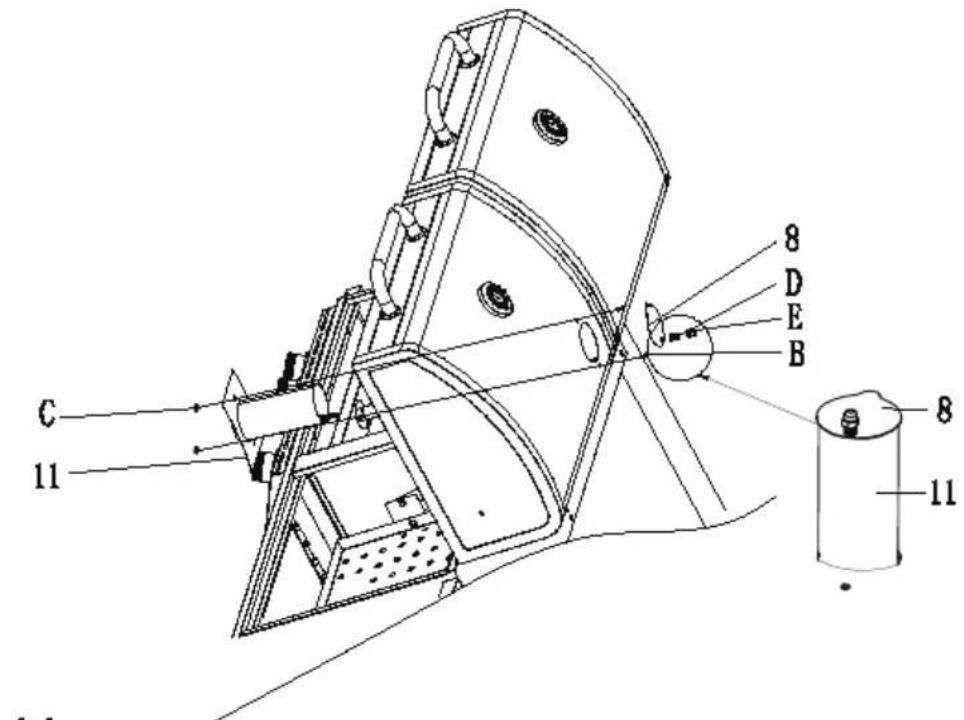
text_image
C 11 8 D E B 8 1114
B X 2
C X 2
D X 1
E X 1
15
text_image
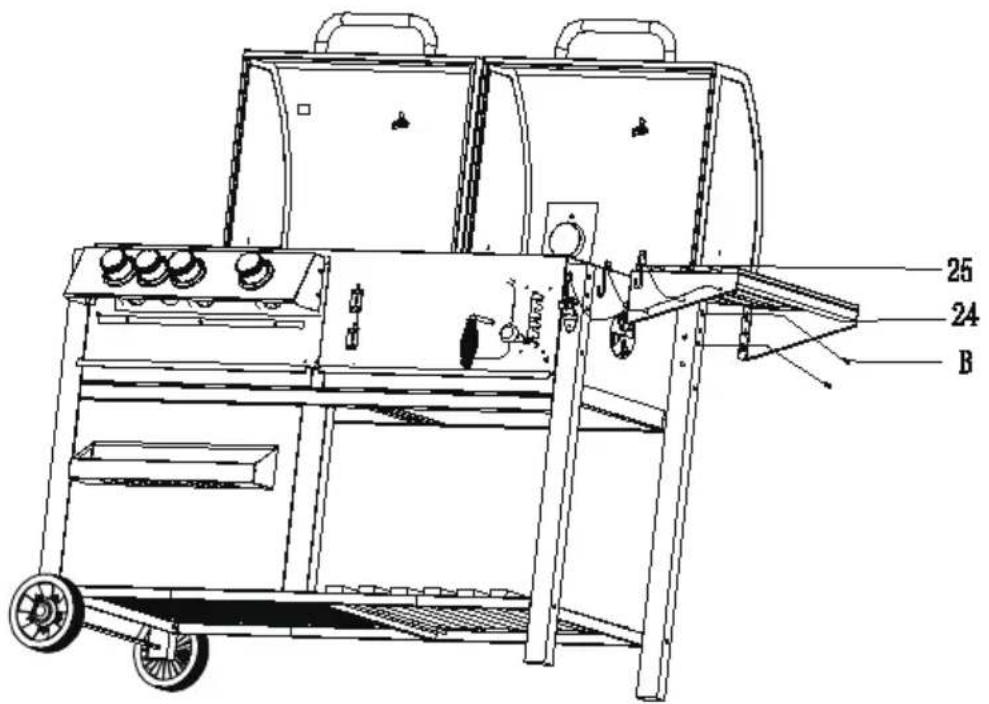
25 24 BB X 4
text_image
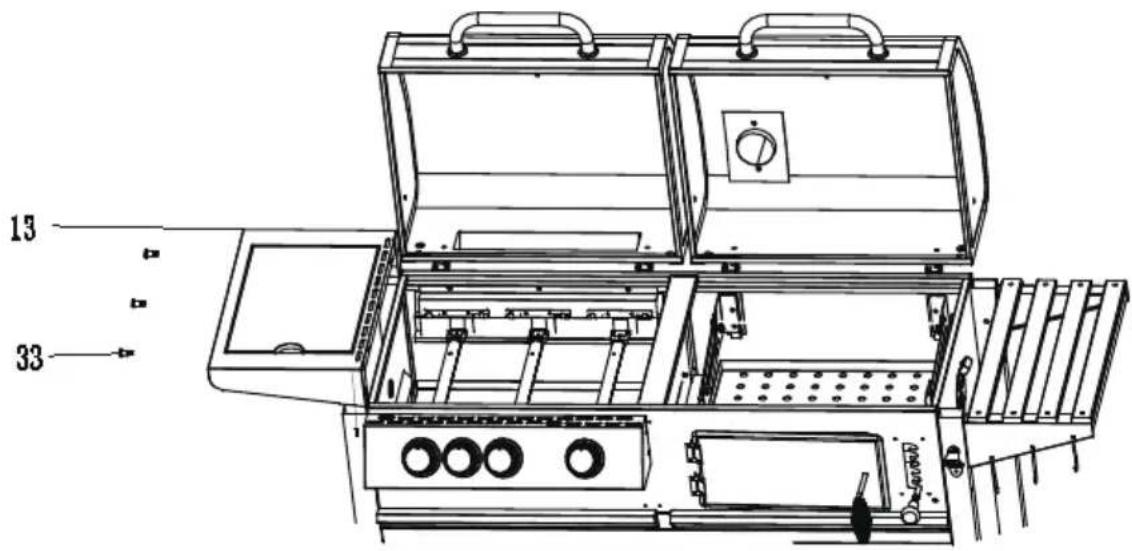
15 3316

text_image
B 13 17B X 3
18
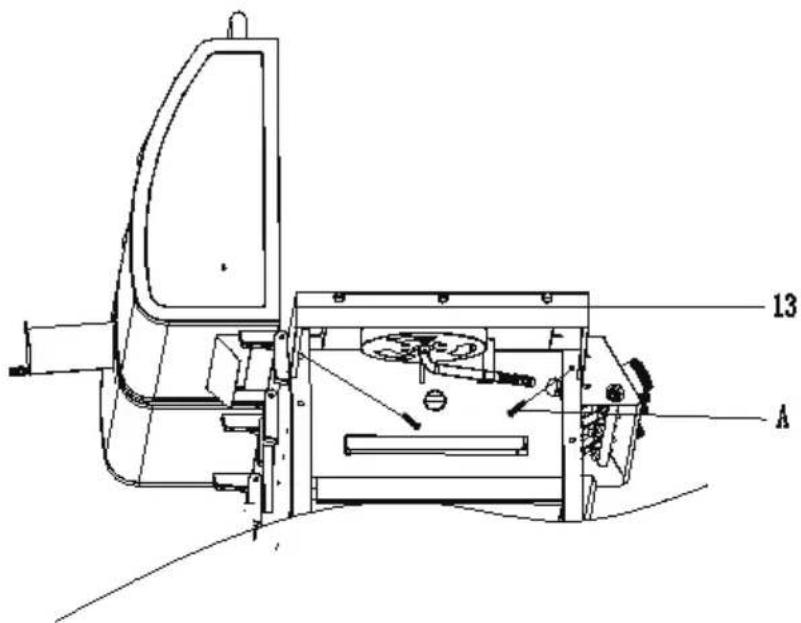
text_image
13 AA X 2
text_image
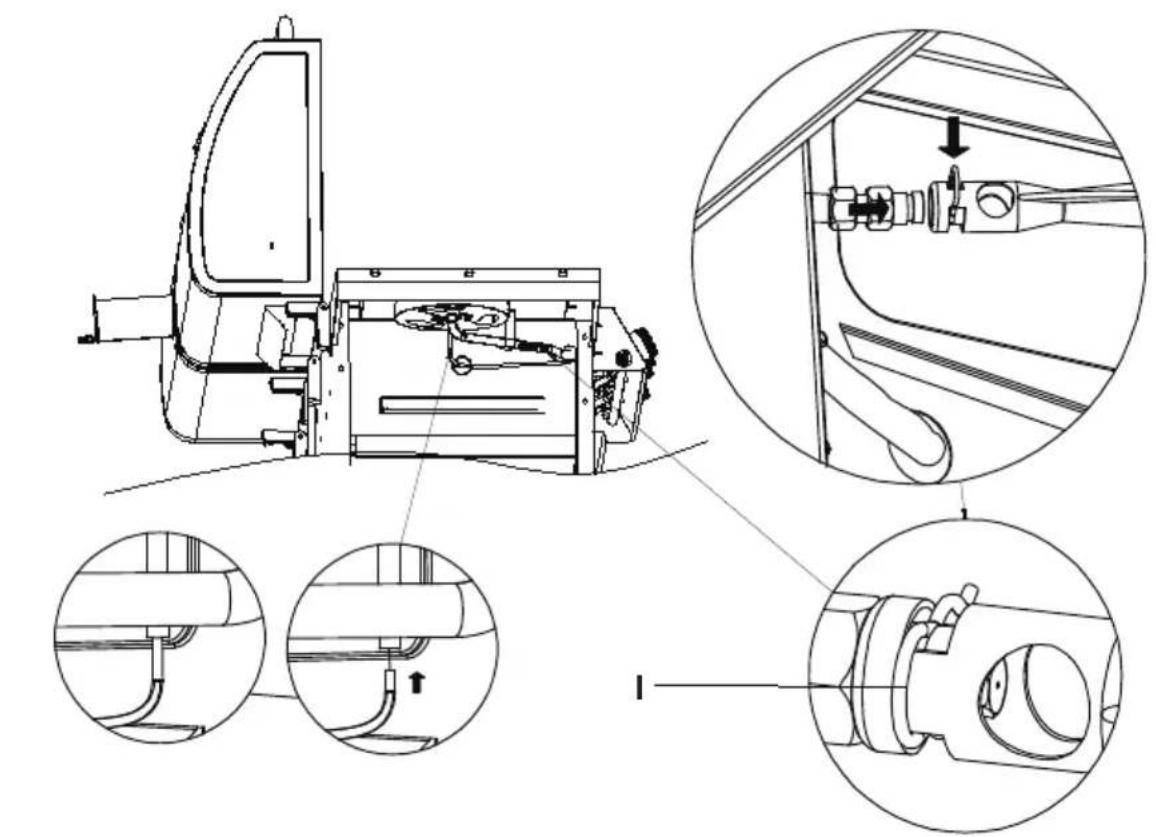
Technical diagram of a mechanical assembly with labeled components and detail views19
IX1
20
natural_image
Line drawing of a portable electric grill with two main chambers and control panel (no text or labels)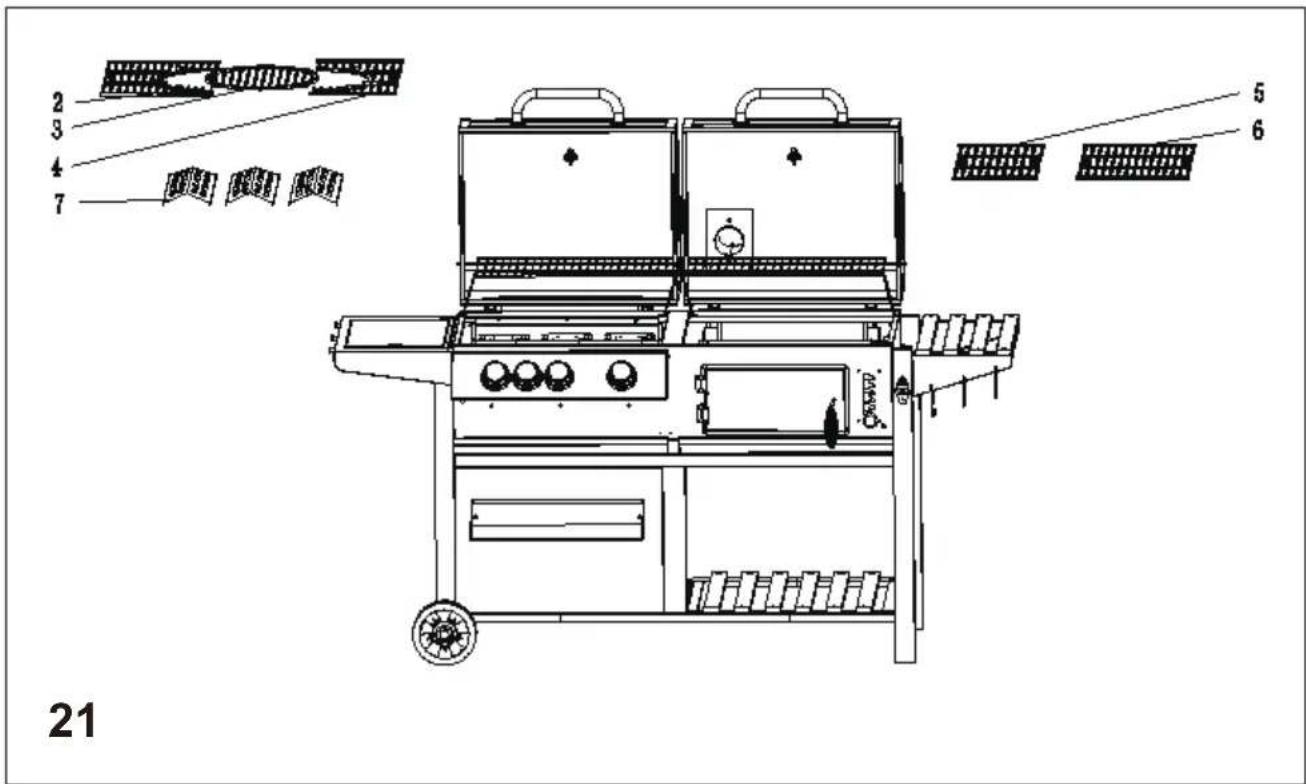
text_image
2 3 4 7 5 6 21
area
| Category | Value | |---|---| | 1 | 100 | | 2 | 100 | | 3 | 100 | | 4 | 100 | | 5 | 100 | | 6 | 100 | | 7 | 100 | | 8 | 100 | | 9 | 100 | | 10 | 100 | | 11 | 100 | | 12 | 100 | | 13 | 100 | | 14 | 100 | | 15 | 100 | | 16 | 100 | | 17 | 100 | | 18 | 100 | | 19 | 100 | | 20 | 100 | | 21 | 100 | | 22 | 100 | | 23 | 100 | | 24 | 100 | | 25 | 100 | | 26 | 100 | | 27 | 100 | | 28 | 100 | | 29 | 100 | | 30 | 100 | | 31 | 100 | | 32 | 100 | | 33 | 100 | | 34 | 100 | | 35 | 100 | | 36 | 100 | | 37 | 100 | | 38 | 100 | | 39 | 100 | | 40 | 100 | | 41 | 100 | | 42 | 100 | | 43 | 100 | | 44 | 100 | | 45 | 100 | | 46 | 100 | | 47 | 100 | | 48 | 100 | | 49 | 100 | | 50 | 100 | | 51 | 100 | | 52 | 100 | | 53 | 100 | | 54 | 100 | | 55 | 100 | | 56 | 100 | | 57 | 100 | | 58 | 100 | | 59 | 100 | | 60 | 100 | | 61 | 100 | | 62 | 100 | | 63 | 100 | | 64 | 100 | | 65 | 100 | | 66 | 100 | | 67 | 100 | | 68 | 100 | | 69 | 100 | | 70 | 100 | | 71 | 100 | | 72 | 100 | | 73 | 100 | | 74 | 100 | | 75 | 100 | | 76 | 100 | | 77 | 100 | | 78 | 100 | | 79 | 100 | | 80 | 100 | | 81 | 100 | | 82 | 100 | | 83 | 100 | | 84 | 100 | | 85 | 100 | | 86 | 100 | | 87 | 100 | | 88 | 100 | | 89 | 100 | | 90 | 100 | | 91 | 100 | | 92 | 100 | | 93 | 100 | | 94 | 100 | | 95 | 100 | | 96 | 100 | | 97 | 100 | | 98 | 100 | | 99 | 100 | | Note: The actual values in the 'Value' column are not provided in the code. I have used the label 'The Region' to represent the 'Region'. The values are estimated based on the provided code.