
BIK7 CPH8TS PT - Oven BAUKNECHT - Free user manual and instructions
Find the device manual for free BIK7 CPH8TS PT BAUKNECHT in PDF.
| Product type | Built-in multifunction steam oven |
| Brand | Bauknecht |
| Model | BIK7 CPH8TS PT |
| Power supply | 230 V ~ 50 Hz, 16 A (adjustable 13 A) |
| Maximum power | Approximately 3.5 kW |
| Water tank capacity | Approximately 1.5 liters |
| Number of functions | More than 20 functions including Fan forced, Convection grill, Grill, Turbo grill, Pure steam, Fan forced + steam, Defrost, Dough rising, Slow cooking, Eco, Diamond Clean, etc. |
| Cooking types | Natural convection, fan forced, steam, grill, combined steam+heat, slow cooking, keep warm |
| Automatic programs | My Menu: lasagna, meat, fish, vegetables, cakes, pizza, bread, etc. |
| Cooking levels | 5 shelf levels |
| Lighting | Halogen bulb 20-40 W, type G9, T300 °C |
| Cleaning | Diamond Clean (low-temperature steam), drain, automatic descaling |
| Removable door | Yes, for easier cleaning |
| Supplied accessories | Metal grid, drip tray, baking tray, steam basket, telescopic rails (depending on model) |
| Safety | Key lock, automatic stop when door opens |
| Repairability | User-replaceable bulb, regular descaling recommended, parts available via after-sales service |
| Energy consumption | Adjustable Eco mode, brightness reduction and lamp off |
Frequently Asked Questions - BIK7 CPH8TS PT BAUKNECHT
User questions about BIK7 CPH8TS PT BAUKNECHT
0 question about this device. Answer the ones you know or ask your own.
Ask a new question about this device
Download the instructions for your Oven in PDF format for free! Find your manual BIK7 CPH8TS PT - BAUKNECHT and take your electronic device back in hand. On this page are published all the documents necessary for the use of your device. BIK7 CPH8TS PT by BAUKNECHT.
USER MANUAL BIK7 CPH8TS PT BAUKNECHT
PHASE 2:ENTKALKEN (~120 MIN)
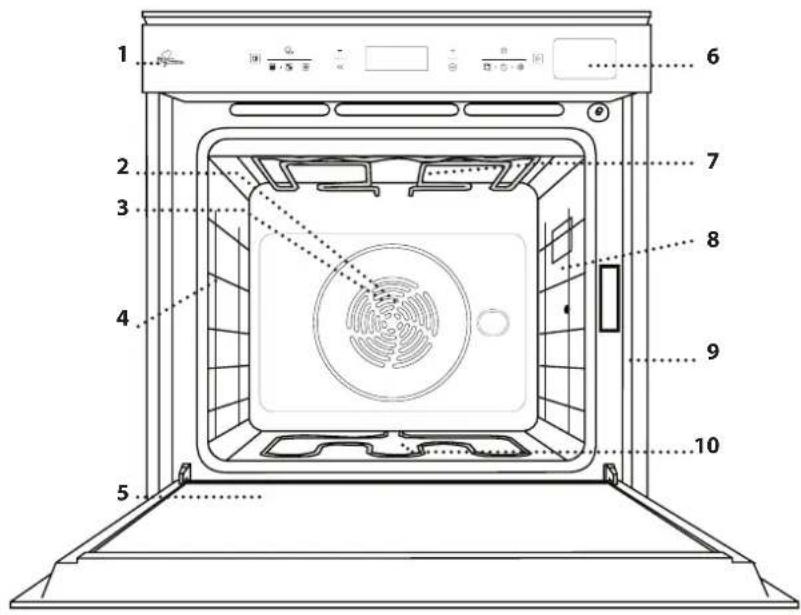
- Control panel
2.Fan - Circular heating element (not visible)
- Shelf guides (the level is indicated on the front of the oven)
- Door
- Water drawer
- Upper heating element/grill
- Lamp
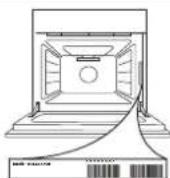
- Identification plate (do not remove)
- Lower heating element (not visible)
CONTROL PANEL DESCRIPTION

1. ON/OFF
For switching the oven on and off and for stopping an active function.
2. FUNCTIONS DIRECT ACCESS
For quick access to the functions and menu.
3. NAVIGATION BUTTON MINUS
For scrolling through a menu and decrease the settings or values of a function.
4. BACK
For returning to the previous screen.
During cooking allows to change settings.
- DISPLAY
6. CONFIRM
For confirming a selected function or a set value.
7. NAVIGATION BUTTON PLUS
For scrolling through a menu and increasing the settings or values of a function.
8 OPTIONS / FUNCTIONS DIRECT ACCESS
For quick access to the functions, duration, settings and favorites.
9. START
For starting a function using the specified or basic settings.
ACCESSIONS
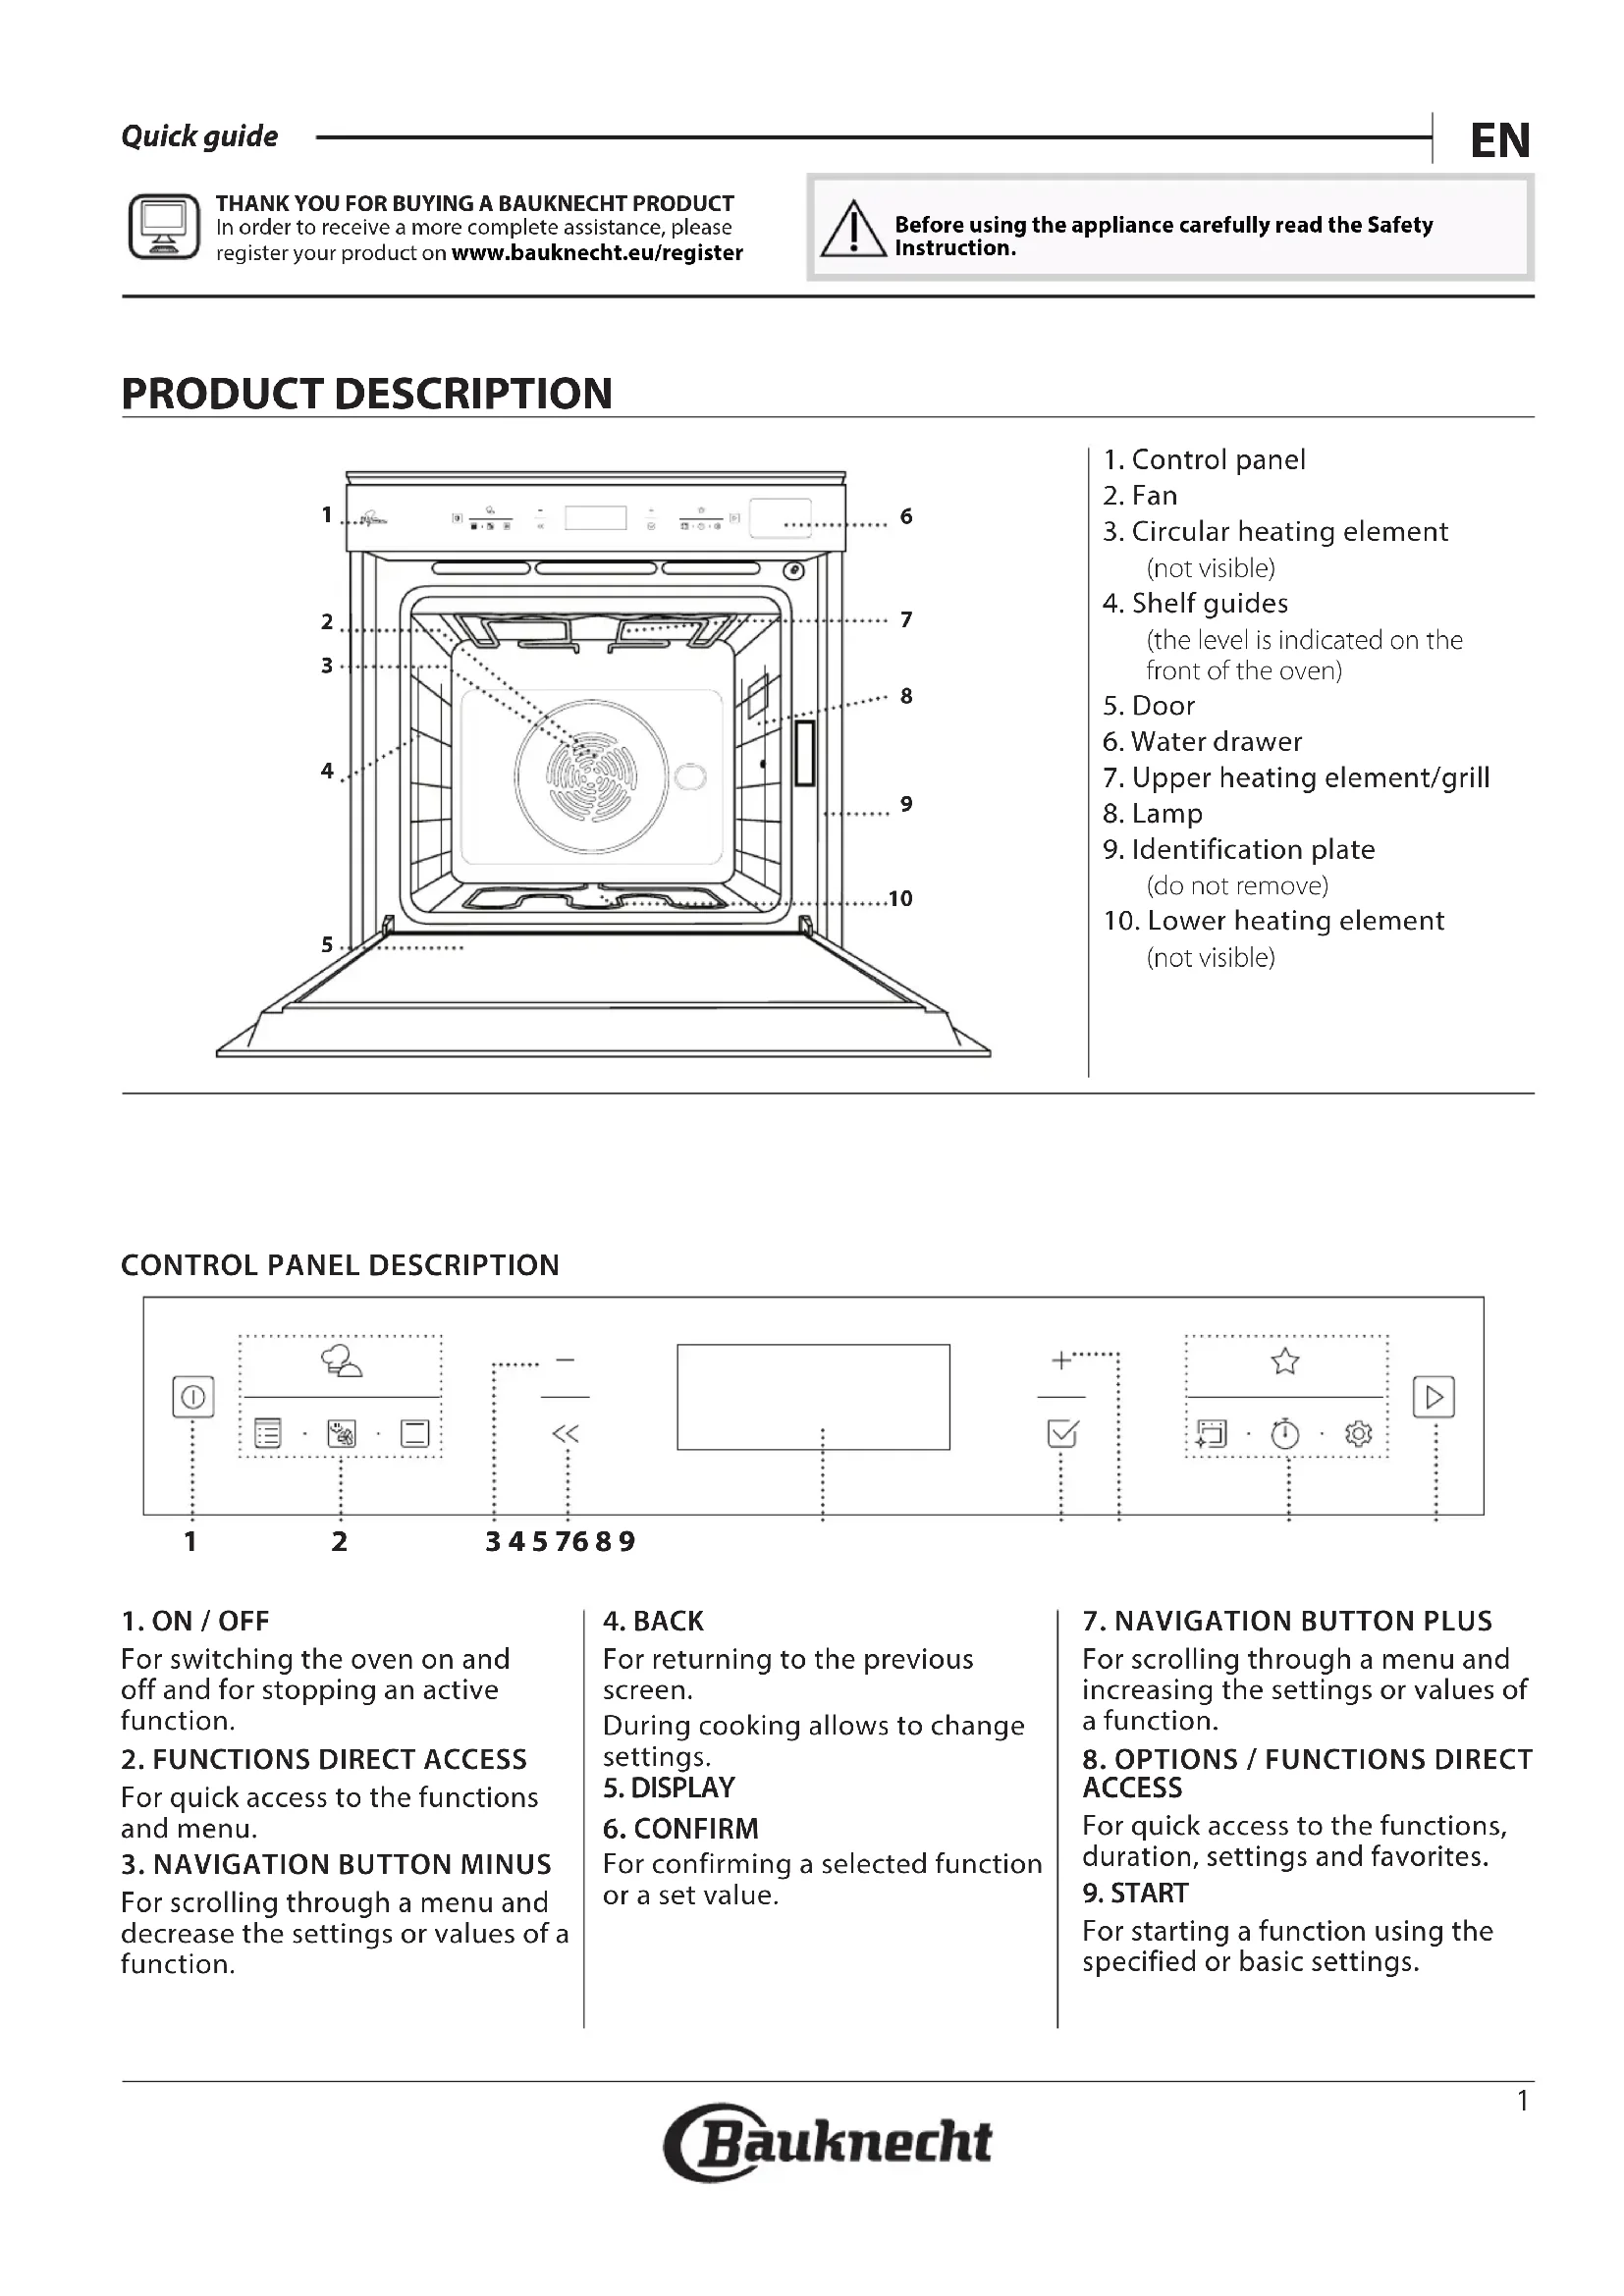
WIRE SHELF
Use to cook food or as a support for pans, cake tins and other ovenproof items of cookware

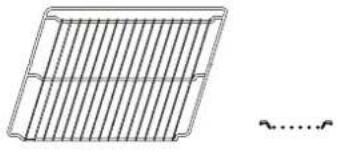
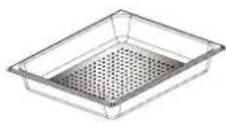
DRIP TRAY
Use as an oven tray for cooking meat, fish, vegetables, focaccia, etc. or position underneath the wire shelf to collect cooking juices.
BAKING TRAY
Use for cooking all bread and pastry products, but also for roasts, fish en papillotte, etc.
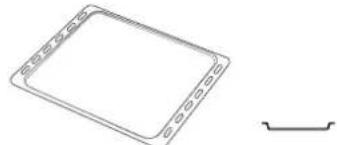
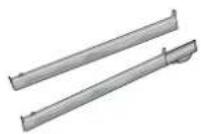
SLIDING RUNNERS*
To facilitate inserting or removing accessories.
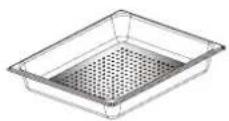
STEAM TRAY
10
This makes it easier for steam to circulate, which helps cook the food evenly. Place the drip tray on the level below to collect the cooking juices.
- Available only on certain models
** Use for STEAM function only
The number and the type of accessories may vary depending on which model is purchased.
Other accessories can be purchased separately from the After-sales Service.
INSERTING THE WIRE SHELF AND OTHER ACCESSORIES
Insert the wire shelf horizontally by sliding it across the shelf guides, making sure that the side with the raised edge is facing upwards.
Other accessories, such as the drip tray and the baking tray, are inserted horizontally in the same way as the wire shelf.
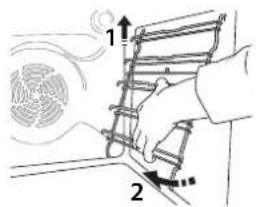
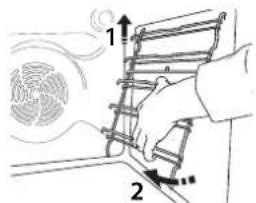
REMOVING AND REFITTING THE SHELF GUIDES
. To remove the shelf guides, remove the fixing screws (if present) on both sides with the aid of a coin of a tool. Lift the guides up and pull the lower parts out of their seatings: The shelf guides can now be removed.
. To remove the shelf guides, remove the fixing screws (if present) on both sides with the aid of a coin of a tool. Lift the guides up and pull the lower parts out of their seatings: The shelf guides can now be removed.
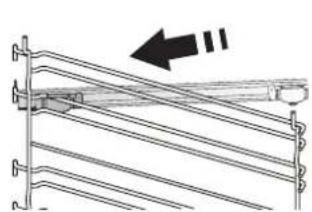
FITTING THE SLIDING RUNNERS (IF PRESENT)
Remove the shelf guides from the oven and remove the protective plastic from the sliding runners.
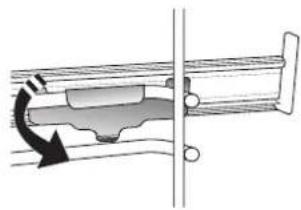
Fasten the upper clip of the runner to the shelf guide and slide it along as far as it will go. Lower the other clip into position. To secure the guide, press the lower portion of the clip firmly against the shelf guide.
Make sure that the runners can move freely. Repeat these steps on the other shelf guide on the same level.
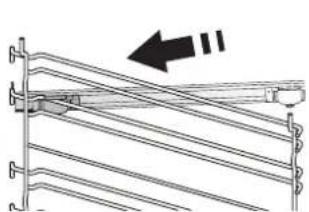
Please note: The sliding runners can be fitted on any level.
FUNCTIONS

MY MENU
These allow a fully automatic cooking for all types of food (Lasagna, Meat, Fish, Vegetables, Cakes & Pastries, Salty cakes, Bread, Pizza). To use at best this function, follow the indications on the relative cooking table.

MANUAL FUNCTIONS
FORCED AIR
For cooking different foods that require the same cooking temperature on several shelves (maximum three) at the same time. This function can be used to cook different foods without odours being transferred from one food to another.
- CONVECT BAKE
For cooking meat, baking cakes with fillings on one shelf only.
- MULTIFLOW MENU
For cooking different foods that require the same cooking temperature on four levels at the same time. This function can be used to cook cookies, cakes, round pizzas (also frozen) and to prepare a complete meal. Follow the cooking table to obtain the best results.
GRILL FUNCTIONS
》GRILL
For grilling steaks, kebabs and sausages, cooking vegetables au gratin or toasting bread. When grilling meat, we recommend using a drip tray to collect the cooking juices: Position the tray on any of the levels below the wire shelf and add 500 ml of drinking water.
TURBO GRILL
For roasting large joints of meat (legs, roast beef, chicken). We recommend using a drip tray to collect the cooking juices: Position the pan on any of the levels below the wire shelf and add 500ml of drinking water.
MY FROZEN FOOD
The function automatically selects the ideal cooking temperature and mode for 5 different types of ready frozen food. The oven does not have to be preheated.
SPECIALS
DEFROSTING
To speed up defrosting of food. Place food on the middle shelf. Leave food in its packaging to prevent it from drying out on the outside.
> KEEP WARM
For keeping just-cooked food hot and crisp.
》RISING
For optimal proving of sweet or savoury dough. To maintain the quality of proving, do not activate the function if the oven is still hot following a cooking cycle.
》MAXI COOKING
For cooking large joints of meat (above 2.5kg ). It is advisable to turn the meat over during cooking, to obtain even browning on both sides. It is best to baste the meat every now and again to prevent it from drying out.
ECO FORCED AIR
For cooking stuffed roasting joints and filletsof meat on a single shelf. Food is prevented from drying out excessively by gentle, intermittent air circulation. When this ECO function is in use, the light will remain switched off during cooking. To use the ECO cycle and therefore optimise power consumption, the oven door should not be opened until the food is completely cooked.
SLOW COOKING
To gently cook meat and fish. This function cooks food slowly to keep it tender and succulent. Due to the low temperature, the food does not brown on the outside and the end result is similar to steam cooking. We recommend searing roast meat in a pan first to brown the meat and help seal in its natural juices. For best results, keep the oven door closed during cooking in order to avoid heat dispersion. Suggested cooking times ranges for fish (300 g - 3 kg) are between 2-5 hours, for meat (1-3 kg) between 4-7 hours.
- FAST PREHEAT
For preheating the oven quickly.

FORCED AIR + STEAM
- PURE STEAM
For cooking natural and healthy dishes using steam to preserve the food's natural nutritional value. This function is particularly suited to cooking vegetables, fish and fruit, and also for blanching. Unless otherwise indicated, remove all packaging and protective film before placing the food in the oven
FORCED AIR + STEAM
Combining the properties of steam with those of the forced air, this function allows you to cook dishes pleasantly crispy and browned outside, but at the same time tender and succulent inside. To achieve the best cooking results, we recommend to select a HIGH steam level for fish cooking, MEDIUM for meat and LOW for bread and desserts.

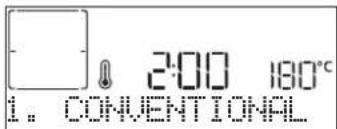
CONVENTIONAL

For cooking any kind of dish on one shelf only.

MY FAVORITES
For retrieving up the list of 10 favorite functions.
CLEANING
DIAMOND CLEAN
The action of water vapor released during this special cycle of cleaning by means of a low temperature, facilitates removal of grime.
Activate the function when the oven is cold.
- DRAIN
For draining the boiler, thereby ensuring it contains no residual water.
- DESCALE
For removing limescale deposits from the boiler. We recommend using this function at regular intervals. If yo do not, a message will appear on the display reminding you to
clean the oven.

MINUTEMINDER
For keeping time without activating a function.

SETTINGS
For adjust the oven settings.
When "ECO" mode is active the brightness of the display will be reduced to save energy and lamp switches off after 1 minute. It will
FIRSTTIMEUSE
1. SELECT THE LANGUAGE
You will need to set the language and the time when you switch on the appliance for the first time: "English" will show on the display.

Press or to scroll through the list of available languages and select the one you require. Press to confirm your selection.
Please note: The language can subsequently be changed by selecting "LANGUAGE" in "SETTINGS" menu, available by pressing
2. SET THE POWER CONSUMPTION
The oven is programmed to consume a level of electrical power that is compatible with a domestic network that has a rating of more than 3kW (16): If your household uses a lower power, you will need to decrease this value (13).
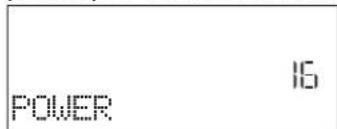
Turn the adjustment knob to select 16 "High" or 13 "Low" and press to confirm.
DAILYUSE
1. SELECT A FUNCTION
Press to switch on the oven: the display will show the last running main function or the main menu. The functions can be selected by pressing the icon for one of the main functions or by scrolling through a menu: To select an item from a menu (the display will show the first available item), press + or to select the desired one, then press + to confirm.
2. SET THE FUNCTION
After having selected the function you require, you can change its settings. The display will show the settings that can be changed in sequence. Pressing allows you to change the previous setting again.
When the value flashes on the display, press or to change it, then press to confirm and continue with the settings that follow (if possible).
be reactivated automatically whenever any of the buttons are pressed.
When "DEMO" is "On" all commands are active and menus available but the oven doesn't heat up. To deactivate this mode, acquire "DEMO" from "SETTINGS" menu and select "Off".
By selecting "FACTORY RESET", the product switches off and then it returns to first switch on. All settings will be deleted.
3. SET THE TIME
After selecting the power, you will need to set the current time: The two digits for the hour will flash on the display.

Press or to set the current hour and press: The two digits for the minutes will flash on the display.
Press + or to set the minutes and press to confirm.
Please note: You may need to set the time again following lengthy power outages. Select "CLOCK" in "SETTINGS" menu, available by pressing
4. HEAT THE OVEN
A new oven may release odours that have been left behind during manufacturing: this is completely normal. Before starting to cook food, we therefore recommend heating the oven with it empty in order to remove any possible odours. Remove any protective cardboard or transparent film from the oven and remove any accessories from inside it. Heat the oven to 200^ for around one hour, ideally using a function with air circulation (e.g. "Forced Air" or "Convection Bake").
Please note: It is advisable to air the room after using the appliance for the first time.
In the same way, it is possible to set the grill level: There are three defined power levels for grilling: 3 (high), 2 (mid), 1 (low). In "Forced Air + Steam" function, you can select the amount of steam from the following values: 1 (Low), 2 (Mid), 3 (High).
Please note: Once the function has been activated, the values can be changed using + or -
DURATION
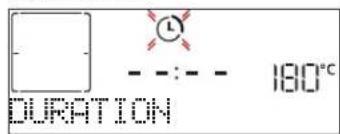
When the icon flashes on the display, press or + - to set the cooking time you require and then press to confirm. You do not have to set the cooking time if you want to manage cooking manually (untimed): Press or to confirm and start the function. By selecting this mode, you cannot program a delayed start.
Please note: You can adjust the cooking time that has been set during cooking by pressing << : press or to amend it and then press l to confirm.
END TIME (START DELAY)
In many functions, once you have set a cooking time you can delay starting the function by programming its end time. The display shows the end time while the icon flashes.
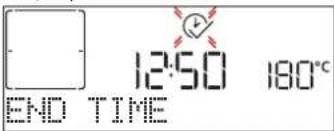
Press to set the time you want cooking to end, then press to confirm and activate the function. Place the food in the oven and close the door. The function will start automatically after the period of time that has been calculated in order for cooking to finish at the time you have set.
Please note: Programming a delayed cooking start time will disable the oven preheating phase: The oven will reach the temperature your require gradually, meaning that cooking times will be slightly longer than those listed in the cooking table. During the waiting time, you can press + or to amend the programmed end time or press << to change other settings. By pressing in order to visualize information, it is possible to switch between end time and duration.
.MY MENU
These functions automatically select the best cooking mode, temperature and duration to cook, roast or bake all the dishes available. When required, simply indicate the characteristic of food to obtain an optimal result.
WEIGHT / HEIGHT / PIZZA (ROUND-TRAY-LAYERS)

To set the function correctly, follow the indications on the display: when prompted, press + or to set the required value then press × to confirm.
DONENESS/BROWNING
In some My Menu functions it is possible to adjust the doneness level.
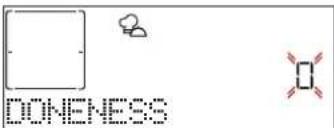
When prompted, press or to select the desired level between rare (-1) and well done (+1). Press l or to confirm and start the function.
In the same way, where allowed, in some My Menu functions, it's possible to adjust the browning level between low (-1) and high (1).
. COOKING WITH STEAM
By selecting the "Forced Air + Steam/Pure steam", or one of the several My Menu dedicated recipes it is possible cook any kind of food thanks to the use of the steam.
Steam spreads more quickly and more evenly through food compared to just the hot air typical of Conventional Functions: this reduce cooking times, locking in food's precious nutrients and ensuring you obtain excellent, truly delicious results with all your recipes. Through the complete duration of the steam cooking the door must be kept closed.
For proceed with steam cooking, it will be necessary fill the tank located inside the oven using the drawer on the control panel.
When requested on the display with "ADD WATER" or "FILL DRAWER" indications, open the drawer by pressing it lightly. Pour in slowly some drinking water until the display shows "FILL COMPLETED". Maximum tank capacity is approx. 1.5 litre.
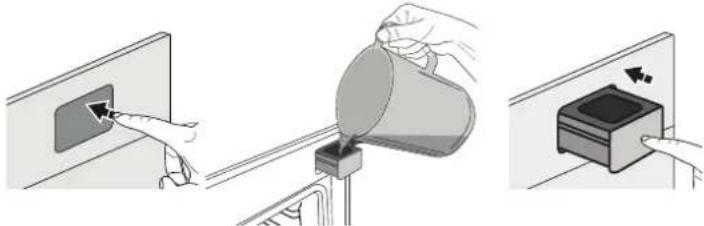
It will be necessary to add water only when the tank won't be filled enough to complete the cooking.
Avoid to fill the tank when the oven is switched off or up to it will requested from the display.
3. START THE FUNCTION
At any time, if the default values are those desired or once you have applied the settings you require, press to activate the function.
During the delay phase, by pressing the oven will start immediately the function.
Please note: Once a function has been selected, the display will recommend the most suitable level for each function.
At any time you can stop the function that has been activated by pressing 0 .
If the oven is hot and the function requires a specific maximum temperature, a message will shown on the display. Press to return to previous screen and select a different function or wait for a complete cooling.
4. PREHEATING
Some functions have an oven preheating phase: Once the function has started, the display indicates that the preheating phase has been activated.
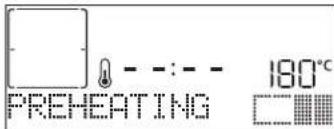
Once this phase has finished, an audible signal will sound and the display will indicate that the oven has reached the set temperature, requiring to "ADD FOOD".
At this point, open the door, place the food in the oven, close the door and start cooking.
Please note: Placing the food in the oven before preheating has finished may have an adverse effect on the final cooking result.
Opening the door during the preheating phase will stop pause it.
The cooking time does not include a preheating phase. You can always change the temperature you want the oven to reach using + or -
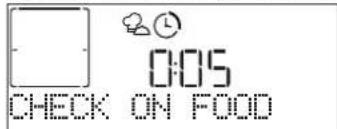
5. PAUSE COOKING / TURN OR CHECK FOOD
By opening the door, the cooking will be temporarily paused through deactivating heating elements.
To resume the cooking, close the door.
Some My Menu functions will require the food to be turned
during cooking.

An audible signal will sound and the display shows the action to be done. Open the door, do the action prompted by the display and close the door and resume cooking. In the same way, at 10% of time before the end of cooking, the oven prompts you to check the food.
An audible signal will sound and the displays shows the action must to be done. Check the food, close the door and resume cooking.
Please note: Press skip these actions. Otherwise, if no action is done after a certain time the oven will continue the cooking.
6.END OF COOKING
An audible signal will sound and the display will indicate that cooking is complete.
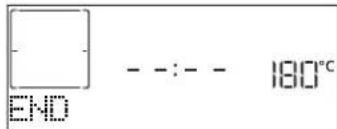
Press to continue cooking in manual mode (untimed) or press + to extend the cooking time by setting a new duration. In both cases, the cooking parameters will be retained. Once the food has been removed, leave the oven cooling down with the door closed.
BROWNING
Some functions of the oven enable you to brown the surface of the food by activating the grill once cooking is complete.

When the display shows the relevant message, if required press to start a five-minute browning cycle. You can stop the function at any time by pressing to switch the oven off.
.FAVORITES
Once cooking is complete the display will prompt you to save the function in a number between 1 and 10 on your list of favorites.
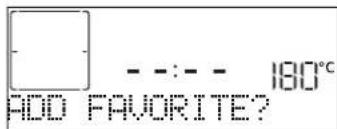
If you would like to save a function as a favorite and store the current settings for future use, press l otherwise, to ignore the request press. Once has been pressed, press the + or to select the number position, then press to confirm.
Please note: If the memory is full or the number chosen has already been taken, the oven will ask you to confirm overwriting the previous function.
To call up the functions you have saved at a later time, press : The display will show your list of favorite functions.
Press to select the function, confirm by pressing, and then press to activate.

CLEANING
DIAMOND CLEAN
Press to show "Diamond Clean" on the display.

Press to activate the function: the display will prompt you to do all actions needed to obtain the best cleaning results: Follow the indications and then press when done. Once you have done all steps, when required press to activate the cleaning cycle.
Please note: It is recommended to do not open the oven door during the cleaning cycle to avoid a loss of water vapor that could get an adverse effect on the final cleaning result.
An appropriate message will start flashing on the display once the cycle has finished. Leave the oven to cool and then wipe and dry the interior surfaces with a cloth or sponge.
DRAIN
The drain function allows the water to be drained in order to prevent stagnation in the tank. For optimal use of the appliance, it is advisable to always carry out draining every time the oven has been used with a steam cycle.
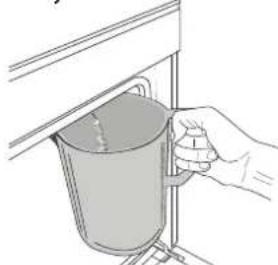
Once selected the "Drain" function, press and follow the actions indicated: Open the door and place a large jug under the drain nozzle located at the bottom right of the panel. Once started the draining, keep the jug in position until the operation is completed. The average duration for full load
drainage is about three minutes.
If needed, it is possible to pause the draining process by pressing BACK or STOP button (for example in case the jug would be already full of water in the middle of the draining process).
The jug must be at least 2 liters large.
Please note: to ensure that the water is cold, it is not possible to perform this activity before 4 hours have elapsed from the last cycle (or the last time the product was powered). During this waiting time, the display will show the following feedback "WATER IS HOT - PLEASE WAIT".
- DESCALE
This special function, activated at regular intervals, allows you to keep the tank and the steam circuit in the best condition.
The message < PLEASE DESCALE> will be shown on display, to remind you to execute this operation regularly.
Descale requirement is triggered by the number of steam cooking cycles performed or steam boiler working hours since the last descale cycle (see the table below).
| "PLEASE DESCALE"MESSAGE appears after | WHAT TO DO |
| 15 cycles of steam cooking | Descale is recommended |
| 22 hours of steam cooking duration | |
| 20 cycles of steam cooking | It is not possible to run a Steam cycle until a Descale cycle will be carried out |
| 30 hours of steam cooking duration |
The descending procedure can also be performed whenever the user desires a deeper cleaning of the tank and the internal steam circuit.
The average duration of the full function is around 180 minutes. Once the function is started, follow all the steps indicated on the display.
Please note: The function can be paused but, if it is canceled at any time, the entire descending cycle must be repeated from the beginning.
PHASE 1: DRAINING (up to 3 min.)
When the display will show
Please note: to ensure that the water is cold, it is not possible to perform this activity before 4 hours have elapsed from the last cycle (or the last time the product was powered). During this waiting time, the display will show the following feedback "WATER IS HOT - PLEASE WAIT".
The jug must be at least 2 liters large.
PHASE 2: DESCALING (~120 MIN.)
When display will show <ADD 1.7 L OF SOLUTION> , please pour the descending solution in the drawer. We recommend to prepare the descending solution adding 3 sachets (corresponding to 75g) of the specific Oven WPRO* descaler in 1,7 liters of drinking water at ambient temperature.
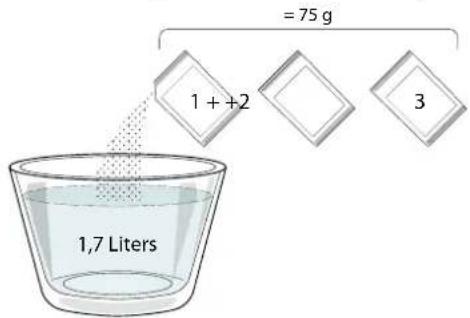
Once the descending solution is poured inside the drawer, press to start the main descending process. The descending phases do not need you to stay in front of the appliance. After each phase is completed, an acoustical feedback will be played and the display will show instructions to proceed with the next phase.
PHASE 3: DRAINING (up to 3 min.)
When the display will show
PHASE 4: RINSING (~20 min.)
To clean the tank and the steam circuit, rinse cycle has to be
done. When the display shows
PHASE 5: DRAINING (up to 3 min.)
PHASE 6: RINSING (~20 min.)
PHASE 7: DRAINING (up to 3 min.)
PHASE 8: RINSING (~20 min.)
PHASE 9: DRAINING (up to 3 min.)
After the last draining operation press OK to complete the descale. When Descale procedure is completed, it will be possible to use all the steam functions.
*WPRO descaler is the suggested professional product for the maintenance of the best performance of your steam function in the oven. Please follow the instructions for use on the packaging. For orders and information contact the after sales service or www.
bauknecht.eu
Bauknecht will not be held responsible for any damage caused by the use of other cleaning products available on the market.
. MINUTEMINDER
When the oven is switched off, the display can be used as a timer. To activate this function, make sure that the oven is switched off and press + or :The icon will flash on the display.
Press + or to set the length of time you require and then press to activate the timer.

An audible signal will sound and the display will indicate once the minuteminder has finished counting down the selected time.
Please note: The minuteminder does not activate any of the cooking cycles. Press + or to change the time set on the timer; press << or to switch the timer off at any time.
Once the minuteminder has been activated, you can also select and activate a function.
Press to switch on the oven and then select the function you require.
Once the function has started, the timer will continue to count down independently without interfering with the function itself.
Please note: During this phase, it isn't possible to see the minuteminder (only the icon will be displayed), that will continue counting down in background. To retrieve the minuteminder screen press to stop the function that is currently active.
. KEYLOCK
To lock the keypad, press and hold for at least five seconds. Do this again to unlock the keypad.
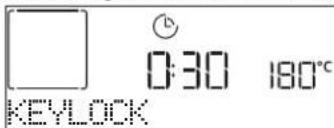
Please note: This function can also be activated during cooking. For safety reasons, the oven can be switched off at any time by pressing
| BAKED | MAIN DISHES | Lasagna | 2 | 0.5 - 3 kg | Prepare according to your favorite recipe. Your bechamel sauce on top and sprinkle with cheese to get perfectbrowning |
| Salty cakes | 2 | 0.8 - 1.2 kg | Line a pie dish for 8-10 portions with a pastry and pierce it with a fork, Fill the pastry according to your favorite recipe | ||
| Vegetables-stuffed | 3 | 0.1 - 0.5 kg each | Brush with oil and rub with salt and pepper. Season with garlic and herbs as you prefer | ||
| PIZZA & BREAD | Rolls | 3 | 60 - 150 g each | Prepare dough according to your favorite recipe and place it on baking tray | |
| Sandwich Loaf in tin | 2 | 400 - 600 g each | Prepare dough according to your favorite recipe for a light bread. Form into a loaf container before rise. Use the oven dedicated function to rise | ||
| Big bread | 2 | 0.7 - 2.0 kg | Prepare dough according to your favorite recipe and place it on baking tray | ||
| Baguettes | 3 | 200 - 300 g each | Prepare dough according to your favorite recipe for a light bread. Form to baguette rolls before rise. Use the oven dedicated function to rise | ||
| Thin pizza | 2 | round - tray | Prepare a pizza dough based on 150ml water, 15g yeast, 200-225g flour, oil and salt. Rise it using the dedicated oven function. Roll out the dough into a lightly greased baking tray. Add topping like tomatoes, mozzarella and ham | ||
| Thick pizza | 2 | round - tray | |||
| Pizza-frozen | 2415315421 | 1 - 4 layers Take out from packaging | |||
| CAKES & PASTRIES | Sponge Cake in tin | 2 | 0.5 - 1.2 kg | Prepare a fatless sponge cake batter of 500-900g. Pour into lined and greased baking pan | |
| Cookies | 3 | 0.2 - 0.6 kg | Make a batch of 500g flour, 200g salted butter, 200g sugar, 2 egg. Flavor with fruit essence. Let cool down. Stretch evenly the dough and shape as you prefer. Lay the cookies on a baking tray | ||
| Choux pastry | 3 | 1 tray Distribute evenly in the baking tray. Let cool down before use | |||
| Tart in tin | 3 | 0.4 - 1.6 kg | Make a batch of 500g flour, 200g salted butter, 200g sugar, 2 egg. Flavor with fruit essence. Let cool down. Stretch evenly the dough and fold in a tin. Fill with marmalade a cook | ||
| Strudel | 3 | 0.4 - 1.6 kg | Prepare a mix of sliced apple, pine nuts, cinnamon and nutmeg. Put some butter in a pan, sprinkle with sugar and cook for 10-15 minutes. Roll it into a pastry and fold the external part | ||
| Fruit filled pie | 2 | 0.5 - 2 kg | Line a pie dish with the pastry and sprinkle the bottom with bread crumbs to absorb the juice from the fruit. Fill with chopped fresh fruit mixed with sugar and cinnamon | ||
| ROASTED | MEAT | Beef-roasted | 3 | 0.6 - 2 kg | Brush with oil and rub with salt and pepper. Season with garlic and herbs as you prefer. At the end of cooking let rest for at least 15 minutes before carving |
| Pork-roasted | 3 | 0.6 - 2.5 kg | Brush with oil and season as you prefer. Rub with salt and pepper. Insert into the oven with the breast side up | ||
| Chicken-roasted | 2 | 0.6 - 3 kg | Brush with oil and season as you prefer. Rub with salt and pepper. Insert into the oven with the breast side up | ||
| SIDE DISH | Vegetables-roasted | 3 | 0.5 - 1.5 kg | Brush with oil and rub with salt and pepper. Season with garlic and herbs as you prefer | |
| Potatoes | 3 | 0.5 - 1.5 kg | Cut in pieces, season with oil, salt and flavor with herbs before insert into the oven |
| ACCESSORIES | ...... Wire shelf | Oven tray or cake tin on wire shelf | Drip tray / Baking tray or oven tray on wire shelf | Drip tray / Baking tray | Drip tray with 500 ml of water | Steam Tray |
| Food categories Level and Accessories Quantity Cooking Tips | ||||
| GRILLED MEAT | Hamburgers | 5 4 | 1.5 - 3 cm Brush with oil and sprinkle with salt before cooking | |
| Sausages & wurstel | 5 4 | 1.5 - 4 cm | Distribute evenly on the wire shelf. Pierce the sausages with a fork to avoid cracking | |
| Kebabs | 5 4 | 1 grid | Brush with oil and sprinkle with salt before cooking | |
| Fillet & breast | 5 4 | 1 - 5 cm | ||
| Filets | 3 2 | 0.5 - 3 cm | Brush with oil and rub with salt and pepper. Season with garlic and herbs as you prefer | |
| Filets-frozen | 3 2 | 0.5 - 3 cm | Brush with oil and rub with salt and pepper. Season with garlic and herbs as you prefer | |
| SIDE DISH | Tomatoes | 3 | 1 tray | Cover with breadcrumbs and season with oil, garlic, pepper and parsley |
| Peppers | 3 | 1 tray | Prepare according to your favorite recipe. Sprinkle with cheese to get perfect browning | |
| Broccoli gratin | 3 | 1 tray | Prepare according to your favorite recipe. Pour bechamel sauce on top and sprinkle with cheese to get perfect browning | |
| Cauliflower gratin | 3 | 1 tray | ||
| Vegetables gratin | 3 | 1 tray | ||
| MAIN DISHES | White rice | 2 1 | 0.1 - 0.5 kg | Place in a pyrex one part of white rice and water for 1.5 of rice weight. For good results is suggest to not open the door |
| Brown rice | 2 1 | 0.1 - 0.5 kg | Place in a pyrex one part of brown rice and water for 1.5 of rice weight. For good results is suggest to not open the door | |
| Wholegrain rice | 2 1 | 0.1 - 0.5 kg | Place in a pyrex one part of Wholegrain rice and water for 1.5 of rice weight. For good results is suggest to not open the door | |
| MEAT | Chicken fillets | 2 1 | 1 - 5 cm | Distribute evenly in the steam tray, for good results is suggest to not open the door |
| Turkey fillets | 2 1 | 1 - 5 cm | ||
| FISH & SEAFOOD | Scallops | 2 1 | one tray | |
| Mussels | 2 1 | one tray | ||
| Shrimps | 2 1 | one tray | ||
| Prawns | 2 1 | one tray | ||
| Squid | 2 1 | 0.1 - 0.5 kg | ||
| Octopus | 2 1 | 0.5 - 2 kg | ||
| SIDE DISH | Potatoes whole | 2 1 | 0.05-0.5 Kg each | Peal and cut in pieces, distribute evenly in the steam tray, for good results is suggest to not open the door |
| Potatoes | 2 1 | 0.1-2.0 Kg suggested | ||
| Peas | 2 1 | 0.2 - 2.5 Kg | ||
| Broccoli | 2 1 | 0.2 - 2 kg | Distribute evenly in the steam tray, for good results is suggest to not open the door | |
| Cauliflower | 2 1 | 0.2 - 2 kg | ||
| Frozen peas | 2 1 | 0.2 - 3 kg | ||
| ACCESSORIES | Wire shelf | Oven tray or cake tin on wire shelf | Drip tray / Baking tray or oven tray on wire shelf | Drip tray / Baking tray | Drip tray with 500 ml of water | Steam Tray |
| RECIPE STEAM LEVEL PREHEAT TEMPERATURE (°C) DURATION (Min.) | SHELF AND ACCESSORIES | ||||
| Shortbread / Cookies LOW Yes 140 - 150 35 - 55 | 3 | ||||
| Small cake / Muffin LOW Yes 160 - 170 30 - 40 | 3 | ||||
| Leavened cakes LOW Yes 170 - 180 40 - 60 | 2 | ||||
| Sponge cakes LOW Yes 160 - 170 30 - 40 | 2 | ||||
| Focaccia LOW Yes 200 - 220 20 - 40 | 3 | ||||
| Bread loaf | LOW | Yes | 170 - 180 | 70 - 100 | 3 |
| Small bread | LOW | Yes | 200 - 220 | 30 - 50 | 3 |
| Baguette | LOW | Yes | 200 - 220 | 30 - 50 | 3 |
| Roast potatoes | MID | Yes | 200 - 220 | 50 - 70 | 3 |
| Veal / Beef / Pork 1 kg | MID | Yes | 180 - 200 | 60 - 100 | 3 |
| Veal / Beef / Pork (pieces) | MID | Yes | 160 - 180 | 60-80 | 3 |
| Roast Beef rare 1 kg | MID | Yes | 200 - 220 | 40 - 50 | 3 |
| Roast Beef rare 2 kg | MID | Yes | 200 | 55 - 65 | 3 |
| Leg of lamb | MID | Yes | 180 - 200 | 65 - 75 | 3 |
| Stew pork knuckles | MID | Yes | 160 - 180 | 85 - 100 | 3 |
| Chicken / guinea fowl / duck 1 - 1.5 kg | MID | Yes | 200 - 220 | 50 - 70 | 3 |
| Chicken / guinea fowl / duck (pieces) | MID | Yes | 200 - 220 | 55 - 65 | 3 |
| Stuffed vegetables (tomatoes, courgettes, aubergines) | MID | Yes 180 - 200 25 - 40 | 3 | ||
| Fish fillet | HIGH | Yes | 180 - 200 | 15 - 30 | 3 |
PURE STEAM
| Recipe | Preheat | Temperature (℃) | Cook Time (Min.) | Level and Accessories | |
| Fresh vegetables (Whole) | - | 100 | 30 - 80 | 2 12.8..2f | |
| Fresh vegetables (Pieces) | - | 100 | 15 - 40 | 2 12.8..2f | |
| Frozen vegetables | - | 100 | 20 - 40 | 2 12.8..2f | |
| Whole fish | - | 90 | 40 - 50 | 2 12.8..2f | |
| Fish fillets | - | 90 | 20 - 30 | 2 12.8..2f | |
| Chicken fillets | - | 100 | 15 - 50 | 2 12.8..2f | |
| Eggs | - | 100 | 10 - 30 | 2 12.8..2f | |
| Fruit (Whole) | - | 100 | 15 - 45 | 2 12.8..2f | |
| Fruit (Pieces) | - | 100 | 10 - 30 | 2 12.8..2f | |
| ACCESSORIES | Wire shelf | Oven tray or cake tin on wire shelf | Drip tray / Baking tray or oven tray on wire shelf | Drip tray / Baking tray | Steam Tray |
COOKING TABLE
| RECIPE FUNCTION PREHEAT TEMPERATURE (°C) DURATION (Min.) | SHELF AND ACCESSORIES | ||||
| Leavened cakes / Sponge cakes | □ | Yes 170 30 - 50 | 2 | ||
| 图 | Yes | 160 | 30 - 50 | 2 | |
| 图 | Yes | 160 | 30 - 50 | 4 1 | |
| Filled cakes(chesecake, strudel, apple pie) | 图 | Yes | 160 - 200 | 30 - 85 | 3 |
| 图 | Yes | 160 - 200 | 35 - 90 | 4 1 | |
| Cookies / Shortbread | □ | Yes | 150 | 20 - 40 | 3 |
| 图 | Yes | 140 | 30 - 50 | 4 | |
| 图 | Yes | 140 | 30 - 50 | 4 1 | |
| 图 | Yes | 135 40 - 60 | 5 3 1 | ||
| Small cakes / Muffin | □ | Yes 170 20 - 40 | 3 | ||
| 图 | Yes | 150 | 30 - 50 | 4 | |
| 图 | Yes | 150 | 30 - 50 | 4 1 | |
| 图 | Yes | 150 | 40 - 60 | 5 3 1 | |
| Choux buns | □ | Yes | 180 - 200 30 - 40 | 3 | |
| 图 | Yes | 180 - 190 | 35 - 45 | 4 1 | |
| 图 | Yes | 180 - 190 | 35 - 45* | 5 3 1 | |
| Meringues | □ | Yes | 90 | 110 - 150 | 3 |
| 图 | Yes | 90 | 130 - 150 | 4 1 | |
| 图 | Yes | 90 | 140 - 160* | 5 3 1 | |
| Pizza / Bread / Focaccia | □ | Yes | 190 - 250 | 15 - 50 | 2 |
| 图 | Yes | 190 - 230 | 20 - 50 | 4 1 | |
| Pizza (Thin, thick, focaccia) | 图 | Yes | 220 - 240 | 25 - 50* | 5 3 1 |
| Frozen pizza | □ | Yes | 250 | 10 - 15 | 3 |
| 图 | Yes | 250 | 10 - 20 | 4 1 | |
| 图 | Yes | 220 - 240 | 15 - 30 | 5 3 1 | |
| Savoury pies(vegetable pie,quiche) | 图 | Yes | 180 - 190 | 45 - 55 | 3 |
| 图 | Yes | 180 - 190 | 45 - 60 | 4 1 | |
| 图 | Yes | 180 - 190 | 45 - 70* | 5 3 1 | |
| Vols-au-vent / Puff pastry crackers | □ | Yes | 190 - 200 | 20 - 30 | 3 |
| 图 | Yes | 180 - 190 | 20 - 40 | 4 1 | |
| 图 | Yes | 180 - 190 | 20 - 40* | 5 3 1 | |
FUNCTIONS

Conventional

Forced air

Convection bake

Grill

TurboGrill

MaxiCooking

Multiflow

Eco Forced air
| RECIPE FUNCTION PREHEAT TEMPERATURE (°C) DURATION (Min.) | SHELF AND ACCESSORIES | ||||
| Lasagne / Flans / Baked pasta / Cannelloni | Yes 190 - 200 45 - 65 | 3 | |||
| Lamb / Veal / Beef / Pork 1 kg Yes 190 - 200 80 | 3 | ||||
| Roast pork with crackling 2 kg — 170 110 - 150 | 2 | ||||
| Chicken / Rabbit / Duck 1 kg Yes 200 - 230 50 - | 3 | ||||
| Turkey / Goose 3 kg | Yes 190 - 200 | 80 - 130 | 2 | ||
| Baked fish / en papillote (fillets, whole) | Yes 180 - 200 40 - 60 | 3 | |||
| Stuffed vegetables (tomatoes, courgettes, aubergines) | Yes 180 - 200 50 - 60 | 2 | |||
| Toast | — 3 (High) | 3 - 6 | 5 | ||
| Fish fillets / Steaks | — 2 (Mid) | 20 - 30 ** | 4 3 | ||
| Sausages / Kebabs / Spare ribs / Hamburgers | — 2 - 3 (Mid - High) | 15 - 30 ** | 5 4 | ||
| Roast chicken 1-1.3 kg | — 2 (Mid) | 55 - 70 *** | 2 1 | ||
| Leg of lamb / Shanks | — 2 (Mid) | 60 - 90 *** | 3 | ||
| Roast potatoes | — 2 (Mid) | 35 - 55 *** | 3 | ||
| Vegetable gratin | — 3 (High) | 10 - 25 | 3 | ||
| Cookies | Yes 135 | 50 - 70 | 5 4 3 1 | ||
| Tarts | Yes 170 | 50 - 70 | 5 4 3 1 | ||
| Round pizzas | Yes 210 | 40 - 60 | 5 4 2 1 | ||
| Complete meal: Fruit tart (level 5) / lasagna (level 3) / meat (level 1) | Yes 190 | 40 - 120 * | 5 3 1 | ||
| Complete meal: Fruit tart (level 5) / roasted vegetables (level 4) / lasagna (level 2) / cuts of meat (level 1) | Yes 190 | 40 - 120 * | 5 4 2 1 | ||
| Lasagna & Meat | Yes 200 | 50 - 100 * | 4 1 | ||
| Meat & Potatoes | Yes 200 | 45 - 100 * | 4 1 | ||
| Fish & Vegetables | Yes 180 | 30 - 50 * | 4 1 | ||
| Stuffed roasting joints | — 200 | 80 - 120 * | 3 | ||
| Cuts of meat (rabbit, chicken, lamb) | — 200 | 50 - 100 * | 3 | ||
- Estimated length of time: dishes can be removed from the oven at different times depending on personal preference.
Turn food halfway through cooking.
* Turn food two thirds of the way through cooking (if necessary).
The table lists the best function, accessories and level to use to cook different types of food. Cooking times start from the moment food is placed in the oven, excluding preheating (where required). Cooking temperatures and times are approximate and depend on the amount of food and the type of accessory used. Use the lowest recommended settings to begin with and, if the food is not cooked enough, then switch to higher settings. Use the accessories supplied and preferably darkcoloured metal cake tins and baking trays. You can also use Pyrex or stoneware pans and accessories, but bear in mind that cooking times will be slightly longer.
HOW TO READ THE COOKING TABLE
| ACCESSIONS | Wire shelf | Oven tray or cake tin on wire shelf | Drip tray / Baking tray or oven tray on wire shelf | Drip tray / Baking tray | Drip tray with 500 ml of water | Steam Tray |
CLEANING AND MAINTENANCE
Make sure that the oven has cooled down before carrying out any maintenance or cleaning. Do not use steam cleaners. Do not cover the inside of the
oven with aluminium foil. Do not use wire wool, abrasive scourers or abrasive/corrosive cleaning agents, as these could damage the surfaces of the appliance.
Wear protective gloves. The oven must be disconnected from the mains before carrying out any kind of maintenance work.
EXTERIOR SURFACES
Clean the surfaces with a damp microfibre cloth. If they are very dirty, add a few drops of pH-neutral detergent. Finish off with a dry cloth.
. Do not use corrosive or abrasive detergents. If any of these products inadvertently comes into contact with the surfaces of the appliance, clean immediately with a damp microfibre cloth.
INTERIOR SURFACES
After every use, leave the oven to cool and then clean it, preferably while it is still warm, to remove any deposits or stains caused by food residues. To dry any condensation that has formed as a result of cooking foods with a high water content, let the oven to cool completely and then wipe it with a cloth or sponge.
. Activate the "Diamond Clean" function for optimum cleaning of the internal surfaces.
. Clean the glass in the door with a suitable liquid detergent.
. The oven door can be removed to facilitate cleaning.
ACCESSIONS
Soak the accessories in a washing-up liquid solution after use, handling them with oven gloves if they are still hot. Food residues can be removed using a washing-up brush or a sponge.
TANK
To ensure that the oven always works at optimum performance and to help prevent the build-up of limescale deposits over time, we recommend using the "Drain" and "Descale" functions regularly.
After a long period of non-use of the "Forced Air + Steam" function, it is highly suggested to activate a cooking cycle with the empty oven by filling completely the tank.
REPLACING THE LAMP
- Disconnect the oven from the power supply.
- Remove the shelf guides.
- Remove the lamp cover.
- Replace the lamp.
- Reposition the lamp cover, pushing it on firmly until it snaps into place.
- Refit the shelf guides.
- Reconnect the oven to the power supply.
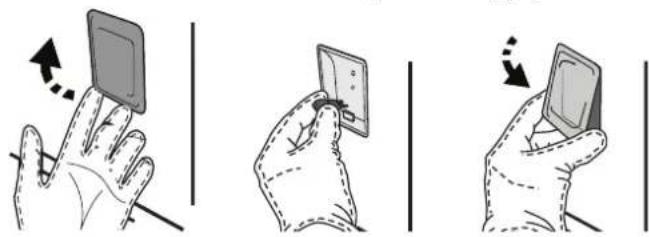
Please note: Only use 20-40 W/230 ~ V type G9, T300°C halogen bulbs. The bulb used in the product is specifically designed for domestic appliances and is not suitable for general room lighting within the home (EC Regulation 244/2009). Light bulbs are available from our After-sales Service.
- If using halogen bulbs, do not handle them with your bare hands as your fingerprints could cause damage. Do not use the oven until the light cover has been refitted.
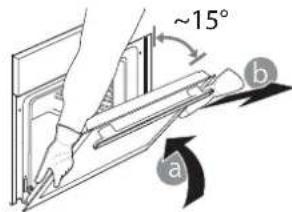
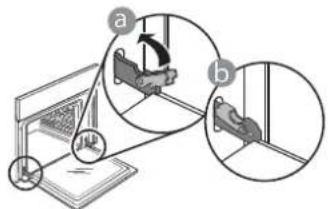
REMOVING AND REFITTING THE DOOR
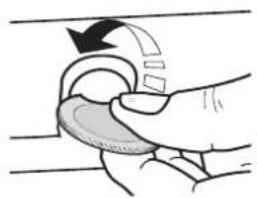
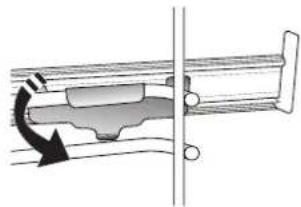
- To remove the door, open it fully and lower the catches until they are in the unlock position.

- Close the door as much as you can. Take a firm hold of the door with both hands – do not hold it by the handle.
Simply remove the door by continuing to close it while pulling it upwards at the same time until it is released from its seating. Put the door to one side, resting it on a soft surface.
-
Refit the door by moving it towards the oven, aligning the hooks of the hinges with their seating and securing the upper part onto its seating.
-
Lower the door and then open it fully. Lower the catches into their original position: Make sure that you lower them down completely.
Apply gentle pressure to check that the catches are in the correct position.

- Try closing the door and check to make sure that it lines up with the control panel. If it does not, repeat the steps above: The door could become damaged if it does not work properly.
TROUBLESHOOTING
| Problem Possible cause Solution | ||
| The oven is not working. | Power cut. Disconnection from the mains. | Check for the presence of mains electrical power and whether the oven is connected to the electricity supply. Turn off the oven and restart it to see if the fault persists. |
| The display shows the letter "F" followed by a number or letter. | Oven failure. | Turn off the oven and restart it to see if the problem persists. Try to perform the "FACTORY RESET" from, selectable from " SETTINGS". Contact you nearest Client After-sales Service Centre and state the number following the letter "F". |
| The oven does not heat up. | When "DEMO" is "On" all commands are active and menus available but the oven doesn't heat up. DEMO appears on display every 60 seconds. | Access "DEMO" from " SETTINGS" and select "Off". |
| The light switches off. "ECO" mode is "On". Access "ECO" from " SETTINGS" and select "Off". | ||
| The home power goes off. Power setting wrong. | Verify if your domestic network has at least a rating of more than 3 kW. If no, decrease the power to 13 Ampere. Access "POWER" from " SETTINGS" and select "LOW". | |
| Steam leaves the drawer during cooking. | Low water in the tank. Add a glass of drinking water. | |

Policies, standard documentation and additional product information can be found by:
- Visiting our website docs.bauknecht.eu
- Using QR Code
- Alternatively, contact our After-sales Service (See phone number in the warranty booklet). When contacting our After-sales Service, please state the codes provided on your product's identification plate.
DESCRIPTION DU PRODUIT
8. ACCES DIRECT AUX OPTIONS / FONCTIONS
3. NAVIGATIETOETS MIN
FASE 1: AFVOEREN (tot 3 min.)
FASE 3: AFVOEREN (tot 3 min.)
FASE 4: SPOELEN (~20 min.)
FASE 5: AFVOEREN (tot 3 min.)
FASE 6:SPOELEN ( 20 MIN.)
FASE 7: AFVOEREN (tot 3 min.)
FASE 8:SPOELEN ( 20 MIN.)
FASE 9: AFVOEREN (tot 3 min.)
3. CÓMOCONFIGURARLA HORA
TELECKONNUECKNE HANPABJIOUNE\*
O6JrHcIOTyCTaHOBky n3BNEeHHe NpHaJaNEXKHOCTe.
NEPΦOPUPOBAHHbI INPOTUBEHb

OTBepTnB npOTNBHe
ynyuHakOT DoCTynnapa,
No3BOJnA IponeKaTb IpOdyKTb
6oJIe paBHomepHO.YCTAHOBITE
noDOn HnIc6Opa COKOB OT
KapeHnHa OOnH yPoBeHb
HNKe. **
*Tolbko BO ONpeJeHbIX MoeJIaX
** IcnoIb3yIte TOnbKO c fYHKUnei STEAM («IAP»)
KolnueCTBO N TIN PnHaJneXHcTe MoKeT BapbnpBaTbcB 3aBNCIMOCTN OT npNo6peTeHHoMDoJI.
IOnOHInTeJIbHbIe IpuHaJIeXHOCTN MOxHO npNo6peCTN B CepBnCHOM CEHTpe.
YCTAHOBKA PEWETKNI IpyrNX PUNHADJEKHOCTEIN
Bctabte pewetky ropu3oHTaJIbHO B dpeXaTeI npOTNBHpaonlaqar ee taK, yTo6bl npnOHaTbIe Kpa 6bln06pauehbl BBepx.
Дугге пинадлжноctи, takne кak noДон и npOTиBEHb, BCTaBnIOTc rOpu3OHTaNbHO Tem Jke cnOCo6OM, YTO n peWetka.
CHRTHN UYCTAHOBKA DEPJKATEJEI POTUBHEI
.ДЯСНТЯDEPЖATENEI NOOK BbIBePHTe YdePJKBaIOUne BnHTbI (pnp HauNUn) C O6eNx CTopoH, NcONb3yra MoHety nINnHCTpyMeNT. POnHMITE DEPxATENB u INBLeKtTe HIXHIOU yAcTb n3 rHe3da. Iocne 3TOrO DEPxATEJI INPOTNBHeMoxHO BbyHYTb.
.ДЯСТИЕPDEKATEEN NOOK BbIBePHNTE ydepknBaIOUne BnHTbI (прн HaHUnu) C o6Enx CTopoH, nCNoJIb3yR MOHety NIN INHCTpyMeH.ToDHNMTe DEPKaTeNb u N3BNeKtTe HIXHIOU YacTb I3 rHe3da. Pocne 3TOr DEPKaTeNl PpOTNBHe MoXHO BbIHyTb.

YCTAHOBKA TELECKONNUECKNX HANPABJIOUX (PNHAIINU)
BbHbTe depKateJIN noJOK n3 dYXOBKn n CHMnTe pnaCTNKOByIO 3aunTy C BbDxBkHbIX HappaBnIooJx.
3akpenite BepxHn 3axn HnpaBnaIooe Ha dePkaTeIe npTbHne n CdbnBe ee Bny6b do ynpa. Onyctnte BtPOO 3axn B ppeymCOTpeHHoe NonoXeHne. YTO6bl 3akpenTb DePkaTeIb, CNbHO HaxmTe Ha HNXIOU qactb 3axnMa B HapabHeHn OT dePkaTeIa NOKN. Y6eNTecb, YTO NOBnKHa JAcTb HnpaBnaIooe MoKet CBOoHO nepemeatbca. NOBtOpTe 3Tu Je DeIcTBnA DnB Tporo dPkaTeJI npTbHne Ha Tom Ke ypOBHe.
O6paTHe BHMaHne: BbDnXHbIe HApBaNIOUme MOrY T KpeINITbCHaJIIObOM yPObHe.
PEXKUMbl

MY MENU
OHN daIOT BO3MOXHbIM IOLHOCTbIO aBTOMaTnueeCKOE
npnroTOBHeHne 6NIOI NIO6bIX TINOB (na3aHb, MRCO, pbl6a, OBOU, npornn Dpyra BbIneYka, HecnlaKne niporn, Xle6, Niuca).DnmaKcIMaJIbHO 0f0fKeTNUBHO IcNOJIb3OBaHnE 3ToI fHyHKmN CNeynte YkazAHnM, PnPBedeHHbIM B COOTBeTCTByIouee Ta6NIUE npnrTOBHeHn.

PУHbIe HACTPOIKN
-KOHBEKLIM
IyOIOHOBpeMeHHOROpnIROTOBHeHnPa3JIuHbIX npOdyKTOB C OINHaKOBoT TempeaTyPOI npIROTOBHeHn Ha HeCKoJIbKnx yOBHx (MaKcIMyM Tpex) 6e3 CMEuBaHn 3aNaXOB. 3TOPTpeKm rapaHTnpyET OTCYCTBnE nepeHoCA 3aNaXOB C OINHO npOdyKTA Ha dpyroI.
BbIeKAHNE C KOHBeKUneI
PexMM 3aneKaHnMa Ca N BbIneKaHnPiPoRc C HauNHKO TOnbKO Ha ODNOM yPOBHe.
- MEHIO MULTIFLOW
PexmI nI npiroTOBHeHn6IIO, Tpe6yIOux OINHaKOBoi TEMnepaTpyb, OOnOBpEmeHHo Ha YeTBipEx ypoBHx.3Ty fYHKUHO MOXHO NcOJIb3OBaTb IIN pIroTOBHeHn NeueHb, INporOB, KpyIbIX nIuC (B Tom uCne 3amOpoxeHHbIX) IN KOMIIeKCHbIX 6IIOJ. IJI IOJIyEHNMAkCMmaJIbHbIX pe3yJIbTaTOB npIndepKJBauTeCb peKOMHeDaIy Ta6NIcBi npiroTOBHeHn 6IIOJ.
- PEXKIMblI TPNJI
》PUNJb
PekimI nprirotoblenHa rpnIe CTeKOB,waunbka, KO16acok,OBOUhblx 3aneKaHOK XJIe6HbIX TOCTOB.IpnprirotoblenHa rpnIe Mca peKOMeHdyETcNcNoB3OBA Tb noDIOH IIN C6opa coka OTJapeHn:YCTaHOBtE IpOTuBeHb Ha IIO6oI yPOBEHb NODpeWetKo, HAIIN B Hero 500 mI nITbeBOB BODbI.
》TYP6O-ΓPnJIb
Pekim dIa Japkn Kpynhbix KcKOB Mca (poc6n, 6apaHbno HoxKn, cIIInTAt). PekomeHyETcNcNoB3ObaTb NIOHO nC6opa CTeKaIOUero Coka: Pa3MeCTnte NOIOH Ha IIObOM yPOBHe NOpeTeKo, HANB B Hero 500 mNITbeBOB BObl.
- 3AMOPOX.K.IPOJyKTbI
3TOT pekum ABtOMaTnueckn Bb6npaet Han6oee noDxOJaUy ToemepaTy u cnoc6 nprirotOBneHn da Tn pa3nHybIX TINOB roTOBbIX 3amOpoxKeHHbIX npOdyKTob. PporpeB dYXOBKn He Tpe6yetc.
CNEU.ФYHKUIN
» PA3MOPAXKBAHNE
PekimIy yckopeHHoro pa3mopaxnBaHn npOyKTOB. Pa3mectntpe npOyKtbi Ha cpeHem ypOBHe.PekomeHnyetc OCTaBJIbTb npOyKtBi BynaKOBKe, YTO6bl ppeD0TbpatNTb BbICbIXaHHe NOBepxHOCTHOro CIOA.
》IODDEPKAHNE TEMNEPATyPbI
PexMM, N03B0JauOuIcoxpaHrTb ropyMn TOnbKO yTo nprirotOBHeHHbe 6JIoua.
》IIObEM TECTA
PexmIOnTnMaJIbHOrO NoDbema CnAdKOrO nII npraHOro TcTa.
IJIa NpUyeHnKaueCTBeHHoro TeTa He IcNoJIb3yIte pexm,
ecn NeB He OCTbIa IIOe IpNroTOBHeHn.
》BOJIbIaJIOPLUJA
PekimДлп npiroTOBneHn60JIbIINx KcKOB Mca (6Oone 2,5 Kr). PekomeHnyeTcpepeBopaunBaTb Mco BO Bpem npiroTOBneHn. TTo6bl OHO paBHomepHo npoxapuNocb c o6eix cToPOH. BpemOT
BpeMeH NOniBaIte MRCOCOM BO n36exAHne nepecyuBaHnA.
KOHBEKUNA 3KO
Pekim dna 3aneKaHnfaapwnpoBaHHoro mca n Mrcbix fHne Ha ODHOM yPOBHe. DeNkAthar npepbIBnCTa UnpkyIaun B03dyxa npedotBpaauet nepecyuWBAHne npOyKTOB. B npoecce npiroTOBHeHn6blD pexmme 己 K O 已 oBeueHne kamepbI DxyOBKn OCTaETC BIKIOUeHHbIM. PpncnboBHaHN cNKa N 己 K O 已 npedycmatprBaIOero ONTMM3auIO eHepronOTpe6NeHn, DBepua DxyOBKn DOJXHbA OCTaBaTbCS 3akpBTOn DoTex nop, noka 6IIOHO He bdyet NOHOCbIO rTOBO.
»MEДЛЕН.ПРИГOTOB.
PexIM nIeMeJIeHHoro npIROTOBHeHnMa ca n pbIb. B 3OM pExime npOyKtbl rTOBRTc MeJIneHNO OCTaIOCT HeXHBIMn COHyBMn. bIarOapra HN3KO TEmpepatye 610do He NOpymAHBaetcN KOHeuHbI pe3yIbTa aHaIOnueH ToMy, KOTOpB IOnLyAeTc PnnpiroTOBHeHn Ha napy. Npeep NCIOB3oAHmE pEXIMa peKOMeHdyTeC cnerKa o6Xapmtb KYKn Ha cKBOpOe, YTObI co3DaT KoPOuy, yDePKNBAUOuy BuHTPN MaCa eCTeCTBeHHeBcOKN. JIeNIOyHeN ONTMaJIbHbIX pe3YbTAToB DEpxNTe DBepy Neu 3aKpbITOB BO BVpem npiroTOBHeHn, YTObI npEOiTOBpaTntb paCCenBaHne TeTTa. IppeIOxHeHoe Bpem npiroTOBHeHn pbIb (300r-3Kr) CoCTABJIeT ot 2 do 5 cacob, Mca (1-3 Kr) ot 4 do 7 u.
-БьICTРИ ПОГ佩В
BbICTpbn npedBaPntbHbN Hargbe neu.

KOHBEKLUNI+NAP
- 100% ΠAP
Pekim dI npiroTOBHeHn HaTypaIbHbIX n3DopOBbIX 6IIOd Ha napy, no3BOJIaUcH coXpaHHT b NcXoHbIe NITaTeHbIe KaueCTBa npOyKtA.3TOT pexIM Oco6eHHo NOxOJNT IINI npiroTOBHeHn OBOUe, fpyKTob Npbl6bl, a TAKKe IINI 6NaHUnPoBaHn. EcnI He yKa3aHO HHOE, OCBO6OJTpePOdyKT OT yNAKObKn n 3aUNTHO INeHNi nepeTeM, KaN NOMeUaTb erO B neyb
-KOHBEKUN+IAP
Blaorapcoetahno npiroTOBneHnHa napy n KOHBeKuHn 3TOT pexmIOo3BOJnRETOBntb 6hnoa C xpyctaue H pymaHOI KopooukO, HO HexKbte I COUHbte BHyTPn. DnI noIyuHn IyUwero pe3yIbTaTpeKomeHnyETc BbIupaTb ypOBeHb npa «BbICok.」nI npiroTOBneHn pb6bl, «CpeH.» dIЯ Mca n «Hn3K.» dIxne6a n DecepToB.

BE3 KOHBKLIIM
PexMM nI nprirotobnHn IIO6bIX 6JIoD TOJbKO Ha ODHOM ypOBHe.

U36PAHHOE

IOCTyn K cnncky n3 10 n36paHHbIX peKIMMOB.
DIAMOND CLEAN
IeBnBnB OBOHOro npa, 6pa3yIOeOcBO BpMa 3TOrO CnueNbHOr Hn3KoTeMpePaTyPhoro UNKna OuNCTk, ObnerHaet ydaJIHeHne 3arpa3HEnH.
BkIouaItepeKIM,KOgdaDyXOBKaXoNOrHa.
CINBBObl
ABTomatueckn CINB BOdbI 3 naporehepaTopa, 06ecneuBAIOUIN NOHoe ydaene HBe BOdbI.
- YDAJI. HAKINI
OuCTKa naporehepatopa OT haknn. NcnoIb3yIte 3Ty fhyHKUHO peryIaRPHo.B npOTUBHOM cIyae Ha dncJIe 6dyT NOBnTBCOooHHeH, HAnOMHaIOUIne O HeoBXoDMOCtN OuaCTKn dyXOBKn.

TAIMEP
OToIeKbAHnBpeMeH6e3akTNaunpeKmna.

HACTPOIKN
N3meHeHne HaCTpoek neu.
PnakTNBHom pexime 《KO》rpkocb DnCnIe CHNkaetc B ueJX KOHOMN 3NEKTPo3Heprnn N lamnoQKa BblKnOuaETcyepe3 1 MNHyTu. OH 6ydt ABTomatueckn aKTNBnpobah npn HaxkTNI JIOBOI KHOJIKN.
IEPBOE IcIIOJIb3OBAHnE
1.BblBOP3bIKA
IpaBnbo npBn nee npE npBOM BkHouen Hno6xOIMO Bb6pTaB3bIK yCTaHOBnTB TeKyuiee Bpem. PepBoHaaybHo Ha dncnnee OTO6pKaKaTcRr'English'.

PpOcMOTpuTe CNICOK DOCTyINHbIX 3bIKOB C IOMOUIIO HnN — BBIepeTpTe p6yEmbl 3bIK.
Haxmnte ⅡI IOITBePckDHeNBAb6opa.
06paTnTe BHNMaHHe: BdaNbHeuIeM Ra3bIK MoXHO N3MeHHTb NyTEM Bb6opaaR3blK>BMehIO HACTPOUKN,OTKpbB Eero HaKaTneM
2. YCTAHOBITE UPOBEHb IOTPEBJREMOI MOUHOCTN
B 3aBoDcKx HactpoiKaX neu yCTaHOBJIeH yPOBeHb NOTpe6JIaEMo MOUHOCTn, COBMeCTIbMy C DOMaUHMN 3JIeKTPocetTmC HOMHaJIbHOJ MOUHOCTbIO 6OJee 3 kBt (16):Ecnn 3JIeKTPocetb B BaIeM DOME paccHTaHa Ha MeHbUIO MOUHOCTb, yMeHbWnte daHHoe 3HaueHne (13).

IIOBepHnTe pezynuropoOHyO pyK, yTO6bI bbl6paTb 16 "BbICOK."nn 13"HN3K. HAnKMnTeIgnoNTBepXdEHNr.
KyBUnH DoJIkeH 6bITb O6bEmOM He MeHee 2 NITpOB.
PnmeuHne:OCUeCTBnTb3TOJeNCTBHeMOXHO NocNe NOHOrO OCTBaHnB OBDI He paHee Yem Upe3 4 yaca NocNe NocNeHero LKJIa pnproToBJIeHn (NIH NocNEHn yctAHOBKn 6JIOda).B TeueHne BpemeHN OxndaHn Ha DnCnnee 6yET OTobpaKaTbC ncldyuOee coo6uHHe:BODA TOPRAU -IIOOXNJTE').
- YDAJIEHNE HAKINI
Pn perynphom nCIOJIb3OBAHm 3OT CneuaJIbHbI peKIM N03BOJAE TCOXpAHITb naporehepaTOp IN napoBOI KOHTyp B INDeaJIbHOM COCTOHM.
Coo6eHne<3AUYCTNEYDAJIEHNE HAKINN> NOBHTCAHa DcNJIe B KaueCTBe HaONMHaHnO Heo6xoIMocTn peryIpaHOrO BbIOnHeHn 3ToI onepaun.
IOnBHeHcOo6eHnO Heo6xOaMocT npOBeHnOuNCTKOT HAKINIOBCNOEHO KONUcETBOM BbINONHeHHbIX UKNIOB
PnroTOBHeHn Ha npy nn Yacamnpa60Tb npoBOrO KOTNa C MOMeHTa NocJeHero cKJIa ONUCTKN OT HAKIN (CM. Ta6NIuY HIXke).