Orbit Pro - Elliptical bike Capital Sports - Free user manual and instructions
Find the device manual for free Orbit Pro Capital Sports in PDF.

User questions about Orbit Pro Capital Sports
0 question about this device. Answer the ones you know or ask your own.
Ask a new question about this device
Download the instructions for your Elliptical bike in PDF format for free! Find your manual Orbit Pro - Capital Sports and take your electronic device back in hand. On this page are published all the documents necessary for the use of your device. Orbit Pro by Capital Sports.
USER MANUAL Orbit Pro Capital Sports
Congratulations on purchasing this equipment. Please read this manual carefully and take care of the following hints to avoid damages. Any failure caused by ignoring the mentioned items and cautions mentioned in the instruction manual are not covered by our warranty and any liability.
CONTENT
Safety Instructions 20
Overview and Parts 21
Assembly 24
Exercise Instructions 27
Operation of the Computer 29
Main Functions 30
Modes and Settings 31
Care and Cleaning 32
Troubleshooting 32
Hints on Disposal 33
TECHNICAL DATA
Item number 10032459
Power supply (Computer) 2 x AA Batteries
DECLARATION OF CONFORMITY

Producer:
This product is conform to the following European Directives:
2011/65/EU (RoHS)
DIN EN 957
SAFETY INSTRUCTIONS
General Instructions
- Before your starting to exercise, read the manual carefully and also always keep this manual with you.
- Do not operate any exercise equipment if it is not assembled well. Also you must inspect your machine periodically to ensure your machine in good condition. It is your responsibility to ensure that all users of the equipment are informed of all warnings and precautions.
- Keep children and pets away from the equipment. The equipment is designed for adult use only. The equipment is not suitable for therapeutic use.
- Before using the machine, please check the nuts and bolts are securely tightened.
- Always use the equipment as mentioned. If any defective components which have been found while assembling or checking the equipment, or you hear any unusual noises from the equipment during use, stop immediately. Do not use the equipment until the problem has been solved.
- Wear appropriate workout clothing while exercising. Do not wear robes or other clothing
- that could become caught in the machine. Running or aerobic shoes are also required while using the machine.
- Use the equipment on a flat, clear surface. Do not use it near the water or outdoors.
- Keep hands away from all moving parts. Always lift or move the equipment with care.
Special Instructions
- Before beginning any exercise program you should consult your doctor first to determine if you have any medical or physical conditions that could put your health and safety at risk or prevent any damage. Your doctor's advise is essential if you are taking medication that affects your heart rate, blood pressure or cholesterol level.
- Be aware of your body's signals. Incorrect or excessive exercise can hurt your health. If you feel dizziness, nausea, chest pain, back pain or other health symptoms stop the workout at once and consult your doctor before continuing.
Note: Maximum weight of user is 100kg
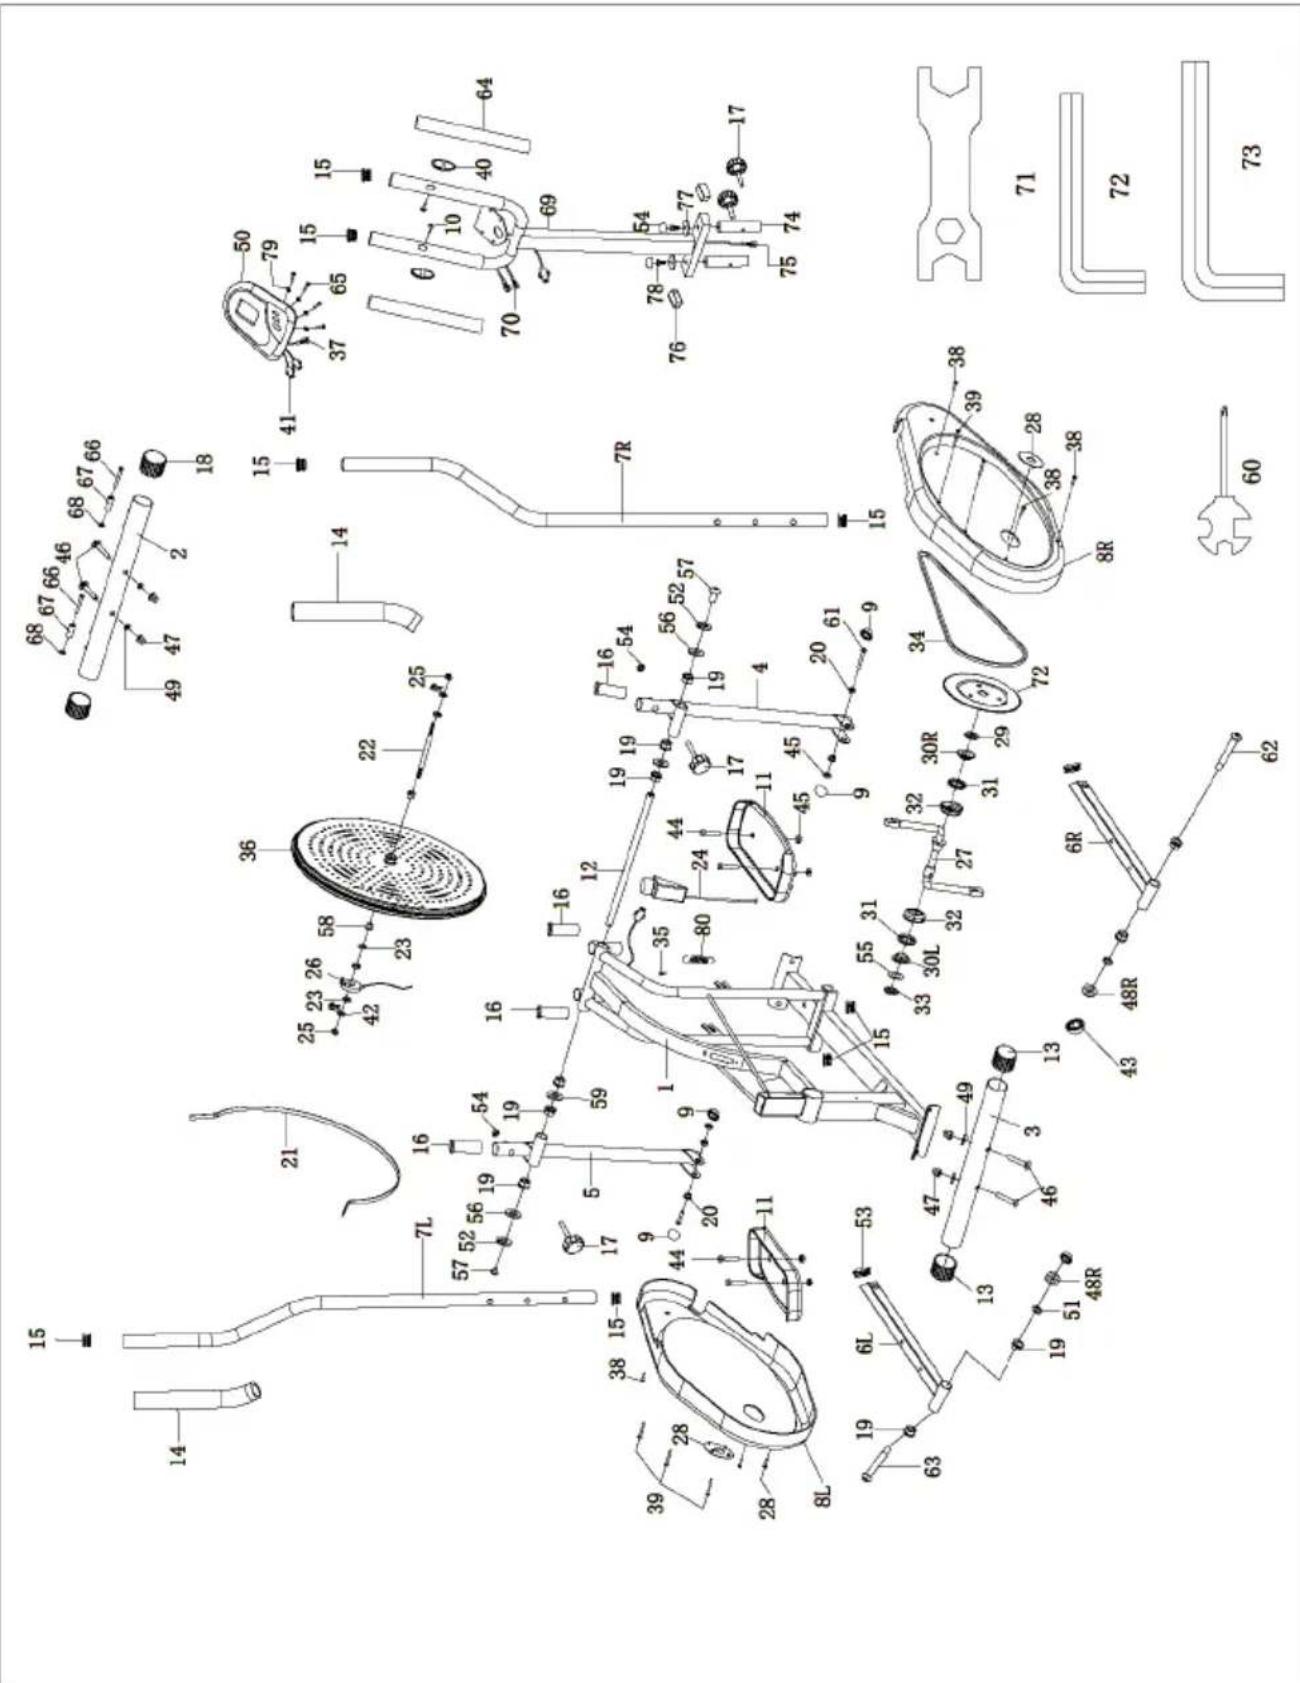
Parts List
| No. | Description Qty No. Description Qty | ||||
| 1 Main frame 1 20 Steel bushing | Ø14×12.5×Ø10.1 | 4 | |||
| 2 Front bottom tube 1 21 Belt 1 | |||||
| 3 Back bottom tube 1 22 Fan wheel axle 1 | |||||
| 4 Right coupler bar 1 23 Nut M10×1×B5 4 | |||||
| 5 Left coupler bar 1 24 Tension control 1 | |||||
| 6R | Right pedal tube | 1 25 Nut | M10×1×B10×Ø20 | 2 | |
| 6L | Left pedal tube | 1 | 26 | sensor | 1 |
| 7R | Right handle bar | 1 | 27 | Crankshaft | 1 |
| 7L | Left handle bar | 1 28 Plastic cap | 2 | ||
| 8R | Right chain cover 1 29 Washer | 1 | |||
| 8L | Left chain cover | 1 | 30R | Collar housing R | 1 |
| 9 | End cap S16 | 4 | 30L | Collar housing L | 1 |
| 10 | Screws ST4*19 | 2 31 Collar ball | 2 | ||
| 11 | Pedal | 2 32 Collar housing | 2 | ||
| 12 | Handle bar shaft | 1 33 Nut | 1 | ||
| 13 | End caps (Ø2") | 2 34 Chain 80Z | 1 | ||
| 14 | Foam grips | 2 35 Screw ST4 | 2*16 1 | ||
| 16 | Plastic bushing (Ø1-1/4") | 4 37 Computer | line I 1 | ||
| 17 | Knob bolt | 4 38 Chain cover | screw ST4.8×20 | 6 | |
| 18 | End caps (Ø2") | 2 39 Chain cover | screw ST4.8×48 | 6 | |
| 19 | Steel bushing Ø24×20×Ø16.1 | 10 | 40 Pulse | 2 | |
| 41 Computer line II 2 61 Bolt M10×L55×I25 2 | |||||
| 42 Bolt M6×36 2 62 Pedal hinge bolt | Ø15.6×88.8×1/2"×24.5 | 1 | |||
| 43 End cap S19 2 63 Pedal hinge bolt | Ø15.6×88.8×1/2"×24.5 | 1 | |||
| 44 Bolt M10×45 4 64 Handlebar grip 2 | |||||
| 45 Nylon nut M10 6 65 Bolt M4 4 | |||||
| 46 Carriage bolt M6×L57×120×Ø10 | 4 66 | Bolt M6*48 2 | |||
| 47 Acorn nut Ø3/8" 4 67 Wheel 2 | |||||
| 48L/R | Nylon Nut 1/2"×B8 | 2 | 68 | Nylon nut M6 | 2 |
| 49 Arc washer Ø10×1.5×Ø25×R25.5 | 4 69 | Handlebar post 1 | |||
| 50 Computer 1 70 Handlebar line 2 | |||||
| 51 Spring washerØ10.5×3×Ø18 | 2 71 | Solid wrench S13-17-19 1 | |||
| 52 Washer Ø16×1×2.5×Ø28 | 1 72 | Socket head wrench S6 2 | |||
| 53 Square end cap 2 73 Socket head wrench S8 1 | |||||
| 54 End cap S14 4 74 Spile | 2 | ||||
| 55 Washer 1 75 Middle line 1 | |||||
| 56 D shape washer Ø28×Ø16.2×14×B5" | 2 76 | Tube plug 2 | |||
| 57 Bolt M10×18 2 77 Washer D8 | 2 | ||||
| 58 bushing 2 78 Hexagon bolt M8 2 | |||||
| 59 Flat washer d16*Ø28*1 2 79 Washer D4 | 4 | ||||
| 60 Open-end wrench 1 80 Tension spring | 1 | ||||
ASSEMBLY
| 1 | 46 47 48 50 | Install the Front bottom tube (2) and Back bottom tube (3) to the Main frame (1) with Carriage bolts (46), Arc washers (49) and Acorn nuts Ø3/8" (47). |
| 2 | 57 52 56 59 63 64 65 66 67 68 69 70 71 72 73 74 75 76 77 78 79 80 81 82 83 84 85 86 87 88 89 90 91 92 93 94 95 96 97 98 99 | A: Insert the Handle bar shaft (12) through the Coupler bar of left & right (4, 5) and the Main frame (1) at the same time, then fix with washer (59), D shape washers (56), Washers (52), Bolts (57) on both sides. B: Insert the Pedal hinge bolt (62, 63) through the Pedal tubing (6L, 6R) to the Crankshafts (27L, 27R) and fix with Nylon nuts (48L, 48R), Spring washers (51), finally cover with plastic cap (9,43). |
| 3 | 44 11 45 6R 44 11 45 | Attach the Pedals (11L, 11R) to the Pedal tubes (6L, 6R) with Bolts (44) and Nylon nuts (45). |
| 4 | 7R 7L 7L 54 17 54 | Insert the Handle bar (7L, 7R) to the coupler bar (5, 4), select a height setting that is comfortable to the user, and make sure both handle bars are set at the same height. Lock each handle bar in a place with Knobs (17)and end cap (54). |
| 5 | 69 78 74 75 26 | Lock the splice (74) on the main frame (1) with the knob bolt (17). Install the handlebar post (69) on the splice (74) using the washer (77), bolt (78) and end cap (54). |
| 6 | 41 37 80 65 50 70 75 69 | Connect the computer wire with sensor wire, after that fix the computer (50) to the computer bracket on the handlebar post (69) with screw (65) and washer (80). |
EXERCISE INSTRUCTIONS
Using your ELLIPTICAL BIKE provides you with several benefits, it will improve your physical fitness, tone muscle and in conjunction with calorie controlled diet help you lose weight.
1. The Warm Up Phase
This stage helps get the blood flowing around the body and the muscles working properly. It will also reduce the risk of cramp and muscle injury. It is advisable to do a few stretching exercises as shown below. Each stretch should be held for approximately 30 seconds, do not force or jerk your muscles into a stretch - if it hurts, STOP.
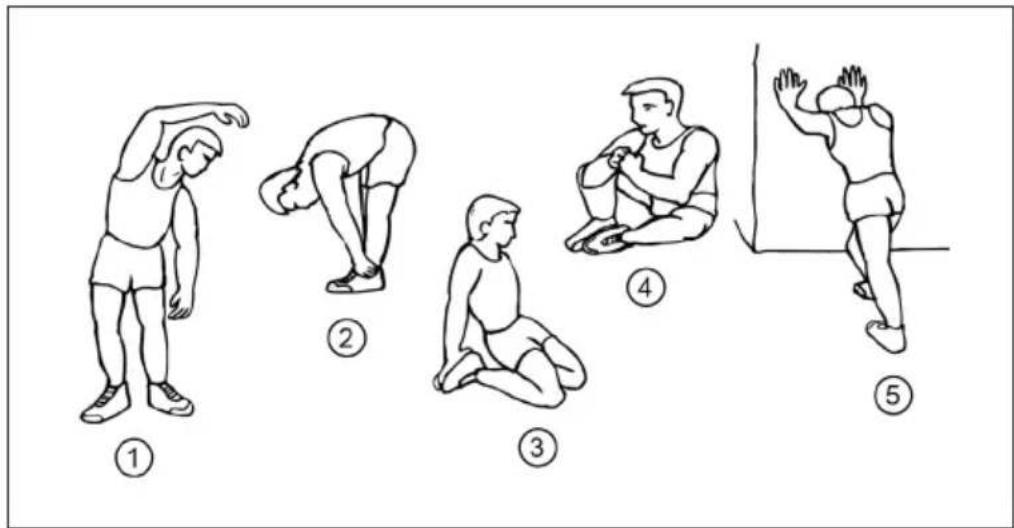
1 Side Bends
2. Forward Bends
3 Outer Thigh
4 Inner Thigh
5 Calf / Achilles
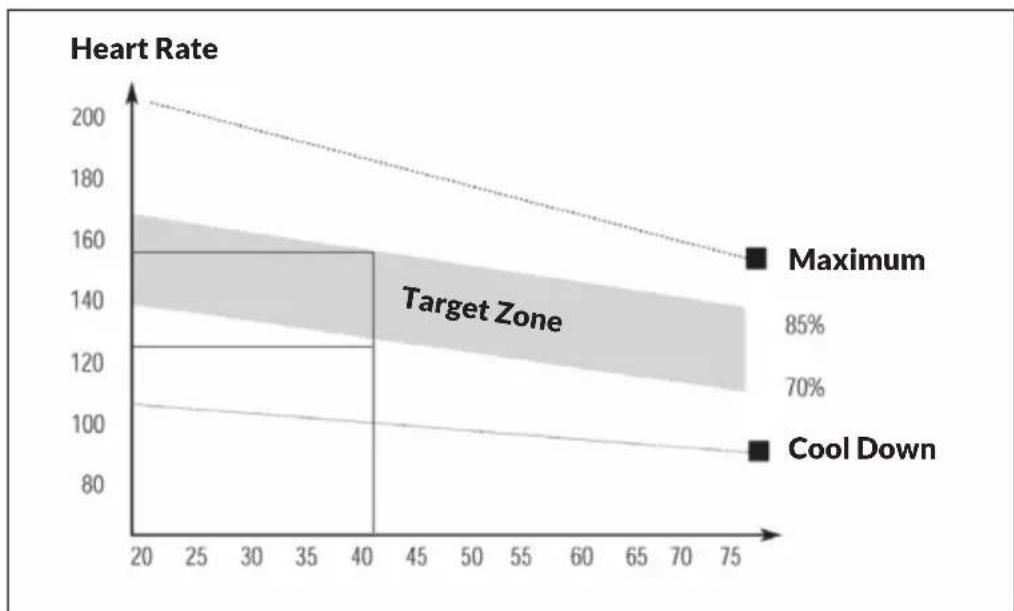
2. The Exercise Phase
This is the stage where you put the effort in. After regular use, the muscles in your legs will become Stronger. Work to your but it is very important to maintain a steady tempo throughout. The rate of work should be sufficient to raise your heart beat into the target zone shown on the graph below.
3. The Cool Down Phase
This stage is to let your Cardio-vascular System and muscles wind down. This is a repeat of the warm up exercise e.g. reduce your tempo, continue for approximately 5 minutes. The stretching exercises should now be repeated, again remembering not to force or jerk your muscles into the stretch. As you get fitter you may need to train longer and harder. It is advisable to train at least three times a week, and if possible space your workouts evenly throughout the week.
Muscle Toning
To tone muscle while on your ELLIPTICAL BIKE you will need to have the resistance set quite high. This will put more strain on our leg muscles and may mean you cannot train for as long as you would like. If you are also trying to improve your fitness you need to alter your training program. You should train as normal during the warm up and cool down phases, but towards the end of the exercise phase you should increase resistance, making your legs work harden than normal. You may have to reduce your speed to keep your heart rate in the target zone.
Weight Loss
The important factor here is the amount of effort you put in. The harder and longer you work the more calories you will burn. Effectively this is the same as if you were training to improve your fitness. the difference is the goal.
How to Install the Battery
1 Remove the battery cover at the rear of computer.
2 Place two „SIZE-AA“ battery into the battery housing.
3 Insure battery is correctly positioned and battery spring is proper contact with battery.
4 Re-install the battery cover.
5 If the display is illegible or only partial segment appear, remove battery and wait 15 seconds before reinstalling.
MAIN FUNCTIONS
MODE:
This key lets you to select and lock on to a particular function you want.
SET:
Can to proceed the data establish for TIME, DISTANCE, CALORIES, PULSE.
CLEAR(Reset):
The key to reset the value to zero by pressing the key.
ON/OFF(START/STOP):
The key to pause the signal input by pressing the key.
Notes on Main Functions:
AUTO ON/OFF
- The system turns on when any key is pressed or when it sensor an input from the speed sensor.
- The system turns off automatically when the speed has no signal input or no key are pressed for approximately 4 minutes.
RESET
The unit can be reset by either changing battery or pressing the MODE key for 3 seconds.
MODE
To choose the SCAN or LOCK if you do not want the scan mode, press the MODE key when the pointer on the function you want which begins blinking.
MODES AND SETTINGS
TIME
Press the MODE key until pointer lock on to TIME. The total working time will be shown when starting exercise.
SPEED
Press the MODE key until the pointer advance to SPEED. The current speed will be shown.
DISTANCE
Press the MODE key until the pointer advance to DISTANCE. The distance of each workout will be displayed.
CALORIE
Press the MODE key until pointer lock on to CALORIE. The calorie burned will be displayed when starting exercise.
ODOMETER (IF HAVE)
Press the MODE key until the pointer advance to ODOMETER. The total accumulated distance will be shown.
PULSE (IF HAVE)
Press the MODE key until the pointer advance to PULSE .User's current heart rate will be displayed in beats per minute. Place the palms of your hands on both of the contact pads(or put ear-clip to ear),and wait for 30 seconds for the most accurate reading.
SCAN
Automatically display changes every 4 seconds.
CARE AND CLEANING
- The elliptical trainer can be cleaned with a soft cloth and mild detergent.
Do not use abrasives or solvents on plastic parts. Please wipe your perspiration off the elliptical trainer - after each use. Be careful not get excessive moisture on the computer display panel as this might cause an electrical hazard or electronics to fail.
- Please keep the elliptical trainer, specially, the computer console, out of direct sunlight to prevent screen damage.
- Please inspect all assembly bolts and pedals on the machine for proper tightness every week.
- Store the elliptical trainer in a clean and dry environment away from children.
TROUBLESHOOTING
| Problem Suggested Solution | |
| There is no display on the computer console. | Remove the computer console and verify the wire that comes from the computer console is properly connected to the wire that comes from the main frame. |
| Check if the batteries are correctly positioned and battery springs are in proper contact with batteries. | |
| The batteries in the computer console may | |
| The elliptical trainer makes a squeaking noise when in use. | The bolts may be loose on the elliptical trainer, please inspect the bolts and tighten the loose bolts. |

According to the European waste regulation 2012/19/EU this symbol on the product or on its packaging indicates that this product may not be treated as household waste. Instead it should be taken to the appropriate collection point for the recycling of electrical and electronic equipment. By ensuring this product is disposed of correctly, you will help prevent potential negative consequences for the environment and human health, which could otherwise be caused by inappropriate waste handling of this product. For more detailed information about recycling of this product, please contact your local council or your household waste disposal service.
Your product contains batteries covered by the European Directive. 2006/66/EC, which cannot be disposed of with normal household waste. Please check local rules on separate collection of batteries. The correct disposal of batteries helps prevent potentially negative consequences on the environment and human health.