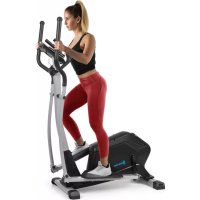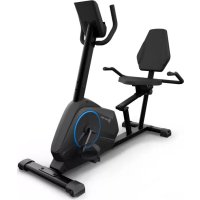
Evo Air Pro - Elliptical bike Capital Sports - Free user manual and instructions
Find the device manual for free Evo Air Pro Capital Sports in PDF.


User questions about Evo Air Pro Capital Sports
0 question about this device. Answer the ones you know or ask your own.
Ask a new question about this device
Download the instructions for your Elliptical bike in PDF format for free! Find your manual Evo Air Pro - Capital Sports and take your electronic device back in hand. On this page are published all the documents necessary for the use of your device. Evo Air Pro by Capital Sports.
USER MANUAL Evo Air Pro Capital Sports
2. Cardio-Trainingsphase
Congratulations on purchasing this equipment. Please read this manual carefully and take care of the following hints to avoid damages. Any failure caused by ignoring the mentioned items and cautions mentioned in the instruction manual are not covered by our warranty and any liability. Scan the QR code to get access to the latest user manual and other information about the product.

CONTENT
Safety Instructions 42
Product Overview 44
Assembly 48
Console and Key Functions 55
Overview of Cardio Training 58
Warming up before a Workout 61
Training via Console 63
Training via KINOMAP App 67
Care and Maintenance 77
Hints on Disposal 78
Declaration of Conformity 78
TECHNICALDATA
| Item number 10032726 | |
| Power supply 220-240 V ~ 50/60 Hz | |
| Weight 33.6 kg |

WARNING
This stationary training device is not suitable for high accuracy purposes. The heart rate monitoring system may be faulty. Excessive exercise may result in dangerous injury or death. If your performance deteriorates abnormally, stop training immediately.
SAFETY INSTRUCTIONS
Before operating this unit, please read this manual carefully to ensure optimum performance and safety. This is manual should be kept available for future reference. For product improvement, the company reserves the right to change the design and specification at any time without prior notice. Pictures are for reference use only and may differ from the actual product.
- Please keep this manual in a safe place for your reference when necessary.
- Please do not assembly or use this equipment until you read this manual thoroughly & carefully. The safety and efficiency only can be achieved when the equipment is assembled, maintained and used properly. It is your responsibility to ensure that all the users are informed of all the warnings and precautions.
- For totally safe use, a stable, leveled surface is required. Protect your floor with a mat. Do not use the equipment in a damp areas such as swimming pool sauna, etc. For safety space, the equipment must have at least 0.6 meter of free space all around it.
- Before starting any exercise program you must consult your doctor to determine if you have any physical or health conditions that could create a risk to your health and safety, or prevent you from using the equipment properly. Your doctor's advice is essential if you are taking medication that affects your heart rate, blood pressure or cholesterol level.
- Be aware of your body's signals. Incorrect or excessive exercise can damage your health. Stop exercising if you experienced any of the following symptoms: pain, tightness in your chest, irregular heartbeat, extreme shortness of breath, feeling light headed, dizzy or nauseous. If you do experience any of these conditions you must consult your doctor before continuing with your exercise program.
- Do not workout immediately after meals.
- Keep children and pets away from the equipment, the equipment must be assembled and used by adults only.
- The equipment is designed for home use only.
- The equipment is not suitable for therapeutic use, may only be used for exercises indicated in the training instructions
- Wearing proper clothing and athletic shoes while using the equipment, Avoid wearing loose clothing that may get caught in the equipment or that may restrict or prevent movements.
-
Keep your back straight while exercising.
-
Before using the equipment, check the handle bar, seat, and the nuts & bolts are securely tightened.
- For adjustable parts, bear the maximum position in your mind, do not exceed the mark "stop", otherwise will cause risk.
- Always use the equipment as indicated. If you find any defective components while assembling or checking the equipment, or if you hear any unusual noises coming from the equipment during use, stop immediately. Do not use the equipment until the problem has been solved.
- Care must be taken when lifting or moving the equipment so as not to injure your back. always use proper lifting techniques and/or seek assistance if necessary.
- All moveable accessories (e.g. pedal, handlebar, saddle...etc.) require weekly maintenance. Check them before use every time. If anything broken or loose, please fix them immediately. You may continue using them only after they return to good conditions.
- Pay attention to the absence of a free wheel system which will cause serious risk.
- Keep power cord away from heat sources.
- Do not insert or drop any object into any opening.
- Unplug exercise bike before moving or cleaning it. To clean, wipe surfaces down with mild detergents and a slightly damp cloth only; never use solvents.
- Do not use the exercise bike in any location that is not temperature controlled, such as, but not limited to, garages, porches, pool rooms, bathrooms, car ports or outdoors.
- Use the bike only as described in this manual.
- Incorrect repair and structural modifications (e.g. removal or replacement of original parts) may endanger the safety of the user.
- The rotating disk flywheel will get hot during the operation.
- Lock the equipment when stop using.
- This product is not designed for use by persons (including children) who have reduced physical, sensory or mental capacities or persons with no experience or knowledge, unless they are instructed and supervised in the use of the appliance by a person responsible for their safety.
- Children should be supervised to ensure that they do not play with the appliance.
- Before use, check the voltage on the device badge. Only connect the device to sockets that correspond to the voltage of the device.
Note: Maximum weight of the user is 120kg
PRODUCT OVERVIEW
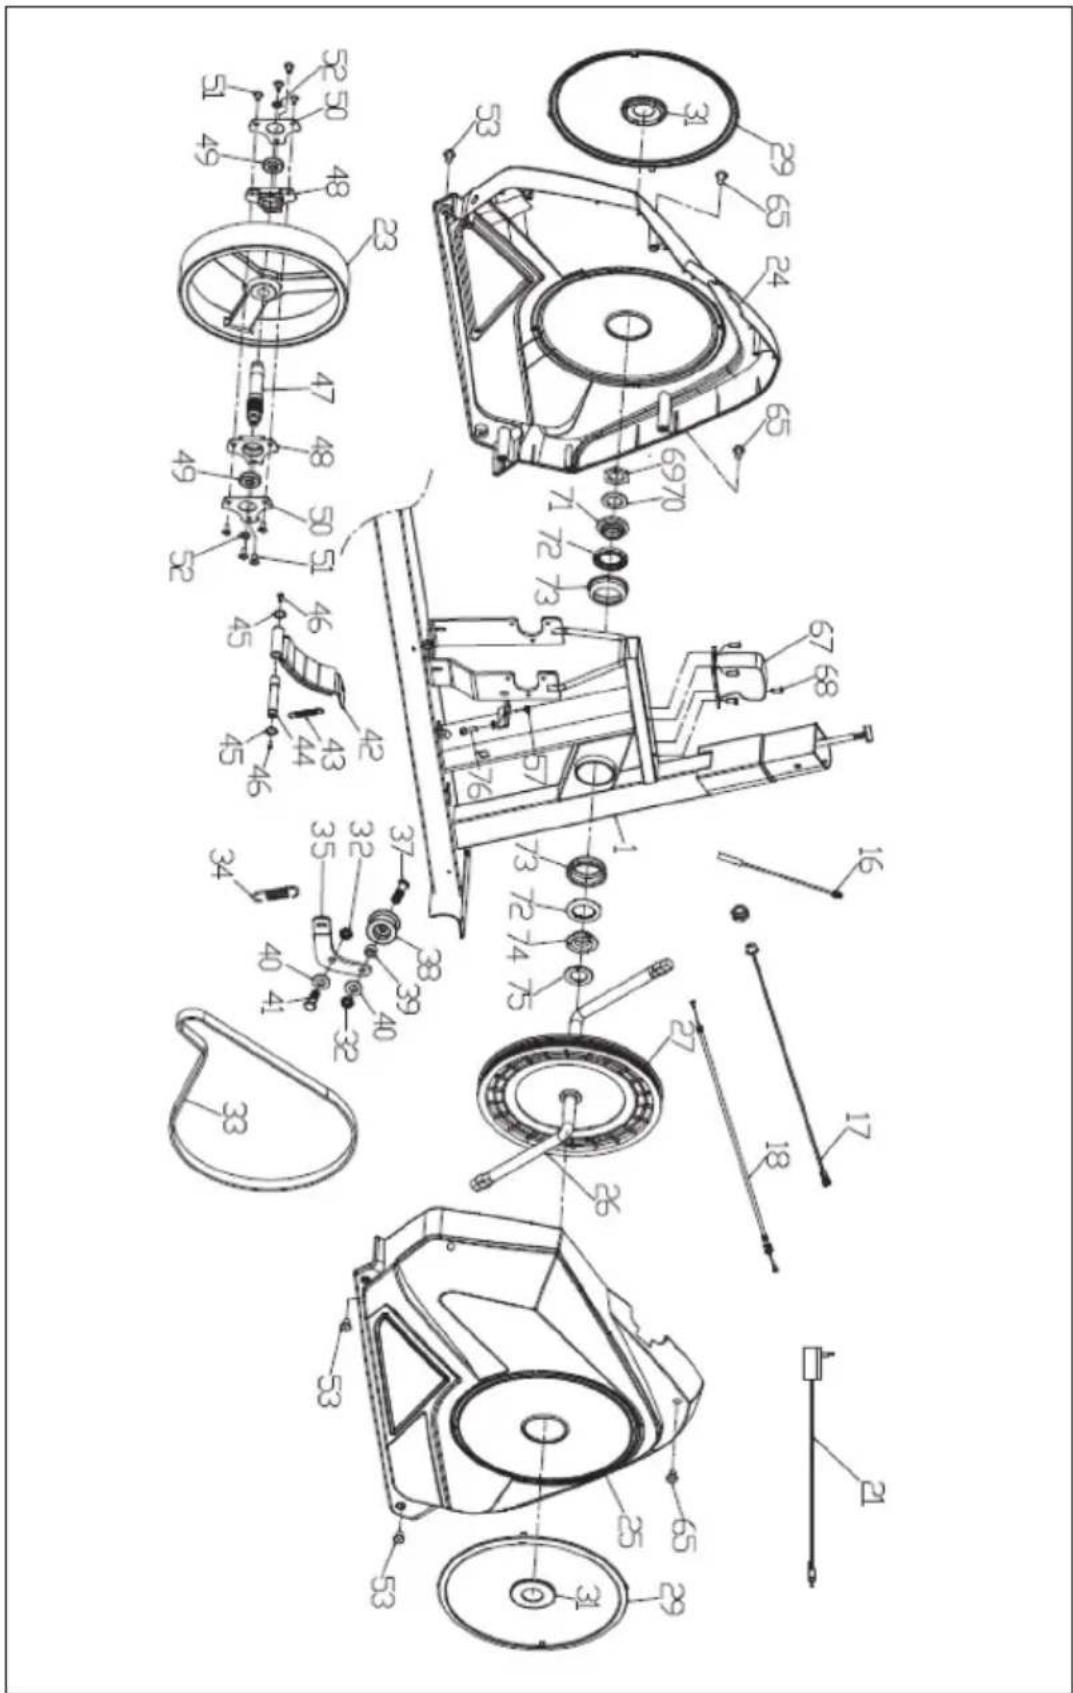
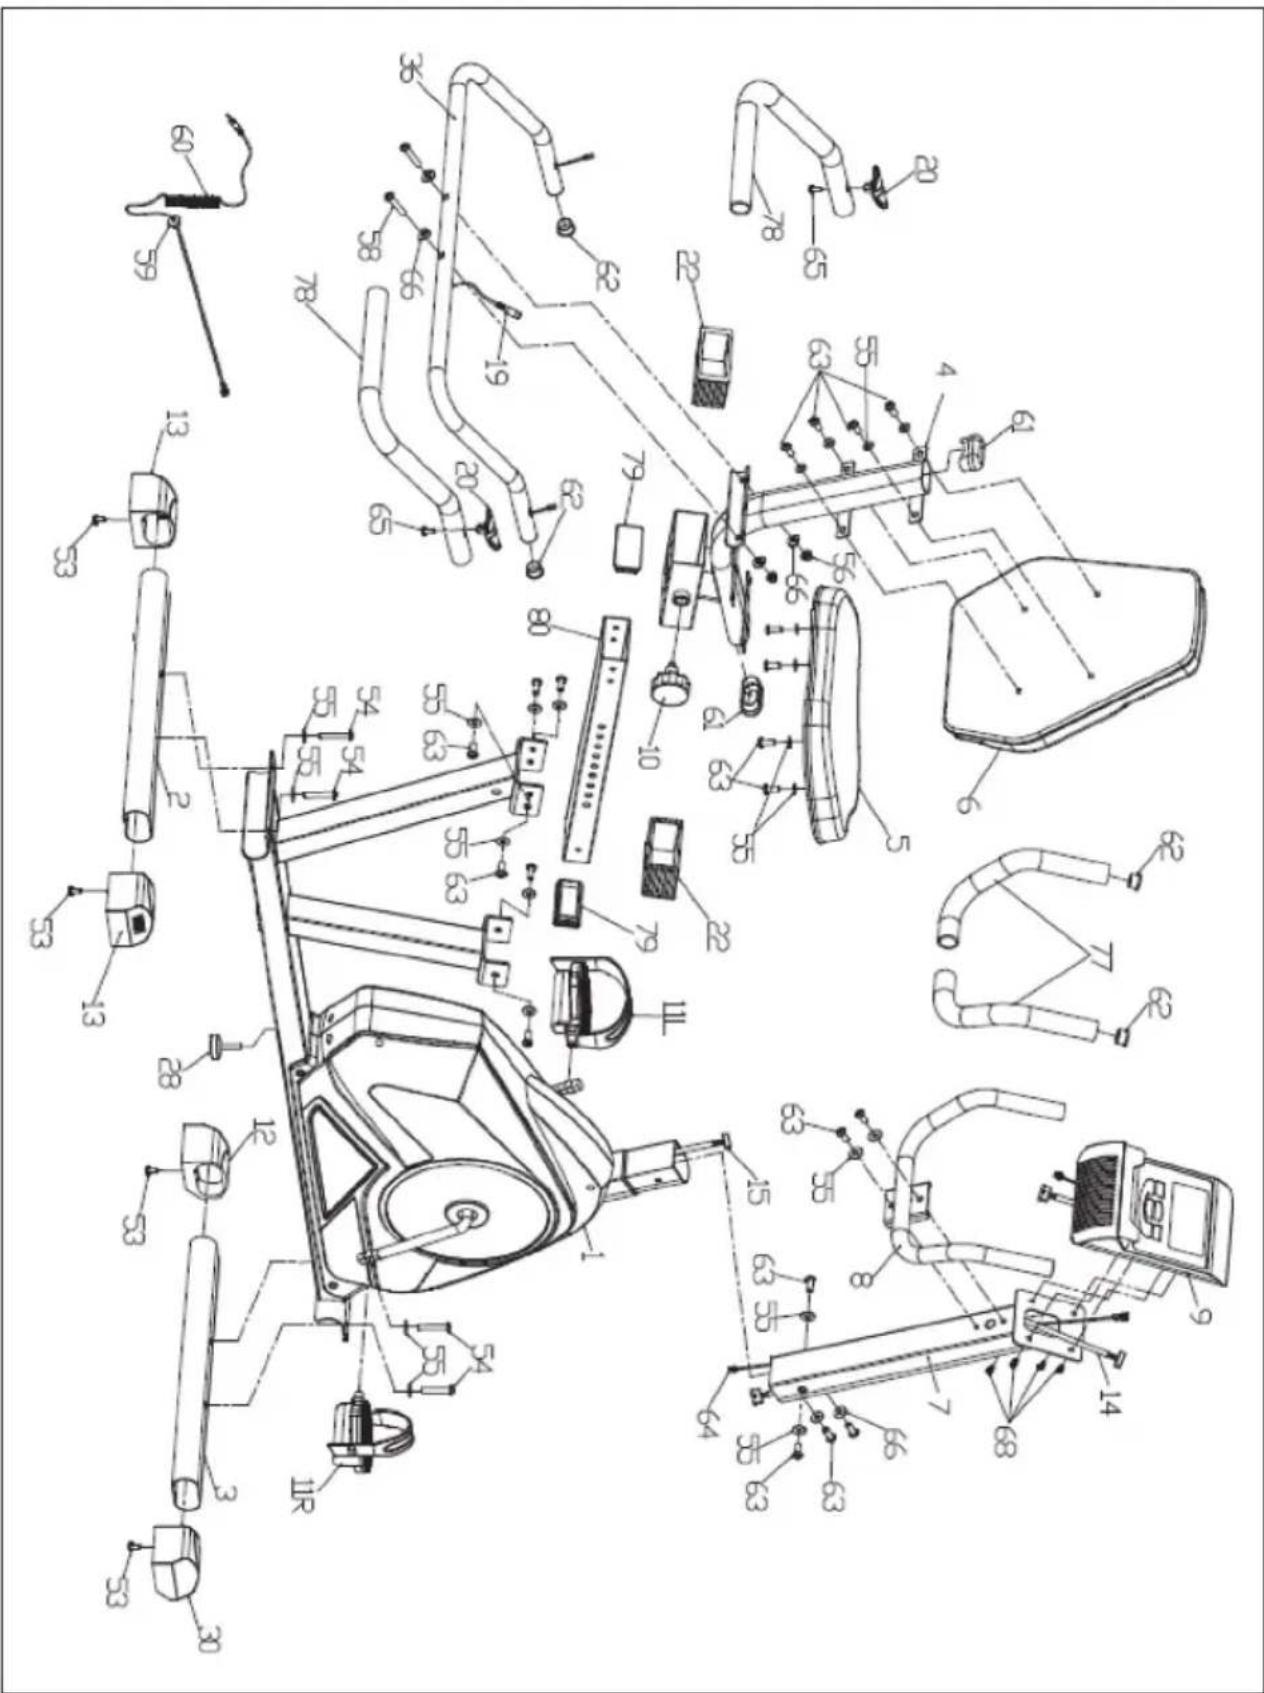
Parts List
| No. | Description Pc. No. Description Pc. | ||||
| 1 | Main frame 1 | 37 | Fixing plate screw 1 | ||
| 2 | Rear stabilizer 1 | 38 | Pinch roller 1 | ||
| 3 | Front stabilizer 1 | 39 | Idler Shaft Bushing 1 | ||
| 4 | Saddle support set 1 | 40 | Flat washer 2 | ||
| 5 | Saddle 1 | 41 | Fixing plate screw 1 | ||
| 6 | Back cushion 1 | 42 | Magnet board 1 | ||
| 7 | Front post 1 | 43 | Tension spring | 1 | |
| 8 | Front handle bar | 1 | 44 | Axle of rotation | 1 |
| 9 | Console | 1 | 45 | Circlip | 2 |
| 10 | Knob | 1 | 46 | Screw 2 | |
| 11L | Pedal-L | 1 | 47 | Flywheel axle | 1 |
| 11R | Pedal-R | 1 | 48 | Bearing seat | 2 |
| 12 | Front stabilizer tube plug-left | 1 | 49 | Bearing | 2 |
| 13 | Rear stabilizer tube plug | 2 | 50 | Bearing end cover piece | 2 |
| 14 | Console wire -top | 1 | 51 | Screw 8 | |
| 15 | Console wire-bottom | 1 | 52 | Flat washer 2 | |
| 16 | Speed sensor wire 1 | 53 | Screw 8 | ||
| 17 | Power wire 1 | 54 | Screw 4 | ||
| 18 | Motor wire | 1 | 55 | Flat washer | 18 |
| 19 | Pulse sensor wire | 1 | 56 | Cap nut | 2 |
| 20 | Pulse sensor | 2 | 57 | Hex nut | 1 |
| 21 | Power adapter | 1 | 58 | Screw 2 | |
| 22 | Tube bushing 2 | 59 | Wire protector | 1 | |
| 23 | Flywheel | 1 | 60 | Sensor wire | 1 |
| 24 | Cover-left | 1 | 61 | Oval tube plug | 2 |
| 25 | Cover-right | 1 | 62 | Handle bar tube plug | 4 |
| 26 | Crank | 1 | 63 | Screw | 16 |
| 27 | Belt pulley | 1 | 64 | Sensor wire-top | 1 |
| 28 | Adjusting pad | 1 | 65 | Screw 9 | |
| 29 | Decorative circle | 2 | 66 | Curved washer | 4 |
| 30 | Front stabilizer tube plug-right | 1 | 67 | Motor | 1 |
| 31 | Crank decorative cove | 2 | 68 | Screw 8 | |
| 32 | Nylon nut | 2 | 69 | Nut | 1 |
| 33 | Belt | 1 | 70 | Locking nut 1 | |
| 34 | Tension spring 1 | 71 | Ball race-left | 1 | |
| 35 | Pinch roller fixing plate | 1 | 72 | ball | 2 |
| 36 | Rear handle bar | 1 | 73 | Ball retainer | 2 |
| No. | Description Pc. No. | Description Pc. | ||||
| 74 | Ball race-right 1 | 78 | Rear handle bar foam 2 | |||
| 75 | Flat washer 1 79 Rectangular tube plug 2 | |||||
| 76 | Screw 1 80 saddle adjusting tube 1 | |||||
| 77 | Front handle bar foam 2 |
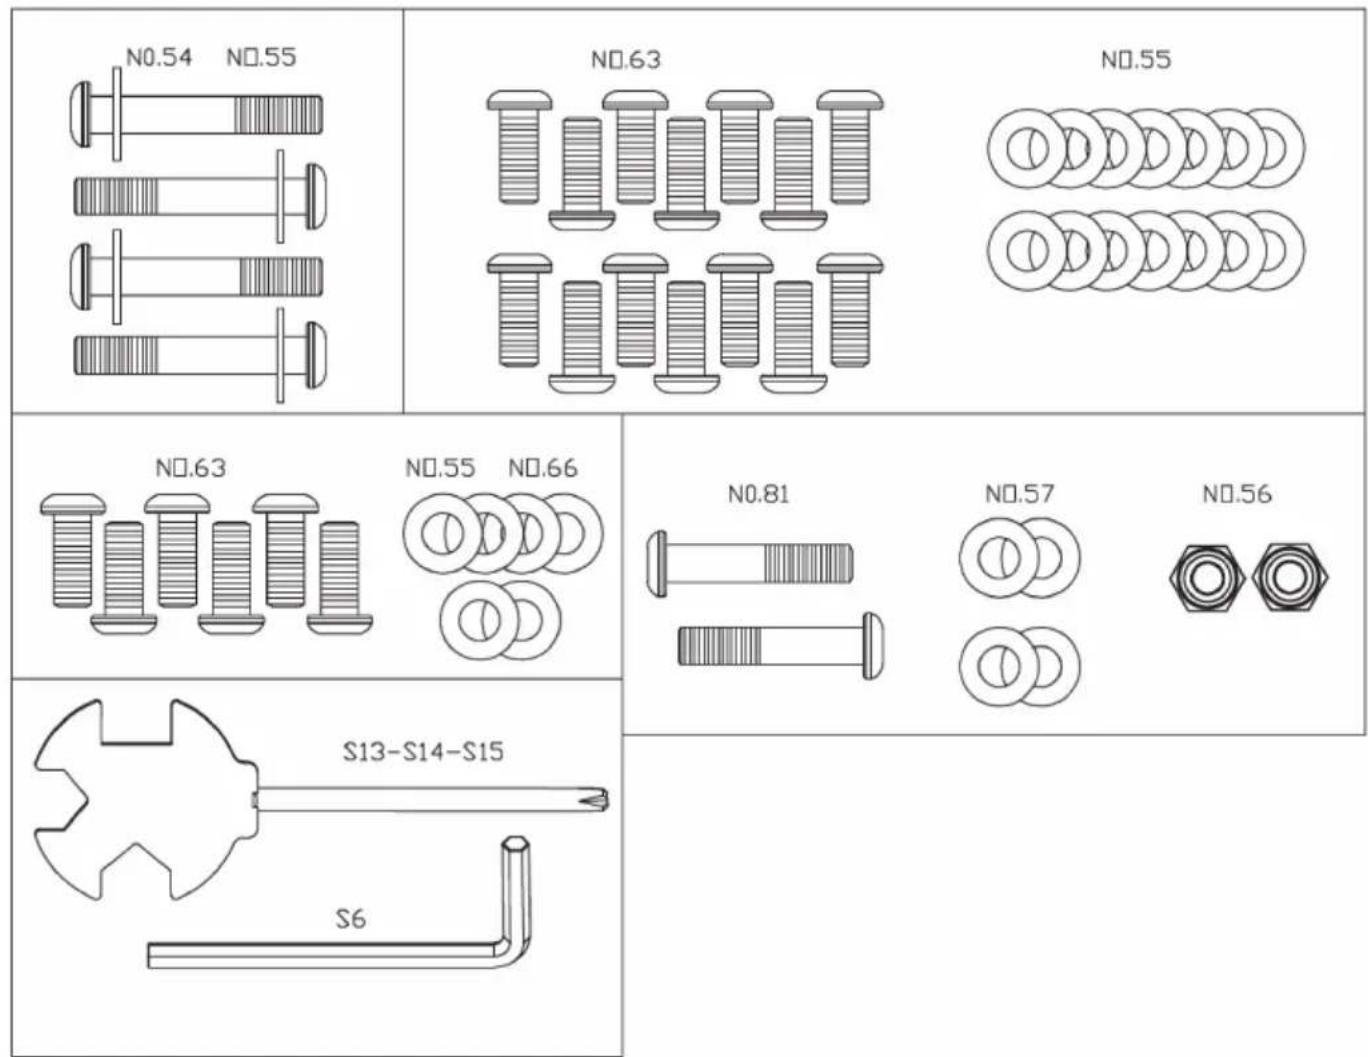
Hardware
ASSEMBLY
| 1 |
| Screw out all the screw (54) and flat washer (55) on the front stabilizer (3) and the rear stabilizer (2) by the S5 Allen wrench and keep them well. |
| Attach the front stabilizer (3) which is with transport wheel to the main frame (1) and fix it by S5 Allen wrench tightly with the kept hardware. Then attach and fix the rear stabilizer (2) to the main frame (1) in the same way. |
2
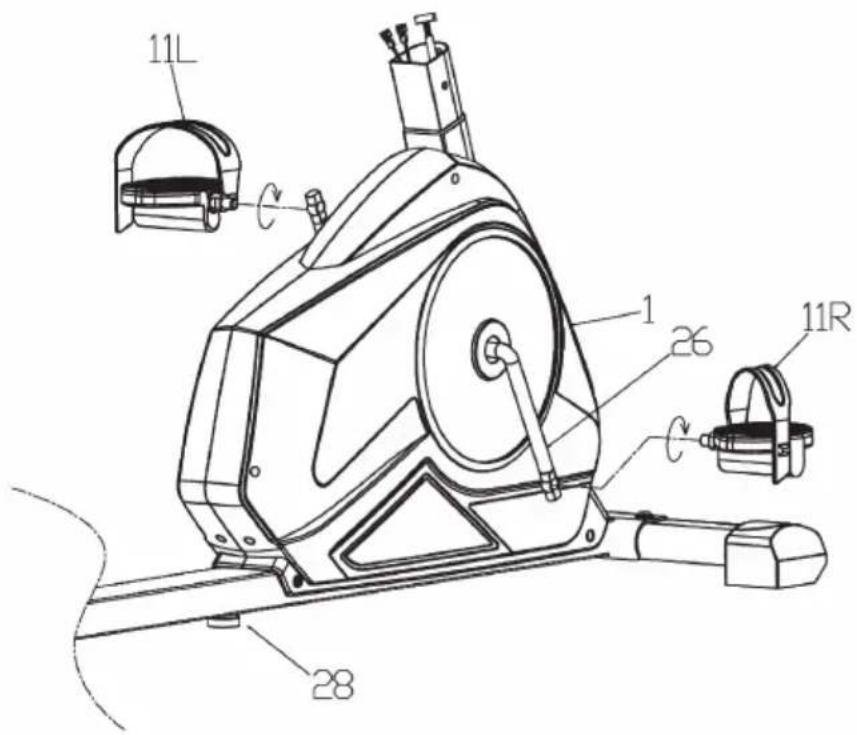
Fix the pedal (11L) which is marked ^ onto the crank (26) marked ^ side by spanner tightly in anticlockwise; and then fix the pedal (11R) which is marked ^ onto the crank (26) marked ^ side by spanner tightly in clockwise.
| 3 |
| Screw out all the screw (63) and flat washer (55) on the saddle adjusting tube (80) by the S5 Allen wrench and keep them well. |
| Fix the saddle adjusting tube (80) on the main frame (1) with the screw (63) and flat washer (55) by S5 Allen wrench tightly. |
4
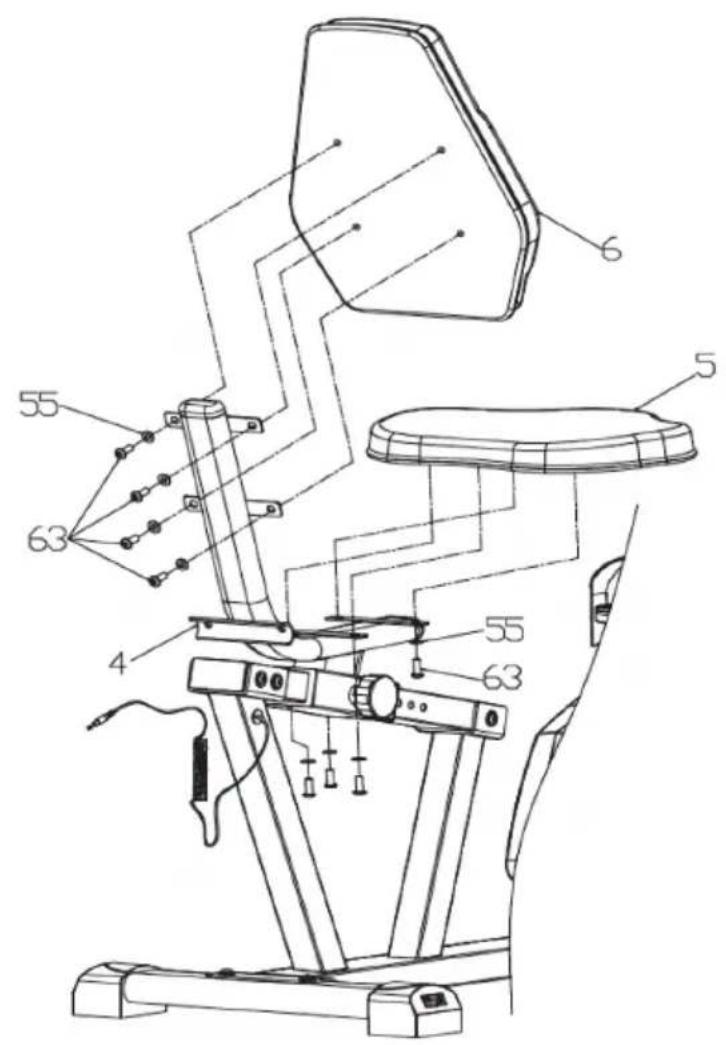
Fix the saddle (5) and back cushion (6) on the saddle support set (4) with screw (63) and flat washer (55) as shown separately and tightly by S5 Allen wrench.
| 5 |
| Fix the rear handle bar (36) onto the saddle support set (4) with screw (58), curved washer (66) and cap nut (56) by S5 Allen wrench tightly. |
| Connect the pulse sensor wire-bottom (19) together with sensor wire (60) correctly. |
6
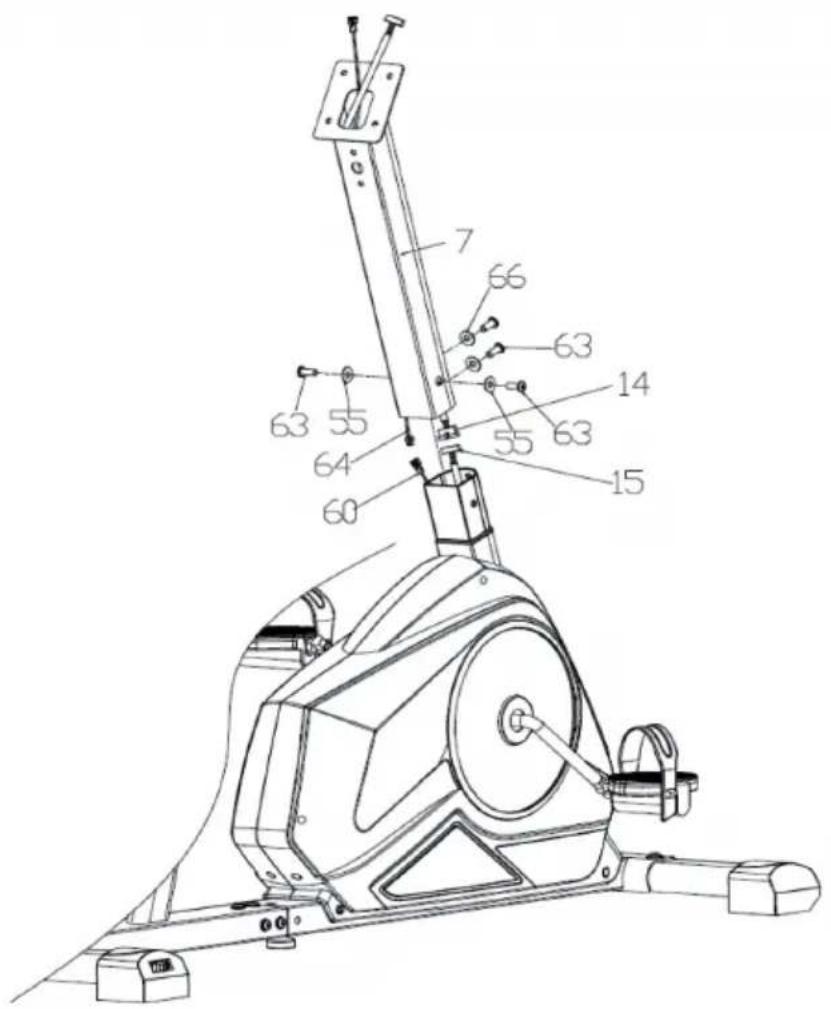
Connect the console wires (14&15) together carefully. Also connect the sensor wires (60&64) correctly. Please ensure that all the pins are straight when connecting 14 & 15 and 60&64. Failure to do so will result in console malfunction.
Put the front post (7) on the main frame (1) as shown and tighten it with Screw (63) and flat washer (55) & curved washer (66) tightly by S5 Allen wrench.
| 7 |
| 64 14 63 55 7 21 Fix the handle bar (8) on the front post (7) with flat washer (55) and screw (63) tightly. |
| Connect the console wire-top(14), speed sensor wire -top (64) together with the wire on the console (9) correctly, please ensure that all the pins are straight when connecting. |
| Fix the console (9) on the plate of the front post (7) with the screws (68) tightly. |
| Note: Now the equipment is completed assembled, if you find it not leveled on the floor, you can adjust it by the adjusting rear stabilizer tube plug(13). Make sure you have tightened all the screws and nuts well before beginning your workout. |
CONSOLE AND KEY FUNCTIONS
EN
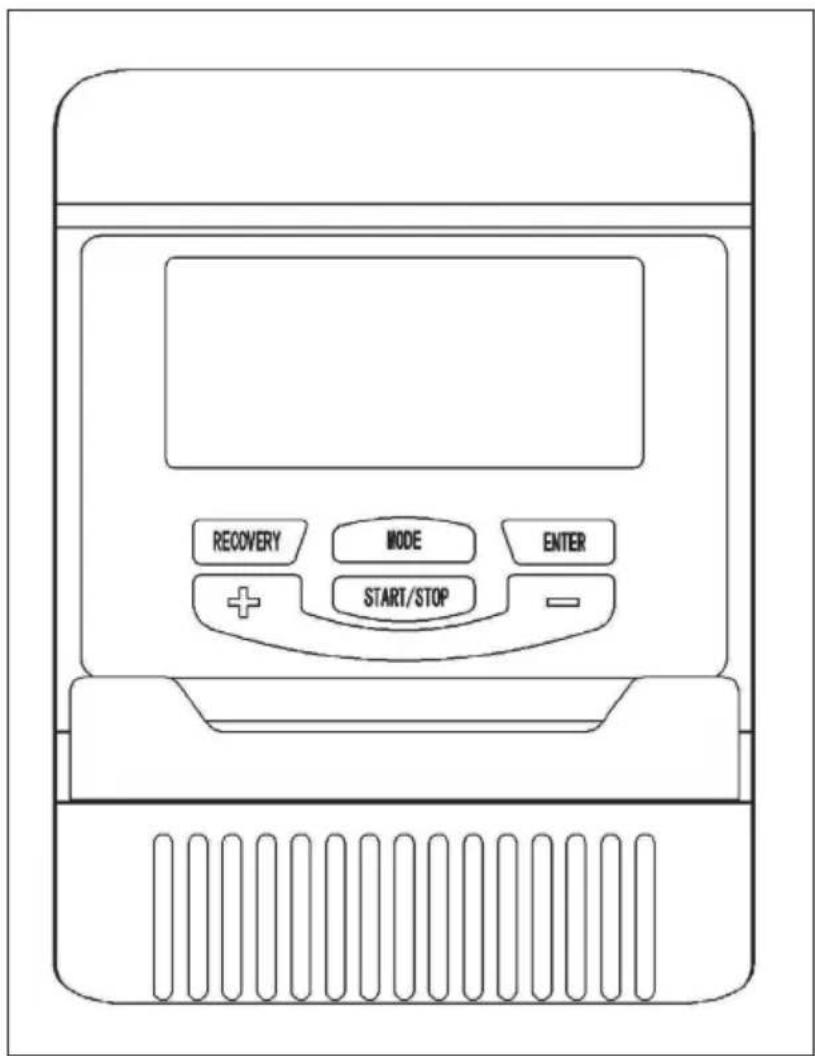
Key Functions
| Button Function | |
| START/STOP • Start & Stop work | kouts. • Start body fat measurement and quit the body fat program. • Holding key for 3 seconds will reset all function value to be zero. |
| DOWN (-) Decrease value of selected | cted workout parameter: TIME, DISTANCE, etc. During the workout, it will decrease the resistance load. |
| UP (+) Increases value of selected | workout parameter. During the workout, it will increase the resistance load. |
| ENTER To input desired value or | work out mode. |
| TEST (PULSE, RECOVERY) Press | to enter into Recovery function when computer has the heart rate value. Recovery is Fitness Level 1-6 after 1 minute. F1 is the best, and F6 is the worst. |
| MODE Press this button to select | a program (1-19). |
Exercise Parameters
Note: Some parameters are not adjustable in certain programs. Once a program has been selected, pressing ENTER, will make "Time" parameter flash. Using UP OR DOWN KEY you may select desired time value. Press ENTER KEY to input value. Flashing prompt will move to the next parameter. Continue use of UP OR DOWN KEY. Press START/STOP to start workout.
| Field Display | Range | Default Value | Increment/ Decrement | Description |
| Time | 0:00 ~ 99:00 | 0:00 | ±1:00 | ·When display is 0:00, Time will count up. ·When time is 1:00 ~ 99:00, it will count down to 0. |
| Distance | 0,00 ~ 999,0 | 0,00 | ±1 | ·When display is 0.00, Distance will count up. ·When Distance is 1.00 ~ 999.0, it will count down to 0. |
| Calories | 0,00 ~ 9950 | 0,00 | ±50 | ·When display is 0.0, Calories will count up. ·When Calories is 50.0 ~ 9950, it will count down to 0. |
| Watt | 20 ~ 300 | 100 | ±10 | User can set watt value only in Watt control program. |
| Age | 10 ~ 99 | 30 | ±1 | Target HR will be based on Age. When Heart Rate exceeds Target H.R, the number of Heart Rate will flash in programs. |
Regular cardio training stimulates the cardiovascular (heart and blood vessels) and respiratory system. It improves your general health and helps you to burn fat. It is the recommended workout if you want to lose weight. When exercising, glucose is burned off first, then the fat stored in the body.
Intensive cardio training (e.g. circuit training, training with high resistance and long duration training) requires a greater amount of effort and also trains the muscular system and your endurance. As a rule, the more regular you train, the more effective the training is (even with short training sessions of 20 minutes).
During the Training
The level of resistance used during the workout determines the training intensity and the associated results.
An optimal training session includes (1) a warm-up phase, (2) an intensive cardio training phase and finally (3) a cool down phase. If you want to progress or burn calories, you should go through these 3 phases as well as exercise for at least 20-30 minutes on the ergometer.
1. Warm-up Phase
Always start your training session with a low resistance level. A warm-up phase of 5-10 minutes is important because your muscles need to be warmed up. During the warm-up phase, you should give your circulatory system and muscles time to prepare for the subsequent workout. As a beginner, you can train for the first 3 minutes at the easiest level and then gradually increase the level to where you feel most comfortable.
2. Cardio Training Phase
After about 10 minutes, you can then begin the cardio training phase. When using the interval training program, the computer controls the resistance depending on the type of interval chosen and thus simulates changing intensities.
The cardio training phase is considered aerobic or anaerobic training depending on the energy expenditure. These two types of training are defined as follows:
Aerobic Training Zone
While you are in this zone, you are improving your cardiovascular system and burning fat.
Despite an increased heart rate, deeper breathing and light sweating, the body is not in a very stressed state, breathing is not significantly accelerated—you could still talk to someone without going out of breath—and you feel that you could sustain the physical exertion for a long time. It's similar to when you briskly walk uphill.
The muscles and heart work more intensely than when the body is at rest and can get most of their energy needs met via aerobic energy production, which utilizes oxygen to facilitate energy production. At the same time, the anaerobic production of energy is also active, but only to a small extent. The lactic acid produced in this process can be broken down to produce energy. Most of your training should be aerobic training.
If you continue to increase the intensity, you will eventually come to the threshold where aerobic energy production is no longer able to increase its output. At this point, there is a shift towards anaerobic energy production being used to a greater extent. You are now doing anaerobic training.
Anaerobic Training
When in this zone, you are improving your performance and speed. When you increase the intensity while in this zone, the training becomes much more strenuous because of the rising lactate level in the body; you start sweating more; your breathing gets faster; and after some time depending on your fitness level, your muscles tire and you feel totally exhausted and that you can no longer continue at this level of intensity.
3. Cool-down Phase
At the end of the cardio training phase, you begin the cool-down phase, which should last for at least 5 minutes. Here, you use low levels of resistance. The recovery or cool-down phase is also helpful with regard to preventing possible muscle soreness. It is also advisable to do active recuperation after an intensive training session, such as a hot bath, a sauna session or a massage.
Training Progress
Each month you can make the training more challenging by extending the duration of the cardio training phase, by using a higher level of resistance within that phase or by doing a more demanding interval training.
Eating and Drinking
- Drink before, during and after training.
- Drink at least 2 sips of water (10 to 20 cl) every 10-15 minutes during a training session.
- If your workout lasts for more than 1 hour, you should drink a sports drink to protect the body from dehydration while training.
- For optimal cardio training, suitable nutrition before and after any physical activity is very important.
Before training, it is best to eat carbohydrates, such as those found in rice and pasta, as they provide the body with an important source of energy.
After training, you need to refuel with proteins, such as those found in eggs, yoghurt and dried fruits. Even if you want to lose weight, it is absolutely necessary to eat after training in order for your body to recuperate.
5.
6.
7.
8.
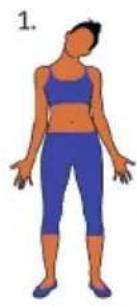
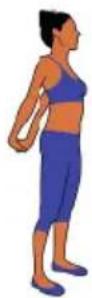
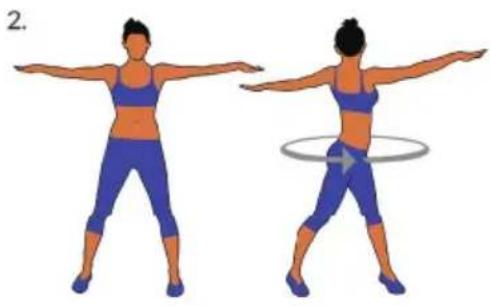
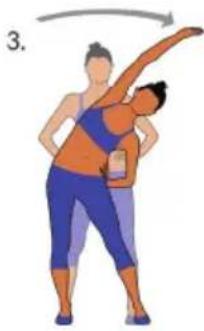
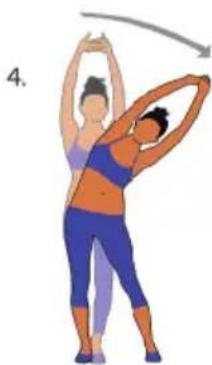
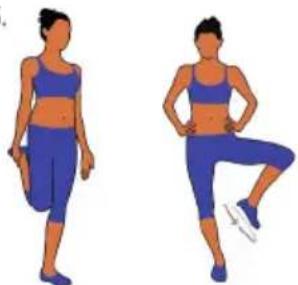
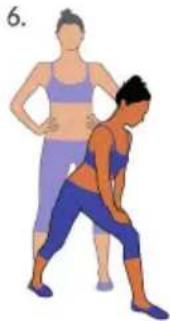
Perform the movements before each workout to mobilize your joints and activate your muscles.
Should a movement be uncomfortable or painful, skip this movement and consult your doctor or fitness instructor about suitable warm-up movements.
Each movement should be repeated (right and left) so that you can start the cardio training relaxed.
Take about 5 minutes to do the following CapitalSports training routine:
- Tilt the head sideways, slowly alternating from right to left. Then mobilize your shoulders (circular movements and shrugging the shoulders).
- Turn the hips while the arms are stretched out. The feet are not firmly fixed to the ground (the ankles follow the body's rotation).
- Bend to the side and raise one arm straight up. Stay in this position for several seconds on each side.
- Bend to the side and raise both arms above your head with palms together. Again, remain on each side for several seconds. The exercise is now a bit more intense with the second arm joining.
- Stand on one leg and hold the instep of the other foot with your hand. Mobilize it so as to stretch the thigh lightly. If necessary, hold onto something to keep your balance. Stand on one leg and trace a circle with your foot in the air in both directions (counter clockwise and clockwise).
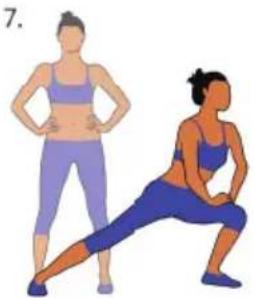
- Put one leg forward and with your arms support the weight of your upper body on your thigh. Position your legs so as to provide a stretch for the rear leg's calf muscles.
- Repeat the previous exercise with more distance between your feet. The stretch will now be more intense.
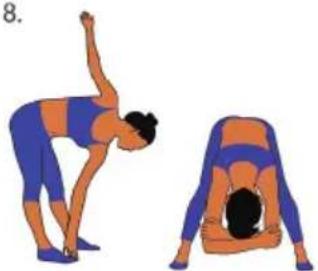
- Bend forward while keeping your legs straight and alternatingly touch each hand to the opposite foot. Finally, let yourself hang down and relax.
TRAINING VIA CONSOLE
To use the training programs:
Manual (P1)
Selecting "Manual" using UP OR DOWN KEY then pressing ENTER KEY. First parameter "Time" will flash so value can be adjusted using UP OR DOWN KEY. Press ENTER KEY to save value & move to next parameter to be adjusted. Continue through all desired parameters, pressing START/STOP to start workout.
Note: One of workout parameters counts down to be zero, it will have BI sounds and stop the workout automatically. Press START KEY to continue the workout to reach the unfinished workout parameter.
Pre-programs (P2 - P9)
There are 8 program profiles ready for use. All program profiles have 24 level of resistance.
Selecting one of pre-programs using UP OR DOWN KEY then pressing ENTER KEY. First parameter "Time" will flash so value can be adjusted using UP OR DOWN KEY. Press ENTER KEY to save value & move to next parameter to be adjusted. Continue through all desired parameters, pressing START/STOP to start workout.
Note: One of workout parameters counts down to be zero, it will have bi sounds and stop the workout automatically. Press START KEY to continue the workout to reach the unfinished workout parameter.
Watt control program (P10)
Selecting "Watt control program" using UP OR DOWN KEY then pressing ENTER KEY . 1St parameter "Time" will flash so value can be adjusted using UP OR DOWN KEY. Press ENTER KEY to save value & move to next parameter to be adjusted. Continue through all desired parameters, pressing START/STOP to start workout.
Note: One of workout parameters counts down to be zero, it will have bi sounds and stop the workout automatically. Press START KEY to continue the workout to reach the unfinished workout parameter. Computer will adjust the resistance load automatically depends on the speed to maintain the constant watt value. User can use up down key to adjust the watt value during workout.
Body Fat Program (P11)
1 Selecting "BODY FAT Program" using UP OR DOWN KEY then pressing ENTER.
2 "Male" will flash so Gender can be adjusted using UP OR DWON KEY, press ENTER to save gender & move to next data.
3 "175" of Height will flash so Height can be adjusted to use UP OR DOWN KEY, press ENTER KEY save value & move to next data.
4 "75" of Weight will flash so Weight can be adjusted to use UP OR DOWN KEY, press ENTER KEY to save vale & move to next data.
5 "30" of Age will flash so Age can be adjusted using UP OR DOWN KEY, press ENTER to save value.
6 Press START/STOP to start measurement, please also grasp hand pulse grips.
6 After 15 seconds the display will show out Body Fat%, BMR, BMI & BODY TYPE.
There are 9 body types divided according to the FAT% calculated:
| Type Body Fat in % | |
| 15 - 9 | |
| 2 10 - 14 | |
| 3 15 - 19 | |
| 4 20 - 24 | |
| 5 25 - 29 | |
| 6 30 - 34 | |
| 7 35 - 39 | |
| 8 40 - 44 | |
| 9 45 - 50 | |
7 Press START/STOP KEY to return the main Display.
Target Heart Rate Program (P12)
Selecting "TARGET H.R." using UP OR DOWN KEY then pressing ENTER KEY. First parameter "Time" will flash so value can be adjusted using UP OR DOWN KEY. Press ENTER KEY to save value & move to next parameter to be adjusted. Continue through all desired parameters, pressing START/STOP to start workout.
Note: If Pulse is above or below (± 5) the set TARGET H.R, computer will adjust the resistance load automatically. It will check Every 15 seconds approx. I resistance load will increase or decrease. One of workout parameters counts down to be zero, it will have bi sounds and stop the workout automatically. Press START/STOP to continue the workout to reach unfinished workout parameter.
Heart Rate Control Program (P13-P15)
There are 3 selection for target pulse:
P13: 60% TARGET H.R = 60% of (220-AGE)
P14: 75% TARGET H.R = 75% of (220-AGE)
P15: 85% TARGET H.R = 85% of (220-AGE)
Selecting "One of Heart Rate Control Program." using UP OR DOWN KEY then pressing ENTER KEY. First parameter "Time" will flash so value can be adjusted using UP OR DOWN KEY. Press ENTER KEY to save value & move to next parameter to be adjusted. Continue through all desired parameters, pressing START/STOP to start workout.
Note: If Pulse is above or below (± 5) the set TARGET H.R, computer will adjust the resistance load automatically. It will check Every 15 seconds approx. I resistance load will increase or decrease. One of workout parameters counts down to be zero, it will have bi sounds and stop the workout automatically. Press START/STOP to continue the workout to reach unfinished workout parameter.
User Program (P16-P19)
There are four user programs can be selected form U1 to U4. User program allows user to set their own program that can be used immediately.
Selecting user using UP OR DOWN KEY then pressing ENTER KEY. First parameter "Time" will flash so value can be adjusted using UP OR DOWN KEY. Press ENTER KEY to save value & move to next parameter to be adjusted. Continue through all desired parameters. After finished set up desired parameter, the level 1 will flash, use UP OR DOWN KEY to adjust then pressing ENTER until finished. (There are 10 times total). Press START/STOP to start workout.
Note: One of workout parameters counts down to be zero, it will have bits sounds and stop the workout automatically. Press START/STOP KEY to continue the workout to reach unfinished workout parameter.
TRAINING VIA KINOMAP APP
With the Kinomap app you can run, drive or row more than 100,000 km around the world with the help of real-life videos that are updated daily by the users themselves. Try to follow their pace under the same conditions as seen in the video. Use the KINOMAP portal and choose your own video to train to. Improve your fitness by using your own interval in the resistance or in the power mode.
You can connect your compatible devices directly. Alternatively, you can use the camera that provides you with an optical pedal, step or stroke sensor. Join our multiplayer training sessions and try to be the first to finish.
Create an Account
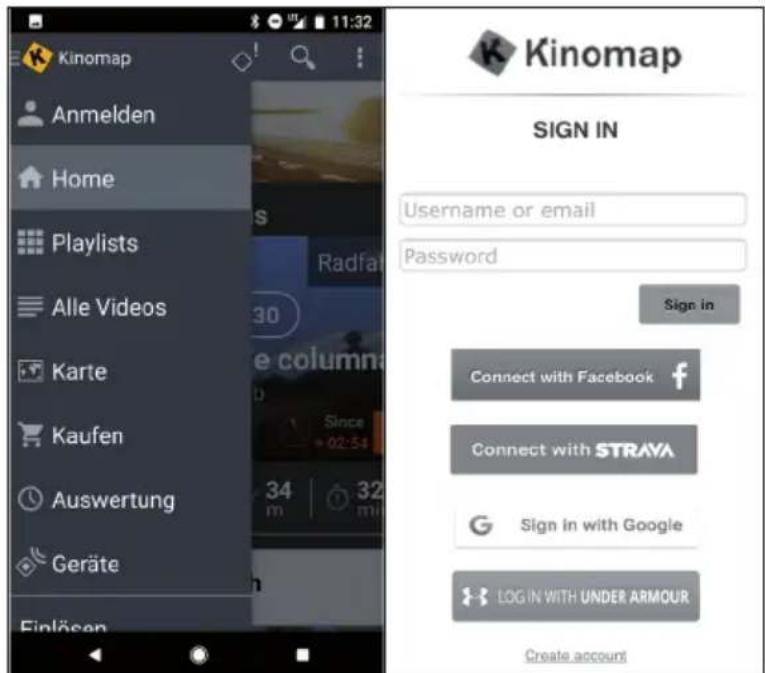
If you want to use Kinomap, you must first connect to your Kinomap account. If you have successfully registered, you can start training. If you do not sign out, you will still be logged in the next time you start the app. If you do not as yet have a Kinomap account, please sign in to get a free account.
Activation Code
- The standard version is free and provides you with access to a number of free videos and interval training (not currently available on all devices).
- A subscription is required later on to gain access to all eligible content, including thousands of videos, a multiplayer mode and more.
- After the first login, the app will ask you for an activation code. If you have one, enter it in to activate your subscription to the app.
- You can also go to "Add Activation Code" at a later time.
Enter Activation Code
Note: You can subscribe to the service on a monthly basis or as an annual subscription, which will provide you with access to advanced features. Go to "Subscribe Settings".
After the activation, you will see your subscription at „My subscription“:
Connecting to the Training Machine
How to connect the device with the KINOMAP app:
1 Go to the „Equipment“ menu.
2 Add new devices with the + button
3 Select your device type from the list (ergometer for the CapitalSports Evo Air PRO).
4 Select the brand CapitalSports.
5 Select the model Evo Air PRO.
6 If the device has been detected, touch the window to confirm.
7 Now press SAVE. Your device has now been added.
Camera
- Your CapitalSports Epsylon product uses Kinomap's face recognition to determine the kick, step or beat frequency (the smartphone or table camera serves as a sensor).
- Kinomap determines and evaluates the intensity of movement by moving the head during training.
When you start a training session, you will see your face in the lower right corner so that you can adjust the position of your TAB or smartphone if needed. Once your face is detected, the image will disappear, and the dashboard will appear.
The app asks you to manually adjust the resistance according to the change of height.
Data Preview
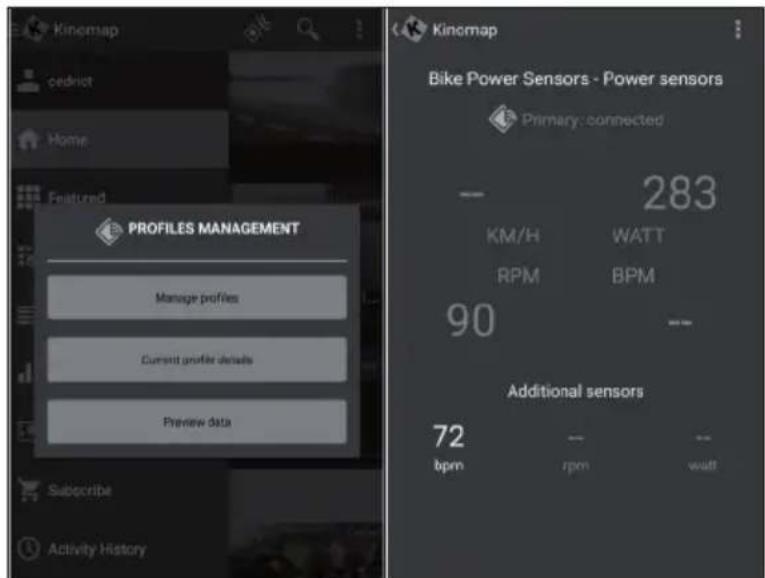
The "Data Preview" feature lets you instantly see the data sent by the device. This feature is especially useful if you have trouble committing when you start a new activity. In accordance with the configuration, the app will receive some values.
Training
Video Selection
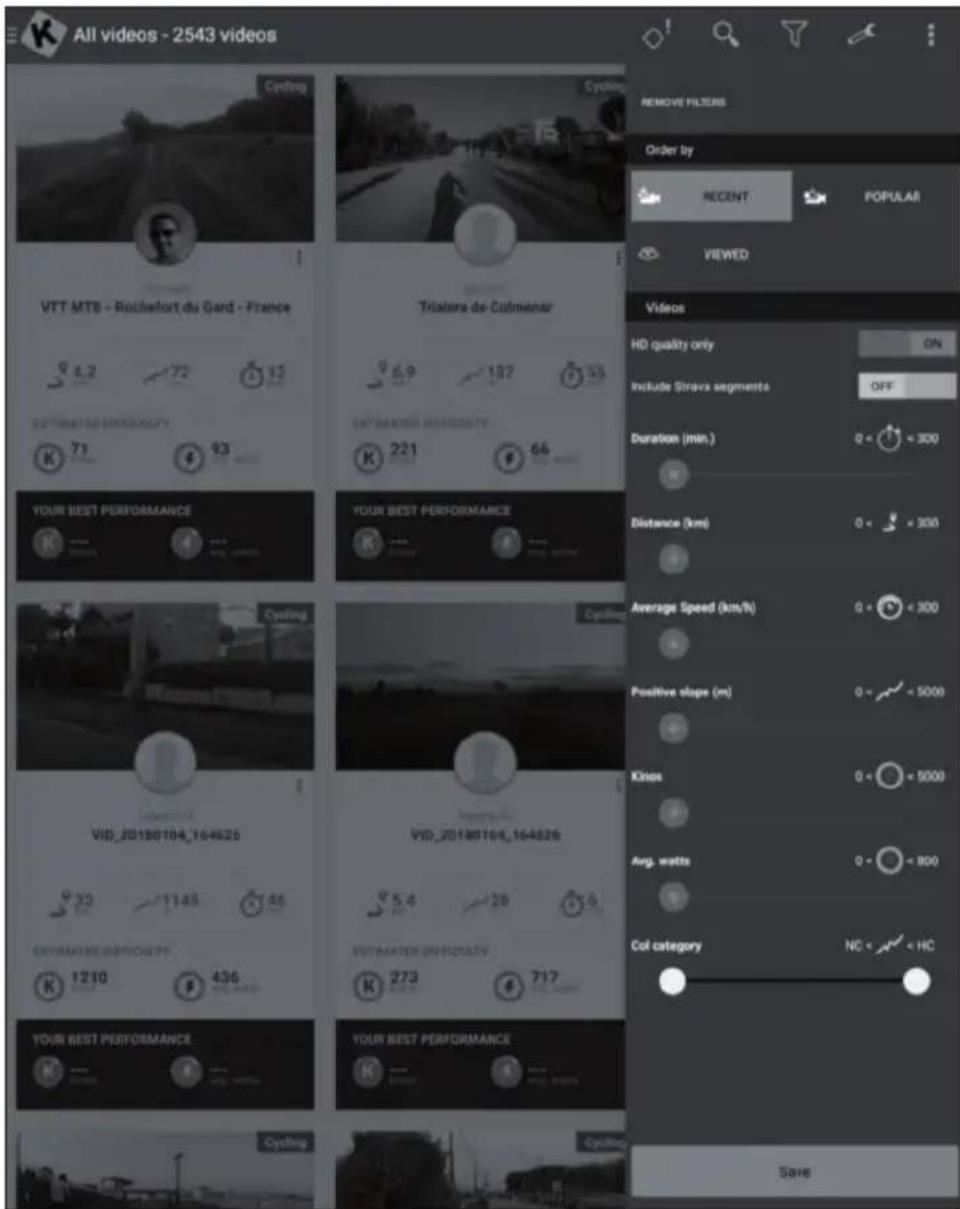
There are several lists of videos from which you can select the desired video.
-
There is a filter function to ensure that you find the videos you wish to train to (featured, popular, most viewed, most recent, duration, distance, incline, among others).
-
For each video, the following relevant information is available: name, contributor (who posted the video), country, duration, distance, average of positive slope and average speed.
Playlists
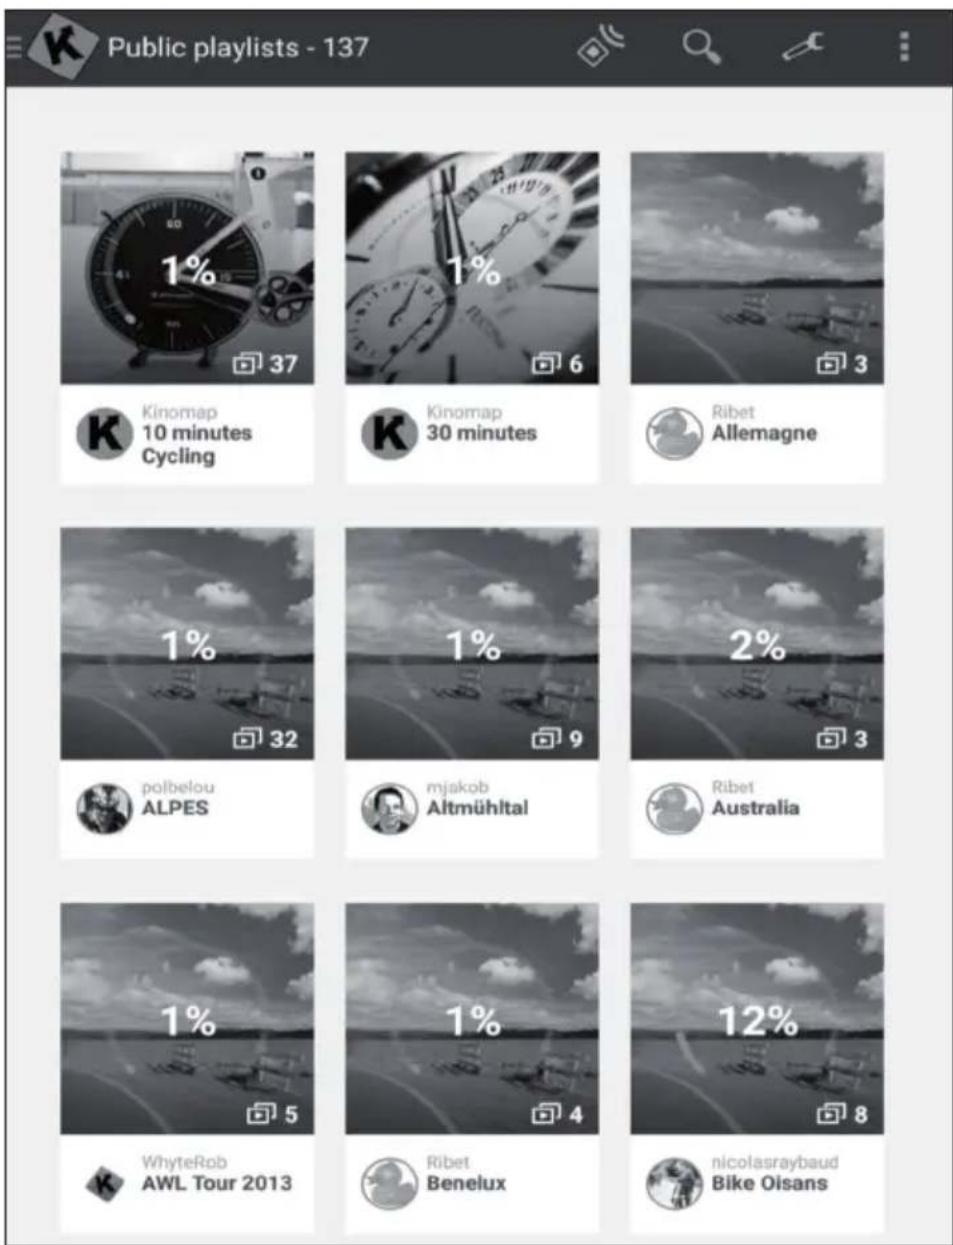
- There are also many playlists created by Kinomap or the users of Kinomap themselves.
Each playlist has a specific theme, such as a 30-minute training session or visiting a country. - You can track your progress on any playlist and any video.
- Currently, you cannot manage your playlists directly on the app.
Beginning of Training
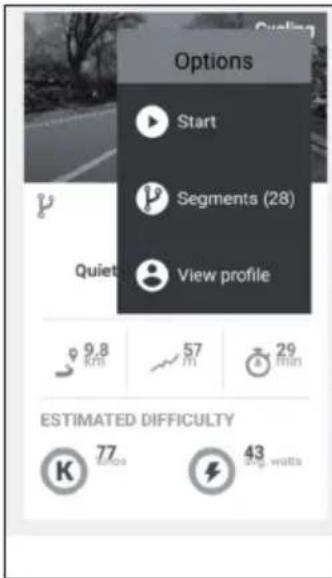
Select the video you would like to train to.
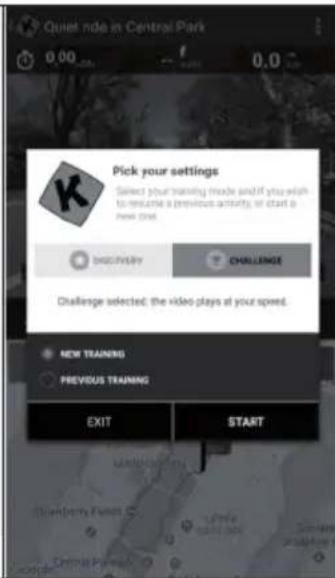
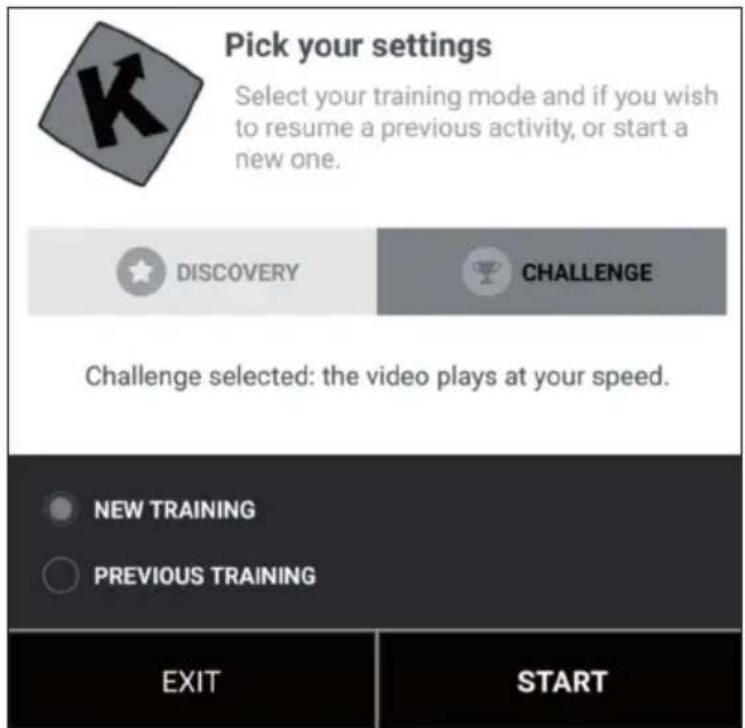
Choose the mode in which you would like to train.
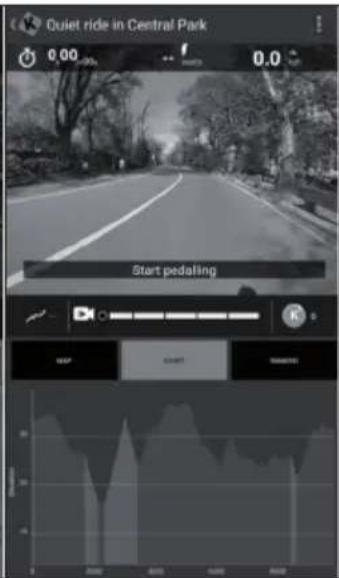
Just start pedaling to start training.
Discovery and Challenge Mode
Challenge Mode: The video will be played at your speed so that you can achieve the same overall performance as the producer of the video. If you're not as fast, the video slows down the frame rate. If you perform better, the frame rate can be increased to twice the original speed. Use this mode to participate in challenges, such as indoor challenges, and to export a map complete with coordinates of your virtual ride to third-party sites, such as Strava.
Discovery Mode: The video plays at its original speed and pauses when your speed reaches 0. Whatever your performance, the frame rate will not change. But you will still see if you perform well by looking at the energy performance data. Note that the data that can be exported to third-party sites, such as Strava, is limited to watts and additional data like cadence and heart rate; however, coordinates and a map are not included.
Training Display
At the top of the screen, the following relevant information is displayed:
The duration
The instantly produced power
The instant speed
- Your heart rate (only if you add an extra heart rate monitor belt or if your device has one already integrated)
The instant pedal frequency
The distance
- Your position on the map is synchronized with the video.
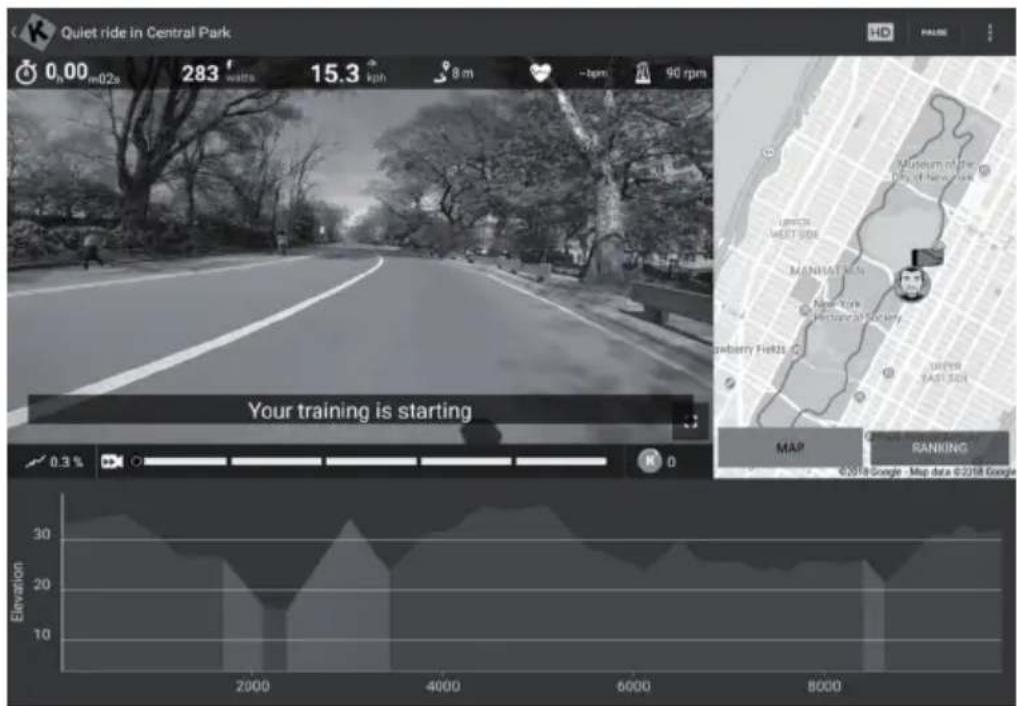
The tab "Ranking List" is only available in the multiplayer mode.
Abscissa: height in meters
- Ordinate: distance in the KM in the challenge mode.
- Duration: in seconds in the discovery mode.
Setting the Resistance/Gears
On the screen you will find instructions on how to set the resistance according to the altitude profile when using a speed/cadence sensor or an optical sensor.
End of Training
If you want to pause or stop exercising, just stop pedaling or use the pause button in the corner. Click the "Resume Session" button to continue the training session. If you want to stop completely, simply confirm by tapping on "Save and Exit".
Evaluations
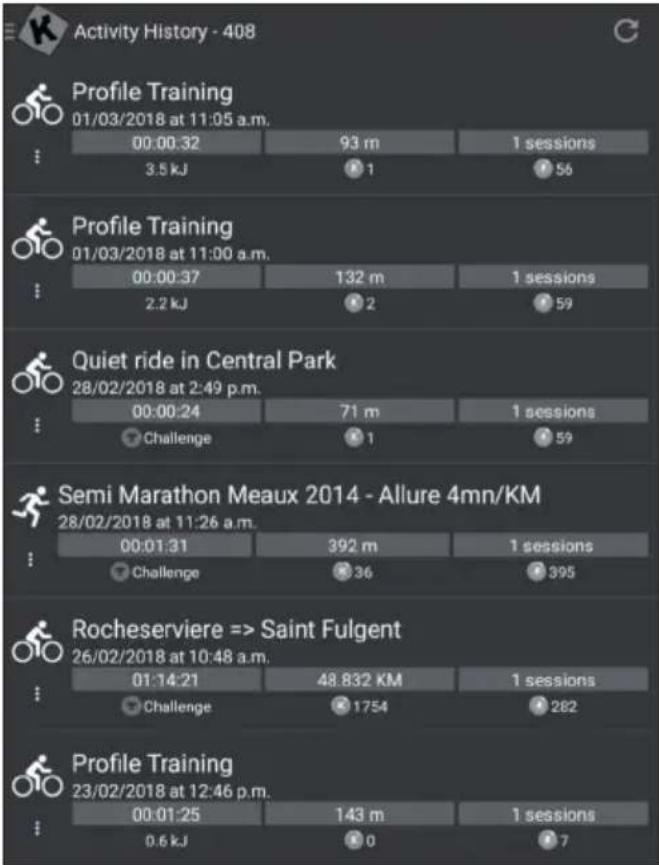
Activity History
- Open the main menu on the left side to find „Activity History".
- You can see the history of your past workouts, including the name of the video you trained with, the date of the workout, the duration and the distance.
- Click on a specific training session to see all of the information.
- Your activity history contains a map, a summary and a series of detailed graphs that show your current speed, power, cadence and heart rate. Note that the activity history can be automatically exported to various platforms, such as RunKeeper, Strava or Under Armor.
Search
This button is always available in the top right corner no matter which menu you are in for you to browse the available videos.
There are several ways to find the right video:
- You can search by clicking the Search button. Once you have entered at least 3 characters, an auto-complete search will be performed.
- You can also perform a geographic search. Choose „Map“ in the main menu.
- You can explore all available videos by clicking "Public Playlists" or "All Videos".
Settings
User Settings
- Go to the Settings menu and input your user details, including your size, weight, birthday and sex.
- This information affects the speed calculation
External Display
Follow the instructions to view the display on your TV using Chromecast or Apple TV.
CARE AND MAINTENANCE
Note: As with all training machines with mechanical, moving components, screws may loosen due to frequent use. We therefore recommend that you check them regularly and, if necessary, retighten them with a suitable key. Clean your training device regularly with a damp cloth to clean the surfaces from sweat and dust.
- When you don't use the exercise bike for a long time, please take out the console battery to avoid running out of battery.
- Often clean the exercise bike with clean cloth to keep the clean appearance.
- The safety level of the equipment only can be maintained if it is regularly examined for damage and or /wear and tear.(e.g. handle bar, pedals and seat ...etc.). It is vital that any faulty parts are replaced and the it is not used until completed repaired.
- Regularly check that the elements fastened with nuts and bolts are correctly tightened.
- Remember regularly to grease moving parts.
- Special attention to the component, most of them are susceptible to wear like brake system, foot pad etc.
- As sweat is very corrosive, do not allow it to come into contact with the enameled or chromed parts of the equipment, particularly the computer. Immediately wipe the equipment after using. The enameled parts can be cleaned using a damp sponge. All aggressive or corrosive products must be avoided.
- Storing the equipment in a clean and dry environment away from children.
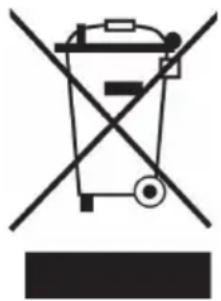
According to the European waste regulation 2012/19/EU this symbol on the product or on its packaging indicates that this product may not be treated as household waste. Instead it should be taken to the appropriate collection point for the recycling of electrical and electronic equipment. By ensuring this product is disposed of correctly, you will help prevent potential negative consequences for the environment and human health, which could otherwise be caused by inappropriate waste handling of this product. For more detailed information about recycling of this product, please contact your local council or your household waste disposal service.
Your product contains batteries covered by the European Directive. 2006/66/EC, which cannot be disposed of with normal household waste. Please check local rules on separate collection of batteries. The correct disposal of batteries helps prevent potentially negative consequences on the environment and human health.
DECLARATION OF CONFORMITY

Producer:
Chal-Tec GmbH, Wallstraße 16, 10179 Berlin, Germany.
This product is conform to the following European Directives:
2014/30/EU (EMC)
2011/65/EU (RoHS)