
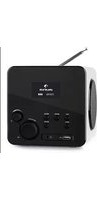
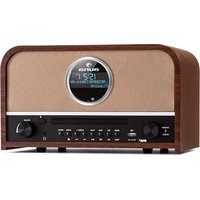
IR150 - Radio Auna - Free user manual and instructions
Find the device manual for free IR150 Auna in PDF.
| Brand | Auna |
| Model | IR150 |
| Product type | Internet and FM radio with alarm |
| Power supply | 9V / 1.5 A power adapter (input 100-240 V ~50 Hz) |
| FM frequency band | 37.5 - 108 MHz |
| Connectivity | WiFi (2.4 GHz), UPnP/DLNA, audio streaming |
| Inputs | AUX input (3.5 mm), headphone output (3.5 mm) |
| Speaker | Built-in speaker (mono) |
| Display | Backlit digital display |
| Main functions | Internet radio (thousands of stations), FM radio, Music library via UPnP, MP3/WMA/FLAC playback, dual alarm, sleep timer, preset equalizer (8 modes), weather and stock information |
| Memory | Up to 250 favorites for Internet radio, 20 FM presets |
| Controls | Buttons on the device, infrared remote control included |
| Menu languages | French, English, German, Dutch, Russian, Swedish, Norwegian, Finnish, Danish |
| Care and cleaning | Use a dry cloth. Do not use volatile products or rub too hard. |
| Safety | Do not expose to water or naked flames. Do not block ventilation slots. Do not repair yourself. |
| Repairability | Spare parts not specified. For maintenance, contact after-sales service. |
| Software update | Update via Internet (menu "Software Update") |
Frequently Asked Questions - IR150 Auna
User questions about IR150 Auna
0 question about this device. Answer the ones you know or ask your own.
Ask a new question about this device
Download the instructions for your Radio in PDF format for free! Find your manual IR150 - Auna and take your electronic device back in hand. On this page are published all the documents necessary for the use of your device. IR150 by Auna.
USER MANUAL IR150 Auna
Congratulations on purchasing this product. Please read and follow these instructions, in order to avoid damaging the item. We do not cover any damages that may arise from improper use of the item or the disregard of the safety instructions.
Technical Data
Article no. 0028443, 10028444
FM Frequency range 37.5 - 108MHz
Supported network profile and encryption EEE802.11b/g/n; WEP/WPA/WPA2
Dimensions 235× 148× 135mm
Important Safety Instructions
- Read all instructions before using.
- Do not place on or near a hot gas or electric burner or in a heated oven.
- To protect against a fire, electric shock or personal injury, do not immerse cord, electric plugs or device in water or other liquids.
- Do not expose the appliance to extreme temperatures. The appliance shall be used in moderate climates.
- Disconnect the appliance from the power source if it is not going to be used for a long time, if there is a thunderstorm or if it isn't working properly.
- The use of attachments that are not recommended by the appliance manufacturer may result in fire, electric shock or personal injury.
- Do not open the unit by removing any cover parts. Do not attempt to repair the unit. Any repairs or servicing should be done by qualified personnel only.
- Only qualified persons may perform technical work on the product. The product may not be opened or changed. The components cannot be serviced by the user. The manufacturer is not responsible for any radio or TV interference caused by unauthorized modifications.
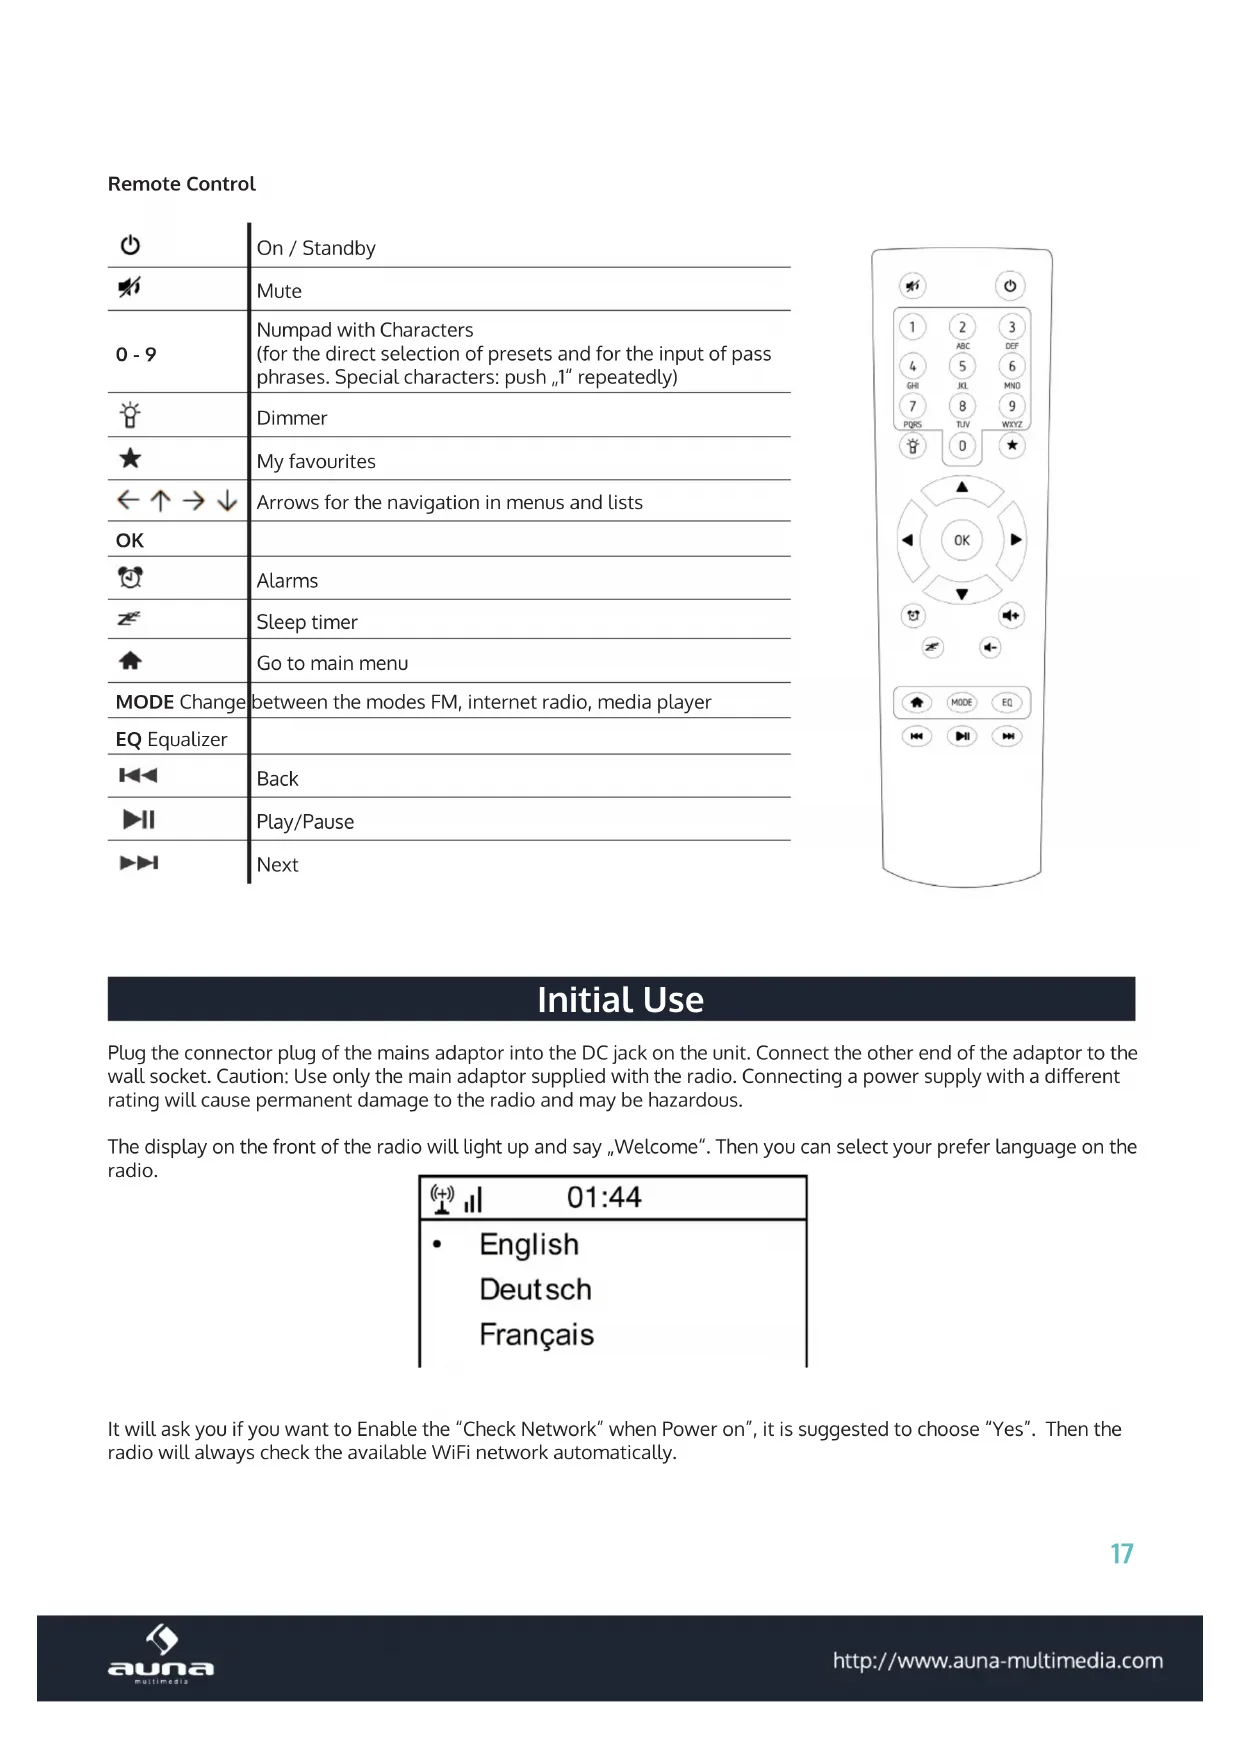
Controls
Front
| Speaker 16 MENU | |||
| Power On / Off | 27 | LEFT (Links) | |
| MODE | 38 Infarot-Sensor | ||
| PRESET | 4 | 9 RIGHT (rechts) | |
| Display | 5 | 10 | Dial/Select (Auswahl) / VOLUME (Lautstärke) |
Back
| O | On / Standby |
| ¶ | Mute |
| 0 - 9 | Numpad with Characters (for the direct selection of presets and for the input of pass phrases. Special characters: push „1“ repeatedly) |
| ♀ | Dimmer |
| ★ | My favourites |
| ← ↑ → ↓ | Arrows for the navigation in menus and lists |
| OK | |
| ◎ | Alarms |
| £ | Sleep timer |
| ▲ | Go to main menu |
| MODE Change | between the modes FM, internet radio, media player |
| EQ Equalizer | |
| ↔ | Back |
| ||| | Play/Pause |
| →↑ | Next |
Initial Use
Plug the connector plug of the mains adaptor into the DC jack on the unit. Connect the other end of the adaptor to the wall socket. Caution: Use only the main adaptor supplied with the radio. Connecting a power supply with a different rating will cause permanent damage to the radio and may be hazardous.
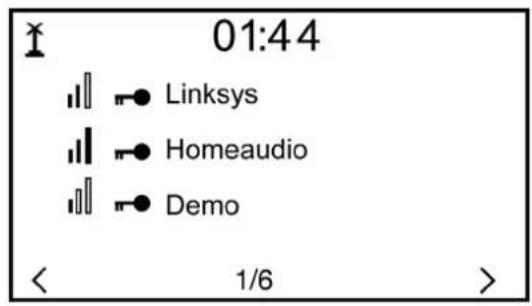
The display on the front of the radio will light up and say "Welcome". Then you can select your prefer language on the radio.
| 01:44 |
| • English Deutsch Français |
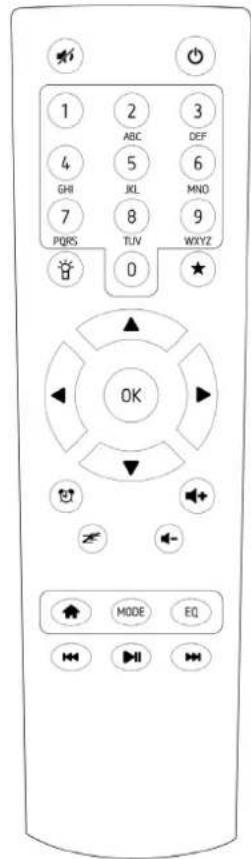
It will ask you if you want to Enable the "Check Network" when Power on", it is suggested to choose "Yes". Then the radio will always check the available WiFi network automatically.
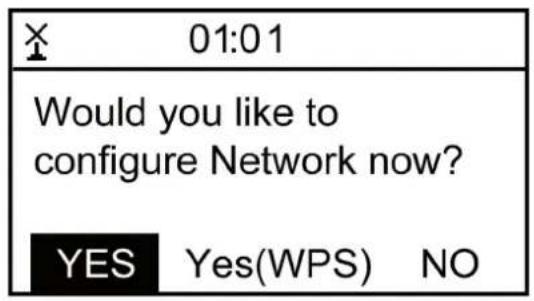
The screen above (left) will appear. You can choose Yes to proceed to search for the available WiFi network. If your router has the WPS function, you can select the "Yes[WPS]" to proceed. It will then start scanning the network. After the search is done, it will display a list of the available router (above right).
Choose your router from the list, enter the WEP(Wired Equivalent Privacy) or WPA(Wi-Fi Protected Access) code. If your network is not configured to be with the WEP or a WPA code, the unit will connect to the router automatically.
Note: The encryption code would have been set up by the person who set up and configured your network.
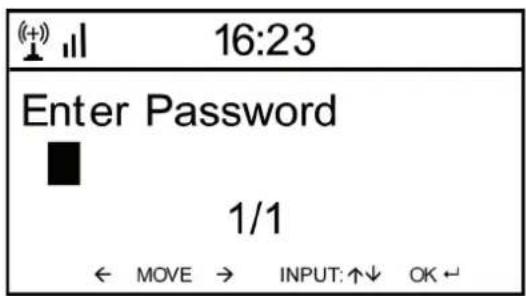
Please refer to the "Remote control character list" for you to enter the passwords. Press the RIGHT button to go to the next word, press LEFT to delete the wrong word you have entered.
If you want to enter the passwords on the radio main unit, you can use the Volume Dial rotary knob. Follow the steps below:
- Rotate the knob to select the character
- Press the RIGHT button to go to the next entry
- After you finish the entries, push down the Rotary knob to confirm.
The radio will start connecting to the network.
After the router is connected successfully, it will show "Network OK" and display the menu screen:
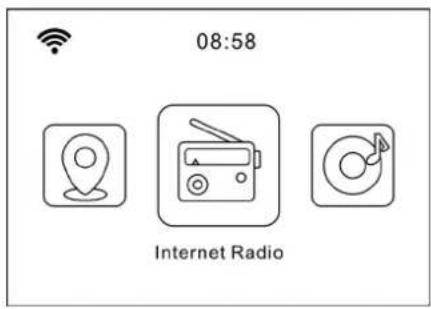
Internet Radio
Choose 'Internet Radio' from the menu, you can see different functions as below:
To start listening the worldwide radio stations, select "Radio Station/Music",
My Favorites
This is to show the list of your Favorite stations which have been assigned to the presets. To preset a station: While you are playing the favorite station, simply hold and press the key until the follow screen appears.
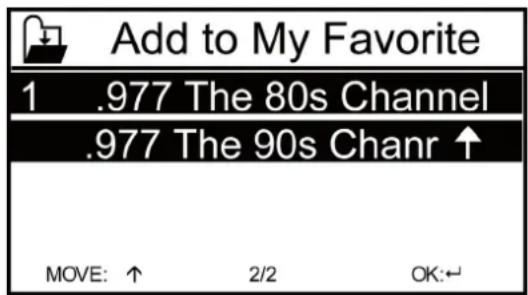
The folder icon will appear in the upper left corner of the display, indicating that the station is added to the radio preset. The presets will be stored in ascending order. You can store up to 250 presets.
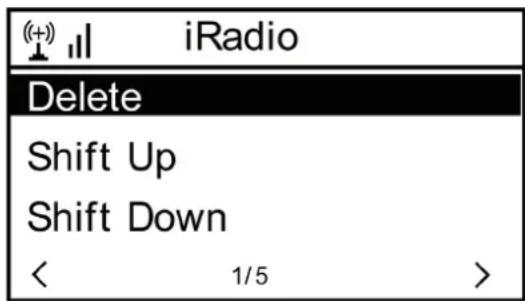
You can edit your Favorite list with the following options: Delete - To delete the selected station; Shift up/Shift down - To shift the selected station to a particular ranking on the list; Rename - To rename the selected station; Play - press and play the selected station
To do the edit, simply press the RIGHT (or the right arrow on the RC) button briefly to enter the Preset station list. Choose the radio station that you want to make with the above changes. Then press the Right key, it will enter into the list with the options listed above. Then choose your desire action.
To recall a preset station Press the button and choose your desired station. Please note Preset 1-5 is reserved for future use and cannot be preset for radio stations.
Radio Station / Music: Select this option to select your desired radio station by Category, Genere or Location.
Local Radio: If you want to access quickly the radio station located in your area, select this function and it will display the list of the stations available in your area.
History: Show the radio stations that you have listened in the past.
Service: Contains the sub menus Search Stations (You can find your desire radio station by entering the name of the radio) and Add New Radio Station (If you cannot find your desire station from the Radio station list and you have the URL address, you can input the link here and add to your favourite list).
When the radio station is playing, the display will show a color image transmitted from the radio station.
FM
Switch the radio to FM mode. The radio will auto scan from the lowest frequency to the highest frequency and store the available FM stations.
Auto Scan
To do the Auto Scan, press the DIAL/SELECT button to start the scan. It will automatically store the available radio station to the Presets.
Please note: When you are using the auto scan, the FM related function (such as stations switching, manual searching, manual tune and figure stored) will not work until the auto searching is completed, and the second searching also will be refused as well.
Manual Scan
If you want to do the scan manually, please follow the steps below:
- Press RIGHT (or the right arrow on the RC) to scan the next FM available station.
- Press LEFT to scan the previous FM available station.
- You can press Right / Left button to stop searching during the manual scan.
Manual Tune
If you want to tune up the radio station manually, please use the DIAL/SELECT button to tune up and down of the frequency. The frequency will go up/down by each step of 0.05MHz. Press the UP/DOWN buttons on the remote controller to perform the manual tune.
FM Station Presets
To preset a station, press and hold the "PRESET" button on the unit, or on the remote controller. It can store up to 20 preset stations. You can select the preset number you want to store the station by using the UP/DOWN buttons and SELECT/OK to confirm.
To Recall a preset you can press the number buttons on the remote control or press PRESET/★ button and enter the station selecting menu. Use DIAL/SELECT or UP7DOWN to select FM stations 1-20 and press SELECT button to recall the desired FM station.
Aux In
You can enjoy the music from other audio devices by connecting the audio cable to the AUX IN connector at the rear of the unit, such as mobile phone, MP3 player, etc.
DLNA
The Internet radio supports DLNA. It allows you to stream music from other devices which has DLNA feature to listen on this internet radio, provided that the Internet radio and other DLNA devices are under the same Wi-Fi network. The radio will appear as "AirMusic" when you try to search it on other devices. If you want to change the name from AirMusic to another, go to Configuration and DLNA setup to make the change.
Please note: The IR-150 DLNA feature is compatible and works with corresponding Android APPs. Apple devices are not supported.
Media Center
UPnP (Universal Plug and Play)
You can stream music from the Networked device which supports UPnP function, allow sharing of the data and entertainment. For instance, most of the latest computer laptop supports UPnP, and you can stream the music from Win
dows Media Player application on the computer and listen on your radio.
If your PC is running Microsoft Windows XP, then you can use Windows Media Player 11(WMP11) to act as your UPnP(Universal Plug and Play) media server. (For Windows 7 or above, please download the correspond version of Windows Media Player). Windows Media Player 11 may be downloaded from Microsoft's website and install by following the instructions detailed in its installation wizard.
-
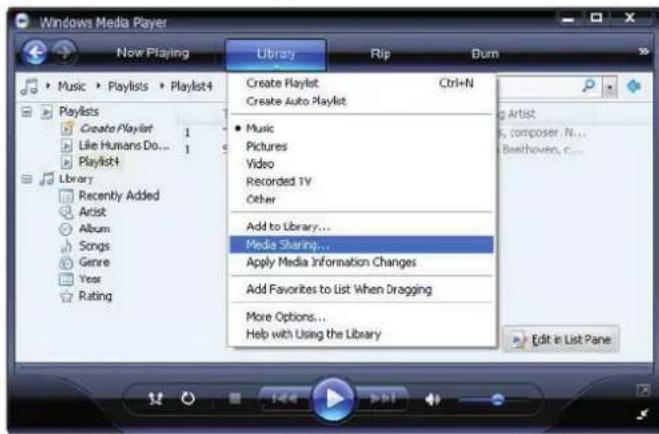
Once installed, Windows Media Player 11 will create a library from all the media files available to it on your PC. To add new media files to the library, select File > Add to Library...> Advanced Options', Click 'Add' and choose the files you wish to add and click OK'.
-
You will now need to connect your Internet radio to Windows Media Player 11 and configure it to allow the radio to access your media library. In order to this, you will need to do the following:
-
Go to the main menu of the radio, select
-> . -
It will scan for all available UPnP servers. Note, this may take a few seconds for the radio to complete its scan and before the scan has completed, the radio will display '[Empty]'. The radio will continue to display '[Empty]' if no UPnP servers are found.
After a successful scan. Select your UPnP server, by rotating the dial if there is more than one UPnP server, and then press SELECT (note, your radio will display' Access Denied' at this stage)
- Your PC will now prompt you that a device has attempted to connect to your UPnP server. In order to allow the radio to have access to the media files, you will need to click the 'Library' tab from Windows Media Player 11 and select the
item to open the 'Media Sharing' window.
Selecting 'Media Sharing' for Windows Media Player 11:
- From the 'Media Sharing' windows, the radio will be listed as an unknown device. Click on the unknown device listed, then click the 'Allow' button and then click 'OK'. Allowing the Radio to Connect:
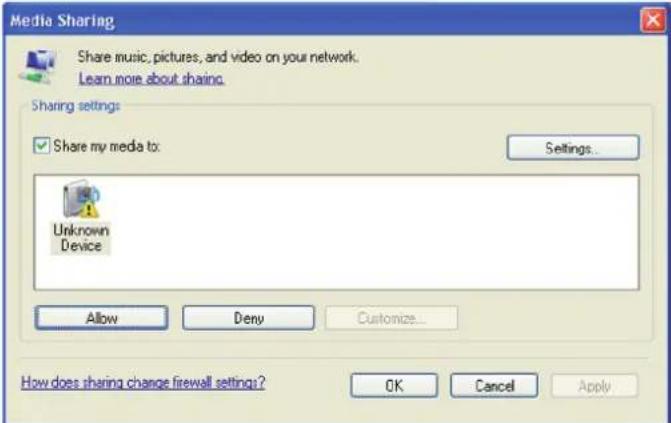
Note: When you are playing the music under UPnP, you are able to change the mode of playback via selecting Media Player/Playback Mode.
Information Center
Weather: View world wide weather forecasts.
- Add to Standby Display
Press RIGHT to display the "add to standby display", then press SELECT to confirm.
"Current Date & Time" and "Current Weather" will be on alternation display every 10 seconds under the standby mode if the weather forecast display is started.
Remark: In standby mode, you can also press "Enter" button for switching manually between "Current Date & Time" and "Current Weather", and you can press the arrow (LEFT/RIGHT) buttons to display the previous/next day weather forecast.
Remark: The weather is just for reference only. It may have deviation to the actual weather.
Financial Information: View information of Stock Markets all over the world.
System Information: View information of the radio such as the version of firmware / WLan Mac / IP address etc.
Configuration
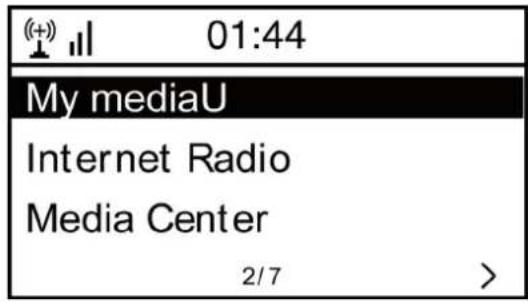
Manage my mediaU
You can customize your own favourite station list using your computer. First, enable "Manage my MediaU" on your radio. Go to Configuration -> Manage my MediaU -> Enable. Then you will see "My mediaU" appear on the main menu.
On your computer, go to http://www.medayou.net/web/index.php, this is the radio portal playing on your radio.
Register as member by selecting "Join now". After you have become the member, then you can login and register your radio. Select "Radio" on the following screen and do the radio registration.

You can then organize your own favourite stations or add any new station which is currently not found on the station list. Once the changes are done, your radio will synchronize the changes immediately and you will find your favourite list under "My MediaU" on the radio menu.
It allows maximum 5 users to register with the same radio and you can switch to listen the favorite list under one user at a time
Network
- Wireless Network Configuration
Press "Enter" to scan for wireless network and list out.
Wireless Network Configuration (WPS): This is the option for you to use WPS function, which means you can set the wireless without enter any passwords for Wi-Fi protected if your router has the function.
Manual Configuration: You can set the DHCP on or off, and enter the SSID as you know, or delete the connected WiFi.
Check network when power on. This is set to enable or disable "Check network when power on".
Date & Time: Current Date & Time setting: You can press UP/DOWN for parameter setting, and move cursor with LEFT/RIGHT and press SELECT to confirm.
- Time Format setting: 12hours / 24hours
- Date Format setting: YY/MM/DD, DD/MM/YY or MM/DD/YY
Daylight Saving Time (On / Off) - GMT: Set the currently time as GMT
Alarm Clock (Switch 2 separate alarms on/off)
Alarm Clock types
You can select your favorite Alarm setting for every day, once or particular day in the week.
Alarm Clock NAP function
If you would like to take a nap or need the Alarm in short time, you can use this function. You can select the time from 5 minutes up to 120 minutes. No Snooze function available for the NAP alarm.
Alarm Sounds setting (Beep/Melody/Internet Radio/FM) Please note: The NAP Alarm will only with beeping sound.
- When the Alarm Clock goes on, press any key except for "Power" button, to enter the "Snoopze" mode. You can press POWER ON/OFF to stop the ringing when the alarm goes on 5 minutes later again.
Remark. You can select any internet radio station or FM station as Alarm tone from the favorite station. When the internet station doesn't work in 1 minute, it will auto set into Beep.
Language: There are 9 Languages available; You can choose the language from English/German/French/Dutch/Danish/Norwegian-Russian/Swedish/Suomi.
Dimmer: You can adjust the backlight of the LCD with below settings:
- Power Saving: You can set the backlight to dim down when there is no operation for a certain time of period. There are 20 levels of the backlight available.
- Turn on: You can adjust the backlight level for the operation mode, i.e. when you are operating the radio or checking on the menu.
- Dimmer Timer: You can select to dim down the backlight after certain time of period with no operation on the radio.
Power Management
This function is to allow the radio to go to Standby if there is no internet signal received in order to save power. The default setting is 30 minutes. When the radio does not receive any internet signal, the radio will go into Standby after 30 minutes. Other time frame for 5 minutes and 15 minutes are available.
Sleep Timer
You can set the timer to put the radio on standby after certain time elapsed, from 15 minutes to 180 minutes with the step of every 15 minute.
You also can do the setting with the "Sleep" button from remote control, when you press "Sleep", then you can see the sleep timer on the top right corner of the display.
Buffer: Select your preferred buffering time.
Weather: Set the display of weather forecast on the standby mode, select your region and the temperature units (°C / °F)
FM Setup: Select Stereo or Mono for the FM and select the region of your location.
Local Radio Setup
The radio will detect your local area stations automatically and it will display under the "Internet radio" you will find all the stations under "Internet radio" -> "Local Radio".
If you would like to change the Local area stations to other countries, you can choose "Manual setup" to make the change.
Playback Setup: Select REPEAT ONE / REPEAT ALL / SHUFFLE
DLNA Setup
When the MS-60i radio is connected by other DLNA devices, the name of the radio will appear as "AirMusic". This is the name in default. You can change other name here as you desire.
Equalizer. Select your prefer music effect.
Software update
- Upgrade information will pop up on the display when there is an upgrade version available on the server.
- When there is an upgrade version available on the server, you can do the manual upgrade from the update menu.
Reset to default
You can do this factory reset to empty all of the settings and it comes back to default settings. Please note that all station preset, settings and configuration will be lost after performing the factory reset.
Remark: Playing is stopped when it comes back to default settings. The device will skip into the language setting automatically. After that it will turn to the internet settings.
Troubleshooting
| Problem | Possible Reasons / Proceeding |
| If you have trouble connecting the radio to your wireless network, these steps may help to resolve the problem: | · Confirm that a Wi-Fi or Ethernet Wired connected PC can access the internet (i.e. can browse the web) using the same network. · Check that a DHCP server is available, or that you have configured a static IP address on the radio. · Check that you firewall is not blocking any outgoing ports. · Some access points may be set so that only equipment with registered MAC addresses can connect to them. This is one possible cause of the Internet Radio being unable to connect to the Wi-Fi network, and the Internet Radio display will show Bad ESSID or key. To overcome this problem you will need to add the Internet Radio's MAC address to the list of allowed equipment in your access point. The Internet Radio's MAC address can be found using the menu <Information Center ->System Information -> Wireless Info ☐ MAC address>. You will need to refer to the guide for you Access Point in order to enter the Internet Radio as an allowed piece of equipment. · If you have an encrypted network, check that you have entered the correct key or passphrase into the radio. Remember that text-format keys are case sensitive. · If your wireless network name(ESSID) is 'Hidden'(a setting on the wireless access point), then you can either turn on the name, or you can manually enter the name into the internet radio and media player, Select <Configure -> Network -> Manual Configuration-> Wireless -> Enter ESSID>. Confirm if the Network is encrypted, e.g. requires a WEP or WPA key, then enter the network name. |
| If your radio can connect to the network successfully, but is unable to play particular stations, it may be due to one of the following reasons.: | · The station is not broadcasting at this time of the day (remember it may be located in a different time zone). · The station has too many people trying to attach to the radio station server and the server capacity is not large enough. · The station has reached the maximum allowed number of simultaneous listeners. · The station is not broadcasting anymore. · The link on the radio is out of date. This is updated automatically every day, so the next time you turn on the link will be recognised. · The internet connection between the server (often located in a different country) and yours is slow. Some internet service providers may fail to stream in certain geographical areas. Try using a PC to play back the stream via the broadcaster's web site. If you can play back the station with a PC, please report to the customer service where you bought this radio. If you have a laptop, try connecting it if your Internet Radio cannot find the station. |
| When you scan for PCs under UPnP function, none can be found, or the PC you are looking for does not appear in the list: | · You have not connected to the wireless Access point. On the internet radio, select 'Configuration', 'Network', 'Wireless network connection' and then select your Wireless network. (You may need to enter a security key to access the network wirelessly). · You have a firewall set on your PC which is stopping you accessing shared files. · If you have a third party firewall (Like Norton, or Zone Alarm) that will have its own control panel and you will need to consult the manual for your firewall. · If your PC is connected to a managed network, with a server sometimes the PC being searched for needs to be server Workgroup. |
| You can see the PC you want to play music from, but cannot find any fold-ers on the PC: | ·-You have a firewall running which is preventing the internet radio from seeing the shared folder. As a quick check, you can disable firewalls like Norton to see if this overcomes the problem, if this resolves the issue then you can either leave the firewall off, or allow file sharing through the fire wall. ·Note: If you firewall is required to provide security for your system, it should not be left off. |
| I can't share a folder, as the option is not highlighted: | ·When the internet radio is scanning the content of the folders on a PC, it is possible that a scan error may occur if the windows file sharing appli-cation times out. This is most likely to occur if both the PC with the media content and the Internet Radio are connected wirelessly. ·Try re-connecting the PC with the media content into the network via ca-ble. This will dramatically increase the speed at which the Internet Radio is able to scan the content of the Media PC. |
| Scan Error: | ·When the internet radio is scanning the content of the folders on a PC, it is possible that a scan error may occur if the windows file sharing appli-cation times out. This is most likely to occur if both the PC with the media content and the Internet Radio are connected wirelessly. ·Try re-connecting the PC with the media content into the network via ca-ble. This will dramatically increase the speed at which the Internet Radio is able to scan the content of The Media PC. |
| Playlists: | ·Some media ripping applications allow 'Playlists' to be created. The In-ternet Radio is able to detect and stream these playlists, but they must be stored in the folder with the rest of the Media content and they must have the file extension.m3u. ·Windows Media player can create suitable playlist, just select 'create new playlist', drag and drop the tracks you want into the playlist, then use 'Save as' to ensure the file type is .m3u. (Existing play lists can be opened and re-saved in this format) When the Internet Radio detects you have playlists, it will enable a new menu option allowing the playlist to be selected and added to the queue. ·If you re-connect to another PC of folder, which does not have any Play-lists in the .m3u. format, the playlist option will not be presented in the menu. |
| If the Internet Radio keeps re-buffer-ing the radio station: | ·The Internet Radio is streaming the data from the radio station via your broadband connection, if there is a high error rate on your broadband connection, or the connection is intermittent, then it will cause the In-ternet Radio to pause until the connection is re-established and it has received enough data to start playing again. ·If your Internet Radio keeps stopping, please check the DSL modem to ensure that the Broadband line is not suffering a high error rate or dis-connections. If you are experiencing these problems, you will need to contact your broadband supplier. |
| What is Buffering? | ·When playing a stream, the Internet Radio/Media player, downloads a small amount of the stream before it starts playing. This is used to fill in any gaps in the stream that may occur if the internet or the wireless network is busy. ·The Internet Radio streams music data from the PC while you are listen-ing. If a stream gets blocked or experiences Internet congestion while transferring it may stop/interfere with the quality of play. If this happens, check your internet connection speed- it must be faster than the speed of the streams. |
Environmental Concerns

According to the European waste regulation 2002/96/EG this symbol on the product or on its packaging indicates that this product may not be treated as household waste. Instead it should be taken to the appropriate collection point for the recycling of electrical and electronic equipment. By ensuring this product is disposed of correctly, you will help prevent potential negative consequences for the environment and human health, which could otherwise be caused by inappropriate waste handling of this product. For more detailed information about recycling of this product, please contact your local council or your household waste disposal service.
Declaration of Conformity
Producer: Chal-Tec GmbH, Wallstraße 16, 10179 Berlin, Germany
This product is conform to the following European directives:
2014/30/EU (EMC)
2011/65/EU (RoHS)
CE
Gentile cliente,
Chere cliente, cher client,
EEE 802.11 b/g/n; WEP/WPA/WPA2
Dimensions
35× 148× 135mm
Avertissements


- Technical Data
- Important Safety Instructions
- Controls
- Initial Use
- Internet Radio
- My Favorites
- FM
- Auto Scan
- Manual Scan
- Manual Tune
- FM Station Presets
- Aux In
- DLNA
- Media Center
- UPnP (Universal Plug and Play)
- Information Center
- Configuration
- Manage my mediaU
- Network
- Power Management
- Sleep Timer
- Local Radio Setup
- DLNA Setup
- Software update
- Reset to default
- Troubleshooting
- Environmental Concerns
- Declaration of Conformity
- Avertissements
Brand : Auna
Model : IR150
Category : Radio