
Flow SPV900i - Pump Eurom - Free user manual and instructions
Find the device manual for free Flow SPV900i Eurom in PDF.
| Product type | Submersible pump |
| Brand | Eurom |
| Model | Flow SPV900i |
| Power consumption | 900 W |
| Supply voltage | 230 V ~ 50 Hz |
| Max capacity | 14,000 liters/hour |
| Max suction height | 9 meters |
| Max immersion depth | 5 meters |
| Max water temperature | 35 °C |
| Hose connection | 25 mm and 32 mm |
| Max particle passage | 35 mm |
| Purge valve | Yes |
| Cable type | H07RN-F |
| Cable length | 10 meters |
| Dimensions (L x W x H) | 24 x 16.5 x 31 cm |
| Weight | 5.2 kg |
| Switching | Automatic and manual (adjustable float) |
| Protection | Thermal overload protection |
| Compatible liquids | Clear, slightly dirty and soapy water |
| Use | For private use in and around the house and garden |
| Warranty | Warranty against manufacturing defects (excluding normal wear) |
Frequently Asked Questions - Flow SPV900i Eurom
User questions about Flow SPV900i Eurom
0 question about this device. Answer the ones you know or ask your own.
Ask a new question about this device
Download the instructions for your Pump in PDF format for free! Find your manual Flow SPV900i - Eurom and take your electronic device back in hand. On this page are published all the documents necessary for the use of your device. Flow SPV900i by Eurom.
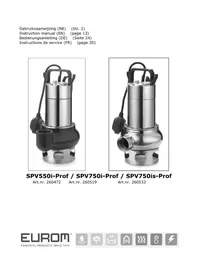
USER MANUAL Flow SPV900i Eurom
Operating instructions (EN) (page 12)
Thank you very much for choosing for a Eurom device. You have made a good choice! We hope you will be satisfied about its functioning. To get maximum profit from your panel, it is important to read this manual attentive and totally before use, and to understand what is written. Read especially the safety instructions: they are there to protect you and your environment. Keep the manual in a safe place for future reference. Store also the package: that is the best protection for your heater in times of no-use. And if you at any time pass the appliance on, pass on the manual and package too.
We wish you a lot of fun with the Flow submersible pump!
Eurom
Kokosstraat 20
8281 JC Genemuiden (NL)
info@eurom.nl / www.eurom.nl
This manual has been complied with the utmost care. Nevertheless, we reserve the right to optimize this manual at any time and to adjust it technically. The images used may differ.
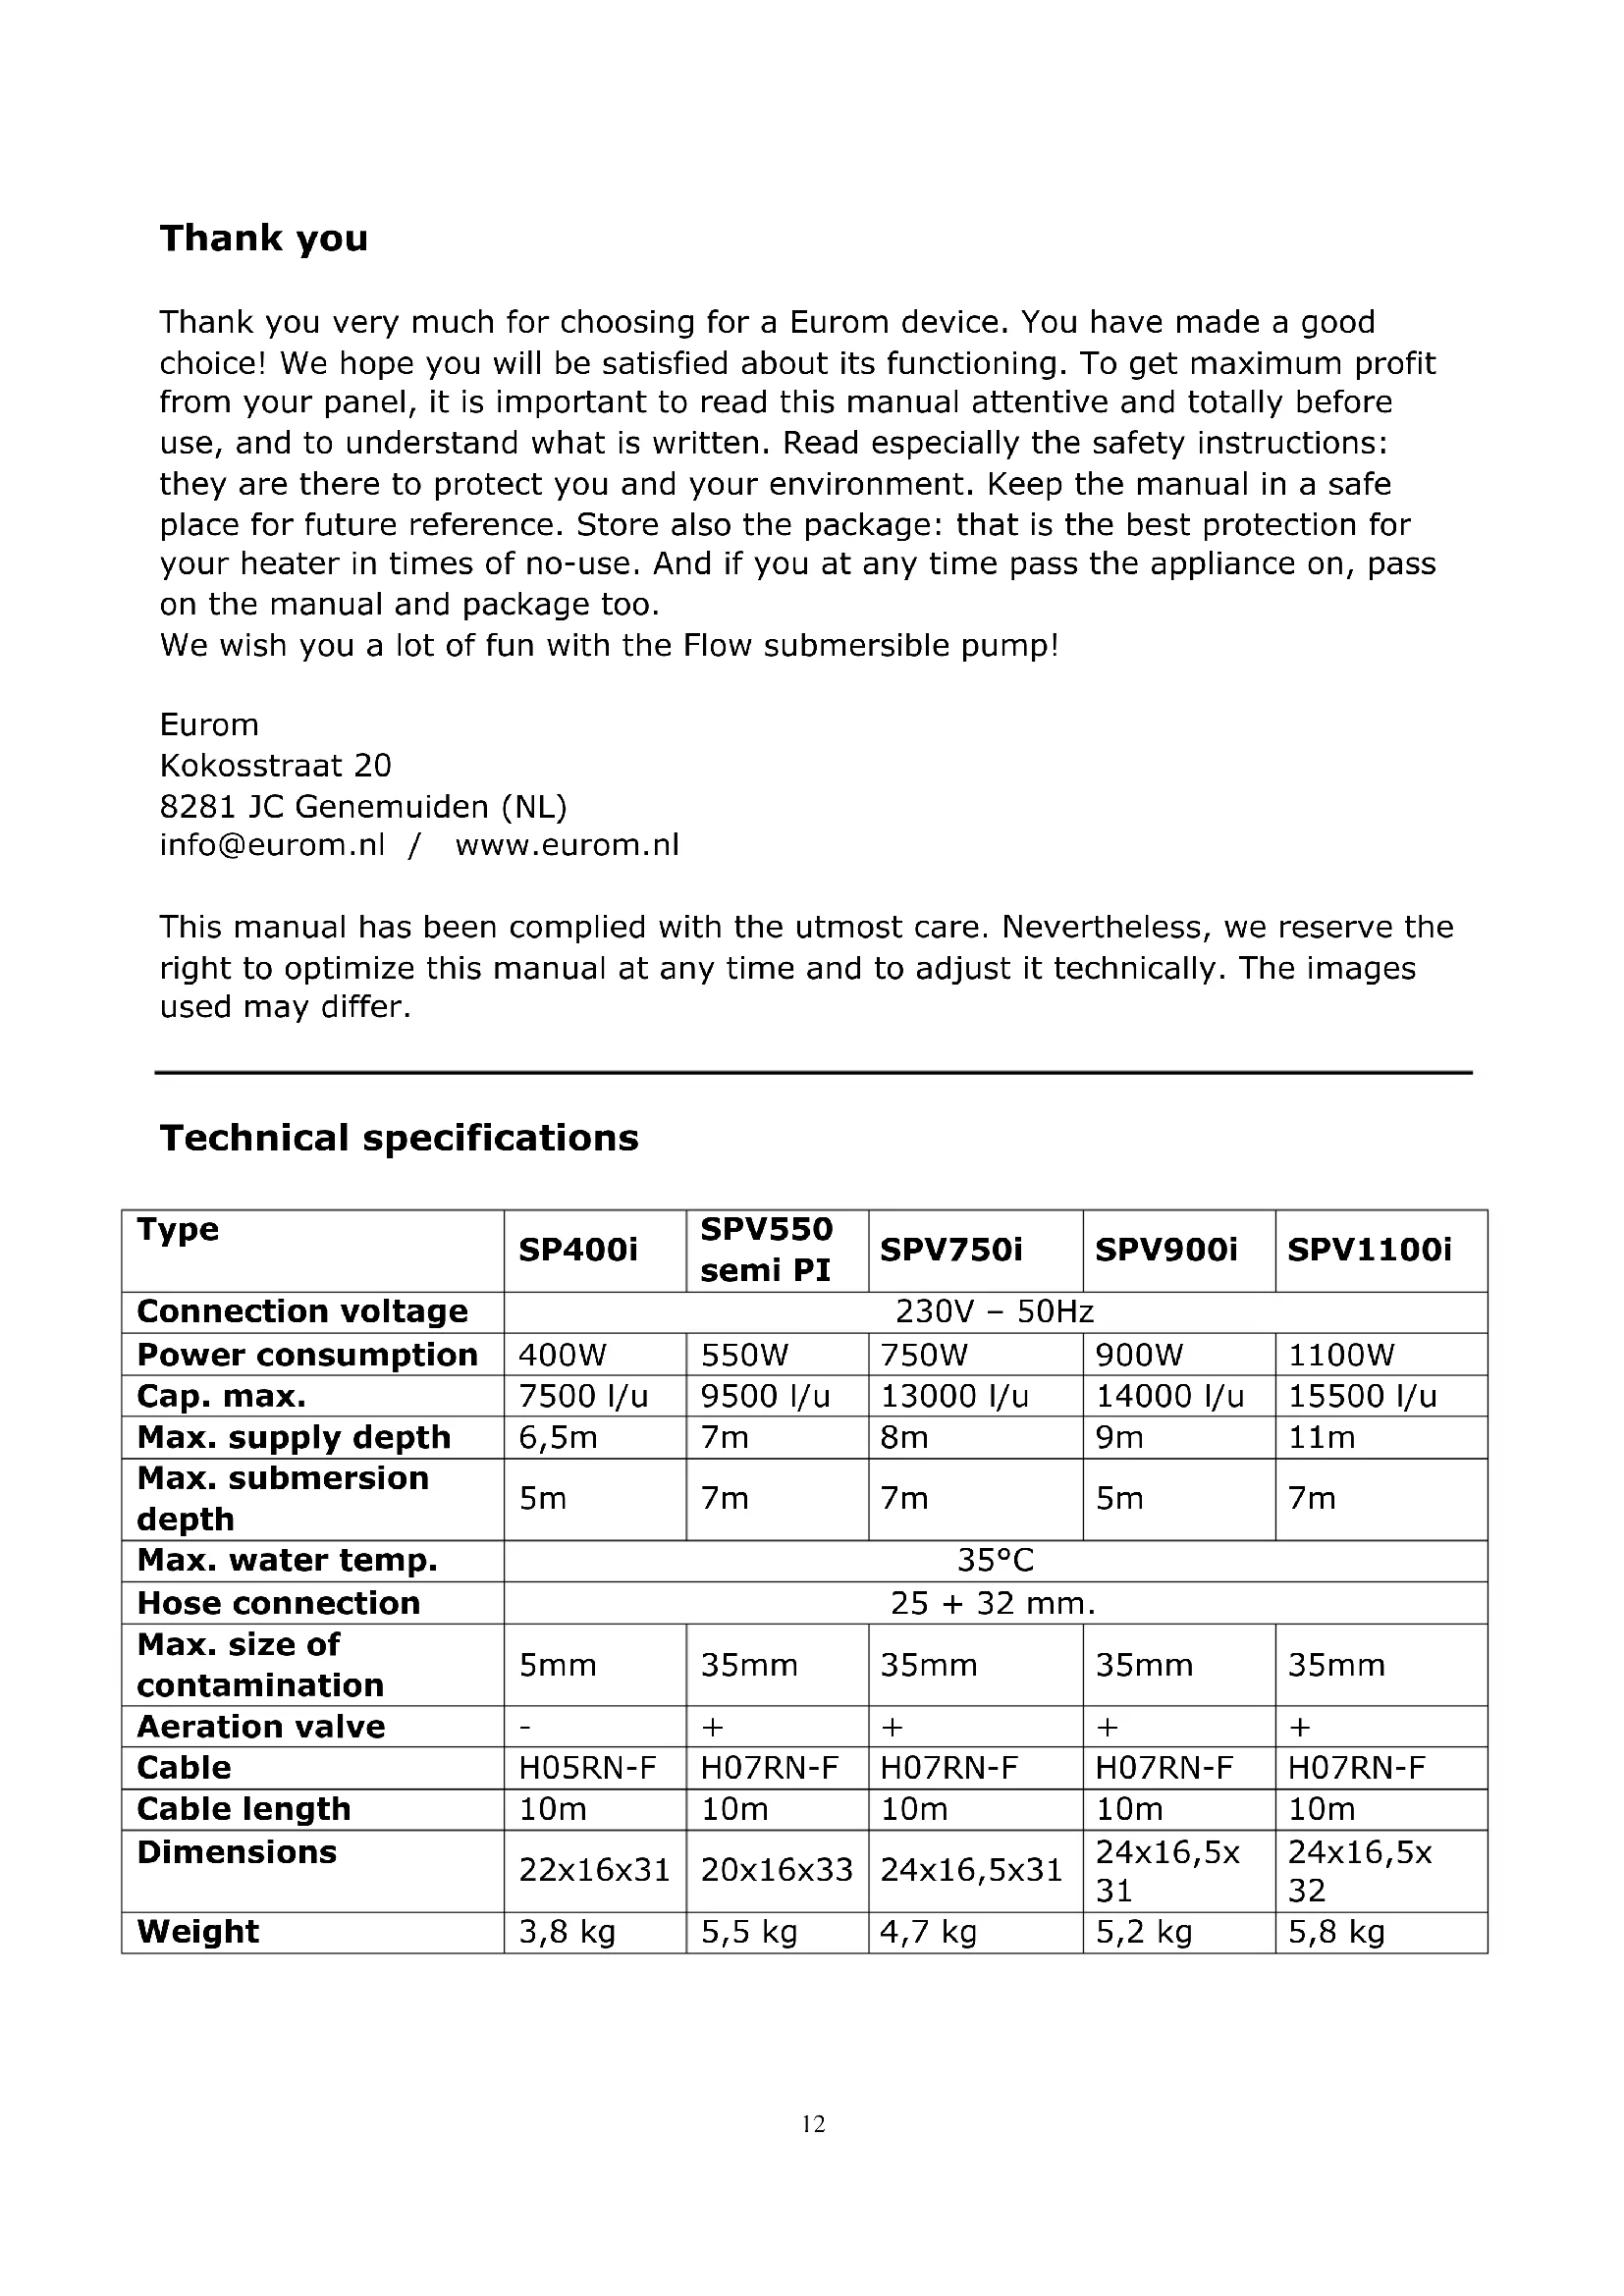
Technical specifications
| Type | SP400i | SPV550 semi PI | SPV750i | SPV900i | SPV1100i |
| Connection voltage | 230V - 50Hz | ||||
| Power consumption | 400W | 550W | 750W | 900W | 1100W |
| Cap. max. | 7500 l/u | 9500 l/u | 13000 l/u | 14000 l/u | 15500 l/u |
| Max. supply depth | 6,5m | 7m | 8m | 9m | 11m |
| Max. submersion depth | 5m | 7m | 7m | 5m | 7m |
| Max. water temp. | 35°C | ||||
| Hose connection | 25 + 32 mm. | ||||
| Max. size of contamination | 5mm | 35mm | 35mm | 35mm | 35mm |
| Aeration valve | - | + | + | + | + |
| Cable | H05RN-F | H07RN-F | H07RN-F | H07RN-F | H07RN-F |
| Cable length | 10m | 10m | 10m | 10m | 10m |
| Dimensions | 22x16x31 | 20x16x33 | 24x16,5x31 | 24x16,5x31 | 24x16,5x32 |
| Weight | 3,8 kg | 5,5 kg | 4,7 kg | 5,2 kg | 5,8 kg |
Safety recommendations
- Before using your new pump, check it, including cord and plug, for any visible damage. Do not use a damaged pump, but send it back to your dealer for replacement.
- For safety reasons, your submersible pump must always be connected to an earthed socket that has been installed according to national regulations, forms part of an electricity network that is equipped with a fuse of at most 16 Amp and has an earth leakage circuit breaker (nominal voltage ≤ 30 mA).
- Check your pump, electrical cable, plug and socket before each use. Do not use if the device is damaged and have this damage repaired by an accredited electrician.
- Ensure that electrical connections stay dry at all times. Do not touch them with wet hands.
- Before use, ensure that the socket to which you are connecting the pump is suitable for the pump itself (see type plate).
- Protect the electrical cable and plug from heat, oil and sharp corners.
- Clean the drainage pipe before use.
- Before use, check to ensure that elevation height does not exceed your pump's capacity.
- Do not use the electrical cable to hang up, lower or move the pump. Attach a rope to the handle in order to do this. Never pull on the cable to remove the plug from the socket but remove by pulling on the plug!
- Rinse the pump with clean water if you have used it to pump water that contains chlorine, for example, or deposits. Bear in mind that sand and all other abrasive and corrosive substances will increase wear and tear and impact upon the effectiveness of the pump.
- Ensure the pump is not used if it cannot drain off the water due to issues such as blocked drainage, elevation too high, etc. This will damage the pump!
- Do not use the pump if there are persons present in the object to be pumped out. It is forbidden to use this pump in a swimming pool.
- Allowing the pump to run dry will increase wear and tear and cause overheating. Always prevent the pump from running if no water is being moved and switch it off immediately if this is the case.
-
Before you carry out checking or cleaning tasks on the pump you must switch it off by removing the plug from the socket.
-
In order to prevent injury, never put your fingers into the suction opening on the pump when the device is plugged in!
- Close supervision is necessary when the product is used near children, incapacitated persons or pets. The device is not suitable for use by persons (including children) with a physical, sensual or mental limitation or a lack of experience and knowledge, irrespective of whether they are being supervised or have been issued with instructions in relation to the use of the device by a person who is responsible for their safety.
- Keep out of reach of children and never leave them unsupervised with the appliance. Consequently, when selecting the location for your machine, do so in such way that children do not have access to the appliance. Always ensure that children cannot play with the device.
- Never repair the pump, cable and/or plug yourself; always have this maintenance carried out by an authorised expert. The importer and manufacturer accept no liability for repairs and/or modifications to the pump if they have been carried out by someone who is not qualified to do so. Such interventions also nullify the guarantee.
Where can the pump be used?
This submersible pump has been designed for private usage in or around the home and garden.
Submersible pumps are primarily used for draining water, moving water and emptying water reservoirs, cellars, boats etc., and also for temporary circulation of water.
Note: these pumps may not be used in a swimming pool!
The pumps are completely watertight and can be submerged in liquid with a maximum depth of 5 or 7 metres (see technical specifications).
The submersible pump is suitable for use with the following liquids:
Type SPi: clean water and soapy water
Type SPV and SPVi: clean and lightly soiled water and soapy water
Corrosive, lightly flammable or explosive liquids (such as petrol, diesel, paraffin, thinners etc), fats, oil, salty or contaminated water from toilets etc. cannot be pumped! Bear in mind that sand and all other abrasive and corrosive substances will increase wear and tear and impact upon the effectiveness of the pump.
The temperature of the pumped liquids must not exceed 35^
This pump is not suitable for continuous use, such as the continual circulation of water. This type of use will substantially shorten the pump's life expectancy.
Description
(model may vary slightly)
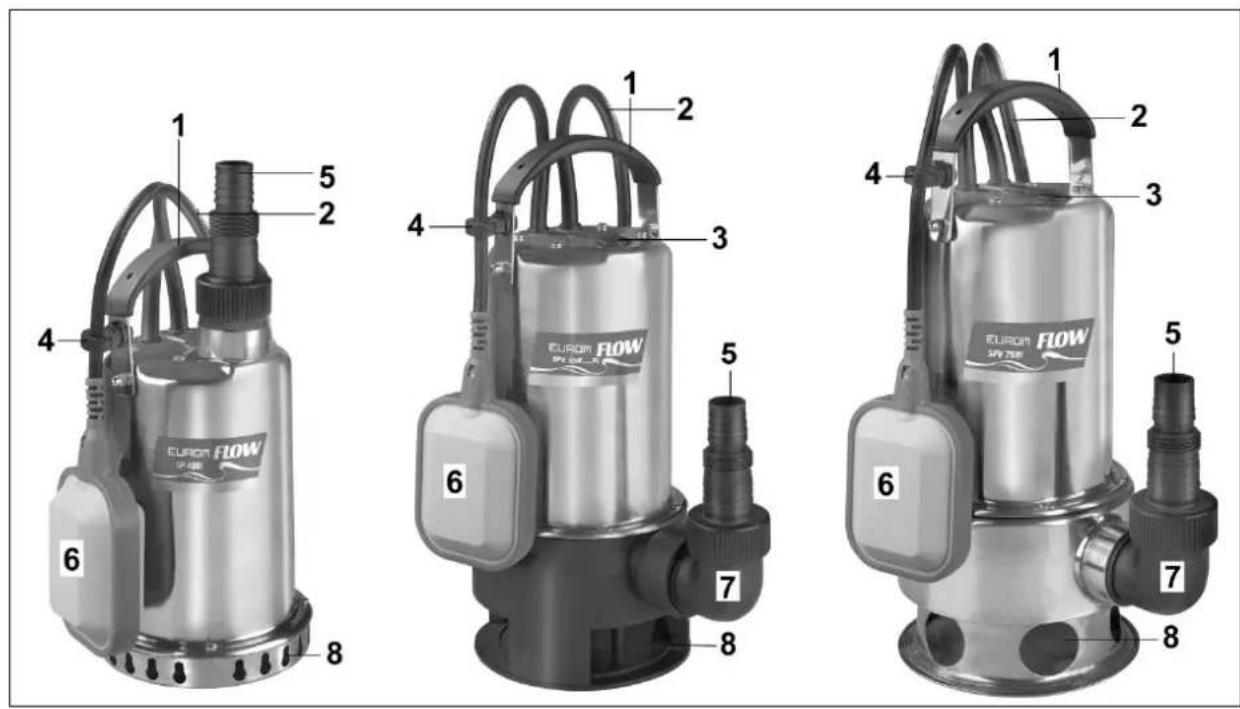
- handle
- electrical cable with plug
- aeration valve
- float switch attachment
- hose connector
- float switch
- curved fitting
- suction openings
Before use
Remove all packaging material and keep out of reach of children. After removing packaging, check the appliance for damage or other signs that could indicate a fault/defect/malfunction. In case of doubt, do not use the appliance, but contact your vendor for inspection or replacement.
Hose connection
Screw the curved fitting (supplied) to the pump, with the opening upwards, as in the above photo. Now connect the hose connector to the fitting.
The hose connector narrows from 32 to 25mm . If you are exclusively using a 32 mm hose, you can remove the remaining piece of the fitting with a saw. Attach the hose to the appropriate part of the connector with a hose clamp. The best results of pumping efficiency are achieved with a 32mm .
Attaching the float switch
The pump is equipped with an adjustable float switch. You adjust the points at which the pump switches itself on and off by shortening or lengthening the float cable using the attachment on the handle.
You must check the following before using the pump for the first time:
- The float switch must be set so that the pump can reach the points at which it must switch itself on and off easily and without any force. In order to check this, you must place the pump in a container filled with water. Manually lift the float switch gently and then allow it to descend. You will feel when the pump switches on and off and can modify these points, if necessary, by shortening or lengthening the float cable via the catch.
- Do not make the distance between the float and the cable catch on the handle too short; the float switch needs a little space in order to run smoothly.
- When setting the float switch, ensure that it does not touch the bottom before the pump switches off. Make sure that the float cannot get caught on anything. If the float cannot transmit the 'OFF' signal, the pump will continue to work until it runs dry and burns itself out.
Locating and moving
- Make sure the pump is positioned at a stable location, particularly if you want it to work automatically.
- Ensure that the float can move around freely, particularly if it is to work automatically.
- Ensure that the suction openings are not blocked (not even partially). If the pump is positioned on a soft surface (e.g. a sand bed), place it on a tile or something similar.
- Do not use the electrical cable or float cable to lift the pump or hang it up. If you wish to locate the pump in a water source or shaft, use a rope that is attached to the handle to do so.
- SPV550 semi PI - SPV750i - SPV900i - SPV1100i: Your pump is fitted with automatic aeration, allowing air to escape when it is submerged in water. The air bubbles that appear are not a sign of a defect but are perfectly normal.
Operation
Before use, check that the values of the socket to which you wish to connect the pump correspond to those on the type plate on the pump itself (230V-50Hz) and that the socket is earthed (max. 30mAmp) and has an earth leakage circuit breaker (nominal voltage ≤ 30 mA). Make sure that no people present in the space to be pumped out (cellar/boat/pond etc).
Automated function
Once you have plugged the device into the socket, the pump will switch on automatically when the water exceeds the set minimum level and switch off when the set minimum level has been obtained.
This means that the pump can be left on at all times and will keep the water in a cellar or boat, for example, at the required level. Bear in mind that this pump is not designed to be used continuously; it must be switched off at regular intervals.
Despite the fact that the pump works automatically, regular supervision is required in order to ascertain that it has not encountered any functional problems and that it has not been damaged (see also: overheating safeguard).
During automatic operation, the pump will turn itself off when there is still some water in your cellar/boat/pond because the automatic float switch needs space in which to switch. If you wish to pump out the remaining water, we advise you to use the pump manually in order to do so. Placing the pump at the lowest point (or in a hollow) will allow you to remove almost all of the remaining water. Make sure it does not dry out!
Manual function
If used manually, your pump will start to work when you insert the plug into the socket and you ensure that the float switch is set to 'on'. You do this by holding the float switch upright (float cable underneath). The pump will continue to work if you hold the float in this way (or fix it like this). Stop the pump from functioning as soon as liquid is no longer being pumped; the pumped liquid also cools the motor and without this cooling effect it may overheat and break down! Always supervise a pump that is working manually; drying out will lead to increased wear and tear!
If your pump has run dry it will not automatically aerate itself. Switch it off (remove the plug from the socket) and move the pump from side to side so that air can escape. Thereafter, you may use the pump as usual. You are advised to use the pump manually for short periods only. You should keep your eye on the pump at all times during manual functioning.
Overheating safeguard
Your submersible pump is equipped with an overheating safeguard. This switches the pump off automatically if the motor gets too hot. Once it has cooled down sufficiently, the pump will automatically switch on again.
There is always a cause for overheating: the fan may have become jammed, a bearing may be worn etc. etc. and if the cause is not removed, the device will overheat once again. If this process is repeated too often it may cause serious damage to your pump. Try to establish what is wrong and resolve the problem. If the pump needs to be opened up you must take it to your supplier or an accredited professional.
If there is insufficient supervision of a pump that is functioning automatically, the pump may break down despite the presence of the overheating safeguard. The user is always responsible for supervising the device!
Maintenance
Before you carry out checking or cleaning tasks on the pump you must switch it off and remove the plug from the socket.
Your submersible pump is more or less maintenance-free. The only tasks you must carry out are as follows:
- Carry out a regular visual inspection. Make sure the pump is not damaged. Check the electrical cable, the plug, the float switch and the float cable for damage too. If you discover damage, you must take the device to your supplier or an accredited professional. Never attempt to carry out repairs yourself and never open the pump!
- Regularly check that the float switch is working effectively, particularly if you have set the pump to work automatically (every 3 months).
- Regularly remove residues from the float with clean water.
- Regularly check (by putting your fingers into the suction openings) whether any dirt (fibres, residues) has accumulated around the blade. Remove it if this is the case. If you cannot do so, take the pump to your supplier or to an accredited professional to open the device and remove the residue.
If you cannot do so, take the pump to your supplier or to an accredited professional to open the device and remove the residue.
- If you regularly use the pump at different locations, you must rinse with clean water (inside and out) after each use.
- Keep the base of the well (or the tile on which the pump is positioned) free from mud and residue.
- Ensure that the pump does not freeze. Before winter sets in, run the pump dry and store it in a frost-free location.
Defects - causes - solutions
| Defects | Causes | Solutions |
| Pump does not start | - No electricity - Float does not switch | - Check electrical supply - Place the float in a higher position |
| Pump runs but does not pump water | - Inlet openings are clogged - Water drainage pipe is bent or hose is blocked - Air around the blade - Blade is jammed - Water level is too low (manual usage) | - Clean them - Straighten the hose or remove the blockage - Switch the pump off and move it from side to side. Wait until the air has escaped and switch on again - Try to remove the blockage or ask a professional to do so - Submerge the pump in deeper water |
| Pump does not switch off | - Float cannot sink | - Give the float more space |
| Insufficient water | - Inlet openings are (partially) blocked - Too little pumping capacity due to contamination and dirty water | - Clean them - Clean the pump and replace worn out parts |
| Pump does not start or suddenly switches off while functioning | - Thermal safeguard stops pump due to overheating - Water is too hot - Power outage - Dirt or stones in the water supply | - See: overheating safeguard - Max. water temperature 35°C - Check fuses and earth leakage - Remove dirt and stones |
| Pump suddenly provides less water | - Suction openings are blocked - Hose is blocked | - Clean the openings - Clean it |
Guarantee
The submersible pump you have purchased comes with the usual guarantee which applies to production and material defects. The following damage and defects are not covered by the guarantee:
- Wear and tear and defects in relation to mechanical seals caused by drying out or the presence of specific substances and/or objects in the water.
- Blockage of the blade by foreign objects
- Transport damage
- Damage caused by unreasonable use
- Defects that unauthorised persons have attempted to resolve or which have been caused by improper repairs
- Damage due to overheating
The guarantee and liability of the supplier, importer and manufacturer will be nullified if the pump is opened by unauthorised persons or modifications or additions are made to the pump.
Removal

In the EU this symbol indicates that this product may not be disposed of as ordinary household waste. Old equipment contains valuable materials, suitable for recycling. These materials should be made suitable for reuse in order to prevent any adverse effects to health and the environment caused by unregulated waste collection. Therefore, please make sure that you bring old equipment to a designated collection point. Alternatively, contact the original supplier, who can make sure that as many of the components as possible can be recycled
CE-declaration
See page 71.
Dank
declares the following device in sole responsibility:
Product: submersible pump
Brand name: EUROM
Model: SP4001 & SPV550 semi PI & SPV750i & SPV900i & SPV1100i
Item number: 260700 & 260878 & 260908 & 260922 & 260946
Complies with the following harmonization rules:
Low Voltage Directive: LVD 2014/35/EU
Electromagnetic compatibility Directive: EMC 2014/30/EU
Restriction of Hazardous Substances RoHS Directive: 2011/65/EU&(EU)2015/863
Applied harmonized standards:
EN 60335-1:2012+A11
EN 60335-2-41:2003+A1+A2
EN 62233:2008
AfPS GS 2014:01
EN 55014-1:1997+A1+A2
EN 55014-2:2015
EN 61000-3-2:2014
EN 61000-3-3:2013
Genemuiden, 18-05-2020
W.J. Bakker, alg. Dir.

EUROM
Kokosstraat 20
8281 JC Genemuiden
The Netherlands
info@eurom.nl
www.eurom.nl
- Safety recommendations
- Where can the pump be used?
- Note: these pumps may not be used in a swimming pool!
- Description
- Before use
- Hose connection
- Attaching the float switch
- Locating and moving
- Operation
- Automated function
- Manual function
- Overheating safeguard
- Maintenance
- Before you carry out checking or cleaning tasks on the pump you must switch it off and remove the plug from the socket.
- Guarantee
- Removal
- CE-declaration
- Dank
- EUROM
Brand : Eurom
Model : Flow SPV900i
Category : Pump