Radio One - Radio AUDIO PRO - Free user manual and instructions
Find the device manual for free Radio One AUDIO PRO in PDF.
User questions about Radio One AUDIO PRO
0 question about this device. Answer the ones you know or ask your own.
Ask a new question about this device
Download the instructions for your Radio in PDF format for free! Find your manual Radio One - AUDIO PRO and take your electronic device back in hand. On this page are published all the documents necessary for the use of your device. Radio One by AUDIO PRO.
USER MANUAL Radio One AUDIO PRO
© Audio Pro AB Sweden 2009/2010.
Audio Pro, the Audio Pro logotype, the 'a' symbol and ace-bass are all registered trademarks of Audio Pro AB, Sweden. All rights reserved. Audio Pro follows a policy of continuous advancement in development. Specifications may be changed without notice.
© Audio Pro AB Sweden 2009/2010.
Audio Pro®, the Audio Pro logotype, the 'a' symbol and ace-bass® are all registered trademarks of Audio Pro AB, Sweden. All rights reserved. Audio Pro follows a policy of continuous advancement in development. Specifications may be changed without notice.
Bluetooth
Bluetooth is a registered trademark of Bluetooth SIF, Inc.
INNEHÄLL
Radio One enchet (modell R-10 eller R-2OBT)
FM antenn
15V AC adapter
3.5 mm stereo kabel
Bruksanvisning
2 x AAA batterier
BYTA KLOCKBATTERI
SPECIFICATIONER
Element: 3'' fullregister
Basreflex kabinett
Ingangar:
1 x Line in (3,5 mm stereo)
15V 1.6A DC, extern adaptor
Utgangar:
Subwoofer ut (3,5 mm)
Höllurar ut (3,5 mm stereo)
Batteri back-up for klockfungtion
Tryck for att valja ljdkalla (R-20BT): FM - Line in - BT (Bluetooth).
ATT VÄLJA RADIOSTATION FRÄN FÖRVALSMINNET
Tryck kort på PRESET knappen, MEM CALL visas i displayen.
2. ATT STÄLLA IN ALARM OCH AKTIVERA ALARM
Se till att klockan ar korrekt installd. Se: Att stalla in klockan.
3. ATT STÄLLA IN ÖNSKAD TID FÖR ALARM
Bluetooth A2DP audio transmission.
Notera:
Radio One unit (model R-10 or R-20BT)
FM antenna
15V AC adaptor
3.5 mm stereo cable
Owners manual
2 x AAA batteries
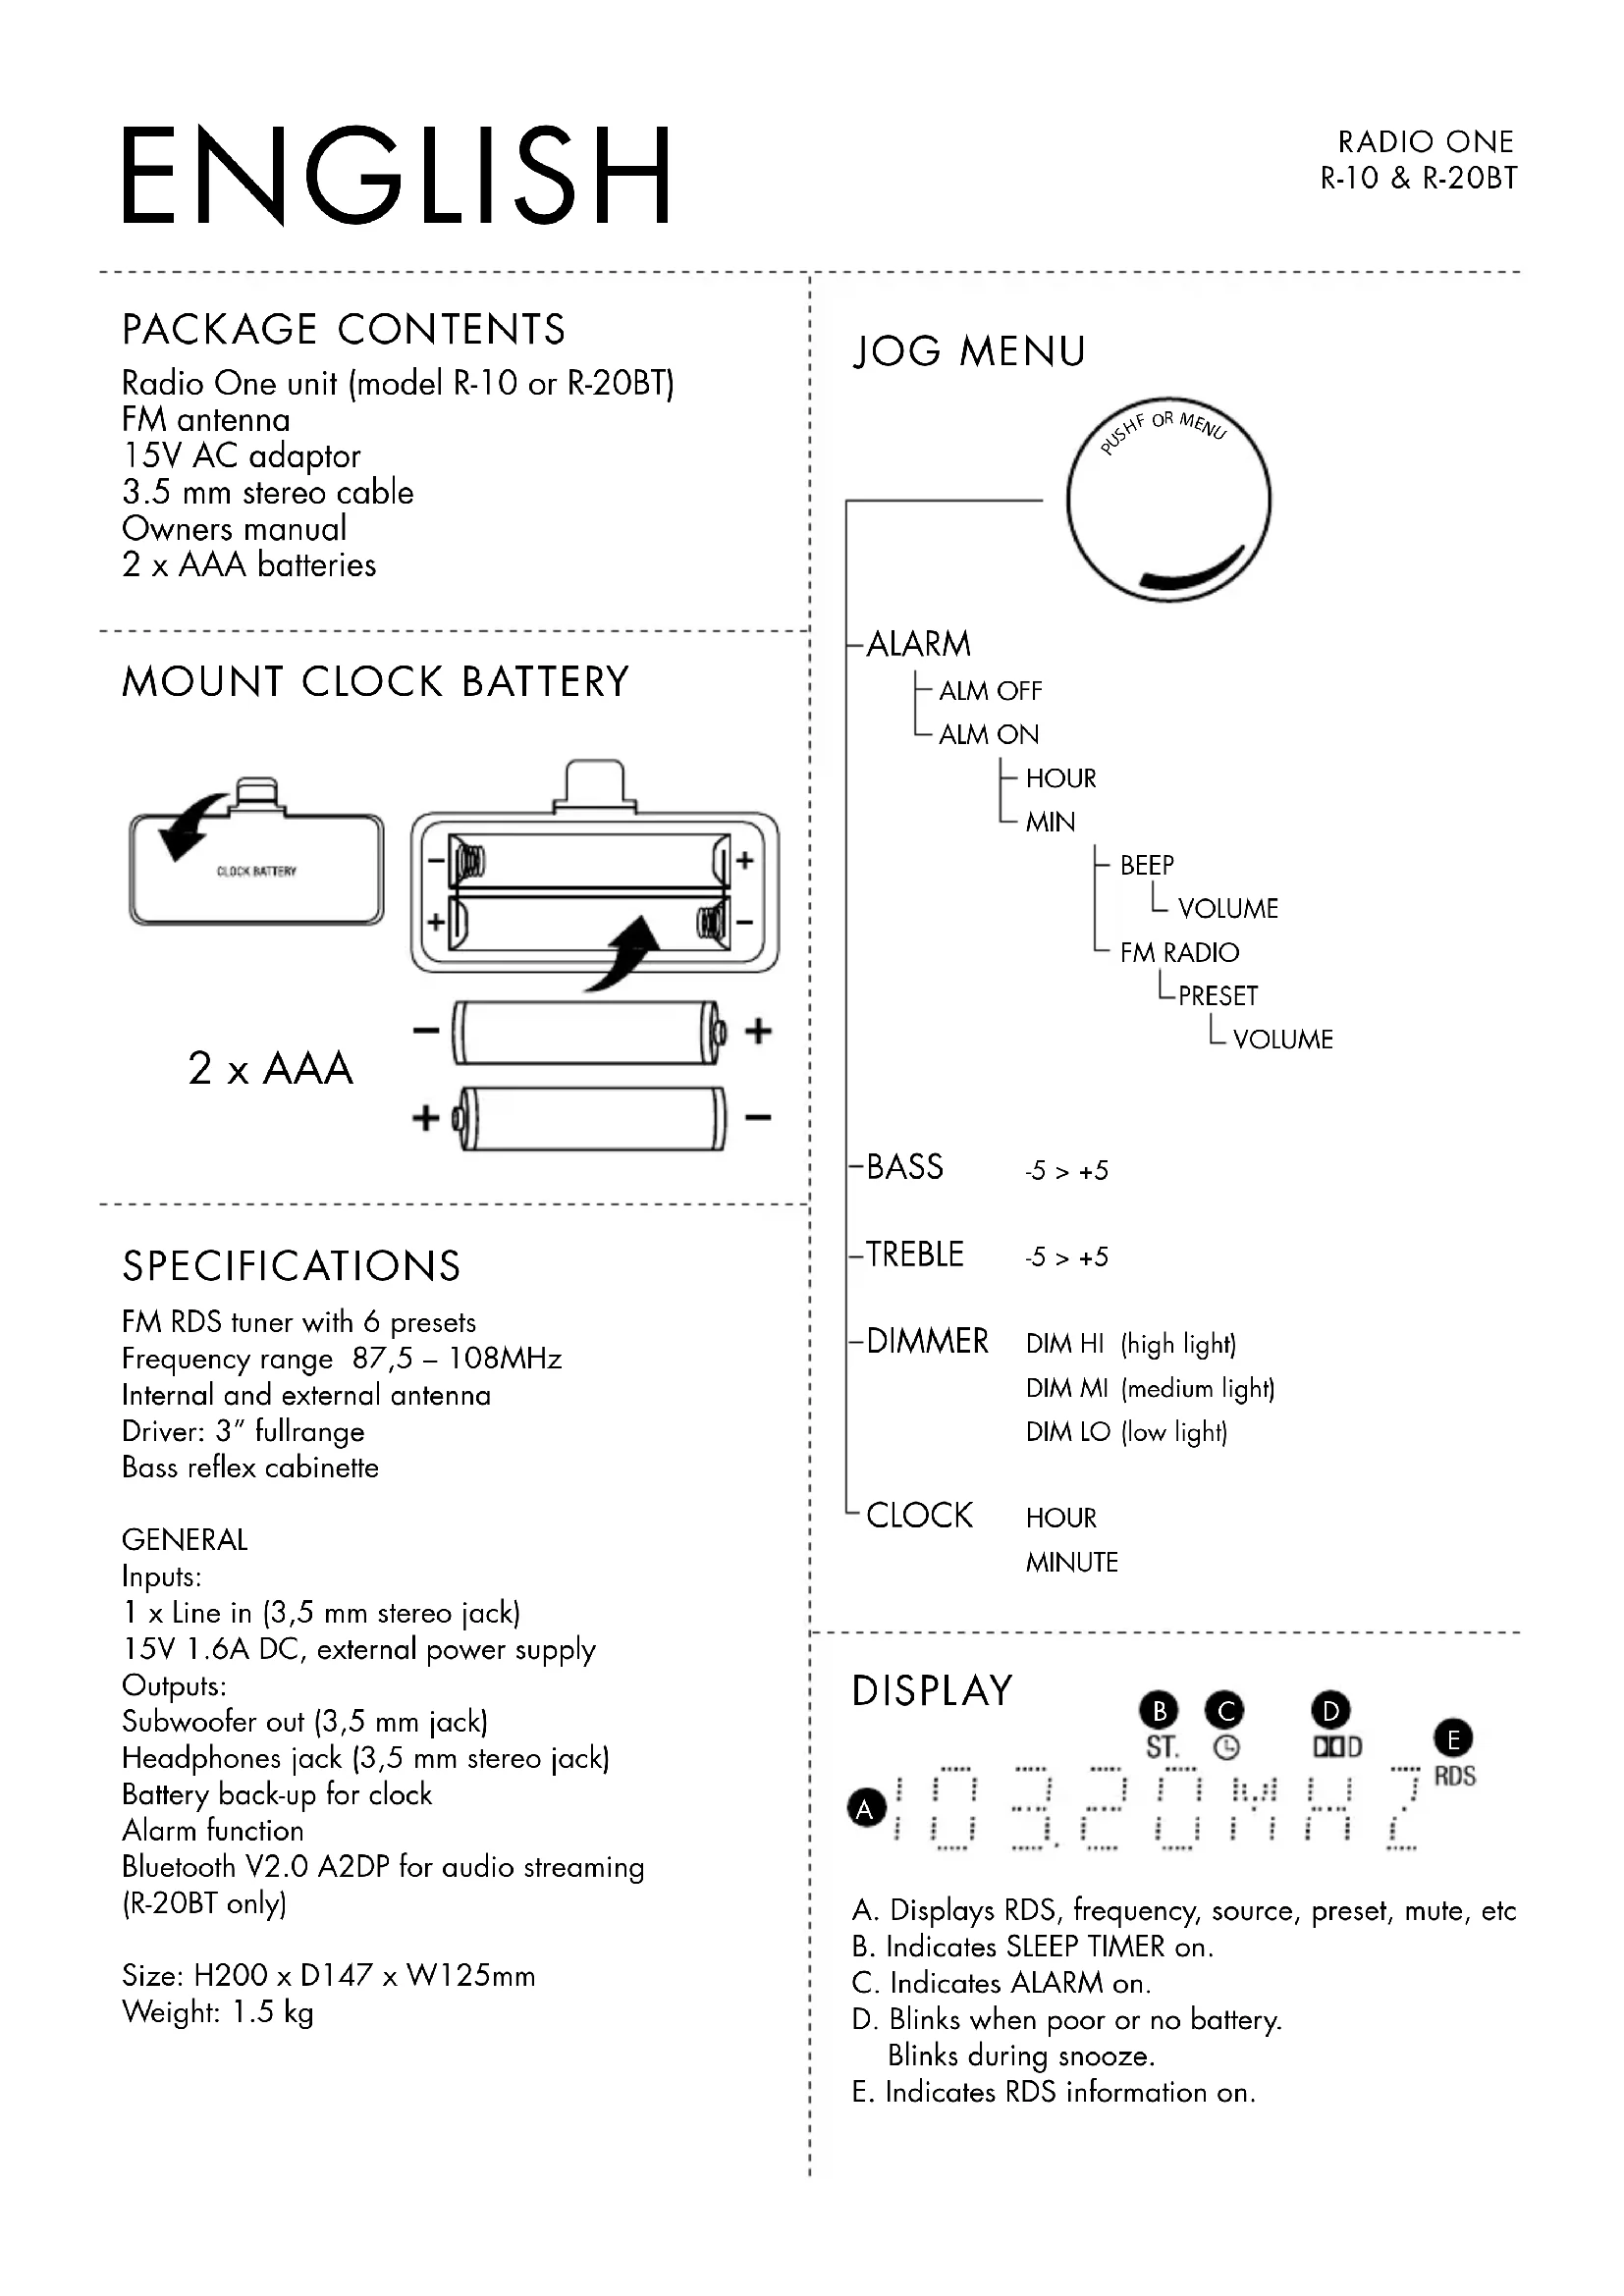
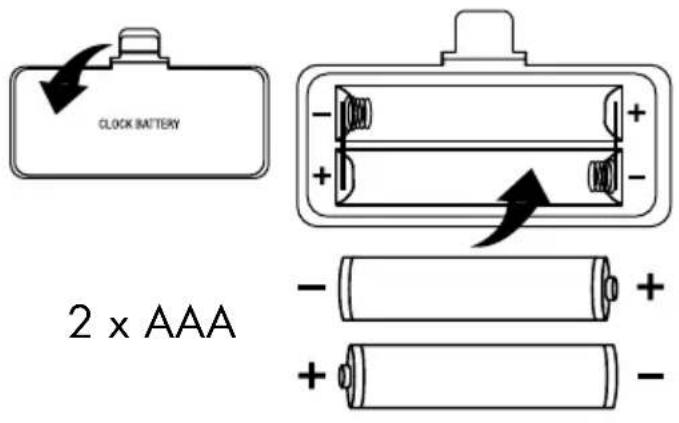
MOUNT CLOCK BATTERY
SPECIFICATIONS
FM RDS tuner with 6 presets
Frequency range 87,5-108MHz
Internal and external antenna
Driver: 3'' fullrange
Bass reflex cabinet
GENERAL
Inputs:
1 x Line in (3,5 mm stereo jack)
15V 1.6A DC, external power supply
Outputs:
Subwoofer out (3,5 mm jack)
Headphones jack (3,5 mm stereo jack)
Battery back-up for clock
Alarm function
Bluetooth V2.0 A2DP for audio streaming
(R-20BT only)
Size: H200 x D147 x W125mm
Weight: 1.5kg
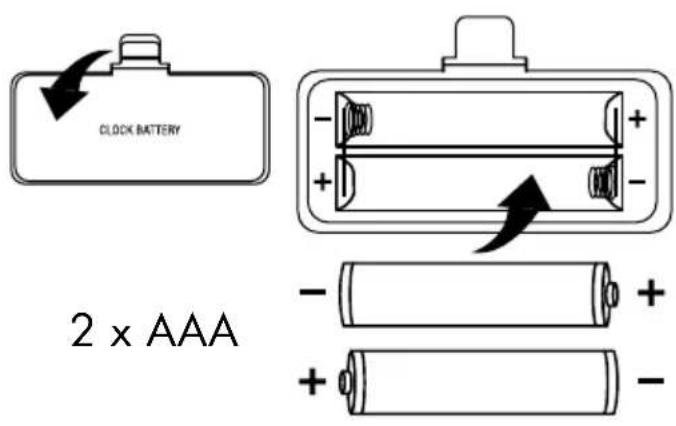
JOG MENU

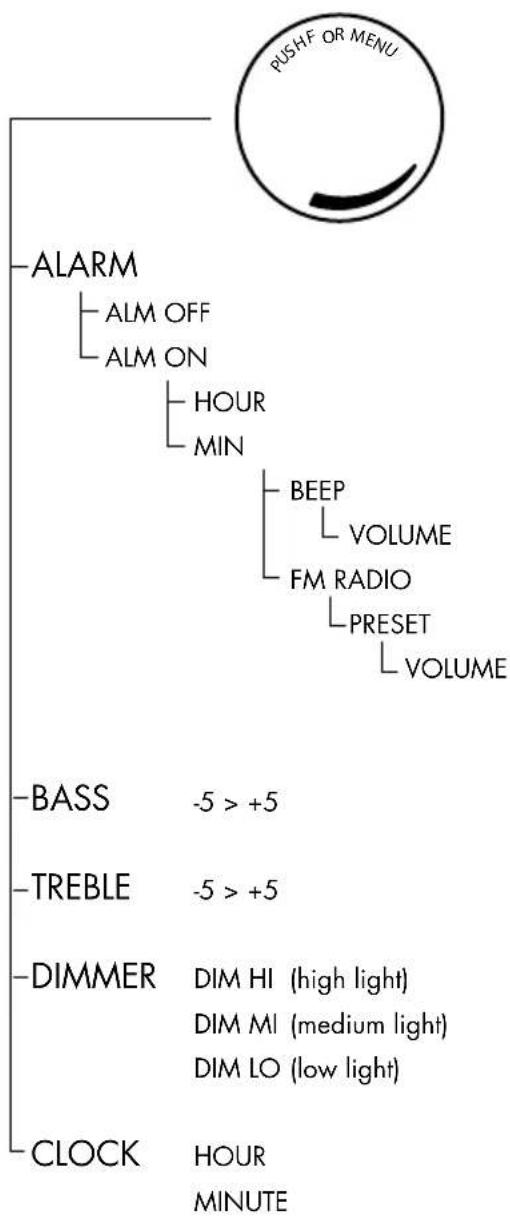
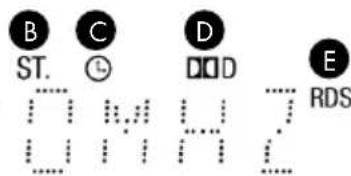
DISPLAY
A. Displays RDS, frequency, source, preset, mute, etc
B. Indicates SLEEP TIMER on.
C. Indicates ALARM on.
D. Blinks when poor or no battery. Blinks during snooze.
E. Indicates RDS information on.
FRONT
1. DISPLAY window
Displays FM frequency, RDS station name, Clock, Alarm ON, Selected Source, MUTE etc.
2. PRESET button
Push short to select a preset FM station (MEM CALL). Select preset station with << or >> buttons or turn the volume knob to select the desired preset number.
Long push to open Preset memory (MEM SET). Select preset number with << or >> buttons or turn the volume knob to the desired preset number. Push Preset memory button again to store station in memory.
3. TUNING <<
Push 1 sec to start Auto search down the frequency scale.
For Manual search push more than 2 sec and hold until desired frequency is found.
- Fine tune by short push (0.5 sec), changes frequency - 0.05 MHz
- Select Preset FM stations in PRESET mode.
- Change snooze time in SNOOZE mode.
4. SOURCE selector.
Push to select a source (R-10) FM - Line in.
Push to select a source (R-20BT) FM - Line in - BT (Bluetooth).
- In MENU mode this button is used as one step back button or to leave menu mode.
5. TUNING >>
Push 1 sec to start Auto search up the frequency scale.
For Manual search push for more than 2 sec and hold until desired frequency is found.
- Fine tune by short push (0.5 sec), changes frequency + 0.05 MHz
- Select Preset FM stations in PRESET mode.
- Change snooze time in SNOOZE mode
6. ALARM button
Push to select Alarm ON, Alarm OFF or cancel snooze function.
(The Alarm time and other settings are made in the MENU ALARM mode)
7. VOLUME control - MENU select
Turn clockwise to increase volume (Max VOL 32).
Turn counter clockwise to decrease volume (Min VOL 00)
Push to enter MENU MODE, turn to select menu.
In Memory CALL or Memory SET mode, turn to select desired preset number.
8. ON/STANDBY Touch sensor button
Push gently to switch ON or STANDBY.
In ON mode the blue light will be lit around the volume knob.
9. SLEEP Touch sensor button
In ON mode, push gently to select minutes to Auto standby. (15-30-45-60-75-90-OFF).
ST (B on previous page) is indicated in the display window, and minutes left to Auto standby every 60 seconds.
10. MUTE Touch sensor button
Push gently to activate or de-activate the MUTE function.
During mute function, MUTE is displayed in the display window.
REAR
- BASS REFLEX port
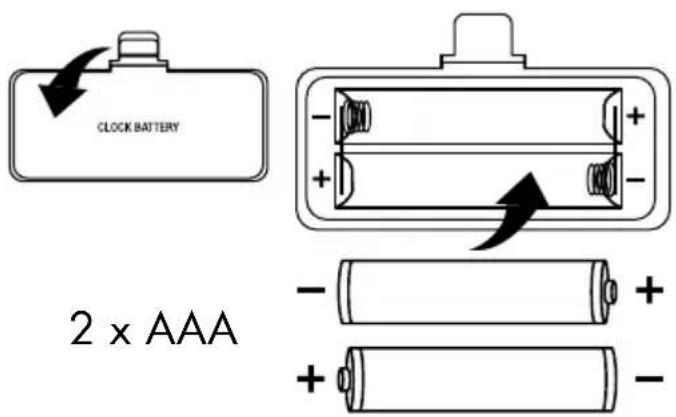
- BATTERY lid for clock battery Insert 2× AAA batteries for clock memory back-up. If no batteries or too weak batteries are installed the battery indicator (D on previous page) will blink in the display window.
- FM External antenna Connect the enclosed external FM antenna if reception is poor. You can also connect a communal aerial.
- ANTENNA switch. Select INTERNAL or EXTERNAL antenna.
- MAIN POWER switch
When unit is set in standby on the front panel it is not totally off (standby mode).
Turn this switch to OFF to totally turn off the unit.
NOTE: The ON/STANDBY switch on the front panel can only work if this switch is set to ON. - 15V DC IN Connect the external AC adaptor to run Radio One. DC plug 2.1mm
- LINE IN input Connect an external audio device with 3,5mm connector. Select LINE IN as source.
- HEADPHONES Connect headphones with a 3,5 mm stereo plug. The speaker output will be muted while headphones are connected.
- SUBWOOFER output For enhanced bass sound performance you can connect an external powered subwoofer.
1. TO LisTEn TO radiO
Make sure the rear power switch is set to ON.
Push ON/STANDBY on front panel to put Radio One in ON mode.
Auto search:
Push 1 sec on << or >> button to start AUTO search. The search is automatically stopped as soon as an FM station is received. Push short again to search another FM station.
Manual search:
Push << or >> button and hold to start MANUAL search. Hold the button pushed until a desired frequency is found
- Fine tune by short push -/+ 0.05 MHz
STORE STATIONS TO PRESET MEMORY
Tune in a desired station. Push the preset button for 3 seconds. MEM SET is displayed in the display window. Turn the volume knob or << or >> to select the preset number to be stored. Press the preset button again to store into the preset memory.
The preset function allows 6 FM stations to be preset in the preset memory.
TO SELECT A PRESET STATION FROM THE MEMORY
Push short on the preset button, MEM CALL is displayed in the display window.
Turn the volume knob or << or >> to select the desired preset number.
2. TO sET THE aLarm TimE and aCTiVaTE On mOdE
Make sure the correct clock time is set (see to set the clock).
3. TO inPUT a dEsiREd aLarm On TimE
Push the volume control to enter Alarm mode. In alarm mode turn the volume knob to enter alarm ON. Push again to enter ON time. Turn the volume knob to select desired hour (00-23). Push again and adjust minutes (00-59) by turning the volume knob. Then push again and turn to select FM radio or Beep as wakeup call. In case of FM push for next setting, preferred preset station. Then press again and turn to select volume of alarm. Push again to confirm settings.
The alarm is now set.
Press source to leave MENU mode.
When alarm is set to ON, a small Clock indicator (C on previous page) is shown in the display.
During a wakeup call (FM or Beep) snooze can be activated by pressing any button.
Snoopze time is 5 minutes and can be repeated. During snooze the time length can be changed using << or >> buttons (adjustable 1 - 20 minutes). Default time is always 5 minutes. The snooze function works up to one hour after alarm start.
Push the ALARM button twice to cancel snooze and turn off the alarm.
If the alarm time remains unchanged for next day, just activate the alarm by pressing the alarm button. Alarm ON and the clock indicator is displayed.
Alarm settings can only be changed in the alarm menu mode.
4. TO sET THE CLOCK
Push the volume knob to open the MENU. Turn the volume knob until CLOCK is displayed. Push the volume knob to enter hour adjust. Turn the volume knob until desired hour is set (00-23). Push again to enter minute adjust. Turn the volume knob until correct minutes are displayed (00-59). Push again to enter the new correct time setting.
Push the source button the leave the menu mode.
Correct time is displayed in standby mode.
Clock will automatically be set correctly when a RDS station is tuned. (If the station supports CT function.)
5. TO PLaY an EXTERnaL aUdiO sOUrCE
Connect an external audio source (iPod, Mp3 player, PC) with a 3,5 mm stereo plug to LINE IN and select LINE IN as source.
6. TO PLaY WirELEss mUsiC FrOm a BLUETOOTH dEViCE (a2dP), OnLY r-20BT
Select Bluetooth as source and wait for about 5 seconds.
When a beep sound is heard, push the >> button and await two short beeps. CODE is indicated in the display.
Activate Bluetooth on the device to be used and search for Radio One. Refer to your device manual. Wait until "radioone" is detected by the device. Enter the code "0000" on the device to activate the connection to Radio One.
Start playback on the device.
This function is only for devices equipped with Bluetooth A2DP audio transmission.
Please NOTE:
A. To connect another bluetooth device, previous device must be disconnected.
Not possible to play 2 bluetooth devices at the same time.
B. If cellphone recieves call during playback, playback will mute until call is ended.
7. TO adJUsT Bass and TrEBLE
Push the volume knob to enter MENU mode, turn to select BASS or TREBLE. Push to change BASS or TREBLE settings and turn the volume knob to adjust between -5 to +5 (0 is default setting).
Press the source button twice to leave the MENU mode.
Push the volume knob to enter MENU mode, turn to select DIMMER. Push and turn to change the display light between Hi - Mi - Lo (High is default setting). Press the source button twice to leave the MENU mode.


The lightning flash with arrowhead symbol, within an equilateral triangle, is intended to alert the user to the presence of uninsulated "dangerous voltage" within the product's enclosure that may be of sufficient magnitude to constitute a risk of electric shock to persons.

The exclamation point within an equilateral triangle is intended to alert the user to the presence of important operating and maintenance (servicing) instructions in the literature accompanying the appliance.
WARNING:
TO REDUCE THE RISK OF FIRE OR ELECTRIC SHOCK,DO NOT EXPOSE THIS APPARATUS TO RAIN OR MOISTURE.
CAUTION:
TO REDUCE THE RISK OF ELECTRIC SHOCK, DO NOT REMOVE COVER (OR BACK). NO USER-SERVICEABLE PARTS INSIDE. REFER SERVICING TO QUALIFIED SERVICE PERSONNEL.
IMPORTANT SAFETY INSTRUCTIONS
- Read these instructions.
- Keep these instructions.
- Heed all warnings.
- Follow all instructions.
- Do not use this apparatus near water.
-
Clean only with dry cloth.
-
Do not block any ventilation openings. Install in accordance with the manufacturer's instructions.
- Do not install near any heat sources such as radiators, heat registers, stoves, or other apparatus (including amplifiers) that produce heat.
- Protect the power cord from being walked on or pinched particularly at plugs, convenience receptacles, and the point where they exit from the apparatus.
- Only use attachments/accessories specified by the manufacturer.
- Unplug this apparatus during lightning storms or when unused for long periods of time.
- Refer all servicing to qualified service personnel. Servicing is required when the apparatus has been damaged in any way, such as power-supply cord or plug is damaged, liquid has been spilled or objects have fallen into the apparatus, the apparatus has been exposed to rain or moisture, does not operate normally, or has been dropped.
- Damage Requiring Service
Unplug the apparatus from the wall outlet and refer servicing to qualified service personnel under the following conditions: A. When the power-supply cord or plug is damaged, B. If liquid has been spilled, or objects have fallen into the apparatus, C. If the apparatus has been exposed to rain or water, D. If the apparatus does not operate normally by following the operating instructions. Adjust only those controls that are covered by the operating instructions as an improper adjustment of other controls may result in damage and will often require extensive work by a qualified technician to restore the apparatus to its normal operation,
E. If the apparatus has been dropped or damaged in any way, and F. When the apparatus exhibits a distinct change in performance this indicates a need for service.
14. Object and Liquid Entry Never push objects of any kind into the apparatus through openings as they may touch dangerous voltage points or short-out parts that could result in a fire or electric shock. The apparatus shall not be exposed to dripping or splashing and no objects filled with liquids, such as vases shall be placed on the apparatus. Don't put candles or other burning objects on top of this unit.
15. Batteries
Always consider the environmental issues and follow local regulations when disposing of batteries.
- If you install the apparatus in a built-in installation, such as a bookcase or rack, ensure that there is adequate ventilation. Leave 20cm (8^ ) of free space at the top and sides and 10 cm (4^ ) at the rear. The rear edge of the shelf or board above the apparatus shall be set 10cm (4^ ) away from the rear panel or wall, creating a flue-like gap for warm air to escape.
- The power supply and power cord for this apparatus is intended for indoor use only.
- Do not move the apparatus if another device, such as an mp3-player or any other audio device, is connected to it.
- Only use the enclosed AC adaptor.
CONTENU DE LA BOITE
- DIMMER DIM HI (high light)
DIM MI (medium light)
DIM LO (low light)
CLOCK HOUR
MINUTE
AFFICHAGE


m = 311
中
··
:
1
:
:
中
:
Driver: 3'' full range
Sistema Bass Reflex
GENERALITA
Ingressi:
1 x Linea In (jack stereo 3,5 mm)
DIMMER DIMHI (high light)
DIM MI (medium light)
DIM LO (low light)
CLOCK HOUR
MINUTE
DISPLAY

ST.


DOD

RDS


:
:
:
RDS
1 x Line in (3,5 mm stereo jack)
- ALARM [HERÄTYS] -painike
Radio One-toestel (model R-10 of R-2OBT)
FM-antenne
15V AC-adaptor
3,5 mm stereokabel
Gebruikershandleiding
2 × AAA batterijen
VERVANGEN VAN DE KLOKBATTERIJ
SPECIFICATIONS
Driver: 3" fullrange
Bass reflex-kast
ALGEMEEN
Inputs:
1 x Line in (3,5 mm stereojack)
15V 1,6A DC, externe stroobron
Outputs:
Subwoofer out (3,5 mm jack)
Headphone jack (3,5 mm stereojack)
- SLEEP (Slaap) touch-sensorknop
In ON-modus, drukt u zacht om de minutes tot AUTO Standby te selecteren.
(15-30-45-60-75-90-OFF).