Simpfy - Speaker Auna - Free user manual and instructions
Find the device manual for free Simpfy Auna in PDF.

User questions about Simpfy Auna
0 question about this device. Answer the ones you know or ask your own.
Ask a new question about this device
Download the instructions for your Speaker in PDF format for free! Find your manual Simpfy - Auna and take your electronic device back in hand. On this page are published all the documents necessary for the use of your device. Simpfy by Auna.
USER MANUAL Simpfy Auna
text_image
QR code image containing encoded data, no visible human-readable textINHALTSVERZEICHNIS
Technische Daten 4
natural_image
Technical drawing of a rectangular frame with a central square and a vertical dimension line labeled '20' (no text or symbols beyond the label)FERNBEDIENUNG

text_image
1 2 4 5 EQ Dimmer Sleep Alarm 3 6 8 9 7 Info 10 MODE MENU 12 13 15 17 14 OK 16 VOL- VOL* 18 19 1 2 3 ABC DEF 4 5 6 GHI JKL MNO 7 8 9 PQRS TUVWXYZ 20 FAV 0 21 auna 22text_image
Internet radio Station list > System settings > Main menu >text_image
System settings Equaliser > Streaming audio quality Network > Time/Date > Inactive Standby >text_image
Main menu Internet radio Podcasts Spotify DAB FM4 Texteingabe
natural_image
Symbol of a trash bin crossed with a diagonal line, representing no waste or discharge (no text or labels)Congratulations on purchasing this device. Please read the following instructions carefully and follow them to prevent possible damages. We assume no liability for damage caused by disregard of the instructions and improper use. Scan the QR code to get access to the latest user manual and more product information.

text_image
QR code image containing encoded data, no visible human-readable textCONTENT
Technical Data 36
Safety Instructions 37
Device Overview and Function Buttons 40
Remote Control 42
Installation 43
Commissioning 43
Operation 44
System Settings 47
Internet Radio Mode 52
Podcasts 54
DAB Radio Mode 56
FM Radio Mode 58
BT 60
AUX IN Mode 61
Alarms and Sleep 61
Hints on Disposal 63
Declaration of Conformity 63
TECHNICAL DATA
Device
| Item number 10035326, 10035327 | |
| Power supply 100-240 V ~ 50/60 Hz | |
| Connections DC, 3,5 mm AUX-IN, | 3,5 mm Line-Out |
| Batteries in remote control AAA | |
| Power consumption (watts) Max. 24 W | |
| Power consumption Standby (watts) <1 W | |
| Power consumption (standby) 0-35 °C | |
| Operating position Horizontal | |
| Dimensions unit (L x B x H) 327 x 201 x 122 mm | |
| Unit weight 2635 g | |
| Radio holder set weight 228.5 g |
Power adapter
| Producer | Chal-Tec GmbH, Wallstraße 16, 10179 Berlin, Germany. |
| Model number AD2401202000EU | |
| Input voltage AC 100-240 V | |
| Input AC frequency 50/60 Hz | |
| Input current 1 A | |
| Output voltage DC 12 V | |
| Output current 2 A | |
| Output power 2 x 8 W RMS |
Note: Use only original AC adaptor. Use only the power supply listed in the user instructions.
SAFETY INSTRUCTIONS

CAUTION
Radiation exposure hazard! Usage of controls or adjustments or performance of procedures other than those specified herein may result in hazardous radiation exposure.
- This unit should not be adjusted or repaired by anyone except qualified service personnel.
- Please take all necessary precautions before use.
- Read the manual carefully before use and follow all instructions.
- Do not use this device near water.
- Clean only with a slightly damp cloth.
- Do not cover or block any ventilation openings. When placing the device on a shelf, leave 5 cm free space around the whole device.
• Install in accordance with the supplied user manual. - Don't step on or pinch the power adaptor. Be very careful, particularly near the plugs and the cable's exit point. Do not place heavy items on the power adaptor, which may damage it.
- Keep the entire device out of children's reach! When playing with the power cable, they can seriously injure themselves.
- Unplug this device during lightning storms or when unused for a long period.
- Keep the device away from heat sources such as radiators, heaters, stoves, candles and other heat-generating products.
- Avoid using the device near strong magnetic fi elds.
- Electrostatic discharge can disturb normal usage of this device. If so, simply reset and restart the device following the instruction manual. During file transmission, please handle with care and operate in a static-free environment.

WARNING
Electric shock hazard! Never insert an object into the product through the vents or openings. High voltage flows through the product and inserting an object can cause electric shock and/or short circuit internal parts. For the same reason, do not spill water or liquid on the product.
- Do not use in wet or moist areas such as bathrooms, steamy kitchens or near swimming pools.
- Do not use this device when condensation may occur.
- Although this device is manufactured with the utmost care and checked several times before leaving the factory, it is still possible that problems may occur, as with all electrical appliances. If you notice smoke, an excessive build-up of heat or any other unexpected phenomena, you should disconnect the plug from the main power socket immediately.
- This device must be well ventilated at all time!
- This device must operate on a power source as specified on the specification label (the type plate is located on the back of the unit). If you are not sure of the type of power supply used in your home, consult your dealer or local power company.
- The socket outlet must be installed near the equipment and must be easily accessible.
- Do not overload AC outlets or extension cords. Overloading can cause fire or electric shock.
- Devices with class 1 construction should be connected to a main socket outlet with a protective earthed connection.
• Devices with class 2 construction do not require a earthed connection.
- Keep away from rodents. Rodents enjoy biting on power cords.
- Always hold the plug when pulling it out of the main supply socket. Do not pull the power cord. This can cause a short circuit.
- Avoid placing the device on any surfaces that may be subject to vibrations or shocks.
- To clean the device, use a soft dry cloth. Do not use solvents or petrol based fluids. To remove severe stains, you may use a damp cloth with dilute detergent.
- The supplier is not responsible for damage or lost data caused by malfunction, misuse, modification of the device or battery replacement.
- Do not interrupt the connection when the device is formatting or transferring files. Otherwise, data may be corrupted or lost.
- The USB memory stick should be plugged into the unit directly. Don't use an USB extension cable because it can cause interference resulting in failing of data.
- The apparatus shall not be exposed to dripping or splashing and make sure that no objects filled with liquids, such as vases, are placed on or near the apparatus.
- To completely disconnect the power input, the mains plug of the apparatus shall be disconnected from the mains, as the disconnect device is the mains plug of apparatus.
- The mains plug of the apparatus should not be obstructed or should be easily accessed during intended use.
- Battery shall not be exposed to excessive heat such as sunshine, fire or the like.
- Minimum distance of 10 cm around the apparatus is needed for sufficient ventilations.
- The ventilation should not be impeded by covering the ventilation openings with items such as newspapers, table-cloths, curtains etc.
- No naked flame sources such as lighted candles should be placed on the apparatus.
- Attention should be drawn to the environmental aspects of battery disposal.
- The apparatus can only be used in moderate extremely cold or climates warm environments should be avoided.
- The rating label has been marked on the bottom panel of the apparatus.
- This device is not intended for use by people (including children) with physical, sensory or mental disabilities, or a lack of experience and knowledge, unless they're under supervision or have received instructions about the correct use of the device by the person who is responsible for their safety.
- This product is intended for household use only and not for commercial or industrial use.
- Make sure the unit is adjusted to a stable position. Damage caused by using this product in an unstable position or by failure to follow any other warning or precaution contained within this user manual will not be covered by warranty.
- Never remove the casing of this apparatus.
- Never place this apparatus on other electrical equipment.
- Do not use or store this product in a place where it is subject to direct sunlight, heat, excessive dust or vibration.
- Do not clean this product with water or other liquids.
- Do not block or cover the slots and holes in the product.
- Do not push foreign objects into the slots or holes in the product.
- Do not allow children access to plastic bags.
- Only use attachments/accessories specified by the manufacturer.
- Refer all servicing to qualified service personnel. Servicing is required when the apparatus has been damaged in any way, such as the power supply cord or the plug, when liquid has been spilled or objects have fallen into the apparatus, when the apparatus has been exposed to rain or moisture, does not operate normally, or has been dropped.
- Do not use a damaged power cord or plug or a loose outlet. Doing so may result in fire or electric shock.

WARNING
Danger of hearing damage! Prolonged exposure to loud sounds from personal music players may lead to temporary or permanent hearing loss.
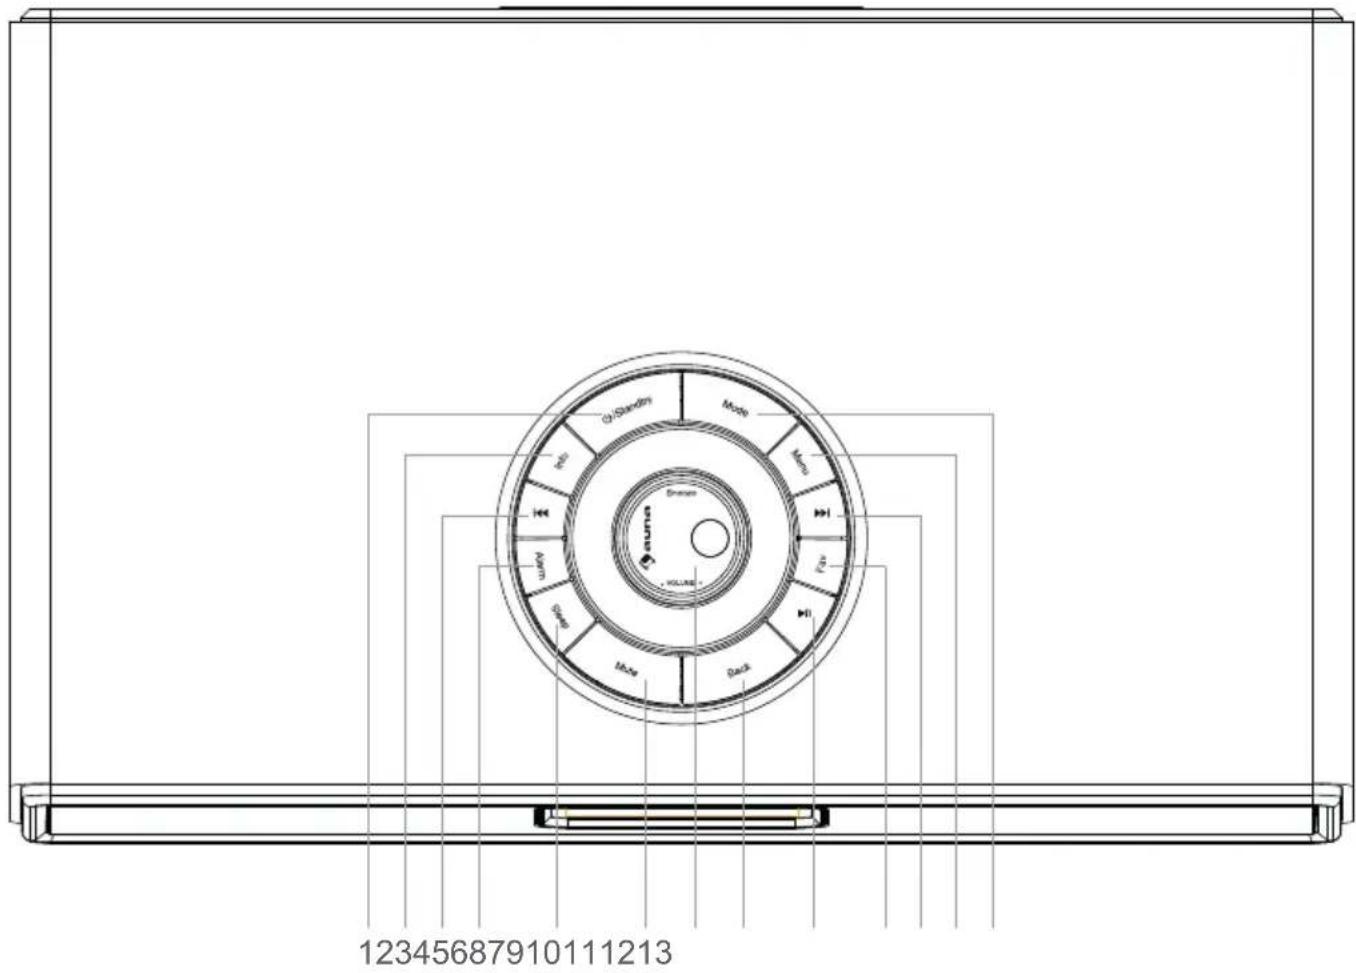
DEVICE OVERVIEW AND FUNCTION BUTTONS
Top side
text_image
123456879101112131 Standby
2 Info
3 ◀ Rewind, Left
4 Alarm
5 Sleep
6 Mute
7 Vol/Nav/Ok/Play/Pause (rotary control):
Rotate=Vol/Scroll, Press=Select
8 Back
9 ▶ Play/Pause
10 Fav. (Favourites)
11 ▶ Fast forward, Right
12 Menu
13 Mode
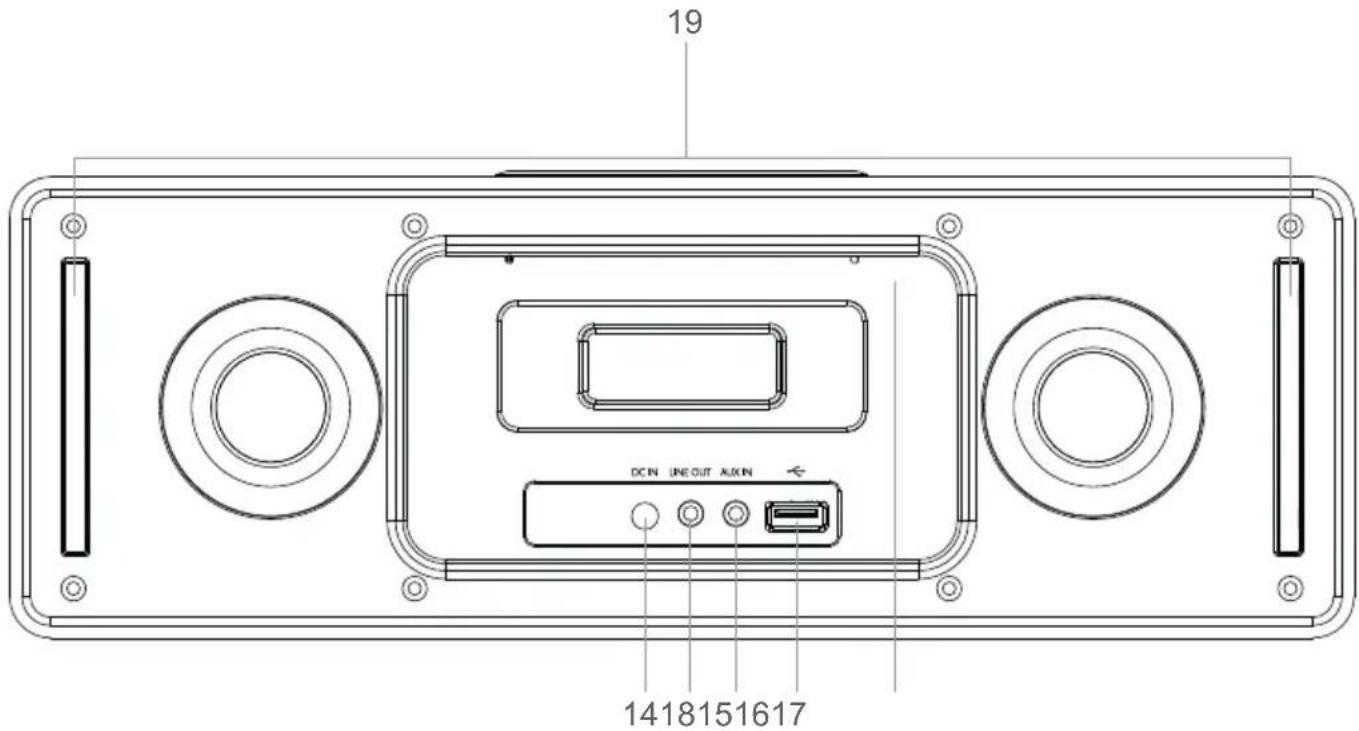
Back side
text_image
19 DCN LINEOUT MAIN 141815161714 DC-IN
15 Line-out (3.5 mm)
16 Aux-in (3.5 mm)
17 USB drive socket
18 Antenna
19 Holder socket
20 Display
Front side
natural_image
Technical line drawing of a rectangular frame with a central square and dimension label '20' (no text or symbols beyond the number)REMOTE CONTROL
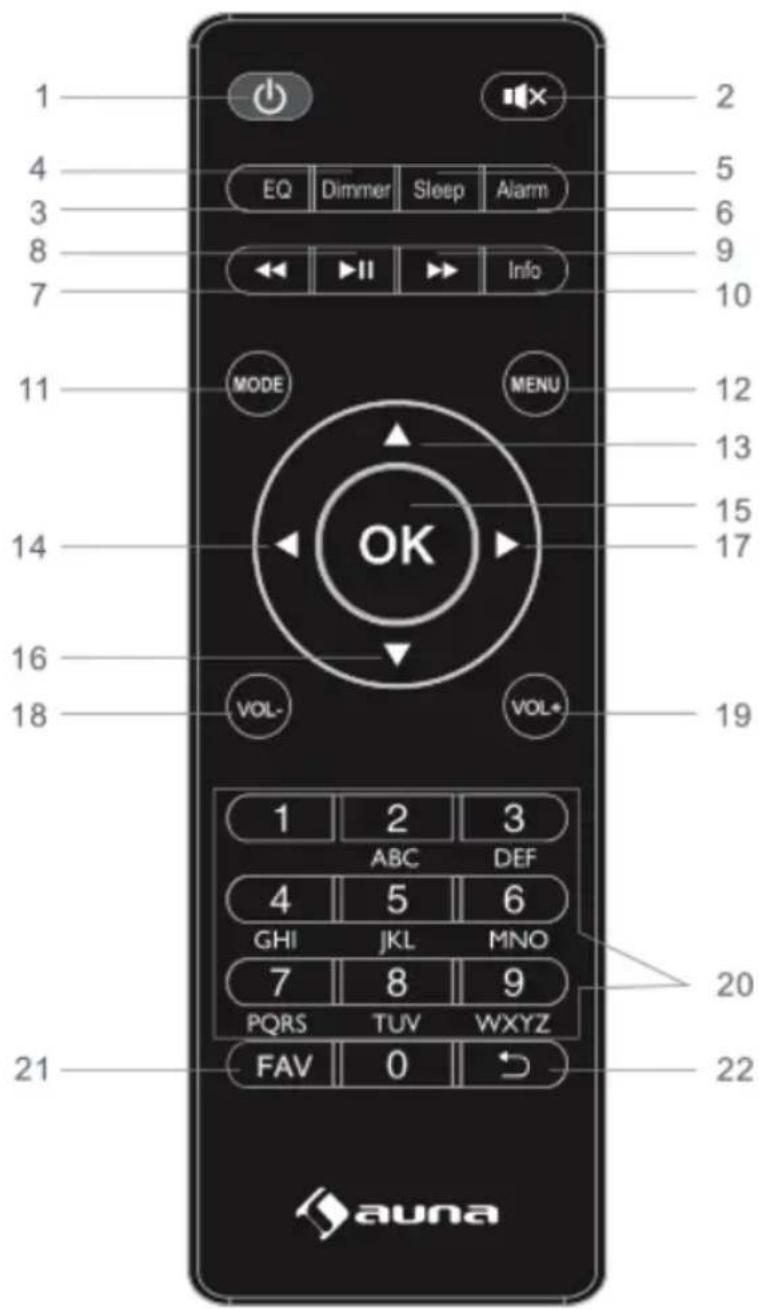
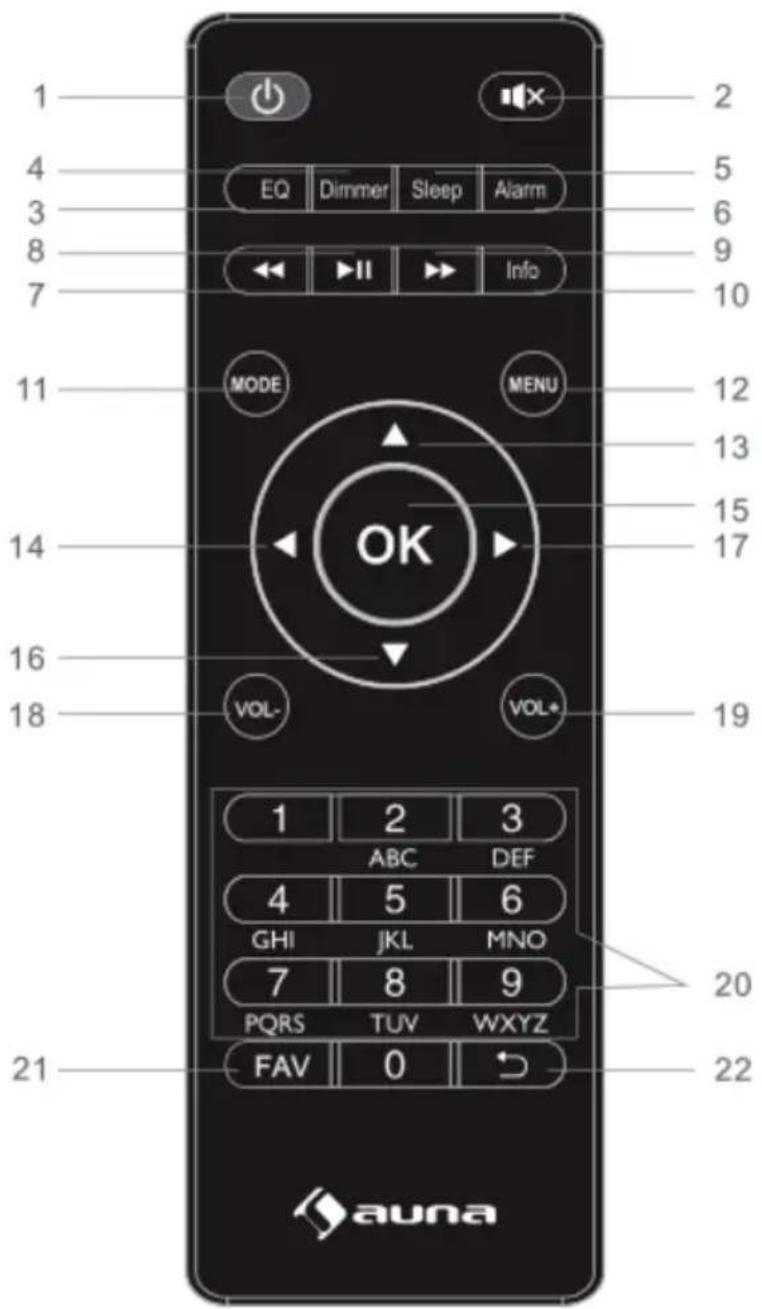
text_image
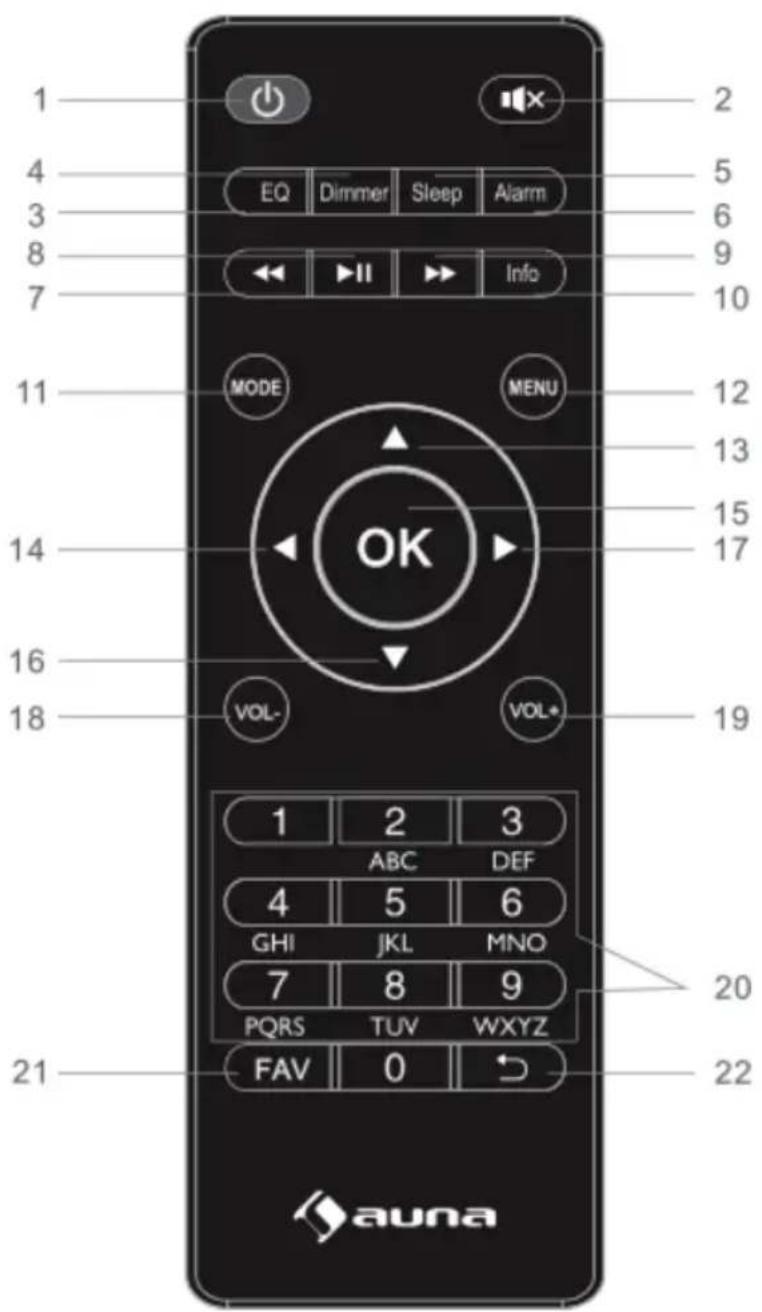
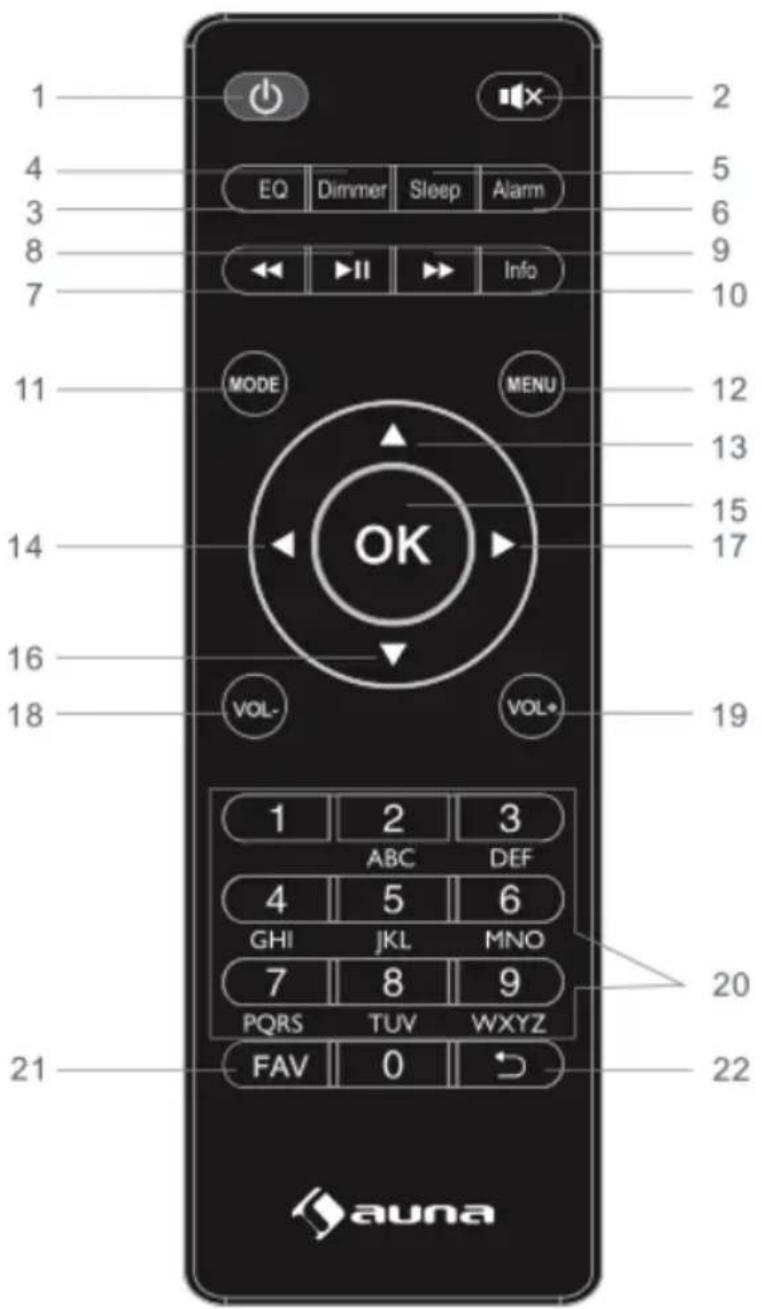
1 2 4 5 EQ Dimmer Sleep Alarm 6 3 8 9 7 Info 10 11 MODE MENU 12 13 14 15 17 16 VOL- VOL* 18 19 1 2 3 ABC DEF 4 5 6 GHI JKL MNO 7 8 9 PQRS TUVWXYZ 20 FAV 0 21 auna 221 ⏻ - Standby
2 📁 × - Mute button
3 EQ set tone
4 Dimmer button
5 Sleep button
6 Alarm button
7 – Backward/previous track
8 ▶ – Play/pause button
9 ▶▶ – Forward/next track
10 Info button
11 Mode button
12 Menu button
13 ▲ - Up Cursor button
14 ← - Left cursor button
15 OK button, Enter button
16 ▼ - Down cursor button
17 ▶ – Right cursor button
18 VOL-button (Volume-)
19 VOL+ button (Volume+)
20 Input letters and numbers
21 FAV button (Favourites)
22 ↩ - Back button
INSTALLATION
- Unpack all parts and remove protective material.
- Do not connect the unit to the mains before checking the mains voltage and before all other connections have been made.
- Do not cover any vents and make sure that there is a minimum distance of 10 cm around the unit for ventilation.
COMMISSIONING
Initial Use
- Before operation, please make sure that the VOLTAGE mentioned on the power supply is same as the voltage of your local area. Use the supplied mains adaptor to connect the device to a household mains socket.
- Switch the device on with the power switch on the rear.
- When it is the first time running the device, the setup wizard is launched automatically.
- Press Standby button ⏻ when unit is power on, unit will go to standby mode. Press again will make it on again.
Setup wizard
When radio is started for the first time, it runs through a setup wizard to configure settings for date/time and network. Once this has finished, the system is ready to use in most modes.
NOTE: To change these settings later, select Menu>System settings>and select the required settings options. To run the setup wizard again, select Menu>System settings>Setup wizard
The Setup wizard guides you through the basic setup parameters for Time/Date and Network connection. To change any settings later all setting functions are accessible from the Settings Menu.
OPERATION
After the initial setup, radio is ready for operating in most Modes.
1 Mode selection
From the Main Menu select a mode and press OK. Alternatively press Mode button repeatedly to switch to different mode. After a brief moment radio switches to that mode. The last station or track previously used in that mode is selected. If this is not possible, radio scans for relevant stations, networks, or prompts the user for appropriate input.
2 Audio playback
The common local controls for audio playback are available in all listening modes:
The volume rotary control is turned to increase or decrease the sound volume. The general track controls are ▶ Play/Pause to start and stop tracks and the ▶ Next and ◀ Previous buttons to skip to the next or previous track in the current playlist.
3 Menu navigation
The primary control for moving through menus and options is the knob control. Rotate the control to move up or down a menu. Once the required option or value is highlighted press the knob control. All menus and lists act as loops such that turning the control to go beyond the first or last entry in a menu or list takes you to the opposite end of the menu or list. So going up from first entry in a menu will take you to the last option in the menu, etc. A scroll bar appears on the right of the screen if there are more options above or below those visible.
- To enter the menu tree in a particular mode press MENU.
- To move back a menu level press Back.
- To exit the menu system, press MENU again.
Each mode has a Mode menu, with options specific to that mode. For example, the FM mode menu has two mode specific options: Scan setting and Audio setting. In addition, each mode menu has two final options: System settings > and Main menu >. The “>” indicates options leading to further menus.
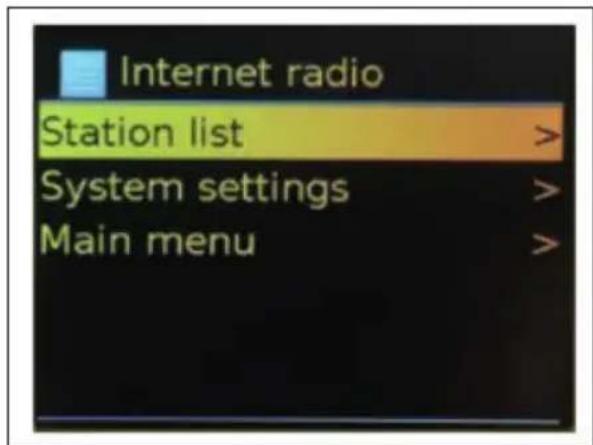
text_image
Internet radio Station list > System settings > Main menu >The System setting menu presents system setting functions to allow the user to setup how the unit behaves. This includes network, time, language and software parameters.
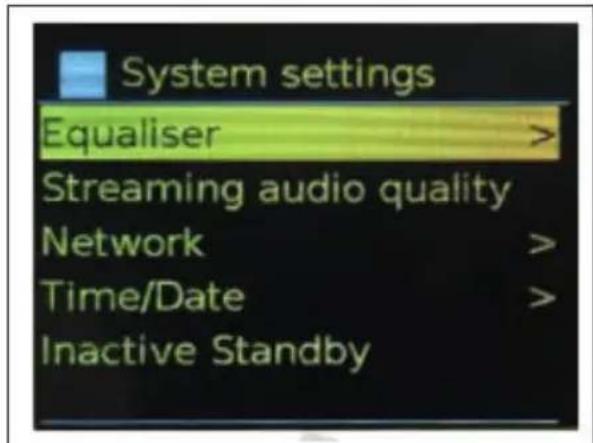
text_image
System settings Equaliser > Streaming audio quality Network > Time/Date > Inactive Standby >The main menu presents an alternative method for selecting listening modes plus sleeps and alarm functions.
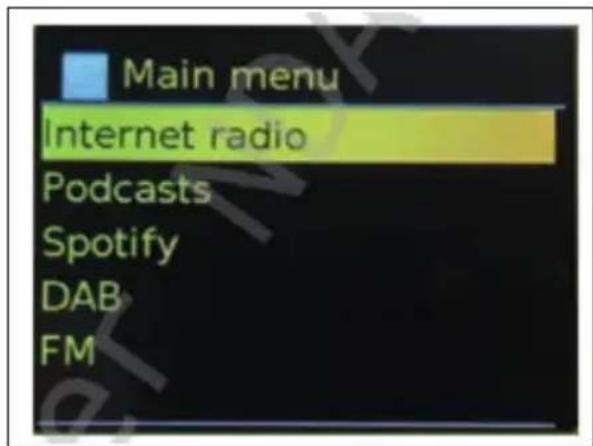
text_image
Main menu Internet radio Podcasts Spotify DAB FM4 Text Entry
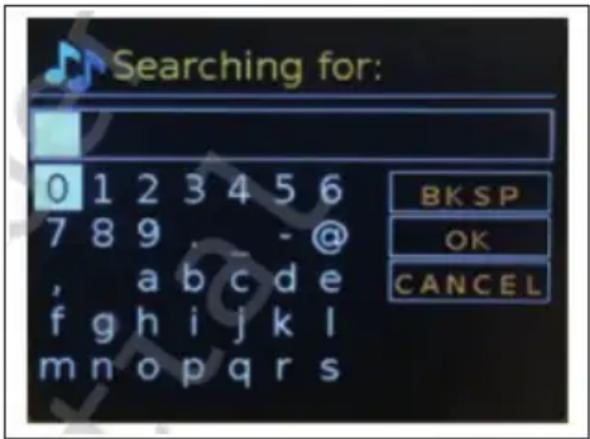
To enter search requests or passwords, etc. The data entry screen presents all available characters and command functions in a continuous loop. Rotate the knob control to scroll back and forth through the loop as required. Press OK to select the currently highlighted character. If you make a mistake select the BKSP (backspace) option to remove the last character. When you have finished the words, select OK to enter the search words or password. Select CANCEL to quit the entry screen.
NOTE: A short cut is available to reduce the amount of scrolling when selecting commands and characters. Press the Info key to jump to the BKSP (Backspace) command option, from anywhere in the character loop. To enter a string of characters, select each character in turn. As each character is selected, the key is built up and displayed in the field at the top of the display. The three options – Backspace, OK and Cancel are included in the selection loop. These can be accessed just using the knob control, or, a short cut is available, press the Info key, to jump to the BKSP (backspace) option.
text_image
Searching for: 0 1 2 3 4 5 6 7 8 9 , - @ , a b c d e f g h i j k l m n o p q r s B K S P O K C A N C E L5 Presets
In each of DAB, FM and Internet radio, up to 40 preset stations can be stored and recalled.
To store the current station as a preset, press and hold FAV until the display shows the Save to Preset screen. Select one of the 40 presets to save the currently playing station and press OK to confirm. To select a preset, press FAV briefly, then select one of the listed preset stations. When a preset station is playing, its preset store number Pn (P1, P2, etc) is shown in the bottom of the screen.
SYSTEM SETTINGS
All the settings parameters for radio are available on the System settings menu.
System settings menu options:
- Equaliser
- Standby Clock
- Network
- Time/Date
- Language
- Factory reset
- Software update
- Setup wizard
- Info
- Privacy policy
- Back light
1 Equaliser
Several predefined EQ settings are available; also a user-defined setting (My EQ). To choose an EQ setting, select Menu > System settings > Equaliser. You can then choose from a variety of predefined settings and My EQ. The last option 'My EQ profile setup' allows you to define your own settings for the 'My EQ' option, with custom bass and treble settings.
2 Standby Clock
You can choose Anolog clock or Digital clock under standby mode.
3 Network
- Network wizard
- WPS setup
- View settings
- Manual settings
- NetRemote PIN setup
- Network profile
- Clear network settings
- Keep network connected.
3.1 Network wizard
This guides you through the necessary steps to join a network. This is also automatically run as part of the Setup wizard. The screens and options presented will depend on the type of network and network protection used.
Selecting a network
When the Network wizard is chosen radio automatically scans for available wireless networks and presents a list of SSID's (Service Set Identifier) for the networks. Radio remembers login details for the last four wireless networks it has connected to and will automatically connect to them when they are available. If connection to a network is temporarily lost, radio will automatically reconnect.
Wi-Fi network (SSID), select a network from the list.
Open network
If the network is open (non-encrypted), radio connects and no further details are required.
Standard encrypted network
If the wireless network is protected the next screen presents options to enter the network key or passphrase.
NOTE: The default passphrase for most wireless routers is printed on a label on the router.
On completion
Radio connects to the selected network. If connecting fails, radio returns to a previous screen to try again. To exit the process uses the Back/Menu button. If the network connection is lost, radio automatically reconnects.
3.2 WPS setup (Wi-Fi Protected Setup)
Radio prompts you to press the connect button on the router and then press the select control. For more information on setting up a WPS encrypted network, see your WPS router's instructions.
3.3 View settings
Displays the settings details for the current network setup, including:
• Active connections
- MAC address
- Wlan region
- DHCP
- SSID
- IP Address
- Subnet mask
- Gateway address
- Primary DNS
- Secondary DNS
3.4 Manual settings
Choose DHCP enable/disable.
3.5 NetRemote PIN setup
Allows you to define a PIN number to be entered before being able to connect to radio remotely over a network.
3.6 Network profile
This displays a list of the networks remembered by radio (up to a maximum of 4). You can see the list of registered networks through Menu > System settings > Network > Network profile>. From here you can delete unwanted networks by turning and press OK then confirming delete Yes.
3.7 Clear network settings
This option will clear current network settings, to allow you to join an alternative network more easily.
3.8 Keep network connected
This option allows you to define whether radio remains connected to its network in Standby mode and when not in Internet radio mode. This is necessary for remote operation and audio streaming in Music player mode.
NOTE: This option is forced to 'Yes' to keep the network connected if connection is configured using the UNDOK app.
4 Time/Date
- Set Time/Date
- Auto Update
- Set Format
- Set Timezone
- Daylight savings
4.1 Set Time/Date
The date and time are displayed as dd-mm-yyyy with the first value, dd, active (flashing). Adjust each value with the knob control. As each value is set by pressing the knob control, the next value becomes active ready for adjustment.
4.2 Auto-update (from DAB, FM or Network)
Auto-update works with data sent over DAB, FM or the Internet. The clock is only updated when in a corresponding mode, so it is best to select a mode you use regularly. DAB and FM use time signals broadcast with radio transmissions. Network uses a time signal sent from the internet radio portal when in any network-connected mode.
- Select Update from DAB, update from FM, update from Network or No update.
- If you are updating from the network, set your time zone.
- If your country uses a daylight saving, the automatically updated time from the network may be wrong by one hour. When daylight saving adjustments is in effect, such as British Summer Time (BST), turn on the Daylight savings option to rectify this.
NOTE: If you are updating the time from DAB or FM, the Daylight savings option has no effect on the clock's time. Radio will auto-update from the selected source when time information is available.
4.3 Set format
Allows you to change between 12 and 24 hour display.
4.4 Set timezone
Allows you to choose the timezone you belong to.
4.5 Daylight savings
Allows you to choose ON or OFF of your daylight savings.
5 Language
The default language is English. TO change, select Menu > System settings > Languages > the select your language.
6 Factory reset
A factory reset resets all user settings to default values, so time/date, network configuration and presets are lost. However, the radio's current software version is maintained.
To perform a factory reset, select Menu > System settings > Factory reset Proceed > Yes.
7 Software Update
From time to time, solution provider may make software upgrades available with bug fixes and/or additional features. You can either check manually, or set radio to check periodically automatically (this is default). If radio detects that newer software is available, it asks if you want to ahead with an update. If you agree, the new software is then downloaded and installed. After a software upgrade, all user settings are maintained.
Note: Before starting a software upgrade, ensure that radio is plugged into a stable mains power connection. Disconnecting power during software update may permanently damage the unit.
8 Setup wizard
This allows you to run the Setup wizard at any time. The wizard guides you through the essential settings in the following order:
- Date/Time – Set format
- Auto update- select clock update source or No Update
- Set Time/Date (this step is only needed if the 'No Update' option is selected in Auto update)
- Network wizard automatically runs (see „3.1 Network wizard“ section). Once you are connected to a network the wizard is completed.
9 Info
Shows details of the current system including:
- SW version: software version number
- Radio ID: Unique code used to identify this particular radio device
- Friendly name: name by which the radio is identified on a network.
10 Privacy Policy
Displays a privacy notice guiding you to our website for full details of the Frontier Smart Technologies Privacy policy. Please visit the following page on a PC or mobile device: www.Frontiersmart.com/privacy
11 Backlight
The radio display can be set to dim, when in Standby, after a Timeout period. This option allows you to set the timeout operation and the brightness settings before (On level) and after (Dim level) the time period.
For the On level, High, Medium, Low are available.
For the Dim level, High, Medium, Low are available.
INTERNET RADIO MODE
Radio can play thousands of radio stations and podcasts from around the world through a broadband internet connection. When you select Internet radio mode, radio contacts the solution provider Internet radio portal to get a list of stations, organized into different categories like Country, and Popular. Once you select a station, radio connects directly to that station. To enter Internet Radio mode, either press Mode to cycle through the listening modes until Internet Radio is displayed, or select Menu > Main menu > Internet Radio. The common local controls for sound volume, mute, play/stop and Presets are available.
NOTE: The station list menu is provided from the Internet radio portal, so it is only accessible when radio is connected to the Internet. Station lists and submenus will change from time to time.
The station list is organized into various categories and search facilities:
• UK
- History
- Search
- Location
- Popular
- Discover
1 UK
Presents a sub-menu to search for stations using a variety of categories, for example, local stations, BBC stations, Genres or stations from a specific city. Choose the required category and either a further list of sub categories is shown, or (if there is no further sub-categories) the available stations for the chosen category are listed.
2 History
When Internet radio mode restarts, the last-listened station is selected. To select another recently used station, select Menu > Station list > Histor then one of the stations listed. Most recent stations appear at the top of the list.
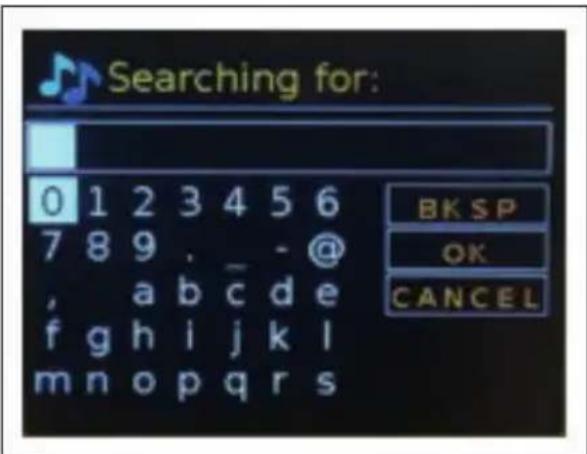
3 Search
You can also search through Internet broadcasts for stations with particular keywords in their title. To search, select Menu > Station list > Search. Enter a keyword by selecting characters in turn, then OK. The search entry screens are similar in operation to the Wi-Fi passphrase entry screen.
text_image
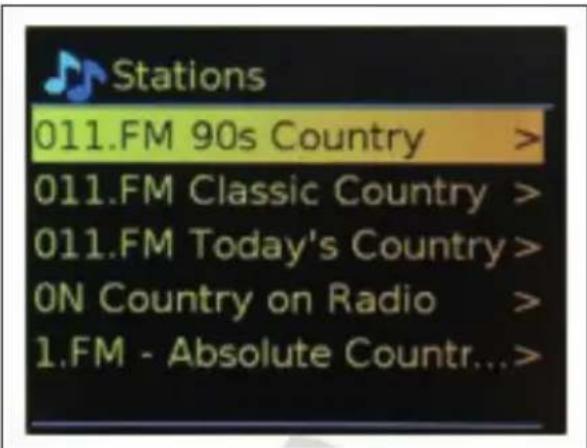
Searching for: 0 1 2 3 4 5 6 7 8 9 . _ - @ , abcde f g h i j k l m n o p q r s BKSP OK CANCELSelect a broadcast from the list.
text_image
Stations 011.FM 90s Country > 011.FM Classic Country > 011.FM Today's Country > ON Country on Radio > 1.FM - Absolute Countr...>4 Location
To select an Internet broadcast from a particular location, select Menu > Station list > Location >. Select a continent from the menu and a list of countries available is presented, select a country and the available internet radio stations are presented. Choose a radio station from the list to tune to that station.
5 Popular
Presents a list of the most popular internet stations from around the world.
6 Discover
Allows you to select from a list of stations defined by either their origin (Country), Genre (style of music) or language. Navigate through the category options; once you have made your selection a screen confirms your selected category and the number stations within that category. To see the list, select the option showing the number of available stations.
7 Now playing information
While the stream is playing, the screen shows its name and description. If artist and track information is available, this is also shown. To view further information, press Info. Each time you press Info, another set of information is displayed, cycling through the following details:
- Slogan (default; where available)
- Language/Location
• Codec and sampling rate - Playback buffer
- Today's Date
PODCASTS
Radio can play thousands of podcasts from around the world through a broadband internet connection. When you select Podcast mode, radio contacts the solution provider portal to get a list of available podcasts. Once you select a podcast, radio connects directly to that podcast source. To enter Podcast mode, either press Mode to cycle through the listening modes until Podcasts is displayed, or select Menu > Main menu > Podcasts. The common local controls for sound volume, mute, play/pause and Presets are available.
NOTE: The podcast menu is provided from the Podcast portal, so it is only accessible when radio is connected to the Internet.
Podcast lists and submenus will change from time to time.
• UK
- Search
- Popular
- Location
- Discover
1 UK
Presents a sub-menu to search for podcasts using a variety of categories, for example, comedy of the week, books and authors, popular, etc. Choose the required category and either a further list of sub categories is shown, or (if there is no further sub-categories) the available podcasts for the chosen category are listed.
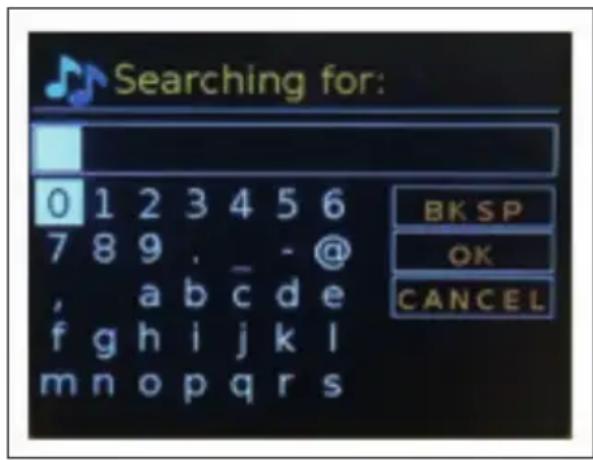
2 Search
You can also search through podcasts with particular keywords in their title. To search, select Menu > Podcast list > Search. Enter a keyword by selecting characters in turn, then OK. The search entry screens are similar in operation to the Wi-Fi passphrase entry screen.
text_image
Searching for: 0 1 2 3 4 5 6 7 8 9 . _ - @ , abc de f g h i j k l m n o p q r s BK SP OK CANCELSelect a broadcast from the list.
3 Location
To select a Pocast from a particular location, select Menu > Podcast list > Location >. Select a continent from the menu and a list of countries available is presented, select a country and the available podcasts are presented. Choose a podcast from the list to tune to that podcast.
4 Popular
Presents a list of the most popular podcasts from around the world.
5 Discover
Allows you to select from a list of podcasts defined by either their origin (Country), Genre (style of music) or language. Navigate through the category options; once you have made your selection a screen confirms your selected category and the number podcasts within that category. To see the list, select the option showing the number of available podcasts.
DAB RADIO MODE
DAB radio mode receives DAB/DAB+ digital radio and displays information about the station, stream and track playing. To enter DAB mode, either press Mode to cycle through the listening modes until DAB Radio is displayed, or select Menu > Main menu > DAB. The DAB radio mode menu offers the following options:
- Station list
- Scan
- Manual tune
- Prune invalid
• DRC - Station order
- System settings
- Main Menu
1 Station List
The first time you select DAB radio mode, or if the station list is empty, radio automatically performs a full scan to see what stations are available. You may also need to start a scan manually to update the list of stations for one of the following reasons:
• Available stations change from time to time.
- If reception was not good for the original scan (for example the antenna was not up), this may result in an empty or incomplete list of available stations.
- If you have poor reception of some stations (burbling), you may wish to list only stations with good signal strength.
A question mark before a station in a list indicates that station is currently unavailable. Depending on the cause of the loss of signal this may be only temporary. Stations that unlikely to be available again (for example you have moved out of the broadcast range of a station), can be removed from the station list.
2 Scan for stations
To start a scan manually, select Menu > Scan. Once the scan is complete, the radio shows a list of available stations. The manual tune menu option allows the user to select a particular channel and display the signal strength for that channel.
3 Remove stations from list
To remove stations that a listed but unavailable, select Menu > Prune invalid.
4 Selecting stations
To listen to or change a station, select Menu > Station List and press OK knob. Scroll knob control to select station you want to listen to. Stations listed with a '?' question mark in front of them are not available. Once selected, the station plays and the screen shows 'playing' information about the station, track or show broadcast by the station. Alternatively, pressing either the left and right keys, jumps to the next station up or down in the station list. Preset stations can be stored and recalled as described in the "5Presets" section (see "Operation" section).
5 Now playing information
While the stream is playing, the screen shows its name and DLS (Dynamic Label segment) information broadcast by the station giving real-time information such as programme name, track title and contact details. Stereo broadcasts are indicated with an icon at the top of the screen. To view further information, press Info. Each time you press Info, another set of information is displayed, cycling through:
- DLS text
- Programme type
- Ensemble name/frequency
• Signal strength/error rate - Bit rate/codec/channels
- Today's date
- DL Plus (if available)
6 Slideshow
When slideshow is available (dependent on the broadcasted signal), the images are displayed on the left side of the screen. To cycle through the different display options (thumbnail, slide with DLS text and full screen slide) prss the knob control.
7 Dynamic range compression (DRC)
Some DAB broadcasts offer dynamic range compression (DRC). This feature allows radios to compress the dynamic range of the output audio stream, so that the volume of quite sounds is increased, and the volume of loud sounds is reduced. This can be useful if you are listening to music with a high dynamic range in a noisy environment (for example, classical music while cooking). To change the DRC setting for radio, select Menu > DRC, and then DRC high, DRC low or DRC off.
NOTE: Radio DRC setting does not have any effect if DRC data is not included in the broadcast.
8 Station order
You can choose the order of DAB station list to be either Alphanumeric, Ensemble or Valid, Ensemble lists groups of stations that are broadcast together on the same ensemble, for example BBC or South Wales local. Valid lists valid stations first, alphanumerically, then off-air stations. To change station order, select Menu > Station order > then Alphanumeric, Ensemble or Valid.
FM RADIO MODE
FM radio mode receives analogue radio from the FM band and displays RDS (Radio Data System) information about the station and show (where broadcast). To enter FM Radio mode, either press Mode to cycle through the listening modes until FM Radio is displayed, or select Menu > Main menu > FM. The FM radio mode menu offers the following options:
- Scan Settings
- Audio Settings
- System Settings
- Main Menu
1 Selecting stations
To find a station, press OK. The frequency display starts to run up as radio scans the FM band. Alternatively, you can scan up or down by pressing and holding left or right buttons or tune manually with quick presses.
NOTE: Scanning can be set to search for strong signals only. Preset stations can be stored and recalled (as described in the "5 Presets" section in the "Operation" chapter).
2 Now playing information
While a FM station is playing, the screen shows one of the two following sets data:
- If RDS information is available, by default the service name (i.e. station name) is displayed. You can cycle through further RDS information by pressing Info. Each time you press Info, another set of information is displayed, cycling through RDS radio text, RDS programme type, frequency and today's date.
- If no RDS information is available, the currently tuned frequency is shown.
3 Settings
3.1 Scan settings:
By default, FM scans stop at any available station. This may result in a poor signal-to-noise ratio (hiss) from weak stations. To change the scan setting to stop only at stations with good signal strength, select Menu > Scan setting > Strong stations only? > Yes.
3.2 Audio Settings:
By default, all stereo stations are reproduced in stereo. For weak stations, this may result in a poor signal-to-noise ratio (hiss). To play weak stations in mono, select Menu > Audio setting > FM weak reception: Listen in mono only > Yes.
BT
BT mode allows BT devices to pair with the radio, stream music and displays information about the track playing. To enter BT Audio mode, either press Mode to cycle through the listening modes until BT Audio is displayed, or select Menu > Main menu > BT. The BT Audio menu offers the following options:
- Setup BT
- View Details
- System Settings
- Main Menu
1 To pair a BT device with the radio
In BT mode, on your radio press Menu > Setup BT, this puts the radio into discoverable mode. The screen shows the BT name of the radio (Simpfy). On your BT smart device, make sure you BT is on and scan for device select the radio from the list of available BT devices.
2 To switch to aother paired BT device
In BT mode, on the radio select Menu > View details > Connected Device List then select the required device from the list.
3 Control from radio
While in BT mode you can pause, play, jump to next track and jump to previous track (in the playlist on the controlling BT device) using the buttons available on the radio.
4 BT connection details
For information on the current state of the BT connection and paired BT devices, in BT mode select Menu > View details, the menu offers the following options:
- BT Info – information on the current state and version of the BT connection on the radio
- Connected Device – details of the currently connected BT device
- Paired Device List – list of up to ten devices that have been paired with the radio
AUX IN MODE
AUX IN mode plays audio from an external source such as an MP3 player.
To play audio with AUX IN mode:
- To avoid sudden loud volume, turn the volume low on both radio and, if adjustable, the audio source device.
- Connect the external audio source to the AUX IN 3.5 mm stereo socket.
- To enter AUX IN mode, either press Mode to cycle through the listening modes until AUX IN is displayed, or select Menu > Main menu > Aux in.
- Adjust the volume of radio (and, if necessary, the audio source device) as required.
ALARMS AND SLEEP
As well as clock/calendar, there are two versatile wake-up alarms with snooze facility, and a sleep function to turn the system off after a set period. Each alarm can be set to start in a particular mode.
1 Sleep
To set the sleep timer, press the Sleep key on remote control repeatedly to cycle through the sleep time options: Sleep OFF, 15 MINS, 30 MINS, 45 MINS or 60 MINS. Stop when the required time is displayed, after a brief moment the screen returns to the screen being used before the sleep function was selected. On the now playing screens the remaining sleep time is displayed at the bottom of the screen. Alternatively select Menu > Main menu > Sleep and select from the sleep time options. Once you select a sleep period, the system returns to the main menu. Press MENU to return to the now playing screen. To cancel a sleep time, select Sleep OFF from the sleep options using either of the above methods.
NOTE: A sleep time is automatically cancelled if radio put into Standby.
2 Alarms
To set or change an alarm, either press Alarm or select Menu > Main menu > Alarms.
Select the alarm number (1 or 2) then configure the following parameters:
- Enable: Off, Daily, Once, Weekends or Weekdays
• Time: 12:00AM (adjust as necessary) - Date: 01-01-2007 (adjust as necessary – this option is usually hidden and only required if 'Once' is selected in the Enable field).
• Mode: Buzzer, Internet radio, DAB or FM - Preset: Last listened or 1-10
• Volume: 0-32
To save these settings and set the alarm, scroll down and select save.
NOTE: If you press ☑ Back or MENU to exit the Alarm settings without saving, a dialogue screen is displayed asking if you wish to save the changes or not. The now playing, screen shows active set alarms with an icon at the bottom left. The standby screen shows active set alarms with a icon. At the set time, the alarm will sound. To temporarily silence it, press OK knob. Press OK knob repeatedly cycles through the available snooze periods: 5 Mins, 10 Mins, 15 Mins, and 30 Mins. The radio returns to standby for the set period, with the silenced alarm icon flashing and a countdown of the remaining snooze period. After the set snooze time the alarm will sound again. During a snooze period, to change the snooze time, press OK knob to select a new snooze time. Any remaining snooze time is reset to the selected time period. To cancel a sounding alarm, or an alarm in snooze, press Standby ⏻.

natural_image
Symbol of a trash bin crossed with a diagonal line, no text or numbers presentAccording to the European waste regulation 2012/19/EU this symbol on the product or on its packaging indicates that this product may not be treated as household waste. Instead it should be taken to the appropriate collection point for the recycling of electrical and electronic equipment. By ensuring this product is disposed of correctly, you will help prevent potential negative consequences for the environment and human health, which could otherwise be caused by inappropriate waste handling of this product. For more detailed information about recycling of this product, please contact your local council or your household waste disposal service.
Your product contains batteries covered by the European Directive. 2006/66/EC, which cannot be disposed of with normal household waste. Please check local rules on separate collection of batteries. The correct disposal of batteries helps prevent potentially negative consequences on the environment and human health.
DECLARATION OF CONFORMITY

text_image
C€Producer:
Chal-Tec GmbH, Wallstraße 16, 10179 Berlin, Germany.
The complete declaration of conformity of the manufacturer can be found at the following link: https://use.berlin/10035326
Chère cliente, cher client,
text_image
QR code image containing encoded data, no visible human-readable textSOMMAIRE
Fiche technique 66
natural_image
Technical drawing of a rectangular frame with a central square and a vertical dimension line labeled '20' (no text or symbols beyond the label)TÉLÉCOMMANDE
text_image
1 2 4 5 EQ Dimmer Sleep Alarm 3 6 8 9 7 Info 10 MODE MENU 12 13 15 17 14 OK 16 VOL- VOL* 18 19 1 2 3 ABC DEF 4 5 6 GHI JKL MNO 7 8 9 PQRS TUVWXYZ 20 FAV 0 21 auna 22text_image
Internet radio Station list > System settings > Main menu >text_image
System settings Equaliser > Streaming audio quality Network > Time/Date > Inactive Standby >text_image
Main menu Internet radio Podcasts Spotify DAB FM4 Saisie de texte
Activer/désactiver DHCP.
3.5 Paramètre PIN NetRemote
natural_image
Symbol of a trash bin crossed with a diagonal line, no text or labels presentDÉCLARATION DE CONFORMITÉ

text_image
C€Fabricant : Chal-Tec GmbH, Wallstraße 16, 10179 Berlin, Allemagne.
text_image
QR code image containing encoded data, no visible human-readable textÍNDICE
Datos técnicos 98
text_image
19 DCN LINEOUT MAIN 1418151617natural_image
Technical drawing of a rectangular frame with a central square and a vertical dimension line labeled '20' (no text or symbols beyond the label)MANDO A DISTANCIA
text_image
1 2 4 5 EQ Dimmer Sleep Alarm 3 6 8 9 7 Info 10 MODE MENU 12 13 15 17 14 OK 16 VOL- VOL* 18 19 1 2 3 ABC DEF 4 5 6 GHI JKL MNO 7 8 9 PQRS TUVWXYZ 20 FAV 0 21 auna 22text_image
Internet radio Station list > System settings > Main menu >text_image
System settings Equaliser > Streaming audio quality Network > Time/Date > Inactive Standby >text_image
Main menu Internet radio Podcasts Spotify DAB FM4 Introducir texto
4 Podcasts favoritos
natural_image
Symbol of a trash bin crossed with a diagonal line, no text or labels presenthttps://use.berlin/10035326
Gentile cliente,
text_image
QR code image containing encoded data, no visible human-readable textINDICE
Dati tecnici 128
text_image
19 DCN LINEOUT MAIN 141815161714 Antenna
15 DC IN
16 Line Out (3.5 mm)
17 AUX IN (3,5 mm)
natural_image
Technical line drawing of a rectangular frame with a central square and dimension label '20' (no text or symbols beyond the number)TELECOMANDO