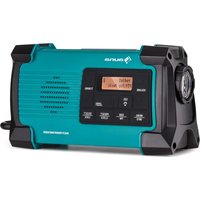
Silver Star CD Cube - Radio Auna - Free user manual and instructions
Find the device manual for free Silver Star CD Cube Auna in PDF.

User questions about Silver Star CD Cube Auna
0 question about this device. Answer the ones you know or ask your own.
Ask a new question about this device
Download the instructions for your Radio in PDF format for free! Find your manual Silver Star CD Cube - Auna and take your electronic device back in hand. On this page are published all the documents necessary for the use of your device. Silver Star CD Cube by Auna.
USER MANUAL Silver Star CD Cube Auna
text_image
QR code image containing encoded data, no visible human-readable textINHALTSVERZEICHNIS
Member of Berlin Brands Group
Handwerkerstr. 11
15366 Dahlwitz-Hoppegarten
Deutschland
natural_image
Symbol of a trash bin crossed with a diagonal line, representing no waste or discharge (no text or labels)Congratulations on purchasing this device. Please read the following instructions carefully and follow them to prevent possible damages. We assume no liability for damage caused by disregard of the instructions and improper use. Scan the QR code to get access to the latest user manual and more product information.

text_image
QR code image containing encoded data, no visible human-readable textCONTENTS
Safety Instructions 26
Product Overview 27
Remote Control 30
Getting Started 31
Menu Structure 32
Radio Function 34
BT Function 35
AUX Function 35
CD Player 35
Other Functions 37
System Settings 40
App Control via Air Music Control 43
Disposal Considerations 44
Declaration of Conformity 44
TECHNICAL DATA
| Item number 10033003, 10033004, 10038352 | |
| Power supply 220-240 V ~ 50/60 Hz | |
| Streaming UPnP, DLNA | |
| Supported filetypes MP3 | |
| WiFi standard 802.11 b/g/n | |
| WiFi frequency 2402-2480 MHz | |
| WiFi radio-frequency power (max.) 14-20 dBm | |
| BT frequency 2402-2480 MHz | |
| BT radio-frequency power (max.) 10 dBm |
SAFETY INSTRUCTIONS
- Observe all notes listed in the operating instructions.
- Do not use the unit near water or in a humid environment.
- Make sure that no liquid is spilled over the unit and the unit openings.
- Move the unit carefully to avoid damaging it.
- Do not block the device outputs.
- Do not place the unit near heat sources (e.g. heating). Do not expose the device to direct sunlight.
- Plug the power plug of the unit into the power outlet in the manner intended.
- The device is equipped with overload protection. Should this need to be replaced, contact customer service or a similarly qualified person.
- Unplug the unit from the wall outlet if it will not be used for a long period of time.
- Do not attempt to service or repair the unit yourself. In this case, the warranty expires.
- The mains plug is used to disconnect the device from the mains after it has been switched off. Make sure that the mains plug is always freely accessible.
- Do not expose the device to splash water or place objects filled with liquid, such as vases, on the device.
- Do not expose the batteries to extreme heat such as sunlight or fire.
- Do not obstruct the ventilation of the unit by blocking the ventilation openings with objects such as newspapers, tablecloths, curtains, etc..
- Ensure that a minimum distance of 5 mm to all sides of the unit is maintained.
- Do not place sources of open flame ignition, such as lit candles, on the unit.
- Dispose of used batteries in an environmentally friendly manner.
- Use the device only in temperate climate, not in tropical climate.
- This device may be only used by children 8 years old or older and persons with limited physical, sensory and mental capabilities and / or lack of experience and knowledge, provided that they have been instructed in use of the device by a responsible person who understands the associated risks.
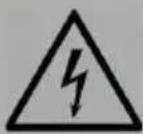
WARNING
Risk of injury! To reduce the risk of electric shock, do not open either the cover or the back of the unit. The device does not contain any parts that could be serviced by the customer. Please contact customer service or similarly qualified personnel for maintenance and repair.
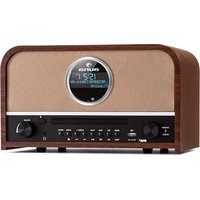
PRODUCT OVERVIEW
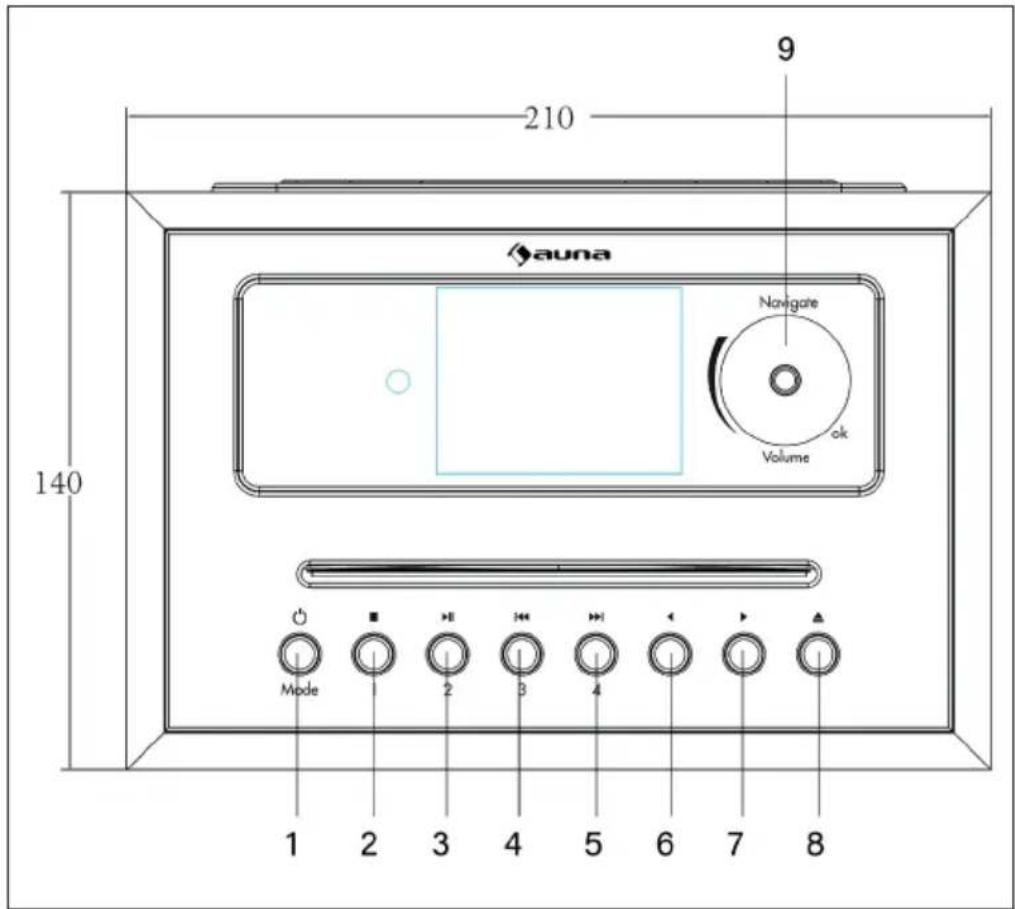
text_image
9 210 140 auna Navigate ok Volume Mode 1 2 3 4 5 6 7 8| 1 | Standby / Mode button | 6 | Left: turn left |
| 2 | Preset 1 / Stop button | 7 | Right: turn right |
| 3 | Preset 2 / Pause / Play button | 8 | Ejection: press for CD ejection |
| 4 | Preset 3 / Backward button | 9 | Navigate / Vol- / Vol+ / OK knob |
| 5 | Preset 4 / Forward button |

text_image
10 DC IN AUX IN 13 USB 11 12 13 14| 10 | Telescopic Antenna | 13 | Headphone jack |
| 11 | DC in socket | 14 | USB port |
| 12 | Aux in socket |
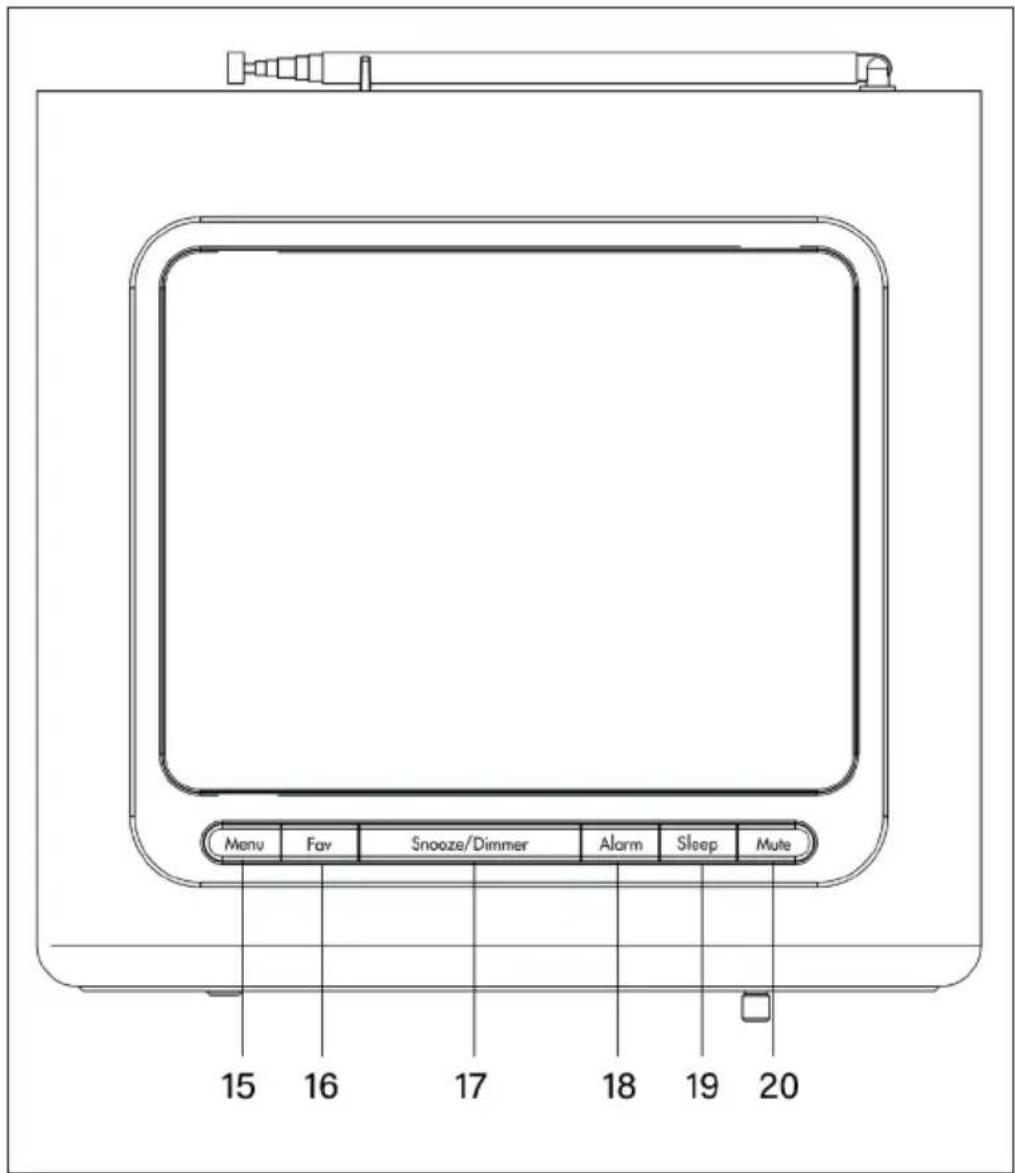
text_image
Menu Fav Snooze/Dimmer Alarm Sleep Mute 15 16 17 18 19 20| 15 | Menu button | 18 | Alarm button |
| 16 | Fav button | 19 | Sleep button |
| 17 | Snooze/Dimmer button | 20 | Mute button |
REMOTE CONTROL
1 Standby / On
2 Ejection: press for CD ejection
3 EQ button
4 Dimmer
5 Sleep
6 CD program
7 Backward button
8 Forward button
9 Stop
10 Play / Pause button
11 Mute
12 Home
13 Up
14 Left
15 Right
16 Down
17 OK
18 Vol-
19 Vol+
20 Number buttons
21 Fav
22 Fav+
GETTING STARTED
Plug the adaptor into the DC in socket (on the rear of the product).
"Welcome" will be shown on the screen. Meanwhile, the radio will scan the available access point automatically. You can use the Volume/Navigator button to choose the internet, and then press OK to confirm the internet.
The steps are as below for first use:
1 There will be a prompt: Would you like to configure Network now? Press Navigator knob to Choose YES. Then the internet radio will scan available network.
2 Choose the network you want to connect by switching the navigator knob and press it to confirm.
3 It will remind you to enter your password by switching the navigator button to input the number, letter or character. After finishing input, press the navigator knob to confirm your input.
4 Then your internet radio will be connected to your network.
Note: When you need input the internet password, please press Navigator button to choose the characters. In this condition, press Left button can turn left and delete the left characters at the same time.
Below characters are available for the radio:
- Numbers (from 0-9)
- English letters (from A to Z and from a to z)
- Other characters ( DEL ,@, lank,!,",#,\$,%,&,*,'+ and ().
MENU STRUCTURE
| Level 1 Level 2 | Level 3 Level 4 | ||
| Configuration | Time Display | Analog | |
| Digital | |||
| Manage My MediaU | On | ||
| Off | |||
| Network | Wireless Network Configuration | ||
| Wireless Network (WPS PBC) | |||
| Manual Configuration | |||
| Check Network when Power On | |||
| Date & Time | Set Date and Time | ||
| Set Time Format | |||
| Set Date Format | |||
| Alarm | Alarm 1 | On | |
| Off | |||
| Alarm 2 | On | ||
| Off | |||
| NAP Alarm (off) | |||
| Alarm Volume | |||
| Timer | |||
| Language | |||
| Dimmer | Power Saving | ||
| On | |||
| Display | Color | ||
| Monochrome | |||
| Power Management | |||
| Sleeptimer | |||
| Buffer | |||
| Weather | Set Location | ||
| Temperature Unit | |||
| Show on the Standby | |||
| Level 1 Level 2 Level 3 Level 4 | |||
| Configuration | FM Setup | Mode | |
| Threshold | |||
| Local Radio Setup | |||
| Playback Setup | |||
| Device | |||
| Equaliser | |||
| Resume When Power On | |||
| Software Update | |||
| Reset to Default | |||
| Local Radio | Internetradio | My Favorite | |
| Radio Station/Music | |||
| Local Radio | |||
| Sleep Radio | |||
| History | |||
| Service | Search Radio Station | ||
| Add New Radio Station | |||
| Media Center | USB | ||
| UPnP | |||
| My Playlist | |||
| Clear My playlist | |||
| FM | |||
| CD | |||
| Information Center | Weather Information | ||
| Financial Information | |||
| System Information | |||
| AUX | |||
| BT | |||
RADIO FUNCTION
- Select [FM mode] on the main display screen with the navigation knob or with the navigation buttons on the remote. Once selected, the FM mode will start on 87.5MHz.
- To save all stations with strong signal, press the navigation knob, it will show [auto scan?] choose YES. Then it will start auto scan. Once the auto-scan is complete, stations will be saved in your favorites.
- You will then be able to browse through these saved stations by press the Fav button then press [<] or [>] to skip between saved stations.
- To manually scroll through FM frequency, simply press the [<] or [>] buttons to go backwards or forwards through the frequency wave.
Pre-setting your favorite FM stations
- To save presets manually, select and listen to the station frequency number for the station you wish to save.
- Follow by holding down the FAV button for 1-2 seconds and the number [01] will display on the screen. Use the navigation knob to browse through preset numbers (up to 99) and select the preset number you wish to save it as by pressing the navigation knob.
- There are 4 separate preset buttons (1-4) on main unit which you can press and hold each of them to store your 4 favorite FM stations quickly.
Recalling preset FM stations
- View your favorite FM stations when you are on FM mode by simply selecting the 'Fav' button and begin scrolling through saved stations.
- There are 4 separate preset buttons (1-4) on main unit which you can simply press each of them to recall your 4 favorite FM stations quickly.
BT FUNCTION
Either press MODE until the display shows BT or select BT under Main menu. It will have remind sound, search the pairing name [Silver Star CD Cube] in your phone and click it to pair. It will have reminding sound after paired successfully. You now can play music via BT. You can adjust volume from the radio or your phone.
AUX FUNCTION
Aux in mode plays audio from an external source such as an MP3 player. To play audio with Aux in mode:
- Turn the volume low on both the Radio and if adjustable, the audio source device.
- Connect the external audio source to the AUX IN 3.5mm stereo socket.
- Either press MODE until the display shows AUX or selects AUX under Main menu.
- Adjust the volume of the Radio (and, if necessary, the audio source device) as required.
CD PLAYER
Select [CD] on the main display screen by turning the knob and pressing the knob or with the remote navigation buttons. The display screen for the CD function will now show [Reading...] followed by [No Disc]. Select the Open/Close CD function on the radio or the remote. Insert your CD slightly and drive will take CD into the system to play. The first song on the CD will now begin to play and album artwork will display on the screen. Please note that not all CDs will display album artwork.
CD Functions
- To skip between songs, use the [<] or [>] buttons on the radio or the remote. Pause/Play using the button on the radio or remote.
- To skip rewind/forward through a song playing, hold down the [<<] or [>>] buttons on the remote control and release when you wish to stop skipping.
- To eject the CD, press the Open/Close CD function on the radio or on the remote, as per the guidance to enter the CD.
- Press the STOP button to stop the album. This will also display how many songs are on the album and total playing time. Press Play/Pause to begin listening again.
Arrange a CD song program
- When the CD is put into 'Stop', you can program the CD player to play songs in a particular order. Simply follow by pressing the "Program" button on the remote to step into the state of programming.
- Once in program settings, the display will show P1 001 to display the first song on the CD as 001. You can now choose what song you would like as program number 001 by using the '<' and '>' buttons to scroll through to the song you would like to choose. Once on the chosen song for 001, press the 'Program' button to select, and be taken to choose your next programmed song.
- For the next song, the display will show P2 002 to show the program 2. Now use the '<' and '>' buttons to scroll through to the song you would like to choose. Once on the chosen for program 2, press the 'Program' button to select, and be taken to choose your next programmed song. On the display, the song number will show as 001 for CD song number 1, 008 for CD song number 8, 010 for CD song number 10 etc.
- After you have finished program song selection, press the 'Play' button to play the songs which have been programmed.
Note: Press STOP button to exit the Program when programming. When the program playback is activated, press EJECT button, then it will exit the program playback mode.
OTHER FUNCTIONS
Information Center
Weather Information
- There are weather information and forecasts for 2000 cities. Select the country and then the city for the weather details.
- Press [<] or [>] to see the weather forecasts.
- The device is able to display the weather information on the standby mode. On the weather information page, press OK to set the city to display on the standby mode. Then turn on the weather display.
Financial Information
View the stock index
System Information
View details of units and of connect network. The information includes MAC address which you are required to fill in when registration of "my mediaU" membership.
Media Center
Select the USB/UPnP mode or playlist mode with Navigate/OK or with the Mode button.
UPnP
- If you have set up shared media, you should see the shared media from UPnP.
- If you have more than one computer sharing media, the alternatives are listed.
- Select the shared media you want to play.
- Use Play/Pause, Next/Prev and Stop. Press Right button to view the display information of the playing track.
Note: The radio can only read the track with the file name less than 40 characters. The characters should be in European Language. If you encounter failure of reading the track under UPnP mode, you may try to rename the file. However, if the track is still unable to play, you can try converting the file to different formats.
USB
- From this point on, menus are generated from the folders on the USB device.
- Browse folders with the NAV wheel or direction keys on the remote control.
- The display shows folder and file names (not necessarily track names).
- Once you have found a track you want to play, press the navigate knob on the device or press OK on the remote control
Note: The USB port does not support charging or data transfer with computer.
My Playlist
You can create a playlist of favorite's music from UPnP. When you playing the music, press and hold OK from unit or remote control to save it into My Playlist.
Clear My Playlist
Please select this option for clearing the playlist. Please confirm the questions.
Local Radio
Stations are categorized to the country/location which the unit is operated.
Internet Radio
- Press [Standby] to go to working mode and rotate Navigate to scroll through the main menu. Press OK (to enter sub menus or confirm settings)
- Press [<] to return to the previous menu. After connection of any station successful, station information will be shown and information content can be changed with [<] or [>] button.
My Favorites
List of my favorite preset stations. It supports 250 favorite entries including stations and folder. During the station playing screen, press and hold FAV on the device or FAV+ on the remote control to save the station as my favorite. You may replace the previous saved station to the new one.
If the Selected station has been saved, you cannot save it again. The saved stations are showed under this menu. You may also press Fav to enter the saved station list. You may enter the number key on the remote control to recall the saved station.
Under the preset station list, move to your station; press OK from unit or OK from remote control to listen.
Enter its submenu with [>] button, Delete, Shift Up/Down along the list, Rename, Play, or Use as Alarm (if you chose internet as alarm sound in alarm configuration).
Radio Station / Music
Stations are categorized into Global Top 20, Genre, Country/Location (Africa, Asia, Europe, Middle East, North America, Oceania/Pacific and South America) and Highlight. Enter to continue the subcategories and choose the station to listen.
For each station, press OK from unit or remote control to play directly. Press [>] to enter its submenu. When you choose Auto Scan, it becomes the playback of marquee of each station in the subcategory. Each station plays 30 seconds until all have played or you press "OK" to stop the marquee listening. Press [>] button to view the display information of the playing station.
Local Radio
Stations are categorized to the country/location which the unit is operated.
Sleep Radio
You can choose Birds, Piano, Rain, Spa, Space, and Wave as sleep radio.
History:
List of the ten recently listened stations.
Service:
Search radio station-Enter your keyword to search radio station from the list. Add new radio by adding IP address, the added stations will be stored in My Favorite. Note that the maximum character of the station name is 250.
SYSTEM SETTINGS
| Time Display Analog / | Digital |
| My MediaU | When it is enabled, my mediaU will exist on the main menu. If various mediaU accounts exist in the Radio, Select the default login account in here. |
| Network | Wireless Network Configuration: Enable/disable WiFi network. When you enable the WiFi network, the system will automatically select the required AP. Enter WEP or WPA code to connect the WiFi. |
| Wireless Network (WPS PBC): If you are using a router with WPS/QSS button, you may set up the network connection simple via WPS function. Enter it and go to press the WPS/QSS button on your router within 120 seconds. The connection between the router and device will then be configured automatically. | |
| Manual Configuration: You can choose DHPC (which IP assigned automatically) or manually input IP address for wireless network connection. When you select manual setting for wired connection, the following have to be entered: SSID (name of access point), IP Address, subnet mask, default gateway, preferred DNS server, alternate DNS server. | |
| Network | Check Network When Power On: Enable/disable WiFi network. When you enable the WiFi network, the system will automatically search the available AP. Select required AP. |
| Date and Time | Setup the date and time |
| Set time format display as 12 Hour or 24 Hour | |
| Set date format YYYY/MM/DD or DD/MM/YYYY or MM/DD/YYYY | |
| Alarm | There are three independent alarms-2 alarms of absolute time setting (Alarm 1 and Alarm 2) and 1 alarm for relative time setting (Alarm NAP).Press Alarm on the remote control to enter this menu directly.Note that the alarm source is from the preset Internet radio if Alarm Sound is set to be Internet Radio. It can only set one same IR station for Alarm 1 and Alarm 2.When the alarm is reached the unit connects to the Internet if the set network is available. Therefore there may be some delay from the alarm to the radio play. If no network is connection can be established within one minute, the alarm will change to Melody automatically.When Alarm" NAP" is set, it alarms once in 5/10/20/30/60/90/120 minutes depending on which one you have set.Choose Alarm Volume to configure the volume of the alarms. |
| Timer Countdown timer (max. 100min) | |
| Language | English / Deutsch / Espanol / Francais / Portugese / Nederlands / Italiano / Pyccknn / Svenska / Norske / Dansk / Magyar / Cesky / Slovensky / Polski / Turkce / Suomi |
| Dimmer Power Saving / Turn On | |
| Display Color / Monochrome | |
| Power Management | Configure to go to standby mode automatically during in the menu or/ and without Wifi signal. Choose the power management timer (5/15/30mins) to set the duration of the radio to switch standby mode automatically when you are not controlling it. Choose Turn off to ignore the power management function. |
| Sleeptimer | Turn off or set the sleep timer of 15/30/60/90/120/150/180 minutes. Once the time is set, there will be a bed icon with remaining minutes at the top right corner and the device will turn to standby then .Press Sleep on the remote control for the shortcut of this function. |
| Buffer | Configure the buffer time of the music playback,2/4/8 seconds. |
| Weather | Activate/deactivate the weather forecast for the standby display. Choose your preferred temperature unit (☐ or ☐) and then proceed entering your location. When activated, the weather forecast is shown in turns with the clock display on the standby screen (each 10 secs). |
| Radio Setup | You can choose the mode and threshold of the FM easily |
| Local Radio | There is a shortcut Local Radio under Internet Radio so that you can easily go to the station list of your location. You may Manual Setup your location, or let the system Auto Detect your current location. The system detects the location according to the IP address of your connected network. Press Local Station to enter this local radio list directly. |
| Playback Setup | Select the playback mode of media center-Off (no repeat or shuffle), Repeat all, Repeat one, or Shuffle. |
| Device | Default device name for DLNA is “AirMusic”. You may rename it for DLNA setup on the PC or mobile. QR code for downlode and install “AirMusic” control App. |
| Equalizer | Default equalizer is Normal, you may change to Flat, Jazz, Rock, Soundtracks, Classical, Pop, News or my EQ. Press EQ on the remote control to swap among the EQ mode for shortcut. |
| Resume When Power On | The system is default to resume internet radio playback if you were listening to internet radio or media center before switch off the unit. If turn this setting off, the system will remain in the main menu when switching on the unit. |
| Software Update | Update software. If there is an updated software version on the server, the system will notify you .Before starting a software upgrade; ensure that the unit is plugged into a stable mains power connection. Disconnected power during a software update may permanently damage the unit. |
| Reset to Default | Restore the default settings. After the device is reset, the system will move to language is selected. |
APP CONTROL VIA AIR MUSIC CONTROL
You can control the Internet radio from your smartphone or tablet.
Download the Air Music Control app from the Google Play Store or the Apple Store.
The devices must be connected to the same network.
text_image
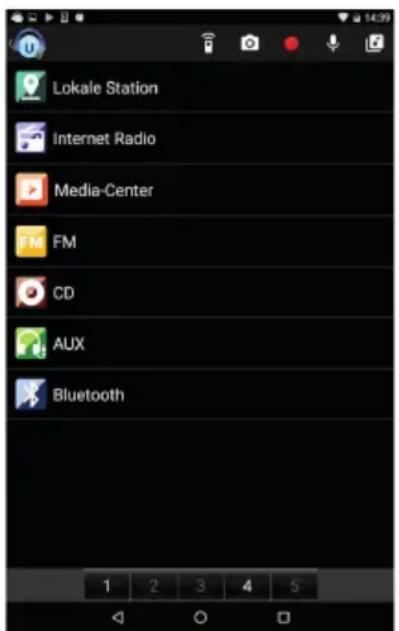
Lokale Station Internet Radio Media-Center FM CD AUX Bluetooth 1 2 3 4 5DISPOSAL CONSIDERATIONS
natural_image
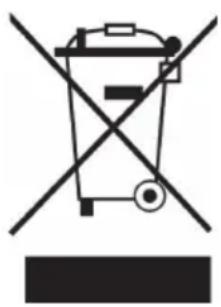
Symbol of a trash bin crossed with a diagonal line, representing no waste or discharge (no text or labels)If there is a legal regulation for the disposal of electrical and electronic devices in your country, this symbol on the product or on the packaging indicates that this product must not be disposed of with household waste. Instead, it must be taken to a collection point for the recycling of electrical and electronic equipment. By disposing of it in accordance with the rules, you are protecting the environment and the health of your fellow human beings from negative consequences. For information about the recycling and disposal of this product, please contact your local authority or your household waste disposal service.
This product contains batteries. If there is a legal regulation for the disposal of batteries in your country, the batteries must not be disposed of with household waste. Find out about local regulations for disposing of batteries. By disposing of them in accordance with the rules, you are protecting the environment and the health of your fellow human beings from negative consequences.
DECLARATION OF CONFORMITY

text_image
CE UK CAManufacturer:
Chal-Tec GmbH, Wallstrasse 16, 10179 Berlin, Germany.
Importer for Great Britain:
Berlin Brands Group UK Ltd
PO Box 1145
Oxford, OX1 9UW
United Kingdom
Hereby, Chal-Tec GmbH declares that the radio equipment type Silver Star is in compliance with Directive 2014/53/EU. The full text of the EU declaration of conformity is available at the following internet address: use.berlin/10033003
For Great Britain: Hereby, Chal-Tec GmbH declares that the radio equipment type Silver Star is in compliance with the relevant statutory requirements. The full text of the declaration of conformity is available at the following internet address: use.berlin/10033003
Estimado cliente:
text_image
QR code image containing encoded data, no visible human-readable textÍNDICE
natural_image
Symbol of a trash bin crossed with a diagonal line, representing no waste or discharge (no text or labels)Berlin Brands Group UK Ltd
PO Box 1145
Oxford, OX1 9UW
United Kingdom
natural_image
Symbol of a trash bin crossed with a diagonal line, representing no waste or discharge (no text or labels)DÉCLARATION DE CONFORMITÉ

text_image
CE UK CAFabricant :
Chal-Tec GmbH, Wallstraße 16, 10179 Berlin, Allemagne.
Berlin Brands Group UK Ltd
PO Box 1145
Oxford, OX1 9UW
United Kingdom
text_image
QR code image containing encoded data, no visible human-readable textINDICE
natural_image
Symbol of a trash bin crossed out by a diagonal line, with no text or labels present.Berlin Brands Group UK Ltd
PO Box 1145
Oxford, OX1 9UW
United Kingdom