IRO320 - Iron Wëasy - Free user manual and instructions
Find the device manual for free IRO320 Wëasy in PDF.

| Product Type | Automatic drying and ironing machine |
| Brand | Wëasy |
| Model | IRO320 |
| Intended use | Drying and ironing of textiles (shirts, blouses, etc.) |
| Delivery contents | Telescopic rod, nylon cover, hanger, clamping clips, power cable |
| Power supply | Mains 220-240 V |
| Power | 1500 W (estimated) |
| Temperature range | Ambient temperature (RT), 30°C, 40°C, 50°C, 60°C, 70°C |
| Timer | 15, 30, 60, 90, 130, 180 minutes |
| Auto shut-off | Yes, at the end of the timer or in case of overheating |
| Safety | Overheat protection, tip-over switch, indicated hot surfaces |
| Adjustable height | Yes, via telescopic rod |
| Nylon cover | Expandable or reducible via zippers |
| Weight | Approximately 4 kg (not specified) |
| Dimensions (approx.) | Height: 1.2 to 1.6 m (adjustable) |
| Maintenance and cleaning | Damp cloth and mild detergent, do not immerse |
| Safety instructions | Do not touch hot surfaces, do not use near water, keep out of reach of children |
| Spare parts | Replaceable nylon cover (not specified, but likely) |
| Repairability | Do not attempt to repair yourself; contact a professional |
| Warranty | Excludes damage due to mishandling |
Frequently Asked Questions - IRO320 Wëasy
User questions about IRO320 Wëasy
0 question about this device. Answer the ones you know or ask your own.
Ask a new question about this device
Download the instructions for your Iron in PDF format for free! Find your manual IRO320 - Wëasy and take your electronic device back in hand. On this page are published all the documents necessary for the use of your device. IRO320 by Wëasy.
USER MANUAL IRO320 Wëasy
We are delighted that you have chosen this automatic drying and ironing machine.
Before using the device for the first time, please read the instructions carefully and keep them for future reference. If the device is given to someone else, these instructions should also be handed over with it.
The manufacturer and importer do not accept any liability if the information in these instructions is not complied with.
Intended Use:
- This device is intended to be used to dry and iron textiles, for example blouses and shirts. Delicate textiles such as wool or similar fabrics must not be used on the product. Always follow the care labels for the textiles!
- The device is for personal use only and is not intended for commercial applications.
- The device should only be used as described in these instructions. Any other use is deemed to be improper.
- The following are excluded from the warranty: all defects caused by improper handling, damage or unauthorized attempts at repair. This also applies to normal wear and tear.
Safety Instructions:
- This device may be used by children aged 8 and over and by people with reduced physical, sensory or mental abilities or a lack of experience and/or knowledge if they are supervised or have received instruction on how to use the device safely and have understood the dangers resulting from failure to comply with the relevant safety
precautions.
Children must not play with the device.
- Cleaning and user maintenance may not be carried out by
- Children unless they are at least 8 years of age and are supervised by an adult.
CAUTION: hot surfaces!
The motor unit / telescopic rod will become hot during use. You should therefore not touch it during or shortly after use.
- The device must always be switched off and disconnected from the main power when it is not being used and before assembling, disassembling or cleaning the device.
- Do not use the unit if its power cable or plug is damaged, does not operate properly, has been damaged or dropped. If the power cable is damaged, it must be replaced by the manufacturer or its agent or by a qualified person to avoid any risk.
- Let the device cool down completely before it is cleaned and stored away.
Danger of Injury
- Danger of suffocation from plastic films and bags! Keep children and animals away from the packaging material.
- Always lay the main cable in such a way that it does not present a trip hazard.
- The device must not be moved during use.
Danger of Electric Shock
- The device should only be connected to a properly installed socket with safety contacts. The socket must also be readily accessible after connection so that the connection to the power supply can quickly be isolated. The main voltage must match the technical data of the device. Do not use any extension cables.
- When using electrical equipment, safety precautions must always be taken to prevent the risk of fire, electric shock and/or injury in the event of misuse.
- Never immerse the device, main cable or main plug in water or other liquids and ensure that they cannot fall into water or become wet.
- Should the device fall into water or liquid get inside it, switch the power supply off immediately. Never attempt to pull the device out of the water while it is still connected to the main power! Have the device checked in a specialized workshop before using it again.
- The device must not be used if it has been dropped, if obvious signs of damage are visible or if it has leaks.
- Never touch the device, main cable or main plug with wet hands when these components are connected to the main power.
- Switch off the device and pull the main plug out of the plug socket if a fault occurs during operation, before it is cleaned or before a thunderstorm.
- Use the device only in closed rooms.
- Do not operate the device in a very damp environment.
- Keep the appliance and its power cord out of reach of children under 8 years of age.
Danger of Fire
- Do not use the device in rooms containing easily ignitable dust or poisonous and explosive fumes.
- Do not operate the device in the vicinity of combustible materials.
- Do not connect the device along with other consumables (with a high wattage) to a multiple socket in order to prevent overloading and a possible short circuit (fire).
Avoiding Damage to Material, Property and the Device
- Always place the device with clear space above it and on all sides on a dry, flat, solid and heat-resistant surface.
- Do not place the device under other electronic devices.
- The device must be switched off when inserting or removing the main plug. Always pull the main plug and never the main cable to disconnect the device from the main power.
- Never cover up the ventilation slots and do not insert any objects into them.
- Make sure that the main cable is not squashed, bent or laid over sharp edges and does not come into contact with hot surfaces.
- Make sure that the voltage rating on the type plate corresponds to your main voltage of your installation. If this is not the case, contact the dealer and do not connect the unit
- Protect the device from heat, naked flames, extreme temperatures, persistent moisture, wet conditions and collisions.
- Do not use any corrosive or abrasive cleaning agents to clean the device. These can damage the surface.
Items Supplied and Device Overview
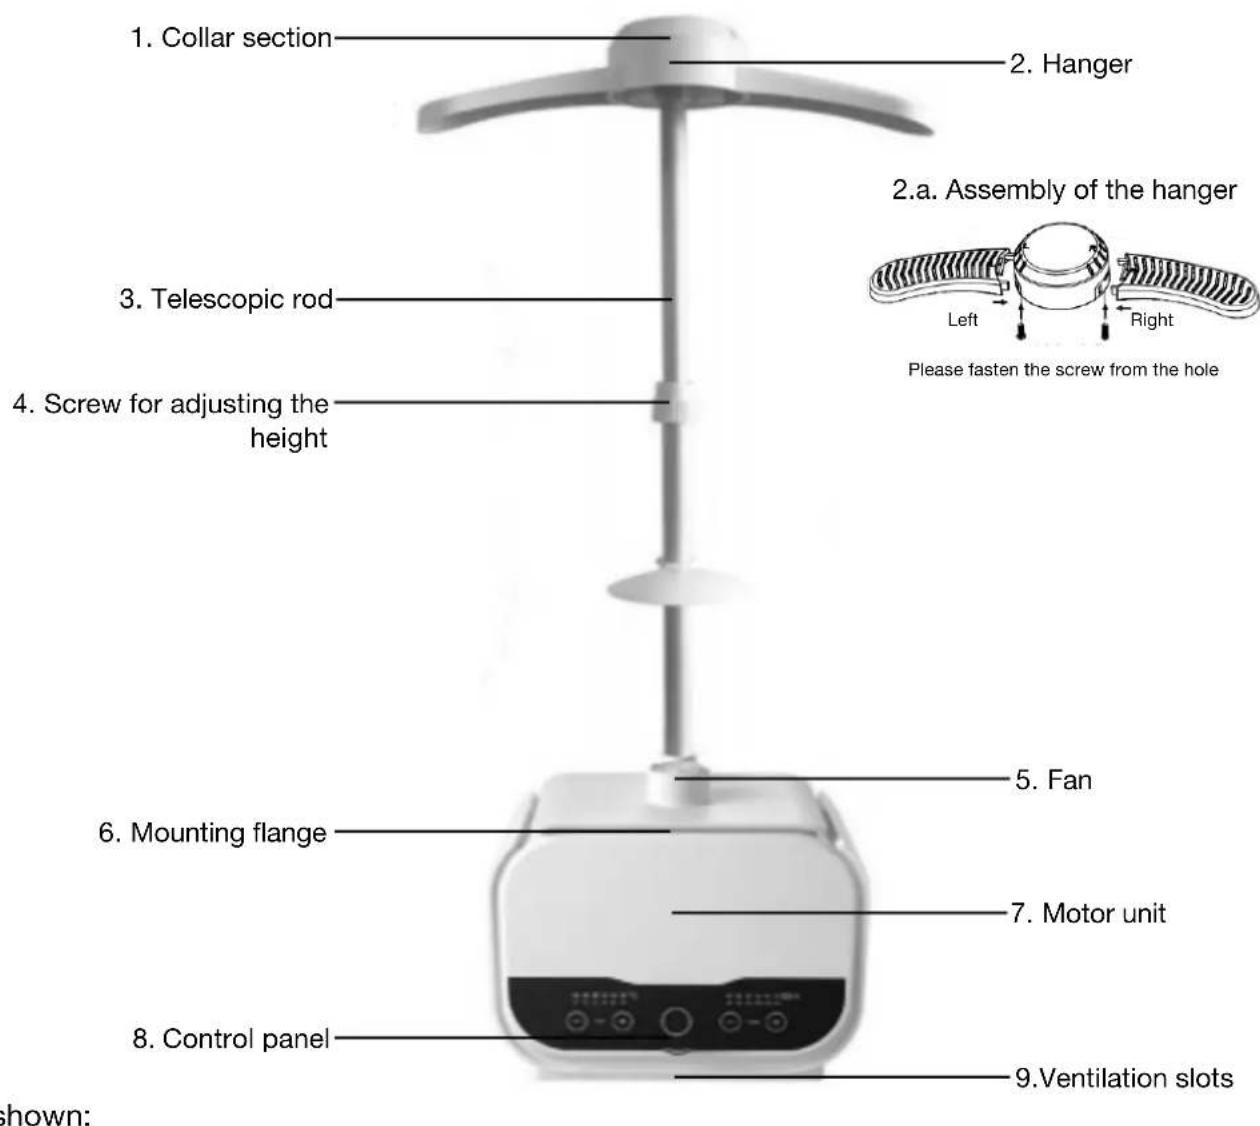
- Nylon balloon
- Main cable with main plus
- Four weight clamps

Control Panel
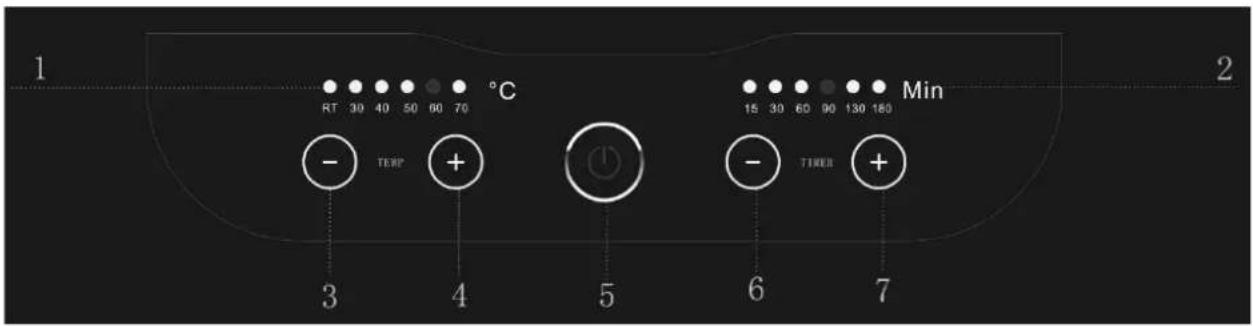
1: Temperature Indicator Light: RT means room temperature. Other temperatures can be set to 30, 40, 50, 60 or 70 Celsius degree.
2: Timer Indicator Light: You can set the operating time to 15, 30, 60, 90, 130 or 180 minutes. It will be automatically count down based on your set time.
3: Minus Icon: Adjustment for Temperature Decrease.
4: Plus. Icon: Adjustment for Temperature Increase.
5:Power Switch:On/Off.
6: Minus Icon: Adjustment for Timer Decrease.
7:Plus,Icon:Adjustment for Timer Increase
Operation Notes:
Caution: Danger of suffocation from plastic films and bags! Keep children and animals away from the packaging material.
Unpack the items supplied and check them for completeness (see the "Items Supplied and Device Overview" chapter) and possible transport damage. If the device, the main plug or the main cable does have damage, do not use the device, but contact our customer service department.
Before using the device, remove all packaging material and any label that may be on the device and are used for protection during transportation or for advertising.
Assembly
- Plug the telescopic rod (3) into the recess on the top of the motor unit (7).
- Follow the instruction manual to fix the left and right hangers (2) into the collar section (1), then place it onto the telescopic rod (3) tightly.
- Attach the balloon:
Pull the balloon from the top of telescopic rod (3) to the bottom and fit the elastic cord on the bottom onto the mounting flange (6).
The device is disassembled in the reverse order.
Use:
Caution
- Only place the device on a stable, flat, moisture-resistant and heat-resistant surface.
- Caution! Hot surface! The motor unit / telescopic rod will become hot during use. You should therefore not touch it during or shortly after use.
It is essential that you follow the care labels for the textiles to be dried! - Never cover up the ventilation slots and do not insert any objects into them
Steps
- Set the height needed. To do this, open the screw (4), pull out the telescopic rod (3) and then close the screw (4) again
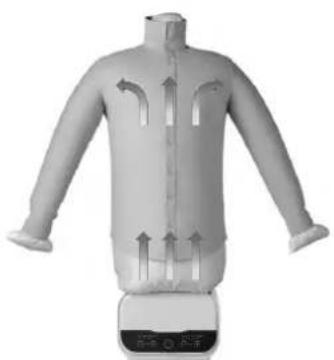
- If you have not already done so, pull on the nylon balloon (see the "Before Initial Use" chapter, "Assembly" section). The nylon balloon should sit immediately below the mounting flange (6) so that it can fully inflate.
- Pull the garment which is to be pressed over the nylon balloon and the hanger (2) and do up the buttons if necessary. Make sure that
a. the collar is fitted over the collar section (1) on the hanger (2),
b. any button strip is over the hole line on the nylon balloon,
c. the arms of the nylon balloon fit properly in the sleeves of the garment and are not twisted or scrunched up,
d. all buttons on the garment (including on the sleeves) are done up.
- Insert the mains plug into an easily accessible socket.
- Press the + or - buttons of the timer (8) and set it to the length of time you want.
- Once the nylon balloon has inflated, straighten out the garment and smooth it down again.
- Spread the clamps along the bottom of the garment (at the front and back in each case on the outsides and in the middle on the button strip at the front) so that it is weighted down and will not go out of shape when the nylon balloon is inflated.
- When the set time elapses, the device switches off automatically. The drying / pressing process can be interrupted at any time by turning the timer (8) off.
- Remove the garment from the nylon balloon and hanger (2).
10.Pull the mains plug out of the plug socket and allow the device to cool down completely.
Tips
- The device is intended primarily for machine-spun laundry! If hand-washed or non-machine-spun laundry is to be ironed, first allow it to dry out a little first.
- The drying / ironing process takes around 10 minutes for a spun-dried shirt. However, the length of time can vary depending on the material and thickness of the material. We recommend that you start with a shorter time and extend it if necessary.
- The nylon balloon can be enlarged or reduced in size with the aid of the zip fasteners. For smaller sizes, the zip fasteners should be closed. For larger sizes, the zip fasteners should be opened on both sides.
- Wide-apart buttons may result in the button strip crimping slightly during ironing. Here it is advisable to smooth down the button strip again by hand immediately after the pressing process.
Cleaning and storage:
Caution
- Pull the main plug out of the plug socket and allow the device to cool down completely before doing any cleaning!
- Never immerse the device, the main cable or the main plug in water or other liquids!
- Do not use any corrosive or abrasive cleaning agents or cleaning pads to clean the device. These can damage the surface.
Steps
- Clean the device and the nylon balloon if necessary, with a slightly damp cloth and a little mild detergent if required. Then wipe down fully with a dry cloth.
- Allow all parts to dry completely before you put them away.
- Store the device in a clean, dry place that is protected from sunlight and is not accessible to children and animals.
Cleaning and storage:
If the device does not work properly, check whether you are able to rectify the problem yourself.
Do not attempt to repair a defective electrical device yourself!
| Problem | Possible cause / solution |
| The device does not work. The LEDs do no light up. | 1. Is the main plug inserted in the plug socket correctly? Correct the fit of the main plug. 2. Is the plug socket defective? Try another plug socket. 3. Check the fuse of the mains connection. 4. Is the device switched on? Set the timer (8) to a time. |
| Unusual noises | 1. Are the ventilation slots (9) covered up or blocked? Free up the ventilation slots (9). |
| The device switches off suddenly. | 1. Are the ventilation slots (9) covered up or blocked? Free up the ventilation slots (9). 2. The device has an automatic safety switch-off function. It switches off automatically if it overheats. Allow the device to cool down and switch it on again. 3. Has the device fallen over? The device has a protective switch that is activated if the device falls over. Set the de- vice up again and switch it back on. 4. Has the set time elapsed? Set the timer (8) to the time you want again. |
| Odor produced | 1. You might notice a slight odor caused by production residues the first time you use the device. However, this is harmless and will cease as you use the device. |
ENVIRONMENT
CAUTION:
Do not dispose of this product as it has with other household products. There is a separation of this waste product into communities, you will need to inform your local authorities about the places where you can return this product. In fact, electrical and electronic products contain hazardous substances that have harmful effects on the environment or human and should be recycled. The symbol here indicates that electrical and electronic equipment I be chosen carefully, a wheeled waste container is marked with a cross.
FRANÇAIS
Cher Client,