
UltraSonic Pulse V640 - Hi-fi system Auna - Free user manual and instructions
Find the device manual for free UltraSonic Pulse V640 Auna in PDF.

| Brand | Auna |
| Model | UltraSonic Pulse V640 |
| Product type | Portable hi-fi system with speaker |
| Article number | 10031878 |
| Dimensions (W x D x H) | 202 x 201 x 490 mm |
| Weight | 5.1 kg |
| Mains power supply | 100-240 V ~ 50/60 Hz |
| Power consumption | 30 W |
| RMS power | 40 W |
| Rechargeable battery | Li-ion 7.4 V, 2600 mAh |
| Charging via | USB-C 5 V / 2 A (cable included) |
| Charging time | Approximately 4 hours |
| Playback time | Approximately 2 hours |
| Wireless connectivity | Bluetooth (max. range 10 m) |
| TWS function | Yes (pairing of two speakers) |
| Audio inputs | USB (USB stick playback), AUX 3.5 mm, microphone 6.3 mm, guitar 6.3 mm |
| Sound settings | Master volume, mic volume, guitar volume, bass, treble, mic echo |
| Light effects | Flash light synchronized with music |
| Auto standby | After 15 minutes of inactivity |
| Minimum ventilation distance | 30 cm around the device |
| Included accessories | Wired microphone, USB-C charging cable |
Frequently Asked Questions - UltraSonic Pulse V640 Auna
User questions about UltraSonic Pulse V640 Auna
0 question about this device. Answer the ones you know or ask your own.
Ask a new question about this device
Download the instructions for your Hi-fi system in PDF format for free! Find your manual UltraSonic Pulse V640 - Auna and take your electronic device back in hand. On this page are published all the documents necessary for the use of your device. UltraSonic Pulse V640 by Auna.
USER MANUAL UltraSonic Pulse V640 Auna
Congratulations on purchasing this equipment. Please read this manual carefully and take care of the following hints on installation and use to avoid technical damages. Any failure caused by ignoring the items and cautions mentioned in the operation and installation instructions are not covered by our warranty and any liability. Scan the QR code to get access to the latest user manual and more product information.

TECHNICAL DATA
| Item number 10031878 | |
| Power requirement 100-240 V ~ | 50/60 Hz |
| RMS power 40 W | |
| Weight 3.18 kg | |
| Measurements 202 x 201 x 490 mm | |
SAFETY INSTRUCTIONS
CAUTION
TO REDUCE THE RISK OF ELECTRIC SHOCK, DO DOT REMOVE THE COVER (OR BACK). DO NOT OPEN THE UNIT. FOR SERVICE, PLEASE REFER TO QUALIFIED SERVICE PERSONNEL
- The apparatus shall not be exposed to dripping or splashing and that no objects filled with liquids, such as vases, shall be placed on the apparatus.
- Minimum distances 30cm around the apparatus for sufficient ventilation.
- The ventilation should not be impeded by covering the ventilation openings with items, such as newspapers, table-cloths, curtains, etc.
- No naked flame sources, such as lighted candles, should be placed on the apparatus.
- When the mains plug or an appliance coupler is used as the disconnect device, the disconnect device shall remain readily operable. To be completely disconnected the power input, the mains plug of apparatus shall be disconnected from the mains completely.
- The main plug of apparatus should not be obstructed or should be easily accessed during intended use.
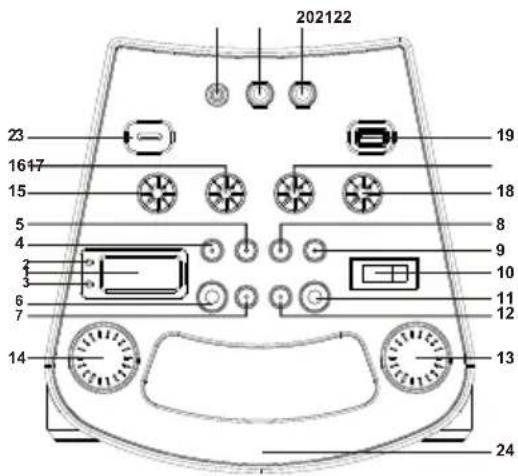
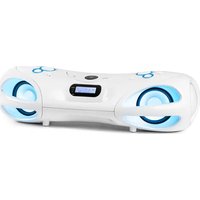
LOCATION OF CONTROLS
1 Display
2 Pair indicator
3 Charge indicator
4 P-mode button
5 Prev- button
6 Light button
7 Folder
8 Play/Pause/Pair/Scan button
9 Prev button
10 Power switch
11 Function/ button
12 Folder/10+ Button
13 Volume knob
14Guitar volume knob
15 Treble knob
16 Bass knob
17 Mic echo knob
18 Mic volume knob
19 USB port
20 6.3mm mic jack
21 6.3mm guitar jack
22 3.5mm aux in jack
23 5-V charging port
24 Handle
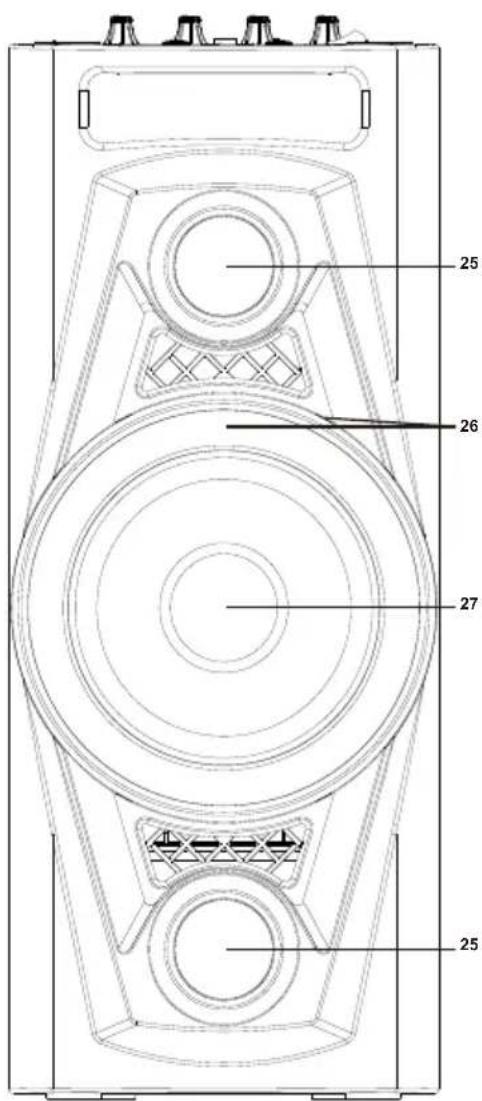
25 Tweeter
26 Flashing light
27 Speaker
29 Wired microphone
OPERATION
Power source
This unit works with a built-in 7.4V 2600mAh Li-ion battery, it can be recharged via DC 5V, 2A type C charging cable (included). Fully charge the unit (around 4 hours) before using the product for the first time. The playback time has about 2 hours after full charging. Unplug the type C charging cable from the DC socket to work on the battery pack after full charged. Plugging the type C charging cable while the battery pack is attached initiates the charging of this battery, the charge indicator will turn red, when the battery is fully charged, the charge indicator turn green. In low power, the charge indicator red light flash constantly.
Basic function
TURNING THE UNIT ON/OFF Press the power ON/OFF button to switch the unit on/off.
NOTE: When the unit is not providing the main function for 15 minutes, the unit will automatically switch into standby mode. To turn on the unit again, press FUNCTION/ button.
ESD hints : The product maybe reset or not reset to operation of control due to electrostatic discharge, just switch off and reconnect again.
Setting the function mode
To change the function modes, press the FUNCTION button to choose USB/ BT/AUX function.
Adjusting the volume
- Rotate the VOLUME knob on the unit to increase or decrease the music volume.
- Rotate the GUITAR VOL. knob on the unit to increase or decrease the guitar volume.
- Rotate the MIC VOL. knob on the unit to increase or decrease the microphone volume.
Bass adjustment
Rotate the BASS knob on unit to increase or decrease the bass effect that best matches the music style.
Treble adjustment
Rotate the TREBLE knob on unit to increase or decrease the treble effect that best matches the music style.
Microphone echo adjustment
MICROPHONE ECHO ADJUSTMENT
Rotate the ECHO knob on unit to increase or decrease the microphone echo effect that best matches the style.
Flash light
When the unit is on, there will be blue light around the speaker, press the LIGHT button once, the blue light flash along with the music rhythm. To disable the disco light, press the LIGHT button on unit until the display shows "OFF".
USB operation
This unit provides two USB port for music playback.
- Press the FUNCTION button on unit to select "USB" mode.
- Connect the USB memory stick to the USB port found on the front of the unit. Playback will start automatically from Track 1.
- To pause playback, press the PLAY/PAUSE/PAIR/SCAN button on unit. The current track No. and P will show on the display.
- To resume playback, press the PLAY/PAUSE/PAIR/SCAN button again
- To select a desired track, press the or button respectively during playing until the desired track appears on the display. The unit will start play automatically.
- To search for a particular passage during playback, press and hold the or button to scan the current playing track at high speed until desired point (passage) appears, then release the button for normal playback mode.
- To select a song which track number exceeds 10, press the FOLDER/10/M. + button or FOLDER/10/M. - button each time to skip forward/backward 10 tracks, then press the or button to select desired track.
- To select a desired folder (if the USB contains more than one folder), press and hold the FOLDER/10/M. + or FOLDER/10/M. - button each time to skip forward/backward a folder, then press the or button to select desired track.
Important note: The USB port is for data transfer only. Other devices cannot be used via this USB connection. The use of a USB extension cable is not recommended.
Repeat play
You can play one track or all tracks on the USB repeatedly
Repeat a single track
- Press P-MODE/M. button on unit during play, the display will show and the current track will be played over an over again.
- To cancel repeat play, press P-MODE/M. button on unit until disappears from the display..
Repeat all tracks
- Press P-MODE/M. button on unit until the C shows steadily on the display, all tracks on the USB will be played over and over again.
- To cancel repeat play, press the P-MODE/M. button on unit until disappears from the display.
Repeat the folder (only for USB which contains more than one folder)
- Press the P-MODE/M. button on unit until show steadily on the display, the current folder will be repeated over and over again.
- To cancel repeat play, press the P-MODE/M. button on unit until "FOLDER" Ctsappears from the display
Press the P-MODE/M. button on unit in play mode till the "RAND" shows steadily on the display, the random play will start from next track automatically. Press the P-MODE/M. button on unit again until the "RAND" disappears from the display to cancel.
BT operation
- Press the FUNCTION button on unit to switch to BT function, the LCD will display "bt" and the pair indicator will flash at high speed.
- Turn on the BT function on the device, scan the unit "PSS 35" and connect, then input the pass word "0000" (four zeroes) if required, the pair indicator keep light up to indicate connection done, and the display will show "bt". Press Play to start playback.
- Rotate the VOLUME knob on the unit or adjust the volume on the external device to increase or decrease the music volume to your desired level.
- Press and hold the PLAY/PAUSE/PAIR/SCAN button to disconnect BT.
Note: The BT works best within 10 meters
TWS operation
If you have two units of this model, you can connect the two units by TWS function to become stereo output.
- Connect the device to one of the units by Bluetooth function, this unit will become the master unit.
- Turn on the second unit and switch to Bluetooth mode, press and hold the "LIGHT/TWS" button on the master unit, then these two units will connect automatically with a sound indicated that the connection is done. The master unit will show "tS R" and the second unit will show "tS L", then these two units will become stereo output.
- Control of play, pause, next track and previous track can be done by both units. Rotate the volume knob on each unit to adjust the volume individually.
- To quit the TWS, press and hold the PLAY/PAUSE/PAIR button on the second unit to disconnect.
AUX-IN
- Press the FUNCTION button on unit to select "AUX" mode.
- Connect your audio device to the AUX IN jack found on the front of the unit with an AUX IN cable.
- Rotate the VOLUME knob on the unit or adjust the volume on the external device to increase or decrease the music volume to your desired level.
- Control playback with your audio device.
Mic jack operation
Microphone input is available in all modes.
- Connect your microphone to the 6.3mm MIC JACK found on the front of the unit.
- Rotate the MIC VOL. knob on the unit to increase or decrease the microphone volume
Guitar jack operation
Guitar input is available in all modes
- Connect your guitar to the 6.3mm Guitar JACK found on the front of the unit.
- Rotate the GUITAR VOL. knob on the unit to increase or decrease the guitar volume.
DISPOSAL CONSIDERATIONS


According to the European waste regulation 2012/19/EU this symbol on the product or on its packaging indicates that this product may not be treated as household waste. Instead it should be taken to the appropriate collection point for the recycling of electrical and electronic equipment. By ensuring this product is disposed of correctly, you will help prevent potential negative consequences for the environment and human health, which could otherwise be caused by inappropriate waste handling of this product. For more detailed information about recycling of this product, please contact your local council or your household waste disposal service.
DECLARATION OF CONFORMITY
Producer:

Chal-Tec GmbH, Wallstraße 16, 10179 Berlin, Germany.
This product is conform to the following European Directives:
2011/65/EU (RoHS)
2014/53/EU (RED)
The complete declaration of conformity of the manufacturer can be found at the following link: https://use.berlin/10031878
Chere cliente, cher client,
https://use.berlin/10031878
Estimado cliente:
- SAFETY INSTRUCTIONS
- CAUTION
- LOCATION OF CONTROLS
- OPERATION
- Power source
- Basic function
- Setting the function mode
- Adjusting the volume
- Bass adjustment
- Treble adjustment
- Microphone echo adjustment
- Flash light
- USB operation
- Repeat play
- Repeat a single track
- Repeat all tracks
- Repeat the folder (only for USB which contains more than one folder)
- BT operation
- TWS operation
- AUX-IN
- Mic jack operation
- Guitar jack operation
- DISPOSAL CONSIDERATIONS
- DECLARATION OF CONFORMITY
Brand : Auna
Model : UltraSonic Pulse V640
Category : Hi-fi system