CDC 100MP3 - Mp3 player OneConcept - Free user manual and instructions
Find the device manual for free CDC 100MP3 OneConcept in PDF.

User questions about CDC 100MP3 OneConcept
0 question about this device. Answer the ones you know or ask your own.
Ask a new question about this device
Download the instructions for your Mp3 player in PDF format for free! Find your manual CDC 100MP3 - OneConcept and take your electronic device back in hand. On this page are published all the documents necessary for the use of your device. CDC 100MP3 by OneConcept.
USER MANUAL CDC 100MP3 OneConcept
Berlin Brands Group UK Limited
PO Box 42
272 Kensington High Street
London, W8 6ND
United Kingdom
Dear Customer,
Congratulations on purchasing this device. Please read the following instructions carefully and follow them to prevent possible damages. We assume no liability for damage caused by disregard of the instructions and improper use. Scan the QR code to get access to the latest user manual and more product information.

CONTENTS
Safety Instructions 18
Device Overview 20
Getting Started 21
Operation 22
Care and Maintenance 26
Troubleshooting 26
Disposal Considerations 27
Manufacturer & Importer (UK) 27
TECHNICAL DATA
| Article number 10031564, 10031565, | 10031566 |
| Power supply Batteries: 2 x 1.5 V (type | LR6, AA) |
| Optional: Mains operation via a USB power supply unit at the USB connection (not included in the scope of delivery) | |
| CD player compatible formats CD, CD-R, CD-RW, MP3-CD | |
General safety instructions

CAUTION
Risk of injury! Do not listen to music at excessively high volumes as this may cause hearing damage.
- Children from the age of 8 and physically, sensory and mentally impaired persons may only use the device if they have been familiarised by a responsible person with its functions and understand the safety precautions in place as well as any associated risks.
- Only place CDs in the CD compartment.
- Never open the unit cover and never attempt to carry out repairs to the unit yourself.
- Contact qualified personnel for repairs. The device does not contain any user serviceable parts.
- Improper handling may damage the unit and invalidate the warranty.
Power connection
- Use only the power supply unit included in the scope of delivery. The use of any other power supply may invalidate the warranty and/or cause irreparable damage to the unit.
- Unplug the device during thunderstorms.
- Make sure that the unit has been switched off before unplugging it from the mains.
- If you are using a power strip or the plug as a disconnecting device, make sure that they are always easily accessible and ready for use.
- Never throw batteries into an open fire and never try to open their outer casing.
- Batteries are hazardous to health if swallowed and should therefore be stored out of the reach of small children.
Ventilation
- Do not block or cover the air vents, holes or openings of the appliance with objects such as rugs, cloths and the like, otherwise the functionality and/or ventilation cannot be guaranteed for safe use.
- The bottom of the unit may become warm if the unit is used for a long period of time. This is normal.
Location
- Make sure that the unit is placed on a flat and stable surface.
- Place the unit no more than 1.4 metres from the nearest power socket. Make sure that the mains power cable and the speaker cables cannot become a trip hazard.
- Place the unit at least one metre away from other electrical equipment to avoid noise interference.
- Position the unit so that it is within range of external BT devices (for example, iPod/ iPhone/iPad/ Android devices/ computers, etc.). The maximum range (without obstacles) is 10 metres (33 feet).
- Make sure that the unit has enough space upwards so that the antenna can be properly aligned.
- Never place the appliance directly on antique or polished surfaces.
Notes on the laser

CAUTION
Risk of injury! Never touch or look into the optical lens in the CD compartment.
This unit is a class 1 laser product
- Use of controls other than those specified in the instruction manual, or unauthorised modification of the unit, may result in harmful exposure to laser radiation.
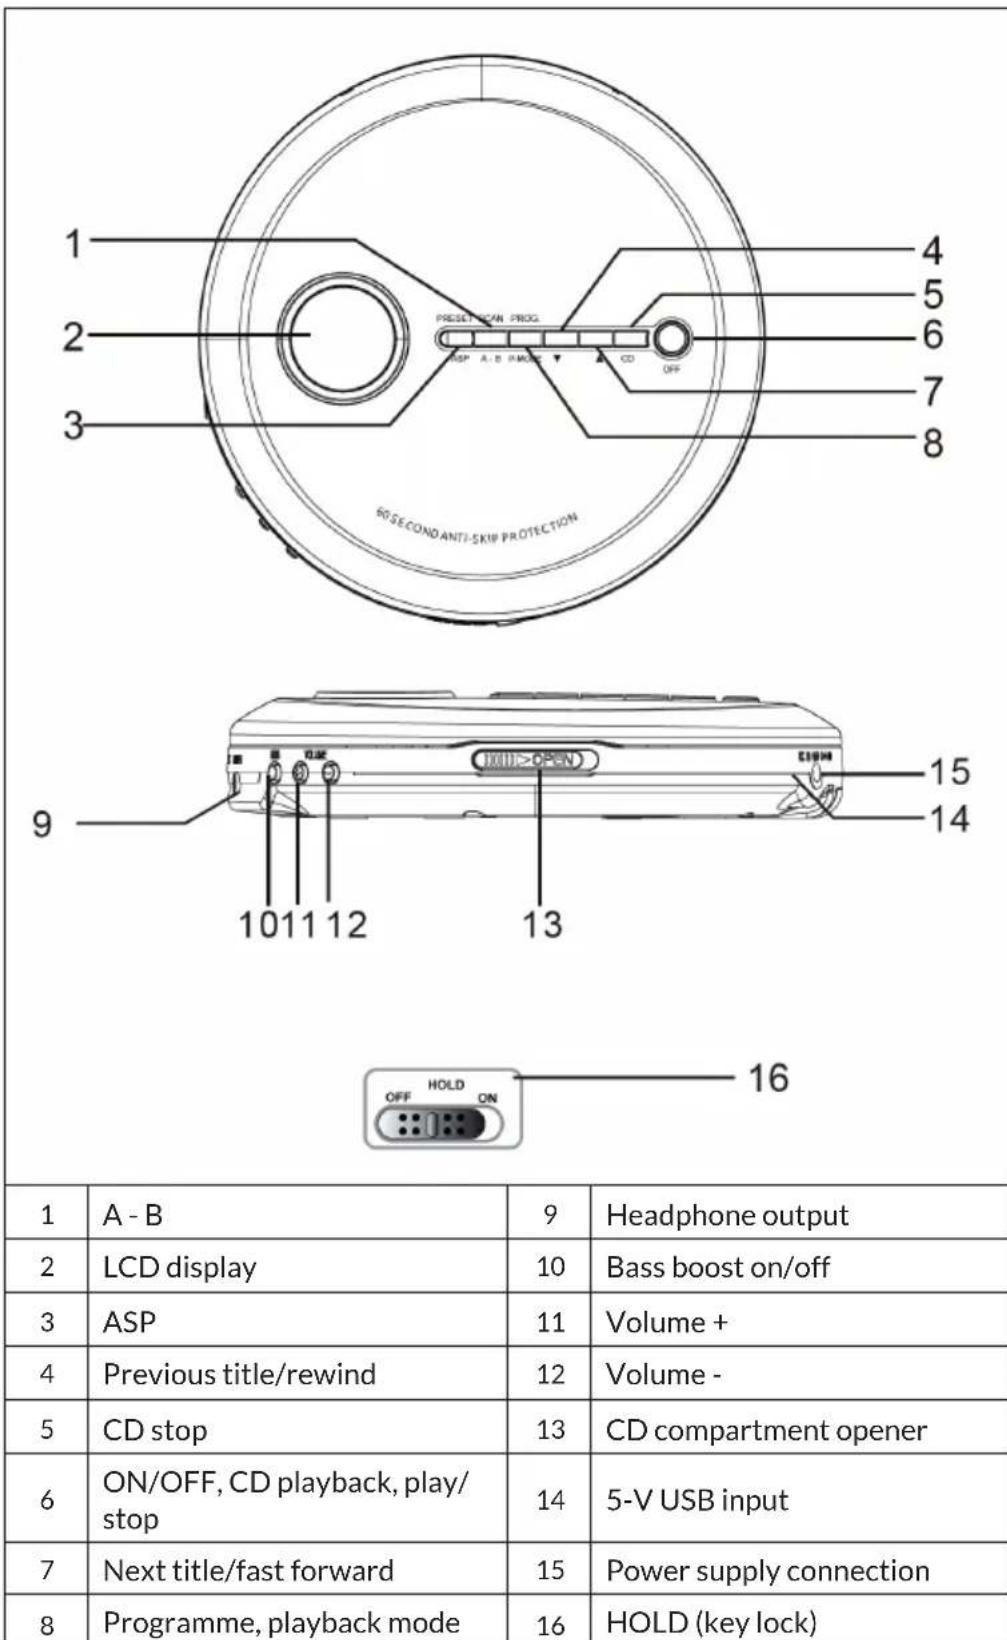
DEVICE OVERVIEW
GETTING STARTED
Power supply
This CD player is powered by two 1.5 V batteries (type LR6). Batteries are not included in the scope of delivery!
Inserting the batteries
- Open the battery compartment cover on the underside of the housing.
- Place two batteries in the battery compartment. Note the polarity marking on the battery compartment cover.
- Close the battery compartment.
Note: Make sure you insert the batteries the right way round. Incorrect polarity may damage the unit and void the warranty.
Notes on handling batteries
- There is a risk of explosion if the wrong type of battery is inserted. Always insert the correct battery type.
- Do not mix old batteries with new ones.
- Do not mix alkaline with zinc-carbon batteries or rechargeable batteries.
- Remove the batteries if the device will not be used for a long period of time. Old or leaking batteries can damage the unit and void the warranty.
- Do not attempt to charge batteries that are not rechargeable. They can overheat and burst. Follow the battery manufacturer's instructions.
- Do not throw batteries into a fire. The batteries could leak or explode.
Use of a USB power supply unit (not included in the scope of delivery)
- Before connecting the mains adapter to the power supply, make sure that the rated voltage of the unit matches the voltage of the power supply in the house.
- Connect the power supply unit to a wall socket.
- Insert the mains plug into the CD player.
Note: When the mains plug is connected, the power supply via the batteries is automatically disconnected and the CD player is now supplied via the mains plug.
Headphone connection
Insert the plug of the headphones (part of the delivery) into the audio socket.
Attention
- When using the headphones, avoid high volume for a long period of time. High volume over a long period of time can lead to hearing impairment.
- Do not use the headphones in road traffic as it may cause a traffic hazard and is against the law in these situations.
Operation of the CD player
The CD player in these units is designed to play all commercially available CDs. It reads self-made MP3, WAV and CD-R/CD-RW discs. However, the start of playback can take up to 10 seconds. If playback does not start, it is probably due to the quality of the CD-R/RW or the compatibility of the CD burner software. The manufacturer is not responsible for the playback quality of CD-R/RW discs. Do not attach covers or labels to any side of the CD. This can lead to malfunction.
OPERATION
Turning the device on and off
- Switching on: Press PLAY/PAUSE to turn the device on or off. The LCD display goes on the CD player reads the inserted disc. If the CD has been inserted or the inserted CD has an error, the display shows "no disc".
- Switching off: Press and hold the STOP button for three seconds in CD mode with the CD stopped. The display switches off.
Note: If the CD player is not in use for approx. 30 seconds, it switches off automatically.
Playback
- The CD player must be switched off. Slide the CD compartment opener sideways to the right to open the CD compartment.
- Insert a CD with the printed side facing up. Close the CD compartment.
- Press the PLAY/PAUSE button to start the unit. Now the number of titles and the total playing time are displayed alternately. The first title will be played back.
- To pause playback temporarily, press the PLAY/PAUSE button. The advanced playing time flashes in the display. Press the same button again to resume playback.
- To adjust the volume, turn the volume control up or down.
- Press the STOP button to stop playback.
- Do not open the CD compartment when a CD is being played.
- For bass amplification, press the BBS button.
- The power of the bass amplification decreases or increases depending on the volume setting.
Key lock
Move the HOLD slider on the back to the ON position to lock the buttons. Slide it to the OFF position to unlock the buttons again.
Information in the display when switching on
- The display shows the number of tracks and the total playing time When the disc starts playing, the display shows the first track number and the time position in the track.
- To see the total number of tracks and the total playing time, press the STOP button once.
During playback: The track number and the elapsed time are displayed. - During pause: When playback is paused, the elapsed time flashes.
- Low battery indicator: The low battery indicator appears.
Playback types
Normal playback
The whole CD is played and the CD player stops after the track is finished.
Fast forward and rewind
- During playback, press the button or to skip to the previous or next track.
- During playback or pause, press and hold or to rewind and fast-forward within the current track.
Each time you press the MODE button, the respective playback mode appears in the display:
REPEAT 1
The current track is repeated.
REPEAT ALL
All tracks on the CD are repeated.
To stop the repeat function, press the MODE button repeatedly until the symbol disappears.
RANDOM
The tracks on the CD are played in random order.
To stop random playback, press the MODE button repeatedly until the symbol no longer appears in the display.
Programme function
You can programme up to 20 tracks.
- With the CD player stopped, press the PROG button. Now the PROG number appears. The PROG symbol and the track number "01" flash.
- Press the FORWARD/BACK button to select the track.
- When the desired track is displayed, press the PROG button to save the track. The PROG number changes to "02". The track number returns to "00" and flashes together with "PROG".
- Repeat steps 2 and 3 to add more titles. Up to 20 titles can be programmed in the memory.
- Press the PLAY/PAUSE button to play the programme.
- To delete the programme, simply press the STOP button while the CD is stopped.
Anti-shock system
The CD player has shock protection to prevent interruption of CD playback in the event of shocks. The anti-shock system activates automatically when a CD is played. The display shows "ESP" and flashes.
When the anti-shock memory is full, it protects against interruptions in audio playback for approx. 60 seconds. If the CD player is subjected to shocks or fluctuations for longer than the memory lasts, interruptions will occur. This is normal and to be expected. The sound will return when the CD player is in a stable position again.
Note: The anti-shock system ensures continuous sound playback when the unit is subjected to shocks. It does not compensate for errors resulting from a defective, scratched or dirty CD.
CARE AND MAINTENANCE
Clean the device with a soft, damp (not wet) cloth. Never use detergents or solvents.
If there are drop-outs or interruptions in music playback, or if the CD does not start, you may need to clean the underside of the CD. Before playback, wipe the CD with a lint-free cloth from the inside to the outside.
Caution: Never allow water or other liquids to enter while cleaning the appliance.
TROUBLESHOOTING
| Problem Check | |
| The CD player is not working. • The CD was inserted the wrong way round. • CD is not properly seated on the drive plate. • Dirty or defective CD. Dirty lens. • CD compartment not closed. • Humidity or condensation: Let the CD player warm up to room temperature for over an hour. • The power supply unit (not included in delivery) has no power supply. The batteries are weak. • The unit has been switched off automatically. | |
| No sound through the headphones • The headphone plug is not firmly inserted into the jack socket. | |
| Noise • Dirty or defective CD. Dirty focusing lens. • The CD player is exposed to strong vibrations. • Low battery. Poor headphone connection. | |
DISPOSAL CONSIDERATIONS

If there is a legal regulation in your country regarding the disposal of electrical and electronic equipment, this symbol on the product or on the packaging indicates that this product must not be disposed of with household waste. Instead, it must be taken to a collection point for the recycling of electrical and electronic equipment. By disposing of this product in accordance with the regulations, you protect the environment and the health of those around you from negative consequences. For information on recycling and disposal of this product, contact your local government or household waste disposal service.
This product contains batteries. If there is a legal regulation in your country regarding the disposal of batteries, the batteries must not be disposed of in household waste. Consult your local regulations for the disposal of batteries. By disposing of this product in accordance with the regulations, you protect the environment and the health of those around you from negative consequences.
MANUFACTURER & IMPORTER (UK)
Manufacturer:
Chal-Tec GmbH, Wallstrasse 16, 10179 Berlin, Germany.
Importer for Great Britain:
Berlin Brands Group UK Limited
PO Box 42
272 Kensington High Street
London, W8 6ND
United Kingdom
Estimado cliente:
Berlin Brands Group UK Limited
PO Box 42
272 Kensington High Street
London, W8 6ND
United Kingdom
Cher client, chere clientele,
Berlin Brands Group UK Limited
PO Box 42
272 Kensington High Street
London, W8 6ND
United Kingdom
Gentile clientele,
PRODUTTORE IMPORTATORE (UK)
Produtlore:
Chal-Tec GmbH, Wallstraße 16, 10179 Berlin, Germania.
Berlin Brands Group UK Limited
PO Box 42
272 Kensington High Street
London, W8 6ND
United Kingdom
Geachte klant,
INSTRUCTIES VOOR AFVOER

Berlin Brands Group UK Limited
PO Box 42
272 Kensington High Street
London, W8 6ND
United Kingdom