
VaporChef - Steam oven Klarstein - Free user manual and instructions
Find the device manual for free VaporChef Klarstein in PDF.

| Product type | Steam oven |
| Brand | Klarstein |
| Model | VaporChef |
| References | 10036173 (31 L) / 10036174 (24 L) |
| Capacity | 31 L (ref. 10036173) or 24 L (ref. 10036174) |
| Net weight | 21.8 kg (ref. 10036173) / 19.5 kg (ref. 10036174) |
| Power supply | 220-240 V ~ 50/60 Hz |
| Total power | 2100-2400 W (ref. 10036173) / 1900-2200 W (ref. 10036174) |
| Steam power | 1100 W (ref. 10036173) / 950 W (ref. 10036174) |
| Water tank capacity | 1.45 L |
| Energy efficiency class | A |
| Energy consumption (conventional mode) | 0.64 kWh/cycle (ref. 10036173) / 0.59 kWh/cycle (ref. 10036174) |
| Energy consumption (fan-assisted mode) | 0.65 kWh/cycle (ref. 10036173) / 0.57 kWh/cycle (ref. 10036174) |
| Cooking programs | Steam, Grill, Grill+Steam, Air Fry, Defrost, Fermentation, Menu (31 recipes) |
| Temperature range | 30 °C to 230 °C (depending on program) |
| Timer | Up to 2 hours |
| Safety functions | Child lock, automatic shut-off, door switch |
| Cleaning | Descaling program (C1) and cavity cleaning (C2) |
| Included accessories | Rack, baking tray, roasting pan, water collection tray |
Frequently Asked Questions - VaporChef Klarstein
User questions about VaporChef Klarstein
0 question about this device. Answer the ones you know or ask your own.
Ask a new question about this device
Download the instructions for your Steam oven in PDF format for free! Find your manual VaporChef - Klarstein and take your electronic device back in hand. On this page are published all the documents necessary for the use of your device. VaporChef by Klarstein.
USER MANUAL VaporChef Klarstein
text_image
COOKINGCO COOKINGCO KINGCOOKING KINGCOOKING COOKINGCO KINGCOOKING KINGCOOKING KINGCOOKING
KLARSTEIN
www.klarstein.com

area
| Category | Value | | -------- | ----- | | A | 100 | | B | 100 | | C | 100 | | D | 100 | | E | 100 | | F | 100 | | G | 100 | | H | 100 | | I | 100 | | J | 100 | | K | 100 | | L | 100 | | M | 100 | | N | 100 | | O | 100 | | P | 100 | | Q | 100 | | R | 100 | | S | 100 | | T | 100 | | U | 100 | | V | 100 | | W | 100 | | X | 100 | | Y | 100 | | Z | 100 |text_image
QR code image containing encoded data, no visible human-readable textINHALTSVERZEICHNIS
PRODUKTDATENBLATT (10036173)
PRODUKTDATENBLATT (10036174)
text_image
Labeled diagram of a microwave oven with numbered components for identification②
③

④

5

text_image
Diagram of an electronic device interior with numbered parts labeled 1 to 4
text_image
BogenBEDIENFELD UND TASTENFUNKTIONEN

natural_image
Symbol of a trash bin crossed with a diagonal line, no text or labels presentBerlin Brands Group UK Limited
PO Box 42
272 Kensington High Street
London, W8 6ND
United Kingdom
Dear Customer,
Congratulations on purchasing this device. Please read the following instructions carefully and follow them to prevent possible damages. We assume no liability for damage caused by disregard of the instructions and improper use. Scan the QR code to get access to the latest user manual and more product information.

text_image
QR code image containing encoded data, no visible human-readable textCONTENTS
Product Data Sheet (10036173) 24
Product Data Sheet (10036174) 25
Safety Instructions 26
Product Overview 28
Shelves Installation 29
Control Panel and Button Functions 30
Displays and Programmes 31
Additional Operating Functions 36
Menu (Recipes) 38
Cleaning and Care 39
Troubleshooting 40
Disposal Considerations 42
Manufacturer & Importer (UK) 42
TECHNICAL DATA
| Item number 10036173 10036 | 174 | |
| Power supply 220-240 V ~ 50/60 Hz | ||
| Power consumption 2100-2400 | W 1900-2200 W | |
| Steam power 1100 W 950 W | ||
| Max. filling quantity water tank 1 | .45 | 1.45 | | |
PRODUCT DATA SHEET (10036173)
Information according to 65/2014
Supplier's trade mark: Klarstein
Supplier's model identifier: 10036173
Energy efficiency index(EEI cavity): 94.1
Energy efficiency class: A
Energy consumption per cycle in conventional mode and in fan-forced
convection mode in kWh: 0,64/0,65 kWh
Number of cavities: 1
Heat source: Electricity
Volume of the cavity in litres: 31 l
Information according to 66/2014
| Symbol Value Unit | |||
| Model identification | 10036173 | ||
| Type of oven | Domestic electric oven | ||
| Mass of the appliance | M 21.8 kg | ||
| Number of cavities | 1 | ||
| Heat source per cavity (electricity or gas) | Electricity | ||
| Volume per cavity | V 31 L | ||
| Energy consumption (electricity) required to heat a standardised load in a cavity of an electric heated oven during a cycle in conventional mode per cavity (electric final energy) | EC electric cavity | 0.64 kWh/cycle | |
| Energy consumption required to heat a standardised load in a cavity of an electric heated oven during a cycle in fan-forced mode per cavity (electric final energy) | EC electric cavity | 0.65 | |
| Energy consumption required to heat a standardised load in a gas-fired cavity of an oven during a cycle in conventional mode per cavity (gas final energy) | EC gas cavity | - | MJ/cycle kWh/cycle (1) |
| Energy consumption required to heat a standardised load in a gas-fired cavity of an oven during a cycle in fan-forced mode per cavity (gas final energy) | EC gas cavity | - | MJ/cycle kWh/cycle (1) |
| Energy Efficiency Index per cavity | EEI cavity 94.1 | ||
(1) 1 kWh/cycle = 3.6 MJ/cycle.
PRODUCT DATA SHEET (10036174)
Information according to 65/2014
Supplier's trade mark: Klarstein
Supplier's model identifier: 10036174
Energy efficiency index(EEI cavity): 87.7
Energy efficiency class: A
Energy consumption per cycle in conventional mode and in fan-forced
convection mode in kWh: 0,59/0,57 kWh
Number of cavities: 1
Heat source: Electricity
Volume of the cavity in litres: 24 l
Information according to 66/2014
| Symbol Value Unit | |||
| Model identification | 10036174 | ||
| Type of oven | Domestic electric oven | ||
| Mass of the appliance | M 19.5 kg | ||
| Number of cavities | 1 | ||
| Heat source per cavity (electricity or gas) | Electricity | ||
| Volume per cavity | V 24 L | ||
| Energy consumption (electricity) required to heat a standardised load in a cavity of an electric heated oven during a cycle in conventional mode per cavity (electric final energy) | EC electric cavity | 0.59 kWh/cycle | |
| Energy consumption required to heat a standardised load in a cavity of an electric heated oven during a cycle in fan-forced mode per cavity (electric final energy) | EC electric cavity | 0.57 | |
| Energy consumption required to heat a standardised load in a gas-fired cavity of an oven during a cycle in conventional mode per cavity (gas final energy) | EC gas cavity | - | MJ/cycle kWh/cycle (1) |
| Energy consumption required to heat a standardised load in a gas-fired cavity of an oven during a cycle in fan-forced mode per cavity (gas final energy) | EC gas cavity | - | MJ/cycle kWh/cycle (1) |
| Energy Efficiency Index per cavity | EEI cavity 87.7 | ||
(1) 1 kWh/cycle = 3.6 MJ/cycle.
SAFETY INSTRUCTIONS
General Information
- Never wash the cabinet with running water to prevent damage to the electrical components.
• To prevent electric shock, do not allow water or other liquids to enter the appliance. - Children over the age of 8 and persons with reduced physical, sensory or mental capabilities or those with a lack of experience and knowledge may only use the appliance if they are instructed on how to do so by a person responsible for their safety, or if they are supervised and understand the hazards associated with the use of the appliance.
- Keep children supervised so that they do not play with the appliance.
- Cleaning and maintenance of the appliance may only be carried out by children under supervision.
- Check the voltage specified on the rating plate before use. Only connect the appliance to sockets that match the voltage of the appliance.
- Do not use this appliance if the plug, power cord, or appliance is damaged.
- If the power cord or plug is damaged, it must be replaced by the manufacturer, an authorized service centre, or a similarly qualified person.
- Do not allow children to play with the appliance.
- Do not handle the plug or control panel with wet hands.
- Do not place this appliance on or near tablecloths, curtains, wallpaper or other combustible materials and objects.
- Install the appliance on a dry, flat surface and leave at least 10 cm of space around the appliance on all sides so that the air can circulate sufficiently. Do not place any objects on top of the appliance.
- Do not leave the appliance unattended during use.

CAUTION
Danger of burns! Hot steam may escape when the oven door is opened. Keep a safe distance to avoid scalding.
- Do not stuff any foreign matter into door lock switch of the oven door.
- The recommended temperature probe to this oven must be used
- Do not use a steam cleaner for cleaning.
- Make sure that the appliance is switched off and unplug the mains plug from the socket before replacing the lamp to avoid electric shock.
- Do not install the appliance in a cabinet, as it may overheat.
Instructions for Safe Use

CAUTION
Danger of burns! The appliance becomes hot during use. Take care not to touch the heating elements inside the oven and use oven gloves.
- Before cleaning, unplug the appliance from the wall outlet and allow it to cool completely.
- Do not plug the appliance into an outlet that is already connected to other kitchen appliances.
- Clean the door panel of the oven with a soft and damp cloth. Do not use abrasives or metal scrapers as they will scratch the surface.
- Do not connect the appliance to external timers or remotely controlled power sockets.
- Before use, check that your cookware is suitable for this appliance. We recommend that you use heat-resistant glass containers or ceramic containers. Fill the container to a maximum of two thirds.
- Do not overfill the water tank. When filling, use the MAX mark in the tank as a guide.
- Do not place any containers on the open oven door.
- Do not heat food in a sealed container, otherwise the container may explode. Transfer the food into a heat-resistant container before heating.
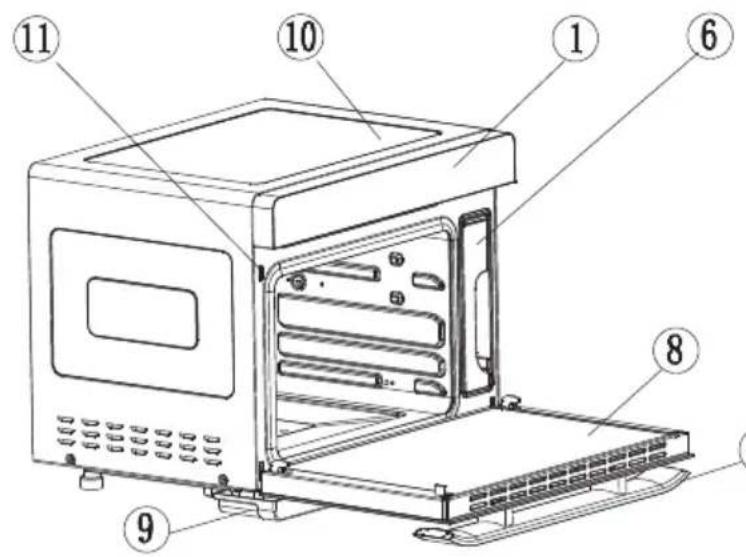
PRODUCT OVERVIEW
text_image
Labeled diagram of a microwave oven with numbered components for identification②

③

④

5

| 1 | Control panel | 7 | Handle |
| 2 | Rotisserie (40 l/36 l) | 8 | Door |
| 3 | Rotisserie handle (40 l/36 l) | 9 | Water tray |
| 4 | Grill | 10 | Body |
| 5 | Baking tray | 11 | Door switch |
| 6 | Water tank |
Note: Make sure that the water level in the water tank is always above the minimum mark. Leave the water tank in the oven all the time the appliance is in operation.
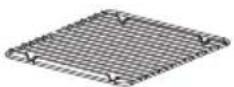
SHELVES INSTALLATION
There are four layers of shelves. Select the appropriate shelf according to the dish or recipe. Make sure that the bulge on the grill rack is pointing downwards and slide it into the oven at the desired shelf layer.
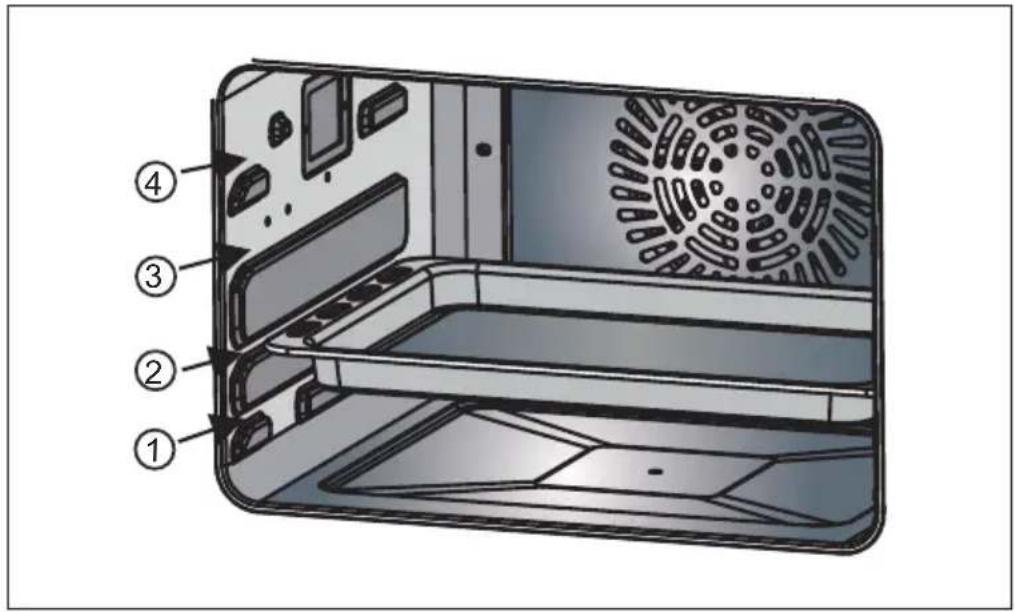
text_image
Diagram of an electronic device interior with numbered parts labeled 1 to 4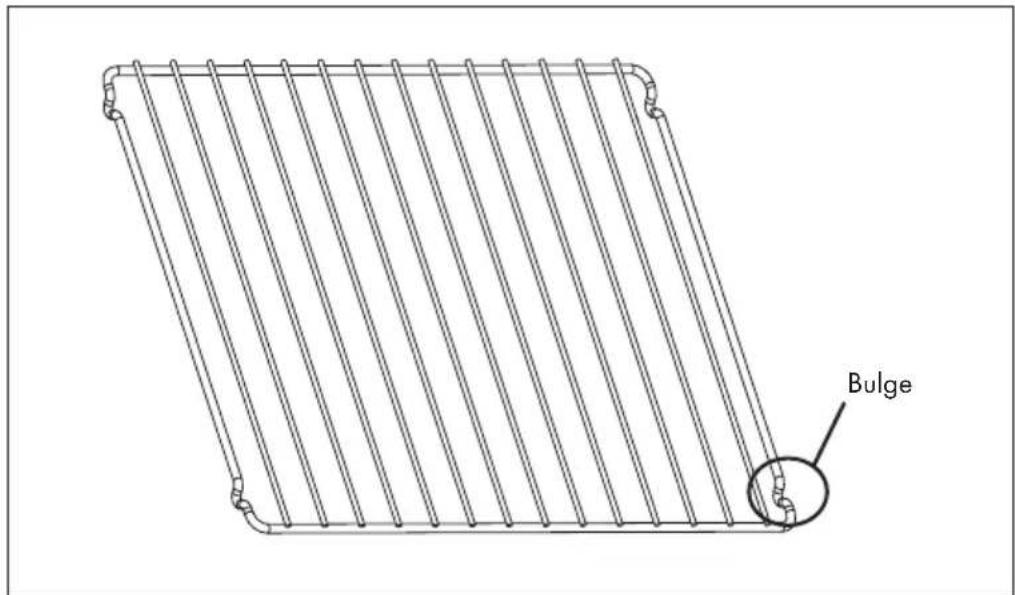
text_image
BulgeCONTROL PANEL AND BUTTON FUNCTIONS

| Buttons Function Description | |
Power On/Off | After switching on for the first time, a beep sounds and the indicator light lights up. Now press the [On/Off button]to enter the function selection mode.If no function is selected within 5 minutes, all settings are deleted and the appliance is put into standby mode. |
Setup/Child Lock | 1. Setup:In the programmes “Steam” Grill, Air Fryeror “Grill and Steam” the [Setup/Child Lock button] lights up. When you press the button, the Time-LED and the [Start/Pause knob] flash simultaneously. Turn the knob to set the temperature and time. Then press the [Start/Pause knob] confirm the setting. If you wait too long, the time LED and the [Start/Pause knob] flash simultaneously for 5 seconds and then the setting is automatically confirmed and saved.When you select the “Menu” programmerswitching on the appliance, the [Setup/Child Lock button]lights up. This button can be used to set the cooking time according to the amount of food. This is only possible once for a recipe, then the [Settings/Child Lock button] goes out and the time cannot be set again for that mode2. Child Lock:The child lock can be activated in all programmes. Press the [Setup/Child Lock button] when it is lit) for 3 seconds. The [Child Lock indicator] lights up, which means the child lock is activated. If you press the [Setup/Child Lock button] again for 3 seconds, the child lock is deactivated. |
Start/Pause(Knob) | Press the [Start/Pause knob] #ll start or pause the appliance.Turn the [Start/Pause knob] to select one of the following programmes: "Steam", "Grill", "Grill and Steam", "Air Fryer", "Menu", "Cleaning", "Unfreezing" or "Fermenting".Turn the [Start/Pause knob] to set the time and temperature in the different programmes and functions.When the [Start/Pause knob] is flashing, pressing or turning the knob confirms or adjusts the setting of the selected programmes or functions.When the appliance is in operation, the [Start/Pause knob] lights up |
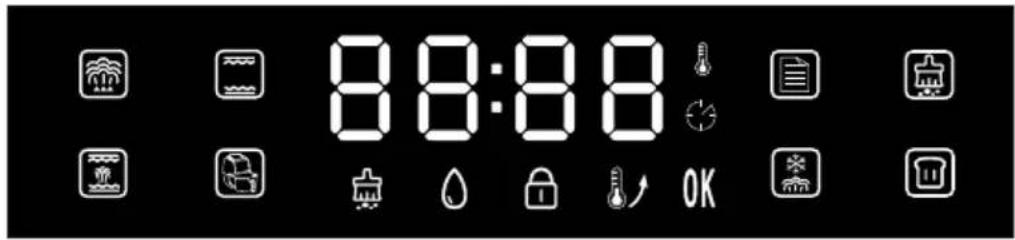
DISPLAYS AND PROGRAMMES
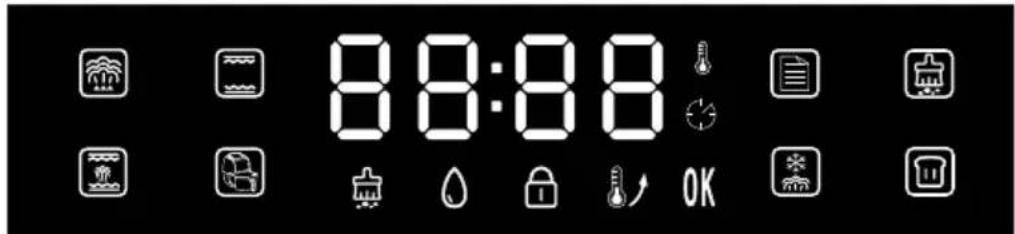
text_image
8:8:88 OK| Programmes | Function Description |
Steam | The main function is steaming. The preset time is 30 minutes and the temperature is 100 ^ .When you select the "Steam" programme, the [Steam indicator]and the [Start/Pause knob]flash. Press the [Start/Pause knob]to confirm the programme selection and enter the setting mode.The [Start/Pause knob]dan then be used to set a time between 1 minute and 2 hours. Press the [Start/Pause knob]to confirm the time setting. Now you can set the temperature. A temperature between 100 ^ and 110 ^ can be set. After setting the temperature, press the [Start/Pause knob]to confirm. If you now press the [Start/Pause knob]again, the appliance starts operation and the countdown begins. |
Grill | In the "Grill" programme, both top and bottom heat are used. Part of the programme is the "Preheat" function Wait until the preheating is finished before putting food into the oven. The preset time is 30 minutes and the temperature is 180 °C.Use the [Start/Pause knob] set a time between 1 minute and 2 hours. Press the [Start/Pause knob] confirm the time setting. Now you can set the temperature. A temperature between 100 °C and 230 °C can be set. Press the [Start/Pause knob] confirm. The appliance starts operation.After the "Grill" programme has been started, the [Preheat indicator] lights up. The oven is now preheating. Once preheating is finished, the [Preheat indicator] goes off and the appliance beeps 10 times to remind you to put food in the oven. As soon as preheating is finished, the grill function starts automatically. |
Grill and Steam | The main function of this programme is the grill function. In addition to the grill function, the oven emits some steam. This cooks the food faster without drying it out. The preset time is 30 minutes and the temperature is 180 °C. Use the [Start/Pause knob] to set a time between 1 minute and 2 hours. Press the [Start/Pause knob] confirm the time setting. Now you can set the temperature. A temperature between 120 °C and 230 °C can be set. Press the [Start/Pause knob] to confirm. The appliance will now start operation. |
Air Fryer | In the "Air Fryer" function, the rear heater runs with circulating air. The preset time is 30 minutes and the temperature is 180 °C.Use the [Start/Pause knob] to set a time between 1 minute and 2 hours. Press the [Start/Pause knob] to confirm the time setting. Now you can set the temperature. A temperature between 100 °C and 230 °C can be set. Press the [Start/Pause knob] confirm. The appliance will now start operation.When the appliance starts, the [Preheat indicator] lights up. The oven is now preheating. When preheating is finished, the [Preheat indicator] goes off and the appliance beeps 10 times to remind you to put food in the oven. Once preheating is finished, the countdown of the "Air Fryer" function starts automatically. |
Menu | You can select from 31 recipes with the [Menu button] when the [Menu button] pressed, the [Menu indicator] and the [Start/Pause knob] flash simultaneously. "F-00" is shown on the LED display. Press the [Start/Pause knob] enter the menu selection. Turn the [Start/Pause knob] display the recipes one after the other ("F-01", "F-02" ... "F-31"). Press the [Start/Pause knob] to select a recipe.When a recipe is selected, the [Setup/Child Lock button] lights up after the start. This button can be used to adjust the cooking time according to the amount of food. For a recipe, the time can only be adjusted once at a time during operation. Afterwards, the [Setup/Child Lock button] light goes out and the time cannot be adjusted again until the cooking of the selected recipe is finished. |
Unfreezing | When you select the "Unfreezing" function, the [Unfreezing indicator] and the [Start/Pause knob] flash. Press the [Start/Pause knob] and turn it to set a time between 5 minutes and 2 hours. Press the [Start/Pause knob] confirm the time setting. Now you can set the temperature. A temperature between 50 °C and 60 °C can be set. Then press the [Start/Pause knob] confirm. The appliance now starts operation with the countdown.The preset time is 20 minutes and the temperature is 55 °C. |
Fermenting | When you select the "Fermenting" function, the [Fermenting indicator] and the [Start/Pause knob] light up. The preset time is 40 minutes and the temperature is 40 °C. The [Start/Pause knob] dan then be used to set a time between 5 minutes and 2 hours. Press the [Start/Pause knob] confirm the time setting. Now you can set the temperature. A temperature between 30 °C and 50 °C can be set. Press the [Start/Pause knob] confirm. The appliance will now start operation. |
Cleaning
- The cleaning function can be used to remove scale after using the oven. When you have selected the "Cleaning" programme, the [Cleaning indicator] and the [Start/Pause knob] light up. Press the [Start/Pause knob] to confirm and select the desired cleaning mode "C1" or "C2".
C-1: Scale removal from the steam generator in 50 minutes. C-2: 25 minutes and 100 °C for cleaning the oven cavity or disinfecting appliances.
Scale removal in cleaning mode "C-1":
- When the total operating time of the evaporator's heating pipe has reached 100 hours, the appliance reminds you that the scale must be removed from the evaporator (the descaling function can be started automatically by you at any time). The [Cleaning indicator] flashes.
- Prepare the descaling solution in a ratio of 1:8 (descaler: water). Pour the solution into the water tank after mixing it carefully. The level of the descaling solution must be above the minimum mark of the water tank.
- When 20 minutes remain, the appliance reminds you to remove the water tank from the appliance, pour out the descaling solution remaining in it and replace it with clean water. The [Cleaning indicator] flashes and the appliance beeps several times. After the water tank has been replaced, cleaning continues. When 10 minutes remain, the appliance reminds you to remove the water tank from the appliance and replace the water inside with clean water. When the water tank has been replaced, the appliance continues cleaning. When the descaling process is completed, the [Cleaning indicator] lights up permanently.
| Display indicators Functional description | |
Lack of Water | If the appliance is started in any programme and there is no or very little water in the water tank, the oven stops operating and the [Lack of Water indicator] flashes. The appliance beeps 10 times. All buttons are deactivated. After you have filled the water tank with water, the oven resumes operation and cooking continues. |
Preheat | When the [Preheat indicator] lights up, the oven is preheating. As soon as the preheating process is finished, the indicator goes out. |
End of Programme | When a programme is completed, the display shows “END” and the indicator lights up. |
Child Lock | When the [Child Lock indicator] lights up, it means that the child lock is activated. Press the [Setup/Child Lock button] for 3 seconds to deactivate the child lock. The display goes out. |
Cleaning | If the [Cleaning indicator] lights up continuously, it means that the appliance is being descaled. The [Cleaning indicator] goes out as soon as the descaling process is completed. |
ADDITIONAL OPERATING FUNCTIONS
Cooking Process 1.
Pause
- When the appliance is in operation and you press the [Start/Pause knob] the time LED light and the [Start/Pause knob] flash. The cooking process is paused, the countdown is temporarily stopped and the display continues to show the operating status. If you press the [Start/Pause knob] again, cooking will continue until the countdown has finished.
- If you open the oven door during cooking, the cooking process is interrupted, the countdown is temporarily stopped and the display continues to show the operating status. The time LED and the [Start/Pause knob] flash. When you close the oven door again, the cooking process will continue until the countdown is over.
2. Time and Temperature setting
During cooking, you can adjust the cooking time and temperature as follows:
- When you press the [Setup/Child Lock button] ,the digits of the minutes display flash. Set the minutes by turning the [Start/Pause knob] and confirm your entry by pressing the [Start/Pause knob] . Note: It is not possible to set the hours).
- After setting the minutes, you can set the temperature by turning the [Start/Pause knob] Press the [Start/Pause knob] confirm your entry. If no temperature adjustment is necessary, you can also press the [Start/Pause knob] directly after setting the minutes.
- After you have selected a recipe in the Menu the [Setup/Child Lock button] lights up after the start. With this button you can adjust the cooking time according to the amount of food. The time can only be adjusted once for each recipe, then the [Setup/Child Lock button] light goes out. It is not possible to adjust the cooking time again.
| Inside Lighting | When the oven is started, the furnace light is on for 3 minutes and then goes off again automatically.When you open the oven door, the furnace light comes on and then switches off again automatically after 3 minutes. When you close the oven door, the furnace light also goes off after 3 minutes.If you turn the knob once in standby mode or during operation, the furnace light comes on for 3 minutes and then switches off again automatically. |
| Open and Close Door | If you open the oven door during operation, the appliance stops and pauses. As soon as you close the door again, operation resumes automatically. |
| End of Cooking | When the oven has finished cooking, the appliance beeps 10 times. The display shows „END“ and This means the cooking process or recipe is finished. |
MENU (RECIPES)
The settings listed in the table for the different foods are for reference only. If more food is to be cooked or food is placed on more than one layer, the cooking time must be adjusted. Adjust the time with the [Setup/Child Lock button]
| Code | F-01 | F-02 | F-03 | F-04 | F-05 | F-06 | F-07 | F-08 | F-09 |
| Food Style | Steam Vegetable | Steam Rice | Steam Fish | Steam Shrimp | Steam Crab | Steam Eggs | Steam Chicken | Steam Papaya | Roast Chicken |
| Time (min.) | 16 | 50 | 20 | 15 | 30 | 18 | 30 | 35 | 45 |
| Temperature (°C) | 100 | 100 | 100 | 100 | 100 | 100 | 100 | 100 | 230 |
| Weight (g) | 600 | 200 | 600 | 500 | 800 | 300 | 800 | 400 | 1000 |
| Code | F-10 | F-11 | F-12 | F-13 | F-14 | F-15 | F-16 | F-17 | F-18 |
| Food Style | Roast Steak | Roast Muttons | Roast Ribbs | Roast Salmon | Roast Chicken legs | Roast Chicken wings | Roast Saury | Roast Chips | Roast Shrimp |
| Time (min.) | 13 | 35 | 20 | 22 | 26 | 23 | 20 | 18 | 15 |
| Temperature (°C) | 230 | 200 | 210 | 210 | 210 | 210 | 220 | 220 | 180 |
| Weight (g) | 600 | 600 | 500 | 400 | 750 | 500 | 600 | 500 | 400 |
| Code | F-19 | F-20 | F-21 | F-22 | F-23 | F-24 | F-25 | F-26 | F-27 |
| Food Style | Roast Sausages | Roast Bacon | Roast Pizza | Mini Pizza | Baguette bread | Chiffon cake | Yoghurt cheese cake | Puff | Cookies |
| Time (min.) | 13 | 11 | 22 | 18 | 16 | 50 | 60 | 32 | 14 |
| Temperature (°C) | 200 | 200 | 180 | 180 | 180 | 150 | 150 | 180 | 180 |
| Code | F-28 | F-29 | F-30 | F-31 | |||||
| Food Style | Egg tart | Roast Almond | Roast Walnut | Make Yoghurt | |||||
| Time (min.) | 22 | 10 | 12 | 480 | |||||
| Temperatur (°C) | 180 | 140 | 160 | 45 | |||||
CLEANING AND CARE
- Before cleaning, switch off the appliance and disconnect the mains plug from the socket.
- Do not clean the surface of the appliance with metal tools or abrasive cleaners as this may damage the coating.
- Clean the inside of the oven regularly. Remove food or grease splashes on the inside wall of the oven with a damp cloth. For stubborn dirt, a mild cleaning solution can also be used.
- It is recommended to fill the water tank with drinking water or distilled water. If tap water is used, limescale residue will occur after prolonged use of the appliance.
- Check the water tank regularly. Remove it horizontally. Clean it and dry it with a soft cloth. After cleaning, put the water tank back in its original position.
- Remove any residual water in the water tank after you have finished cooking.
- Clean the oven seal regularly with a soft and dry cloth.
- Unplug the appliance from the mains, clean the entire appliance, empty the water tank and place the appliance in a clean and dry place if you are not going to use it for a long period of time.
- The appliance must be repaired by the manufacturer, the after-sales service or a similarly qualified person if it malfunctions. Never attempt to carry out the repair yourself.
- Do not clean the glass door of the appliance with aggressive cleaning agents or sharp metal scrapers as this may damage the glass.
- Unplug the appliance from the mains before cleaning the appliance or replacing the light bulb.
- Do not use a steam cleaner to clean the appliance.
TROUBLESHOOTING
| Problem Possible Cause Suggested Solution | ||
| E01 | Open circuit of the top sensor | Stop operation, open the oven door and let the appliance cool down for 10 minutes. Restart the appliance or contact the customer service. |
| E02 | Short circuit of the top sensor | |
| E03 | Open circuit of the bottom sensor | |
| E04 | Short circuit of the bottom sensor | |
| E05 | Open circuit of the evaporating heater sensor | Contact the customer service. |
| E06 | Short circuit of the evaporating heater sensor | Contact the customer service. |
| No display is shown on the screen. | Check that the mains plug is plugged in. | Insert the mains plug into the socket. |
| Display panel is in poor contact. | Contact the customer service. | |
| The oven lamp does not light up. | The oven lamp is damaged. | Replace the oven lamp or contact the customer service. |
| Poor contact. | Contact the customer service. | |
| Fan does not work | Poor contact. Contact the customer service. | Contact the customer service. |
| Fan is damaged | ||
| No response from the buttons. | The control panel is broken or the key lock is active. | Deactivate the key lock or contact the customer service. |
| The time LED flashes, all other buttons do not react. | Make sure that there is enough water in the water tank and that it is correctly inserted into the appliance. | |
| No steam | Water pipe is blocked. | Contact the customer service. |
| Evaporator heater is damaged. | ||
| Water intake system is damaged. | ||
| Steam oven does not work. | Door is not closed tightly. Close the door properly. | |
| Poor contact of door control switch. | Contact the customer service. | |
| Steam leakage from oven door | Door is not closed tightly Close the door properly. | |
| Door sealant is off or damaged. | Replace the door seal or contact the customer service. | |
| The oven releases steam when steam pressure is too big. | That is normal. | |
DISPOSAL CONSIDERATIONS
natural_image
Symbol of a trash bin crossed with a diagonal line, no text or labels presentIf there is a legal regulation for the disposal of electrical and electronic devices in your country, this symbol on the product or on the packaging indicates that this product must not be disposed of with household waste. Instead, it must be taken to a collection point for the recycling of electrical and electronic equipment. By disposing of it in accordance with the rules, you are protecting the environment and the health of your fellow human beings from negative consequences. For information about the recycling and disposal of this product, please contact your local authority or your household waste disposal service.
MANUFACTURER & IMPORTER (UK)
Manufacturer:
Chal-Tec GmbH, Wallstrasse 16, 10179 Berlin, Germany.
Importer for Great Britain:
Berlin Brands Group UK Limited
PO Box 42
272 Kensington High Street
London, W8 6ND
United Kingdom
Chère cliente, cher client,
text_image
QR code image containing encoded data, no visible human-readable textSOMMAIRE
FICHE DE DONNÉES PRODUIT (10036174)
(1) 1 kWh/cycle = 3,6 MJ/cycle.
CONSIGNES DE SÉCURITÉ
Consignes générales
text_image
Labeled diagram of a microwave oven with numbered components for identification②

③

④
5

text_image
Diagram of an electronic device interior with numbered parts labeled 1 to 4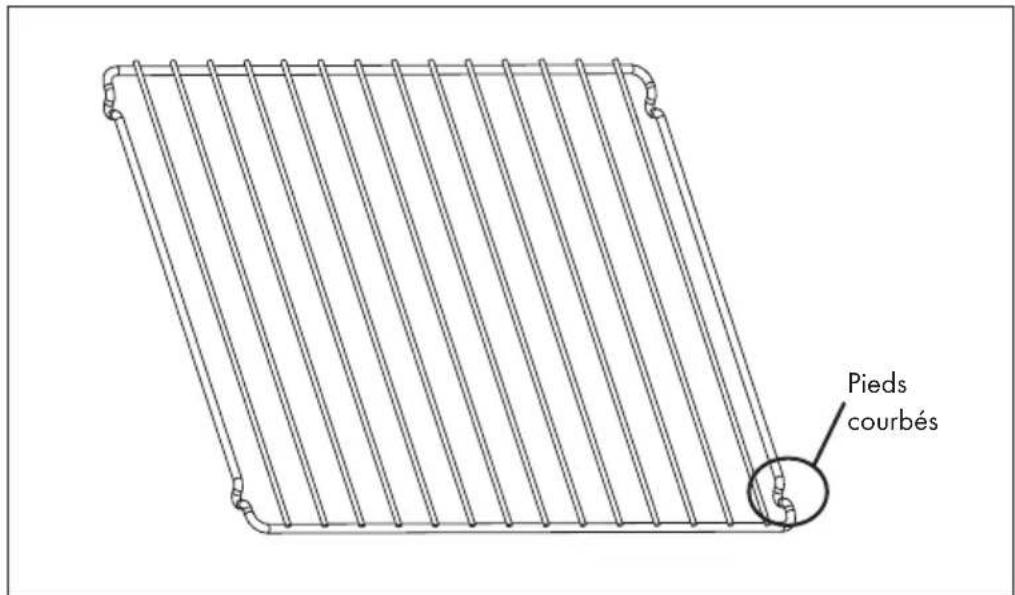
text_image
Pieds courbésPANNEAU DE COMMANDE ET FONCTIONS DES TOUCHES

natural_image
Symbol of a trash bin crossed with a diagonal line, no text or numbers presentBerlin Brands Group UK Limited
PO Box 42
272 Kensington High Street
London, W8 6ND
United Kingdom
Estimado cliente,
text_image
QR code image containing encoded data, no visible human-readable textÍNDICE
text_image
Labeled diagram of a microwave oven with numbered components for identification②

③

④

5

text_image
Diagram of an electronic device interior with numbered parts labeled 1 to 4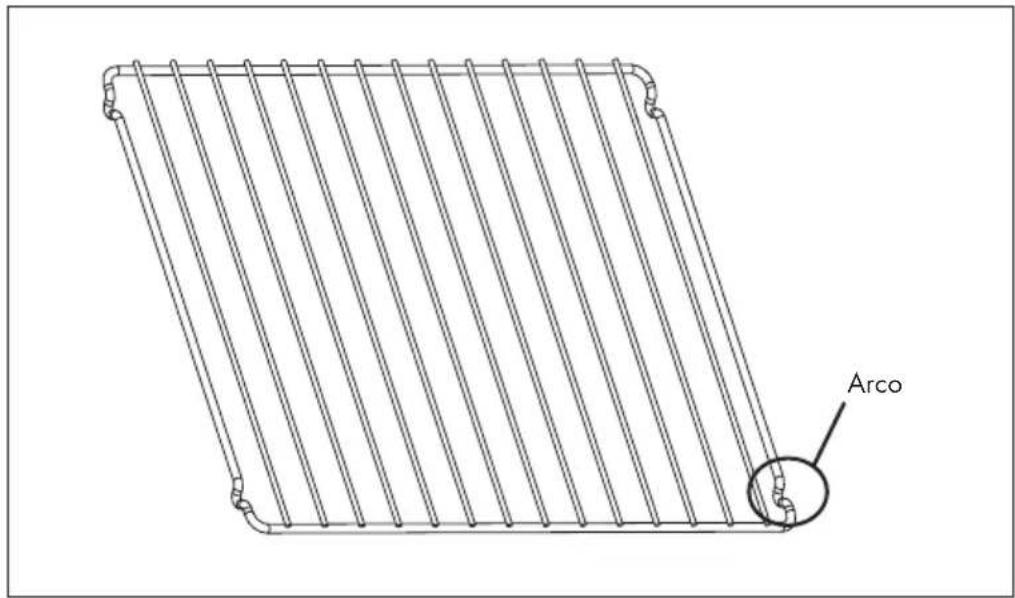
text_image
Arcotext_image
8:0:88 OKnatural_image
Symbol of a trash bin crossed with a diagonal line, no text or labels presentBerlin Brands Group UK Limited
PO Box 42
272 Kensington High Street
London, W8 6ND
United Kingdom
Gentile Cliente,
text_image
QR code image containing encoded data, no visible human-readable textINDICE
Dati tecnici 83
text_image
Labeled diagram of a microwave oven with numbered components for identification②

③

④

5

text_image
Diagram of an electronic device interior with numbered parts labeled 1 to 4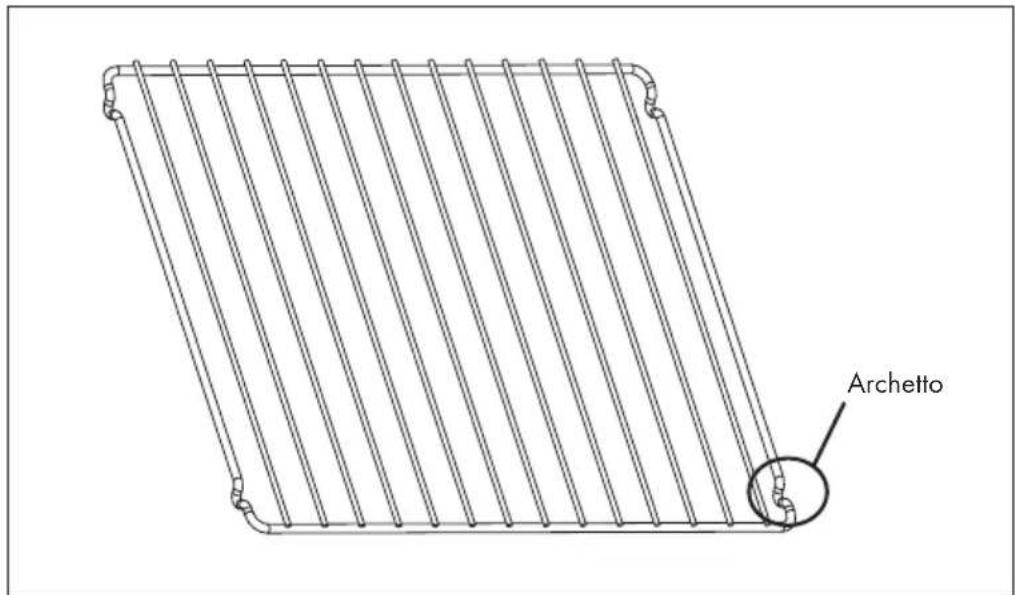
text_image
Archettonatural_image
Symbol of a trash bin crossed with a diagonal line, no text or numbers presentPRODUTTORE E IMPORTATORE (UK)
Produttore:
Chal-Tec GmbH, Wallstraße 16, 10179 Berlin, Germania.
Berlin Brands Group UK Limited
PO Box 42
272 Kensington High Street
London, W8 6ND
United Kingdom
Geachte klant,
text_image
QR code image containing encoded data, no visible human-readable textINHOUDSOPGAVE
Productinformatieblad (10036173) 104
Productinformatieblad (10036174) 105
text_image
Labeled diagram of a microwave oven with numbered components for identification②

③

④

5
text_image
Diagram of a device interior with numbered parts labeled 1 to 4, showing internal compartments and casing structure.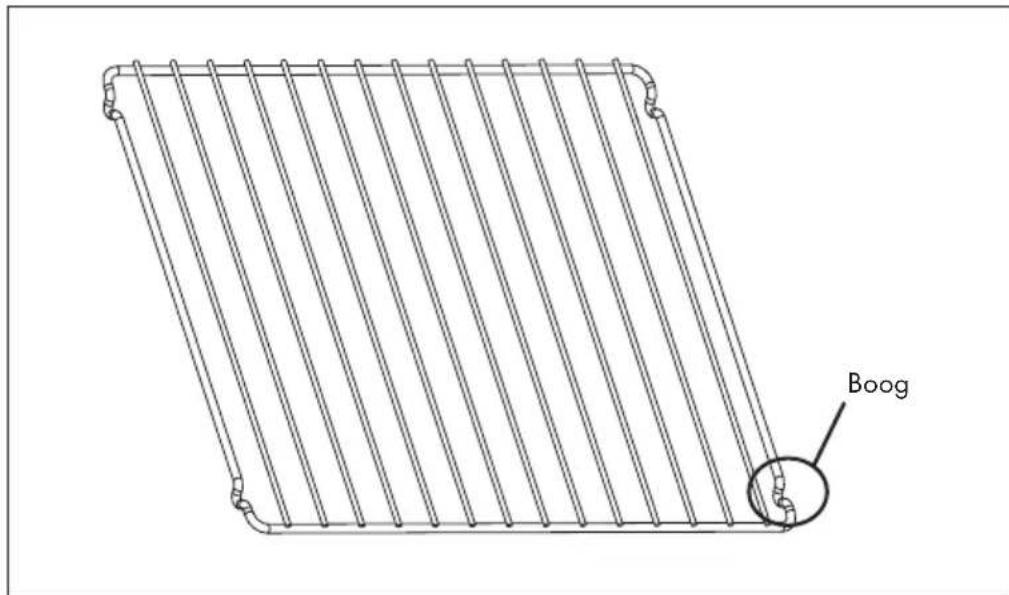
text_image
BoogCONTROLEPANEEL EN TOETSENFUNCTIES

text_image
8:8:8:8 /$ +WEERGAVE DISPLAY EN PROGRAMMA'S
text_image
8:00:00 OKINSTRUCTIES VOOR AFVOER
natural_image
Symbol of a trash bin crossed with a diagonal line, no text or labels presentBerlin Brands Group UK Limited
PO Box 42
272 Kensington High Street
London, W8 6ND
United Kingdom

area
| Category | Value | | -------- | ----- | | A | 100 | | B | 100 | | C | 100 | | D | 100 | | E | 100 | | F | 100 | | G | 100 | | H | 100 | | I | 100 | | J | 100 | | K | 100 | | L | 100 | | M | 100 | | N | 100 | | O | 100 | | P | 100 | | Q | 100 | | R | 100 | | S | 100 | | T | 100 | | U | 100 | | V | 100 | | W | 100 | | X | 100 | | Y | 100 | | Z | 100 |