
Luca - Blender Klarstein - Free user manual and instructions
Find the device manual for free Luca Klarstein in PDF.

| Product type | Multi-function blender |
| Brand | Klarstein |
| Model | Luca |
| Article numbers | 10035486, 10035487, 10035488 |
| Power supply | 220-240 V ~ 50/60 Hz |
| Power | 1000 W |
| Main bowl capacity | 3 liters |
| Blade material | Stainless steel and plastic |
| Included accessories | Knife blades (stainless steel and plastic), julienne cutter, slicing knife, french fry knife, grinder, blender, emulsifier, citrus press |
| Automatic programs | Pulse, crushed ice, smoothies, mix dough, chopping, cleaning |
| Manual speed | Yes, adjustable via slider |
| Safety | Safety lock on bowl and blender, automatic shut-off after 4 minutes |
| Cleaning | Automatic cleaning program, hand wash accessories |
| Maximum liquid temperature | Do not pour hot (frothy) liquid beyond 1 liter |
| Maximum continuous use | 4 minutes max, then 30 minutes cooling |
| Repairability | Repairs by qualified specialist only |
| Recycling | Do not discard with household waste, deposit at collection point |
Frequently Asked Questions - Luca Klarstein
User questions about Luca Klarstein
0 question about this device. Answer the ones you know or ask your own.
Ask a new question about this device
Download the instructions for your Blender in PDF format for free! Find your manual Luca - Klarstein and take your electronic device back in hand. On this page are published all the documents necessary for the use of your device. Luca by Klarstein.
USER MANUAL Luca Klarstein
Berlin Brands Group UK Limited
PO Box 42
272 Kensington High Street
London, W8 6ND
United Kingdom
SICHERHEITSHINWEISE
Congratulations on purchasing this device. Please read the following instructions carefully and follow them to prevent possible damages. We assume no liability for damage caused by disregard of the instructions and improper use. Scan the QR code to get access to the latest user manual and more product information.

CONTENTS
Technical Data 21
Manufacturer & Importer (UK) 21
Safety Instructions 22
Program Selector Switch 23
Commissioning and Operation 23
Using the Accessories 25
Cleaning 35
Troubleshooting 35
Disposal Considerations 36
TECHNICAL DATA
| Item number 10035486, 10035487, 10035488 |
| Power supply 220-240 V ~ 50/60 Hz |
| Power consumption (watts) 1000 W |
| Bowl capacity 3 Liter |
MANUFACTURER & IMPORTER (UK)
Manufacturer:
Chal-Tec GmbH, Wallstrasse 16, 10179 Berlin, Germany.
Importer for Great Britain:
Berlin Brands Group UK Limited
PO Box 42
272 Kensington High Street
London, W8 6ND
United Kingdom
SAFETY INSTRUCTIONS
- Before use, check the voltage on the device badge and connect the device only to sockets which correspond to the voltage of the device. If you are not sure whether your connections meet the requirements, consult an electrician or your power supplier.
- Always turn the motor off before plugging the motor into an electrical outlet.
- To prevent electric shock, never completely immerse the base in water or other liquids.
- If the power cord is damaged, it must be replaced by the manufacturer, an authorized service center, or a similarly qualified person.
- Do not bend the power cord or allow it to hang over the work surface to prevent it from getting caught.
- Do not place the appliance near open stoves, hot ovens, or easily flammable materials such as curtains or textiles.
- Before use, place the appliance on a stable, level surface.
- Children 8 years of age and older, mentally, sensory and physically impaired persons may only use the device if they have been thoroughly familiarized with its functions and safety precautions by a supervisor responsible for them and understand the associated risks.
- Ensure that children do not play with the device.
- Place the device as close as possible to the power source so that you can pull the plug quickly and easily if necessary.
- Check the power cord regularly for damage. Do not use the unit with the power cord damaged.
- Only use the unit indoors and for the specified purpose.
- Keep children away from the unit and stow it out of the reach of children.
- Do not use the device without contents and only under supervision.
- Do not touch any moving parts with your hands during use.
- Keep the operating instructions and pass on the device only with the operating instructions.
- Only use original accessories.
- Unplug the appliance from the wall outlet before cleaning or discontinuing use.
- Switch off the appliance and disconnect the plug before changing or removing any moving parts.
- The unit contains parts that are not accessible to the user. Do not remove any covers and do not attempt to repair the unit yourself. Repairs may only be carried out by qualified specialists.
- Do not connect the unit to multiple sockets, external timers or remotely controlled sockets.
Note: The device is only designed for short-term operation, i.e. it should not be operated continuously for more than 4 minutes. Then switch off the unit and let the motor cool down before switching it on again.
PROGRAM SELECTOR SWITCH
This appliance has the following program settings:
"Manual Speed" (M), On & Off (0), "Auto program".

Manual control for variable speeds (Manual Speed)

Switch Off (On & Off)

Pulse (Auto program)

Ice crusher (Auto program)

Smoothies (Auto program)

Dough mixing (Auto program)

Chopping (Auto program)

Auto Clean (Auto program)
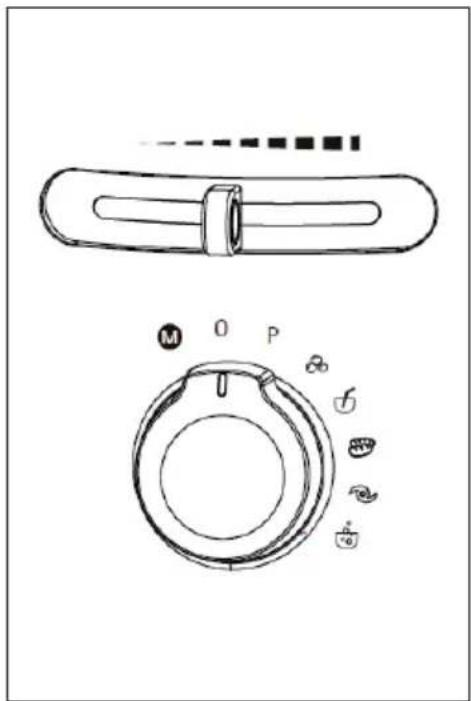
Note: If you turn the knob to "0", the appliance stops operating and all functions are reset.
COMMISSIONING AND OPERATION
Before Use
- Before connecting to the power, recheck the type of supply and the mains voltage match with the details given on the rating label on the appliance.
- Using for the first time, rip off all wrapping paper and plastic bags. Clean the fittings.
Commissioning
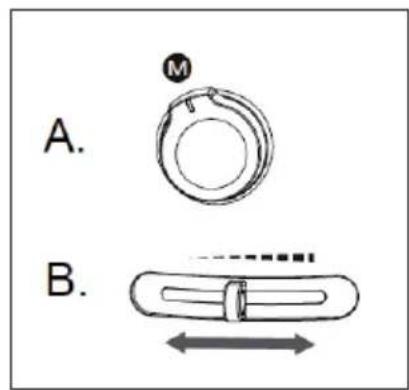
- Before you plug the power plug into the power outlet, set the rotary control to "0" and only then set the rotary control to the desired position. The functions are not available if the knob is not turned to the "0" position when the power is turned on. This is a safety function to prevent accidents, which could cause the appliance to start unexpectedly.
Manual control for variable speed

In this setting the speed can be adjusted manually.
- Move the knob to the position Miss the knob down to start the function. If you pr the knob again, the function will stop.
- The speed can be adjusted using the control bar.
- The manual function can be used for all accessories.
Pulse control P
- Move the knob to the position and press and hold the knob to start the function.
- As soon as you release the knob, the operation will stop.
- This function can be used for all accessories.
Ice crusher

- Move the knob to the position and press the knob down to start the function. Press the knob again to stop the function.
- This function is suitable for the blender.
Smoothies

- Move the knob to the position and press the knob down to start the function. Press the knob again to stop the function.
- This function is suitable for the blender.
Dough mixing

- Move the knob to the position and press the knob down to start the function.
Press the knob again to stop the function.
- This function is suitable for the plastic blade.

Note: Due to different ingredients in the recipes you use, the performance of the appliance may vary. You can also use the manual control M to get the best result.
Chopping

- Move the knob to the position and press the knob down to start the function. Press the knob again to stop the function.
- This function is suitable for the stainless steel blade.

Note: Due to different ingredients in the recipes you use, the performance of the appliance may vary. You can also use the manual control to get the best result.
- Put 3-4 drips of detergent into the bowl and add a maximum of 800ml of water.
- Insert the stainless steel or plastic blade and close the lid.
- Turn the knob to the position and press the knob down to start the function. Press the knob again to stop the function.
USING THE ACCESSORIES
1) Using the Knife Blades
The two knife blades supplied are versatile.

For the stainless steel knife blade:
- Do not fill food into the appliance in one piece, but cut it into pusher size pieces first.
- Do not run the appliance for more than 3 minutes at a time, otherwise it may overheat. Then turn the appliance off and let it cool down for at least 30 minutes.
- For the stainless steel knife blade, the "Chopping" (Auto program) recommended.
Use the "Pulse" control for coarser foods.
| Food Processing Size Quantity Time Speed | ||||
| Onion Into 4 pieces, without skin | 250 g ca. 3 | 0-60 s Pulse / Chopping (Auto program) / Max. | ||
| Garlic Without skin 250 g ca. 30-60 s Pulse / Chopping (Auto program) / Max. | ||||
| Carrot | < 2 x 2 cm | 250 g | ca. 30-60 s | Pulse / Chopping (Auto program) / Max. |
| Meat | < 2 x 2 cm, without bone | 250 g ca. 3 | 0-60 s Pulse | / Chopping (Auto program) / Max. |
For the plastic knife blade:
- Do not run the appliance for more than 2 minutes at a time, otherwise the motor may overheat. Then allow the appliance to cool down for at least 30 minutes before using the appliance again.
- It is recommended to use the „Dough Mixing“ (Auto program)
- Use a maximum of 500g flour and 300g liquid.
| Food Suggest quantity Speed | |||
| Flour / water | Flour 200 g Water 120 g | Dough mixing (Auto program) | |
| Mixing of cake batter | Eggs 1 piece Margarine 50 g Sugar 50 g Flour 50 g Baking powder 1 g | Dough mixing (Auto program) | |
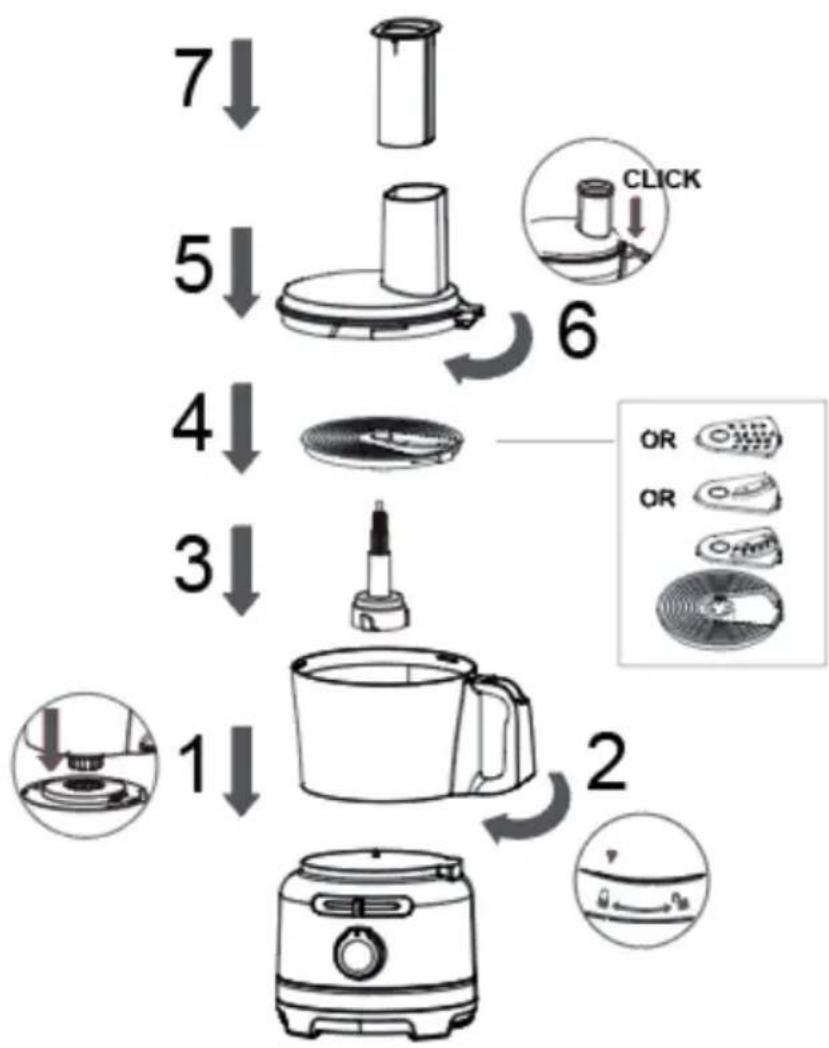
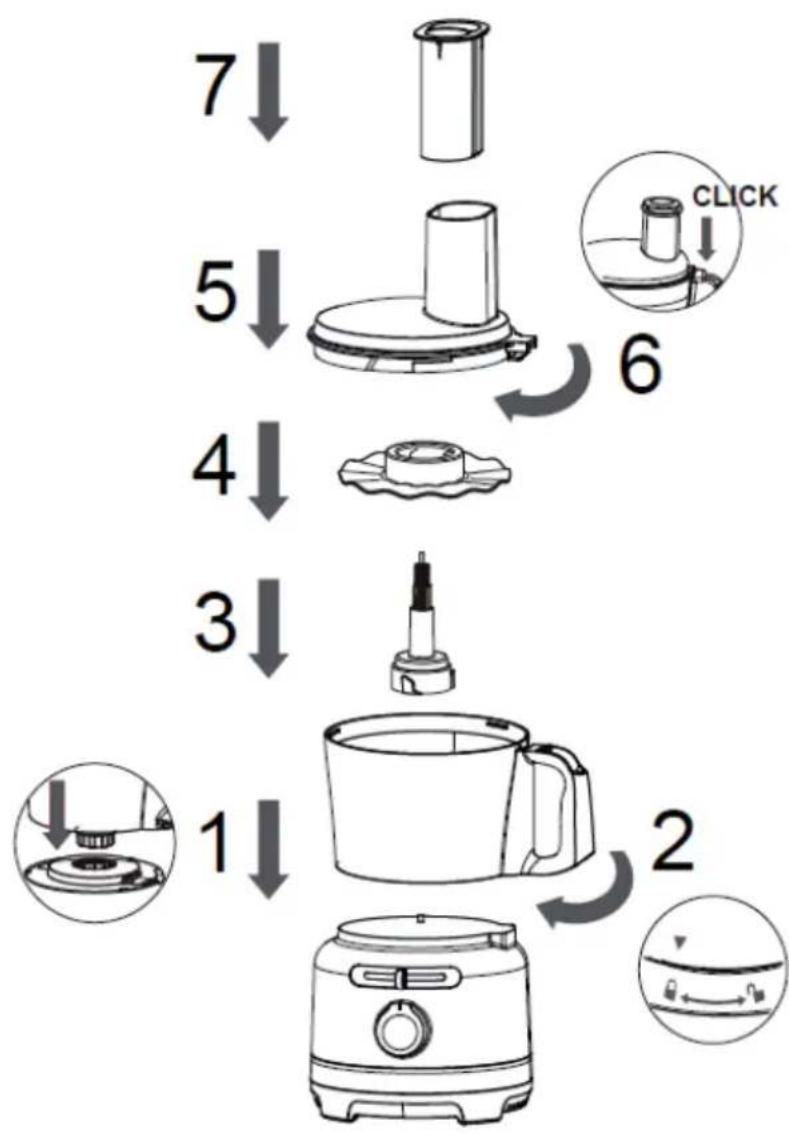
- Follow the steps shown in the figure below to assemble the appliance.
- Make sure that the bowl in step 2 and the lid in step 5 are properly secured, otherwise the appliance cannot be operated.
- In step 3, the stainless steel knife blade or the plastic knife blade can be used. Make sure that the appropriate accessories are properly secured to the shaft.
After use, the appliance can be disassembled again in the opposite order. - Only open the lid when the blades have stopped completely.
Assembly with the Knife Blades
2) Using the Slicer/Julienne/French Fried Potato Blade

-
Pay attention to the capacity line of container. Once the food approaches the max line on the container, please stop operation and pour out food.
-
Switch on and push the food down evenly with the Pushers. Never put your fingers in the feed tube!
- Do not run the appliance for more than 3 minutes at a time, otherwise the motor may overheat. Then allow the appliance to cool down for at least 30 minutes before using it again.
| Julienne Blade |
| Slicer Blade |
| French Fried Potato Blade |
| Food Suggested quantity | Processing time (minutes) | Speeds | ||
| Julienne Disc | Slicer Disc | French Fried Potato Disc | ||
| Carrot 500 g approx. 1 min Speed 1 Speed 1 N/A | ||||
| Potato 500 g approx. 1 min Speed 1 Speed 1 Speed 2 | ||||
| Zucchini 500 g approx. 1 min Speed 1 Speed 1 N/A | ||||
| Leek 500 g approx. 1 min Speed 1 Speed 1 N/A | ||||
| Beetroot without skin | 500 g approx. 1 min Speed | 1 Speed 1 | N/A | |
Note: To get the best performance, follow above suggestion on the speeds.
- Follow the steps shown in the figure below to assemble the appliance.
- Ensure the bowl in step 2 and the lid in step 6 are locked well, otherwise the appliance will not operate.
- One of the three blades can be inserted in step 4. Make sure that the appropriate accessories are properly attached to the blade holder.
After use, the appliance can be disassembled again in the opposite order. - Be careful when handling the blades, as they are very sharp.
- Only open the lid when the blades are completely stopped.
Assembly with Slicer Blade / Julienne Blade / French Fried Potato Blade
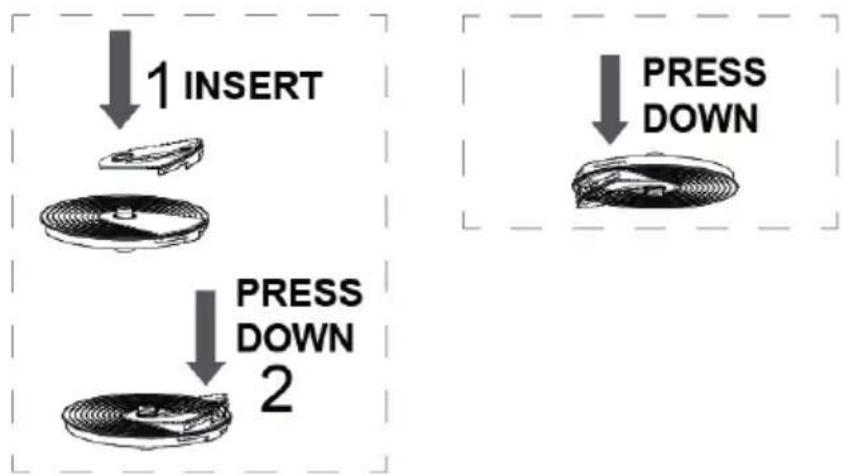
Assembly Disassembly

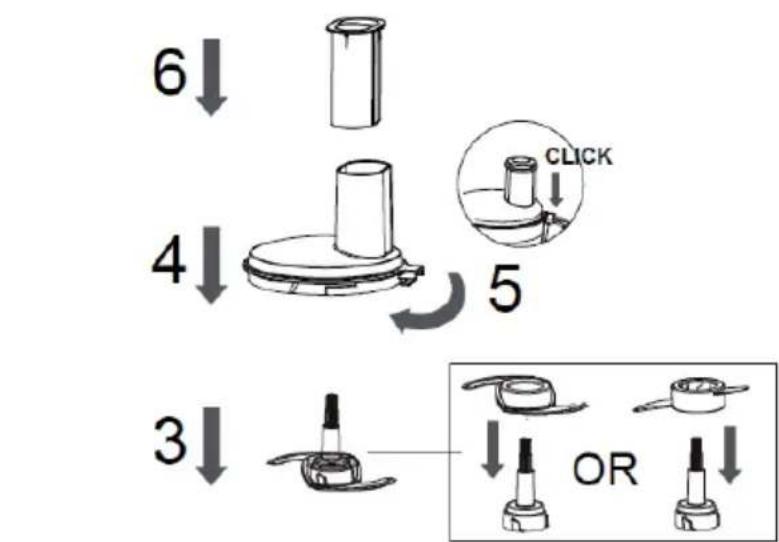
3) Using the Grinding
- Do not run the appliance for more than 30 seconds at a time, otherwise the motor may overheat. Allow the appliance to cool down for at least 30 minutes after use.
- Use the grinder for milling coffee beans, Almond so on similar food.
It is recommended to use the pulse control P - Follow the steps shown in the figure below to assemble the appliance.
- In step 1, make sure that the silicone ring is correctly inserted into the grinder cup. Then, in step 2, screw in the blade base.
- Make sure that the grinder cup is properly secured in step 4, otherwise the appliance will not operate.
After use, the appliance can be disassembled again in the opposite order. - Only take the grinder from the appliance when the blade is completely stopped.
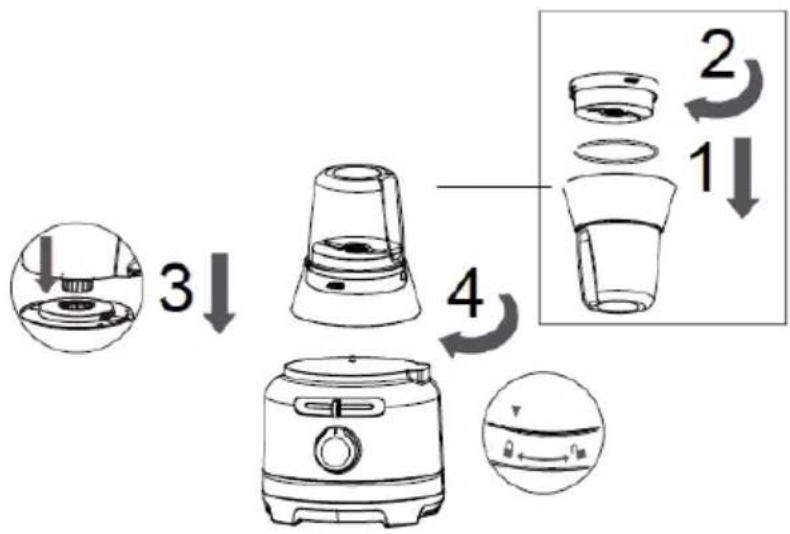
Assembly with the Grinding
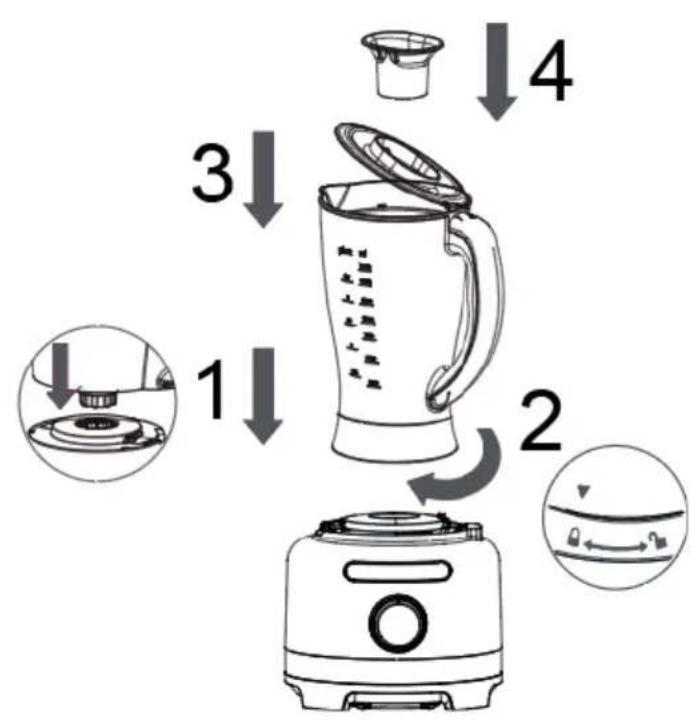
4) Using the Blender

- Do not run the appliance for more than 2 minutes at a time, otherwise the motor may overheat. Allow the appliance to cool down for at least 30 minutes before the next use.
- Never open the lid while the blade is still rotating. As a precaution, also unplug the power cord from the wall outlet before removing the lid.
- To add liquid ingredients during processing, remove the measuring cup of the lid and pour liquid through the opening in the lid.
- Cut solid ingredients into smaller pieces before you process them.
For a large quantity, pour small batches of ingredients instead of a large quantity at one time. - Use cooked ingredients for a soup preparation.
If a liquid is hot or tends to foam (e.g. milk), do not put more than 1 liter in the blender jar to avoid spillage.
If the result is not satisfactory, switch the appliance off and stir the ingredients with a spatula.
For best results, use the maximum speed or pulse control P
NOTE: It is recommended to use the "Smoothies" (Auto program) or "Ice Crusher" (Auto program) for the blender.
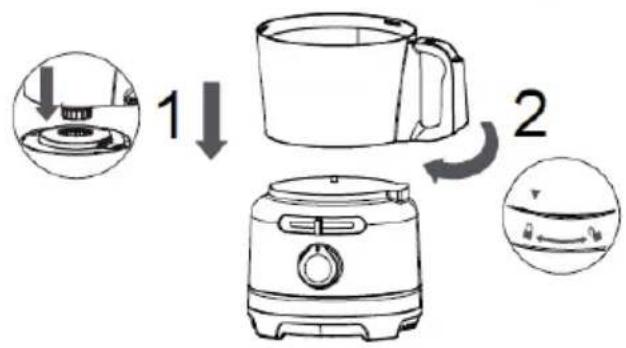
- Follow the steps shown in the figure below to assemble the appliance.
- Make sure that the jar is fixed properly in step 2, otherwise the appliance cannot be operated.
After use the appliance can be disassembled again in the opposite order.
Always be careful when handling the Stainless steel blade as they are very sharp. - Only open the lid when the blades are completely stopped.
Assembly with the Blender
5) Using the Emulsifying Disk

- Do not run the appliance for more than 2 minutes at a time, otherwise the motor may overheat. Allow the appliance to cool down for at least 30 minutes before using it again.
- Use the emulsifiying disk for aioli, instant pudding, mayonnaise, whipping cream, whisking eggs, egg whites, and sponge cake mixtures.
- For egg white whisking, use room temperature eggs. Ensure the bowl and emulsifying disc is dry and free from grease. It is recommended to use the manual control maximum speed to get the best performance.
-
For whipping cream, cool the cream in the fridge at least 24 hours, and use the cream in cool status. It is recommended to use the manual control at maximum speed to get the best performance.
-
Follow the steps shown in the figure below to assemble the appliance.
- Ensure the bowl in step 2 and the lid in step 6 are fixed properly, otherwise the appliance cannot be operated.
After use, the appliance can be disassembled again in the opposite order. - Only take the disc from the appliance when the disc is completely stopped.
Assembly with the Emulsifying Disk
6) Using the Citrus Juicer

Use this citrus juicer to squeeze the juice from citrus fruits (e.g. oranges).
- Pay attention to the capacity line of container. Once the food approaches the max line on the container, please stop operation and pour out food.
- Do not run the appliance for more than 3 minutes at a time, otherwise the motor may overheat. Allow the appliance to cool down for at least 30 minutes before reusing it.
- To get the best performance, press the orange not only vertical by also on left or right side.
- Follow the steps shown in the following figure to assemble the appliance.
- Make sure that the bowl in step 2 and the juicer in step 5 have been fixed properly, otherwise the appliance cannot be operated.
After use, the appliance can be disassembled again in the opposite order. - Only take the juicer from the appliance when the juicer is completely stopped.
Assembly with Citrus Juicer

CLEANING
Automatic cleaning
- Clean the bowl with the Stainless steel blade or the plastic blade with "Auto Clean" (Auto program)
Cleaning the appliance
Follow the steps below to clean the appliance:
- Unplug the power cord from the wall outlet.
- Do not immerse the housing the motor under water.
- Do not use any abrasive detergents.
- Only use a damp to clean the outside of the housing.
- Components that have come into contact with food can be cleaned with soapy water.
- Allow the parts to dry thoroughly before reassembling the appliance.
TROUBLESHOOTING
| Problem Possible Solution | |
| The appliance does not work. There is a safety interlock switch on processing bowl/blender. Please ensure bowl and lock are securely locked into position. If the motor still will not start, check the power cord and power outlet. | |
| French Fried Potato Julienne Disk is blocked. | Always clear any blocked potato from the chipper disc before processing more potatoes. |
| Some food remains on the disc after processing. | It is normal for small pieces to remain after processing. |
| Motor slows down when mixing dough. Amount of dough may exceed maximum capacity. Remove half and process in two batches. Do not add more than 250 g dough. | |
| Dough is too dry. Running appliance and added water through feed cube, 1 tablespoon at a time until dough cleans the inside of the processing bowl. | |
| Dough is too wet. Running machine and add flour through feed cube, 1 tablespoon at a time until dough cleans the inside of the processing bowl. | |
| Motor slows down when using the chopping blade. | Amount of meat may be too much. Remove half and process in two batches. |
| Note: For the best result, trim the meat of fat before processing. | |
| Vibrates/moves during processing. Clean | and dry the rubber feet at the bottom of the appliance. Also make sure that the maximum load capacity is not being exceeded. |
DISPOSAL CONSIDERATIONS

If there is a legal regulation for the disposal of electrical and electronic devices in your country, this symbol on the product or on the packaging indicates that this product must not be disposed of with household waste. Instead, it must be taken to a collection point for the recycling of electrical and electronic equipment. By disposing of it in accordance with the rules, you are protecting the environment and the health of your fellow human beings from negative consequences. For information about the recycling and disposal of this product, please contact your local authority or your household waste disposal service.
Chere cliente, cher client,
Berlin Brands Group UK Limited
PO Box 42
272 Kensington High Street
London, W8 6ND
United Kingdom
CONSIGNES DE SECURITE
Berlin Brands Group UK Limited
PO Box 42
272 Kensington High Street
London, W8 6ND
United Kingdom
Berlin Brands Group UK Limited
PO Box 42
272 Kensington High Street
London, W8 6ND
United Kingdom
AVVERTENZE DI SICUREZZA
Berlin Brands Group UK Limited
PO Box 42
272 Kensington High Street
London, W8 6ND
United Kingdom
VEILIGHEIDSINSTRUCTIES
INSTRUCTIES VOOR AFVOER


- SICHERHEITSHINWEISE
- CONTENTS
- TECHNICAL DATA
- MANUFACTURER & IMPORTER (UK)
- SAFETY INSTRUCTIONS
- PROGRAM SELECTOR SWITCH
- COMMISSIONING AND OPERATION
- Before Use
- Commissioning
- Manual control for variable speed
- Pulse control P
- Ice crusher
- Smoothies
- Dough mixing
- Chopping
- USING THE ACCESSORIES
- 1) Using the Knife Blades
- For the stainless steel knife blade:
- For the plastic knife blade:
- Assembly with the Knife Blades
- 4) Using the Blender
- Assembly with the Blender
- 6) Using the Citrus Juicer
- Assembly with Citrus Juicer
- CLEANING
- Automatic cleaning
- Cleaning the appliance
- TROUBLESHOOTING
- DISPOSAL CONSIDERATIONS
- CONSIGNES DE SECURITE
- AVVERTENZE DI SICUREZZA
- VEILIGHEIDSINSTRUCTIES
- INSTRUCTIES VOOR AFVOER
Brand : Klarstein
Model : Luca
Category : Blender