
DiscoFever LED - Karaoke system Auna - Free user manual and instructions
Find the device manual for free DiscoFever LED Auna in PDF.

| Product type | Karaoke system with CD, USB and Bluetooth player |
| Brand | Auna |
| Model | DiscoFever LED |
| Article number | 10030797, 10030798 |
| Power supply | Mains adapter 230 V ~ 50 Hz |
| Output power | 2 x 3 W RMS |
| Frequency response | 100 Hz - 20 kHz |
| Signal-to-noise ratio | 50 dB |
| Microphone type | Dynamic microphone, -73 dB, 600 ohms, Ø 6.3 mm plug |
| Playback format | Audio CD, CD+G, CD MP3, MP3 files on USB stick |
| Wireless connectivity | Bluetooth |
| Display | TFT (built-in display) |
| Sound effects | Echo, balance, automatic voice control (AVC) |
| Recording | MP3 recording on USB stick from a CD |
| Lighting | Integrated light effects (LIGHT I/O) |
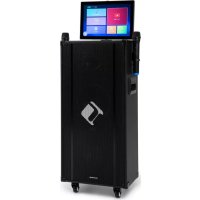
| Dimensions (W x H x D) | 440 x 221 x 246 mm |
| Package contents | Unit, mains adapter, audio/video cables, 1 microphone, instruction manual |
| Maintenance | Wipe with a soft, slightly damp cloth; do not immerse |
| Safety | Unplug during storms; do not overload outlets; avoid moisture |
| Intended use | Home karaoke, parties |
Frequently Asked Questions - DiscoFever LED Auna
User questions about DiscoFever LED Auna
0 question about this device. Answer the ones you know or ask your own.
Ask a new question about this device
Download the instructions for your Karaoke system in PDF format for free! Find your manual DiscoFever LED - Auna and take your electronic device back in hand. On this page are published all the documents necessary for the use of your device. DiscoFever LED by Auna.
USER MANUAL DiscoFever LED Auna
Berlin Brands Group UK Limited
PO Box 42
272 Kensington High Street
London, W8 6ND
United Kingdom
Congratulations on the purchase of your device. Please read the following instructions carefully and follow them to prevent potential damage. We accept no liability for damage caused by disregarding the instructions or improper use. Please scan the QR code to access the latest operating instructions and for further information about the product.
CONTENTS
Technical Data 17
Safety Instructions 18
Controls and connections 19
Connection variants 21
General operation 23
CD/USB 23
Karaoke functions 24
Establishing a BT connection 25
Troubleshooting 26
Cleaning and care 27
Disposal instructions 28
Declaration of conformity 28
TECHNICAL DATA
| Product code 10030797, 10030798 |
| Power supply Power supply unit for socket (230 V ~ 50 Hz) |
| Audio output 2 x 3 W RMS |
| CD player CD / CD+G |
| Frequency response 100 Hz - 20 kHz, SNR 50 dB |
| Microphone Dynamic / -73 dB 600 Ohm / Ø 6.3 mm |
| Dimensions 440 x 221 x 246 mm (W x H x D) |
| Scope of delivery Unit, power supply unit, cable (audio, video), 1 microphone, operating instructions |
SAFETY INSTRUCTIONS
General Instructions
- Lightning - If you do not use the device for a longer period of time or in the event of electrical storms, unplug the device from the power outlet or disconnect the device from the antenna connection. This prevents damage to the product due to lightning and overvoltage.
- Overloading - Do not overload electrical outlets, extension cords or integrated sockets as this may result in a fire or electric shock.
- Foreign objects and liquid entry - Never push objects of any kind into the unit through openings as they may touch dangerous voltage points or short out parts that could cause a fire or electric shock. Never spill liquids of any kind on the unit.
- Repair and maintenance - Do not attempt to service this product yourself as opening or removing covers may expose you to dangerous voltages or other hazards. Leave all maintenance work to qualified service personnel.
- Damage requiring servicing - Unplug the appliance from the wall outlet and refer servicing to qualified service personnel when any of the following situations occur:
a) If the mains cable or plug is damaged.
b) If liquid has been spilled or objects have fallen onto the product.
c) If the product has been exposed to rain or water.
d) If the product has been dropped or damaged.
e) If the product has a significantly reduced performance.
- Spare parts - If spare parts are needed, make sure that the specialist company replacing the parts only uses spare parts that are approved by the manufacturer or have the same characteristics as the original part. Unauthorised substitutions may result in fire, electric shock or other hazards.
- Heat - Do not place the unit near any heat sources such as radiators, heat registers, stoves, or other products (including amplifiers).
Note: Children over 8 years as well as mentally, sensory and physically impaired persons may only use the device if they have been informed in detail about the functions and safety precautions by a supervisor responsible for them beforehand and understand the associated risks.
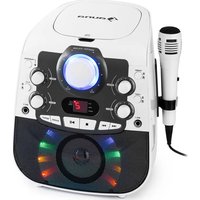
CONTROLS AND CONNECTIONS
| 8 | |||
| 1 | SCREEN ON/OFF (screen on/off) | 9 | PROGRAM/REPEAT (programming/repeat mode) |
| 2 | FUNCTION (function) | 10 | SKIP +/- (fast forward/rewind) |
| 3 | POWER LED (operating light) | 11 | PLAY/PAUSE/PAIR (play/pause/BT device pairing) |
| 4 | ON/OFF (On/Off) | 12 | STOP/LIGHT I/O (stop/light on/off) |
| 5 | TFT SCREEN (screen) | 13 | KEY/PAGE +/- (adjust karaoke track/page forward/back) |
| 6 | MIC VOL (microphone volume) | 14 | AVC (Automatic Voice Control) |
| 7 | MASTER VOL (master volume) | 15 | BALANCE (Balance) |
| 8 | RECORD (record) | 16 | ECHO (echo effects) |
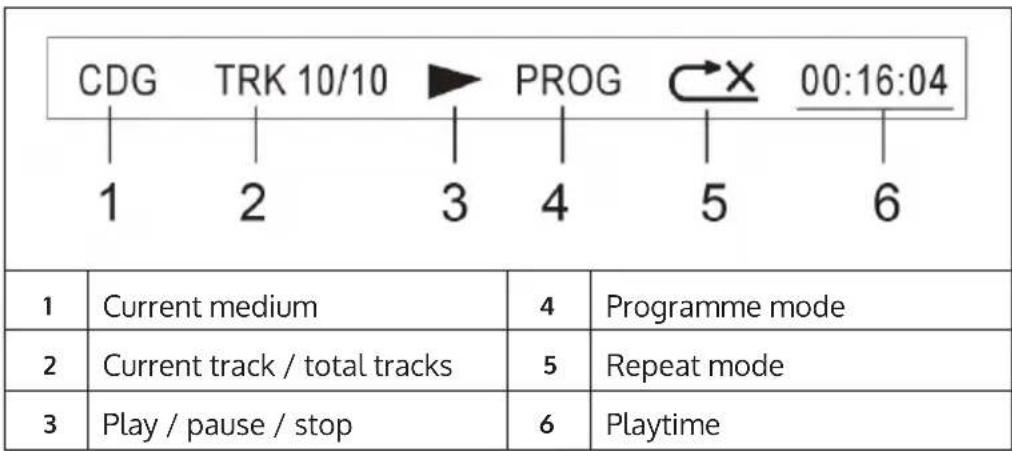
Display indications
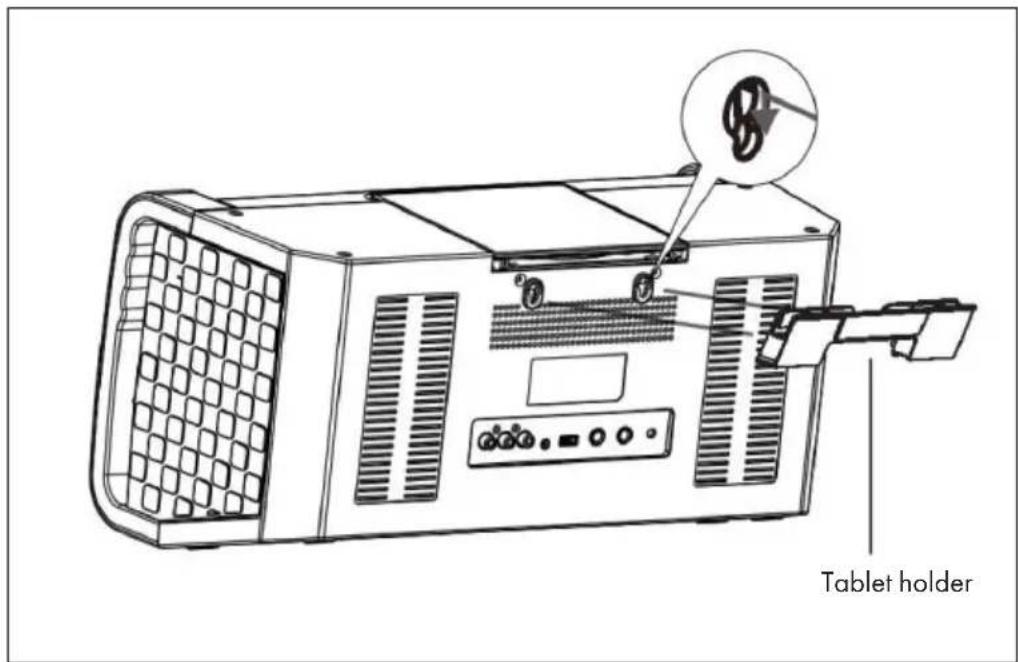
Tablet holder
- Hook the bracket into the slots on the back.
- Place your tablet on it in landscape format.
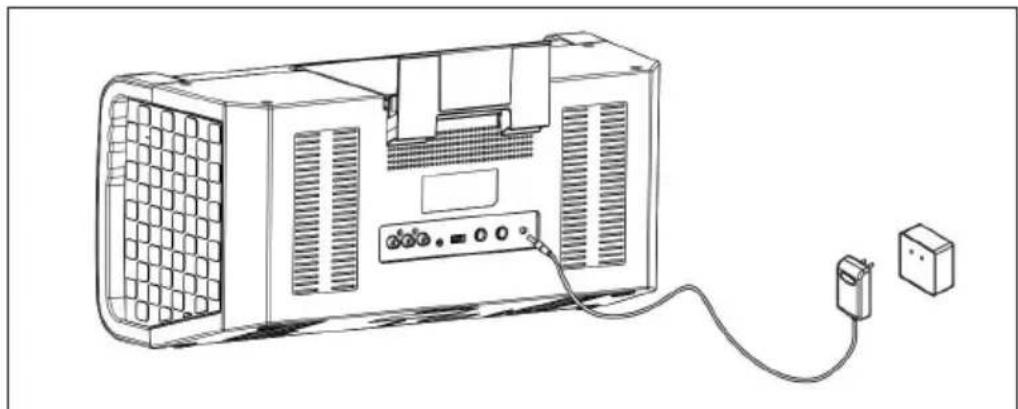
CONNECTION VARIANTS
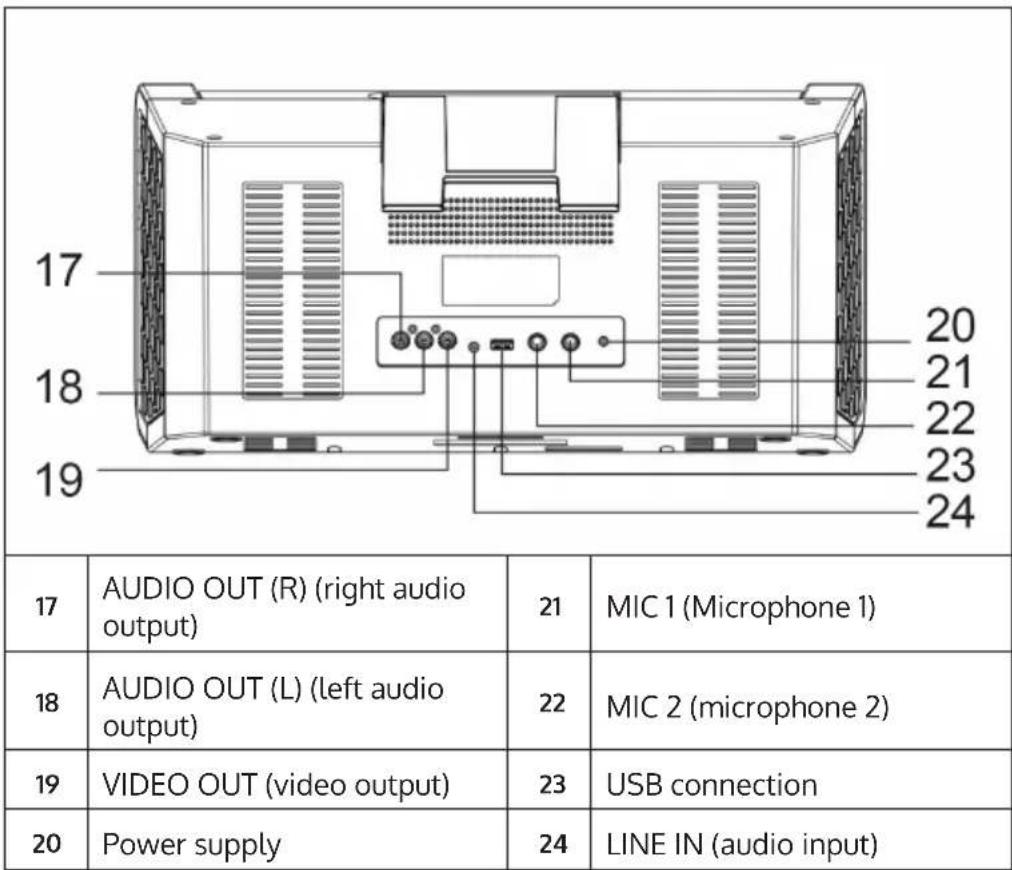
Power supply: Connect the unit to a household socket using the power supply unit supplied:
Video: Use the supplied video cable (yellow) to connect the video output (Video Out) of the karaoke system to the video input (Video In) of your TV set/digital projector/etc.
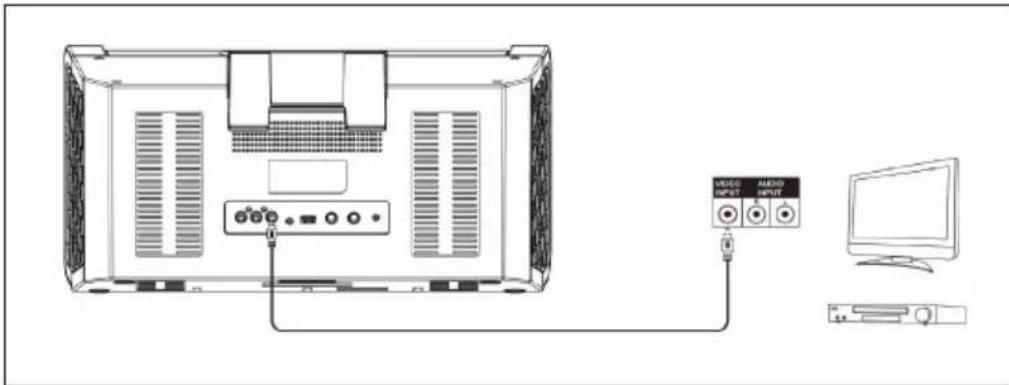
In most cases, you will have to select the input source on the TV set/digital projector accordingly. While some units have corresponding menus, others may have input channels that are behind or ahead of the regular receiving channels or on "0". Please consult the operating instructions/help files of your TV set in this regard.
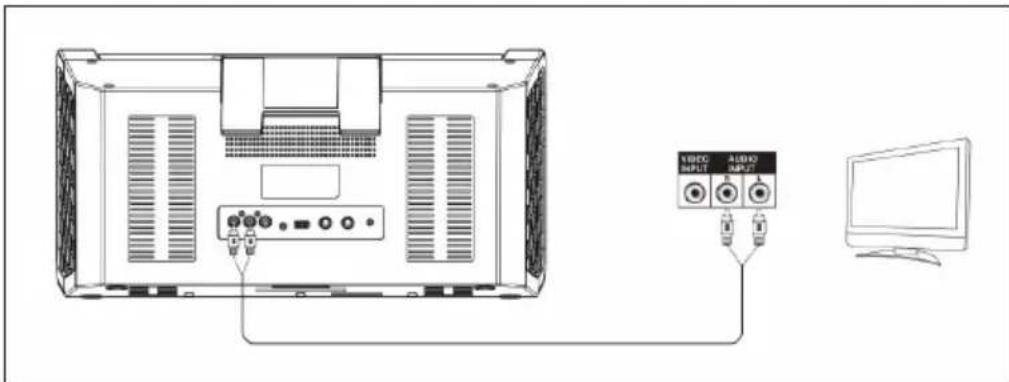
AUDIO LINE OUT: Use the supplied cinch cable (red-white) to connect the audio output (Audio Out) of your karaoke system to the audio input of your stereo system or TV set.
AUDIO LINE IN: Connect external sound sources to the line-in of the karaoke system. Make sure that the external media device you are using plays sound. Then adjust the output volume (master volume) on the karaoke system. Please note: As soon as a device is connected to the line-in, the karaoke system automatically switches to this mode. Disconnect the line connection to switch to the other modes (CDG/ USB/BT).
Microphones: Connect the microphones to the MIC 1 and MIC 2 connectors on the rear panel. Switch on the microphones with the switches on the microphones. The microphone signals are mixed with the music playback from CD/CD+G. To prevent feedback loops, do not point the microphone capsules towards the speakers and do not cover the capsules with your hands.
GENERAL OPERATION
Switch the unit on and off: Switch the DiscoFever on and off with the POWER button.
Set the master volume: Use the MASTER VOL button to adjust the volume.
Select the audio source: Press the FUNCTION button to select CDG, USB or BT.
Switch the light effect on and off: Use the LIGHT I/O button to switch the integrated light effect on or off.
CD/USB
Open the CD compartment and put in a CD (printed side up). Then close the CD compartment again. Or: Connect a USB data carrier with MP3 files to the USB port.
After a short moment in which the unit reads the inserted medium, a corresponding message appears on the display. If the medium cannot be read or if none has been inserted, "No Disc" appears on the display.
Use the PLAY/PAUSE, NEXT/PREVIOUS and PAGE+/- buttons (the latter in stop mode) to control playback.
Repeat function
During playback, press PROGRAM/REPEAT several times to select the playback modes REPEAT1 (repeat current track) - REP FOLDER (for MP3 CDs/USB: repeat current folder) - REP ALL (repeat all) - or NO REP (repeat function off).
Program playlists
Stop playback. In stop mode, you can programme playlists with up to 20 entries:
1 Press PROGRAM/REPEAT. The display shows "PRG SET 01:XX".
2 Use the FORWARD/BACK buttons to select your chosen track. Then press PROGRAM to add the selected track to your playlist.
3 Repeat this process up to 20 times.
4 Press PLAY/PAUSE for playback.
5 Press STOP twice to stop playback and delete the playlist.
KARAOKE FUNCTIONS
PAGE+ / PAGE-: Skip 10 tracks or scroll when displaying text.
KEY+ / KEY-: Adjust the karaoke track at CD+G to your voice pitch (maximum 6 semitones +/-).
ECHO: Use this to set the integrated reverb effect.
BALANCE: Adjust the volume balance of the disc's vocal track and the music track here (for karaoke discs (CD + G)
AUTO VOICE CONTROL: Set the limit at which the (recorded) vocal track fades out and your vocal performance replaces it.
MIC VOLUME: Use the MIC VOL control to adjust the proportion of the microphone volume in the overall volume.
SCREEN ON/OFF: switch TFT screen on/off.
Audio recording
You can record the music of a karaoke CD together with your vocal performance in MP3 format on connected USB data carriers. The results are saved as numbered files in the format "TRKXX.MP3".
- Connect a USB stick.
- Start the desired track of a CD/CD+G.
- Press RECORD - the recording history appears on the display.
- Press RECORD again to finish recording.
Note: Only tracks from CD / CD+G disc can be recorded in this way.
ESTABLISHING A BT CONNECTION
1 Use FUNCTION to switch to BT mode. Activate BT on your smartphone/ tablet and connect with DISCOFEVER in the list of devices found within range.
2 You can now stream the sound content of your mobile media library via DiscoFever.
3 To disconnect, press and hold PAIR. The BT LED now flashes again rapidly.
TROUBLESHOOTING
| The device cannot be switched on. | Check the fit of the power supply unit and the function of the socket (fuses?). | |
| TV does not emit sound via the DiscoFever. | TV-VOL is at minimum? | |
| TV switched off? | ||
| Cinch cable loose? | ||
| TV: Audio input not selected? | ||
| CD player not working correctly. | Disc inserted upside down? | |
| Disc dirty or damaged? | ||
| Disc not compatible? Only audio CDs, CD+G and MP3 CDs can be read. | ||
| Moisture in the CD compartment? | Allow any condensation to dry for 20-30 minutes. | |
| Switch the unit off and then on again after a short time. | ||
| TV does not emit sound. | Check that the correct audio input has been set on your TV set and that the cinch cables have been connected to the correct connections. | |
| Cinch cable loose? | ||
| Song lyrics do not appear on the TV screen. | Check the connection and fit of the video cable. | |
| Check that the correct video input has been selected on your TV set. | ||
| No microphone signal. | MIC VOL turned to minimum? | |
| Microphone switched off? | ||
| No video display on the TFT. | TFT switched off? | |
| No karaoke CD (CD+G) inserted? | ||
| No sound in BT mode W | as the pairing process successful? | |
| BT device muted? | ||
CLEANING AND CARE
Please note: switch off the unit before cleaning. Disconnect the power supply unit and/or remove the batteries.
- Never immerse the device in water or other liquids to clean it.
- Clean the surface of the unit with a soft, slightly damp cloth. Ensure that no water gets into the unit.
- Never use abrasive cleaners or hard objects such as scouring pads cleaning.
- Dry the unit carefully after cleaning.
- Store the unit in a cool, dry place.
DISPOSAL INSTRUCTIONS
If there is a legal regulation in your country regarding the disposal of electrical and electronic equipment, this symbol on the product or on the packaging indicates that this product must not be disposed of with household waste. Instead, it must be taken to a collection point for the recycling of electrical and electronic equipment. By disposing of this product in accordance with the regulations, you protect the environment and the health of those around you from negative consequences. For information on recycling and disposal of this product, contact your local government or household waste disposal service.
DECLARATION OF CONFORMITY
CE UK CA
Manufacturer:
Chal-Tec GmbH, Wallstraße 16, 10179 Berlin, Germany.
Importer for Great Britain:
Berlin Brands Group UK Limited PO Box 42 272 Kensington High Street London, W8 6ND United Kingdom
Chal-Tec GmbH hereby declares that the radio equipment type DiscoFever is in compliance with Directive 2014/53/EU. The full text of the EU declaration of conformity is available at the following internet address: use.berlin/10030798
Estimado cliente:
Berlin Brands Group UK Limited
PO Box 42
272 Kensington High Street
London, W8 6ND
United Kingdom
Cher client, chere clientele,
Berlin Brands Group UK Limited
PO Box 42
272 Kensington High Street
London, W8 6ND
United Kingdom
Berlin Brands Group UK Limited PO Box 42
272 Kensington High Street
London, W8 6ND United Kingdom
- CONTENTS
- TECHNICAL DATA
- SAFETY INSTRUCTIONS
- General Instructions
- CONTROLS AND CONNECTIONS
- Tablet holder
- CONNECTION VARIANTS
- GENERAL OPERATION
- CD/USB
- Repeat function
- Program playlists
- KARAOKE FUNCTIONS
- Audio recording
- ESTABLISHING A BT CONNECTION
- TROUBLESHOOTING
- CLEANING AND CARE
- DISPOSAL INSTRUCTIONS
- DECLARATION OF CONFORMITY
- CE UK CA
- Manufacturer:
- Importer for Great Britain:
- Estimado cliente:
- Cher client, chere clientele,
Brand : Auna
Model : DiscoFever LED
Category : Karaoke system