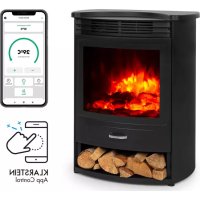
Bormio Smart - Fireplace Klarstein - Free user manual and instructions
Find the device manual for free Bormio Smart Klarstein in PDF.


| Product Type | Electric Fireplace |
| Brand | Klarstein |
| Model | Bormio Smart |
| Power Supply | 220-240 V ~ 50/60 Hz |
| Rated Heat Output | 1.8 kW (1800 W) |
| Maximum Power | 1900 W |
| Built-in Wi-Fi | Yes, standard 802.11 b/g/n, 2.4 GHz |
| Smartphone Control | Yes, Klarstein App |
| Remote Control | Yes (AAA batteries not included) |
| Flame Simulation | Yes, with brightness adjustment (3 levels + off) |
| Coal Bed | Yes, with brightness adjustment (3 levels + off) |
| Adjustable Heat Output | 950 W / 1900 W / Off |
| Adjustable Thermostat | From 7 °C to 30 °C |
| Programmable Timer | Yes, adjustable by day of the week (Monday to Sunday) |
| Open Window Function | Yes, automatic shut-off in case of rapid temperature drop |
| Overheat Protection | Yes |
| Cleaning | Vacuum cleaner for slots and grilles, damp cloth for exterior surfaces |
| Required Batteries | 2 AAA batteries (not included) |
| Recycling | Do not dispose with household waste; take to collection point |
Frequently Asked Questions - Bormio Smart Klarstein
User questions about Bormio Smart Klarstein
0 question about this device. Answer the ones you know or ask your own.
Ask a new question about this device
Download the instructions for your Fireplace in PDF format for free! Find your manual Bormio Smart - Klarstein and take your electronic device back in hand. On this page are published all the documents necessary for the use of your device. Bormio Smart by Klarstein.
USER MANUAL Bormio Smart Klarstein
Note: This product is only suitable for well insulated spaces or occasional use.
INHALTSVERZEICHNIS
Produktdatenblatt 4
Member of Berlin Brands Group
Handwerkerstr. 11
15366 Dahlwitz-Hoppegarten
Deutschland
natural_image
Symbol of a trash bin crossed with a diagonal line, no text or numbers presentBerlin Brands Group UK Limited
PO Box 42
272 Kensington High Street
London, W8 6ND
United Kingdom
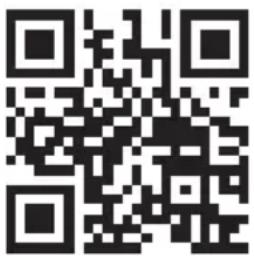
Congratulations on purchasing this device. Please read the following instructions carefully and follow them to prevent possible damages. We assume no liability for damage caused by disregard of the instructions and improper use. Scan the QR code to get access to the latest user manual and more product information.
CONTENTS
Product Data Sheet 20
Safety Instructions 21
Control Panel and Button Functions 22
Remote Control and Button Functions 23
Getting Started 24
Manual Operation 24
Operation Via Remote Control 25
Device Control by Smartphone 29
Cleaning and Care 30
Disposal Considerations 31
Declaration of Conformity 31
TECHNICAL DATA
| Article number 10035086, 10035087, 1 | 0035088 |
| Power supply 220-240 V ~ 50/60 Hz | |
| Power consumption 1600-1900 W | |
| WiFi standard | 802.11 b/g/n |
| WiFi frequency | 2,4 GHz |
| WiFi radio-frequency power (max.) | 20 dBm |
PRODUCT DATA SHEET
| Model identifier(s): | 10035086, 10035087, 10035088 | |||||
| Item Symbol Value Unit Item Unit | ||||||
| Heat output Type of heat input, for electric storage local space | heaters only | |||||
| Nominal heat output P | nom | 1.8 | kW manual | heat charge control, with integrated thermostat | N/A | |
| Minimum heat output (indicative) | Pmin | 0 | kW manual | heat charge control with room and/or outdoor temperature feedback | N/A | |
| Maximum continuous heat output | Pmax,c | 1.8 | kW electronic | heat charge control with room and/or outdoor temperature feedback | N/A | |
| Auxiliary electricity consumption | fan assisted heat output N/A | |||||
| At nominal heat output (fan motor) | elmax | N/A kW | Type of heat output/room temperature control | |||
| At minimum heat output (fan motor) | elmin | N/A kW | single stage | heat output and no room temperature control | no | |
| In standby mode el | SB | 0 W | two or more | manual stages, no room temperature control | no | |
| with mechanic thermostat room temperature control | no | |||||
| with electronic room temperature control | no | |||||
| electronic room temperature control plus day timer | no | |||||
| electronic room temperature control plus week timer | yes | |||||
| Other control options (multiple selections possible) | ||||||
| room temperature control, with presence detection | no | |||||
| room temperature control, with open window detection | no | |||||
| with distance control option | no | |||||
| with adaptive start control | yes | |||||
| with working time limitation | no | |||||
| with black bulb sensor | no | |||||
| Contact details | Chal-Tec GmbH, Wallstraße 16, 10179, Berlin, Germany | |||||
SAFETYINSTRUCTIONS
- Read these operating instructions carefully before use and keep them for future reference.
- Install the electric fi replace in accordance with the provisions of this manual. If in doubt, consult customer service.
- Make sure the power outlet you want to use is easily accessible and not above the unit.
- Always turn the device off and unplug the power cord before moving, cleaning or servicing the unit.
• Fix the device securely so that it can not fall over. - Do not leave the unit unattended when small children or elderly people are in the vicinity.
- Never leave children alone and unattended in the same room as the appliance when it is switched on.
- Do not cover the ventilation holes of the unit or block them. Never insert objects into the ventilation holes.
- Do not install the unit in rooms where running water is used, such as in bathrooms, kitchens, shower rooms, near swimming pools, etc.
- Never use sprays or steam cleaners to clean the unit.
- Never lay the device cable under carpets or in places where it may become a trip hazard.
- Do not install the device near curtains or other fl ammable materials.
• Do not use the device to dry clothing etc.
• Never sit or stand on the device. - Never use the device in combination with timers or other devices that automatically turn on the device at a certain time.
Note: The device has overheating protection. If the device stops due to overheating, do the following: turn off the device and disconnect the power plug from the wall outlet. If any objects are covering the device, remove them.

WARNING
Risk of burns! The device gets very hot, so do not touch it. Set all switches to "off" and allow it to cool completely. Once the unit has cooled down completely, you may reconnect the power plug to the power outlet. Never open the product. It has no user serviceable parts.
CONTROL PANEL AND BUTTON FUNCTIONS
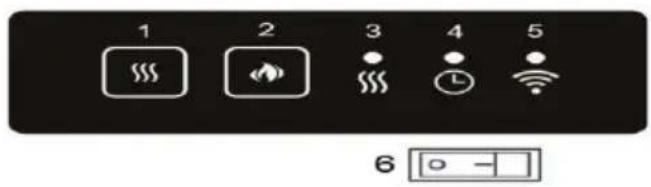
| 1 | Adjust the heating power |
| 2 | Adjust the brightness of the flame effect |
| 3 | Display of heating power |
| 4 | Display of timer |
| 5 | WiFi display |
| 6 | On / off switch |
REMOTE CONTROL AND BUTTON FUNCTIONS
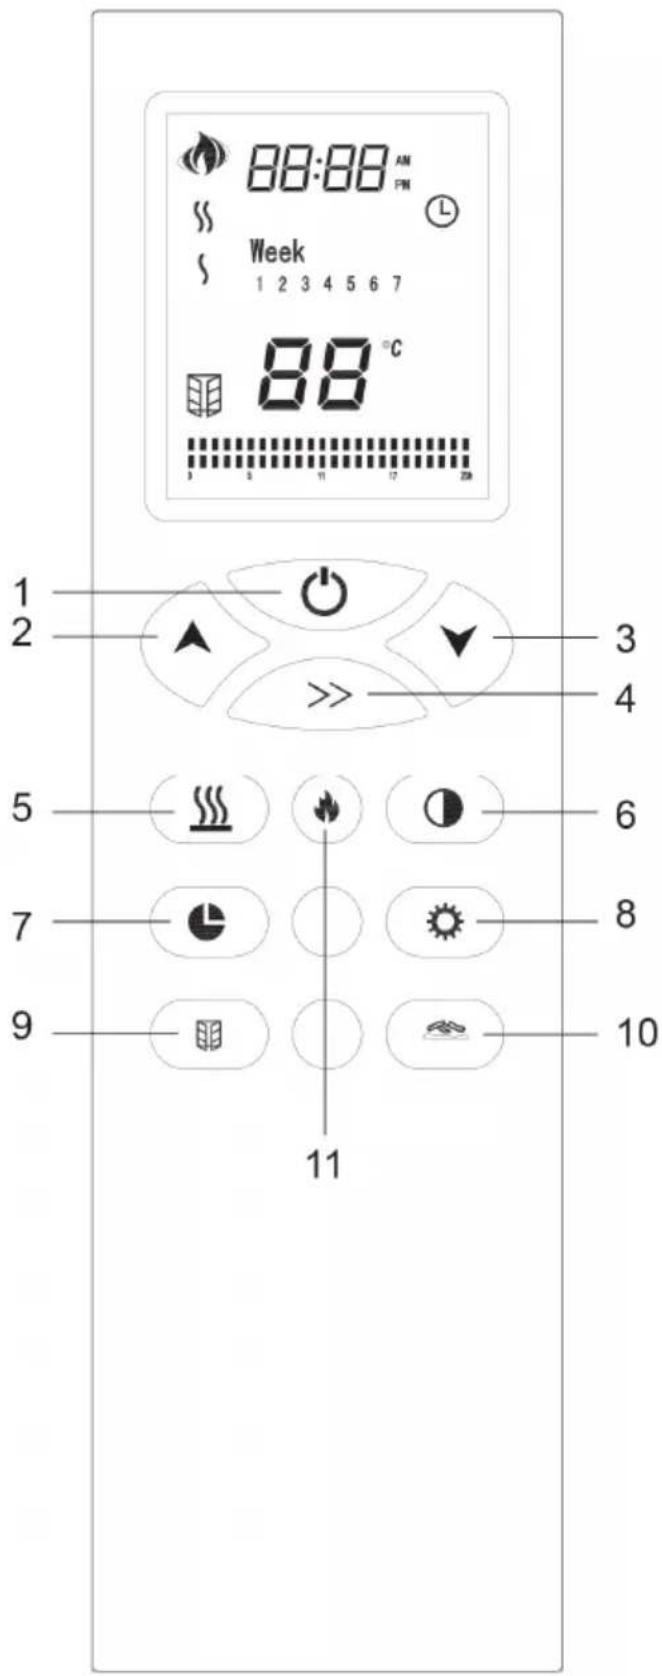
1 On / off switch
2 Increase value
3 Decrease value
4 Adjust the current week and time
5 Adjust the heating power
6 Switch the flame effect and coal bed on or off
7 Set the timer
8 Set the timer parameters
9 Turn on or off the open window function
10 Adjust the brightness of the coal bed
11 Adjust the brightness of the flame
Note: The remote control requires 2 AAA batteries (not included with delivery). Open the battery compartment by sliding the cover down and insert the batteries into the battery compartment according to the correct polarity.
GETTING STARTED
Insert the plug into the socket. Press the on / off switch on the lower right side of the device. If the device has been switched on, it can only be started via the remote control. To do this, press the power button on the remote control.
Note: As soon as the device has been started via the remote control, it can be operated via the control panel on the bottom left of the device as well as via the remote control.
MANUAL OPERATION
Switch on the device via the main switch. The unit will beep once to indicate that it has been switched on. The device is now in standby mode. Once the device has been started via the remote control, it can be operated via the control panel in the lower left corner of the device.
Adjust the heating power

- When you press the button for the first time, the unit will heat up with 950 W of power. The heating power indicator will light up blue.
- The second time you press the button, the unit will heat up to 1900 W of power. The heating power indicator will light up red.
- If you press the button a third time, the heating elements will be switched off and the heating power indicator will disappear.
Adjust the brightness

- When you press the button for the first time, the coal and the flames will be at the lowest brightness level.
- If you press the button a second time, the coal and the flames will be at the middle brightness level.
- If you press the button a third time, the coal and the flames will be at the highest brightness level.
- Pressing the button a fourth time will cause the coal and flames to go out.
Note: When using the remote control, do not remove it more than 6 meters (19 feet) from the unit, making sure that the remote control is always oriented in the direction of the unit.
Start the device ⏻
When you press the power button on the remote control, the screen of the remote control will turn on, the flame will ignite, and the flame icon will appear on the LCD screen.
Week, time (24h system) and temperature display will be displayed normally. If you press the power button again, the LCD screen of the remote control will turn off.
Flame and coal control switch ①
- Pressing the button once when the unit is turned on will extinguish the flame and the coal bed, and the LCD screen will no longer display the icon.
- If you press this button again, the flame and the coal will start again and the screen will show the icon. When this button is pressed, the unit will beep once.
Adjust the flame brightness
Press this button to adjust the flame brightness. When this button is pressed, the unit will beep once.
Adjust the brightness of the coal bed
To adjust the brightness of the coal bed, press this button. The unit will beep once when this button is pressed.
Set the heating power
- When you press the button for the first time, the heating elements will operate at a power of 1900 W, the LCD screen will display and the heating power indicator lights up red.
- When you press the button the second time, the heating elements will operate at a power of 950 W, the LCD screen will display and the heating power indicator will light up blue.
- If you press the button a third time, the heating elements will be switched off, the LCD screen no longer displays the icon and the heating power indicator will turn off. The unit will beep once when the button is pressed.
Note: If the heating elements are switched on with the remote control, whether they are activated or not will depend on the temperature setting and the room temperature. The heating elements will only be activated if the temperature set by you on the device is above the room temperature.
Adjust the temperature setting ▲▼
Press the arrow keys to adjust the temperature setting. You can set a temperature between 7^ C and 30^ C on the device. The device will beep once when one of the keys is pressed.
Setting the current week and time >>
- If you press the button once, the corresponding symbol will light up on the LCD screen.
- Now press the arrow buttons to set the current time and the week. When this button is pressed, the unit will not beep.
Adjust the timer parameters
When you press the button for the first time, the LCD screen will display "1" which stands for Monday. The temperature setting will start to flash.
- Press the arrow keys to set the temperature for Monday. Press the >> button to confirm and press the arrow buttons to set the start time of the heating.
• The screen will now show [00-23]. Press >> to set the start of the heating. - The [:] indication means that the timer function is currently activated and that the temperature measured by the unit corresponds to the temperature setting.
- The [.] Indication means that the timer function is currently activated and the temperature measured by the unit corresponds to the temperature setting minus 3 °C.
- If the LCD screen does not show anything, this indicates that the timer function is disabled and the heating elements are not operating. The corresponding point will flash during the setting.
When you press the button a second time, the LCD screen displays „2“ for Tuesday.
Note: You may press this button up to seven times to set the temperature for the entire week. If you press the key an eighth time, you will exit the menu and the screen will show the setting for the current day of the week.
Activate the timer function Ⓛ
If you press the timer button, the timer function will be activated.
- When you press the button for the first time, the screen will display and the timer indicator will light up green on the device.
- If you press the button again, the icon will disappear from the screen and the timer indicator on the unit will turn off.
- After activating the timer function, this will be based on the respective temperature settings.
• The LCD screen will display these set parameters:

Note: If you want to change the time, week, and timer settings, you must turn the timer button on and off once to save the new data. When the device has received the new data, it will beep once.
Open window function

- If you press the button once, the screen will display the icon
- If you press the button again, the icon will disappear from the screen.
- When this button is pressed, the unit will beep once.
After the open window function is activated, the device first checks whether the heating elements are currently active. If the heating elements are active, the program will save the current room temperature values and measure the room temperature again every 12 minutes.
- If a temperature drop of more than 4^ C is detected within 30 minutes, the program will automatically deactivate the heating elements as the device suspects an open window.
- After the heating has been stopped for 70 minutes, the program will start again to check whether the window has been closed.
- The unit now will now heat to 1900W for 6 minutes every 30 minutes. If the temperature rises more than 2 °C during this period, the window will be assumed to be closed.
DEVICE CONTROL BY SMARTPHONE
If you integrate the device into your home WiFi, you can conveniently operate it via the associated Klarstein app. The app not only allows you to remotely control the device via your smartphone, but also gives you access to recipes and additional information.
Follow these steps to connect your smartphone to your Klarstein device:
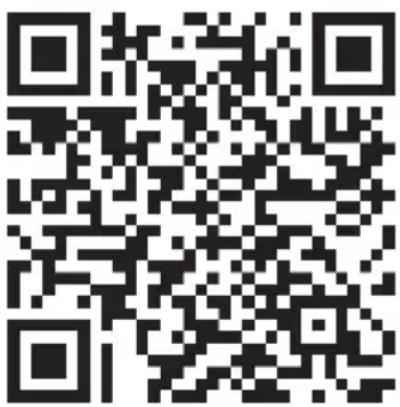
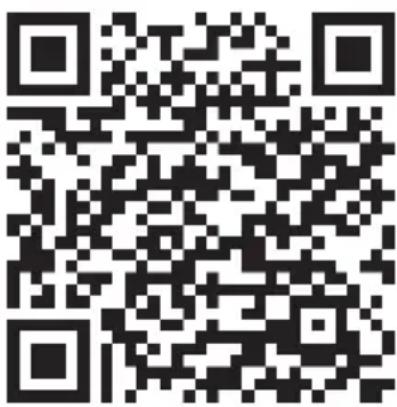
1 Download the Klarstein app first by scanning the QR code with your smartphone (see below), or download it directly from App Store or Google Play.
2 Make sure your smartphone is connected to the same WiFi network that your Klarstein device is to be connected to.
3 Open the Klarstein app.
4 Sign in to your account. If you do not have an account, sign up in the Klarstein app.
5 Follow the instructions from the app.
App Download
Use the scan function of your smartphone to scan the QR code and save the app on your smartphone.
Note: The app provides further information on how to use the app and help on how to connect to your device as soon as you open it for the first time.
| iOS Android | |
 |  |
Troubleshooting connection problems
If your Klarstein device cannot be found in the WLAN, check the following:
• Is the device plugged in?
• Is the WiFi feature of my phone enabled?
- Is the WiFi function of the Klarstein device activated? (Follow the instructions in the app)
- Has the WLAN password been entered correctly?
- Are the router, Klarstein device and smartphone in the immediate vicinity during the connection attempt? (Ideally no more than 5 m apart)
- If you have deactivated the 2.4 GHz band in the settings of your wireless router, activate it in your router settings.
Note: For further help, follow the instructions in the app when setting up the connection.
CLEANING AND CARE
Note: Turn off the unit and unplug it from the power outlet. Wait until the unit has completely cooled down before cleaning it.
- Use a vacuum cleaner to clean the ventilation slots and grilles.
- Remove dust on the outside surfaces with a damp (not wet) cloth.
- Do not use strong cleaning agents or abrasives.
- Do not spray the device with liquids or immerse it in water or other liquids.
• Never open the heater housing.
Storage
Keep the unit in a dust-free place during the low season. Pack it in the original carton. Wind the heater cable cleanly to avoid damaging the cable.
DISPOSAL CONSIDERATIONS
natural_image
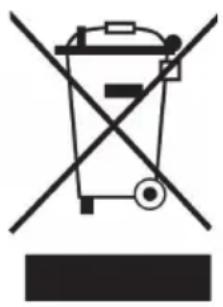
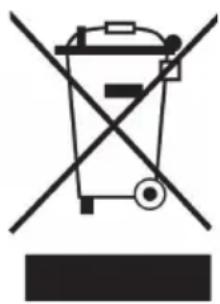
Symbol of a trash bin crossed with a diagonal line, no text or numbers presentIf there is a legal regulation for the disposal of electrical and electronic devices in your country, this symbol on the product or on the packaging indicates that this product must not be disposed of with household waste. Instead, it must be taken to a collection point for the recycling of electrical and electronic equipment. By disposing of it in accordance with the rules, you are protecting the environment and the health of your fellow human beings from negative consequences. For information about the recycling and disposal of this product, please contact your local authority or your household waste disposal service.
This product contains batteries. If there is a legal regulation for the disposal of batteries in your country, the batteries must not be disposed of with household waste. Find out about local regulations for disposing of batteries. By disposing of them in accordance with the rules, you are protecting the environment and the health of your fellow human beings from negative consequences.
DECLARATION OF CONFORMITY
CE UK CA
Manufacturer:
Chal-Tec GmbH, Wallstrasse 16, 10179 Berlin, Germany.
Importer for Great Britain:
Berlin Brands Group UK Limited
PO Box 42
272 Kensington High Street
London, W8 6ND
United Kingdom
Hereby, Chal-Tec GmbH declares that the radio equipment type Bormio Smart is in compliance with Directive 2014/53/EU. The full text of the EU declaration of conformity is available at the following internet address: use.berlin/10035086
For Great Britain: Hereby, Chal-Tec GmbH declares that the radio equipment type Bormio Smart is in compliance with the relevant statutory requirements. The full text of the declaration of conformity is available at the following internet address: use.berlin/10035086
Estimado cliente:
ÍNDICE
natural_image
Symbol of a trash bin crossed with a diagonal line, no text or numbers presentBerlin Brands Group UK Limited
PO Box 42
272 Kensington High Street
London, W8 6ND
United Kingdom
SOMMAIRE
FICHE DE DONNÉES PRODUIT
natural_image
Symbol of a trash bin crossed with a diagonal line, no text or numbers presentDÉCLARATION DE CONFORMITÉ

Fabricant :
Chal-Tec GmbH, Wallstraße 16, 10179 Berlin, Allemagne.
Berlin Brands Group UK Limited
PO Box 42
272 Kensington High Street
London, W8 6ND
United Kingdom
INDICE
natural_image
Symbol of a trash bin crossed with a diagonal line, no text or numbers presentBerlin Brands Group UK Limited
PO Box 42
272 Kensington High Street
London, W8 6ND
United Kingdom
INHOUDSOPGAVE
INSTRUCTIES VOOR AFVOER
natural_image
Symbol of a trash bin crossed with a diagonal line, no text or numbers presentBerlin Brands Group UK Limited
PO Box 42
272 Kensington High Street
London, W8 6ND
United Kingdom


- INHALTSVERZEICHNIS
- Member of Berlin Brands Group
- Dahlwitz-Hoppegarten
- CONTENTS
- TECHNICAL DATA
- SAFETYINSTRUCTIONS
- WARNING
- CONTROL PANEL AND BUTTON FUNCTIONS
- REMOTE CONTROL AND BUTTON FUNCTIONS
- GETTING STARTED
- MANUAL OPERATION
- Adjust the heating power
- Adjust the brightness
- Start the device ⏻
- Flame and coal control switch ①
- Adjust the flame brightness
- Adjust the brightness of the coal bed
- Set the heating power
- Adjust the temperature setting ▲▼
- Setting the current week and time >>
- Adjust the timer parameters
- Activate the timer function Ⓛ
- Open window function
- DEVICE CONTROL BY SMARTPHONE
- App Download
- CLEANING AND CARE
- Storage
- DISPOSAL CONSIDERATIONS
- DECLARATION OF CONFORMITY
- CE UK CA
- Manufacturer:
- Importer for Great Britain:
- Estimado cliente:
- ÍNDICE
- SOMMAIRE
- DÉCLARATION DE CONFORMITÉ
- Fabricant :
- INDICE
- INHOUDSOPGAVE
- INSTRUCTIES VOOR AFVOER
Brand : Klarstein
Model : Bormio Smart
Category : Fireplace