
10031558 - Fireplace Klarstein - Free user manual and instructions
Find the device manual for free 10031558 Klarstein in PDF.


| Product type | Electric fireplace |
| Brand | Klarstein |
| Model | 10031558 |
| Power supply | 220-240 V ~ 50 Hz |
| Rated power | 2000 W |
| Minimum power | 1000 W |
| Standby consumption | 0.48 W |
| Heating type | Convection with LED flame simulation |
| Temperature control | Electronic with weekly programming |
| Adjustable temperature range | 15 °C to 30 °C |
| Number of timer settings | 10 |
| Remote control | Yes |
| Flame simulation | Yes, adjustable in 5 brightness levels |
| Overheat protection | Yes |
| Adaptive start control function | Yes |
| Cleaning | Soft dry cloth; glass with damp cloth |
| LED maintenance | Not user serviceable |
| Main use | Supplementary heating (not recommended as main heat source) |
Frequently Asked Questions - 10031558 Klarstein
User questions about 10031558 Klarstein
0 question about this device. Answer the ones you know or ask your own.
Ask a new question about this device
Download the instructions for your Fireplace in PDF format for free! Find your manual 10031558 - Klarstein and take your electronic device back in hand. On this page are published all the documents necessary for the use of your device. 10031558 by Klarstein.
USER MANUAL 10031558 Klarstein
KLARSTEIN NIEIJSRYATK TEIN NIEIJSRYATK KLAR KLARSTEIN NIEIJSRYATK TEIN NIEIJSRYATK KLAR KLARSTEIN NIEIJSRYATK TEIN NIEIJSRYATK KLAR KLARSTEIN NIEIJSRYATK
KLARSTEIN
Elektrischer Kamin
Fireplace Heater
Cheminée électrique
Camino elettrico
Chimenea eléctrica
10012126 10031558
Note: The device is not suitable for use as a primary heat source.
natural_image
Symbol of a trash bin crossed with a diagonal line, no text or numbers presentCongratulations on purchasing this equipment. Please read this manual carefully and take care of the following hints to avoid damages. Any failure caused by ignoring the mentioned items and cautions mentioned in the instruction manual are not covered by our warranty and any liability.
CONTENT
Technical Data 14
Declaration of Conformity 14
Product Data Sheet 15
Safety Instructions 16
Installation 17
General Use 18
Display and Indicators 19
Operation and Settings 20
Timer Settings 21
Troubleshooting 23
Care and Cleaning 24
Hints on Disposal 24
TECHNICAL DATA
| Item number 10012126, 10031558 | |
| Power supply 220-240 V ~ 50 Hz | |
| Power consumption 2000 W |
DECLARATION OF CONFORMITY

Producer:
Chal-Tec GmbH, Wallstraße 16, 10179 Berlin, Germany.
This product is conform to the following European
Directives:
2014/30/EU (EMC)
2014/35/EU (LVD)
2011/65/EU (RoHS)
2009/125/EC (ErP)
PRODUCT DATA SHEET
| Model identifier(s): 10012126, 10031558 | ||||||
| Item Symbol Value Unit Item Unit | ||||||
| Heat output Type of heat input, for electric storage local space | heaters only | |||||
| Nominal heat output Pnom 2.0 | kW manual | heat charge | control, with | integrated thermostat | N/A | |
| Minimum heat output (indicative) | Pmin | 1.0 | kW | manual heat charge control with room and/or outdoor temperature feedback | N/A | |
| Maximum continuous heat output | Pmax,c | 2.0 | kW | electronic heat charge control with room and/or outdoor temperature feedback | N/A | |
| Auxiliary electricity consumption | fan assisted heat output | N/A | ||||
| At nominal heat output (fan motor) | elmax | 0.014 | kW | Type of heat output/room temperature control (select one) | ||
| At minimum heat output (fan motor) | elmin | 0.014 | kW | single stage heat output and no room temperature control | no | |
| In standby mode | eISB | 0.48 | W | Two or more manual stages, no room temperature control | no | |
| with mechanic thermostat room temperature control | no | |||||
| with electronic room temperature control | no | |||||
| electronic room temperature control plus day timer | no | |||||
| electronic room temperature control plus week timer | yes | |||||
| Other control options (multiple selections possible) | ||||||
| room temperature control, with presence detection | no | |||||
| room temperature control, with open window detection | no | |||||
| with distance control option | no | |||||
| with adaptive start control yes | ||||||
| with working time limitation | no | |||||
| with black bulb sensor | no | |||||
| Contact details | Chal-Tec GmbH, Wallstraße 16, 10179, Berlin, Germany | |||||
SAFETYINSTRUCTIONS
- This appliance can be used by children aged from 8 years and above and persons with reduced physical, sensory or mental capabilities or lack of experience and knowledge if they have been given supervision or instruction concerning use of the appliance in a safe way and understand the hazards involved.
- Children shall not play with the appliance. Cleaning and user maintenance shall not be made by children without supervision.
• Children of less than 3 years should be kept away unless continuously supervised.
- Children aged from 3 years and less than 8 years shall only switch on/off the appliance provided that it has been placed or installed in its intended normal operating position and they have been given supervision or instruction concerning use of the appliance in a safe way and understand the hazards involved. Children aged from 3 years and less than 8 years shall not plug in, regulate and clean the appliance or perform user maintenance.

CAUTION
Risk of burns! Some parts of this product can become very hot and cause burns. Particular attention has to be given to be given where children and vulnerable people are present.
- If the appliance or the supply cord is damaged, it must be repaired by manufacturer, its service agent or qualified person.
- This heater must be used on an AC supply only and the voltage marked on the heater must correspond to the supply voltage.
- Do not switch the appliance on until it properly installed as described in this manual.
- The heater must not be located immediately below a socket outlet.
- The heater must not be located in front of a socket-outlet.
- Keep furniture, curtains and other fl ammable material at least 1 meter away from the appliance. Never closed to curtains and other combustible material, otherwise may cause risk
- Do not leave the appliance unattended during use.
- Do not leave the appliance unattended whilst connected to the mains supply.
- This appliance is intended for household use and should not be used for industrial purposes.
- From time to time, check the cord for damage. Never use the appliance if the cord or any part of the appliance shows signs of damage.
- Do not operate this appliance with a damaged plug or cord, after a malfunction or after being dropped or damaged in any way.
- Repairs to electrical appliances should only be performed by a qualified electrician. Improper repairs may place the user at serious risk.
- Do not run the mains cable under carpets, rugs etc.
-
Do not allow the mains cable to hang over sharp edges or come into contact with hot surfaces.
-
In order to avoid overheating, do not cover or obstruct the heater in any way.
• Overheating will result if it is accidentally covered. - Never immerse the product in water or any other liquids.
- Do not use this heater in the immediate surroundings of a bath, a shower or a swimming pool.
- Do not use the appliance outdoors.
- Do not use if you have wet hands.
- Never use the appliance on or near hot surfaces.
- Before cleaning the appliance, ensure it is unplugged from the power and that it is completely cooled.
- Do not clean the appliance with abrasive chemicals.
- Never use accessories that are not recommended or supplied by the manufacturer. It could cause danger to the user or damage to the appliance.
- Do not lift the appliance by the front panel.
- In order to avoid a hazard due to inadvertent resetting of the thermal cutout, this appliance must not be supplied through an external switching device, such as a timer, or connected to a circuit that is regularly switched on and off by the utility.
Note: This heater is not equipped with a device to control the room temperature. Do not use this heater in small rooms when they are occupied by persons not capable of leaving the room on their own, unless constant supervision is provided.
INSTALLATION
Unpack the heater carefully and retain the packaging for possible future use. The heater are normally positioned against a wall.
A choice of 1kW or 2kW heat output is provided by the heater, which is located at the bottom of the heater.
Before connecting the heater check that the supply voltage is the same as that stated on the heater.
Note: Used in an environment where background noise is very low, it may be possible to hear a sound which is related to the operation of the flame effect. This is normal and should not be a cause for concern.
GENERAL USE
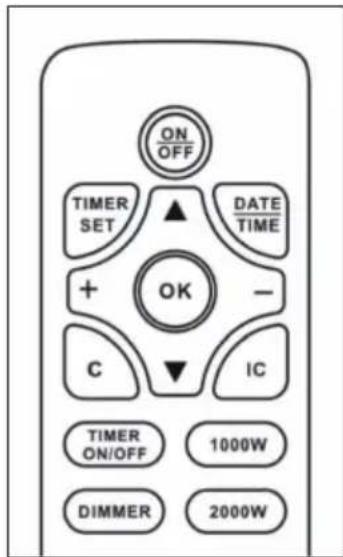
Note: The appliance can be operated either by the switches located at the bottom left hand side of the fire or by the supplied remote control.
Manual Operation
- This is done by operating the switches located at the bottom left hand side of the fire. The standby rocker switch must first be switched on, the fire will beep to indicate that it is powered up.
- Press the O/I button once to turn on the appliance and fire effect. A red indicator light will show to indicate that the fire is ON. Press the O/I button for 3 seconds this will operate the dimmer mode, hold the button down until the desired brightness is obtained.
- Press once the 1000W button for the low heat settings; press twice to switch off the heat setting.
- Press once the 2000W button for the low heat settings; press twice to switch off the heat setting.
Remote Operation
The standby rocker switch located at the bottom left hand side of the fire must first be switched on; the fire will beep to indicate that it is powered up.
It takes a little time for the receiver to respond to the transmitter. Do not press the buttons more than once within two seconds for the fire to operate normally.
DISPLAY AND INDICATORS
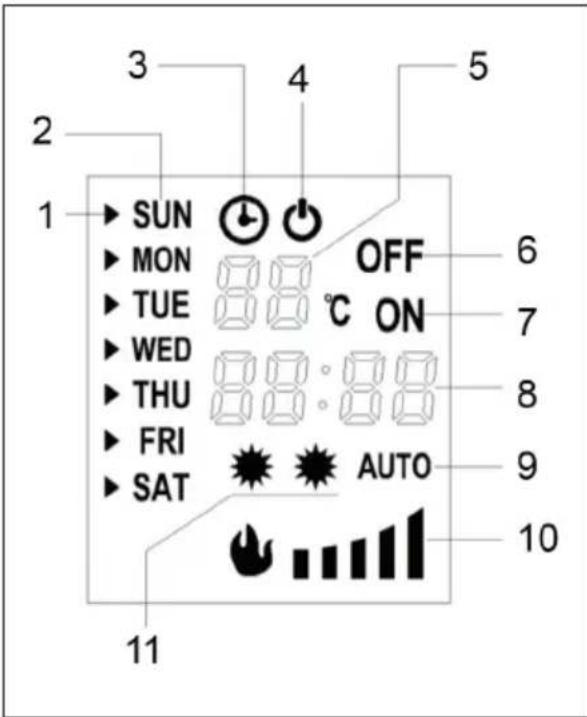
1 Cursor
2 Date
3 Timer
4 Standby
5 Temperature display/serial number display
6 Timer off
7 Timer on
8 Time display
9 Automatic control of heating
10 Flame brightness
11 Heat position
Temperature and serial number display (5)
Normally it displays the room temperature; while setting the temperature, the setting temperature is displayed; When setting the timer, the serial number of the setting is displayed.
Time display (8)
Normally it is display the current time; while setting the timer, the setting time is displayed.
Timer starting and timer shutdown
While setting the timer, the setting time is displayed, and the timer is used in combination with serial number setting.
| 05 ON23:4005 OFF06:10 | E.g. Means the starting time of setting 5 is 23:40. |
| E.g. means the shutdown time of setting 5 is 6:10. |
Flame brightness
It displays the current brightness of the flame, which ranges from one to five positions.
OPERATION AND SETTINGS
Boot steps
1 Connect the power
2 Turn on the power switch
3 Press the control switch or "ON/OFF" key of the remote controller to start up
4 Press once the 1000W button for the low heat settings; press twice to switch off the heat setting.
5 Press once the 2000W button for the high heat settings; press twice to switch off the heat setting.
6 Press the DIMMER button for operate the dimmer mode.
Adaptive start control function
Press "IC" button on the remote controller to start or close the adaptive start control function. When turned on this function, the fireplace can automatically change the heating mode, and this is depend on the setting temperature and the room temperature. When the timer is on, it is possible to start the heating ahead of the schedule.
Note: Adaptive start control function is only working when the week timer system is power on.
The date and time setting
1 Press „DATE TIME“ button, then press the „▲r” key to select the date
2 Press „DATE TIME“ button again, then press the „+“ or „-“ to set the hour
3 Press „DATE TIME“ button again, then press the „+“ or „-“ to set the minute
4 Press „OK“ button to finish the setting.
Temperature setting
The default temperature setting is 22^ , press „+“ or „-“ on the remote controller to set the temperature, which ranges is from 15^ to 30^ .
TIMER SETTINGS
• There are up to 10 kinds of timer setting.
• Each setting has its date, power-on time, shutdown time and temperature setting
• The max. time of each setting is 23 hours 50 minutes
- The setting date for each timer can be any day or more days of a week
- The setting date is the date of power-on time. If the shutdown time is on the second day, it is unnecessary to set the date, you just set the shutdown time.
View the timer setting
1 Press the "TIME SET" button
2 Press the „+“ or „-“ to check the power-on time by one by one.
3 For checking the shutdown time, press the "▲button
4 Press the „+“ or „-“ to continue viewing
5 For deleting the current item of setting, press „C“ to delete this setting.
Timer setting
(1) Select the settings
Press the "TIME SET" button, and the serial number of setting starts blinking Press the "+" or "-" to change the serial number of the setting. E.g., it is showing the setting of No.2.
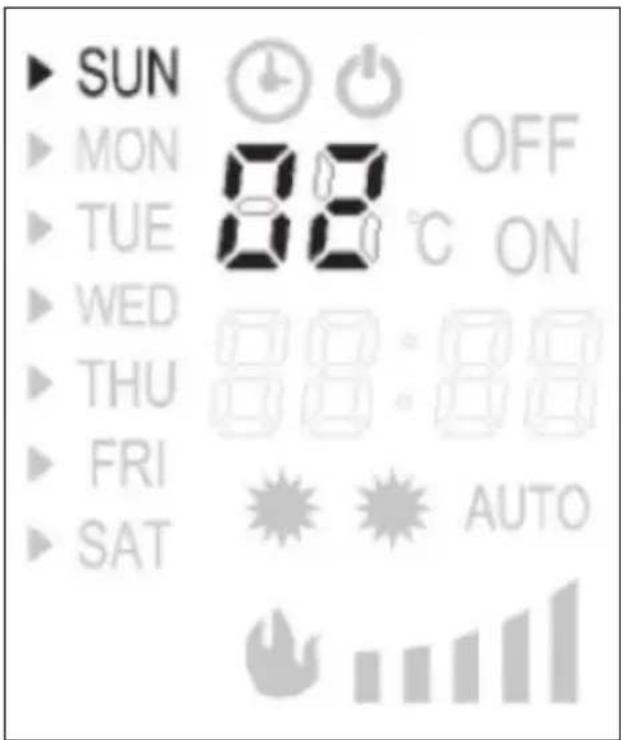
(2) Select date
Press "TIME SET" button once again, and the cursor on the left side of date starts blinking Press the "▲" or "▼" keys to move the cursor to the corresponding date, press the "+" to add the corresponding date, or press "-" to delete the date until you have completed the selection of all dates
(3) Set the start time
1 Continue to press the "TIME SET" button, the hour starts blinking
2 Press the „+“ or „-“ to adjust the hour
3 Continue to press the "TIME SET" button, the minute starts blinking
4 Press the „+“ or „-“ to adjust minute
(4) Set the shutdown time
1 Press the "TIME SET" button, the display is off, and the hour starts blinking.
2 Press the „+“ or „-“ to adjust the hour.
3 Continue to press the "TIME SET" button, the minute starts blinking.
4 Press the „+“ or „-“ to adjust minute.
(5) Set temperature
Then press the „TIME SET“ button, and the temperature setting starts blinking. Then you can adjust the temperature by pressing „+“ or „-“. and “+” button will raise the temperature, and the “-” will lower the temperature.
Press „TIME SET“ button to continue setting, and press „OK“ complete the setting.
Important Notes on Timer
• TIME ON/OFF is to control the timer opening and closing
- Note 1: Restart the machine after the power is cut off, the original setting is kept, but the date and time must be reset.
- Note 2: When the week timer is power on, you should turn on the heating function, or else when the machine is working again as the timer, there will be only the flame effect working.
Safety Cut-Off
This appliance is fitted with a safety cut-off which will operate if the fire overheats (e.g. due to blocked air vents). For safety reasons, the fire will NOT automatically reset.
To reset the appliance, disconnect the appliance from the mains supply for at least 15 minutes. Reconnect to the mains supply and switch on the appliance.
Troubleshooting
| Symptom Solution | |
| No operation/no fan. Check fuse by replacement. | |
| Check for safety cut-off operation. | |
| No fire effect light. Check the bulb by a qualified electrician. | |
CARE AND CLEANING
Always disconnect from the mains supply before cleaning heater. For general cleaning use a soft clean duster - never use harsh abrasive or cleaners.
Note: The glass viewing screen should be cleaned carefully with a soft cloth. DO NOT use proprietary glass cleaners.
This product does not use a standard bulb for its flame effect. The appliance uses an electronically controlled LED system to create the effect, therefore no parts need to be replaced. There are no user-serviceable parts on this appliance. Under no circumstances should the appliance be serviced by anyone other than a qualified electrician.
HINTS ON DISPOSAL
natural_image
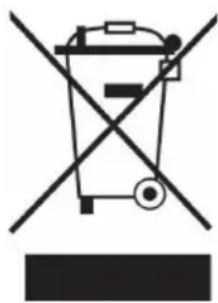
Symbol of a trash bin crossed with a diagonal line, representing no waste or discharge (no text or labels)According to the European waste regulation 2012/19/EU this symbol on the product or on its packaging indicates that this product may not be treated as household waste. Instead it should be taken to the appropriate collection point for the recycling of electrical and electronic equipment. By ensuring this product is disposed of correctly, you will help prevent potential negative consequences for the environment and human health, which could otherwise be caused by inappropriate waste handling of this product. For more detailed information about recycling of this product, please contact your local council or your household waste disposal service.
Your product contains batteries covered by the European Directive. 2006/66/EC, which cannot be disposed of with normal household waste. Please check local rules on separate collection of batteries. The correct disposal of batteries helps prevent potentially negative consequences on the environment and human health.
Cher client,
DÉCLARATION DE CONFORMITÉ

Fabricant :
Chal-Tec GmbH, Wallstraße 16, 10179 Berlin, Allemagne.
FICHE DE DONNÉES PRODUIT
ÉCRAN ET INDICATIONS
natural_image
Symbol of a trash bin crossed with a diagonal line, no text or numbers presentnatural_image
Symbol of a trash bin crossed with a diagonal line, no text or numbers presentnatural_image
Symbol of a trash bin crossed with a diagonal line, no text or numbers present
- KLARSTEIN NIEIJSRYATK TEIN NIEIJSRYATK KLAR KLARSTEIN NIEIJSRYATK TEIN NIEIJSRYATK KLAR KLARSTEIN NIEIJSRYATK TEIN NIEIJSRYATK KLAR KLARSTEIN NIEIJSRYATK
- KLARSTEIN
- Elektrischer Kamin
- CONTENT
- TECHNICAL DATA
- DECLARATION OF CONFORMITY
- PRODUCT DATA SHEET
- SAFETYINSTRUCTIONS
- CAUTION
- INSTALLATION
- GENERAL USE
- Manual Operation
- Remote Operation
- DISPLAY AND INDICATORS
- Temperature and serial number display (5)
- Time display (8)
- Timer starting and timer shutdown
- Flame brightness
- OPERATION AND SETTINGS
- Boot steps
- Adaptive start control function
- The date and time setting
- Temperature setting
- TIMER SETTINGS
- View the timer setting
- Timer setting
- Important Notes on Timer
- Safety Cut-Off
- Troubleshooting
- CARE AND CLEANING
- HINTS ON DISPOSAL
- Cher client,
- DÉCLARATION DE CONFORMITÉ
- ÉCRAN ET INDICATIONS
Brand : Klarstein
Model : 10031558
Category : Fireplace