
Oceana - Dishwasher Klarstein - Free user manual and instructions
Find the device manual for free Oceana Klarstein in PDF.
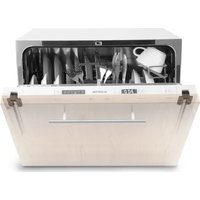
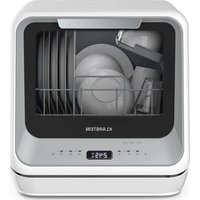
| Product type | Compact freestanding dishwasher |
| Brand | Klarstein |
| Model | Oceana |
| Dimensions (H x W x D) | 46,5 x 42,0 x 43,5 cm |
| Number of standard place settings | 3 |
| Energy efficiency class | F |
| Energy consumption (ECO program) | 0,446 kWh / cycle |
| Water consumption (ECO program) | 6,0 L / cycle |
| ECO program duration | 2 h 35 min |
| Noise level | 58 dB(A) |
| Noise emission class | D |
| Wash programs | ECO, Intensive, Glass, 58 min, Rapid, Self-cleaning |
| Installation type | Freestanding |
| Power supply | See manual |
| Regeneration salt tank capacity | Approximately 130 g |
| Weight | Not specified |
| Filtration system | Fine filter and main filter |
| Automatic door opening function | Yes (depending on program) |
| Child lock | Yes |
| Delayed start | Up to 24 hours |
| Manufacturer warranty | See conditions |
Frequently Asked Questions - Oceana Klarstein
User questions about Oceana Klarstein
0 question about this device. Answer the ones you know or ask your own.
Ask a new question about this device
Download the instructions for your Dishwasher in PDF format for free! Find your manual Oceana - Klarstein and take your electronic device back in hand. On this page are published all the documents necessary for the use of your device. Oceana by Klarstein.
USER MANUAL Oceana Klarstein
PRODUKTDATENBLATT (EN 60436)
Congratulations on purchasing this device. Please read the following instructions carefully and follow them to prevent possible damages. We assume no liability for damage caused by disregard of the instructions and improper use. Scan the QR code to get access to the latest user manual and more product information.

CONTENT
Safety Instructions 32
Quick Start Guide 34
Device Overview 37
Control Panel and Keys 38
Adding Rinsing Salt 40
Loading the Dishwasher 42
Loading the Baskets (EN 60436) 44
Detergent Types 45
Adding Detergent 45
Washing Programmes (EN 60436) 46
Operation in Detail 47
Cleaning and Care 49
Troubleshooting 51
Product Data Sheet (EN 60436) 56
Hints on Disposal 57
Producer 57
SAFETY INSTRUCTIONS
WARNING
Risk of explosion! Under certain conditions, Hydrogen gas may be produced in a hot-water system that has not been used for two weeks or more. HYDROGEN GAS IS EXPLOSIVE. If the hot-water system has not been used for such a period, before using the dishwasher turn on all hot-water faucets and let the water flow from each for several minutes. This will release any accumulated hydrogen gas. As the gas is flammable, do not smoke or use an open fl ame during this time.
- Do not abuse, sit on, or stand on the door or dish basket of the dishwasher.
- Do not touch the heating element during or immediately after use.
- Do not operate your dishwasher unless all enclosure panels are properly in place.
- Open the door very carefully if the dishwasher is operating. There is a risk of water squirting out.
- Do not place any heavy objects or stand on the door when it is open. The appliance could tip forward.
- When using your dishwasher, you should prevent plastic items from contacting with heating element.
- Check that the detergent receptacle is empty after completion of the wash cycle.
- Do not wash plastic items unless they are marked dishwasher safe or the equivalent.
- For plastic items not so marked, check the manufacturer's recommendations.
- Use only detergent and rinse additives designed for an automatic dishwasher.
- Never use soap, laundry detergent, or hand washing detergent in your dishwasher.
- Other means for disconnection from the supply must be incorporated in the fixed wiring with at least 3mm contact separation in all poles.
- Keep children away from detergent and rinse aid, keep children away from the open door of the dishwasher, there could still be some detergent left inside.
- Young children should be supervised to ensure that they do not play with the appliance.
- This device may be only used by children 8 years old or older and persons with limited physical, sensory and mental capabilities and / or lack of experience and knowledge, provided that they have been instructed in use of the device by a responsible person who understands the associated risks.
-
Dishwasher detergents are strongly alkaline. They can be extremely dangerous if swallowed. Avoid contact with skin and eyes, and keep children away from the dishwasher when the door is open.
-
The door should not be left in the open position since this could present a tripping hazard.
- If the supply cord is damaged, it must be replaced by the manufacturer or its service agent or a similarly qualified person in order to avoid a hazard.
- Please dispose of packing materials properly.
- During installation, the power supply must not be excessively or dangerously bent or flattened.
- Do not tamper with controls.
- The appliance is to be connected to the water mains using new hose sets, and the old hose-sets
should not be reused. - Make sure that the carpet must not obstruct the openings at the bottom base.
- Use the dishwasher only for its intended function.
- The dishwasher is intended for indoor use only.
- The dishwasher is not designed for commercial use. It is intended for use in domestic households and in similar working and residential environments.

CAUTION
Risk of injury! Locate sharp items so that they are not likely to damage the door seal. Load sharp knives with the handles up to reduce the risk of cut-type injuries. Warning: Knives and other utensils with sharp points must be loaded in the basket with their points down or placed in a horizontal position.

WARNING
Risk of suffocation! Packaging material could be dangerous for children! For disposing of package and the appliance please go to a recycling centre. Cut off the power supply cable and make the door closing device unusable.
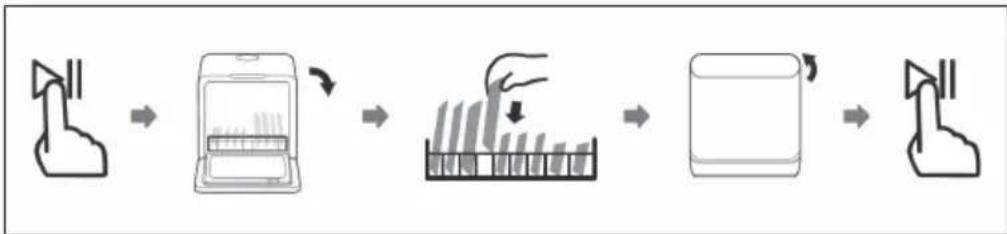
QUICK START GUIDE
(1) Setting up water drainage
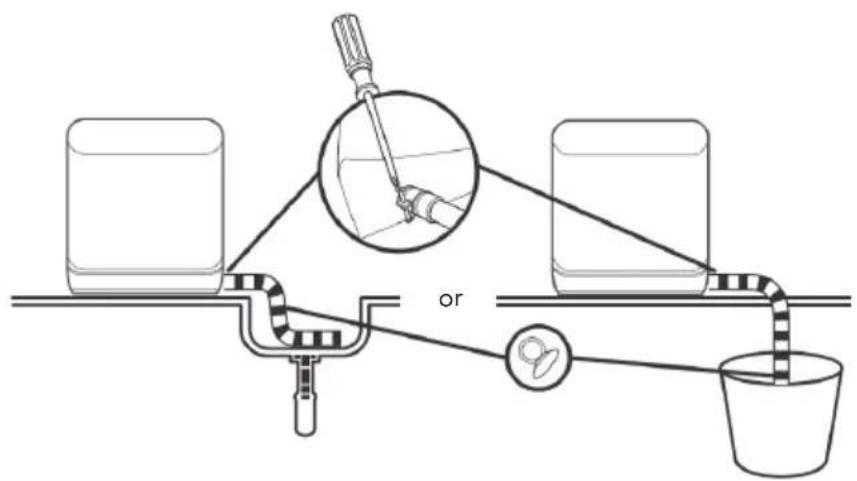
Insert the end of the drain hose into a sink or bucket. Fix the drain hose with the back pipe of the machine. The interface is fitted with clamps and tightened with a screwdriver. OR: Fix the drain hose with suction cups.
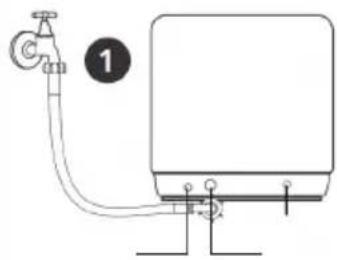
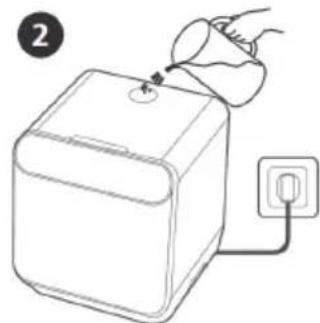
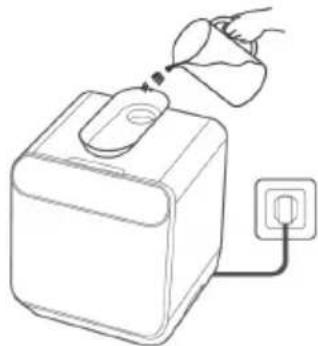
(2) Setting up the water supply
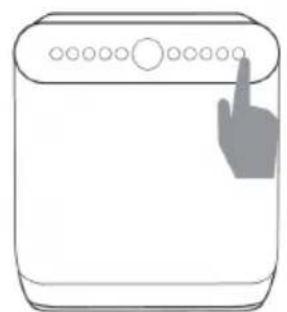
Note: Before adding water, press the Power button to turn on the dishwasher.
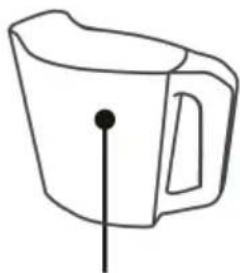
You can fill the device with water in two ways:
Permanent connection via the tap (1)
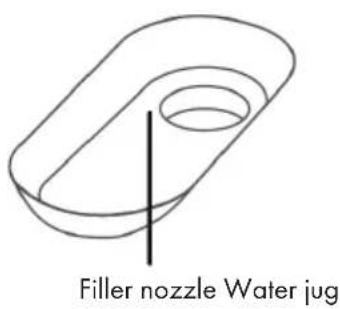
- Manual filling via the cap at the top of the device (2)
How to tell if there is enough water in the tank:
If there is too little water in the tank, the indicator lights up.
- When the tank is filled with enough water, a short beep sounds for 3 seconds and the display goes out.
(3) Filling the device
- Remove the larger food residues from the dishes.
- Open the door, place the dishes in the basket and add detergent.
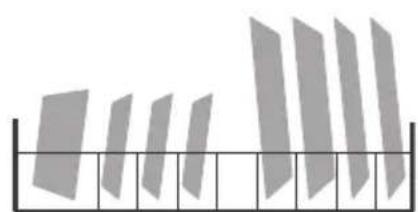
Populate the device by size and from both sides to the center. All cutlery should be tilted to improve cleaning performance. The arm may be blocked by improper placement of the cutlery, in which case dishes may not be properly cleaned.
| Place the dishes dirty side down in the basket and tilt slightly to allow water to drain off. |
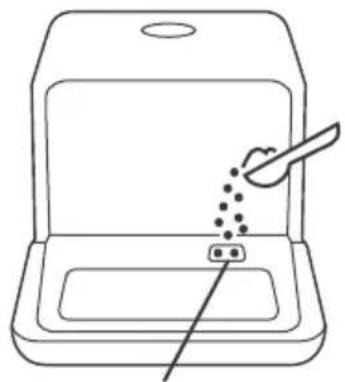
At this place the detergent is filled in.

(4) Starting the device
Close the door, select a program and start the device.
Dobrom

Lower spray arr
Filter
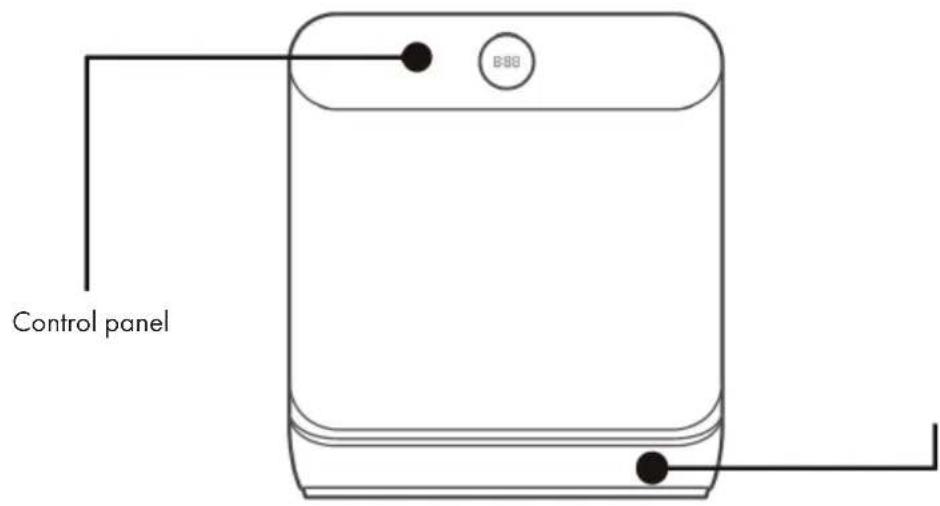
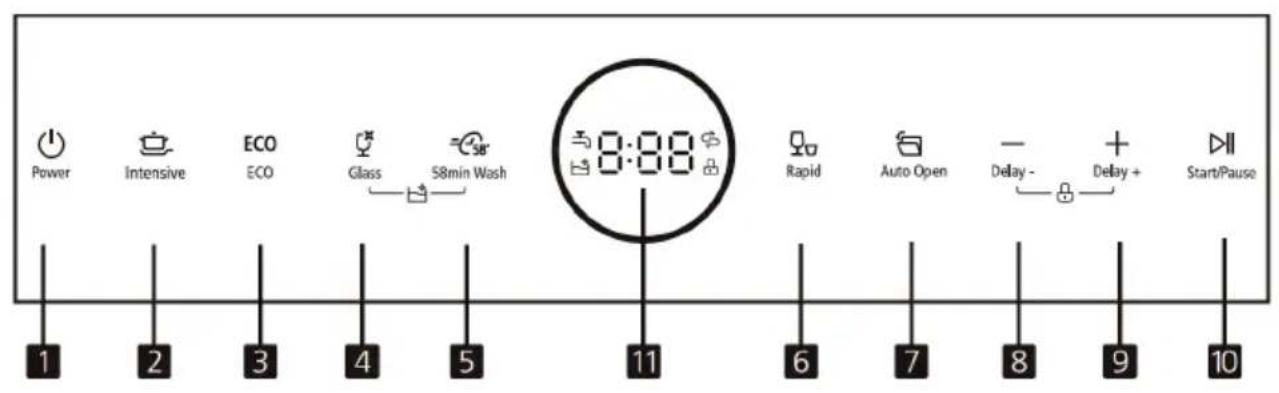
CONTROL PANEL AND KEYS
basket
it compartment
| 1 | Power | For switching on and off. | |
| 2 | Intensive | Press the button to select the intensive program. Heavily soiled items include pots and pans with dried food. | |
| 3 | ECO | Press the button to select the ECO program. This is the standard program suitable for normally soiled dishes such as pots, plates, glasses and slightly soiled pans. | |
| 4 | Glass | Press the button to select the glass program. For lightly soiled crockery and slightly soiled glasses. Press [4] and [5] simultaneously for 3 seconds to start the self-cleaning program, which ensures that the dishwasher cleans itself effectively. | |
| 5 | 58min wash | Press the button to select the 58-minute washing program. | |
| 6 | Rapid | Press the button to select the fast wash program. A shorter wash cycle for slightly soiled dishes that do not need to be dried. | |
| 7 | Auto open | Press this button to switch the automatic door open function on and off. When the corresponding indicator lights up, this means that the door will open automatically during the drying stage for better drying. | |
| 8 | Delay - | Press this button to reduce the delay of the wash start. Pressing this button reduces the delay in the start of the wash cycle by one hour. Press buttons [8] and [9] simultaneously for 3 seconds to turn the child lock on and off. | |
| 9 | Delay + | Press this button to increase the wash start delay up to 24 hours. Pressing this button increases the delay in the start of the wash cycle by one hour. Press buttons [8] and [9] simultaneously for 3 seconds to turn the child lock on and off. | |
| 10 | Start/Pause | To start or interrupt the selected wash programme when the dishwasher is in operation. | |
| 11 | Display | 8:88 | The display shows the remaining time, delay time, functions and error codes in the middle. |
| ∅ | If the display is lit, this means that the dishwasher is low on dishwashing salt and that salt needs to be topped up. | ||
| When the indicator is lit, this means that the tap is closed. | |||
| When the indicator is illuminated, this means that the child lock is on. | |||
| When the indicator is illuminated, this means that the self-cleaning programme is running. | |||
ADDING RINSING SALT
Note: If your dishwasher does not have a water softener (on some models), you can skip this section.
Only use rinsing salt that is intended for use in the dishwasher.
The salt container is under the basket and should be filled as follows:
- Any other type of salt that is not specifically designed for the dishwasher, especially table salt, will damage the container. In the case of damage caused by the use of unsuitable salt, the manufacturer will not be liable for any damage caused.
- Fill the device with rinsing salt before starting a run. This avoids spilled salt grains that remain on the floor of the machine for an indefinite period, which can lead to corrosion.
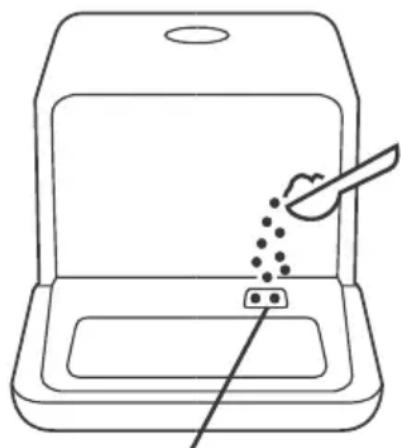
How to fill in the rinsing salt
| A | Remove the basket and unscrew the cap from the salt container. |
| B | Add 1 liter of water to the salt container before the first wash. |
| C | Insert the end of the funnel (supplied) into the hole and pour in about 130 g of salt. It is normal for a small amount of water to come out of the salt container. |
| D | After filling, tighten the cap clockwise. |
| E | The salt warning lamp usually goes out within 2-6 days after filling the salt container. |
| F | Immediately after filling the salt into the salt container, a washing program should be started (e.g., the quick program "Rapid"). Otherwise, the filter system, the pump or other important parts of the machine may be damaged by salt water. |
Important instructions
- The salt container should only be refilled when the salt warning light on the control panel is lit. Depending on how well the salt dissolves, the salt warning light will still light up when the salt container is filled. If there is no salt warning light on the control panel (on some models), you can use the cycles the dishwasher has undergone to determine when to refill with salt.
- If you spill some salt, start the quick program (Rapid) to remove the excess salt.
Step 1: Call up rinsing salt settings
Close the door within 60 seconds of powering on, press and hold the Start/Pause button for 5 seconds.
Step 2: Adjust the amount of rinsing salt according to water hardness
Press the Start/Pause button to select the correct setting according to your water hardness: H1 > H2 > H3 > H4 > H5 > H6. For the correct water softener setting, refer to the table below in the „Water hardness and rinsing salt quantity" section.
Step 3: Leave rinsing salt settings
If you do not make another setting for 5 seconds, the unit will automatically exit the settings and enter standby mode.
Water hardness and rinsing salt quantity
| Water hardness | Softener setting | Display | Salt consumption (g/cycle) | |
| °dH 1) | mmol/1 2) | |||
| 0-5 0 - | 0.94 | 1 | H1 | 0 |
| 6-11 1.0 - | 2.0 2 H2 4 | |||
| 12-17 2.1 - | 3.0 3 | 3) | H3 8 | |
| 18-22 3.1 - | 4.0 4 H4 | 13 | ||
| 23-34 4.1 - | 6.0 5 H5 | 20 | ||
| 35-55 | 6.1 - 9.8 | 6 | H6 | 40 |
| (1) German water hardness. (2) Millimoles, international water hardness. (3) Default when first started | ||||
| Note: Ask your local water supplier about the degree of hardness of your tap water. | ||||
LOADING THE DISHWASHER
We recommend only using dishes suitable for dishwashers.
- Use only mild detergents.
- For heat-sensitive dishes, we recommend a program with a lower temperature.
- To prevent damage, do not remove glasses and cutlery from the dishwasher immediately after the program has ended.
| Unsuitable dishes and cutlery | Conditionally suitable dishes and cutlery |
| • Cutlery with wooden, horn, china or mother of pearl handles • Plastic items that are not heat resistant • Older cutlery with glued parts that are not temperature resistant • Bonded cutlery items or dishes • Pewter or copper items • Crystal glass • Things made of non-stainless steel • Wooden dishes • Plastic dishes and utensils | • Certain types of glass, as they can become cloudy over time • Silver and aluminium parts, as they can change colour over time • Glazed dishes, as the glaze disappears the more you wash it |
What you should consider when loading:
Remove larger food residues. Soak residues baked in pans beforehand. It is not necessary to pre-rinse the dishes. Place the items in the dishwasher as follows:
- Place cups, glasses, pots and pans in the dishwasher with the inside facing down.
- Place cups, glasses, pots and pans in the dishwasher with the inside facing down.
- Place dishes and other objects in the appliance in such a way that they cannot fall over.
- Place dishes and other objects in the appliance in such a way that they cannot fall over.
- Do not wash small parts in the dishwasher as they could easily fall out of the basket.
- Make sure that dishes and cutlery do not overlap or cover each other.
- To prevent glass breakage, glasses should not touch.
- Long and sharp objects (such as knives with long blades) must be placed horizontally in the basket to avoid injury.
- For best results, do not overload the dishwasher.
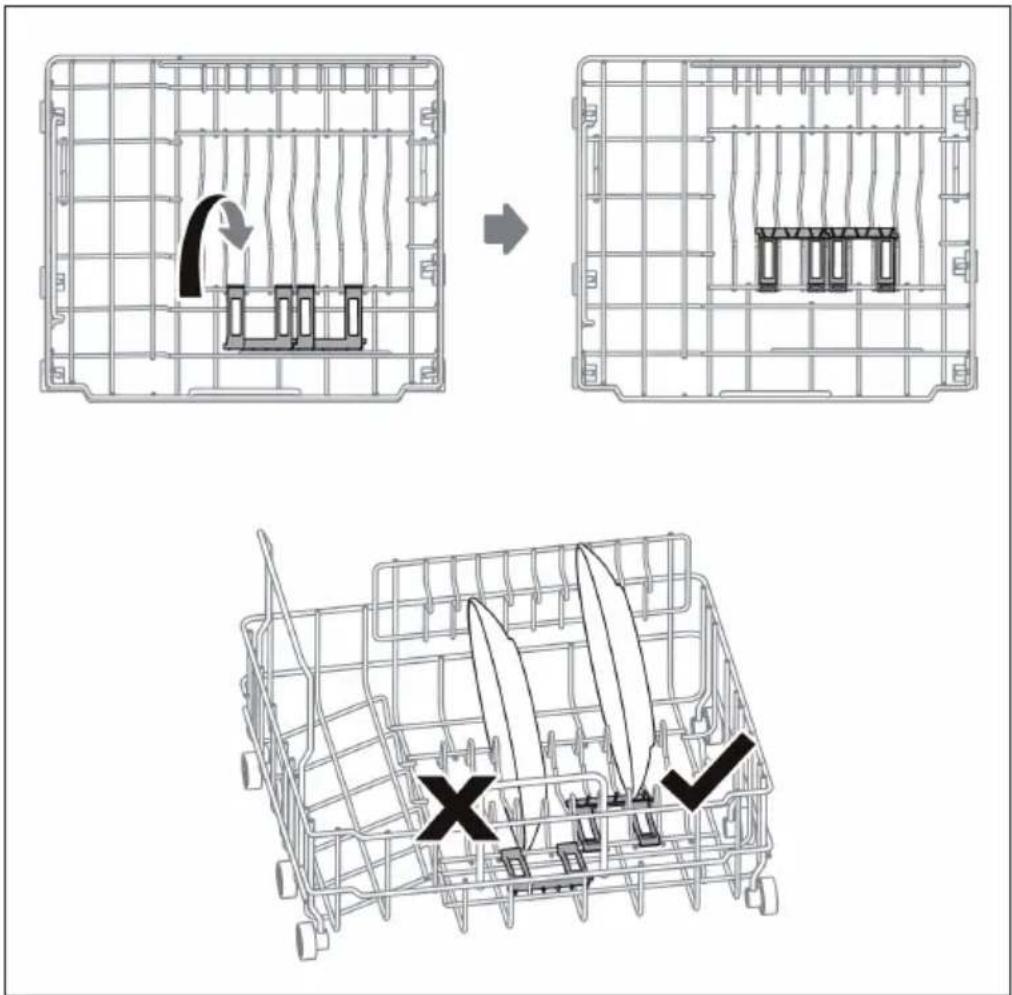
Use of the dishware support
Small-size dishware will drop through the basket and block the rotation of spray arm. Flip the dishware support inward to support the small-size dishware.
LOADING THE BASKETS (EN 60436)

Crockery basket
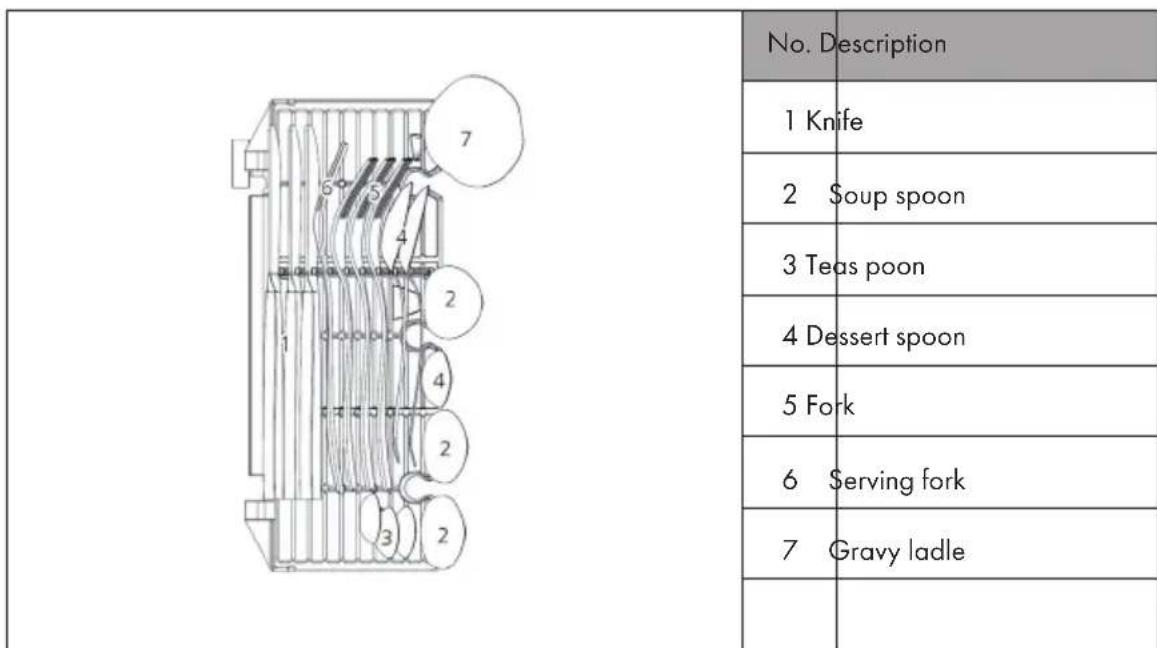
Cutlery basket
DETERGENT TYPES
Notes on the use of detergent
- Only use detergent specifically for dishwashers.
- Never use any other rinse aid and detergents. This will damage the appliance.
- Dishwasher detergent may contain corrosive ingredients. Keep dishwasher detergent out of the reach of children.
- The rinse aid is released during the final rinse to prevent water from forming droplets on your dishes and utensils, which can leave spots and streaks.
Concentrated Detergent
Due to their chemical composition, dishwashing detergents can be divided into two types:
- Conventional alkaline detergents with corrosive components
- Weak alkaline detergents with natural enzymes
Detergent tabs
The detergent tabs of different brands dissolve at different speeds in the machine. For this reason, they often can not develop their full cleaning power in short programs. Therefore always use the long programs in conjunction with detergent tabs to ensure that the tab dissolves completely.
ADDING DETERGENT
Always fill the detergent chamber immediately before starting a program and follow the instructions in the program table. Your dishwasher requires less detergent and rinse aid than standard equipment. Usually one tablespoon of detergent is enough for a normal rinse load. Heavily soiled dishes require more detergent. Put the detergent into the chamber shortly before starting, otherwise it may become damp and not dissolve as well.
Fill in detergent here
WASHING PROGRAMMES (EN 60436)
| Program | Rinsing cycle | Detergent Pre/Main | Time (min) | Energy (kWh) | Water (L) |
| ECO EN 60436* | Washing (55 °C) Rinsing Rinsing (70 °C) Drying | 11 g155 0.44 | 6 | ||
| Intensive | Washing (62 °C) Rinsing (55 °C) Rinsing (70 °C) Drying | 11 g160 0.58 | 6 | ||
| Glass | Washing (50 °C) Rinsing Rinsing (65 °C) Drying | 11 g85 0.38 | 6 | ||
| 58min | Washing (50 °C) Rinsing Rinsing (65 °C) Drying | 11 g58 0.39 | 6 | ||
| Rapid | Washing (55 °C) Rinsing Rinsing (60 °C) | 11 g29 0.29 | 6 | ||
| Self-cleaning | Washing (65 °C) Rinsing Rinsing (70 °C) | 11 g65 0.43 | 6 | ||
| *EN 60436: The ECO program was used for the test run in accordance with EN 60436. | |||||
OPERATION IN DETAIL
Starting the washing process
1 Pull out the basket.
2 Add a suitable detergent.
3 Insert the plug into the socket.
4 Press the Power button to turn on the unit.
5 Connect the inlet hose to the faucet and make sure that the water supply is set to full pressure OR manually add the water to the tank.
6 Select the desired program. When a program is selected, the corresponding indicator will light up.
7 Press the Start/Pause button to start the dishwasher.
Note: If you press the Start/Pause button to pause during washing, the dishwasher will beep every minute until you press the Start/Pause button again to start.
Changing the program
If possible, a running program should be changed directly after the start. Otherwise, the detergent may have already dissolved and run out of the machine with the water. If this is the case, the dishwasher needs to be reset and the detergent dispenser must be refilled. To reset the dishwasher, follow the instructions below:
1 Press the Start/Pause button to pause the washing.
2 Press Program button for more than 3 seconds, the machine will be in stand by state.
3 Press the Program button to select the desired program.
4 Press the Start/Pause button, after 10 seconds, the dishwasher will start.
Note: If you open the door while the unit is running, the machine will stop automatically. When you close the door again and press the Start/Pause button, the unit will continue to move for 10 seconds.
Adding dishes later
A forgotten dish can be added any time before the detergent dispenser opens. In this case, follow the instructions below:
1 Press the Start/Pause button.
2 Open the door a little to stop the washing.
3 After the spray arms stop working, you can open the door completely.
4 Add forgotten dishes.
5 Close the door.
6 Press the Start/Pause button to start the dishwasher again.
After the end of the program
At the end of the program, the buzzer will sound for 8 seconds. Press the power button to turn off the power. Turn off the tap and open the dishwasher door. Wait a few minutes before unloading the dishwasher to avoid scalding. The dishes are still very hot after drying and can easily break. They will also dry better.
-
Switch off the dishwasher:
-
Press the Power button.
-
Turn off the water tap!
-
Open the door carefully:
-
Hot dishes are sensitive to knocks. The dishes should be allowed to cool down around 15 minutes before removing from the appliance.
-
Open the dishwasher's door, leave it ajar and wait a few minutes before removing the dishes. In this way they will be cooler and the drying will be improved.
-
Unloading the dishwasher
It is normal that the dishwasher is wet inside.

CAUTION
Risk of scalding! Never open the door during the washing process, as the hot water may scald you.
Drain water from the water tank
- In standby mode, press and hold the Program and Extra Drying buttons simultaneously for 3 seconds to drain the water tank.
CLEANING AND CARE
Note: Never use the dishwasher without filters!
Make sure the filter is properly assembled. The performance may be affected and dishes and utensils could become damaged.
Cleaning the filter system
The filter system removes dirt and food residues, allowing the clean water to be recirculated for cleaning. In order for the device to perform at its best you should clean the filters once a week. We recommend removing coarse dirt and food residues after each wash, by rinsing the filter and cup under running water. To remove the filter assembly, pull the cup handle in the upward direction.
| Fine filter: Filters out dirt and residues and prevents them from getting back onto the dishes during the washing process. Main filter: Leftovers and dirt particles are crushed by a special nozzle on the spray arm and discharged through the drain. | |
| Step 1: Unscrew the complete filter set counterclockwise. | |
| Step 2: Lift fine filter (B) up from main filter (A). When you have cleaned the filters, replace them in reverse order. |
Note: Do not tap the filters when cleaning. Otherwise you may bend them, which would have a negative impact on the performance of the dishwasher.
Cleaning the dishwasher
- Clean the control panel with a slightly damp cloth and then dry it thoroughly.
- Maintain the housing with a suitable polishing wax.
- Do not use sharp objects, scouring pads, aggressive detergents, scouring agents or paper towels to protect the stainless steel surface from scratches and stains.
- Clean the edge of the door with a warm, damp cloth. To prevent water from entering the locking mechanism or electrical components, do not use spray cleaners.
How to protect the device from frost damage
In winter, take the following precautions to protect the machine against frost. Perform the following steps after every program run:
1 Pull the plug out of the socket.
2 Close the water supply and remove the inlet hose from the inlet valve.
3 Drain the water from the hose and valve into a vessel.
4 Reattach the inlet hose to the inlet valve.
5 Remove the filter from the bottom of the tub and use a sponge to soak up excess water.
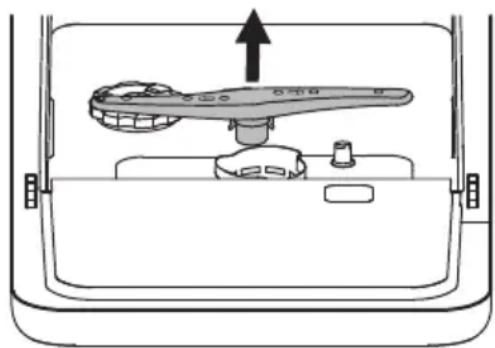
Cleaning the spray arms
The spray arms can be easily removed for regular cleaning of the nozzles to avoid clogging.
1 Grasp the center of the spray arm and pull it up to remove it.
2 Wash the spray arms under running water and carefully reinsert them. Check that the spray arms are seated correctly and make sure that their rotation is not obstructed in any way.
TROUBLESHOOTING
| Problem Possible Causes | Solution | |
| Dishwasher does not start. | Fuse blown, or the circuit break tripped. | Replace fuse or reset circuit breaker. Remove any other appliances sharing the same circuit with the dishwasher. |
| No power. Make sure the d | dishwasher is turned on and the door is closed securely. Make sure the power cord is properly plugged into the wall socket | |
| Water inflow abnormal or water pressure is too low. | Check that the water supply is connected properly and the water is turned on. | |
| Door of dishwasher not properly closed. | Make sure to close the door properly and latch it. | |
| Water not pumped form dishwasher | Twisted or trapped drain hose. | Check the drain hose. |
| Filter clogged. Check the filters. | ||
| Kitchen sink clogged. Check | the kitchen sink to make sure it is draining well. If the problem is the kitchen sink that is not draining, you may need a plumber rather than a serviceman for dishwashers. | |
| Stained tub interior Detergent | with colourant may have been used. | Make sure that the detergent has no colourant. |
| Suds in the tub Wrong detergent. Use only the dedicatedagent. Use only the dedicateddishwasher detergent toavoid suds. If suds exist inthe washer. Open the doorfor 20-30 minutes to allowthe foam to evaporate.If the foam still exists inthe liner. Add 1.5 litre ofwater to the liner, closethe dishwasher door andrun a forced drain to drainit with the water. Repeatabove operation until thefoam is cleared. | ||
| Spilled rinse-aid. Always wipe up rinse- aidspills immediately. | ||
| White film on insidesurface | Hard water minerals. To clean the interior, usea damp sponge withdishwasher detergentand wear rubber gloves.Never use any othercleaner than dishwasherdetergent otherwise, itmay cause foaming orsuds. | |
| There are rust stains oncutlery. | The affected items are notcorrosion resistant. | Avoid washing items thatare not corrosion resistantin the dishwasher. |
| A program was not runafter dishwasher salt wasadded. Traces of salt havegotten into the wash cycle. | Always run a washprogram without anycrockery after adding salt. | |
| The lid of the softer isloose. | Check the softener lid issecure. | |
| Knocking noise in thedishwasher | A spray arm is knockingagainst an item in a basket | Interrupt the program andrearrange the items whichare obstructing the sprayarm. |
| Rattling noise in thedishwasher | Items of crockery areloose in the dishwasher. | Interrupt the program andrearrange the items ofcrockery. |
| Knocking noise in the water pipes | This may be caused by on-site installation or the cross-section of the piping. | This has no influence on the dishwasher function. If in doubt, contact a qualified plumber. |
| The dishes are not clean. The dishes were not loaded correctly. | Follow the instructions for loading the dishwasher. | |
| Use more detergent, or change our detergent. | Select the Intensive program. | |
| Not enough detergent was dispensed | Use more detergent, or change your detergent. | |
| Items are blocking the movement of the spray arms. | Rearrange the items so that the spray can rotate freely. | |
| The filter combination is not clean or is not correctly fitted in the base of washcabinet. This may cause the spray arm jets to get blocked. | Clean and/or fit the filter correctly. Clean the spray arm jets. | |
| Cloudiness on glassware. Combination of soft water and too much detergent. | Use less detergent if you have soft water and select a shorter cycle to wash the glassware and to get them clean. | |
| White spots appear on dishes and glasses. | Hard water can cause limescale deposits. | Add more detergent. |
| Black or grey marks on dishes | Aluminium utensils have rubbed against dishes | Use a mild abrasive cleaner to eliminate those marks. |
| Detergent left in dispenser | Dishes block detergent dispenser | Re-loading the dishes properly. |
| The dishes are not drying. | Improper loading Load the dish | washer as suggested in the directions. |
| Dishes are removed too soon. | Do not empty your dishwasher immediately after washing. Open the door slightly so that the steam can come out. Take out the dishes until the inside temperature is safe to touch. Unload the lower basket first to prevent the dropping water from the upper basket. | |
| Wrong program has been selected. | With a short program, the washing temperature is lower, decreasing cleaning performance. Choose a program with a long washing time. | |
| Use of cutlery with a low- quality coating. | Cutlery or dishes of this type are not suitable for washing in the dishwasher. | |
Error codes
When some malfunctions come on, the appliance will show a signal to warn you:
| Code Meaning Possible cause | |
| E1 Longer running-in period. The flow meter, a drain valve or the pump has failed. Have the unit repaired by a qualified technician. | |
| E3 The desired temperature is not reached. | Heating pipe or thermistor anomaly. Have the unit repaired by a qualified technician. |
| E4 Water runs out. The dishwasher is leaking | somewhere. |
| Ed Abnormal communication. Problem with the electronic components. Have the appliance repaired by a qualified technician. | |
Note: If overflow occurs, turn off the main water supply before calling a service. If there is water in the base pan because of an overfill or small leak, the water should be removed before restarting the dishwasher.
PRODUCT DATA SHEET (EN 60436)
| Name or trademark of the producer: Chal-Tec GmbH | |||
| Address of the producer: Wallstraße 16, 10179 Berlin, Deutschland. | |||
| Item number: 10035304 | |||
| General product parameters: | |||
| Parameter Value Parameter Value | |||
| Standard place settings (a) | 3 Dimensions in cm | Height 46,5 | |
| Width 42,0 | |||
| Depth 43,5 | |||
| EEI (a) 61,9 | Energy efficiency class (a) | F | |
| Cleaning performance index (a) | 1, 13 | Drying performance index (a) | 0,87 |
| Energy consumption in kWh [per cycle], based on the eco programme using cold water fill. Actual energy consumption will depend on how the appliance is used. | 0,446 | Water consumption in litres [per cycle], based on the eco program. Actual water consumption will depend on how the appliance is used and on the hardness of the water. | 6,0 |
| Program duration (a) (h:min) | 2:35 Type Free standing | ||
| Airborne acoustical noise emissions (a) (dB(A) re 1 pW) | 58 | Airborne acoustical noise emission class (a) | D |
| Off-mode (W) 0,49 Standby mode (W) k.A. | |||
| Delay start (W) (if applicable) | 1,00 | Networked standby (W) (if applicable) | k.A. |
(a)for the eco program.
HINTS ON DISPOSAL
According to the European waste regulation 2012/19/EU this symbol on the product or on its packaging indicates that this product may not be treated as household waste. Instead it should be taken to the appropriate collection point for the recycling of electrical and electronic equipment. By ensuring this product is disposed of correctly, you will help prevent potential negative consequences for the environment and human health, which could otherwise be caused by inappropriate waste handling of this product. For more detailed information about recycling of this product, please contact your local council or your household waste disposal service.
PRODUCER
Chal-Tec GmbH, Wallstraße 16, 10179 Berlin, Germany.
Estimado cliente,
Chere cliente, cher client,
RICERCA DEI PROBLEMI RISOLUZIONE DEI PROBLEMI

- CONTENT
- SAFETY INSTRUCTIONS
- WARNING
- CAUTION
- QUICK START GUIDE
- Setting up the water supply
- Filling the device
- CONTROL PANEL AND KEYS
- ADDING RINSING SALT
- How to fill in the rinsing salt
- Important instructions
- Step 1: Call up rinsing salt settings
- Step 2: Adjust the amount of rinsing salt according to water hardness
- Step 3: Leave rinsing salt settings
- Water hardness and rinsing salt quantity
- LOADING THE DISHWASHER
- What you should consider when loading:
- Use of the dishware support
- LOADING THE BASKETS (EN 60436)
- DETERGENT TYPES
- Notes on the use of detergent
- Concentrated Detergent
- Detergent tabs
- ADDING DETERGENT
- OPERATION IN DETAIL
- Starting the washing process
- Changing the program
- Adding dishes later
- After the end of the program
- Drain water from the water tank
- CLEANING AND CARE
- Cleaning the filter system
- Cleaning the dishwasher
- How to protect the device from frost damage
- Cleaning the spray arms
- TROUBLESHOOTING
- Error codes
- HINTS ON DISPOSAL
- PRODUCER
- Estimado cliente,
- Chere cliente, cher client,
- RICERCA DEI PROBLEMI RISOLUZIONE DEI PROBLEMI
Brand : Klarstein
Model : Oceana
Category : Dishwasher