
Toledo - Humidifier Klarstein - Free user manual and instructions
Find the device manual for free Toledo Klarstein in PDF.

| Product type | Ultrasonic air humidifier |
| Brand | Klarstein |
| Model | Toledo |
| Power supply | 220-240 V ~ 50-60 Hz |
| Power | 24 W |
| Tank capacity | 6 L |
| Mist output | 300 ml/h |
| Flow adjustment | Continuous rotary knob |
| LED lighting | Yes, blue, switchable |
| Aroma function | Yes, with essential oil container |
| Recommended use | Indoor, domestic |
| Ideal relative humidity | 45 to 60% |
| Cleaning | Weekly, descaling with vinegar if hard water |
| Air nozzle | 2 sizes: S and L |
| Filling type | Top opening |
| Max level mark | Yes, inside the tank |
| Detection float | Yes, for shutdown in case of low water level |
| Article numbers | 10031822, 10031823 |
| Max water temperature | 40 °C |
| Country of manufacture | Germany (manufacturer Chal-Tec GmbH) |
Frequently Asked Questions - Toledo Klarstein
User questions about Toledo Klarstein
0 question about this device. Answer the ones you know or ask your own.
Ask a new question about this device
Download the instructions for your Humidifier in PDF format for free! Find your manual Toledo - Klarstein and take your electronic device back in hand. On this page are published all the documents necessary for the use of your device. Toledo by Klarstein.
USER MANUAL Toledo Klarstein
INHALTSVERZEICHNIS
flowchart
graph LR
    A["Device with battery"] --> B["Switch"]
    B --> C["Air lift with load"]
    C --> D["Device with battery"]
natural_image
Symbol of a trash bin crossed with a diagonal line, representing no waste or discharge (no text or labels)Unit 6 Riverside Business Centre
Brighton Road
Shoreham-by-Sea
BN43 6RE
United Kingdom
Dear Customer,
Congratulations on purchasing this equipment. Please read this manual carefully and take care of the following hints to avoid damages. Any failure caused by ignoring the items and cautions mentioned in the instruction manual is not covered by our warranty and any liability. Scan the QR code to get access to the latest user manual and other information about the product

CONTENT
Safety Instructions 12
Product Description 13
Operation 13
Aroma Function 14
Cleaning and Care 15
Relative Humidity 16
Troubleshooting 16
Disposal Considerations 18
Manufacturer & Importer (UK) 18
TECHNICAL DATA
| Item number 10031822, 10031823 | |
| Power supply 220-240 V ~ 50-60 Hz | |
| Power consumption 24 W | |
| Mist volume □ 300 ml/h | |
| Water tank capacity 6 L |
SAFETY INSTRUCTIONS
- Children over 8 years of age, mentally and physically handicapped persons may only use the device if they have been familiarized in detail with the functions and safety precautions by a supervisor responsible for them. Do not allow children to play with the device. Children from 8 years of age may only clean the device under supervision.
- Check the voltage on the device plate before use. Only connect the device to sockets that correspond to the voltage of the device.
- Place the unit on a stable, level surface. Do not place the redness in direct sunlight or near heat sources such as ovens or radiators. Doing so may cause the unit to malfunction.
- Do not touch the plug with wet hands.
- If the power cord or plug is damaged, it must be replaced by the manufacturer, an authorized service center or a similarly qualified person.
- Do not open the housing. The device contains parts that are not accessible to the user. Repairs may only be carried out by qualified specialists.
- Fill the tank with fresh, distilled or demineralized water. Do not switch on the unit if there is no water in the tank.
- Do not shake or tilt the unit. Otherwise, the water from the tank may overflow and penetrate inside the unit.
- If water drips on the unit or penetrates into the unit, immediately unplug the unit and contact a specialist dealer.
- Never touch the water or components while the unit is running.
- If there is an unusual smell, turn the unit off, unplug it and have it checked by a specialist dealer.
- Do not pour water warmer than 40^ into the tank.
- Disconnect the plug before cleaning the unit or removing the tank.
- Never immerse the device and the power cord in water or other liquids.
- The unit must be cleaned regularly. Please observe the cleaning instructions in this manual.
- If you are not going to use the unit for a long time, unplug it.
- Never use this device in rooms where sprays are used or where oxygen is administered.
- Do not place clothes or towels on the machine.
- When you move the unit, lift it at the base and not at the water tank.
- The humidifier is intended for indoor and domestic use only.
Note: Do not use the humidifier if the air in the room is already sufficiently humid (relative humidity of at least 50%). The ideal relative humidity is between 45% and 60%. Excess moisture can be seen in the form of condensation on cold surfaces or cold walls in the room. To measure humidity correctly, use a hygrometer that is available in specialist shops and DIY stores.
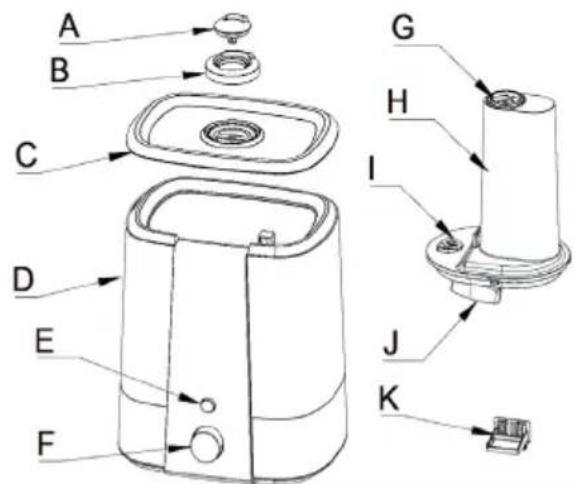
PRODUCT DESCRIPTION
A Nozzle-S
B Nozzle-L
C Top Cover
D Body
E LED Button
F Knob
G Mist Outlet
H Air Tube
I Valve
J Floater
K Aroma Box
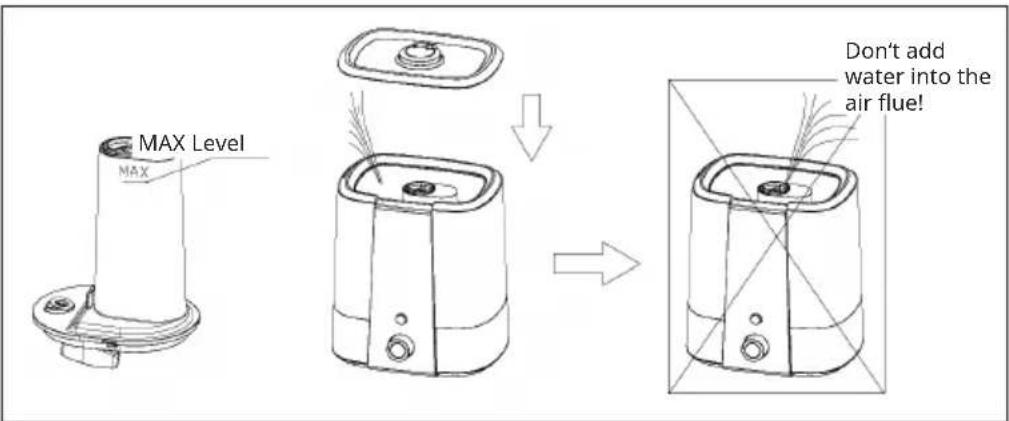
OPERATION
1 Open the top cover Fill the water into the water tank. The water can't be over the MAX level. Don't add the water into the air
2 flue. If there is too much water pouring into the air flue to make the device stop working, please pour out the water and then re-fill the water tank, and then the device will be back to normal.
3 Insert the plug; adjust the knob clockwise, the device will start working with the blue LED on. Press the LED control button, the LED will be off; press the button one more time, the LED will be on. Adjust the knob counterclockwise, the device will stop working.
4 If the device is waterless, please refill the water tank.
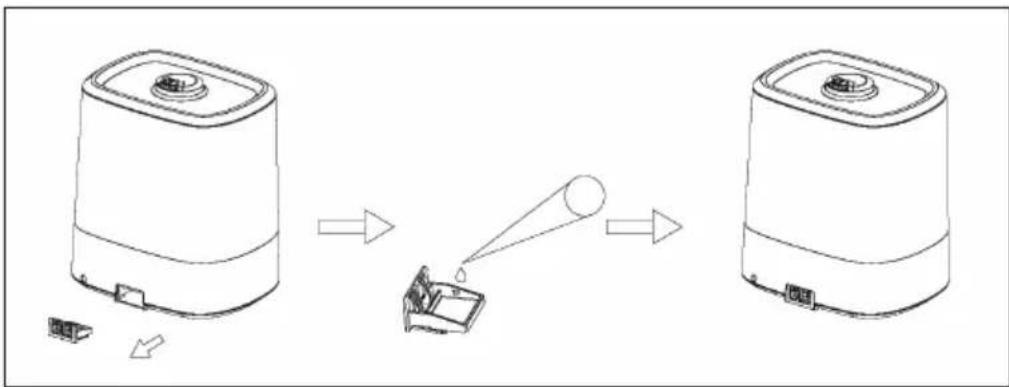
AROMA FUNCTION
The machine has the aroma function. Please according to the below operation process:
a Take out the aroma box from the machine.
b Drop some ensential oil to the aroma box.
c Assemble the aroma box back to the machine.
d If don't use the aroma function, please clean the aroma pad and make it dry and then put it back to the aroma box.
flowchart
graph LR
    A["Device with battery"] --> B["Switch"]
    B --> C["Air lift with load"]
    C --> D["Device with battery"]
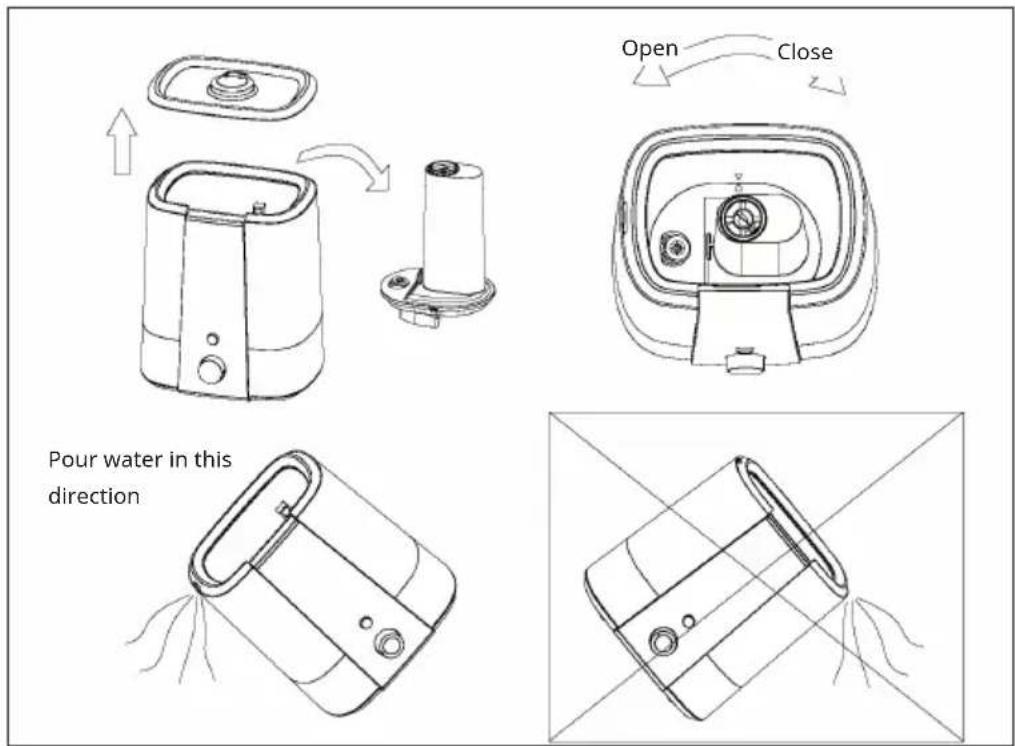
CLEANING AND CARE
- Clean the device every week. Please disassemble the air flue before cleanness and pour out the water according to the below picture instruction. And then wipe the device by the dry cloth. Put the device in a shady and cool place. When clean the valve body and sealing ring of the air flue, please disassemble this part and clean up the water scale, dust and other dirty. After cleanness, please assemble all the spare parts together without any distortion. When assemble the air flue to the device, please make sure the air flue will be locked tight.
- If don't use the device for a long time, please clean the device up and put it in a shady and cool place.
- For the areas, the water is hard. There will be water scale on the transducer. The user should clean the transducer with oxalic acid based agent regularly and clean the water tank and water sink every week. Disassembe the air flue, add 10ml oxalic acid based agent to soak for 2\~5 mins and clean the scale with brush. Then flush with clean water.
RELATIVE HUMIDITY
The percentage of water mist in a given space with a given air temperature is named as relative humidity, i.e. 45%. The air contains water mist more or less. The proportion of water mist to the air varies according to different air temperatures. The higher the temperature, the more water mist inhaled in the air.
In the winter, the cold air outside enters the room and becomes warmer by the higher temperature in the room. As a result, the relative humidity decreases. If you want to keep the healthy environmental humidity, we need to increase the mist volume in the air. The humidifier can do that for us. Relative humidity in different environments suitable for people:
• Bedroom, living room: 45-65%
• Patient's room: 40-55%
• Room with computer, experiment equipment: 45-60%
• Room with piano: 40-60%
• Museum, exhibition hall, and library: 40-60%
TROUBLESHOOTING
If the machine doses not work appropriately, please check as following before turn to maintenance service:
| Problem Possible Cause Solution | ||
| No wind and no steam. Check plug. Insert the plug.. | ||
| Check the power switch. Turn on the power switch. | ||
| No water in the tank. Add water into the tank. | ||
| Less water in the tank. Add enough water into the tank. | ||
| No wind and no steam. The | sealing ring on the air flue was disassembled with distortion. | Disassemble the air flue, pour out the water and clean the air flue. And then assemble the valve body and sealing ring to the air flue without any distortion. |
| The air flue was not locked tight. | ||
| Other dirty on the air flue and valve body. | ||
| Steam with peculiar smell. | New device. Open the top | cover and put the device in the shady and cool place for 12 hours. |
| Dirty water or the water in the tank for a long time. | Clean the water tank and replace the clean water. | |
| Noise. Less water in tank. | Add water. | |
| Resonance with the table surface. | Put the device on the firm and flat place. | |
| Steam out from outlet surrounding. | Clearance between steam outlet and water tank. | Soak the nozzle into the water and use it again. |
| There is water in the tank, but the device indicates waterless. | Something may stuck the float and water can't flow out to the water sink. | Take out the air flue and clean it. And then assemble it back to the device. |
| Small mist output or no mist output with indicator on. | There are scales or some dirty on the valve body. The water can't flow out to the water sink. | Clean the air flue and valve body and then try again. |
DISPOSAL CONSIDERATIONS

natural_image
Symbol of a trash bin crossed with a diagonal line, no text or numbers presentIf there is a legal regulation for the disposal of electrical and electronic devices in your country, this symbol on the product or on the packaging indicates that this product must not be disposed of with household waste. Instead, it must be taken to a collection point for the recycling of electrical and electronic equipment. By disposing of it in accordance with the rules, you are protecting the environment and the health of your fellow human beings from negative consequences. For information about the recycling and disposal of this product, please contact your local authority or your household waste disposal service.
MANUFACTURER & IMPORTER (UK)
Manufacturer:
Chal-Tec GmbH, Wallstrasse 16, 10179 Berlin, Germany.
Importer for Great Britain:
Chal-Tec UK limited
Unit 6 Riverside Business Centre
Brighton Road
Shoreham-by-Sea
BN43 6RE
United Kingdom
Estimado cliente,
ÍNDICE
PUESTA EN MARCHA Y USO
flowchart
graph LR
    A["Device with battery"] --> B["Switch"]
    B --> C["Air lift with load"]
    C --> D["Device with battery"]
LIMPIEZA Y CUIDADO
natural_image
Symbol of a trash bin crossed with a diagonal line, no text or numbers presentUnit 6 Riverside Business Centre
Brighton Road
Shoreham-by-Sea
BN43 6RE
United Kingdom
Chère cliente, cher client,
SOMMAIRE
MISE EN SERVICE ET UTILISATION
flowchart
graph LR
    A["Device with battery"] --> B["Switch"]
    B --> C["Air lift with load"]
    C --> D["Device with battery"]
NETTOYAGE ET ENTRETIEN
natural_image
Symbol of a trash bin crossed with a diagonal line, no text or numbers presentUnit 6 Riverside Business Centre
Brighton Road
Shoreham-by-Sea
BN43 6RE
United Kingdom
Gentile cliente,
INDICE
flowchart
graph LR
    A["Device with battery"] --> B["Switch"]
    B --> C["Air lift with load"]
    C --> D["Device with battery"]
natural_image
Symbol of a trash bin crossed with a diagonal line, no text or numbers presentPRODUTTORE E IMPORTATORE (UK)
Produttore:
Chal-Tec GmbH, Wallstraße 16, 10179 Berlino, Germania.
Unit 6 Riverside Business Centre
Brighton Road
Shoreham-by-Sea
BN43 6RE
United Kingdom

bar
| Category | Value | |---|---| | Category 1 | 100 | | Category 2 | 100 | | Category 3 | 100 | | Category 4 | 100 | | Category 5 | 100 | | Category 6 | 100 | | Category 7 | 100 | | Category 8 | 100 | | Category 9 | 100 | | Category 10 | 100 | | Category 11 | 100 | | Category 12 | 100 | | Category 13 | 100 | | Category 14 | 100 | | Category 15 | 100 | | Category 16 | 100 | | Category 17 | 100 | | Category 18 | 100 | | Category 19 | 100 | | Category 20 | 100 | | Category 21 | 100 | | Category 22 | 100 | | Category 23 | 100 | | Category 24 | 100 | | Category 25 | 100 | | Category 26 | 100 | | Category 27 | 100 | | Category 28 | 100 | | Category 29 | 100 | | Category 30 | 100 | | Category 31 | 100 | | Category 32 | 100 | | Category 33 | 100 | | Category 34 | 100 | | Category 35 | 100 | | Category 36 | 100 | | Category 37 | 100 | | Category 38 | 100 | | Category 39 | 100 | | Category 40 | 100 | | Category 41 | 100 | | Category 42 | 100 | | Category 43 | 100 | | Category 44 | 100 | | Category 45 | 100 | | Category 46 | 100 | | Category 47 | 100 | | Category 48 | 100 | | Category 49 | 100 | | Category 50 | 100 | | Category 51 | 100 | | Category 52 | 100 | | Category 53 | 100 | | Category 54 | 100 | | Category 55 | 100 | | Category 56 | 100 | | Category 57 | 100 | | Category 58 | 100 | | Category 59 | 100 | | Category 60 | 100 | | Category 61 | 100 | | Category 62 | 100 | | Category 63 | 100 | | Category 64 | 100 | | Category 65 | 100 | | Category 66 | 100 | | Category 67 | 100 | | Category 68 | 100 | | Category 69 | 100 | | Category 70 | 100 | | Category 71 | 100 | | Category 72 | 100 | | Category 73 | 100 | | Category 74 | 100 | | Category 75 | 100 | | Category 76 | 100 | | Category 77 | 100 | | Category 78 | 100 | | Category 79 | 100 | | Category 80 | 100 | | Category 81 | 100 | | Category 82 | 100 | | Category 83 | 100 | | Category 84 | 100 | | Category 85 | 100 | | Category 86 | 100 | | Category 87 | 100 | | Category 88 | 100 | | Category 89 | 100 | | Category 90 | 100 | | Category 91 | 100 | | Category 92 | 100 | | Category 93 | 100 | | Category 94 | 100 | | Category 95 | 100 | | Category 96 | 100 | | Category 97 | 100 | | Category 98 | 100 | | Category 99 | 100 | | Total (Total) = [sum of bars] / [values] * (sum of bars + bars) * (sum of bars + bars) * (sum of bars + bars). The values in the table represent the sum of the bars and the corresponding sum of the bars. There is no additional data series or categories specified in the code.
KLARSTEIN

- INHALTSVERZEICHNIS
- Dear Customer,
- CONTENT
- SAFETY INSTRUCTIONS
- PRODUCT DESCRIPTION
- OPERATION
- AROMA FUNCTION
- CLEANING AND CARE
- RELATIVE HUMIDITY
- TROUBLESHOOTING
- DISPOSAL CONSIDERATIONS
- MANUFACTURER & IMPORTER (UK)
- Manufacturer:
- Importer for Great Britain:
- Estimado cliente,
- ÍNDICE
- PUESTA EN MARCHA Y USO
- LIMPIEZA Y CUIDADO
- Chère cliente, cher client,
- SOMMAIRE
- MISE EN SERVICE ET UTILISATION
- NETTOYAGE ET ENTRETIEN
- Gentile cliente,
- INDICE
- PRODUTTORE E IMPORTATORE (UK)
- Produttore:
- KLARSTEIN
Brand : Klarstein
Model : Toledo
Category : Humidifier