
VapoAir Onyx - Humidifier Klarstein - Free user manual and instructions
Find the device manual for free VapoAir Onyx Klarstein in PDF.


| Brand | Klarstein |
| Model | VapoAir Onyx |
| Product Type | Humidifier |
| Item Number | 10032894 |
| Power Supply | 220-240 V ~ 50/60 Hz |
| Power Consumption | 110 W |
| Water Tank Capacity | 5.5 L |
| Evaporation Rate | ≥ 350 ml/hour |
| Modes | Auto, Mist Speed (4 levels), Ion, Heat, Constant Humidity, Timer (1-12h) |
| Anion Generator | Yes (ION button) |
| Warm Mist Function | Yes (Heat mode, mist warm after 10-15 min) |
| Constant Humidity Setting | 40% to 75% RH in 5% steps |
| Auto Mode Operation | Adjusts mist speed based on temperature and humidity table |
| Timer Range | 1 to 12 hours |
| Low Water Alarm | Automatic shutdown with beeps and display warning |
| Child Safety Lock | Yes (tank removal triggers lock) |
| Display | LED showing temperature and humidity (switches every 30s) |
| Water Tank Light | Yes (toggle via long press ION button) |
| Cleaning Frequency | Weekly cleaning of transducer, water tank, and basin |
| Ceramic Filter System | Yes (clean after 1000 L water use) |
| Recommended Water | Fresh, distilled, or demineralized water (max 40°C) |
| Noise Level | < 35 dB (normal operation) |
| Safety Certifications | CE, RoHS, ErP compliant |
Frequently Asked Questions - VapoAir Onyx Klarstein
User questions about VapoAir Onyx Klarstein
0 question about this device. Answer the ones you know or ask your own.
Ask a new question about this device
Download the instructions for your Humidifier in PDF format for free! Find your manual VapoAir Onyx - Klarstein and take your electronic device back in hand. On this page are published all the documents necessary for the use of your device. VapoAir Onyx by Klarstein.
USER MANUAL VapoAir Onyx Klarstein
bar
| Category | Value | |---|---| | Category 1 | 100 | | Category 2 | 100 | | Category 3 | 100 | | Category 4 | 100 | | Category 5 | 100 | | Category 6 | 100 | | Category 7 | 100 | | Category 8 | 100 | | Category 9 | 100 | | Category 10 | 100 | | Category 11 | 100 | | Category 12 | 100 | | Category 13 | 100 | | Category 14 | 100 | | Category 15 | 100 | | Category 16 | 100 | | Category 17 | 100 | | Category 18 | 100 | | Category 19 | 100 | | Category 20 | 100 | | Category 21 | 100 | | Category 22 | 100 | | Category 23 | 100 | | Category 24 | 100 | | Category 25 | 100 | | Category 26 | 100 | | Category 27 | 100 | | Category 28 | 100 | | Category 29 | 100 | | Category 30 | 100 | | Category 31 | 100 | | Category 32 | 100 | | Category 33 | 100 | | Category 34 | 100 | | Category 35 | 100 | | Category 36 | 100 | | Category 37 | 100 | | Category 38 | 100 | | Category 39 | 100 | | Category 40 | 100 | | Category 41 | 100 | | Category 42 | 100 | | Category 43 | 100 | | Category 44 | 100 | | Category 45 | 100 | | Category 46 | 100 | | Category 47 | 100 | | Category 48 | 100 | | Category 49 | 100 | | Category 50 | 100 | | Category 51 | 100 | | Category 52 | 100 | | Category 53 | 100 | | Category 54 | 100 | | Category 55 | 100 | | Category 56 | 100 | | Category 57 | 100 | | Category 58 | 100 | | Category 59 | 100 | | Category 60 | 100 | | Category 61 | 100 | | Category 62 | 100 | | Category 63 | 100 | | Category 64 | 100 | | Category 65 | 100 | | Category 66 | 100 | | Category 67 | 100 | | Category 68 | 100 | | Category 69 | 100 | | Category 70 | 100 | | Category 71 | 100 | | Category 72 | 100 | | Category 73 | 100 | | Category 74 | 100 | | Category 75 | 100 | | Category 76 | 100 | | Category 77 | 100 | | Category 78 | 100 | | Category 79 | 100 | | Category 80 | 100 | | Category 81 | 100 | | Category 82 | 100 | | Category 83 | 100 | | Category 84 | 100 | | Category 85 | 100 | | Category 86 | 100 | | Category 87 | 100 | | Category 88 | 100 | | Category 89 | 100 | | Category 90 | 100 | | Category 91 | 100 | | Category 92 | 100 | | Category 93 | 100 | | Category 94 | 100 | | Category 95 | 100 | | Category 96 | 100 | | Category 97 | 100 | | Category 98 | 100 | | Category 99 | 100 | | Total (Total) = [sum of two separate bars] * [sum of the bars] * [values from the 'bar' in the 'box' table] * [values from the 'box' table] * [values from the 'box' table] * [values from the 'box' table] * [values from the 'box' table] * [values from the 'box' table]. The sum of the bars is calculated by subtracting the sum of the bars from the 'box' table. Note: The total bar length is based on the sum of the bars. The sum of the bars is calculated as the sum of the bars. The sum of the bars is derived from adding the sum of the bars to the total bar length. The sum of the bars is derived from adding the sum of the bars to the total bar length. The sum of the bars is derived from adding the sum of the bars to the total bar length. The sum of the bars is derived from adding the sum of the bars to the total bar length. The sum of the bars is derived from adding the sum of the bars to the total bar length. The sum of the bars is derived from adding the sum of the bars to the total bar lengths. The sum of the bars is derived from adding the sum of the bars to the total bar lengths. The sum of the bars is derived from adding the sum of the bars to the total bar lengths.INHALTSVERZEICHNIS
natural_image
Symbol of a trash bin crossed with a diagonal line, no text or numbers presentCongratulations on purchasing this equipment. Please read this manual carefully and take care of the following hints to avoid damages. Any failure caused by ignoring the items and cautions mentioned in the instruction manual is not covered by our warranty and any liability. Scan the QR code to get access to the latest user manual and other information about the product

CONTENT
Safety Instructions 14
Product Overview 15
Operation and Modes 16
Relative Humidity 18
Cleaning and Care 19
Troubleshooting 20
Hints on Disposal 22
TECHNICAL DATA
| Item Number 10032894 | |
| Power supply 220-240 V ~ 50/60 Hz | |
| Power 110 W | |
| Water tank capacity 5,5 L | |
| Evaporation Rate ≥ 350 ml/hour |
DECLARATION OF CONFORMITY

Producer:
Chal-Tec GmbH, Wallstraße 16, 10179 Berlin, Germany.
This product is conform to the following European Directives:
2014/30/EU (EMC)
2014/35/EU (LVD)
2011/65/EU (RoHS)
206/2012/EU (ErP)
SAFETY INSTRUCTIONS
- Children over 8 years of age, mentally and physically handicapped persons may only use the device if they have been familiarized in detail with the functions and safety precautions by a supervisor responsible for them. Do not allow children to play with the device. Children from 8 years of age may only clean the device under supervision.
- Check the voltage on the device plate before use. Only connect the device to sockets that correspond to the voltage of the device.
- Place the unit on a stable, level surface. Do not place the redness in direct sunlight or near heat sources such as ovens or radiators. Doing so may cause the unit to malfunction.
- Do not touch the plug with wet hands.
- If the power cord or plug is damaged, it must be replaced by the manufacturer, an authorized service center or a similarly qualified person.
- Do not open the housing. The device contains parts that are not accessible to the user. Repairs may only be carried out by qualified specialists.
- Fill the tank with fresh, distilled or demineralized water. Do not switch on the unit if there is no water in the tank.
- Do not shake or tilt the unit. Otherwise, the water from the tank may overflow and penetrate inside the unit.
- If water drips on the unit or penetrates into the unit, immediately unplug the unit and contact a specialist dealer.
- Never touch the water or components while the unit is running.
- If there is an unusual smell, turn the unit off, unplug it and have it checked by a specialist dealer.
- Do not pour water warmer than 40^ into the tank.
- Disconnect the plug before cleaning the unit or removing the tank.
- Never immerse the device and the power cord in water or other liquids.
- The unit must be cleaned regularly. Please observe the cleaning instructions in this manual.
- If you are not going to use the unit for a long time, unplug it.
- Never use this device in rooms where sprays are used or where oxygen is administered.
- Do not place clothes or towels on the machine.
- When you move the unit, lift it at the base and not at the water tank.
- The humidifier is intended for indoor and domestic use only.
Note: Do not use the humidifier if the air in the room is already sufficiently humid (relative humidity of at least 50%). The ideal relative humidity is between 45% and 60%. Excess moisture can be seen in the form of condensation on cold surfaces or cold walls in the room. To measure humidity correctly, use a hygrometer that is available in specialist shops and DIY stores.
PRODUCT OVERVIEW
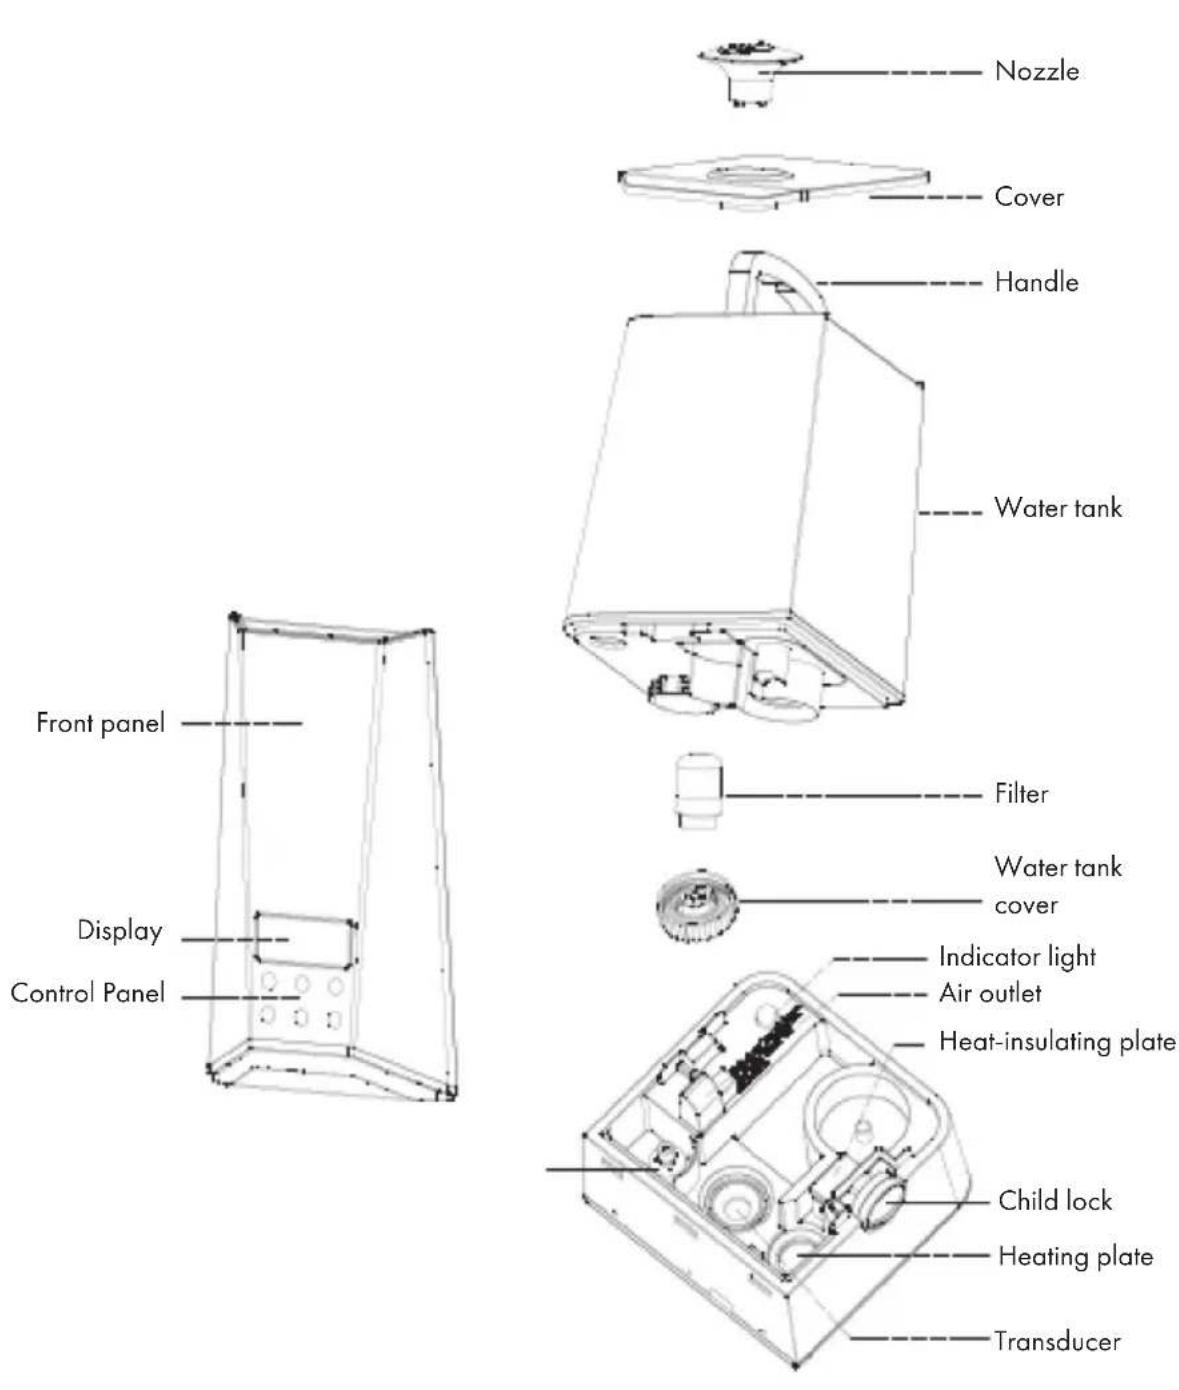
OPERATION AND MODES
Before first Use
- For first Operation, put unit in the room temperature for half of an hour before running.
• Use clear water not over 40 degree C - Check the water basin, make sure it is clear.
Getting Started
- Put the machine on a flat surface.
- When you take out of the water tank, you must be turn on the child safety lock
- Fill the water into the water tank, and then tighten the tank cover.
- Put the water tank on the main base, and turn off the child safety lock.
- Plug into the socket. The display will be on and show current temperature. After 30 seconds, it switches into current humidity. Temperature and humidity will switch every 30 seconds. If without any operation for 15 seconds, LED light will become dark. Press any button, LED be bright and enter related function.
AUTO Mode and Mist Speed
Touch the POWER button

- If lack of water, display will show find current temperature or humidity.
- If there is enough water, display will show [AUTO] and current temperature or humidity, and water tank light will be on.
Device works in AUTO mode. (If it shows humidity before turn off, it will show humidity when turn on again. But it will switch into temperature after 5 seconds, and switch back to humidity after 30 seconds.) Touch POWER button again to turn off the device.
Touch the AUTO button to out of AUTO mode and the mist start from first speed until fourth speed for each touch. Touch the fifth times, it enters AUTO mode.
In Auto mode, the device determines the optimal humidity by the formula and starts to achieve. When the current humidity less than the table showed humidity, it is in the third speed operation. When the humidity arrived, the machine will be in the first speed operation. The device checks the accordance of the temperature level and the humidity level every 1 minute.
| Air temperature in °C | Humidity in % |
| ≤ 18 65 | |
| 19-20 60 | |
| 21-22 55 | |
| 23-24 50 | |
| 25-26 45 | |
| ≥ 27 40 |
ION Mode
Touch ION button ^[1] to turn on the anion generator. It shows the symbol on LED display. Touch again to stop the function. Long press this button for 3 seconds to turn on/off water tank light. ION button is not available when lack of water.
Heat Mode
Touch HEATING button, the warm mist will come out after 10\~15 minutes. It shows the symbol on LED display. Touch again to stop the function. Mist will become cool after 5\~10 minutes.
Constant Humidity Mode
Touch CONSTANT HUMIDITY button ,you may set the humidity arranged from 40%RH to 75%RH. Press once, it will increase by 5%RH. After setting expected humidity, LED display blinks for 5 seconds, then switch to show current temperature. If current humidity is lower than setting humidity, device will work in the third speed. If current humidity is higher than setting humidity, device will stop humidifying and stay in sleeping state.
Note: During sleep state, ION and HEATING function are not available to select.
When current humidity is lower than setting humidity 2%RH, device will exit sleeping state and humidify in previous state. When setting reaches 75%RH, press again, it will turn into AUTO mode and show "CO" on LED display. Press again, it will be back to 40%RH.
Note: AUTO button is not available to select under CONSTANT HUMIDITY function is on!
Timer Mode
Touch the TIMER button ☐, the LED display will show the timer [1H]. There are 12 timer setting: 1,2,3,4,5,6,7,8,9,10,11,12 hours. The timer shows the rest operation time and decreases by 1 hours. After setting, if the timer is set at 12 hours, LED display shows [11] after one hour. This function is still available when lack of water.
Low Water Alarm
Once the water in the basin is too little to keep the machine working, device will automatically stop working and warn by three beeps. LED shows 📄 Refill the water, and the machine will restart.
RELATIVE HUMIDITY
The percentage of water mist in a given space with a given air temperature is named as relative humidity, usually marked as %RH, i.e. 45%RH. The air contains water mist more or less. The proportion of water mist to the air varies according to different air temperatures. The higher the temperature, the more water mist inhaled in the air.
In the winter, the cold air outside enters the room and becomes warmer by the higher temperature in the room. As a result, the relative humidity decreases. If you want to keep the healthy environmental humidity, we need to increase the mist volume in the air. The humidifier can do that for us. Relative humidity in different environments suitable for people:
• Bedroom, living room: 45-65%RH
• Patient's room: 40-55%RH
• Room with computer, experiment equipment: 45-60%RH
• Room with piano: 40-60%RH
• Museum, exhibition hall, and library: 40-60%RH
CLEANING AND CARE
Note: Always switch off and unplug the unit before cleaning.
• Use cold boiled water or distilled water.
- Clean the transducer, water tank and basin unit every week.
- Change the water in water tank more often to keep it fresh.
- Make sure to pull out the water from the water tank and dry the water basin before you store the unit unused for a long period of time.
- Clean the whole unit and make sure that all parts of the unit are dried completely before unused for longer period of time.
How to clean the transducer:
- Put 5-10 drops of cleaning abluent on the surface of the transducer, wait for 2-5 minutes.
• Brush off the scale from the surface. - Rinse the transducer with clean water.
- Never use sharp or solid objects for cleaning the transducer
How to clean the Basin unit:
- Clean the water basin with soft cloth. If there is excess film on the surfaces, then soak the cloth with vinegar and repeat the process.
- If there is a film in any of the depressions along the basin, drop a bit of vinegar into depression and clean it out with a brush.
- Rinse the water basin with clean water.
How to clean the Ceramic Filter System:
- Clean and activate the ceramic balls after use of 1000 L water regularly.
- Remove the filter from the tank cover.
- Put some white vinegar into a glass, soak the filter in the vinegar for about 10 minutes.
- Remove the filter from the glass and shake it several times.
- Clean and rinse the filter once again with fresh water.
If you don't plan to use the humidifier for a long time, remove the filter from the water tank and let it dry thoroughly, then wrap it in protective packaging and keep it next to the humidifier in a cool, dry and dark storage space.
Storage
- If you are not going to use the humidifier for a long time, make sure that all its parts are dry, including the operating chamber of the sprayer.
- Do not store the unit with water in the water tank and in the operating chamber of the sprayer.
- Clean and dry the filter-cartridge before taking it away for storage. Keep the filter-cartridge in a cool darkened place.
- Keep the humidifier away from children in a dry cool place.
TROUBLESHOOTING
| Problem Possible Cause Suggested Solution | ||
| Power lamp off or does not work | Humidifier is not plugged into the power outlet or loose. | Connect power cord to electrical outlet and press power button |
| Power lamp is on but no mist | No water in water tank Fill water into water tank | |
| The mist has a strange odour | A New unit Take out water tank, open cover, let it stay 12 hours in cool position | |
| It either has dirty water or the water has been stagnant too long | Clean water tank, fill with clear water | |
| Power light is on, but the machine doesn’t work. | Too much water in the water basin | Remove the water tank. Take a small cup and remove some of the water from the machine’s water basin. Reinsert the water tank and make sure that it sits properly |
| The volume of spray mist is too low | Too much mineral scale in the water basin | Clean transducer |
| Water is too dirty or water kept too long in the tank | Clean water tank and refill with clean water | |
| Abnormal noise Vibration in | the water tank because the water level too low | Fill the water tank |
| Machine is on and unstable surface | Move the unit to a stable flat surface | |
| Spray mist is coming out of the area around the jets. | There are gaps between the nozzle and water tank | Dip the nozzle in water for a while, clean it with a damp cloth and put it back to the tank. |
The following is not considered faulty operation:
- If your water is very hard (containing abnormally high levels of minerals) the humidifier may produce white dust. This is not a malfunction. The solution would be to clean the filter more often or use softer water.
- If you stand very close to the humidifier, you will hear the gurgling sound of water, this is normal.
- The machine operate very quietly but it is not completely silent. Noise levels less than 35 dB is considered normal.
HINTS ON DISPOSAL
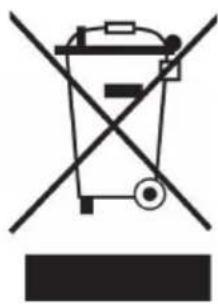
natural_image
Symbol of a trash bin crossed with a diagonal line, no text or numbers presentAccording to the European waste regulation 2012/19/EU this symbol on the product or on its packaging indicates that this product may not be treated as household waste. Instead it should be taken to the appropriate collection point for the recycling of electrical and electronic equipment. By ensuring this product is disposed of correctly, you will help prevent potential negative consequences for the environment and human health, which could otherwise be caused by inappropriate waste handling of this product. For more detailed information about recycling of this product, please contact your local council or your household waste disposal service.

bar
| Category | Value | |---|---| | Category 1 | 100 | | Category 2 | 100 | | Category 3 | 100 | | Category 4 | 100 | | Category 5 | 100 | | Category 6 | 100 | | Category 7 | 100 | | Category 8 | 100 | | Category 9 | 100 | | Category 10 | 100 | | Category 11 | 100 | | Category 12 | 100 | | Category 13 | 100 | | Category 14 | 100 | | Category 15 | 100 | | Category 16 | 100 | | Category 17 | 100 | | Category 18 | 100 | | Category 19 | 100 | | Category 20 | 100 | | Category 21 | 100 | | Category 22 | 100 | | Category 23 | 100 | | Category 24 | 100 | | Category 25 | 100 | | Category 26 | 100 | | Category 27 | 100 | | Category 28 | 100 | | Category 29 | 100 | | Category 30 | 100 | | Category 31 | 100 | | Category 32 | 100 | | Category 33 | 100 | | Category 34 | 100 | | Category 35 | 100 | | Category 36 | 100 | | Category 37 | 100 | | Category 38 | 100 | | Category 39 | 100 | | Category 40 | 100 | | Category 41 | 100 | | Category 42 | 100 | | Category 43 | 100 | | Category 44 | 100 | | Category 45 | 100 | | Category 46 | 100 | | Category 47 | 100 | | Category 48 | 100 | | Category 49 | 100 | | Category 50 | 100 | | Category 51 | 100 | | Category 52 | 100 | | Category 53 | 100 | | Category 54 | 100 | | Category 55 | 100 | | Category 56 | 100 | | Category 57 | 100 | | Category 58 | 100 | | Category 59 | 100 | | Category 60 | 100 | | Category 61 | 100 | | Category 62 | 100 | | Category 63 | 100 | | Category 64 | 100 | | Category 65 | 100 | | Category 66 | 100 | | Category 67 | 100 | | Category 68 | 100 | | Category 69 | 100 | | Category 70 | 100 | | Category 71 | 100 | | Category 72 | 100 | | Category 73 | 100 | | Category 74 | 100 | | Category 75 | 100 | | Category 76 | 100 | | Category 77 | 100 | | Category 78 | 100 | | Category 79 | 100 | | Category 80 | 100 | | Category 81 | 100 | | Category 82 | 100 | | Category 83 | 100 | | Category 84 | 100 | | Category 85 | 100 | | Category 86 | 100 | | Category 87 | 100 | | Category 88 | 100 | | Category 89 | 100 | | Category 90 | 100 | | Category 91 | 100 | | Category 92 | 100 | | Category 93 | 100 | | Category 94 | 100 | | Category 95 | 100 | | Category 96 | 100 | | Category 97 | 100 | | Category 98 | 100 | | Category 99 | 100 | | Total (Total) = [sum of two separate bars] * [sum of the bars] * [values from the 'data' table in the 'data' table] * [values from the 'data' table in the 'data' table] * [values from the 'data' table in the 'data' table] * [values from the 'data' table in the 'data' table] * [values from the 'data' table in the 'data' table] * [values from the 'data' table in the 'data' table] * [values from the 'data' table in the 'data' table] * [sum of the bars] * [values from the 'data' table] * [sum of the bars] * [values from the 'data' table] * [sum of the bars] * [values from the 'data' table] * [sum of the bars] * [values from the 'data' table] * [sum of the bars] * [sum of the bars] * [values from the 'data' table] * [sum of the bars] * [sum of the bars] * [values from the 'data' table] * [sum of the bars] * [sum of the bars] * [values from the 'data' table] * [sum of the bars] * [sum of the bars] * [values from the 'data' table] * [sum of the bars] * [total (Total) = [sum of these bars] * [values from the 'data' table] * [sum of the bars] * [values from the 'data' table] * [values from the 'data' table] * [sum of the bars] * [sum of the bars] * [values from the 'data' table] * [sum of the bars] * [sum of the bars] * [values from the 'data' table] * [sum of the bars] * [sum of the bars]KLARSTEIN NIEI SRA T EIN NIEI SRA T K LARS KLARSTEIN NIEI SRA T EIN NIEI SRA T K LARS KLARSTEIN NIEI SRA T EIN NIEI SRA T K LARS KLARSTEIN NIEI SRA T
- INHALTSVERZEICHNIS
- CONTENT
- DECLARATION OF CONFORMITY
- SAFETY INSTRUCTIONS
- PRODUCT OVERVIEW
- OPERATION AND MODES
- Before first Use
- Getting Started
- AUTO Mode and Mist Speed
- ION Mode
- Heat Mode
- Constant Humidity Mode
- Timer Mode
- Low Water Alarm
- RELATIVE HUMIDITY
- CLEANING AND CARE
- How to clean the transducer:
- How to clean the Basin unit:
- How to clean the Ceramic Filter System:
- Storage
- The following is not considered faulty operation:
- HINTS ON DISPOSAL
Brand : Klarstein
Model : VapoAir Onyx
Category : Humidifier